The question of barrel break-in is controversial. Some folks advocate an elaborate, lengthy cycle of shooting and brushing, repeated many times — one shot and clean, two shots and clean and so on. This, it is argued, helps barrels foul less and shoot more accurately. Others say minimal break-in, with patching and brushing after 10-15 rounds, is all you need. Still others contend that break-in procedures are a total waste of time and ammo — you should just load and shoot, and clean as you would normally.
We doubt if there will ever be real agreement among shooters concerning barrel break-in procedures. And one must remember that the appropriate break-in procedure might be quite different for a factory barrel vs. a custom hand-lapped barrel. This Editor has found that his very best custom barrels shot great right from the start, with no special break-in, other than wet patches at 5, 10, and 15 rounds. That said, I’ve seen some factory barrels that seemed to benefit from more elaborate break-in rituals.
What’s the best barrel break-in procedure? Well our friend Eric Mayer of Varminter.com decided to ask the experts. A while back Eric interviewed representatives of three leading barrel manufacturers: Krieger, Lothar-Walther, and Shilen. He recorded their responses on video. In order of appearance in the video, the three experts are:
Do I Need to Break-In a New Rifle Barrel?
Eric Mayer of Varminter.com says: “That is a simple question, [but it] does not necessarily have a simple answer. Instead of me repeating my own beliefs, and practices, on breaking-in a new rifle barrel, I decided to answer this one a bit differently. While we were at the 2016 SHOT Show, we tracked down three of the biggest, and most popular, custom barrel makers in the world, and asked them what they recommend to anyone buying their barrels, and why they recommend those procedures. We asked the question, and let the camera run!” Launch the video above to hear the answers — some of which may surprise you.
Long-Term Barrel Care — More Experts Offer Opinions
Apart from the debate about barrel break-in, there is the bigger question of how should you clean and maintain a barrel during its useful life. Some folks like aggressive brushing, other shooters have had success with less invasive methods, using bore foam and wet patches for the most part. Different strokes for different folks, as they say. In reality, there may not be one solution for every barrel. Different fouling problems demand different solutions. For example, solvents that work well for copper may not be the best for hard carbon (and vice-versa).
“Why worry about a little barrel fouling when the throat is subjected to a brutal 5,600° F volcano at 55,000 PSI? To investigate these and other questions about taking care of a match barrel, we spoke with a dozen experts and share their knowledge in this first of a series of articles.
After listening to folks who shoot, build barrels or manufacture cleaning solvents for a living, we concluded that even the experts each have their own unique recommendations on how to care for a match barrel. But they all agree on one thing — the gun will tell you what it likes best. Because the life expectancy of a match barrel is about 1,500 to 2,500 rounds, the objectives of cleaning one should include: preserve accuracy, slow the erosion, and remove fouling — all without damaging the gun. This article doesn’t claim that one cleaning method is better than the next. Rather, we set out to interject a little science into the discussion and to share some lessons learned from experts in the field.” — Chip Lohman
Do you know what the inside of a rifle chamber (and throat zone) really looks like? Do you understand the concept of headspace and why it’s important? If not, you should read the Brownells GunTech article Gauging Success – Minimum Headspace and Maximum COL. This article explains the basics of headspace and shows how to measure headspace (and length to lands) in your barrels with precision. The article also explains how to adjust your full-length sizing dies to “bump the shoulder” as needed.
Why is headspace important? The article explains: “Controlling headspace and setting proper C.O.L. also represent improved safety and reduced cost of handloading. Excessive headspace can cause case head separation and gases in excess of 60,000 PSI escaping from a rifle’s chamber. Too little headspace can result in a chamber forced bullet crimp and a bullet that becomes an obstruction more than a properly secured projectile. Excessive C.O.L. can result in a rifling-bound bullet, a condition that could result in spikes of excessive pressure.” [Editor’s NOTE: It is common for competitive benchrest shooters to seat bullets into the rifling. This can be done safely if you reduce your loads accordingly. With some bullets we often see best accuracy .010″ (or more) into the lands. However, this can generate more pressure than the same bullet seated .010″ away from initial lands contact. As with all reloading, start low and work up gradually.]
How is headspace specified? Most cartridges used within the United States are defined within ANSI/SAAMI Z299.3-4. Brownells explains: “In the case of the .243 Winchester, as an example, there are pressure specifications, cartridge drawings and, as pictured above, chamber drawings. Armed with a chamber drawing, each manufacturer producing a firearm for the .243 Winchester knows the proper standard dimension to cut chambers and set headspace. Notice there are two headspace reference dimensions for the chamber. The upper is a place in the chamber where the shoulder is .400″ in diameter; the “datum” or “basic” line. The lower is the 1.630″~1.640″ minimum – maximum dimension from the breech face (bolt face) to that point in the chamber that measures .400″.”
The actual headspace of any firearm is the distance from the breech face to the point in the chamber that is intended to prevent forward motion of a cartridge.
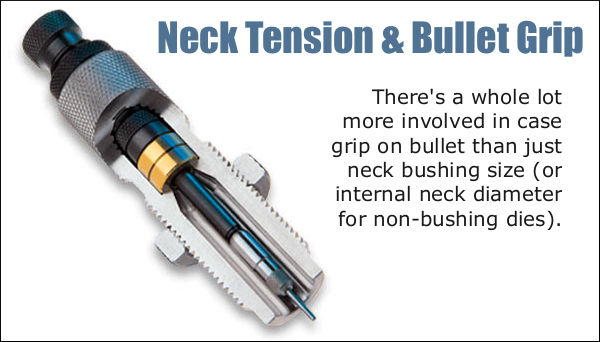
Many novice hand-loaders believe that neck bushing Inside Diameter (ID) size is the only important factor in neck tension. In fact, many different things will influence the grip on your bullet and its ability to release from the case neck. To learn the ins and outs of neck tension, take some time and read this article carefully.
Neck Tension (i.e. Grip on Bullets) Is a Complex Phenomenon
While we certainly have considerable control over neck tension by using tighter or looser bushings (with smaller or bigger Inside Diameters), bushing size is only one factor at work. It’s important to understand the multiple factors that can increase or decrease the resistance to bullet release. Think in terms of overall brass-on-bullet “grip” instead of just bushing size (or the internal neck diameter in non-bushing FL dies).
Bullet grip is affected by many things, such as:
1. Neck-wall thickness.
2. Amount of bullet bearing surface (shank) in the neck.
3. Surface condition inside of neck (residual carbon can act as a lubricant; ultrasonic cleaning makes necks “grabby”).
4. Length of neck (e.g. 6mmBR neck vs. 6mm Dasher).
5. Whether or not the bullets have an anti-friction coating.
6.The springiness of the brass (which is related to degree of work-hardening; number of firings etc.)
7. The bullet jacket material.
8. The outside diameter of the bullet and whether it has a pressure ridge.
9. Time duration between bullet seating and firing (necks can stiffen with time).
10. How often the brass is annealed.
11. Amount (length) of neck sized (e.g. you can size only half the neck).
12. Interior diameter of bushing, or neck section of non-bushing die.
— and there are others…
One needs to understand that bushing size isn’t the beginning and end of neck tension questions, because, even if bushing size is held constant, the amount of bullet “grip” can change dramatically as the condition of your brass changes. Bullet “grip” can also change if you alter your seating depth, and it can even change if you ultrasonically clean your cases.
In our Shooters’ Forum a reader recently asked: “How much neck tension should I use?” This prompted a Forum discussion in which other Forum members recommended a specific number based on their experience, such as .001″, .002″, or .003″. These numbers, as commonly used, correspond to the difference between case-neck OD after sizing and the neck OD of a loaded round, with bullet in place. In other words, the numbers refer to the nominal amount of interference fit (after sizing).
While these commonly-used “tension numbers” (of .001″, .002″ etc.) can be useful as starting points, neck tension is actually a fairly complex subject. The actual amount of “grip” on the bullet is a function of many factors, of which neck-OD reduction during sizing is just one. Understanding these many factors will help you maintain consistent neck tension as your brass “evolves” over the course of multiple reloadings.
Seating Depth Changes Can Increase or Decrease Grip on Bullet
You can do this simple experiment. Seat a boat-tail bullet in your sized neck with .150″ of bearing surface (shank) in the neck. Now remove the bullet with an impact hammer. Next, take another identical bullet and seat it with .300″ of bearing surface in another sized case (same bushing size/same nominal tension). You’ll find the deeper-seated bullet is gripped much harder.
Neck-Wall Thickness is Important Too
I have also found that thinner necks, particularly the very thin necks used by many PPC shooters, require more sizing to give equivalent “grip”. Again, do your own experiment. Seat a bullet in a case turned to .008″ neckwall thickness and sized down .003″. Now compare that to a case with .014″ neckwall thickness and sized down .0015″. You may find that the bullet in the thin necks actually pulls out easier, though it supposedly has more “neck tension”, if one were to consider bushing size alone.
In practical terms, because thick necks are less elastic than very thin necks, when you turn necks you may need to run tighter bushings to maintain the same amount of actual grip on the bullets (as compared to no-turn brass). Consequently, I suspect the guys using .0015″ “tension” on no-turn brass may be a lot closer to the guys using .003″ “tension” on turned necks than either group may realize.
Toward a Better Definition of Neck Tension
As a convenient short-cut, we tend to describe neck tension by bushing size alone. When a guy says, “I run .002 neck tension”, that normally means he is using a die/bushing that sizes the necks .002″ smaller than a loaded round. Well we know something about his post-sizing neck OD, but do we really have a reliable idea about how much force is required to release his bullets? Maybe not… This use of the term “neck tension” when we are really only describing the amount of neck diameter reduction with a die/bushing is really kind of incomplete.
My point here is that it is overly simplistic to ask, “should I load with .001 tension or .003?” In reality, an .001″ reduction (after springback) on a thick neck might provide MORE “grip” on a deep-seated bullet than an .003″ reduction on a very thin-walled neck holding a bullet with minimal bearing surface in the neck. Bushing ID is something we can easily measure and verify. We use bushing size as a descriptor of neck tension because it is convenient and because the other important factors are hard to quantify. But those factors shouldn’t be ignored if you want to maintain consistent neck tension for optimal accuracy.
Consistency and accuracy — that’s really what this all about isn’t it? We want to find the best neck tension for accuracy, and then maintain that amount of grip-on-bullet over time. To do that you need to look not only at your bushing size, but also at how your brass has changed (work-hardened) with time, and whether other variables (such as the amount of carbon in the neck) have changed. Ultimately, optimal neck tension must be ascertained experimentally. You have to go out and test empirically to see what works, in YOUR rifle, with YOUR bullets and YOUR brass. And you may have to change the nominal tension setting (i.e. bushing size) as your brass work-hardens or IF YOU CHANGE SEATING DEPTHS.
Remember that bushing size alone does not tell us all we need to know about the neck’s true “holding power” on a bullet, or the energy required for bullet release. True bullet grip is a more complicated phenomenon, one that is affected by numerous factors, some of which are very hard to quantify.
Wipe-Out foam bore cleaner is a product we’ve used with great success on many rifles. With sufficient dwell time, it removes both carbon and copper fouling. You can combine it with Wipe-Out Accelerator or Patch-Out liquid to speed up cleaning time. Many shooters, including this editor, find that bore-brushing has been virtually eliminated with the regular use of Wipe-Out. (With some barrels however, you may still have to brush or use a bore paste if you notice stubborn carbon build-up in the throat area.)
Method One: Apply Through Muzzle
Out standard procedure with Wipe-Out is to insert an O-ring-sealed cleaning rod guide into the chamber and then squirt through the muzzle in short puffs. Put a towel or rag on the comb of your stock and watch for a little bit of foam to exit the rod guide. We usually wait 30 minutes for the bubbles to dissipate, then do a second foam application. Be sure to clean off any excess foam before it drips on your stock. It is important to keep the foam off fine wood or paint finishes.
Our actual routine normally starts with 3-4 wet patches with Carb-Out (to get the loose black stuff out), followed by the two foam cycles as explained above. Then we plug both ends of the barrel, drive home from the range and dry-patch out on arrival at the house. If the gun is going to be used again soon, that’s all we do. If there will be long-term storage we’ll run some Eezox down the bore.
Method Two: Apply Wipe-Out from Breech
You can also apply Wipe-Out from the breech. To allow breech-first application, Wipe-Out cans now come with a short plastic tube and a plastic tip that fits in your chamber. These can also be purchased separately for $2.50. However, we’ve found the plastic tip is too big for some chambers and it is not always easy to get a good, secure seal even if it does fit. Jason Baney has come up with a solution. READ Jason’s Wipe-Out Article.
Use Fitted Tubing for Breech-First Applications of Wipe-Out
You can apply Wipe-Out through the breech very effectively if you use fitted, plastic tubing. While this works well for bolt-actions, breech application is particularly handy for the Garand, M1A and other semi-autos. Jason Baney has written a short article describing this process. In a nutshell, you need one piece of tubing that fits the chamber tightly and then connects with a second, smaller diameter tube that attaches to the Wipe-Out can. This avoids any “over-spray” of foam in the action area, providing a clean, simple solution. Just squirt for a second or so, and wait for white foam to come out of the muzzle. Be sure to keep Wipe-Out off fine wood stocks.
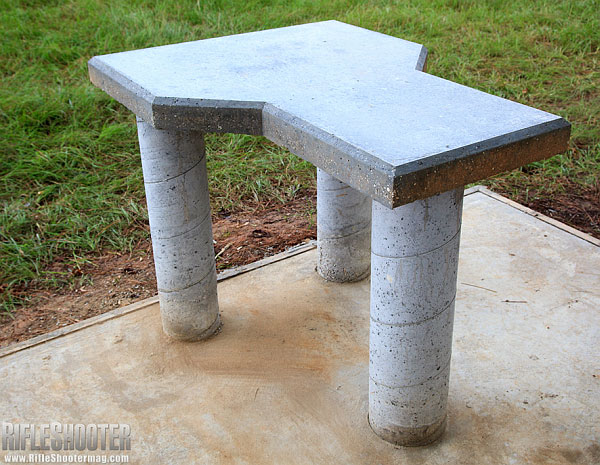
Who hasn’t dreamed of having a professional-quality, permanent shooting bench on their own property? Well here’s an article that can help you make that dream come true. This “how-to” feature from the archives of RifleShooter Magazine shows how to build a quality concrete shooting bench step-by-step.
All aspects of the construction process are illustrated and explained. The author, Keith Wood explains: “Construction happened in three phases — first creating the slab foundation, then the support pillars (legs), and finally the table.”
Click image below to load article with slide show.
Each step in the process is illustrated with a large photo and descriptive paragraph. Starting with framing the foundation (Step 1), the article illustrates and explains the 15 Steps that produce the finished, all-concrete bench (see top photo).
What is Parallax?
Parallax is the apparent movement of the scope’s reticle (cross-hairs) in relation to the target as the shooter moves his eye across the exit pupil of the riflescope. This is caused by the target and the reticle being located in different focal planes.
Why is it Important?
The greater the distance to the target and magnification of the optic, the greater the parallax error becomes. Especially at longer distances, significant sighting error can result if parallax is not removed.
How to Remove Parallax
This Nightforce Tech Tip video quickly shows how to remove parallax on your riflescope.
While keeping the rifle still and looking through the riflescope, a slight nod of the head up and down will quickly determine if parallax is present. To remove parallax, start with the adjustment mechanism on infinity and rotate until the reticle remains stationary in relation to the target regardless of head movement. If parallax has been eliminated, the reticle will remain stationary in relation to the target regardless of eye placement behind the optic.
This Parallax Discussion first appeared in the Nightforce Newsletter. To get other helpful Tech Tips delivered to your mailbox, CLICK HERE to open the Nightforce Newsletter sign-up page.
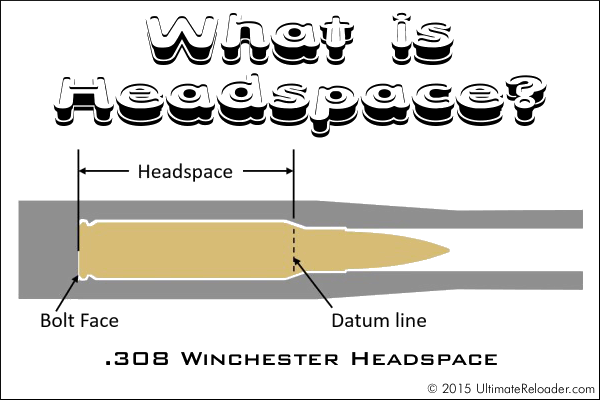
This illustration shows headspace measurement for the popular .308 Winchester cartridge, which headspaces on the shoulder. Image copyright 2015 Ultimate Reloader.
In this Brownells Tech Tip, Brownells gun tech Steve Ostrem explains what headspace is and why it’s one of the most critical measurements for nearly all firearms. Even if you’re an experienced rifle shooter, it’s worth watching this video to refresh your understanding of headspace measurements, and the correct use of “GO” and “NO-GO” gauges.
Headspace Definition
In firearms, headspace is the distance measured from the part of the chamber that stops forward motion of the cartridge (the datum reference) to the face of the bolt. Used as a verb, headspace refers to the interference created between this part of the chamber and the feature of the cartridge that achieves the correct positioning. Different cartridges have their datum lines in different positions in relation to the cartridge. For example, 5.56x45mm NATO ammunition headspaces off the shoulder of the cartridge, whereas .303 British headspaces off the forward rim of the cartridge.
If the headspace is too short, ammunition that is in specification may not chamber correctly. If headspace is too large, the ammunition may not fit as intended or designed and the cartridge case may rupture, possibly damaging the firearm and injuring the shooter. (Source: Wikipedia)
Headspace Gauges
Headspace is measured with a set of two headspace gauges: a “Go” gauge, and a “No-Go” gauge. Headspace gauges resemble the cartridges for the chambers they are designed to headspace, and are typically made of heat-treated tool steel. Both a “Go” and a “No-Go” gauge are required for a gunsmith to headspace a firearm properly. A third gauge, the “Field” gauge, is used (as the name implies) in the field to indicate the absolute maximum safe headspace. This gauge is used because, over time, the bolt and receiver will wear, the bolt and lugs compress, and the receiver may stretch, all causing the headspace to gradually increase from the “factory specs” measured by the “Go” and “No-Go” gauges. A bolt that closes on “No-Go” but not on “Field” is close to being unsafe to fire, and may malfunction on cartridges that are slightly out of spec. (Source: Wikipedia)
To learn more, read Brownell’s longer article Headspace Gauges and How to Use Them. Among other things, this explains the relative lengths of “Go”, “No-Go”, and “Field” gauges. The “Field” is actually the longest: “The GO gauge corresponds to the SAAMI (Sporting Arms & Ammunition Manufacturer’s Institute) minimum chamber length, while the FIELD gauge usually matches the maximum chamber depth, or slightly less. NO-GO gauges are an intermediate length between minimum and maximum, that, technically, is a voluntary dimension. A firearm that closes on a NO-GO gauge and does not close on a FIELD gauge may not give good accuracy and may have very short cartridge case life from the ammunition re-loader’s standpoint.”
Nightforce Optics has just launched a new monthly newsletter. This free, subscription-based digital publication will offer information on optics, target shooting, hunting, and other topics of interest. The debut October issue, released this week, features match reports, tactical shooting hold-over advice, plus a TECH TIP explaining Parallax.
PARALLAX – What is it and Why is it important?
What is Parallax?
Parallax is the apparent movement of the scope’s reticle (cross-hairs) in relation to the target as the shooter moves his eye across the exit pupil of the riflescope. This is caused by the target and the reticle being located in different focal planes.
Why is it Important?
The greater the distance to the target and magnification of the optic, the greater the parallax error becomes. Especially at longer distances, significant sighting error can result if parallax is not removed.
How to Remove Parallax
This Nightforce Tech Tip video quickly shows how to remove parallax on your riflescope.
While keeping the rifle still and looking through the riflescope, a slight nod of the head up and down will quickly determine if parallax is present. To remove parallax, start with the adjustment mechanism on infinity and rotate until the reticle remains stationary in relation to the target regardless of head movement. If parallax has been eliminated, the reticle will remain stationary in relation to the target regardless of eye placement behind the optic.
If you want to subscribe to the Nightforce Newsletter, CLICK HERE to open the Newsletter then click the green “Join Email List” button at the top of the page.
Forum member Rich DeSimone uses a handy “Stub Gauge” for setting shoulder “bump” and seating depth. The gauge is made from a section of barrel lopped off when the muzzle is crowned. The chambering reamer is run in about 1/4 of the way, enough to capture the neck and shoulder area of the case. Rich then uses his full-length die to “bump” a master case with the ideal amount of headspace for easy feeding and extraction. He takes that case and sets it in this Stub Gauge, and measures from the front of the gauge to the rim. He can then quickly compare any fired case to a his “master” case with optimal headspace. Since the gauge measures off the shoulder datum, this tells him how much to bump his fired brass.
In addition, the Stub Gauge can be used to set bullet seating-depth. Rich has a channel cut transversely on one side of the gauge, exposing the throat area. Since the interior of the gauge is identical to the chamber in his gun, this lets him see where a seated bullet engages the rifling. He can tinker with bullet seating length until he gets just the right amount of land contact on the bullet, confirmed visually. Then he measures the case OAL and sets his seating dies accordingly. This is much handier than using a Stoney Point Tool to measure distance to the lands. As your barrel’s throat wears, you may seat your bullets out further to “chase the lands”, but the gauge provides a constant land engagement point, in the barrel’s “as new” condition. By measuring the difference between the land contact point on the gauge and the actual contact point on your barrel, you can determine throat “migration”.
Here’s a clever, easy modification for your RCBS ChargeMaster electronic powder dispenser. Many folks use a McDonald’s straw to smooth kernel flow out of the dispensing tube. Forum member Mike S. (aka in2deep) found that, even with a straw in place, he sometimes got clumps, which dropped 5-6 kernels at once, throwing off his dispensed weight.
Mike looked at the situation and ingeniously decided to trim the straw into little v-shaped arms or prongs. This helps to break up the clumps, so the kernels flow out the end of the tube more consistently during the dispense cycle. Mike writes:
Soda Straw Modification
This is a further tweak of the popular soda straw modification as the original mod would still allow Varget powder to collect in the straw and dump sometimes as many as 6 or 8 or even more extra kernels in the pan. It would sometimes signal an overcharge, but even when it didn’t there could be as many as 6+ kernels too high or too low (total spread of 12+).
The little arms (prongs) on the straw tend to separate the kernels into groups of 1 or 2 or 3 and prevents piling and many times the throw is now within 1 or 2 kernels of the desired weight.
Straw Cutting Tips — Mike found the shape/angle of the “arms” is very important. If the cuts are too fine or too course it allows the kernels to collect almost like before but the illustrated angle seems to allow an average of only 2 or 3 kernels per trickle input from the machine. This means that more charges are much closer to the actual desired weight and max kernel variances will be cut in less than half and there will be almost no overthrows.



 Do I Need to Break-In a New Rifle Barrel?


 In our
  Neck-Wall Thickness is Important Too
 Method Two: Apply Wipe-Out from Breech



 Headspace Gauges

 Forum member Rich DeSimone uses a handy “Stub Gauge” for setting shoulder “bump” and seating depth. The gauge is made from a section of barrel lopped off when the muzzle is crowned. The chambering reamer is run in about 1/4 of the way, enough to capture the neck and shoulder area of the case. Rich then uses his full-length die to “bump” a master case with the ideal amount of headspace for easy feeding and extraction. He takes that case and sets it in this Stub Gauge, and measures from the front of the gauge to the rim. He can then quickly compare any fired case to a his “master” case with optimal headspace. Since the gauge measures off the shoulder datum, this tells him how much to bump his fired brass.
 Here’s a clever, easy modification for your RCBS ChargeMaster electronic powder dispenser. Many folks use a McDonald’s straw to smooth kernel flow out of the dispensing tube. Forum member Mike S. (aka in2deep) found that, even with a straw in place, he sometimes got clumps, which dropped 5-6 kernels at once, throwing off his dispensed weight.


