


Prone Position — Key Points to Improve Your Prone Shooting


The First Shot, the CMP’s online magazine, features a well-written article on Prone Shooting Technique by SPC Matthew Sigrist of the U.S. Army Marksmanship Unit (USAMU). The article covers all the major points of gun hold and body position: hand position, elbow position, stock weld, buttstock placement, and sling position/tension.
Keep it Steady — The Elements of a Good Prone Position
Part 1 — Building the Position
By SPC Matthew Sigrist
Imagine the following scenario: You are at the last stage of fire in the National Trophy Individual Match, firing at the 600 yard line in the prone position and every point matters. What should you reflect on as you prepare to shoot this final string? As your eyes cloud from sweat, you realize that all you have to rely on is your experience and knowledge of the fundamentals.
During the National Trophy Individual Match, you will fire 60 percent of your shots from the prone position. This article will address the fundamentals of a good prone position and help you learn the techniques required to be successful in both the slow and rapid-fire stages of National Match competition.
This article will be divided into two parts. In part one, we will discuss the elements of a good prone position. In part two, we will cover the techniques you will in the rapid-fire and slow-fire stages.
The Fundamentals
The fundamentals are the building blocks of a position. Much like the framework of a house, a correct application of the fundamentals ensures a solid and stable structure. Since each person’s position will depend on their particular body build and shape, there is no “perfect position” that applies to everyone. Experience, practice and knowledge of the correct fundamentals will dictate the best position for you.
There are six key elements of any position. The purpose for these six points is to achieve a solid platform that allows for consistent sight alignment using the least amount of muscle tension.
1. Placement of the Firing Hand (the hand that pulls the trigger)
The firing hand needs to be placed high on the pistol grip. This high hand position will give you better control of the rifle. Combined with a firm grip there will be a reduced amount of hand movement when pulling the trigger. Wrap your thumb over the three fingers on the pistol grip (excluding the trigger finger). This will help isolate the movement of the trigger finger.
2. Placement of the Non-firing Hand (the hand supporting the rifle).
The non-firing hand should grip the handguard or stock in the flat portion of the hand between the thumb and forefinger. The fingers should curl naturally around the stock, but they should not grip it tightly. The position of the hand on the stock will depend on the physical size of the shooter. Generally speaking, taller shooters with longer arms will grip the rifle further out, near the sling swivel, while shorter shooters will need to pull their hand rearward. This is sometimes referred to as “short-stocking” the rifle.
3. Stock Weld
Stock weld is the contact that the face makes with the stock. It is important because it directly effects your sight alignment. Consistent head placement will help you achieve consistent sight alignment. The human head weighs an average of 8 to 10 pounds. The full weight of the head must rest on the stock. In doing this you achieve two things, a relaxed neck and reduced recoil because of the pressure of the head.
4. Placement of the Rifle (the contact that is made in the firing shoulder)
The rifle butt placement needs to be consistent. If this changes between shots, it effects your sight alignment and the effect of recoil. In the prone position the rifle will sit lower in the shoulder compared to other shooting positions. This allows for a more forward head and a lower position as a whole.
5. Position of the Sling
The sling should be high on the arm, above the bicep. This way the sling will have less leverage on the arm so it doesn’t cut off the circulation.
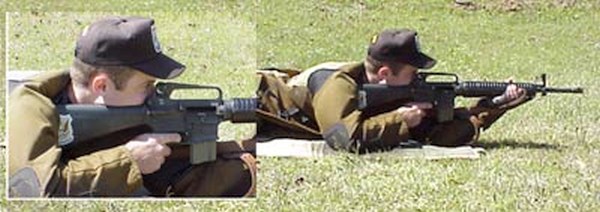
Demonstration of the placement of the firing elbow (left) and non-firing elbows (right).
6. Placement of both the firing, and non-firing elbows
A guideline for non-firing elbow placement is that there should be 1 ½’’ to 2’’ gap between your non-firing arm and the rifle’s magazine. (NOTE: this references the AR-15 service rifle) Your arm should be almost straight up and down; this will transfer the weight directly down the arm and not to the side (see picture above). Think of the firing arm as only a kind of kickstand, it doesn’t support weight it only holds the firing hand in position.
Variations of the Prone Position
There are two main variations of the prone position; open/spread legged, and bent-legged. The two types will be discussed below.
Open/Spread Leg Position

Demonstration of the Open/Spread Leg Position.
The first position is the open/spread legged position. This is when the shooter spreads their legs shoulder width or more apart. This allows for a more forward pressure on the sling and elbows. This position requires a tighter sling and solid elbow placement. The rifle should sit tight in the shoulder. With this position, your body will be farther behind the rifle compared to the bent leg position, allowing for minimum disturbance from recoil.
Bent Leg Position
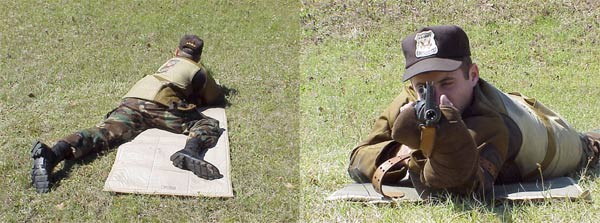
Demonstration of the Bent Leg Position.
The bent leg position is when the shooter bends the firing side leg up towards the firing hand making the knee at a rough 90 degree angle to the body. The non-firing leg will remain straight and inline with the body. This will take pressure off the lungs and heart minimizing the pulse from the chest as well as easing the pressure on the lungs which will allow for easy breathing and control.
Summary
You now know the fundamentals of a good prone position, as well as the two types most commonly used. Extensive dry-firing will reveal which is the best position for you. If possible, have a friend take pictures of you in position. This will enable you to better diagnose and correct your errors. Remember, a position must be both fundamentally sound and comfortable. Practice frequently to learn your new position and to develop the conditioning required to endure long days on the range.


