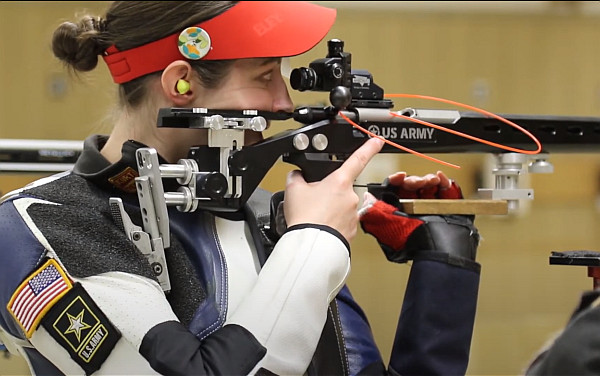
The U.S. Armed Services’ new champion is a young lady. U.S. Army Staff Sergeant (SSG) Erin McNeil claimed the 2021 Interservice Individual Rifle Champion title with an impressive score of 996-52X, beating out 86 other service members. That score also earned Erin the title of High Woman. The 2021 Interservice Rifle Championships (IRC) continued with other events, including the 1000-yard match. Shown below is SSG McNeil competing in the IRC 1K Match.
Staff Sgt. Erin McNeil hails from Fort Wayne, Indiana. She has a B.S. in Mathematics from Texas Christian University (TCU), and holds the military occupational specialty of battle management system operator. With the USAMU, SSG McNeil has served on the International Shooting Team and the Service Rifle Team. As a USAMU team member, SSG McNeil has earned the President’s 100 Tab, Rifleman’s EIC Badge, and Bronze Medal at the 2014 World Championship in 3-Position/50m Smallbore Rifle.
McNeil started shooting through a 4-H program while in the 8th grade and then shot in college with the TCU Rifle Team. Now, she serves as a shooter/instructor on the USAMU International Rifle Team. In the video below, SSG McNeil talks about her career in competitive shooting, and what she enjoys most about rifle competition — both smallbore and High Power. She notes she gets enjoys instructing young high school and collegiate shooters.
Erin enjoys shooting competition because “It’s really between you and the gun. It’s a very mental game. I think shooting is a great sport… as long as you are able to compete within yourself.”
Like Father, Like Daughter — Both Great Shooters
Erin noted: “My father was very influential in my shooting career. As a child, I looked up to him. I knew that he had been a world-class shooter in his youth. He asked me a few times if I would be interested in starting the 4H Rifle program He was excited when I started showing interest in the program. Although he never coached me for fear of crossing the father/daughter relationship with the athlete/coach relationship, but he was always my biggest supporter and even gave assistance when I asked for it. I had a natural talent for shooting and ended up joining my high school’s Army JROTC. I was given a NCAA scholarship; to TCU during my senior year. After completing college, I was accepted into the USAMU. My dad [was] the quiet, proud encourager of my shooting career[.]”
Words of Praise for SSG Erin McNeil from Facebook
“The nice thing about shooting sports is men and women can compete against each other and be on equal footing. Congratulations on the win!” — Doug Fraser
“Congrats Sergeant McNeil from an old shooter from the 1964 ARADCOM Interservice Rattle Battle matches at Fort Carson Colorado, Ft. Campbell, Ft Sheridan, et cetera. You make me proud of all you folks who carry on the tradition.” — Walter Colbert
“I’ve watched Erin shoot while I was calling the matches from the Tower at the Camp Perry smallbore championships. [She was] never bothered and never ruffled. Just keeps shooting those Xs.” — Ken Kelley
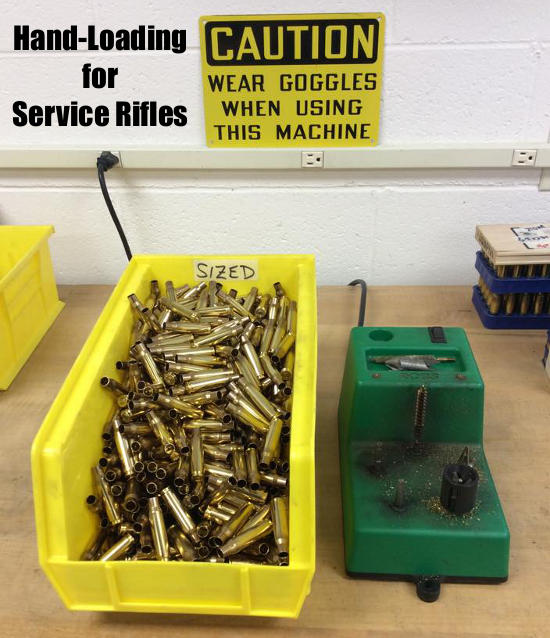
The U.S. Army Marksmanship Unit regularly publishes a reloading “how-to” article on the USAMU Facebook page. One excellent “Handloading Hump Day” post covered preparation of once-fired 5.56x45mm brass. This article, the first in a 3-part series, has many useful tips. If you shoot a rifle chambered in .223 Rem or 5.56x45mm, this article is worth reading.
This week, Handloading Hump-Day will answer a special request from several competitive shooters who asked about procedures for morphing once-fired GI 5.56mm brass into accurate match brass for NRA High Power Rifle use. The USAMU has used virgin Lake City (LC) 5.56 brass to win National Championships and set National Records for many years. In this 3-part series, we’ll share techniques proven to wring match-winning accuracy from combat-grade brass.
GI brass has an excellent attribute, worth noting — it is virtually indestructible. Due to its NATO-spec hardness, the primer pockets last much longer than most commercial brass when using loads at appropriate pressures.
Preparing Once-Fired GI 5.56 Brass for Reloading (Part 1 of 3)
Assuming our readers will be getting brass once-fired as received from surplus dealers, the following steps can help process the low-cost raw material into reliably accurate components.
1. Clean the Brass
First, clean the brass of any dirt/mud/debris, if applicable. Depending on the brass’s condition, washing it in a soap solution followed by a thorough rinsing may help. [This step also extends the life of the tumbling media.] Approaches range from low-tech, using gallon jugs 1/2 full of water/dish soap plus brass and shaking vigorously, to more high-tech, expensive and time-consuming methods.
2. Wet-Tumbling Options (Be Sure to Dry the Brass)
When applying the final cleaning/polish, some use tumblers with liquid cleaning media and stainless steel pins for a brilliant shine inside and out, while others take the traditional vibratory tumbler/ground media approach. Degree of case shine is purely personal preference, but the key issue is simple cleanliness to avoid scratching ones’ dies.
If a liquid cleaner is used, be SURE to dry the cases thoroughly to preclude corrosion inside. One method is to dump the wet brass into an old pillow case, then tilt it left/right so the cases re-orient themselves while shifting from corner to corner. Several repetitions, pausing at each corner until water stops draining, will remove most water. They can then be left to air-dry on a towel, or can be dried in a warm (150° F-200° F max) oven for a few minutes to speed evaporation.
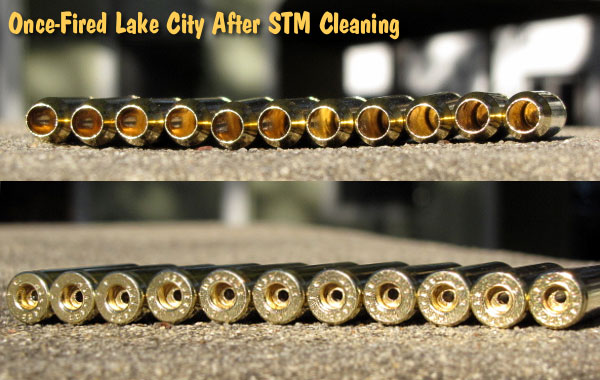
Shown below are Lake City cases after cleaning with Stainless Media (STM). Note: STM Case cleaning was done by a third party, not the USAMU, which does not endorse any particular cleaning method.
3. Inspect Every Case
Once dry, inspect each case for significant deformation (i.e., someone stepped on it), damaged mouths/necks and case head/rim damage. Some rifles’ ejectors actually dig small chunks of brass out of the case head — obviously, not ideal for precision shooting. Similarly, some extractors can bend the case rims so badly that distortion is visible when spinning them in one’s fingers. These can be used for plinking, but our match brass should have straight, undamaged rims.
Dented case mouths are common, and these can easily be rounded using a conical, tapered tool, [such as a .223 expander mandrel. A dummy 7.62 or .30-06 cartridge with a FMJ spitzer can also work.] If most of your brass is of one headstamp, this is a good time to cull out any odd cases.
4. Check the Primers Before Decapping
Your clean, dry and inspected brass is now ready for full-length sizing, decapping and re-priming. Historically, primer crimps on GI brass have caused some head-scratching (and vile language) among handloaders. Our next installment will detail efficient, easy and practical methods to remove primer crimp, plus other useful handloading tips. Until next week, Good Shooting!
NOTE: The USAMU Handloading (HL) Shop does not RE-load fired 5.56 brass. We use virgin LC brass with our chosen primer already staked in place. However, our staff has extensive personal experience reloading GI brass for competition, which will supplement the Shop’s customary steps. In handloading, as in life, there are many ways to accomplish any given task. Our suggestions are note presented as the “only way,” by any means. Time for loading/practicing is always at a premium. Readers who have more efficient, alternative methods that maintain top accuracy are invited to share them here.
Accuracy Potential of Mil-Surp 5.56×45 Brass
So, how accurate can previously-fired GI surplus brass be in a good National Match AR-15? Well, here’s a data point from many years ago that might be of interest. A High Power shooter who wrote for the late Precision Shooting magazine took a Bill Wylde-built AR match rifle to a registered Benchrest match. His first 5-round group ever fired in a BR match was officially measured at 0.231″ at 200 hundred yards. This was fired in front of witnesses, while using a moving target backer that confirmed all five rounds were fired.
He recounted that his ammo was loaded progressively with factory 52gr match bullets and a spherical powder using mixed years of LC brass with no special preparation whatsoever. Obviously, this was “exceptional”. However, he had no difficulty obtaining consistent 0.5-0.6 MOA accuracy at 200 yards using LC brass and a generic “practice” load that was not tuned to his rifle.
Saving Money by Using GI Brass
So, with good commercial brass readily available, why would one go to all the extra steps necessary to process fired GI brass? [Editor: It’s about saving money.]
Economically, it makes great sense. When the author was actively practicing and competing with the service rifle, he had ~3,000 rounds of 5.56mm brass, which allowed him to load during winter and spend most time in the summer practicing. If one were wealthy and wanted to shoot nothing but the finest imported brass, the current cost of 3,000 is ~$1920 (plus shipping.)
Dropping down to good, but less-expensive new, U.S. commercial brass brings the price to a much more realistic ~$720. However, at current rates, the same amount of surplus GI once-fired brass costs between $120 — $150, leaving lots of room in the budget for other expenses. [Editor: that’s less than 10% of the cost of the best imported brass.]
Don’t Be “That Guy” (The Bad Apple on the Firing Line)
By SFC Norman Anderson, USAMU Service Rifle Team Member
You know the guy, he’s still talking at the coffee jug when his preparation period begins, then his magazines aren’t loaded when the command “STAND” is given, and finally, he doesn’t know the rules when he argues with the block officer as his target comes up marked “9 and No”. Although this guy might be the highlight of the “after match” activities, he is the proverbial bad apple on the firing line. With this example fresh in your mind, let’s go over how not to be “that guy”.
While the sport of High Power shooting is a hobby for most, all are passionate about performance throughout the day. In order to achieve your maximum performance each and every day, it is essential that you conduct yourself as a professional competitor. As a competitor, you have a personal responsibility to know the course of fire as well as the rules and procedures that apply to it and to be prepared to follow them. Knowing this will not only make you a better competitor, but it will enable you to resolve situations with other targets besides your own. So what does all this mean? I’ll explain…
Know the Course of Fire
Know the course of fire. It sounds easy enough, as we all shoot plenty of matches, but it’s more than that. If you think about it, how many people in the pits, for example, do not really know what is happening on the firing line? This leads to targets being pulled early during a rapid fire string or missing a shot during a slow fire string. In cases like this, the result is the same, delays in the match and upset competitors. To avoid being “that guy,” it is imperative that you stay tuned to the events as the day progresses. When you are at the range shooting a match, be at the range shooting the match.
At any firearms competition — be sure you know (and understand) the course of fire.
Know the Rules
Now, let’s discuss rules. As you have probably heard more than once, the rulebook is your best friend. Here is why. I can virtually guarantee that most competitors know some of the rules based only on the old “this is how we do it at home” adage. The funny part of that is, the same green NRA rulebook and orange CMP rulebooks are used to govern High Power matches all over the country.*
It is vital that all shooters be familiar with the rules as they are written, not with “how they are applied at home”. This creates consistency and continuity in how matches are conducted, from local club matches to state tournaments to National Championships. Knowledge is power when it comes to scoring targets under contention, what to do in the case of a malfunction, or even how to file a protest correctly. These rules are in place for a reason and it benefits everyone to both know and operate by these rules.
Maintain Composure and Humility — Exhibit Good Sportsmanship
One aspect of competing that cannot be forgotten is bearing. As I mentioned earlier, you must be prepared for both good and bad to happen. All too often we all see “that guy” (or that “that guy’s” gear) flying off of the firing line in disgust. Remember that we all must maintain our composure and humility in all conditions, not matter what happens. After all, it’s just a game. To put it into perspective, if it were easy, attendance would be a lot higher. Sportsmanship must be displayed in an effort to keep from ruining the day for all those around you. It doesn’t cost anything to smile, and smiling never killed anyone. So turn that frown upside down and keep on marching, better days will come.
Like a Boy Scout — Always Be Prepared
Lastly, I would like to cover preparedness. Being prepared goes beyond simply having your magazines loaded and a zero on your rifle. It means approaching the firing line, knowing what you are about to do, being ready for what is going to happen (good or bad), and being ready for the results. If you approach the firing line to merely shoot 10 shots standing in your next LEG match, you are not going to be pleased with the result. You must be prepared mentally and physically, not only for the next stage, but also the next shot. By being prepared physically (equipment ready), you give yourself peace of mind which is an essential part of being prepared mentally, and by being prepared mentally, you are less likely to become distracted and are more likely to maintain focus for each and every shot.
Conclusion — Informed Competitors Make for Better Matches
The culmination of these efforts results in a shooter that knows how to be ready for success on the range, but also and perhaps more importantly, a shooter who knows what it means to be a competitor. When you have a range full of competitors who know and follow the rules and proper match procedures, the match runs smoothly, everyone shoots well, and a good time is had by all. In the end, isn’t that what it’s all about?
* After this article was originally written, the CMP separated its rules into multiple Rulebooks:
The 2020-21 24th Edition CMP Highpower Competition Rules for CMP-sponsored and sanctioned matches for Highpower Rifle events in National Trophy Matches, Excellence-In-Competition (EIC) Matches, CMP Cup Matches and other CMP-sanctioned competitions.
The 2020-21 24th Edition CMP Pistol Competition Rules for CMP-sponsored and sanctioned Pistol Matches in the National Matches, National Trophy Matches, Excellence-In-Competition (EIC) Matches, and other CMP-sanctioned competitions.
The U.S. Army Marksmanship Unit (USAMU) regularly releases a reloading “how-to” article on the USAMU Facebook page. Here’s a helpful USAMU guide on removing military primer pocket crimps. If you ever use surplus military brass, you really should this article. It contains vital information “learned the hard way”. The writer has tried many different options for removing/swaging out crimps. He weighs the pros and cons of various methods and provides some advice that will save you time and headaches. This article was the second in a 3-part series. Visit the USAMU Facebook page regularly for other informative articles on reloading methods.
A common question, and important issue with US GI surplus 5.56 brass is “what to do with the primer crimp?” Our Handloading Shop does not prime/re-prime GI 5.56 brass, as we receive it in virgin state (primed) and don’t reload it. However, our staff has extensive private experience handloading GI brass in our own competitive shooting careers, and have several tips to offer.
Once the brass is full-length sized and decapped, the staked-in ring of displaced metal from the primer crimp remains, and hinders re-priming. Some swaging tools exist to swage out this ring, allowing free access to the primer pocket. Some are stand-alone products, and some are reloading-press mounted. Early in this writer’s High Power career, he used the common press-mounted kit several times, with less than stellar results.
Setting Up Swaging Tools
Surplus brass tends to come from mixed lots, and primer crimp varies from very mild to strong. Also, primer pocket dimensions vary. So, setting up this “one size fits most” tool involves trying to find a happy medium for a selection of different types of brass in your particular lot. Some are over-swaged, some under-swaged, and some are “Just Right.” Overall, it was a time-consuming and sub-optimal process, in this writer’s experience.
Cutting Out the Crimp Ring with a Chamfer Tool
[After trying swaging tools] this writer evolved to using the ubiquitous Wilson/RCBS/Other brands chamfer and deburring tool to cut out only the displaced crimp ring at the top of the primer pocket. One caution: DON’T OVER-DO IT! Just a little practice will let the handloader develop a “feel” for the right degree of chamfer that permits easy re-priming without removing so much metal that primer edges start to flow under pressure. For this writer, it was three half-turns of the tool in the primer pocket, with medium pressure.
Here, as with all bulk reloading operations, mechanization is our friend. A popular reloading supply house has developed an inexpensive adaptor that houses the chamfer/deburr tool (retained by an allen screw) and allows mounting in a hand drill or drill press. This speeds the operation significantly, as does use of one of the popular Case Preparation Stations that feature multiple powered operations. (Say good-bye to carpal tunnel syndrome and arthritis!)
One advantage of chamfering the primer pockets lightly to remove remnants of primer crimp, vs. swaging, is that primer pockets are not loosened in this process. US GI (usually LC) NATO 5.56 brass has a great reputation for longevity due to the superior hardness of the case head vs. some softer brands of commercial brass. This means the brass will stand up well to multiple full-pressure loads without loosening primer pockets, and the chamfering method helps support this benefit.
Powered Case Prep Centers — What to Look For
A word of advice (often learned the hard way) — think carefully before jumping on the “latest/greatest” case prep center. One with a proven, long-time track record of durability and excellent customer support has a lot going for it, vs. the flashy “new kid on the block.” Analyze the functions each case prep center can support simultaneously — i.e., can it chamfer, deburr and clean primer pockets all at the same time, without having to re-configure?
Do the tool-heads that come with it look truly functional and durable? If not, can they be easily replaced with proven or more-needed versions, such as a VLD chamfer tool, or a solid/textured primer pocket cleaner rather than a less-durable wire-brush type?
Tips for Priming with Progressive Presses
When re-priming, a couple of factors are worth noting. When re-priming using either single-stage presses, hand tools, or bench-mounted tools (such as the RCBS bench-mounted priming tool), precise alignment of the primer pocket entrance with the primer is easily achieved, and priming goes very smoothly. When using certain progressive presses, due to the tolerances involved in shell-heads, etc., one may occasionally encounter a primer that isn’t quite perfectly aligned with the primer pocket.
If resistance is felt when attempting to re-prime, DO NOT attempt to force the primer in — doing so can be dangerous! Rather, just exert SLIGHT upward pressure to keep the primer in contact with the case-head, and with the support hand, move the case back/forth a trifle. The primer will drop into alignment with the primer pocket, and then prime as usual. After priming, check each seated primer by feel. Ensure it is below flush with the case head (cleaning primer pockets helps here), and that there are no snags, burrs or deformed primers.
More Info on Primer Pocket Swaging
For more information about removing military crimps in primer pockets, we recommend you read Get the Crimp Out on the Squibloads Gun Thoughts Blog. This is a detailed, well-illustrated article that shows how to use various primer pocket reamers/cutters. It also has a very extensive discussion of swaging using CH4D, RCBS, and Dillon tools. The Squibloads author had much better luck with swaging tools than did the USAMU’s writer — so if you are considering swaging, definitely read the Squibloads article.
The illustration of primer pocket types is from the Squibloads Blog Article, Get the Crimp Out.
SFC Brandon Green is a shooting superstar. Green won his third NRA National High Power Rifle Championship in 2018 at Camp Atterbury. He dominated the HP Championship cycle, finishing eight points and ten Xs ahead of his nearest competitor. Brandon also won High Power National Championships in 2015 and 2013. And in 2017 he set all-time Service Rifle Records at the CMP’s National Trophy Matches at Camp Perry. Just two weeks ago, he won the CMP 2400 Overall Aggregate at the 2021 CMP Eastern Games, (2379-97X), setting a new record 497-26X in the EIC Service Rifle match. When he’s “on his game”, SFC Green is very hard to beat. He has no weaknesses, excelling at all positions, both rapid-fire and slow-fire.
Wicked Fast and Smooth…
Brandon Shoots Bolt Gun, Rapid-Fire
In this remarkable video, Brandon shows why he is tough to beat in rapid-fire. Using a Tubb 2000 bolt-action target rifle, Green displays amazing speed working the bolt and then immediately recapturing a rock-steady hold. Our reaction when viewing this video was: “Wow… this guy is beyond good.” We think you’ll agree. Anyone who has shot prone with sling should appreciate the remarkable skills which make Brandon one of the USAMU’s top shooters. Watching this man in action is like watching Michael Jordan in his prime. You’re seeing one of the very best ever…
SFC Brandon Green — 300m Rapid Fire Prone Training with Tubb 2000:
What does a three-time High Power National Champion choose for PRS comps? A set of twins. Twin rifles that is. SFC Brandon Green of the USAMU is one of America’s best marksmen. He’s excelled in Service Rifle and High Power disciplines, and now he’s getting very serious about the Precision Rifle Series (PRS). Brandon recently took delivery of “Twins” — two impressive rifles optimized for PRS competition. Green told us: “The Twins are ready for business! The silver one is a 6XC and the black one is a 6.5×47 Lapua”. Both rifles feature Impact Precision actions (with AICS-type mags), 24″ Proof stainless barrels, and Fat Bastard muzzle brakes. Rifle work was done by Stuteville Precision (Wade Stuteville) and Exodus Rifles (Joe Walls).
In the 6XC, Brandon runs Berger 105gr VLDs in Norma 6XC brass. For the 6.5×47 Lapua he shoots 140gr Berger Hybrids or 143gr Hornady ELD-Xs in Lapua brass. Both rifles have stainless steel Proof barrels, but the 6.5x47L has a matte black Cerakote finish.
Brandon loves his new Twins. He said he likes the “feel” of the guns with the Foundation stocks: “These rifles weigh around 17 pounds with optics. They feel very solid under recoil — without the ‘tuning fork’ vibration you can get with a metal-chassis gun. They feel like a good wood-stocked gun, but the material is stronger and more rigid than wood. I’ve heard that guys are having success with these Foundation stocks with the actions installed without pillars or conventional bedding.” Currently Brandon is running both guns without action-screw pillars. He did have one skim-bedded, but he doesn’t think that was really needed. “Both rifles hammer now”, Brandon tells us.
Green Runs Vortex Razor HD Gen II 4.5-27x56mm FFP scopes on both rifles:
High-Tech Micarta Stock Material
At first glance, those stocks may look like wood, but they are actually a special “Micarta” material that is strong, durable, and stable. Micarta, often used for knife handles, is a “a brand name for composites of fiberglass, carbon fiber, or other fabric in a thermosetting plastic.” The stock-maker, Foundation Stocks, says Micarta offers some distinct advantages over laminated wood or conventional fiberglass: “The solid block of material gives us a dense, homogenous material that is absent of any voids or air pockets commonly found in composite stocks. The high compression strength of the material allows us to build an action/DBM specific stock that requires no bedding or pillars. The material is very durable and stable in extreme environments. We use advanced CAD software to design and model our stocks, working in conjunction with action manufacturers and rifle builders to provide exact fitment.”
Here is a close-up of a Foundation Stock showing the distinctive Micarta texture:
Tactical Competition vs. NRA High Power Competition
Brandon says PRS competition is tough: “PRS can be pretty humbling, but it’s been a lot of fun and a great challenge. For a shooter (like me) with a Service Rifle/High Power background, the variations in stages combined with the time limits can be very challenging. And the unusual shooting positions put a new spin on things. PRS is definitely a different ball game, but I really enjoy it.”
SFC Brandon Green honored as the 2015 High Power National Champion. Brandon also won the HP Championship in 2013, and in 2018.
Life before the Twins… Here is Brandon, with his previous PRS rig, at the MasterPiece Arms Precision Rifle Shootout, a PRS event at the CORE Shooting Solutions Range in Florida:
Three-time National High Power Champion SFC Brandon Green (left above) set four new National Records at Camp Perry in 2017, when he won the Service Rifle Championship.
When He’s not Competing in PRS, Brandon Excels with his Service Rifle
This video shows SFC Brandon Green shooting his modern AR Service Rifle in the off-hand (standing), prone (2:20 time), and sitting (3:25 time) positions in competition.
SFC Brandon Green is a shooting superstar. Green won his third NRA National High Power Rifle Championship in 2018 at Camp Atterbury, Indiana. He dominated the High Power Championship cycle, finishing eight points and ten Xs ahead of his nearest competitor. Brandon also won High Power National Championships in 2015 and 2013. And in 2017 he set new records at the CMP’s National Trophy Matches at Camp Perry, winning the Service Rifle title. One of the greatest marksmen in the nation’s history, SFC Green excels at all positions, both rapid-fire and slow-fire.
The U.S. Army Marksmanship Unit (USAMU) has published a great series of reloading “how-to” articles on its Facebook Page. This post covers key factors to consider when loading ammunition for Match Rifles and Service Rifles, with a particular focus on self-loading “gas guns”. Visit the USAMU Facebook Page each Wednesday for other, helpful “Handloading Hump-Day” tips.
We offer some “cardinal rules” to help new gas-gun handloaders with safety and efficiency. These address both Match Rifle and Service Rifle versions of the AR15, M1 Garand, M1A, and M110. However, they can also improve safe reloading for many other auto-loaders such as M1 Carbines, FALs, SIGs, etc. The author distilled these principles many years ago to help focus on the essential aspects of these rifles.
RULE ONE: Service Rifles Are Not Benchrest Rifles
Gas-guns require a relatively loose fit between ammunition and chamber (vs. bolt actions) for safe, smooth operation. Many techniques, such as neck sizing and keeping cartridge headspace quite tight, are popular in the extreme bolt gun accuracy realm. However, they are of little value with Service Rifles, and some could even be hazardous. Before adopting a specialized technique, seriously consider whether it is appropriate and beneficial in a gas-gun.
RULE TWO: Never Compromise Safety to Obtain Accuracy
Example: If choosing a brand of great, but ultra-sensitive match primers offers possibly better accuracy at the risk of slam-fires in your design of rifle, don’t do it! You are issued exactly two eyes and ten fingers (best-case scenario). Risking them trying to squeeze 0.25 MOA better accuracy out of an M1A, etc. simply isn’t worth it.
RULE THREE: Tailor the Precision to Your Individual Skill and Your Rifle’s Potential
This has been addressed here before, but bears repeating for newcomers. If you are struggling to break out of the Marksman Class, or using a CMP M1 “As-Issued,” then laboriously turning the necks of your 600-yard brass is a waste of time. Your scores will improve much faster by practicing or dry-firing. On the other hand, if the reigning champions anxiously check your scores each time you fire an event, a little neck-turning might not be so far-fetched.
Verifying Load Improvements — Accuracy hand-loading involves a wide variety of techniques, ranging from basic to rather precise. Carefully select those which offer a good return on investment for your time and labor. In doubt? Do a classic pilot study. Prepare ammo for at least three or four ten-shot groups with your new technique, vs. the same with your standard ammo. Then, pick a calm day and test the ammo as carefully as possible at its full distance (e.g. 200, 300, or 600 yards) to verify a significant improvement. A little testing can save much labor!
RULE FOUR: Be Your Own Efficiency Expert
Serious Service Rifle shooters generally think of ammunition in terms of thousands of rounds, not “boxes”, or even “hundreds”. Analyze, and WRITE DOWN each step in your reloading process. Count the number of times each case is handled. Then, see if any operations can be dropped or changed without reducing safety or accuracy. Eliminating just two operations saves 2000 steps per 1000 rounds loaded. Conversely, carefully consider any measurable benefits before adding a step to your routine.
RULE FIVE: In Searching for Greater Accuracy with Efficiency, Look for System Changes
For example, instead of marking your 300-yard rounds individually to differentiate them from your 200-yard ammo, would a simple change in primers work? If accuracy is maintained, using brass-colored primers for 200 and silver for 300 provides an indelible indicator and eliminates a step! Similarly, rather than spending hours selecting GI surplus brass for weight and neck uniformity, consider splurging on some known, high-quality imported match brass for your 600-yard loads. Results should be excellent, time is saved, and given limited shooting at 600 yards, brass life should be long.
RULE SIX: Check All Your Primers Before Packaging Your Loaded Ammo
This seems simple and even intuitive. However, many slam-fires (which were much more common when M1s and M1As were the standard) are due, at least in part, to “high” primers. Primers should be seated below flush with the case head. The USAMU has addressed this at length in a previous column, but each round should be checked for properly-seated primers before they are packaged for use.
Three near-equal-weight 7mm bullets with different shapes and bearing surface.
This article, from the USAMU Facebook Page, concerns reloading safety. In the relentless quest for more speed and flatter ballistics, some hand-loaders load way too hot, running charges that exceed safe pressure levels. Hint: If you need a mallet to open your bolt, chances are your load is too hot. Stay within safe margins — your equipment will last longer, and you won’t risk an injury caused by over-pressure. In this article, the USAMU explains that you need to account for bullet shape, diameter, and bearing surface when working up a load. Don’t assume that a load which is safe for one bullet will be safe for another even if both bullets are exactly the same weight.
Today, we continue our handloading safety theme, focusing on not inadvertently exceeding the boundaries of known, safe data. Bullet manufacturers’ loading manuals often display three, four, or more similar-weight bullets grouped together with one set of load recipes. The manufacturer has tested these bullets and developed safe data for that group. However, seeing data in this format can tempt loaders — especially new ones — to think that ALL bullets of a given weight and caliber can interchangeably use the same load data. Actually, not so much.
The researchers ensure their data is safe with the bullet yielding the highest pressure. Thus, all others in that group should produce equal or less pressure, and they are safe using this data.
However, bullet designs include many variables such as different bearing surface lengths, hardness, and even slight variations in diameter. In fact, diameters can occasionally range up to 0.001″ by design. Thus, choosing untested bullets of the same weight and caliber, and using them with data not developed for them can yield excess pressures.
This is only one of the countless reasons not to begin at or very near the highest pressure loads during load development. Always begin at the starting load and look for pressure signs as one increases powder charges.
Bullet Bearing Surface and Pressure
Bullet bearing surface length (BSL) is often overlooked when considering maximum safe powder charges and pressures. In Photo 1, note the differences in the bullets’ appearance. All three are 7 mm, and their maximum weight difference is just five grains. Yet, the traditional round nose, flat base design on the left appears to have much more BSL than the sleeker match bullets. All things being equal, based on appearance, the RN/FB bullet seems likely to reach maximum pressure with significantly less powder than the other two designs.
TECH TIP: Bullets of the same weight (and caliber) can generate very different pressure levels due to variances in Bearing Surface Length (BSL).
Bullet 1 (L-R), the RN/FB, has a very slight taper and only reaches its full diameter (0.284 inch) very near the cannelure. This taper is often seen on similar bullets; it helps reduce pressures with good accuracy. The calculated BSL of Bullet 1 was ~0.324″. The BSL of Bullet 2, in the center, was ~0.430″, and Bullet 3’s was ~ 0.463″. Obviously, bullets can be visually deceiving as to BSL!
Some might be tempted to use a bullet ogive comparator (or two) to measure bullets’ true BSL for comparison’s sake. Unfortunately, comparators don’t typically measure maximum bullet diameter and this approach can be deluding.
Note: Due to time constraints, the writer used an approximate, direct measurement approach to assess the bullets’ different BSLs. While fairly repeatable, the results were far from ballistics engineer-grade. Still, they are adequate for this example.
Photo 2: The Perils of Measuring Bearing Surface Length with Comparators
In Photo 2, two 7mm comparators have been installed on a dial caliper in an attempt to measure BSL. Using this approach, the BSLs differed sharply from the original [measurements]. The comparator-measured Bullet 1 BSL was 0.694” vs. 0.324” (original), Bullet 2 was 0.601” (comparator) vs. 0.430” (original), and Bullet 3 (shown in Photo 2) was 0.602” (comparator) vs. 0.463” (original). [Editor’s comment — Note the very large difference for Bullet 1, masking the fact that the true full diameter on this bullet starts very far back. You can use comparators on calipers, but be aware that this method may give you deceptive reading — we’ve seen variances just by reversing the comparators on the calipers, because the comparators, typically, are not perfectly round, nor are they machined to precision tolerances.]
Thanks to the U.S. Army Marksmanship Unit for allowing the reprint of this article.
Now here is an example of truly impressive marksmanship skills and amazing aiming from a USAMU soldier. From a standing position, SPC Ivan Roe shoots a tiny aspirin pill off the top of a balloon — without breaking the balloon. In fact, he does this twice … with iron sights no less.
Watch Video to See Aspirin Pill Shot Twice off Balloon:
The first time the pill sits on a small piece of tape just millimeters above the upper edge of the balloon (Time mark 00:40-45). But the second time, the aspirin pill lies flat on the top on the balloon — an even tougher challenge. Watch Ivan nail that flat pill again without hitting the balloon at 00:59. No that is truly impressive — and remember it was done from standing with Iron sights!
SPC Ivan Roe was using a German Feinwerkbau, an elite precision air rifle favored by Olympic and World Cup competitors. Originally from Montana, SPC Roe is a member of the USAMU International Rifle Team.
Did you like this demonstration of Trick-Shot marksmanship? Then visit the USAMU’s Facebook Page. Every Tuesday the USAMU releases a new trick-shot video on Facebook and YouTube. CLICK HERE for the latest USAMU trick-shot video — hitting a poker chip on a fast-moving target frame with a pistol. Very impressive.
The U.S. Army Marksmanship Unit (USAMU), in cooperation with Shooting USA TV, has created a series of instructional Pro Tip pages covering a wide range of shooting disciplines. All totaled, there are more than 50 USAMU Pro Tips. Most relate to rifle marksmanship but there are also numerous tips for shotgunners and pistol shooters. Each Pro Tip entry includes multiple photos and 6-15 paragraphs, in an easy-to-follow format. Many Pro Tips also include an instructional video produced by Shooting USA. Here are three Pro Tip videos, and links to seven more Pro Tip web pages.
USAMU TOP TEN PRO TIPS
1. Reading the Wind with SGT Sherri Gallagher.
Apart from gravity, wind has the most pull on the bullet as it travels down range. Being able to accurately read the wind and mirage will greatly enhance your performance on the rifle range. National Champion, SGT Gallagher gives you some of her tips.
2. Angle Shooting with SFC (Ret.) Emil Praslick.
SFC Praslick shows you how to determine the angle to your target, and then how to include that to change your data necessary to hit your target on the first shot.
3. Rifle Grip, Stance and Body Position for 3-Gun with SFC Daniel Horner.
Professional 3-gun marksman SFC Daniel Horner, U.S. Army Marksmanship Unit (USAMU), give tips on how to properly handle a semi-automatic rifle, including grip, stance and body position.


 Know the Rules

 Tips for Priming with Progressive Presses