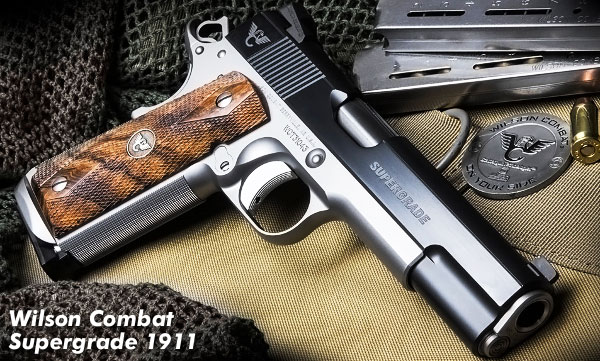
Each Wednesday the USAMU offers tips for handloaders on the USAMU Facebook page. This article from the “Handloading Hump-Day” archives should interest pistol competitors, an any shooter who enjoys getting the best possible accuracy from their fine pistols. In this article, the USAMU’s experts share key tips that can help optimize your pistol ammo. Follow this tips to produce more consistent ammo, that can shoot higher scores.
Optimize the Taper Crimp
One often-overlooked aspect of handloading highly-accurate pistol ammunition is the amount of crimp and its effect on accuracy. Different amounts of taper crimp are used with various handloads to obtain best accuracy. The amount is based on bullet weight, powder burn rate and charge, plus other factors. It is not unusual for our Shop to vary a load’s crimp in degrees of 0.001″ and re-test for finest accuracy.
Use Consistent Brass
Brass is also important to pistol accuracy. While accurate ammunition can be loaded using brass of mixed parentage, that is not conducive to finest results, particularly at 50 yards. It is important for the serious competitor/handloader to use brass of the same headstamp and ideally one lot number, to maximize uniformity. Given the volumes of ammunition consumed by active pistol competitors, using inexpensive, mixed surplus brass for practice, particularly at the “short line” (25 yards), is understandable. However, for the “long line” (50 yards), purchasing and segregating a lot of high-quality brass to be used strictly for slow-fire is a wise idea.
Importance of Uniform COAL
Uniformity of the Case Overall Length (COAL) as it comes from the factory is also important to achieving utmost accuracy. More uniform case lengths (best measured after sizing) contribute to greater consistency of crimp, neck tension, ignition/burn of powder charge, and so on. Cartridge case-length consistency varies from lot to lot, as well as by maker. Some manufacturers are more consistent in this dimension than others. [Editor’s note: It is easy to trim pistol brass to uniform length. Doing this will make your taper crimps much more consistent.]
Primers and Powders — Comparison Test for Accuracy
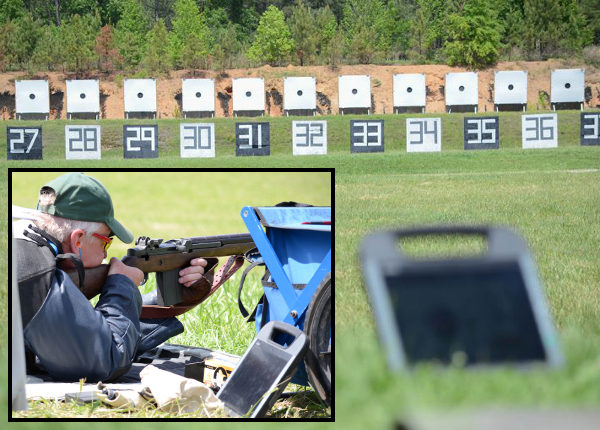
Pay attention to primer brands, powder types and charges. Evaluating accuracy with a Ransom or other machine rest at 50 yards can quickly reveal the effect of changes made to handload recipes.
Bullet Selection — FMJ vs. JHP
Bullets are another vital issue. First, there is the question of FMJ vs. JHP. A friend of this writer spent decades making and accuracy-testing rifle and pistol bullets during QC for a major bullet manufacturer. In his experience, making highly-accurate FMJ bullets is much more difficult than making highly-accurate JHPs, in large part due to the way the jackets are formed. Small die changes could affect accuracy of FMJ lots dramatically.
The CMP now allows “safe, jacketed ammunition” in Excellence-in-Competition (EIC) Service Pistol matches, although wadcutter ammunition is prohibited. Thus, the option to use very accurate JHP designs simplifies the life of CMP Service Pistol shooters in pursuit of the prestigious Distinguished Pistol Shot badge.
Hopefully, these tips will be helpful to any pistol shooters interested in accurate handloads, not just “Bullseye” shooters. Small tweaks to one’s normal routine can pay big dividends in improved accuracy and make practice and competition more rewarding.
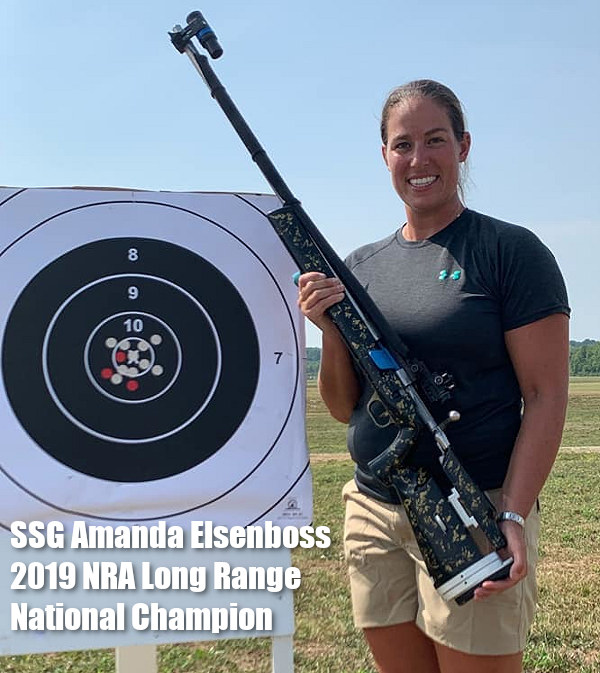
The display target is a copy, for spectators, of the larger, official target. The actual X-Ring is 10″ at 1000 yards. Amanda shot without a bipod, using only a sling to support the rifle, and aperture sights (no scope).
Congrats to Amanda Elsenboss for winning the 2019 NRA National Long Range Championships held this month at Camp Atterbury, Indiana. This completes her season of dominance, winning the Interservice, CMP, and NRA Long Range Championships. Amanda finished off her campaign with a win in the Mustin match and a shoot-off score of 100-9x. She also won the Leech Cup with a 200-15X, and 100-6X shoot-off score. Great job, Amanda!
Before his retirement from the U.S. Army, Emil Praslick III coached Amanda as a shooter with the U.S. Army Markmanship (USAMU) team. Emil was impressed with Amanda’s skill and dedication. Emil posted: “[Amanda is] by far the easiest shooter to coach I’ve ever worked with. A machine.”
Amanda expressed gratitude: “Thank you to everyone who supported me during the 2019 CMP Long Range Matches. Everyone’s support and encouragement helped me along the way, fan club included. Especially, a huge shout out to past and present AMU members for pointing me in the right direction. When the moment of confusion happened I always knew who I could count on to get me back on track. So, Thank you to everyone on and off the range who was cheering me along!”
Amanda Helps Train Young Competitors
When Amanda is not shooting matches or practicing with the USAMU, she helps train new shooters. Here SSG Amanda Elsenboss offers pointers to a Liberty University Service Rifle shooter at a CMP Small Arms Firing School (SAFS). Amanda Elsenboss hails from Woodbury, Connecticut and holds the military occupational specialty of small arms repairer. Elsenboss started shooting when she was 13, and soon became an avid rifle competitor. She now serves as a shooter/instructor on the USAMU Service Rifle Team.
Video Interview with SSG Amanda Elsenboss
This video, featuring SSG Amanda Elsenboss, was created by the USAMU to mark Women’s History Month. Amanda talks about her career in the military, and her love of competitive shooting. This is a great video, well worth watching. There are images from many shooting ranges around the nation.
SSG Amanda Elsenboss. CLICK Speaker Icon to Hear Sound!
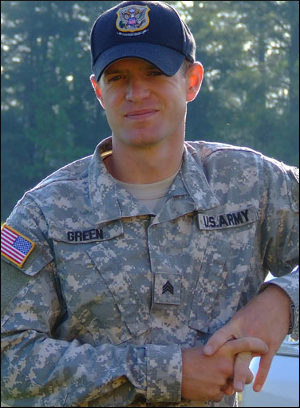
The U.S. Army Marksmanship Unit (USAMU) has produced an excellent series of videos, which collectively cover the Basic Rifleman’s Course. If you are getting started in High Power shooting, or want to improve your position shooting skills, this series is well worth watching. And these videos are not just for service rifle shooters — even bench shooters can benefit from these videos, particularly Part 5, which explains how to estimate wind speed and direction. The lead instructor for these videos is SFC Brandon Green, the reigning National High Power Champion, and Service Rifle Champion at the 2017 CMP Trophy Matches. When SFC Green talks, you should listen.
SFC Brandon Green is a shooting superstar. Green won his third NRA National High Power Rifle Championship in 2018 at Camp Atterbury, Indiana. He dominated the HP Championship cycle, finishing eight points and ten Xs ahead of his nearest competitor. Brandon also won High Power National Championships in 2015 and 2013. And in 2017 he set new records at the CMP’s National Trophy Matches at Camp Perry. One of the greatest marksmen in the nation’s history, SFC Green has no weaknesses, excelling at all positions, both rapid-fire and slow-fire.
Part 5 — Wind and Weather Estimation (Very Useful for All Shooters)
Note: This video includes a hit location “target analysis” in the first 6 minutes.
Part 4 — Minute of Angle Explained
Part 3 — Ballistics and Zeroing
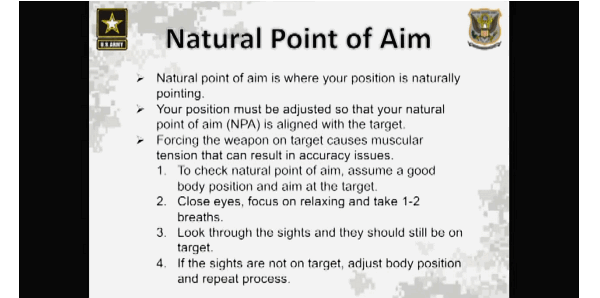
Part 2 — Positions, Sight Alignment, and Natural Point of Aim (Very Useful)
Part 1 — Aiming and Sight Picture
Three-time National High Power Champion SFC Brandon Green (left above) set four new National Records at Camp Perry in 2017.
This article, in longer form, appears on the USAMU Facebook page, as part of the “Handloading Hump Day Series”. This article explores three different “Philosophies” of precision reloading. Some handloaders seek to produce ammo that yields the very tightest groups (without factoring in the wind). Other shooters load their ammo to deliver the highest safe velocity. That’s because a projectile launched at higher velocity will drift less in the wind. The theory is that even if fast ammo doesn’t produce the tightest groups in zero wind conditions, it will yield higher scores in a the real world (where the wind blows). Lastly, some handloaders favor ammo that is ultra-consistent across a wide temperature range. This last philosophy dictates selection of a powder that is temp-insensitive, even if it may not produce the very best raw accuracy (or speed).
What’s Your Handloading Philosophy?
Objectives of Reloading — Accuracy, Velocity, Temp Stability What do you, the reader, primarily value in your handloads?
Viewpoint ONE: Accuracy Trumps Everything
Some shooters prize consistent, excellent medium/long range accuracy enough that they’re willing to give up some extra velocity (and reduced wind deflection) to obtain that. Their underlying philosophy could be stated: “Superior accuracy is present for every shot, but the wind isn’t”. One’s ability to hold well, aim well and read the wind are all factors in making this type decision. The photo below shows stellar raw accuracy. This is an 0.67″, 10-shot group at 300-yards fired from a text fixture. The group measures just 0.67″. (This shows the USAMU’s 600-yard load with 75gr bullets).
Viewpoint TWO: Load to Highest Safe Velocity for Less Wind Drift
Some shooters value obtaining the highest safe velocity, even if one’s pure, consistent mechanical accuracy at medium/long range isn’t quite as brilliant. The theory here seems to be that a really good hold extracts as much mechanical accuracy from the rifle/ammo as possible, and faster bullets equal occasional “bonus” points snatched from the jaws of wind.
[For example] one of the USAMU’s many Service Rifle National Champions revealed his philosophy. It can be stated thus: a super-accurate, but [relatively] “slow” load “required him to have a Ph.D. in wind reading for every shot, while a faster, but less accurate load netted him more points.”
Note — this was not mere speculation; his score book data backed up his claims, due to less wind effects. Remember, however, this fellow has a consistent, National Championship-level hold, and other Champions on the same team would have opted differently.
Viewpoint THREE: Temperature Stability Is Key
Still another approach is to place heavy emphasis on fine accuracy with absolute stability in changing temperatures. When this writer was actively earning his Distinguished Rifleman badge, that was his goal. The reason? Sighting shots are not allowed in EIC (“Leg”) matches. The first shot out of the barrel was for score. It had to be 100% consistent, with very reliable, predictable elevation and wind deflection regardless of the ambient temperature — even if it wasn’t the lowest wind deflection possible.
Naturally, selecting a powder that is insensitive to temperature changes is a key element here. Elevation zeros and wind effects HAD to be consistent every time. Hunters and military snipers might be among those who fall into this camp, as well as those in pursuit of their Distinguished Rifleman badges.
Contrast that with a traditional High Power shooter who gets two sighter shots before each event (offhand, sitting rapid, prone rapid, prone slow fire.) If there is a zero change on any given day, he/she can correct during sighters. This writer well remembers talking with another very high-level Service Rifle competitor who was happy to have high temperatures boost the velocities of his ammunition above their usual level… As far as this SR competitor was concerned, 60-80 fps more velocity -– even if only due to high ambient temperatures -– meant less wind deflection, and he was mighty happy to have it.
Particularly in the summer, with hot daily conditions, you need to be concerned about temperature stability. Loads worked up in winter may not work in the summer time.
This article has been confined to NRA High Power Rifle competition, which has relatively generous 10-ring dimensions in relation to the accuracy of well-built competition rifles. Hopefully, it will provide food for thought. For some, this might be an opportunity to ensure that one’s load development approach helps them attain their desired results.
Emil Praslick III is widely recognized as one of the greatest wind wizards on the planet — a master at identifying wind value and direction, and predicting wind cycles. As coach of the USAMU and top civilian teams, Emil has helped win many high-level championships. In the three videos we feature today, Emil, who works with Capstone Precision Group (Berger, Lapua, SK, Vihtavuori) and Team Applied Ballistics, explains how to determine wind direction and velocity using a variety of indicators. Praslick, now retired from the U.S. Army, was an 18-time National and 2-time World Champion coach with the USAMU.
Video ONE: Wind Theory Basics — Understanding “Wind Values”
In this video from UltimateReloader.com, Emil explains the basics of modern wind theory. To properly understand the effect of the wind you need to know both the velocity of the wind and its angle. The combination of those variables translates to the wind value. Emil also explains that the wind value may not be constant — it can cycle both in speed and velocity. Emil also explains some of the environmental conditions such as mirage that can reveal wind conditions.
Video TWO: Determining the Direction of the Wind
Key Point in Video — Find the Boil
Emil explains how to determine wind direction using optic. The method is to use spotting scope, riflescope, or binoculars to look for the “Boil” — the condition in mirage when the light waves rising straight up. The wind will generate that straight-up, vertical boil in your optics when it is blowing directly at you, or directly from your rear. To identify this, traverse your scope or optics until you see the boil running straight up. When you see that vertical boil, the direction your optic is pointing is aligned with the wind flow (either blowing towards you or from directly behind you).
Video THREE: The No Wind Zero Setting
In this second video, Emil defines the “No-Wind Zero”, and explains why competitive shooters must understand the no-wind zero and have their sights or optics set for a no-wind zero starting point before heading to a match. In order to hit your target, after determining wind speed and direction, says Emil, “you have to have your scope setting dialed to ‘no wind zero’ first.”
Coach of Champions — Emil Praslick III
SFC Emil Praslick III, (U.S. Army, retired) works with Berger Bullets and Applied Ballistics. Emil served as the Head Coach of the U.S. National Long Range Rifle Team and Head Coach of the USAMU for several years. Teams coached by Emil have won 33 Inter-Service Rifle Championships. On top of that, teams he coached set 18 National records and 2 World Records. Overall, in the role of coach, Praslick can be credited with the most team wins of any coach in U.S. Military history.
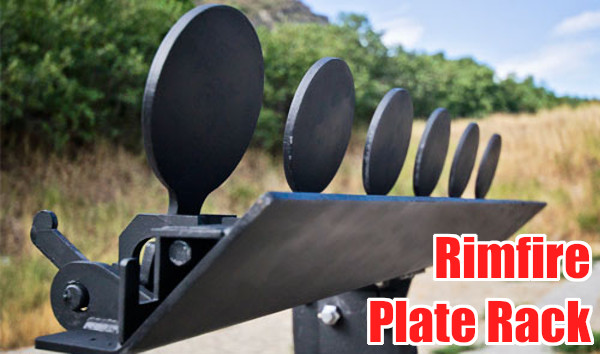
The Action Target Sport Plate Rack is specifically designed for .22 LR Rimfire shooting. This rack features six 4″-diameter plates that reset with a provided cable.
Shooting plates is fun. You get immediate feedback — “instant gratification” when you make a hit. When shooting steel inside 100 yards, we like to use .22 LR rimfire guns. The ammo is inexpensive, noise levels are lower (though you still need ear protection), and at close ranges there are fewer issue with ricochets and bullet splash-back. Additionally, for busy folks who don’t have time to reload, you can pick up a .22 LR rifle or pistol, grab a couple $5 boxes of ammo, and get to the range in a few minutes. The convenience means it is easier to shoot every week if you like.
SFC Joel Turner from the USAMU’s Action Shooting Team offers a few pointers on how to shoot plates quickly and accurately. He’s using a centerfire pistol, but the same principles apply for rimfire handguns. Click speaker icon to activate audio.
New .22 LR CP33 Pistol is Great for Plates
If you like shooting plates, one of the better new handguns for the job is Kel-Tec’s CP33. We tested this interesting handgun at the 2019 SHOT Show Media Day at the Range, and were impressed. The pistol is big, but balances well. The sights are easy to see, and the full-length rail lets you easily mount a variety of optics. The trigger is surprisingly good — better than 90% of rimfire handguns out there. For the plates game, this “quad-stack” gun can handle long stages without mag changes. The standard clear-sided CP33 magazine holds 33 rounds of .22 LR ammo.
If you are interested in an affordable, but very accurate, high-capacity semi-auto rimfire pistol you should consider Kel-Tec’s new CP33. Shooting Sports USA (SSUSA) notes: “The rapid growth of rimfire competition in Steel Challenge has prompted some gun makers to enter the fray. Kel-Tec is one, and their new CP33 .22 LR pistol has a lot of potential.” Watch 22 Plinkster’s video review below. He reports: “This handgun has been 100% reliable IF I load the magazine the right way… and it’s pretty dog-gone accurate.”
SSUSA’s testers tried the pistol with a variety of ammo and it consistently shot about one-half-inch for five shots “from a 25-yard sandbag bench rest using the iron sights.” SSUSA noted that the gun disassembles quickly and easily by removing one central pin. That’s a nice feature.
Overall SSUSA’s tester, Chris Christian, was impressed with the gun, saying it balanced well and the sights aligned naturally: “…the neutral-balance-point grip produced an almost instinctive sight alignment.”
Christian used the CP33 in a 6-stage Steel Challenge Match, and did well: “I decided to shoot Rimfire Pistol Iron (RFPI) and used the CCI Mini-Mag. The high-speed ammo ran perfectly. [T]he bright sights and handling qualities let me finish top among iron-sight shooters and even hold my own with C and B class rimfire pistol shooters using optical sights. It would be interesting to put a reflex sight on the gun, and maybe even shoot some Bullseye with it.”
The competition was founded in 1981 by Mike Dalton and Mike Fichman, in Southern California. The two Mikes wanted an exciting alternative to paper targets and came up with the all-steel format. The Steel Challenge World Speed Shooting Championships have grown to one of the largest professional pistol competitions in America. In 2018, hundredes of competitors from the United States and around the world competed at the Talladega Marksmanship Park for glory and huge cash prizes. The Steel Challenge is governed by the Steel Challenge Shooting Association (SCSA) that consists of eight standardized stages with three types of steel targets: small circle, big circle, and square. Here is a steel challenge layout in Germany.
Steel Challenge is similar to IPSC, but has simpler rules and more consistent stage designs. Up until 2011 the annual Steel Challenge World Championship was held in Piru, California every year. Then, as renamed the World Speed Shooting Championships (WSSC), the Championship was held in Frostproof, Florida (2012, 2013), St. George, Utah (2014), San Luis Obispo, California (2015-2017), and Talladega, Alabama (2018, 2019). There are also over 100 Steel Challenge Regional Matches held around the country.
This Video Shows the Steel Challenge Rimfire Rifle Optics Divison. These guys are FAST!
SFC Brandon Green is a shooting superstar. Green won his third NRA National High Power Rifle Championship last year at Camp Atterbury. He dominated the HP Championship cycle, finishing eight points and ten Xs ahead of his nearest competitor. Brandon also won the High Power National Championship in 2015 and 2013. And in 2017 he set a record at the CMP’s National Trophy Matches at Camp Perry. When he’s “on his game”, SFC Green is very hard to beat. He has no weaknesses, excelling at all positions, both rapid-fire and slow-fire.
Wicked Fast and Smooth…
Brandon Shoots Bolt Gun, Rapid-Fire
In this remarkable video, Brandon shows why he is tough to beat in rapid-fire. Using a Tubb 2000 bolt-action target rifle, Green displays amazing speed working the bolt and then immediately recapturing a rock-steady hold. Our reaction when viewing this video was: “Wow… this guy is beyond good.” We think you’ll agree. Anyone who has shot prone with sling should appreciate the remarkable skills which make Brandon one of the USAMU’s top shooters. Watching this man in action is like watching Michael Jordan in his prime. You’re seeing one of the very best ever…
SFC Brandon Green — 300m Rapid Fire Prone Training with Tubb 2000:
SFC Green at World Shooting Championship — The Need for Speed
While he’s a master of serious Across the Course match rifle shooting, SFC Green also enjoys speed shooting events. And he’s no slouch. Here’s footage of SFC Green at the 2015 NRA World Shooting Championship (WSC) in West Virginia. Brandon shows some serious speed with the little semi-auto. Brandon’s comment was: “10/22s are just too much fun!”.
Watch SFC Brandon Green speed through a steel plates stage with a Ruger 10/22:
U.S. Army SGT Benjamin Cleland recently won the 2019 CMP Cup at the CMP Eastern Games in Camp Butner, North Carolina. And in taking that impressive victory, the USAMU’s Cleland set a new CMP Cup Record of 2389-133X.
The CMP Cup, a 3-day course of fire, includes four stages: 20 standing shots at 200 yards in 22 minutes; two series of sitting/kneeling 10 shots at 200 yards in 60 seconds; two series of 10 prone shots at 300 yards in 70 seconds; and then 20 prone shots at 600 yards in 22 minutes.
Cleland’s new Aggregate Record of 2389-133X beat out his own 2018 CMP Cup record of 2368-111X. What’s even more impressive, Cleland’s score tops the NRA Service Rifle Championship Record of 2386-128X, which the talented SGT Cleland himself set in 2018*.
More Great Performances by USAMU Shooters
SGT Cleland wasn’t the only USAMU hotshot at the Eastern CMP Games. Sgt. Jarrod McGaffic won the CMP Eastern Games’ EIC Match with a 491-21X. SFC Brandon Green won Silver at CMP Cup with a 3-day aggregate of 2385-118X. And SSG Amanda Elsenboss (below) finished as High Woman and 4th Overall in the CMP Eastern Games with a 2378-114X.
The CMP Cup and Eastern Games are shot on Electronic Targets with portable wireless monitors.
* The NRA lists a “Service” record of 2396-181 set in 2009 by SFC Sherri Gallagher. But that was with a Match Rifle. SGT Cleland now holds both the CMP Record and the NRA Record for this Course of Fire with an actual Service Rifle. The USAMU explains: “SFC Gallagher’s record was in a different class, or category: Match Rifle. But since she is military, it may have been labeled as a ‘service record’ and caused confusion. SGT Cleland’s records mentioned above were all in the Service Rifle class, or category. The 2389-133X is the new, 2019 CMP record for this course of fire. In 2018, at the same CMP course of fire, he set a record with his 2368-111X. So he broke his own CMP record this year. However, also in 2018, he set the NRA Rifle Championship record by shooting a 2386-128X. It’s the same course of fire but in an NRA match, so technically, a different “record” since CMP and NRA keep separate records.”
Efficient cartridges make excellent use of their available powder and case/bore capacity. They yield good ballistic performance with relatively little recoil and throat erosion.
Cartridge Efficiency: A Primer (pun intended!)by USAMU Staff
Each week, the U.S. Army Marksmanship Unit (USAMU) publishes a reloading article on its Facebook Page. In this week’s article, the USAMU discusses cartridge case efficiency and its benefits. While this is oriented primarily toward NRA High Power Rifle and Long Range (1000-yard) competition, these factors also apply to medium/big game hunters. Assuming one’s rifle and ammunition are accurate, key considerations include ballistic performance (i.e., resistance to wind effects, plus trajectory), recoil, and throat erosion/barrel life.
Efficient cartridges make excellent use of their available powder and case/bore capacity. They yield good ballistic performance with relatively little recoil and throat erosion. A classic example in the author’s experience involved a featherweight 7x57mm hunting/silhouette rifle. When loaded to modern-rifle pressures, just 43-44 grains of powder pushed a 139gr bullet at 2900 fps from its 22” barrel. Recoil in this light rifle was mild; it was very easy to shoot well, and its performance was superb.
An acquaintance chose a “do everything” 7mm Remington Magnum for use on medium game at short ranges. A larger, heavier rifle, it used ~65 grains of powder to achieve ~3200 fps with similar bullets — from its 26″ barrel. Recoil was higher, and he was sensitive to it, which hampered his shooting ability.
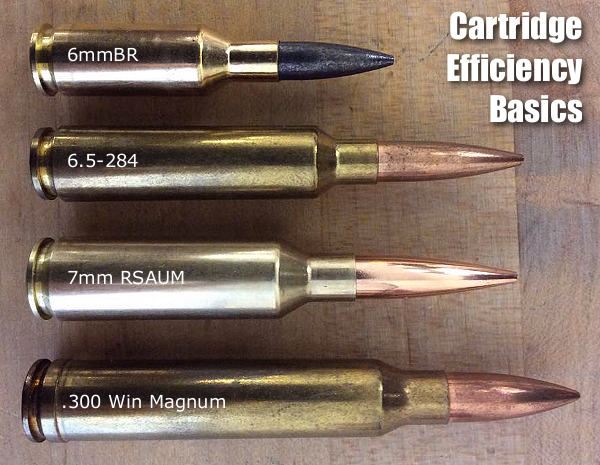
Similarly efficient calibers include the 6mm BR [Norma], and others. Today’s highly-efficient calibers, such as 6mm BR and a host of newer developments might use 28-30 grains of powder to launch a 105-107gr match bullet at speeds approaching the .243 Winchester. The .243 Win needs 40-45 grain charges at the same velocity.
Champion-level Long Range shooters need every ballistic edge feasible. They compete at a level where 1″ more or less drift in a wind change could make the difference between winning and losing. Shooters recognized this early on — the then-new .300 H&H Magnum quickly supplanted the .30-06 at the Wimbledon winner’s circle in the early days.
The .300 Winchester Magnum became popular, but its 190-220gr bullets had their work cut out for them once the 6.5-284 and its streamlined 140-142gr bullets arrived on the scene. The 6.5-284 gives superb accuracy and wind performance with about half the recoil of the big .30 magnums – albeit it is a known barrel-burner.
Currently, the 7mm Remington Short Action Ultra-Magnum (aka 7mm RSAUM), is giving stellar accuracy with cutting-edge, ~180 grain bullets, powder charges in the mid-50 grain range and velocities about 2800+ fps in long barrels. Beyond pure efficiency, the RSAUM’s modern, “short and fat” design helps ensure fine accuracy relative to older, longer cartridge designs of similar performance.
Recent design advances are yielding bullets with here-to-fore unheard-of ballistic efficiency; depending on the cartridge, they can make or break ones decision. Ballistic coefficients (“BC” — a numerical expression of a bullet’s ballistic efficiency) are soaring to new heights, and there are many exciting new avenues to explore.
The ideal choice [involves a careful] balancing act between bullet BCs, case capacity, velocity, barrel life, and recoil. But, as with new-car decisions, choosing can be half the fun!
Factors to Consider When Evaluating Cartridges
For competitive shooters… pristine accuracy and ballistic performance in the wind are critical. Flat trajectory benefits the hunter who may shoot at long, unknown distances (nowadays, range-finders help). However, this is of much less importance to competitors firing at known distances.
Recoil is an issue, particularly when one fires long strings during competition, and/or multiple strings in a day. Its effects are cumulative; cartridges with medium/heavy recoil can lead to shooter fatigue, disturbance of the shooting position and lower scores.
For hunters, who may only fire a few shots a year, recoil that does not induce flinching during sight-in, practice and hunting is a deciding factor. Depending on their game and ranges, etc., they may accept more recoil than the high-volume High Power or Long Range competitor.
Likewise, throat erosion/barrel life is important to competitive shooters, who fire thousands of rounds in practice and matches, vs. the medium/big game hunter. A cartridge that performs well ballistically with great accuracy, has long barrel life and low recoil is the competitive shooter’s ideal. For the hunter, other factors may weigh more heavily.
Cartridge Efficiency and Energy — Another Perspective
Lapua staffer Kevin Thomas explains that efficiency can be evaluated in terms of energy:
“Cartridge efficiency is pretty straight forward — energy in vs. energy out. Most modern single-based propellants run around 178-215 ft/lbs of energy per grain. These figures give the energy potential that you’re loading into the rifle. The resulting kinetic energy transferred to the bullet will give you the efficiency of the round. Most cases operate at around 20-25% efficiency. This is just another way to evaluate the potential of a given cartridge. There’s a big difference between this and simply looking at max velocities produced by various cartridges.”
Each Wednesday, the U.S. Army Marksmanship Unit (USAMU) publishes a reloading “how-to” article on the USAMU Facebook page. A while back, the USAMU’s reloading gurus addressed a question frequently asked by handloaders: “How much neck tension is optimal, and how should I select a neck bushing size?” The USAMU offers a straight-forward answer, suggesting that hand-loaders start with a neck bushing that sizes the neck so that it is .003″ less than the loaded outside diameter with bullet in place. From there, you can experiment with more or less tension, but this is a good starting point for many popular cartridge types.
Determining Optimal Case-Neck Tension
This week, we examine determining the correct case neck tension for optimum accuracy. Our method is simple, but relies on the use of case sizing dies which accept interchangeable neck diameter bushings graduated in 0.001″ increments. (Those readers using fixed-diameter dies with expander balls aren’t forgotten, however. Methods of tailoring these dies for proper neck tension will be found below.)
In our experience across many calibers, sizing case necks 0.003″ under the loaded-case neck diameter usually yields excellent accuracy. In other words, the sized case neck expands 0.003″ when the bullet is seated.
Bushing Choice for Optimal Sizing
Over the years, we have periodically experimented with increasing neck tension to possibly improve accuracy. In testing with machine rests at 300/600 yards, accuracy often deteriorated as neck tension increased; thus, 0.003″ expansion (from sized neck to loaded neck) is where we usually start.
Using the .260 Remington as an example, our loaded cartridge case necks measure 0.292”. Simply subtract 0.003” from that, and use a bushing that sizes necks to 0.289” (after springback). There are exceptions — sometimes, brass may be a bit soft or hard. Some case necks might need, say, 0.001” more tension, but in general, this works well.
This .003″ standard of neck tension works very well for single-loaded, long range cartridges. Depending on your caliber and firearm, it MAY also work very well for magazine-fed cartridges. If this neck tension proves inadequate for your purpose, one can increase neck tension as needed while monitoring for possible accuracy changes.
Special Considerations for Coated Bullets: If you are using moly-coated bullets, this significantly reduces the “grip” of the case neck on the bullet, and you can expect to have to tighten your case necks accordingly — particularly for magazine-fed ammunition. In any event, we do not crimp rifle cartridges, and advise against it for accuracy handloads.
Tips for Using Expander Balls
Many savvy handloaders avoid the use of expander balls in high-accuracy reloading, if possible. These can stretch cases and/or disturb the concentricity of the case neck vs. case body. If using a die with an expander ball, tapering both ends of the ball and polishing it to a mirror finish can significantly reduce these effects. (Special carbide expander ball/decapping stem sets are available for this as well.)
The typical dies used with expander balls are intended to take any cases the user may find, and size them down well below the ideal “spec” to ensure any cases will give good neck tension. The necks are then expanded up to provide heavy to medium neck tension as the expander ball exits the neck. The brass is over-worked, leading to premature work-hardening, and seated-bullet concentricity may suffer. However, the cartridges produced are perfectly adequate for most handloaders. Those who seek finest accuracy generally prefer not to over-work their brass if possible.
Another Option — Custom-Honed FL Dies
There are companies which offer to convert one’s standard dies to accept neck bushings, and that gives excellent flexibility. Another, more “old-school” approach, is to have the neck of one’s FL die honed out to the desired diameter for sizing, based on one’s case neck thickness. The expander ball may then be reduced until it barely touches the case necks after sizing, or it may be eliminated entirely. However, once performed, this modification is permanent and leaves fewer options than the bushing route, if one later changes case neck thickness.
Those shooters who turn their case necks for optimum neck wall thickness uniformity, or for a tight-neck chamber, will want to take the reduced neck wall thickness into consideration. For example, when setting up a 7mm match rifle to use a standard hunting die without an expander ball, the slightly thinner necks resulted in a perfect 0.003″ reduction in the fired-neck diameter. The result was a low-cost die that fit with custom precision and yielded excellent, match accuracy!


 Use Consistent Brass


 SFC Brandon Green is a shooting superstar. Green won his third NRA National High Power Rifle Championship last year at Camp Atterbury. He dominated the HP Championship cycle, finishing eight points and ten Xs ahead of his nearest competitor. Brandon also won the High Power National Championship in 2015 and 2013. And in 2017 he set a record at the CMP’s National Trophy Matches at Camp Perry. When he’s “on his game”, SFC Green is very hard to beat. He has no weaknesses, excelling at all positions, both rapid-fire and slow-fire.


 Bushing Choice for Optimal Sizing


