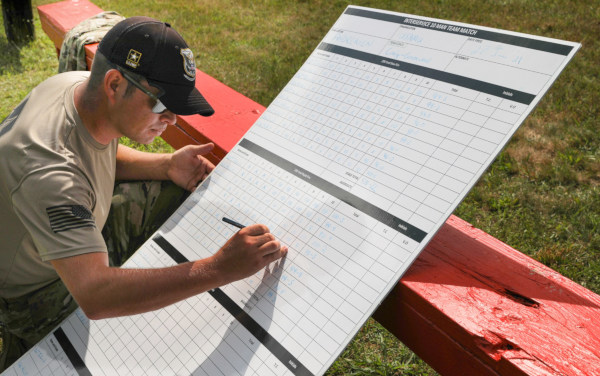
SFC Brandon Green Fires 2023 First Shot at Camp Perry Matches
The First Shot Ceremony for the 2023 Camp Perry National Matches took place July 10, 2023. The star of the show was Sergeant First Class (SFC) Brandon Green of the USAMU, one of the greatest marksmen in American history. Brandon delivered a speech and kicked off the competition with the First Shot (see above), taken with a famed Winchester Model 70 used by Gary Anderson 51 years ago.
SFC Green is truly one of the greatest shooters on the planet. His record in major competitions is truly remarkable. Green has won three NRA National High Power Championships, and in winning the 2022 NRA Long Range Championship, Brandon became the first person in history to win all four individual matches in the series: the Wimbledon Cup, the Mustin Trophy, the Leech Cup, and the Remington Band of Brothers Trophy. Green, from Box Springs, Georgia, is the first shooter to accomplish this feat in the history of the National Trophies, spanning more than a century of championship rifle competition. In addition, Green has won the Interservice Long Range championships five times and the Interservice Individual Championship four times.
SFC Brandon Green Fires Cannon at Conclusion of First Shot Ceremony
CLICK HERE for gallery of photos from 2023 First Shot Ceremony at Camp Perry.
Green has had a stellar marksmanship career. First Shot Ceremony Emcee and CMP Programs Chief, Christie Sewell noted: “His historic 2018 shooting season finished with Brandon earning four individual national records, capturing his first President’s 100 Match win in dramatic fashion. He set a new national record – a perfect score of 400, with a 20 ‘X’ count. That year he also won his third National Trophy Individual championship and third Mountain Man Trophy, setting a new national record.”
Green Fires First Shot with Gary Anderson’s Famed Winchester Model 70
Green was given the opportunity to choose his gun for the ceremonial first shot, so he chose the bolt-action Winchester Model 70 that Director Emeritus of Civilian Marksmanship, Gary Anderson, used in 1972 to set the only perfect 200-yard standing slow-fire score at the National Matches. “To shoot it was absolutely a huge honor,” Green said. “I was shooting a piece of history.”
The gun’s story begins long before that historic shot. “This gun plays a special role in the history of marksmanship,” said Anderson. “It started as my dad’s rifle and was converted to a match rifle. In 2019, I used it to shoot the first shot, so it’s been here at the First Shot Ceremony a couple times.”
Brandon Green Joins Rimfire Match before First Shot Ceremony
Green, a 20-year member of the U.S. Army Marksmanship unit, arrived at Camp Perry a few days ahead of the rest of his USAMU teammates. SFC Green wanted a few days, he said, to collect his thoughts and prepare the First Shot Ceremony speech he would deliver to the hundreds of people attending the event. But he got sidetracked. As he walked across the Petrarca Range parking lot, he stopped to watch men and women compete in the Smallbore Prone Iron Sight Championship and to talk to CMP Smallbore Program Manager Brad Donoho.
“I told Brad it looked fun and said I’ll have to find a rifle,” Green said. “Brad said I’ve got a guy who has an extra rifle. I borrowed a gun and borrowed ammo and had a lot of fun.”
Members of Congress and CMP Chairman/CEO Attend First Shot Ceremony
The July 10 First Shot ceremony was attended by hundreds of marksmen, National Matches competitors, and dignitaries in the legislative, marksmanship, and military worlds. Guest speakers were Congresswoman Marcy Kaptur (Ohio); Congressman Bob Latta (Ohio); Major General John C. Harris Jr.; and Gerald O’Keefe, Chairman of the Board and Chief Executive Officer of the Civilian Marksmanship Program. O’Keefe talked about the impact the National Matches’ long history has made on marksmanship, and he said the CMP is committed to carrying that impact into the future.
Emil Praslick III is widely recognized as one of the greatest wind wizards on the planet — a master at identifying wind value and direction, and predicting wind cycles. As coach of the USAMU and top civilian teams, Emil has helped win many high-level championships. In the three videos we feature today, Emil, who works with Capstone Precision Group (Berger, Lapua, SK, Vihtavuori) and Team Applied Ballistics, explains how to determine wind direction and velocity using a variety of indicators. Praslick, now retired from the U.S. Army, was an 18-time National and 2-time World Champion coach with the USAMU.
Video ONE: Wind Theory Basics — Understanding “Wind Values”
In this video from UltimateReloader.com, Emil explains the basics of modern wind theory. To properly understand the effect of the wind you need to know both the velocity of the wind and its angle. The combination of those variables translates to the wind value. Emil also explains that the wind value may not be constant — it can cycle both in speed and velocity. Emil also explains some of the environmental conditions such as mirage that can reveal wind conditions.
Video TWO: Determining the Direction of the Wind
Key Point in Video — Find the Boil
Emil explains how to determine wind direction using optic. The method is to use spotting scope, riflescope, or binoculars to look for the “Boil” — the condition in mirage when the light waves rising straight up. The wind will generate that straight-up, vertical boil in your optics when it is blowing directly at you, or directly from your rear. To identify this, traverse your scope or optics until you see the boil running straight up. When you see that vertical boil, the direction your optic is pointing is aligned with the wind flow (either blowing towards you or from directly behind you).
Video THREE: The No Wind Zero Setting
In this second video, Emil defines the “No-Wind Zero”, and explains why competitive shooters must understand the no-wind zero and have their sights or optics set for a no-wind zero starting point before heading to a match. In order to hit your target, after determining wind speed and direction, says Emil, “you have to have your scope setting dialed to ‘no wind zero’ first.”
Coach of Champions — Emil Praslick III
SFC Emil Praslick III, (U.S. Army, retired) works with Berger Bullets and Applied Ballistics. Emil served as the Head Coach of the U.S. National Long Range Rifle Team and Head Coach of the USAMU for several years. Teams coached by Emil have won 33 Inter-Service Rifle Championships. On top of that, teams he coached set 18 National records and 2 World Records. Overall, in the role of coach, Praslick can be credited with the most team wins of any coach in U.S. Military history.
The Civilian Marksmanship Program (CMP) is privileged to announce the 2023 National Matches First Shot Speaker will be renowned rifle marksman Sergeant First Class (SFC) Brandon Green. After being part of the U.S. Army Marksmanship Unit (USAMU) since 2004, Green has announced his retirement in 2023 — making this year’s National Matches his last in uniform.
SFC Green is a shooting superstar — one of the most talented riflemen on the planet. He is a multi-time High Power Rifle National Champion. SFC Green was the 2022 Overall Long Range Champion, and he won every other major individual NRA Long Range Trophy in 2022 — something never done before. With this truly dominant Long Range performance, along with his three previous National High Power Championships, Green has established himself as one of the greatest American marksmen who has ever lived.
In 2022, Green was the first shooter to sweep ALL FOUR NRA Long Range Championship events. Green is also a 5-time champion of the Interservice Long Range Championships.
With the USAMU, he has been an integral part of multiple record-setting teams in both service rifle and long range rifle and has acted as the lead instructor of the unit’s Marksmanship Training courses. Green also served as Team Chief for the USAMU Service Rifle Team until 2022.
SFC Brandon Green Marksmanship Highlights
SFC Brandon Green is a multi-time Service Rifle National Champion. At the National Matches in 2017, Green fired a record score of 499-30X during the National Trophy Individual (NTI) event. He went on to earn the Mountain Man title, setting a national record score, beating the score the following year for a new record of 1296-83X that still stands today. Additionally, in 2017, he earned the championship title during the CMP’s inaugural 2400 Aggregate Rifle event during the National Matches High Power rifle series.
Green is a three-time winner of the Mountain Man Trophy, awarded to the highest aggregate score in the President’s Rifle, NTI, and National Trophy Team (NTT) matches, and is a three-time winner of the NTI itself, among several other individual National Trophy wins and records.
SFC Brandon Green — 300m Rapid Fire Prone Training with Tubb 2000: You’ll be amazed at how quickly and smoothly SFC Green cycles this bolt-action rifle.
Greene Shoots Perfect Score at President’s 100
At the 2018 National Matches, Green fired a new national record for the prestigious President’s 100 Match, shooting a perfect score of 400-20X while winning the match. No other competitor had ever achieved a perfect score in the President’s 100 match since the event began (in its current form) in 1894.
SFC Green’s Military Accolades
Green has earned many military accolades, including being named Soldier of the Year by the Military Marksmanship Association in 2013. Along with his marksmanship honors, his military awards include the Meritorious Service Medal (3), Army Commendation Medal (2), Army Achievement Medals (4), Good Conduct Medal, Afghanistan Campaign Medal, National Defense Service Medal, Global War on Terrorism Service Medal, Noncommissioned Officers Professional Development Ribbon and the Army Service Ribbon.
About the First Shot Ceremony at Camp Perry
Each year, the First Shot Ceremony serves as a welcoming event for the National Rifle and Pistol Matches at the Camp Perry National Guard Training Facility. The National Matches attract the nation’s top rifle and pistol shooters for a month of competitions.
The 2023 First Shot Ceremony takes place Monday, July 10, at 4:30 p.m. on the grounds of Camp Perry. SFC Green will speak and make the traditional First Shot to officially open the National Matches. Green will be firing the M70 bolt rifle once used by DCM Emeritus and two-time Olympic Gold Medalist, Gary Anderson, to shoot the National Matches 200-yard standing record in 1971.
Here are Cadets Hayle and Jesse Mayer, from the Texas A&M Reserve Officers’ Training Corps (ROTC), at the 2023 U.S. Army Small Arms Championships at Fort Benning, Georgia in March 2023. The annual, live fire training event is open to Army ROTC cadets and all soldiers in the active duty, Army Reserve, and National Guard, and is therefore commonly called the ‘All Army’. CLICK HERE to Read Full Story on USAMU website. (Photo by Lt. Col. Michelle Lunato.)
Cadet Sisters Compete at the U.S. Army Small Arms Championships Story by Lt. Col. Michelle Lunato U.S. Army Marksmanship Unit
This year’s U.S. Army Small Arms Championships was more than just a unique training event for two Texas A&M ROTC cadets, it was a family affair. Cadets Hayle Mayer and Jesse Mayer, who are sisters, participated in the week-long, comprehensive, live-fire marksmanship training event that brings together more than 250 soldiers from across the U.S. Army to the Maneuver Center of Excellence.
The annual event, which is commonly called the “All Army”, is hosted by the U.S. Army Marksmanship Unit (USAMU) and begins with All Army competitors receiving a variety of classes from the USAMU champions and experienced trainers.
After that, the soldier competitors, who were a mix of service members from active duty, Reserve, National Guard, and ROTC, competed in 11 different courses of fire during the week … both rifle and pistol matches, with and without combat gear, as well a 4-stage multi-gun match.
As a senior, All Army 2023 was Jesse’s second year to compete and the cadet said each year has been extremely helpful in developing her soldier skills. “I think both times that I have come here, I have really grown as a marksman … just learning the basics, what I am capable of, watching improvement each year, and just learning how complex marksmanship is. It’s been really incredible each time.”
For her sophomore sister, Hayle, it was her first All Army experience. With limited prior marksmanship experience … Hayle said she was trying to absorb all that she could. “I am just learning basically everything you can about shooting.”
Cadet Hayle Mayer, with Texas A&M ROTC, competes in the Bullseye Pistol Match at the 2023 U.S. Army Small Arms Championships at Fort Benning, Georgia.
Sisters Come from a Multi-Generation Military Family
Though Hayle and Jesse may at be different levels of marksmanship knowledge, the sisters say that military life in general is nothing new to them. In fact, they were born into that life since both their parents were Marines, both grandfathers were soldiers, and a grandmother was an Airman.
That meant that military life was just always there. It’s what we saw and respected, Jesse explained. “Everyone was so disciplined and so patriotic. There was just such a higher purpose to the military that I always saw, and I wanted to be part of that.”
So when it came time for college, joining an Army ROTC program was nothing out of the ordinary because both our parents instilled a strong sense of independence and strength in us, Jesse said.
“Growing up, I watched it — the honor, the sacrifice, and what it meant to give back and serve other people, your Country and your family.”
With all that, Jesse is proud to say that she is contracted to commission in May of 2024 and looks forward to carrying on her family’s tradition of service.
“It means a lot to me to serve my Country, to push myself in any way that I can, and it is part of a family legacy — being in the military — and I just want to complete that and do that for my family.”
Each summer for the past 100 years, the nation’s top Service Rifle Teams have competed in National Trophy Infantry Team (NTIT) Match at Camp Perry, Ohio. In this match, known informally as the “Rattle Battle”, six-member teams shoot at 200, 300, 500 and 600 yards with time limits — 384 rounds total. To win this match, the six shooters must work like a finely-tuned machine. This is a popular match with spectators as there is plenty of action in a short time span.
The National Trophy Infantry Team Match (NTIT) was first fired in 1922. Only four civilian teams have ever won the prestigious Infantry Trophy that goes to the winner of this match. The first civilian team to win this honor (we are told) was the Massachusetts Team in 1929 followed by a Nebraska Civilian Team in 1930. Seventy-nine years later, in 2009, the California Grizzlies Junior Team won the Infantry Trophy.
The Infantry Trophy Team Match is a unique event where scoring is based on how many hits six-person teams, which begin the match with 384 rounds of ammunition, can score on banks of eight silhouette targets at distances of 600, 500, 300 and 200 yards during 50-second firing periods. The NTIT is sometimes called the “Rattle Battle” because it requires firing, moving to the next firing point with all gear in tow. The match emphasizes extremely fast, accurate fire and good communication among teammates. CLICK HERE for more information.
This video shows the winning 2011 NTIT team at Camp Perry. Six USAMU shooters started with a combined load of 384 rounds to be fired at 8 targets from 600 and 500 yards prone, then 300 yards seated, and finally 200 yards standing.
For the past two years (2021 and 2022) the USAMU-Greenwood Team has won the title with a 1431 score in 2021 and 1344 in 2021. The record team score for this match is 1466, set by the USAMU-Remily Team in 1996. For more information about this great team event, read Unraveling the Mystery of the Rattle Battle on the Shooting Sports USA website.
The National Trophy Infantry Team Match (NTIT) was first fired in 1922 and has been part of the the CMP’s annual National Rifle Matches at Camp Perry. The NTIT is called the “Rattle Battle” because it emphasizes extremely fast, accurate fire.
Our friend Grant U., who runs the Precision Shooting Journal on Facebook, says the NTIT is a special match, a real “crowd-pleaser: “The National Trophy Infantry Team Match (Rattle Battle)… was always one of my favorite team events. It takes a hell of a lot more planning, practice, and precision than one might expect. You get one shot at it and the entire team had better be running on all cylinders because there are no alibis. Each team of six shooters is allocated 384 rounds and when the teams fire at 600 and 500 yards, it sounds like a war.”
SFC Brandon Green, one of the nation’s finest marksmen, won the 2018 NRA High Power Rifle Championship at Camp Atterbury, Indiana.
PHOTOS courtesy U.S. Army Marksmanship Unit. U.S. Army photos by Michelle Lunato/released. See more on USAMU Facebook Page.
The U.S. Army Marksmanship Unit (USAMU) has created a series of instructional videos about High Power Rifle shooting, Service Rifle shooting, 3-Gun matches, and pistol competition. We’ve linked five of these informative USAMU videos today along with a special profile video on Amanda Elsenboss, who, as a USAMU shooter, has won both the Long Range and High Power National Championships in recent years.
In addition, as a major BONUS, we link twenty (20) informative articles authored by expert USAMU shooters and coaches. Those excellent, detailed articles covering a wide range of topics including rifle positions, wind reading, fitness training, trigger control, nutrition, training plans, and much more.
Amanda Elsenboss — National HP and Long Range Champion
The gifted SSG Amanda Elsenboss won the 2019 NRA Long-Range Championship and the 2021 High Power National Championship. In 2022 Amanda also won the National President’s Rifle Match, the first woman ever to do so. Those accomplishments place Amanda among America’s legendary shooters. Amanda started shooting at age 8 with her father, then began competitive marksmanship at age 13. In 2009, she joined the U.S. Army as part of the USAMU rifle team. She has left full-time service, but is now a member of the Pennsylvania National Guard.
Sight Alignment and Trigger Control
In this USAMU Shooter’s Corner instructional video, SFC Kenneth Rose explains key elements of using sights on a service rifle. Rose also explain how to make the trigger pull at the optimum moment when the sights are perfectly aligned and steady.
How to Set Up Sling and Rifle for Prone Shooting
In this video, the USAMU’s SGT Jonathan Wannemacher explains how to set up a service rifle sling for prone rifle shooting. Wannemacher has earned a number of coveted awards including the the Distinguished Rifleman Badge and President’s Hundred Tab.
Rifle Grip, Stance, and Body Position for 3-Gun Action Matches
SFC Daniel Horner, now with SIG Sauer, is arguably the best 3-Gun action shooter on the planet. Horner has won multiple major 3-Gun Championships, shooting rifle, shotgun, and pistol in timed action matches. Horner’s speed, accuracy, and mobility is without peer. In this video, Horner shows techniques for AR-type rifle shooting in 3-Gun competition.
Amazing Trick Shot with Air Rifle
In this Trick Shot Tuesday video SPC Ivan Roe shoots a pill (at two different angles) off the top of a balloon. Very impressive shooting! Ivan hails from Manhattan, Montana and has been a notable member of the USAMU International Rifle Team.
How to Use Data Books During Matches
Data books can be very valuable tools during marksmanship training. In this video, USAMU shooter SGT Lane Ichord explains Data Book basics and how to log information during practice and matches.
BONUS: 20 Marksmanship Articles from USAMU Experts
USAMU shooters and coaches have written an excellent series of articles on highpower and service rifle shooting. Many of these originally appeared in The First Shot, the CMP’s on-line magazine. Here are twenty notable USAMU expert articles:
On Wednesdays, the U.S. Army Marksmanship Unit often publishes a reloading “how-to” article on the USAMU Facebook page. One “Handloading Hump Day” post covered bore-cleaning, specifically the use of pull-through style bore-snakes. Visit the USAMU Facebook page each Wednesday for other helpful tips.
Today, we’ll shift from handloading to rifle bore cleaning and maintenance, with information courtesy of the USAMU’s Custom Firearms Shop. We recently had some inquiries about bore cleaning, and this seems a good opportunity to share. After all, even the best handloads won’t yield their full potential in a poorly-cleaned and maintained rifle.
NOTE: Hoppes claims a trademark on the term “BoreSnake” (one word, no hyphen). For this article, the USAMU has used the term in hyphenated form, two words. We believe the USAMU is referring to a Hoppes Brand Boresnake, not a different bore cleaning rope.
BORE-SNAKES: MIRACLE REPLACEMENT FOR THE CLEANING ROD?
The experiences of both our firearms test specialist and this writer have given no evidence that proper use of a clean bore-snake will damage a match barrel. Of course, one does not pull the bore-snake at an angle to the crown when removing it — pull it straight out, parallel to the bore’s direction, to prevent crown wear over time.
Bore-snakes are very useful for some applications (primarily a hasty, interim wipe-down). In [my] experience they cannot replace a thorough cleaning with a proper rod and brushes. While the experiment cited here involves rimfire, it may help illustrate. Several years ago, the writer used his new, personal Anschutz to investigate the bore-snake issue. It had been fired ~350 rds with match ammo and had had 3 typical rod/brush cleanings.
Next, starting with a clean bore, the writer fired 300 more rounds without cleaning in order to build up a “worst-case” fouling condition. Afterwards, the writer examined the bore with a Hawkeye bore scope. There was a uniform, grey film down the entire barrel, with some small, intermittent lead build-up at and just forward of the throat.
Some bore-cleaning rope products feature separate, detachable bronze brush and bore mop segments. This allows more usage options (e.g. mop only), and makes it easier to clean the brush elements:
A new bore-snake was then wet with solvent and pulled through the bore. The Hawkeye revealed that the grey fouling was gone, and much of the visible fouling at the throat was reduced. However, nine more passes with the bore-snake, checking after each with the Hawkeye, revealed no further improvement in cleaning. The writer then cleaned with two wet patches, observed, then one stroke of a new, wet bronze brush, and one wet patch to clean out residue.
The Hawkeye showed a significant reduction in fouling at the throat; it was virtually gone. A second pass with a wet bronze brush and a wet patch removed the remaining fouling. Scrubbing the bore further, checking to see how much fouling was removed, revealed no significant improvement. The reason for this test was to learn what’s needed to get (and keep) this Anschutz clean with minimal cleaning rod use — and thus, minimal risk of bore damage/wear. Leaving fouling in the bore promotes corrosion over time.
Obviously, this applies to a nice, smooth rimfire match barrel, using good, well lubed ammo. It doesn’t apply directly to the use of copper-jacketed bullets, which leave a stubborn fouling all their own. However, it does suggest that while the bore-snake can be helpful and a useful field-expedient, to truly clean a rifle barrel one will still need a good quality rod, bronze brush and solvents. [Editor: Add a good-fitting cleaning rod bore guide.]
SO, WHAT ABOUT BORE SNAKES FOR BARREL BREAK-IN?
The goal of barrel break-in is to fire each shot through a clean barrel, preventing copper buildup and allowing the bullets their best chance at burnishing sharp edges. Thus, it seems this purpose would be best served by one’s usual rods, brushes and rod guides.
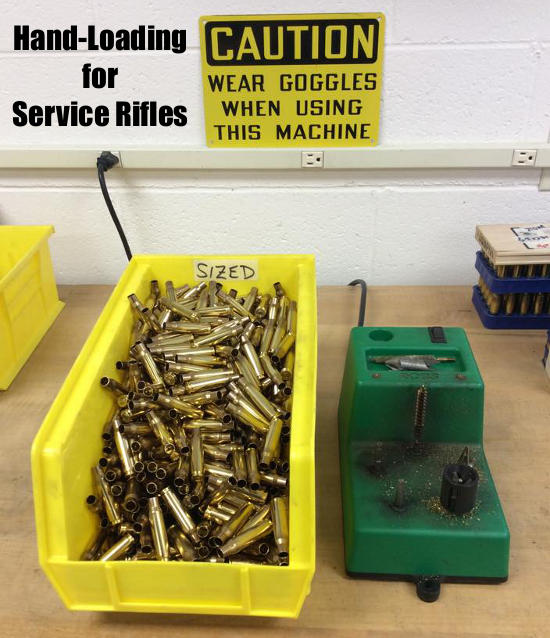
The U.S. Army Marksmanship Unit (USAMU) has published a great series of reloading “how-to” articles on its Facebook Page. This post covers key factors to consider when loading ammunition for Match Rifles and Service Rifles, with a particular focus on self-loading “gas guns”. Visit the USAMU Facebook Page regularly for other, helpful reloading and marksmanship tips.
We offer some “cardinal rules” to help new gas-gun handloaders with safety and efficiency. These address both Match Rifle and Service Rifle versions of the AR15, M1 Garand, M1A, and M110. However, they can also improve safe reloading for many other auto-loaders such as M1 Carbines, FALs, SIGs, etc. The author distilled these principles many years ago to help focus on the essential aspects of these rifles.
RULE ONE: Service Rifles Are Not Benchrest Rifles
Gas-guns require a relatively loose fit between ammunition and chamber (vs. bolt actions) for safe, smooth operation. Many techniques, such as neck sizing and keeping cartridge headspace quite tight, are popular in the extreme bolt gun accuracy realm. However, they are of little value with Service Rifles, and some could even be hazardous. Before adopting a specialized technique, seriously consider whether it is appropriate and beneficial in a gas-gun.
RULE TWO: Never Compromise Safety to Obtain Accuracy
Example: If choosing a brand of great, but ultra-sensitive match primers offers possibly better accuracy at the risk of slam-fires in your design of rifle, don’t do it! You are issued exactly two eyes and ten fingers (best-case scenario). Risking them trying to squeeze 0.25 MOA better accuracy out of an M1A, etc. simply isn’t worth it.
RULE THREE: Tailor the Precision to Your Individual Skill and Your Rifle’s Potential
This has been addressed here before, but bears repeating for newcomers. If you are struggling to break out of the Marksman Class, or using a CMP M1 “As-Issued,” then laboriously turning the necks of your 600-yard brass is a waste of time. Your scores will improve much faster by practicing or dry-firing. On the other hand, if the reigning champions anxiously check your scores each time you fire an event, a little neck-turning might not be so far-fetched.
Verifying Load Improvements — Accuracy hand-loading involves a wide variety of techniques, ranging from basic to rather precise. Carefully select those which offer a good return on investment for your time and labor. In doubt? Do a classic pilot study. Prepare ammo for at least three or four ten-shot groups with your new technique, vs. the same with your standard ammo. Then, pick a calm day and test the ammo as carefully as possible at its full distance (e.g. 200, 300, or 600 yards) to verify a significant improvement. A little testing can save much labor!
This video explains the procedure for ordering an M1 Garand from the CMP.
RULE FOUR: Be Your Own Efficiency Expert
Serious Service Rifle shooters generally think of ammunition in terms of thousands of rounds, not “boxes”, or even “hundreds”. Analyze, and WRITE DOWN each step in your reloading process. Count the number of times each case is handled. Then, see if any operations can be dropped or changed without reducing safety or accuracy. Eliminating just two operations saves 2000 steps per 1000 rounds loaded. Conversely, carefully consider any measurable benefits before adding a step to your routine.
RULE FIVE: In Searching for Greater Accuracy with Efficiency, Look for System Changes
For example, instead of marking your 300-yard rounds individually to differentiate them from your 200-yard ammo, would a simple change in primers work? If accuracy is maintained, using brass-colored primers for 200 and silver for 300 provides an indelible indicator and eliminates a step! Similarly, rather than spending hours selecting GI surplus brass for weight and neck uniformity, consider splurging on some known, high-quality imported match brass for your 600-yard loads. Results should be excellent, time is saved, and given limited shooting at 600 yards, brass life should be long.
RULE SIX: Check All Your Primers Before Packaging Your Loaded Ammo
This seems simple and even intuitive. However, many slam-fires (which were much more common when M1s and M1As were the standard) are due, at least in part, to “high” primers. Primers should be seated below flush with the case head. The USAMU has addressed this at length in a previous column, but each round should be checked for properly-seated primers before they are packaged for use.
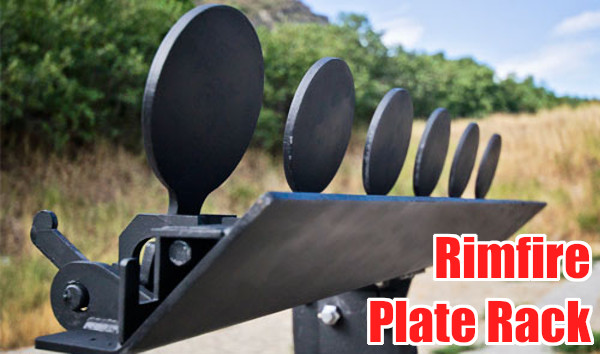
The Action Target Sport Plate Rack is specifically designed for .22 LR Rimfire shooting. This rack features six 4″-diameter plates that reset with a provided cable.
Shooting plates is fun. You get immediate feedback — “instant gratification” when you make a hit. When shooting steel inside 100 yards, we like to use .22 LR rimfire guns. The ammo is inexpensive, noise levels are lower (though you still need ear protection), and at close ranges there are fewer issue with ricochets and bullet splash-back. Additionally, for busy folks who don’t have time to reload, you can pick up a .22 LR rifle or pistol, grab a couple $5 boxes of ammo, and get to the range in a few minutes. The convenience means it is easier to shoot every week if you like.
SFC Joel Turner from the USAMU’s Action Shooting Team offers a few pointers on how to shoot plates quickly and accurately. He’s using a centerfire pistol, but the same principles apply for rimfire handguns. Click speaker icon to activate audio.
New .22 LR CP33 Pistol is Great for Plates
If you like shooting plates, one of the better new handguns for the job is Kel-Tec’s CP33. We tested this interesting handgun at the 2019 SHOT Show Media Day at the Range, and were impressed. The pistol is big, but balances well. The sights are easy to see, and the full-length rail lets you easily mount a variety of optics. The trigger is surprisingly good — better than 90% of rimfire handguns out there. For the plates game, this “quad-stack” gun can handle long stages without mag changes. The standard clear-sided CP33 magazine holds 33 rounds of .22 LR ammo.
If you are interested in an affordable, but very accurate, high-capacity semi-auto rimfire pistol you should consider Kel-Tec’s new CP33. Shooting Sports USA (SSUSA) notes: “The rapid growth of rimfire competition in Steel Challenge has prompted some gun makers to enter the fray. Kel-Tec is one, and their new CP33 .22 LR pistol has a lot of potential.” Popular YouTube host 22 Plinkster tested the gun and reports: “This handgun has been 100% reliable IF I load the magazine the right way… and it’s pretty dog-gone accurate.” The video below shows the best way to load the 33-round magazine:
SSUSA’s testers tried the pistol with a variety of ammo and it consistently shot about one-half-inch for five shots “from a 25-yard sandbag bench rest using the iron sights.” SSUSA noted that the gun disassembles quickly and easily by removing one central pin. That’s a nice feature.
Overall SSUSA’s tester, Chris Christian, was impressed with the gun, saying it balanced well and the sights aligned naturally: “…the neutral-balance-point grip produced an almost instinctive sight alignment.”
Christian used the CP33 in a 6-stage Steel Challenge Match, and did well: “I decided to shoot Rimfire Pistol Iron (RFPI) and used the CCI Mini-Mag. The high-speed ammo ran perfectly. [T]he bright sights and handling qualities let me finish top among iron-sight shooters and even hold my own with C and B class rimfire pistol shooters using optical sights. It would be interesting to put a reflex sight on the gun, and maybe even shoot some Bullseye with it.”
The competition was founded in 1981 by Mike Dalton and Mike Fichman, in Southern California. The two Mikes wanted an exciting alternative to paper targets and came up with the all-steel format. The Steel Challenge World Speed Shooting Championships have grown to one of the largest professional pistol competitions in America. In 2018, hundredes of competitors from the United States and around the world competed at the Talladega Marksmanship Park for glory and huge cash prizes.
The Steel Challenge is governed by the Steel Challenge Shooting Association (SCSA) that consists of eight standardized stages with three types of steel targets: small circle, big circle, and square. Here is a steel challenge layout in Germany.
Steel Challenge is similar to IPSC, but has simpler rules and more consistent stage designs. Up until 2011 the annual Steel Challenge World Championship was held in Piru, California every year. Then, renamed the World Speed Shooting Championships (WSSC), the Championship was held in Frostproof, Florida (2012, 2013), St. George, Utah (2014), San Luis Obispo, California (2015-2017), and Talladega, Alabama (2018-2022). There are also over 100 Steel Challenge Regional Matches held around the country.
Top to bottom – Remington firing pin assembly with ISS, Tubb SpeedLock alloy-composite system without ISS (current versions have dual, opposite-wound springs), and Remington short action firing pin assembly without ISS.
The U.S. Army Marksmanship Unit regularly publishes technical articles on the USAMU Facebook page. One informative USAMU article covered mechanical issues and related ignition irregularities that can cause vertical fliers even with good ammunition in an otherwise excellent rifle. We highly recommend you read this article, which offers some important tech tips.
Vertical Dispersion: Mechanical/Ignition Issues?
Poor or inconsistent ignition has long been known to be one of the “usual suspects” when one encounters vertical fliers that just shouldn’t be there. By having a sense of some of the basic principles involved, and a few basic areas to check, the shooter may avoid colsiderable frustration, not to mention time, expensive loading components and barrel wear.
Is your well-built rifle of high-quality components plagued with vertical fliers across more than 1-3 handload combinations? Consider the bedding, crown and scope/sight mounts. Are they correct? If so, then you might check for ignition issues before boldly undertaking an extensive, expensive, and quite possibly fruitless quest for the “magic handload”.
SEEING IS BELIEVING: While the author had been aware for many years that poor ignition should be considered and ruled out when dealing with vertical fliers in an otherwise-excellent rifle, actually seeing the problem and its almost instantaneous cure really drove the lesson home.
He was working with a “dot” rifle – a .22 LR match rifle that really stacked bullets into little piles at 50 yards and beyond. With one lot of ELEY Tenex, it produced consistent “bughole” groups at 50, but with another, selected lot of Tenex, similar groups were regularly ruined by single, vertical fliers that did not appear in other rifles. Rather than spending days burning up expensive, select ammunition looking for “magic lots”, he contacted a well-respected rimfire gunsmith and explained the situation.
Without so much as batting an eye, the highly-experienced ‘smith tore into the rifle’s action, and quickly found the cause(s) of the problem. He discovered a demonstrably weak firing pin spring, plus a chip out of the face of the firing pin where it contacted the cartridge rim.
After replacing and tuning the offending parts, the rifle immediately began shooting tiny, bughole groups with the previously “unacceptable” lot of Tenex. Centerfire rifles can also benefit from ensuring positive, consistent ignition. A wise riflesmith is literally worth his weight in gold!
So, what are some issues we as shooters can inspect in our rifles to help determine if ignition woes could be part of our problem? At the club level, ask yourself if that “experienced” Remington, Winchester 70, or even Springfield-based match bolt gun you’re using is still running its’ original 40-80 year-old factory striker spring? If so, a new replacement is cheap insurance against current or future problems. (And BTW, it might be best to stick to the normal, factory-spec spring weight. A super-powerful spring can cause vertical, just as a weak one one can.) Along with that, a routine check for proper firing-pin protrusion is a quick preventive measure that can rule out potential issues.
Other areas to consider are the centering and consistency of the firing pin’s operation in the bolt. Admittedly, with the increasing use of precision-machined custom actions, this is becoming less an issue every day. Below is the firing pin assembly from a custom BAT action:
However, particularly with factory actions, a very quick and easy check is to remove the bolt, let the firing pin go forward, and look at the firing pin tip through the firing pin hole. Is the tip off-center in the hole, and possibly striking it as it moves forward? Is the hole out-of-round or burred from being struck repeatedly? If so, a trip to the riflesmith is likely in order.
Similarly, machining issues in the bolt/firing pin system can lead to rough and erratic firing pin movement, in which the firing pin drags against an internal surface of the bolt. In high-quality rifles these issues are relatively rare, but not unheard-of, and it takes mere minutes to rule them out. It may be worthwhile to remove the cocking piece/firing pin/spring assembly and look for any unusual gouges, dings, peening, burrs or signs of abnormal wear.
This task is especially easy with Winchester 70s, Springfields, and the similar Mauser 98s, involving little more than the push of a button and unscrewing the cocking piece assembly. This is just one of the many reasons these tried-and-true actions have earned such a loyal following in the field, among hunters who must maintain their rifles away from a shop.
Particularly with older rifles, watch for and remove excess grease (or even Cosmoline!) from both the firing pin assembly and inside the bolt. This can help improve firing pin speed and consistency. Other bolt-action designs may need a take-down tool or other measures.
As part of this inspection, AFTER ENSURING THE RIFLE IS UNLOADED, slowly cock the rifle, dry-fire, and repeat several times. Listen carefully near the action for inconsistency in the sounds it generates. Does the striker falling make the same sound each time? Do you hear or feel grinding upon operation? If so, where?
Be sure to check the operation of the cocking piece (bolt shroud), firing pin within the bolt shroud, the cocking piece cam and the rear of the bolt body where the cocking piece cam operates. As with our examination for abnormal wear marks discussed above, look for marks indicating roughness or a possible need for light polishing. Then, clean and lightly grease the bearing surfaces while you’re at it.
Remington 700 bolt shroud and cocking cam
These are relatively easy checks that shooters can undertake to perform a preliminary inspection on their own. Other mechanical issues can also cause ignition issues, chiefly centered around the action of the trigger, sear and sear spring. If these are suspected, a trip to an experienced, qualified riflesmith for diagnosis is recommended. We hope you find this information helpful! Join us again next week, and in the meantime, enjoy the shooting sports safely!


 Bore-snakes are very useful for some applications (primarily a hasty, interim wipe-down). In [my] experience they cannot replace a thorough cleaning with a proper rod and brushes. While the experiment cited here involves rimfire, it may help illustrate. Several years ago, the writer used his new, personal Anschutz to investigate the bore-snake issue. It had been fired ~350 rds with match ammo and had had 3 typical rod/brush cleanings.


 Is your well-built rifle of high-quality components plagued with vertical fliers across more than 1-3 handload combinations? Consider the bedding, crown and scope/sight mounts. Are they correct? If so, then you might check for ignition issues before boldly undertaking an extensive, expensive, and quite possibly fruitless quest for the “magic handload”.


