Lake City vs. Lapua — which brass is harder? And how about Remington vs. Winchester? Is the widely-held belief that Win brass is harder than Rem brass really true? To help settle these burning questions (raised in a Forum thread), Forum member Catshooter recently sampled the base hardness of four brands of .223/5.56 brass. He employed a very impressive tool for the task — a $2,500 Ames Hardness Gauge. Catshooter explained that his Ames Guage “is FAA certified and approved for testing aircraft engine parts — it does NOT get any better than that!”
Catshooter measured four cases picked at random from batches of Lake City (LC) 2008 (5.56x45mm), Lapua .223 Rem Match, Winchester .223 Rem, and Remington R-P .223 Rem.
Lake City
Lapua Match
Winchester
Remington
Photo Shows Ames Gauge Base Hardness Measurement on Lake City Brass
Photo Show Ames Gauge Base Hardness Measurement on Winchester Brass
TEST RESULTS
Using Rockwell hardness standards (.062″x100kg, Rockwell “B”), the brass measured as follows:
LC 2008 = 96
Lapua 223 Match = 86
Winchester 223 = 69
Remington “R-P” = 49
Summary of Test Results
Catshooter writes: “For all you guys that have believed that Winchester cases were tougher than Remington — you are vindicated, they are a lot tougher! However, Lake City and Lapua are ‘the pick of the litter'”. Catshooter notes that both Lake City and Lapua are significantly harder than either Winchester and Remington .223 brass. That’s something that we’ve observed empirically (Lapua and LC stand up better to stout loads), but now we have some hard numbers to back that up. Hats off to Catshooter for settling the hardness debate with his Ames Hardness Gauge.
Share the post "How Hard is Your Brass? 5.56 and .223 Rem Base Hardness Tests"
The U.S. Army Marksmanship Unit regularly published a reloading “how-to” article on the USAMU Facebook page. One excellent “Handloading Hump Day” post covered preparation of once-fired 5.56x45mm brass. This article, the first in a 3-part series, has many useful tips. If you shoot a rifle chambered in .223 Rem or 5.56x45mm, this article is worth reading. You can obtain once-fired Lake City 5.56x45mm brass for less than half the cost of premium .223 Rem brass.
This week, Handloading Hump-Day will answer a special request from several competitive shooters who asked about procedures for morphing once-fired GI 5.56mm brass into accurate match brass for NRA High Power Rifle use. The USAMU has used virgin Lake City (LC) 5.56 brass to win National Championships and set National Records for many years. In this 3-part series, we’ll share techniques proven to wring match-winning accuracy from combat-grade brass.
GI brass has an excellent attribute, worth noting — it is virtually indestructible. Due to its NATO-spec hardness, the primer pockets last much longer than most commercial brass when using loads at appropriate pressures.
Preparing Once-Fired GI 5.56 Brass for Reloading (Part 1 of 3)
Assuming our readers will be getting brass once-fired as received from surplus dealers, the following steps can help process the low-cost raw material into reliably accurate components.
1. Clean the Brass
First, clean the brass of any dirt/mud/debris, if applicable. Depending on the brass’s condition, washing it in a soap solution followed by a thorough rinsing may help. [This step also extends the life of the tumbling media.] Approaches range from low-tech, using gallon jugs 1/2 full of water/dish soap plus brass and shaking vigorously, to more high-tech, expensive and time-consuming methods.
2. Wet-Tumbling Options (Be Sure to Dry the Brass)
When applying the final cleaning/polish, some use tumblers with liquid cleaning media and stainless steel pins for a brilliant shine inside and out, while others take the traditional vibratory tumbler/ground media approach. Degree of case shine is purely personal preference, but the key issue is simple cleanliness to avoid scratching ones’ dies.
If a liquid cleaner is used, be SURE to dry the cases thoroughly to preclude corrosion inside. One method is to dump the wet brass into an old pillow case, then tilt it left/right so the cases re-orient themselves while shifting from corner to corner. Several repetitions, pausing at each corner until water stops draining, will remove most water. They can then be left to air-dry on a towel, or can be dried in a warm (150° F-200° F max) oven for a few minutes to speed evaporation.
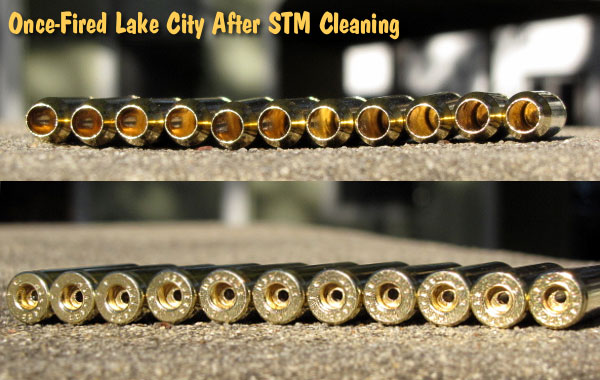
Shown below are Lake City cases after cleaning with Stainless Media (STM). Note: STM Case cleaning was done by a third party, not the USAMU, which does not endorse any particular cleaning method.
NOTE: The USAMU Handloading (HL) Shop does not RE-load fired 5.56 brass. We use virgin LC brass with our chosen primer already staked in place. However, our staff has extensive personal experience reloading GI brass for competition, which will supplement the Shop’s customary steps. In handloading, as in life, there are many ways to accomplish any given task. Our suggestions are note presented as the “only way,” by any means. Time for loading/practicing is always at a premium. Readers who have more efficient, alternative methods that maintain top accuracy are invited to share them here.
3. Inspect Every Case
Once dry, inspect each case for significant deformation (i.e., someone stepped on it), damaged mouths/necks and case head/rim damage. Some rifles’ ejectors actually dig small chunks of brass out of the case head — obviously, not ideal for precision shooting. Similarly, some extractors can bend the case rims so badly that distortion is visible when spinning them in one’s fingers. These can be used for plinking, but our match brass should have straight, undamaged rims.
Dented case mouths are common, and these can easily be rounded using a conical, tapered tool, [such as a .223 expander mandrel. A dummy 7.62 or .30-06 cartridge with a FMJ spitzer can also work.] If most of your brass is of one headstamp, this is a good time to cull out any odd cases.
4. Check the Primers Before Decapping
Your clean, dry and inspected brass is now ready for full-length sizing, decapping and re-priming. Historically, primer crimps on GI brass have caused some head-scratching (and vile language) among handloaders. Our next installment will detail efficient, easy and practical methods to remove primer crimp, plus other useful handloading tips. Until next week, Good Shooting!
Accuracy Potential of Mil-Surp 5.56×45 Brass
So, how accurate can previously-fired GI surplus brass be in a good National Match AR-15? Well, here’s a data point from many years ago that might be of interest. A High Power shooter who wrote for the late Precision Shooting magazine took a Bill Wylde-built AR match rifle to a registered Benchrest match. He had no difficulty obtaining consistent 0.5-0.6 MOA accuracy at 200 yards using LC brass and a generic “practice” load that was not tuned to his rifle.
Share the post "How to Prep Milsurp 5.56 Brass for Match Use — USAMU Tips"
Powder Valley has added Norma products to its extensive inventory of ammunition, reloading components, tools, and shooting accessories. Powder Valley is now carrying Norma products for shooters and handloaders. Norma ammo and components are developed with the high quality raw materials and tight tolerances to ensure long life and accuracy.
About Norma Precision AB
Dedicated to outfitting shooting enthusiasts with quality products since 1902, Norma started out in a small Swedish town and is now a top global brand boasting more than 350 employees, most of whom are hunters, shooters, and reloaders themselves. For hunting and target shooting applications Norma manufactures many millions of rounds annually for 100+ different cartridge types.
VERY Informative Video Show Cartridge Brass and Ammunition Production:
Here’s a cool video showing how bullet, brass, and ammunition are produced at the Norma Precision AB factory. You can see how cartridges are made starting with brass disks, then formed into shape through a series of processes, including “hitting [the cup] with a 30-ton hammer”. After annealing (shown at 0:08″), samples from every batch of brass are analyzed (at multiple points along the case length) to check metal grain structure and hardness. Before packing, each case is visually inspected by a human being (3:27″ time-mark). The video also shows how bullets are made from jackets and lead cores. Finally, you can watch the loading machines that fill cases with powder, seat the bullets, and then transport the loaded rounds to the packing system.
12 Days Of Christmas Contest at Powder Valley
Beginning Monday, December 4, 2023, Powder Valley has been running a major give-away contest, with prize products from a different maker each day. Today, 12/6/23, Berry’s Bullets are the Prize. And, TAKE NOTE readers, tomorrow 12/7/2023 Lapua, Berger, and Vihtavuori products are the Daily Contest Prize. If you need Lapua Brass, Berger Bullets, or VV powder, be sure to enter before end of day 12/7/2023. The 12 prizes vary by day and by value. Each day’s prize will be posted on Facebook and Instagram. WINNER SELECTION: A random drawing will be conducted the following day by Sponsor or its designated representatives. The Sweepstakes began on 12/4/23 and ends on 12/15/23.
About Powder Valley Powder Valley began in 1984 as Dexter Automotive, the first master distributor of Accurate powder. In 2000, Bryan and Noel Richardson purchased the company and moved operations to Winfield, Kansas with a focus on providing the finest in reloading components at the best possible price. Powder Valley expanded its vision to offer every type of powder and primer available so reloaders would have a single shopping source. Since then, Powder Valley has grown into the largest distributor of canister powder in the United States and currently carries an ever-expanding offering of high-quality bullets, brass, wads, shot, gun care items, and ammunition at an excellent value.
Share the post "Powder Valley Now Offers Norma Brass and Loaded Ammo"
Guys — honestly, if you do anything today on this site, watch this video. You won’t be disappointed. Guaranteed. This is a very informative (and surprisingly entertaining) video. Every serious hand-loader should watch this video to see how cartridge cases and loaded ammo are made. Your Editor has watched the video multiple times and I still find it fascinating. The camera work and editing are excellent — there are many close-ups revealing key processes such as annealing and head-stamping.
VERY Informative Video Show Cartridge Brass and Ammunition Production:
Norma has released a fascinating video showing how bullet, brass, and ammunition are produced at the Norma Precision AB factory which first opened in 1902. You can see how cartridges are made starting with brass disks, then formed into shape through a series of processes, including “hitting [the cup] with a 30-ton hammer”. After annealing (shown at 0:08″), samples from every batch of brass are analyzed (at multiple points along the case length) to check metal grain structure and hardness. Before packing, each case is visually inspected by a human being (3:27″ time-mark).
The video also shows how bullets are made from jackets and lead cores. Finally, you can watch the loading machines that fill cases with powder, seat the bullets, and then transport the loaded rounds to the packing system. In his enthusiasm, the reporter/narrator does sometimes confuse the term “bullets” and “rounds” (5:00″), but you can figure out what he means. We definitely recommend watching this video. It’s fascinating to see 110-year-old sorting devices on the assembly line right next to state-of-the art, digitally-controlled production machinery.
Video tip by EdLongrange. We welcome reader submissions.
Share the post "GREAT Video on Making Brass and Precision Ammo — Watch Now"
NOTE: If you prefer drying your brass in an oven we recommend a temp setting no higher than 200° F. Better yet, use a dedicated case dryer that cannot possibly over-cook your cases.
Tech Tip by Craig Arnzen of Area419.com
As wet-tumbling brass has become more popular in recent years, guys have tried a LOT of ways to get their brass dry — towels, hair dryers, and even food dehydrators. (See Top Ten Brass Drying Methods). Another common method — albeit with some potential issues — is putting your wet brass in the oven to dry. Provided you monitor TEMP and TIME, this method is fast, effective, and easy (as long don’t use the wife’s favorite cooking pans — that’ll get you in trouble.)
With oven-drying, however, unexpected issues can arise, as illustrated by this worrisome story: “I put my brass in for an hour at 200° F and turned it off. Next thing I know I realize my wife has the oven pre-heating to 350° F. Is my brass ruined?”
If you search the AccurateShooter.com Shooters’ Forum, you’ll find at least three threads with stories like that (i.e. higher-than-expected oven temps when drying brass), and answers on both sides of the line. I know this, because it happened to me — I had some 6XC brass drying and the wife pre-heated the oven. Concerned about my cases, I consulted a genuine annealing expert, Andrew Rixon.
Andrew is the Director of Engineering and Manufacturing at Alpha Munitions, makers of premium-grade rifle brass. I had baked a batch of Alpha’s new 6XC brass, which is exceptionally consistent and well-made.
Before Andrew would answer my question though, he gave me a little lesson on what really happens during annealing:
“Annealing is performed by heating the brass to specific temperatures. There are three phases of annealing: recovery, recrystallization, and grain growth. All of which have specific temperatures and or exposure times related to them. It is key for cartridge brass annealing processes to hit the recrystallization phase which allows for strain-free grains to grow. The growth of strain-free grains eliminate dislocations, drastically decreasing hardness and increasing ductility. For recrystallization to occur the material temperature must be within 600-1000 degrees Fahrenheit (F).”
He then got into really answering the question, and was (fortunately) definitive in his answer: “If the temps do not exceed 450 degrees F then there is nothing to worry about as it did not exceed the critical temperature for annealing to occur.” Editor: Caution — do NOT assume that the temperature marked on the oven knob is the actual temperature INSIDE the oven, particularly near the back. Some older ovens can be off as much as 75 degrees F. Be conservative!
Well, there you have it. If you’ve baked your brass, you’re probably OK. If you got it hotter than 450° F then there can start to be some changes to the metal.
The U.S. Army Marksmanship Unit regularly published a reloading “how-to” article on the USAMU Facebook page. One excellent “Handloading Hump Day” post covered preparation of once-fired 5.56x45mm brass. This article, the first in a 3-part series, has many useful tips. If you shoot a rifle chambered in .223 Rem or 5.56x45mm, this article is worth reading. You can obtain once-fired Lake City 5.56x45mm brass for less than half the cost of premium .223 Rem brass.
This week, Handloading Hump-Day will answer a special request from several competitive shooters who asked about procedures for morphing once-fired GI 5.56mm brass into accurate match brass for NRA High Power Rifle use. The USAMU has used virgin Lake City (LC) 5.56 brass to win National Championships and set National Records for many years. In this 3-part series, we’ll share techniques proven to wring match-winning accuracy from combat-grade brass.
GI brass has an excellent attribute, worth noting — it is virtually indestructible. Due to its NATO-spec hardness, the primer pockets last much longer than most commercial brass when using loads at appropriate pressures.
Preparing Once-Fired GI 5.56 Brass for Reloading (Part 1 of 3)
Assuming our readers will be getting brass once-fired as received from surplus dealers, the following steps can help process the low-cost raw material into reliably accurate components.
1. Clean the Brass
First, clean the brass of any dirt/mud/debris, if applicable. Depending on the brass’s condition, washing it in a soap solution followed by a thorough rinsing may help. [This step also extends the life of the tumbling media.] Approaches range from low-tech, using gallon jugs 1/2 full of water/dish soap plus brass and shaking vigorously, to more high-tech, expensive and time-consuming methods.
2. Wet-Tumbling Options (Be Sure to Dry the Brass)
When applying the final cleaning/polish, some use tumblers with liquid cleaning media and stainless steel pins for a brilliant shine inside and out, while others take the traditional vibratory tumbler/ground media approach. Degree of case shine is purely personal preference, but the key issue is simple cleanliness to avoid scratching ones’ dies.
If a liquid cleaner is used, be SURE to dry the cases thoroughly to preclude corrosion inside. One method is to dump the wet brass into an old pillow case, then tilt it left/right so the cases re-orient themselves while shifting from corner to corner. Several repetitions, pausing at each corner until water stops draining, will remove most water. They can then be left to air-dry on a towel, or can be dried in a warm (150° F-200° F max) oven for a few minutes to speed evaporation.
Shown below are Lake City cases after cleaning with Stainless Media (STM). Note: STM Case cleaning was done by a third party, not the USAMU, which does not endorse any particular cleaning method.
NOTE: The USAMU Handloading (HL) Shop does not RE-load fired 5.56 brass. We use virgin LC brass with our chosen primer already staked in place. However, our staff has extensive personal experience reloading GI brass for competition, which will supplement the Shop’s customary steps. In handloading, as in life, there are many ways to accomplish any given task. Our suggestions are note presented as the “only way,” by any means. Time for loading/practicing is always at a premium. Readers who have more efficient, alternative methods that maintain top accuracy are invited to share them here.
3. Inspect Every Case
Once dry, inspect each case for significant deformation (i.e., someone stepped on it), damaged mouths/necks and case head/rim damage. Some rifles’ ejectors actually dig small chunks of brass out of the case head — obviously, not ideal for precision shooting. Similarly, some extractors can bend the case rims so badly that distortion is visible when spinning them in one’s fingers. These can be used for plinking, but our match brass should have straight, undamaged rims.
Dented case mouths are common, and these can easily be rounded using a conical, tapered tool, [such as a .223 expander mandrel. A dummy 7.62 or .30-06 cartridge with a FMJ spitzer can also work.] If most of your brass is of one headstamp, this is a good time to cull out any odd cases.
4. Check the Primers Before Decapping
Your clean, dry and inspected brass is now ready for full-length sizing, decapping and re-priming. Historically, primer crimps on GI brass have caused some head-scratching (and vile language) among handloaders. Our next installment will detail efficient, easy and practical methods to remove primer crimp, plus other useful handloading tips. Until next week, Good Shooting!
Accuracy Potential of Mil-Surp 5.56×45 Brass
So, how accurate can previously-fired GI surplus brass be in a good National Match AR-15? Well, here’s a data point from many years ago that might be of interest. A High Power shooter who wrote for the late Precision Shooting magazine took a Bill Wylde-built AR match rifle to a registered Benchrest match. He had no difficulty obtaining consistent 0.5-0.6 MOA accuracy at 200 yards using LC brass and a generic “practice” load that was not tuned to his rifle.
Share the post "How to Prep Once-Fired Lake City 5.56 Brass for Match Use"
Guys — honestly, if you do anything today on this site, watch this video. You won’t be disappointed. Guaranteed. This is a very informative (and surprisingly entertaining) video. Every serious hand-loader should watch this video to see how cartridge cases are made. Your Editor has watched the video 5 times now and I still find it fascinating. The camera work and editing are excellent — there are many close-ups revealing key processes such as annealing and head-stamping.
VERY Informative Video Show Cartridge Brass and Ammunition Production:
Norma has released a fascinating video showing how bullet, brass, and ammunition are produced at the Norma Precision AB factory which first opened in 1902. You can see how cartridges are made starting with brass disks, then formed into shape through a series of processes, including “hitting [the cup] with a 30-ton hammer”. After annealing (shown at 0:08″), samples from every batch of brass are analyzed (at multiple points along the case length) to check metal grain structure and hardness. Before packing, each case is visually inspected by a human being (3:27″ time-mark).
The video also shows how bullets are made from jackets and lead cores. Finally, you can watch the loading machines that fill cases with powder, seat the bullets, and then transport the loaded rounds to the packing system. In his enthusiasm, the reporter/narrator does sometimes confuse the term “bullets” and “rounds” (5:00″), but you can figure out what he means. We definitely recommend watching this video. It’s fascinating to see 110-year-old sorting devices on the assembly line right next to state-of-the art, digitally-controlled production machinery.
Video tip by EdLongrange. We welcome reader submissions.
Share the post "How Cartridge Brass (and Bullets) Are Made — Great Norma Video"
The U.S. Army Marksmanship Unit regularly publishes a reloading “how-to” article on the USAMU Facebook page. One excellent “Handloading Hump Day” post covered preparation of once-fired 5.56x45mm brass. This article, the first in a 3-part series, has many useful tips. If you shoot a rifle chambered in .223 Rem or 5.56x45mm, this article is worth reading.
This week, Handloading Hump-Day will answer a special request from several competitive shooters who asked about procedures for morphing once-fired GI 5.56mm brass into accurate match brass for NRA High Power Rifle use. The USAMU has used virgin Lake City (LC) 5.56 brass to win National Championships and set National Records for many years. In this 3-part series, we’ll share techniques proven to wring match-winning accuracy from combat-grade brass.
GI brass has an excellent attribute, worth noting — it is virtually indestructible. Due to its NATO-spec hardness, the primer pockets last much longer than most commercial brass when using loads at appropriate pressures.
Preparing Once-Fired GI 5.56 Brass for Reloading (Part 1 of 3)
Assuming our readers will be getting brass once-fired as received from surplus dealers, the following steps can help process the low-cost raw material into reliably accurate components.
1. Clean the Brass
First, clean the brass of any dirt/mud/debris, if applicable. Depending on the brass’s condition, washing it in a soap solution followed by a thorough rinsing may help. [This step also extends the life of the tumbling media.] Approaches range from low-tech, using gallon jugs 1/2 full of water/dish soap plus brass and shaking vigorously, to more high-tech, expensive and time-consuming methods.
2. Wet-Tumbling Options (Be Sure to Dry the Brass)
When applying the final cleaning/polish, some use tumblers with liquid cleaning media and stainless steel pins for a brilliant shine inside and out, while others take the traditional vibratory tumbler/ground media approach. Degree of case shine is purely personal preference, but the key issue is simple cleanliness to avoid scratching ones’ dies.
If a liquid cleaner is used, be SURE to dry the cases thoroughly to preclude corrosion inside. One method is to dump the wet brass into an old pillow case, then tilt it left/right so the cases re-orient themselves while shifting from corner to corner. Several repetitions, pausing at each corner until water stops draining, will remove most water. They can then be left to air-dry on a towel, or can be dried in a warm (150° F-200° F max) oven for a few minutes to speed evaporation.
Shown below are Lake City cases after cleaning with Stainless Media (STM). Note: STM Case cleaning was done by a third party, not the USAMU, which does not endorse any particular cleaning method.
3. Inspect Every Case
Once dry, inspect each case for significant deformation (i.e., someone stepped on it), damaged mouths/necks and case head/rim damage. Some rifles’ ejectors actually dig small chunks of brass out of the case head — obviously, not ideal for precision shooting. Similarly, some extractors can bend the case rims so badly that distortion is visible when spinning them in one’s fingers. These can be used for plinking, but our match brass should have straight, undamaged rims.
Dented case mouths are common, and these can easily be rounded using a conical, tapered tool, [such as a .223 expander mandrel. A dummy 7.62 or .30-06 cartridge with a FMJ spitzer can also work.] If most of your brass is of one headstamp, this is a good time to cull out any odd cases.
4. Check the Primers Before Decapping
Your clean, dry and inspected brass is now ready for full-length sizing, decapping and re-priming. Historically, primer crimps on GI brass have caused some head-scratching (and vile language) among handloaders. Our next installment will detail efficient, easy and practical methods to remove primer crimp, plus other useful handloading tips. Until next week, Good Shooting!
NOTE: The USAMU Handloading (HL) Shop does not RE-load fired 5.56 brass. We use virgin LC brass with our chosen primer already staked in place. However, our staff has extensive personal experience reloading GI brass for competition, which will supplement the Shop’s customary steps. In handloading, as in life, there are many ways to accomplish any given task. Our suggestions are note presented as the “only way,” by any means. Time for loading/practicing is always at a premium. Readers who have more efficient, alternative methods that maintain top accuracy are invited to share them here.
Accuracy Potential of Mil-Surp 5.56×45 Brass
So, how accurate can previously-fired GI surplus brass be in a good National Match AR-15? Well, here’s a data point from many years ago that might be of interest. A High Power shooter who wrote for the late Precision Shooting magazine took a Bill Wylde-built AR match rifle to a registered Benchrest match. His first 5-round group ever fired in a BR match was officially measured at 0.231″ at 200 hundred yards. This was fired in front of witnesses, while using a moving target backer that confirmed all five rounds were fired.
He recounted that his ammo was loaded progressively with factory 52gr match bullets and a spherical powder using mixed years of LC brass with no special preparation whatsoever. Obviously, this was “exceptional”. However, he had no difficulty obtaining consistent 0.5-0.6 MOA accuracy at 200 yards using LC brass and a generic “practice” load that was not tuned to his rifle.
Saving Money by Using GI Brass
So, with good commercial brass readily available, why would one go to all the extra steps necessary to process fired GI brass? [Editor: It’s about saving money.]
Economically, it makes great sense. When the author was actively practicing and competing with the service rifle, he had ~3,000 rounds of 5.56mm brass, which allowed him to load during winter and spend most time in the summer practicing. If one were wealthy and wanted to shoot nothing but the finest imported brass, the current cost of 3,000 is ~$1920 (plus shipping.)
Dropping down to good, but less-expensive new, U.S. commercial brass brings the price to a much more realistic ~$720. However, at current rates, the same amount of surplus GI once-fired brass costs between $120 — $150, leaving lots of room in the budget for other expenses. [Editor: that’s less than 10% of the cost of the best imported brass.]
Share the post "How to Prep Mil-Surp 5.56 Lake City Brass — Save Money"
The U.S. Army Marksmanship Unit (USAMU) regularly releases a reloading “how-to” article on the USAMU Facebook page. Here’s a helpful USAMU guide on removing military primer pocket crimps. If you ever use surplus military brass, you really should this article. It contains vital information “learned the hard way”. The writer has tried many different options for removing/swaging out crimps. He weighs the pros and cons of various methods and provides some advice that will save you time and headaches. This article was the second in a 3-part series. Visit the USAMU Facebook page regularly for other informative articles on reloading methods.
A common question, and important issue with US GI surplus 5.56 brass is “what to do with the primer crimp?” Our Handloading Shop does not prime/re-prime GI 5.56 brass, as we receive it in virgin state (primed) and don’t reload it. However, our staff has extensive private experience handloading GI brass in our own competitive shooting careers, and have several tips to offer.
Once the brass is full-length sized and decapped, the staked-in ring of displaced metal from the primer crimp remains, and hinders re-priming. Some swaging tools exist to swage out this ring, allowing free access to the primer pocket. Some are stand-alone products, and some are reloading-press mounted. Early in this writer’s High Power career, he used the common press-mounted kit several times, with less than stellar results.
Setting Up Swaging Tools
Surplus brass tends to come from mixed lots, and primer crimp varies from very mild to strong. Also, primer pocket dimensions vary. So, setting up this “one size fits most” tool involves trying to find a happy medium for a selection of different types of brass in your particular lot. Some are over-swaged, some under-swaged, and some are “Just Right.” Overall, it was a time-consuming and sub-optimal process, in this writer’s experience.
Cutting Out the Crimp Ring with a Chamfer Tool
[After trying swaging tools] this writer evolved to using the ubiquitous Wilson/RCBS/Other brands chamfer and deburring tool to cut out only the displaced crimp ring at the top of the primer pocket. One caution: DON’T OVER-DO IT! Just a little practice will let the handloader develop a “feel” for the right degree of chamfer that permits easy re-priming without removing so much metal that primer edges start to flow under pressure. For this writer, it was three half-turns of the tool in the primer pocket, with medium pressure.
Here, as with all bulk reloading operations, mechanization is our friend. A popular reloading supply house has developed an inexpensive adaptor that houses the chamfer/deburr tool (retained by an allen screw) and allows mounting in a hand drill or drill press. This speeds the operation significantly, as does use of one of the popular Case Preparation Stations that feature multiple powered operations. (Say good-bye to carpal tunnel syndrome and arthritis!)
One advantage of chamfering the primer pockets lightly to remove remnants of primer crimp, vs. swaging, is that primer pockets are not loosened in this process. US GI (usually LC) NATO 5.56 brass has a great reputation for longevity due to the superior hardness of the case head vs. some softer brands of commercial brass. This means the brass will stand up well to multiple full-pressure loads without loosening primer pockets, and the chamfering method helps support this benefit.
Powered Case Prep Centers — What to Look For
A word of advice (often learned the hard way) — think carefully before jumping on the “latest/greatest” case prep center. One with a proven, long-time track record of durability and excellent customer support has a lot going for it, vs. the flashy “new kid on the block.” Analyze the functions each case prep center can support simultaneously — i.e., can it chamfer, deburr and clean primer pockets all at the same time, without having to re-configure?
Do the tool-heads that come with it look truly functional and durable? If not, can they be easily replaced with proven or more-needed versions, such as a VLD chamfer tool, or a solid/textured primer pocket cleaner rather than a less-durable wire-brush type?
Tips for Priming with Progressive Presses
When re-priming, a couple of factors are worth noting. When re-priming using either single-stage presses, hand tools, or bench-mounted tools (such as the RCBS bench-mounted priming tool), precise alignment of the primer pocket entrance with the primer is easily achieved, and priming goes very smoothly. When using certain progressive presses, due to the tolerances involved in shell-heads, etc., one may occasionally encounter a primer that isn’t quite perfectly aligned with the primer pocket.
If resistance is felt when attempting to re-prime, DO NOT attempt to force the primer in — doing so can be dangerous! Rather, just exert SLIGHT upward pressure to keep the primer in contact with the case-head, and with the support hand, move the case back/forth a trifle. The primer will drop into alignment with the primer pocket, and then prime as usual. After priming, check each seated primer by feel. Ensure it is below flush with the case head (cleaning primer pockets helps here), and that there are no snags, burrs or deformed primers.
More Info on Primer Pocket Swaging
For more information about removing military crimps in primer pockets, we recommend you read Get the Crimp Out on the Squibloads Gun Thoughts Blog. This is a detailed, well-illustrated article that shows how to use various primer pocket reamers/cutters. It also has a very extensive discussion of swaging using CH4D, RCBS, and Dillon tools. The Squibloads author had much better luck with swaging tools than did the USAMU’s writer — so if you are considering swaging, definitely read the Squibloads article.
The illustration of primer pocket types is from the Squibloads Blog Article, Get the Crimp Out.
Share the post "Removing Primer Crimps from Military Brass — Tools & Methods"
Each Wednesday, the U.S. Army Marksmanship Unit publishes a reloading “how-to” article on the USAMU Facebook page. A recent “Handloading Hump Day” post covered preparation of once-fired 5.56x45mm brass. This article, the first in a 3-part series, has many useful tips. If you shoot a rifle chambered in .223 Rem or 5.56x45mm, this article is worth reading.
This week, Handloading Hump-Day will answer a special request from several competitive shooters who asked about procedures for morphing once-fired GI 5.56mm brass into accurate match brass for NRA High Power Rifle use. The USAMU has used virgin Lake City (LC) 5.56 brass to win National Championships and set National Records for many years. In this 3-part series, we’ll share techniques proven to wring match-winning accuracy from combat-grade brass.
GI brass has an excellent attribute, worth noting — it is virtually indestructible. Due to its NATO-spec hardness, the primer pockets last much longer than most commercial brass when using loads at appropriate pressures.
Preparing Once-Fired GI 5.56 Brass for Reloading (Part 1 of 3)
Assuming our readers will be getting brass once-fired as received from surplus dealers, the following steps can help process the low-cost raw material into reliably accurate components.
1. Clean the Brass
First, clean the brass of any dirt/mud/debris, if applicable. Depending on the brass’s condition, washing it in a soap solution followed by a thorough rinsing may help. [This step also extends the life of the tumbling media.] Approaches range from low-tech, using gallon jugs 1/2 full of water/dish soap plus brass and shaking vigorously, to more high-tech, expensive and time-consuming methods.
2. Wet-Tumbling Options (Be Sure to Dry the Brass)
When applying the final cleaning/polish, some use tumblers with liquid cleaning media and stainless steel pins for a brilliant shine inside and out, while others take the traditional vibratory tumbler/ground media approach. Degree of case shine is purely personal preference, but the key issue is simple cleanliness to avoid scratching ones’ dies.
If a liquid cleaner is used, be SURE to dry the cases thoroughly to preclude corrosion inside. One method is to dump the wet brass into an old pillow case, then tilt it left/right so the cases re-orient themselves while shifting from corner to corner. Several repetitions, pausing at each corner until water stops draining, will remove most water. They can then be left to air-dry on a towel, or can be dried in a warm (150° F-200° F max) oven for a few minutes to speed evaporation.
Shown below are Lake City cases after cleaning with Stainless Media (STM). Note: STM Case cleaning was done by a third party, not the USAMU, which does not endorse any particular cleaning method.
3. Inspect Every Case
Once dry, inspect each case for significant deformation (i.e., someone stepped on it), damaged mouths/necks and case head/rim damage. Some rifles’ ejectors actually dig small chunks of brass out of the case head — obviously, not ideal for precision shooting. Similarly, some extractors can bend the case rims so badly that distortion is visible when spinning them in one’s fingers. These can be used for plinking, but our match brass should have straight, undamaged rims.
Dented case mouths are common, and these can easily be rounded using a conical, tapered tool, [such as a .223 expander mandrel. A dummy 7.62 or .30-06 cartridge with a FMJ spitzer can also work.] If most of your brass is of one headstamp, this is a good time to cull out any odd cases.
4. Check the Primers Before Decapping
Your clean, dry and inspected brass is now ready for full-length sizing, decapping and re-priming. Historically, primer crimps on GI brass have caused some head-scratching (and vile language) among handloaders. Our next installment will detail efficient, easy and practical methods to remove primer crimp, plus other useful handloading tips. Until next week, Good Shooting!
NOTE: The USAMU Handloading (HL) Shop does not RE-load fired 5.56 brass. We use virgin LC brass with our chosen primer already staked in place. However, our staff has extensive personal experience reloading GI brass for competition, which will supplement the Shop’s customary steps. In handloading, as in life, there are many ways to accomplish any given task. Our suggestions are note presented as the “only way,” by any means. Time for loading/practicing is always at a premium. Readers who have more efficient, alternative methods that maintain top accuracy are invited to share them here.
Accuracy Potential of Mil-Surp 5.56×45 Brass
So, how accurate can previously-fired GI surplus brass be in a good National Match AR-15? Well, here’s a data point from many years ago that might be of interest. A High Power shooter who wrote for the late Precision Shooting magazine took a Bill Wylde-built AR match rifle to a registered Benchrest match. His first 5-round group ever fired in a BR match was officially measured at 0.231″ at 200 hundred yards. This was fired in front of witnesses, while using a moving target backer that confirmed all five rounds were fired.
He recounted that his ammo was loaded progressively with factory 52gr match bullets and a spherical powder using mixed years of LC brass with no special preparation whatsoever. Obviously, this was “exceptional”. However, he had no difficulty obtaining consistent 0.5-0.6 MOA accuracy at 200 yards using LC brass and a generic “practice” load that was not tuned to his rifle.
Saving Money by Using GI Brass
So, with good commercial brass readily available, why would one go to all the extra steps necessary to process fired GI brass? [Editor: It’s about saving money.]
Economically, it makes great sense. When the author was actively practicing and competing with the service rifle, he had ~3,000 rounds of 5.56mm brass, which allowed him to load during winter and spend most time in the summer practicing. If one were wealthy and wanted to shoot nothing but the finest imported brass, the current cost of 3,000 is ~$1920 (plus shipping.)
Dropping down to good, but less-expensive new, U.S. commercial brass brings the price to a much more realistic ~$720. However, at current rates, the same amount of surplus GI once-fired brass costs between $120 — $150, leaving lots of room in the budget for other expenses. [Editor: that’s less than 10% of the cost of the best imported brass.]
Share the post "Save $$ By Using Lake City 5.56x45mm Once-Fired GI Brass"
The U.S. Army Marksmanship Unit (USAMU) regularly releases a reloading “how-to” article on the USAMU Facebook page. Here’s a helpful USAMU guide on removing military primer pocket crimps. If you ever use surplus military brass, you really should this article. It contains vital information “learned the hard way”. The writer has tried many different options for removing/swaging out crimps. He weighs the pros and cons of various methods and provides some advice that will save you time and headaches. This article was the second in a 3-part series. Visit the USAMU Facebook page regularly for other informative articles on reloading methods.
A common question, and important issue with US GI surplus 5.56 brass is “what to do with the primer crimp?” Our Handloading Shop does not prime/re-prime GI 5.56 brass, as we receive it in virgin state (primed) and don’t reload it. However, our staff has extensive private experience handloading GI brass in our own competitive shooting careers, and have several tips to offer.
Once the brass is full-length sized and decapped, the staked-in ring of displaced metal from the primer crimp remains, and hinders re-priming. Some swaging tools exist to swage out this ring, allowing free access to the primer pocket. Some are stand-alone products, and some are reloading-press mounted. Early in this writer’s High Power career, he used the common press-mounted kit several times, with less than stellar results.
Setting Up Swaging Tools
Surplus brass tends to come from mixed lots, and primer crimp varies from very mild to strong. Also, primer pocket dimensions vary. So, setting up this “one size fits most” tool involves trying to find a happy medium for a selection of different types of brass in your particular lot. Some are over-swaged, some under-swaged, and some are “Just Right.” Overall, it was a time-consuming and sub-optimal process, in this writer’s experience.
Cutting Out the Crimp Ring with a Chamfer Tool
[After trying swaging tools] this writer evolved to using the ubiquitous Wilson/RCBS/Other brands chamfer and deburring tool to cut out only the displaced crimp ring at the top of the primer pocket. One caution: DON’T OVER-DO IT! Just a little practice will let the handloader develop a “feel” for the right degree of chamfer that permits easy re-priming without removing so much metal that primer edges start to flow under pressure. For this writer, it was three half-turns of the tool in the primer pocket, with medium pressure.
Here, as with all bulk reloading operations, mechanization is our friend. A popular reloading supply house has developed an inexpensive adaptor that houses the chamfer/deburr tool (retained by an allen screw) and allows mounting in a hand drill or drill press. This speeds the operation significantly, as does use of one of the popular Case Preparation Stations that feature multiple powered operations. (Say good-bye to carpal tunnel syndrome and arthritis!)
One advantage of chamfering the primer pockets lightly to remove remnants of primer crimp, vs. swaging, is that primer pockets are not loosened in this process. US GI (usually LC) NATO 5.56 brass has a great reputation for longevity due to the superior hardness of the case head vs. some softer brands of commercial brass. This means the brass will stand up well to multiple full-pressure loads without loosening primer pockets, and the chamfering method helps support this benefit.
Powered Case Prep Centers — What to Look For
A word of advice (often learned the hard way) — think carefully before jumping on the “latest/greatest” case prep center. One with a proven, long-time track record of durability and excellent customer support has a lot going for it, vs. the flashy “new kid on the block.” Analyze the functions each case prep center can support simultaneously — i.e., can it chamfer, deburr and clean primer pockets all at the same time, without having to re-configure?
Do the tool-heads that come with it look truly functional and durable? If not, can they be easily replaced with proven or more-needed versions, such as a VLD chamfer tool, or a solid/textured primer pocket cleaner rather than a less-durable wire-brush type?
Tips for Priming with Progressive Presses
When re-priming, a couple of factors are worth noting. When re-priming using either single-stage presses, hand tools, or bench-mounted tools (such as the RCBS bench-mounted priming tool), precise alignment of the primer pocket entrance with the primer is easily achieved, and priming goes very smoothly. When using certain progressive presses, due to the tolerances involved in shell-heads, etc., one may occasionally encounter a primer that isn’t quite perfectly aligned with the primer pocket.
If resistance is felt when attempting to re-prime, DO NOT attempt to force the primer in — doing so can be dangerous! Rather, just exert SLIGHT upward pressure to keep the primer in contact with the case-head, and with the support hand, move the case back/forth a trifle. The primer will drop into alignment with the primer pocket, and then prime as usual. After priming, check each seated primer by feel. Ensure it is below flush with the case head (cleaning primer pockets helps here), and that there are no snags, burrs or deformed primers.
More Info on Primer Pocket Swaging
For more information about removing military crimps in primer pockets, we recommend you read Get the Crimp Out on the Squibloads Gun Thoughts Blog. This is a detailed, well-illustrated article that shows how to use various primer pocket reamers/cutters. It also has a very extensive discussion of swaging using CH4D, RCBS, and Dillon tools. The Squibloads author had much better luck with swaging tools than did the USAMU’s writer — so if you are considering swaging, definitely read the Squibloads article.
The illustration of primer pocket types is from the Squibloads Blog Article, Get the Crimp Out.
Share the post "How to Remove Primer Pocket Crimps from Fired Brass"
NOTE: If you prefer drying your brass in an oven we recommend a temp setting no higher than 200° F. Better yet, use a dedicated case dryer that cannot possibly over-cook your cases.
Tech Tip by Craig Arnzen of Area419.com
As wet-tumbling brass has become more popular in recent years, guys have tried a LOT of ways to get their brass dry — towels, hair dryers, and even food dehydrators. (See Top Ten Brass Drying Methods). Another common method — albeit with some potential issues — is putting your wet brass in the oven to dry. Provided you monitor TEMP and TIME, this method is fast, effective, and easy (as long don’t use the wife’s favorite cooking pans — that’ll get you in trouble.)
With oven-drying, however, unexpected issues can arise, as illustrated by this worrisome story: “I put my brass in for an hour at 200° F and turned it off. Next thing I know I realize my wife has the oven pre-heating to 350° F. Is my brass ruined?”
If you search the AccurateShooter.com Shooters’ Forum, you’ll find at least three threads with stories like that (i.e. higher-than-expected oven temps when drying brass), and answers on both sides of the line. I know this, because it happened to me — I had some 6XC brass drying and the wife pre-heated the oven. Concerned about my cases, I consulted a genuine annealing expert, Andrew Rixon.
Andrew is the Director of Engineering and Manufacturing at Alpha Munitions, makers of premium-grade rifle brass. I had baked a batch of Alpha’s new 6XC brass, which is exceptionally consistent and well-made.
Before Andrew would answer my question though, he gave me a little lesson on what really happens during annealing:
“Annealing is performed by heating the brass to specific temperatures. There are three phases of annealing: recovery, recrystallization, and grain growth. All of which have specific temperatures and or exposure times related to them. It is key for cartridge brass annealing processes to hit the recrystallization phase which allows for strain-free grains to grow. The growth of strain-free grains eliminate dislocations, drastically decreasing hardness and increasing ductility. For recrystallization to occur the material temperature must be within 600-1000 degrees Fahrenheit (F).”
He then got into really answering the question, and was (fortunately) definitive in his answer: “If the temps do not exceed 450 degrees F then there is nothing to worry about as it did not exceed the critical temperature for annealing to occur.” Editor: Caution — do NOT assume that the temperature marked on the oven knob is the actual temperature INSIDE the oven, particularly near the back. Some older ovens can be off as much as 75 degrees F. Be conservative!
Well, there you have it. If you’ve baked your brass, you’re probably OK. If you got it hotter than 450° F then there can start to be some changes to the metal, but we will let you learn more about that directly from Andrew, who is working on a lengthy, detailed article on the science of annealing, to be released later this summer.


 TEST RESULTS


 Here’s a cool video showing how bullet, brass, and ammunition are produced at the

 Norma has released a fascinating video showing how bullet, brass, and ammunition are produced at the
 If you search the AccurateShooter.com


 Tips for Priming with Progressive Presses


