Soon after Lapua released the 6.5×47 cartridge, wildcatters recognized the potential of a necked-down 6mm version of the case. The 6-6.5×47 has emerged as a great, do-it-all cartridge that performs well in High Power competition, 600- and 1000-yard benchrest, and PRS tactical matches. But the 6-6.5×47 is not just for paper-punching. An efficient cartridge with great inherent accuracy, the 6-6.5×47 can be an excellent, flat-shooting, long-range varmint round. Here we feature Stan Stewart’s BAT-actioned 6-6.5×47 varminter. Fitted with a Krieger 1:10″ barrel, Stan’s rifle excels with a wide variety of varmint bullets. Whether driving 70-grainers at 3700 fps, or pushing the Berger 88gr High-BC FB bullet at 3400 fps, this 6-6.5×47 delivers half-MOA (or better) accuracy, in a well-balanced, easy-handling rifle.
The 6-6.5×47 for Precision Long-Range Varminting
The rifle carries a 12-42x56mm Nightforce NSX in Nightforce rings “hand-lapped for optimal fit/alignment”.
‘Seller’s Remorse’ Spurs 6mm Project Report by Stan Stewart
After selling my 6mm Remington Ackley Improved a couple of years ago and wishing I hadn’t, I begun to think about a new custom rifle for work on Prairie Dog towns and New York wood chucks at 600+ yards. I have a .223 AR and 22-250 for medium ranges but I missed my 6mm AI for long-range work so I started asking questions.
The 22-250 is a fine chambering, but it is hard on barrels, and I think the 6mms may have an accuracy edge out past 400 yards. Also, shooters today enjoy a vast collection of really great 6mm bullets. Barrel life and bullet options were two main reasons I decided to build a 6mm rather than another .224-caliber gun. But the question remained… what 6mm chambering to choose?
I started doing serious research on the 6-6.5×47. I received a lot of good advice from AccurateShooter.com and other websites on the pros and cons. I also talked to gunsmiths — quite a few recommended the new cartridge as well. Some of the cartridge attributes I liked was the small rifle primer, enough case capacity to efficiently reach 3700 fps with a 70gr bullet and 3400 fps with an 85-grainer without being terribly over-bore. Most important was the 6-6.5×47’s reputation for inherent accuracy without being finicky like my 6mm AI. So, having chosen my cartridge, I started asking for gunsmith recommendations. Again the folks on the AccurateShooter.com Forum were very helpful. After many conversations I settled on Dave Bruno in Dayton, Pennsylvania. He was a good choice.
Putting Together the New Rig with Premium Components
From the get-go, I knew I wanted a BAT action and Krieger barrel. BAT Machine and Krieger Barrels enjoy a great reputation in the shooting industry. BATs are beautifully-machined, smooth, and strong. Krieger cut-rifled barrels are known for dependable accuracy and long barrel life. While many 6-6.5×47 shooters choose an 8-twist barrel to shoot the 100-108gr bullets, I would be using smaller, varmint-weight bullets, so I selected a 1:10″ twist Krieger. This would allow me to shoot bullets from 60 grains up to 90 grains. Dave chambered the barrel with a .269″ neck and fluted the barrel to save weight. I also had Dave install a Vais muzzle brake. Dave fitted the BAT with a 2 oz. Jewell trigger, mounted a +20 MOA scope rail, then pillar-bedded the BAT into a McMillan Hunter-Class-style fiberglass stock.
Load Development for Varminting
I had selected a few powders and bullets recommended by other 6-6.5×47 shooters and started by seating all the bullets .005″ off the lands. The powders I selected were Varget, Vihtavuori N-550, and Reloder 15.
I was very pleased with the 88gr Bergers. In initial testing, they grouped well and I was able to drive them to 3400 fps easily. As I wanted a gun for long-range varmint work, I was hoping the 1:10″-twist barrel would provide enough stability for the heavier weight bullets. It did — the 10-twist worked great! I was able to shoot the lighter weight bullets and the 88s were superb. With a BC of 0.391, leaving the barrel at 3400, these bullets were still traveling at 2600 fps at 600 yards!
I did a lot of testing, recording group sizes for a variety of different bullets (see below) and powders. With group size/velocity data in a spreadsheet I was able to “crunch the numbers” and choose my preferred loads. The data drew a clear picture of what the rifle shot best. Here is a chart showing comparative group sizes, arranged by bullet type. On the last three lines, powders are listed by average for all bullets.
Choosing a Varmint Bullet for Precision and Performance
Stan Stewart didn’t just grab a box of bullets off the shelf and head off to the varmint fields. He researched a broad selection of varmint bullets suitable for a 10-twist barrel. He did extensive group testing with a wide range of bullets from 70 grains to 90 grains. Shown below is a “line-up” of some of the bullets Stan tested in his gun.
Stan logged all load data, velocities, and group sizes in a very detailed Excel spreadsheet. Stan’s testing revealed that the light bullets delivered superb accuracy, but they were less than ideal for long shots out past 400 yards. Stan tried the Bart’s 70, Sierra 70 BlitzKing, Berger 80, Hornady 87, Berger 88 Lo-Drag, and Berger 90. Among these choices the Berger 88-grainer was the clear winner for long range (see test targets at right). With an 0.391 BC, this unique “Match Varmint High-BC Flat-Base” offers good ballistics, and high velocities. Stan’s average group size with the 88s was 0.40 inches, bettered only by the Bart’s 70-grainer. Stan’s 6-6.5×47 can launch the Berger 88s at a healthy 3400 fps, providing a highly accurate, flat-shooting solution.
Initially, Stan had high hopes for the Hornady 87-grain V-Max. Stan told us “I also tried the 87 gr Hornady but they didn’t perform to expectations. I am a big Hornady fan but these bullets varied in weight and just didn’t want to group well.” [Editor’s Note: While many varmint shooters have had great luck with the Hornady 87gr V-Max, this is not the first report we’ve received of disappointing results with these bullets. In the Editor’s own 8-twist 6BR, the 87s never shot as well as Bergers, Lapuas, or Sierras in the 85-90 grain range.]
Final Thoughts on the 6-6.5×47 Lapua
I have owned three rifles chambered in 22-250 and will always own a rifle in this caliber because it is inherently accurate and drives a 50gr bullet at 3800 fps. No question the 22-250 can be deadly out to 500 yards. However, I’ve found that shooting past 400 yards with the light bullets is difficult if there is any wind at all. That’s why I liked my 6mm AI for those longer shots and why I decided on the 6-6.5×47 Lapua. I couldn’t be happier with my choice. The only thing that could make it better is if Lapua would produce the 6-6.5×47 as an “official” factory 6mm cartridge with 6mm necks right out of the box. But overall, I am very happy with the cartridge, and I thank Dave Bruno for producing a superbly accurate varmint rifle.
This report is from Bryan Litz and the ScienceofAccuracy.com website.
As long as there have been rifles, there has been a debate as to how much – if any – the rifle moves prior to the bullet exiting the bore. The first video below shows a Barrett MRAD chambered in .338 Lapua Magnum firing a 300gr Lapua Scenar bullet. Capturing projectiles at 100k+ frames per second allows us to visualize aspects of the firing sequence that are otherwise invisible to the human eye.
Click Video to see barrel with suppressor (on right) move with recoil before bullet exits.
What is clear from this video is that the rifle system is moving rearward while the bullet is traveling through barrel and subsequently through the suppressor. During the “in-bore” portion of bullet travel, any deviation of the muzzle orientation from the initial point of aim can cause a point of impact change. This is because the bullet will exit while the barrel is pointed somewhere different than when the shot was initially fired. Much of the shot’s point-of-aim orientation can be maintained through consistent marksmanship fundamentals and recoil management techniques. However, most shooters are not likely capable of managing it to less than 0.001″ for EVERY shot, especially given on lightweight magnum rifles.
Here’s another example with a 180gr bullet in a Rem 700 BDL .30-06 rifle. “Every time we watch a video like this it reminds us that guns like this, the majority of accuracy and precision come from the gun/sight/support system, not the ammo. When you consider that 0.005″ of muzzle deflection, (orthogonal to the bore) results in ~1.5 moa of dispersion (.75 in any direction) and you see this massive barrel movement prior to bullet exit, it’s clear that the vast majority of dispersion [for typical rifles] is coming from this movement”.
Precision rifle systems, such as benchrest, PRS, and F-Class rifles, tend to minimize the movement away from the bore axis prior to bullet exit to achieve the best possible precision. A common theme among the most precision systems is higher-weight rifles with lower-weight projectiles. This relates to basic physics: Newton’s Third of Motion “For every action, there is an equal and opposite reaction.” With all else held equal, if the rifle weighs more and the bullet weighs less, there is a lower magnitude of motion prior to the bullet leaving the barrel.
In our latest book, Modern Advancements in Long Range Shooting Volume III, Chapter 3 covers the Theory of Precision for Rifles which mathematically describes and estimates the precision potential of rifles based on rifle mass and kinetic energy of the bullet. The chapter includes all the live fire test data to support the theory and great discussion on the testing performed can be found on our podcast at the Science of Accuracy Academy website.
Hodgdon Powder Company (Hodgdon) offers a series of professionally-produced, “how-to” instructional videos on its online Reloading Data Center. These 3.5-minute videos present rifle, pistol, and shotshell reloading basics in an easy-to-understand, step-by-step format. These mobile-friendly, informative videos can also be viewed on a smart phone or tablet.
Along with these videos, you’ll find a ton of useful information on Hodgdon’s updated Reloading Data Center at hodgdon.com. From the landing page choose rifle, pistol, shotgun, or muzzle-loader, and then click “Get Details”. This will launch a page where you can find loads by selecting Cartridge, Bullet Weight, Powder Maker, and Powder Type (such as Varget or H4350).
Click to Watch Hodgdon Rifle Reloading Video:
Click to Watch Hodgdon Pistol Reloading Video:
In addition to these videos, Hodgdon’s Reloading Data Center (RDC) provides a wealth of information on Hodgdon®, IMR®, Accurate, Ramshot®, and Winchester® propellants. Along with reliable load data, you’ll find explanations of reloading basics, safety procedures, plus answers to frequently asked questions (FAQ).
Share the post "Learn Reloading Basics with Hodgdon Instructional Videos"
by Sierra Bullets Ballistic Technician Paul Box
One thing that plays a major role in building an accuracy load is neck tension [one of the factors that controls the “grip” on a bullet]. I think a lot of reloaders pretty much take this for granted and don’t give that enough thought.
So, how much neck tension is enough?
Through the years and shooting both a wide variety of calibers and burn rates of powder, I’ve had the best accuracy overall with .002″ of neck tension. Naturally you will run into a rifle now and then that will do its best with something different like .001″ or even .003″, but .002″ has worked very well for me. So how do we control the neck tension? Let’s take a look at that.
First of all, if you’re running a standard sizing die with an expander ball, just pull your decapping rod assembly out of your die and measure the expander ball. What I prefer [for starters] is to have an expander ball that is .003″ smaller than bullet diameter. So for example in a .224 caliber, run an expander ball of .221″. If you want to take the expander ball down in diameter, just chuck up your decapping rod assembly in a drill and turn it down with some emery cloth. When you have the diameter you need, polish it with three ought or four ought steel wool. This will give it a mirror finish and less drag coming through your case neck after sizing.
Tips for Dies With Interchangeable Neck Bushings
If you’re using a bushing die, I measure across the neck of eight or ten loaded rounds, then take an average on these and go .003″ under that measurement. There are other methods to determine bushing size, but this system has worked well for me.
Proper Annealing Can Deliver More Uniform Neck Tension
Another thing I want to mention is annealing. When brass is the correct softness, it will take a “set” coming out of the sizing die far better than brass that has become too hard. When brass has been work hardened to a point, it will be more springy when it comes out of a sizing die and neck tension will vary. Have you ever noticed how some bullets seated harder than others? That is why.
Paying closer attention to neck tension will give you both better accuracy and more consistent groups.
Share the post "Optimize Case Neck Tension with Bushings, Expanders, Annealing"
For many Americans, real incomes have stayed flat in recent years, while inflation has increased the cost of living very significantly in the past four years. Accordingly, it’s important to save money whenever possible. Prices are going up, but wages aren’t following (for most of us). Here are six ways shooters can save money on gear purchases and other shooting-related expenses.
1. Watch for Our Deals of the Week. Every Monday, in our Daily Bulletin, AccurateShooter.com offers some of the best deals to be found. We search the web to find great deals on ammo, reloading components, optics, tools, firearms, gun safes, electronics and more. It’s not unusual to find savings of 20-35% through our Deals of the Week. And many of our vendors are now offering special deals just for AccurateShooter.com readers.
2. Check Out the Forum Classifieds. There are great deals to be found every day in the AccurateShooter Shooters’ Forum. The latest deals are displayed in the right column of every Forum page. To see all the listings, browse through the Forum MarketPlace section which has four main categories:
Guns, Actions, Stocks, & Barrels
Tools, Dies, Rests, Reloading Components & Misc
Scopes, Optics, Sights, Rings, Bases Etc.
Commercial Sales by Paid Sponsors
3. Share a Ride to Matches. Fuel prices are on the rise — regular-grade gasoline is $5.13 per gallon in California now and around $3.54/gallon nationwide. With many shooters living 30-100 miles from the nearest range, fuel remains a big part of a shooter’s hobby budget. We’d say 90% of shooters drive solo to matches, often in large, gas-guzzling trucks. If you drive 200 miles round-trip to attend a match in a 20-mpg vehicle, you’ll burn over $35.40 worth of gasoline on your trip. That adds up. By simply sharing the ride with one fellow shooter you cut your fuel expenditures in half. And, if you alternate vehicles with a buddy from one match to the next, you save on vehicle wear and tear. At $0.58/mile (overall operating costs) consider the savings.
4. Use Discount Codes to Save. It’s always smart to check for discount codes before you buy. In the Daily Bulletin, we feature “Deals of the Week” every Monday morning, and we provide discount Coupon Codes when available. These can reduce the price substantially or lower shipping costs. Search codes for Brownells, Creedmoor Sports, EuroOptic, Graf’s, Midsouth, Powder Valley, Sportsman’s Warehouse, KYGUNCO, MidwayUSA, and Precision Reloading. Check your email also — some discount codes are only announced in email newsletters. If you can’t find a Coupon Code for your preferred vendor, visit Gun.deals and/or RetailMeNot.com. Both those sites list current coupon codes, and RetailMeNot.com covers thousands of vendors.
5. Shop for “Demo” Optics. Modern high-quality optics can easily cost $1500.00 or more, often exceeding the value of the rifle on which they are mounted. However, you can often save 20-30% by purchasing demo optics. These are normally display units used at trade shows. They may have slight ringmarks, but otherwise they are “as new”, having never been carried in the field or used on a rifle that has fired live ammo. When purchasing demo scopes, you should always ask about the warranty before consummating the sale. However, most demo scopes from name-brand manufacturers come with full factory warranties. EuroOptic.com and SWFA.com are two respected vendors that offer a good selection of demo optics.
6. Train with Rimfire Rifles. Good match-grade centerfire, hand-loaded ammo, counting premium bullets, powder, primers, and brass (figuring 10X loads), can now exceed $1.50 per round. And if your $600 (as chambered and fitted) competition barrel is toast after 1500 rounds, add $0.40 for barrel deprecation per shot. So you’re approaching two bucks a round total! By contrast, you can get quite good .22 LR target ammo for under $0.18 per round. Good rimfire barrels last a long, long time, so you don’t have to be concerned about wearing out your barrel quickly. A quality rimfire barrel can retain its accuracy for 7,000 rounds or more. If you run the ballistics, a .22 LR round at 100 yards can emulate the wind drift experienced by a centerfire cartridge at long range. This allows for effective cross-training with much less expensive ammo.
Share the post "Six Ways Shooters Can Save Money This Spring"
Creedmoor Sports has recently expanded and updated the Creedmoor Sports InfoZone. This web resource contains valuable information about reloading, rifle maintenance, marksmanship skills, and gunsmithing. In addition, the InfoZone has Competition Reports, numerous Gear Reviews, and general Shooting Sports News.
For this Saturday Showcase, you’ll find five InfoZone Videos hosted by Bill Gravatt, President of Creedmoor Sports. There are over 85 other videos on the Creedmoor Sports YouTube Channel. Bill Gravatt is an expert on reloading processes and gear. He developed many of the popular tools for Sinclair Int’l, and now he directs operations for Creedmoor Sports.
Reloading Procedures with Bill Gravatt
Here are five helpful videos Bill Gravatt created for the Creedmoor Sports InfoZone. These videos cover a variety of essential processes for handloading. In addition Bill Shows how to find the exact twist rate in your rifle barrels.
How to Determine a Barrel Twist Rate
Bill Gravatt of Creedmoor Sports demonstrates an easy method to determine your barrel’s twist rate. Knowing the twist rate is essential to selecting suitable bullets for your discipline.
How to Seat Bullets with Inline Press
Many top Benchrest and F-Class shooters favor inline presses for bullet seating. With good hand dies (such as Wilson) and a inline Arbor press (such as a 21st Century), you can get great results with super seating depth consistency and very low run-out.
How to Trim Cases with L.E. Wilson Trimmer
There are many ways to trim cartridge brass. If you need to trim hundreds of cases it may pay to have a dedicated power trimmer. However, for most rifle shooters, a good hand trimmer will do the job very well. We regularly use a Wilson trimmer to trim our cases, as demonstrated in this video.
How to Clean Cartridge Cases
It is important to regularly clean cartridge brass. There are many different means. Wiping the outside with a solvent is a good start. For more thorough cleaning inside and out tumbling or wet-tumbling will do the job. After tumbling in media, you should always check the primer pockets and flash holes before loading.
How to Clean Reloading Dies
Cleaning your reloading dies is something that many who reload often neglect. In this 60-second Tech Tip, Bill Gravatt provides some tips on cleaning your reloading dies.
BONUS Video: How to Fine Tune Seating Depth
Now that you’ve learned Reloading Basics from the Creedmoor Sports videos, here’s a great video from our friend Keith Glasscock that will help you get optimal results when seating bullets. Keith is one of America’s greatest F-Class competitors, with multiple podium finishes at F-Class National Championships. With over 213,000 views, this is the most popular video Keith has created for his Winning in the Wind YouTube Channel.
About Creedmoor Sports — 45 Years of Service to Marksmen
For the past 45 years, since 1979, Creedmoor Sports has been supplying quality equipment and supplies to avid shooters in a wide variety of disciplines: Rimfire, F-Class, PRS/NRL, Silhouette, Service Rifle, Benchrest, and more. Specializing in competitive centerfire, smallbore, and air rifle accessories, as well as reloading components and tools, Creedmoor Sports seeks to provide its customers with the right gear to help them achieve their personal shooting goals.
Share the post "Saturday at the Movies: Creedmoor Sports InfoZone Showcase"
Today is Good Friday and Easter will be celebrated Sunday, March 31, 2024. In connection with this Easter weekend, many companies are currently offering Easter-themed discounts and promotions. Here we list some of the top bargains and discounts you can get.
There is a good list of Easter Weekend Sales on the PewPewTactical.com website. You’ll find a selection of ammo bargains for .22 LR, 9mm Luger, .223 Rem/5.56, and Shotgun Ammunition.
Now through Monday, April 1st at 12:00 pm Central Time, you can get FREE Ground Shipping on all Creedmoor Sports purchases over $99.00. Use CODE EASTER24. NOTE: Certain exclusions apply.
Palmetto State Armory Easter Deals
Palmetto State Armory is running a pretty big Easter-themed sale. You’ll find complete AR-15 Blem lower starting at just $149.99, major discounts on S&W, SIG Sauer, and Taurus handguns, plus significant discounts on a wide variety of major-brand optics.
Brownells Discount Codes for March 2023
For the month of March, Brownells has three special discount codes. These codes can save you up to 15% on a major purchase:
$20 Off Orders $200+. Use Code MARCH20
$55 Off Orders $500+. Use Code MARCH50
$152 Off Orders $1000+. Use Code MARCH120
In addition, there are other current Brownells Discount Codes running which may be available for longer periods (no specific expiration date — may end soon).
10% OFF $150+. Use Code TTB10
$10 Off $100+. Use Code GIFT10
15% OFF Select Optics. Use Code OPTICS15
Share the post "Easter Weekend Sales — Product Savings and Discount Codes"
by Sierra Bullets Ballistic Technician Paul Box This cartridge was introduced by Winchester in 1935 in their model 54 rifle. A year later, it was added as a standard cartridge in the model 70. What might not be common knowledge to some reloaders is that the prototype for the Swift was developed in 1934-35 by Grosvenor Wotkyns by necking down the 250 Savage case, but in the end, Winchester chose the 6mm Lee Navy case for the foundation for this cartridge.
This cartridge was far ahead of its time and for that reason it received a lot of bad press. We’ve all read the horror stories through the years. Many of those stories were just simply repeated from previous articles even the wording was just slightly different. So how bad was the Swift? Let’s take a deeper look.
Some of the early Swifts had soft barrel steel and some of the rare ones even had barrels that were .223 in bore size. This stemmed from the fact that the .22 Hornets prior to the end of World War II were .223 in bore size and some of these barrels were chambered in the Swift. It was rumored that the Swift peaked in pressure far too quick. I’ll bet they did with a turkey extra full choke barrel.
Burn rates of powders were limited at that time as well, so the Swift was limited in its true ability due to that. It was almost like building a funny car for drag racing when only kerosene was available.
One of the longest lasting black eyes was that it shot barrels out so fast. If you get the barrel branding iron hot and fail to clean it often this can happen. Common sense will go a long ways here. Keep the barrel as cool as you can and properly clean it every fifteen rounds or less will go a long way to improving accuracy life of a Swift.
So what is the real truth about this cartridge? I’m glad you ask. I’ve been shooting the .220 Swift for over 43 years now. It is one of the best varmint cartridges I’ve ever owned. It is not hard to load for, it doesn’t suddenly peak in pressure and it isn’t the barrel burner that you’ve heard. Hodgdon powders once reported a Remington 40-X with over 3,000 rounds of full power loads averaged .344” for five, 5-shot groups. My findings have been the same. It isn’t as hard on barrels as it has been made out to be.
I’ve also read that down loading it slightly will help in barrel life. This is true, but if you buy a thoroughbred you want him to run. Barrels are threaded on the end for a reason. If you have enough fun to shoot out a Swift barrel, just rebarrel it.
The bottom line is enjoy the .220 Swift for what it was meant to be. The popularity of the Swift has slipped in the last twenty years and few factory rifles are now available in this caliber. There is no reason for this and I know the Swift will always have a strong and loyal following.
Share the post "The .220 Swift — Great, Classic Varmint Cartridge"
He who dies with the most toys wins — right? Well Sinclair has another interesting gadget you can add to your reloading bench. The Sinclair Case Neck Sorting Tool lets you quickly sort brass by neck-wall thickness. For those who shoot “no-turn” brass, this can improve neck-tension consistency. Large variances in neck-wall thickness can cause inconsistent neck “grip” on the bullet. Generally, we’ve found that more consistent neck tension will lower ES and (usually) improve accuracy. We know some guys who shoot no-turn 6mmBR brass in competition with considerable success — but their secret is pre-sorting their brass by neck-wall thickness. Cases that are out-of-spec are set aside for sighters (or are later skim-turned).
Watch Case Neck Sorting Tool Operation in Video
How the Case Neck Sorting Tool Works
Here’s how the Sinclair tool works. Cases are rotated under an indicator tip while they are supported on a case-neck pilot and a support pin through the flash hole. The unit has a nice, wide base and low profile so it is stable in use. The tool works for .22 through .45 caliber cases and can be used on .17- and .20-caliber cases with the optional carbide alignment rod. The MIC-4 pin fits both .060 (PPC size) and .080 (standard size) flash holes. Sinclair’s Case Neck Sorting Tool can be ordered with or without a dial indicator. The basic unit without dial indicator (item item 749006612) is priced at $59.99. You can also buy the tool complete with dial indicator (item 749007129) for $89.99. IMPORTANT: This sorting tool requires caliber-specific Case Neck Pilots which must be ordered separately.
Editor’s Comment: The purpose of this Sinclair tool is rapid, high-quantity sorting of cartridge brass to ascertain significant case-neck-wall thickness variations. Consider this a rapid culling/sorting tool. If you are turning your necks, you will still need a quality ball micrometer tool to measure neck-wall thickness (to .0005) before and after neck-turning operations.
Share the post "Handy Case Neck Sorting Tool for Non-Neck-Turned Brass"
At the request of our readers, we provide select “Deals of the Week”. Every Sunday afternoon or Monday morning we offer our Best Bargain selections. Here are some of the best deals on firearms, hardware, reloading components, optics, and shooting accessories. Be aware that sale prices are subject to change, and once clearance inventory is sold, it’s gone for good. You snooze you lose.
NOTE: All listed products are for sale to persons 18 years of age or older. No products are intended for use by minors.
⏺ Get 15X Binocs worth $1799 Free with LRP S5 Scope
Here’s a great optics deal. Purchase a ZEISS LRP S5 riflescope and get the ZEISS Conquest HD 15×56 binoculars for FREE — a $1799.99 value. Choose either of the two LRP S5 scope versions: 3-18x50mm and 5-25x56mm. Both are FFP with premium Schott glass and 34mm main tubes. These optics boast an impressive 40.7 MRAD or 140 MOA of total elevation with two reticle options, a ZF-MRi or ZF-MOAi. The Conquest HD 15×56 binocular comes with a ZEISS tripod adaptor. American Rifleman says this is a great offer: “With the purchase of an LRP S5, new owners can receive a free Conquest HD 15x56mm binocular. The riflescope is an excellent choice for PRS and NRL competitions or long-range hunting.”
2. Savage Axis II XP with 4-12X Scope, $429.99
⏺ Nice hunting rifle complete with Bushnell scope
Need a hunting rifle? Here’s a great deal on a Savage Axis II bolt-action rifle, complete with mounted Bushnell 4-12x40mm scope. This has a nice tan/brown stock plus a user-adjustable AccuTrigger. Total price, with scope, is just $429.99. Choose one of six (6) available chamberings: .223 Rem, 22-250, .243 Win, 6.5 Creedmoor, .308 Win, 350 Legend.
3. Midsouth — Blem Bullets Sale, Save 20-33%
⏺ Major savings on big-name bullets in many calibers
Need bullets for your varmint, hunting, or tactical rifle? Right now Midsouth has major-brand bullets on sale at huge discounts. Get 100 bullets for as little at $13.99! These bullets may have a small blemish or visual defect or weight inconsistencies. Some are simply “factory seconds”. With all these items you can save 22-33% off the regular price. NOTE: Along with the six featured blem bullet types shown above, there are over 50 other bullet types on sale including pistol and large rifle calibers.
⏺ Save $100 on Lyman Combo with Turret Press and Gen 6 Powder Dispenser
This is a great kit if you load many different cartridge types, as the Lyman turret press holds 8 dies. This Lyman Ultimate Reloading System Kit includes ALL the following: 8-Station Turret Press, Electronic Powder Dispenser, Pro 1200 Turbo Tumbler, E-ZEE Prime Hand Priming Tool, Universal Trimmer, Magnum Inertia Bullet Puller, Case Prep Multi Tool, Steel Calipers, Bench wrench, Loading Block, Case Lue, and Lyman Reloading Handbook. You get all that for $569.99 — $100 off the regular price. This is a great Combo Deal — you could pay $240+ for this turret press alone
⏺ Fun rimfire rifle complete with optic — good owner reviews
Here’s a fun semi-auto .22 LR rifle at a crazy low price — $224.99 complete with a mounted Red Dot Reflex optic. Plus with the Winchester Warm-Up Rebate you get $25 back, lowering your net cost to just $199.99. Offer valid for purchases through March 26, 2024. CLICK HERE to submit Winchester Rebate Form.
The Winchester Wildcat takes Ruger 10/22 mags, and has some great features, such as field-removable lower receiver, ambidextrous controls, integral Picatinny rail, and rear barrel access. It has a good trigger and shoots well. In many respects the Wildcat beats the Ruger 10/22 while costing a lot less. If you don’t need the optic, you can get a basic Wildcat for $199.99 with Strata camo stock or $174.99 after rebate.
6. EuroOptic — Trijicon Close-Out Scope Sale
⏺ Huge discounts on high-quality Trijicon scopes
While supplies last, save up to 57% on these Trijicon Tenmile and Credo closeout riflescopes! User review of these optics have been very positive. Choose the 3-9x40mm Trijicon Huron BDC Hunter for $349.99, the 6-24x50mm Tenmile FFP for $849.99 (great PRS/NRL optics), or the innovative 1-8x28mm Trijicon Credo EX (good for ARs) for $999.99 (over $900 off!).
7. Midsouth — 2000 Rounds Aguila .22 LR ammo, $119.99
⏺ Good reliable ammo for just six cents a round with FREE shipping
Here is one of the best deals on rimfire ammunition that we’ve seen in years. Right now at Midsouth, you can get 2000 rounds of Aguila .22 LR Super Extra HV ammo for just $119.99 with FREE Shipping. That works out to just $3.00 per box (6 cents per round). This would work great for pistol and rifle plinking.
8. MidwayUSA — Electronic Muffs with Walkie-Talkie, $59.99
⏺ Dual-function electronic muffs — great for range communications
Electronic earmuffs protect your hearing while allowing you to hear range commands. With these Walkie-Talkie muffs you also get 2-way communication capabilities. The Walker Razor Slim Low Profile Electronic Earmuffs (NRR 23dB) with Walkie Talkie allows you to communicate with other FRS radios. That lets you give range commands or talk with friends without the need for a second radio. If you don’t need the two-way functionality, MidwayUSA also has the NRR 26 Walker’s Alpha Power Electronic Muffs for $34.99 — a 50% savings off the regular price.
9. Creedmoor Sports — Spring Rifle Cleaning Tools & Supplies
⏺ Save on cleaning tools, solvents, patches, brushes and more
With the shooting season getting started, it’s time for “spring cleaning”. Creedmoor Sports has a variety of good products for firearms cleaning, including specialty items for ARs. Show above are six of the items we liked, but there are dozens of other tools including brushes, cleaning mats, cleaning rods holder, solvents and more. These and other cleaning tools and supplies can be found on the Creedmoor Sports Cleaning & Maintenance webpage.
⏺ Great price on handy Hi-Viz adhesive target dots
Targ-Dots Instant Targets from Lyman work great and come in three sizes. For the same $3.79 price you can get a 100-ct pack of 1″ diameter targets, a 45-ct pack of 2″ targets, or a 25-ct pack of 3″ targets. These stick-on Targ-Dot hi-viz target circles have an adhesive for easy placement on your target backer. User reviews have been very positive.
Share the post "BargainFinder 444: AccurateShooter’s Deals of the Week"
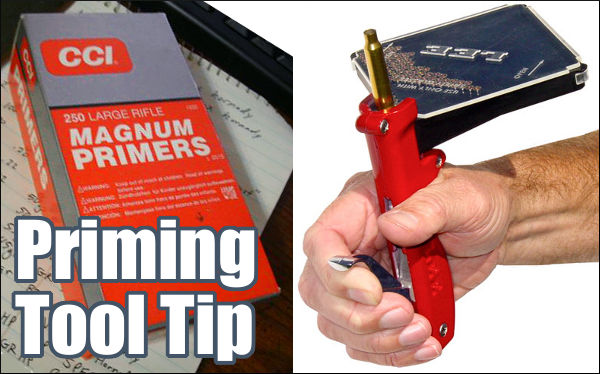
From time to time, we all encounter a primer that doesn’t go off. It’s normal to attribute the problem to a bad primer. But sometimes there are other explanations. George S., one of our Forum members, experienced a couple failures to fire, but he learned that the issue was his priming TOOL, not his primers. Here’s what George told us. There’s a lesson to be learned:
“I had issues with CCI 450s when I had my first 6BR barreled. I had probably three or four out of 20 rounds that failed to fire. the primers were dented but didn’t fire. I called CCI since I had bought a case of them. The tech was decent enough but had the audacity to tell me I was not seating the primers all the way in the pocket. I proceeded to let him know I had been reloading longer than he had been alive and I knew how to seat a primer.
Turns out that I did and I didn’t! I was using the RCBS primer tool I had used for years and the primers felt just fine to me. I finally decided to check the tool and since I had a new one I took the seating pins out and measured them. The seating pin on the tool I had been using for years was shorter by a few thousandths! I then used the pin from the new primer tool and darned if the primers that didn’t seat down to the bottom of the cup.
I switched to a K&M primer tool for seating the CCI primers and have not had a problem since. It was the combination of harder cup and lack of proper seating. I did call the CCI tech back and apologized for being an idiot.”
Another Forum member witnessed a problem cause by misuse of a priming tool: “I did … see a failure to fire on a Rem 9 1/2 primer only a week ago. That was in the new Rem muzzleloader that uses a primed case to ignite the pellets. After watching the muzzleloader’s owner seat his primers, I believe that it was operator error not the primer. He was seating the primer and then squeezing the priming tool so hard that his hands hurt after a few. We got that corrected.”
Share the post "Primer Problems? Check Your Primer Seating Tool"
Want to improve your understanding of Ballistics, Bullet Design, Bullet Pointing, and other shooting-related tech topics? Well here’s a treasure trove of gun expertise. Applied Ballistics offers dozens of FREE tech articles on its website. Curious about Coriolis? — You’ll find answers. Want to understand the difference between G1 and G7 BC? — There’s an article about that.
“Doc” Beech, technical support specialist at Applied Ballistics says these articles can help shooters working with ballistics programs: “One of the biggest issues I have seen is the misunderstanding… about a bullet’s ballistic coefficient (BC) and what it really means. Several papers on ballistic coefficient are available for shooters to review on the website.”
Credit Shooting Sports USA Editor John Parker for finding this great resource. John writes: “Our friends at Applied Ballistics have a real gold mine of articles on the science of accurate shooting on their website. This is a fantastic source for precision shooting information[.] Topics presented are wide-ranging — from ballistic coefficients to bullet analysis.”
Here are six (6) of our favorite Applied Ballistics articles, available for FREE to read online. There are dozens more, all available on the Applied Ballistics Education Webpage. After Clicking link, select Plus (+) Symbol for “White Papers”, then find the article(s) you want in the list. For each selection, then click “Download” in the right column. This will send a PDF version to your device.
Share the post "Access Great Applied Ballistics Tech Articles for FREE"


 ‘Seller’s Remorse’ Spurs 6mm Project


 Final Thoughts on the 6-6.5×47 Lapua


 2. Check Out the Forum Classifieds. There are great deals to be found every day in the AccurateShooter
  3. Share a Ride to Matches. Fuel prices are on the rise — regular-grade gasoline is $5.13 per gallon in California now and around $3.54/gallon nationwide. With many shooters living 30-100 miles from the nearest range, fuel remains a big part of a shooter’s hobby budget. We’d say 90% of shooters drive solo to matches, often in large, gas-guzzling trucks. If you drive 200 miles round-trip to attend a match in a 20-mpg vehicle, you’ll burn over $35.40 worth of gasoline on your trip. That adds up. By simply sharing the ride with one fellow shooter you cut your fuel expenditures in half. And, if you alternate vehicles with a buddy from one match to the next, you save on vehicle wear and tear. At
  4. Use Discount Codes to Save. It’s always smart to check for discount codes before you buy. In the Daily Bulletin, we feature “Deals of the Week” every Monday morning, and we provide discount Coupon Codes when available. These can reduce the price substantially or lower shipping costs. Search codes for Brownells, Creedmoor Sports, EuroOptic, Graf’s, Midsouth, Powder Valley, Sportsman’s Warehouse, KYGUNCO, MidwayUSA, and Precision Reloading. Check your email also — some discount codes are only announced in email newsletters. If you can’t find a Coupon Code for your preferred vendor, visit
  5. Shop for “Demo” Optics. Modern high-quality optics can easily cost $1500.00 or more, often exceeding the value of the rifle on which they are mounted. However, you can often save 20-30% by purchasing demo optics. These are normally display units used at trade shows. They may have slight ringmarks, but otherwise they are “as new”, having never been carried in the field or used on a rifle that has fired live ammo. When purchasing demo scopes, you should always ask about the warranty before consummating the sale. However, most demo scopes from name-brand manufacturers come with full factory warranties.
  6. Train with Rimfire Rifles. Good match-grade centerfire, hand-loaded ammo, counting premium bullets, powder, primers, and brass (figuring 10X loads), can now exceed $1.50 per round. And if your $600 (as chambered and fitted) competition barrel is toast after 1500 rounds, add $0.40 for barrel deprecation per shot. So you’re approaching two bucks a round total! By contrast, you can get quite good .22 LR target ammo for under $0.18 per round. Good rimfire barrels last a long, long time, so you don’t have to be concerned about wearing out your barrel quickly. A quality rimfire barrel can retain its accuracy for 7,000 rounds or more. If you run the ballistics, a .22 LR round at 100 yards can emulate the wind drift experienced by a centerfire cartridge at long range. This allows for effective cross-training with much less expensive ammo.


 This cartridge was introduced by Winchester in 1935 in their model 54 rifle. A year later, it was added as a standard cartridge in the model 70. What might not be common knowledge to some reloaders is that the prototype for the Swift was developed in 1934-35 by Grosvenor Wotkyns by necking down the 250 Savage case, but in the end, Winchester chose the 6mm Lee Navy case for the foundation for this cartridge.


 He who dies with the most toys wins — right? Well Sinclair has another interesting gadget you can add to your reloading bench. The Sinclair