Do you have .20-Cal fever? Do you yearn to see what a 4200+ fps projectile can do to an unsuspecting prairie dog? Well you could go out and purchase a 204 Ruger rifle, fork over the money for a new, complete die set, and hope that the brass is in stock. Warren B (aka “Fireball”) has a more cost-effective solution. If you have .223 Rem dies and brass, all you need to shoot the 20 Practical is a new barrel and a .230″ bushing to neck down your .223 Rem cases. Warren’s wildcat is simple, easy, and economical. And the 20 Practical matches the performance of the highly-publicized 20 Tactical with less money invested and no need to buy forming dies or fire-form cases. Warren’s cartridge was aptly named. Practical it is.
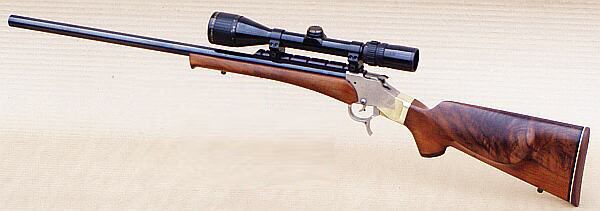
20 Practical Tikka Bolt Action for Varminting
by Warren B (aka “Fireball”) and Kevin Weaver
After building my 20 PPC, I wanted to do another .20 caliber, this time a repeater for predator hunting that could also serve as a gopher/prairie dog rifle. I wanted to use a Tikka M595 stainless sporter I had. This rifle is the ultimate repeater with an extremely smooth-feeding cycle from its single-column magazine. Since the Tikka was a .223 Remington from the factory, I first looked at possible case designs that would fit the magazine. The 204 Ruger was a very new round at the time and brass was scarce. I also didn’t care for the overly long case design or the standard throat dimensions of the cartridge. I then looked at the 20 Tactical. It was a nice cartridge but I didn’t like the fact that (at the time) an ordinary two-die Tac 20 set with just a plain full-length die and standard seater were $150. Not only did the costs bother me, but I was accustomed to using a Redding die set featuring a body die, a Type-S bushing neck die, and a Competition seater. To be honest, I also didn’t care for the 20 Tactical’s name–there is absolutely nothing tactical about the cartridge. I didn’t want to adopt a new cartridge based on what I perceived to be a marketing gimmick (that “tactical” title).
Warren B, aka “Fireball”, with his Tikka 595. With its smooth action and phenolic single-column mag, it cycles perfectly in rapid fire.
Simply Neck Down .223 Rem to Make a 20-223 Wildcat
I decided the best thing to do for my purposes was to simply neck down the .223 Rem case and make a 20-223. I already had the dies, the brass, and a rifle that would feed it perfectly. I decided to call the cartridge the 20 Practical because as you will see in this article, it truly is a very practical cartridge. In addition to the generous and inexpensive availability of brass and dies, the 20 Practical is an easy case to create, requiring no fire forming as a final step. Simply neck your .223 Rem cases down, load and shoot.
[Editor’s Note: Over the years, other shooters have experimented with .223 Remington cases necked down to .20 caliber, some with longer necks, some with different shoulder angles. Warren doesn’t claim to be the first fellow to fit a .20-caliber bullet in the .223 case. He gives credit to others who did pioneering work years ago. But he has come up with a modern 20-223 wildcat that involves no special case-forming, and minimal investment in dies and tooling. He commissioned the original PTG 20 Practical reamer design, and he and Kevin did the field testing to demonstrate the performance of this particular version.]
I chose Kevin Weaver at Weaver Rifles to fit and chamber the barrel to my rifle. Kevin does excellent work and is great to work with. Kevin liked the idea of the 20 Practical so much he agreed to purchase the project reamer. (BTW Kevin didn’t even need to purchase a Go/No-Go gauge, he just used an existing .223 Rem gauge.)
Before Kevin ordered the reamer, I talked over the reamer specs with him. My priorities were tolerances on the tight end of the .223 Rem SAAMI specification, a semi-fitted neck with no need for neck-turning, and a short throat so that we could have plenty of the 32gr V-Max in the case and still touch the lands. I also wanted this short throat in case [anyone] wanted to chamber an AR-15 for the 20 Practical. A loaded 20 Practical round will easily touch the lands on an AR-15 while fitting into the magazine with no problem. With its standard 23-degree shoulder, the 20 Practical case also feeds flawlessly through an AR-15.
As for the barrel, I only use Liljas on my rifles. I have had great luck with them. They have always shot well and they clean up the easiest of any barrels that I have tried. I had previously sent my Tikka barreled action to Dan Lilja so that he could program a custom contour into his equipment and turn out a barrel that would perfectly fit the factory M595 sporter stock. There isn’t much material on an M595 sporter stock so the contour had to match perfectly and it did. Dan Lilja now has this custom contour available to anyone who would like to rebarrel their M595 sporter with one of his barrels.
There Are Plenty of Good .204-Caliber Varmint Bullet Options
How to Form 20 Practical Cases — Simple and Easy
Forming 20 Practical cases is very easy. No fire-forming is required. Start with any quality .223 Rem brass. Then simply run the case into your bushing die with the appropriate bushing and call it done.
Project Componentry
My 20 Practical rifle started out as a Tikka Model 595 Stainless Sporter in .223 Remington. Though the M595 is no longer imported, if you shop around you can find M595 Sporters for bargain prices. Mine cost under $500. I think the action alone is worth that! The receiver has a milled dovetail for scope rings plus a side bolt release like expensive BR actions. The bolt cycles very smoothly. Ammo is handled with super-reliable 3- or 5-round detachable single-column magazines (FYI, Tikka’s M595 22-250 mags will feed a 6BR case flawlessly.) We kept the standard Tikka trigger but fitted it with a light-weight spring. Now the trigger pull is a crisp 1.8 pounds–about as good as it gets in a factory rifle. We replaced the factory tube with a custom, 24″, 3-groove Lilja 12-twist barrel. Dan Lilja created a special M595 sporter contour to allow a perfect “drop-in” fit with the factory stock. For optics, I’ve fitted a Leupold 4.5-14x40mm zoom in low Talley light-weight aluminum mounts. All up, including optics and sling, my 20 Practical weighs just under 8.5 pounds.
Test Report–How’s It Shoot?
I sent the barrel and barreled action to Kevin and in a very short time it was returned. Kevin did a perfect job on the rifle. I had asked him to try to match the bead blasted finish of the Tikka when he finished the new barrel. It came out perfect and the only way one can tell it is a custom is the extra two inches of length and the “20 Practical” cartridge designation.
So, no doubt you’re asking “how does she shoot?” Is my “prototype”, first-ever 20 Practical an accurate rig? In a word, yes. Even with the standard factory stock, and light contour barrel, it can shoot 3/8″ groups. Take a look at the typical target from this rifle. This is from an 8.5-pound sporter with a very skinny fore-end and a factory trigger.
Gunsmith’s Report from Kevin Weaver The 20 Practical: Origins and Development
Editor’s NOTE: We can’t say for sure who first necked down the .223 Rem to .20 caliber and chambered a rifle for that wildcat (as opposed to the .20 Tactical). But here is an account from way back in 2006 when the Warren B first came up with the idea of a .20 Practical cartridge, complete with reamer specs.
A year ago I received a call from Warren with a great idea. Warren asked “Why couldn’t we simply neck down the .223 Remington case to 20 caliber and get basically the same performance as the 20 Tactical? This way you can forgo the expensive forming dies that are needed for the 20 Tactical.” The idea made perfect sense to me, and I saw no major technical issues, so we got started on the project. I ordered a reamer from Dave Kiff at Pacific Tool & Gauge (PTG) with a .233″ neck. The .233″ neck should allow for a simple necking-down of the 223 Remington case to produce the 20 Practical in just one step. No fire-forming necessary! Furthermore, the PTG 20 Practical reamer Dave created should work with any available .223 Rem brass, commercial or military.
The first 20 Practical round was launched down range (through Warren’s Tikka) just a few months later. The brass formed as easily as expected. All one needs is a Redding type “S” bushing die with a .230 bushing and with just one step I had a .20 caliber case ready to shoot. Warren is brilliant. [Editor’s Note: We concur. For more details on Warren’s case-forming methods and his tips for adapting .223 Rem dies, read the technical sections further down the page.]
It would be almost six months later until I got around to building a dedicated test rifle chambered for the 20 Practical. I used a Remington 722 action, Remington synthetic semi-varmint stock, and a 24″ Douglas stainless steel XX 12-twist barrel. I formed and loaded about 30 cases using Remington brass in about 20 minutes. I used a .223 Rem seating die to seat the 20 Practical bullets. The .223 seating stem seated the small 20-Cal bullets just fine. The first loads sent the 40gr Hornady V-Max bullets down range at a modest 3500 FPS. I did not shoot for groups. I just wanted to use this load to sight in the rifle and break in the barrel. Load development was painless–I used reduced .223 Rem loads for 40gr bullets and worked up from there. In the table below are some of my preferred loads as well as Warren’s favorite recipes for his 20 Practical.
Bullet Wt.
Powder
Charge Wt.
Velocity FPS
Comments
32GR
H4198
24.1
4025
Warren’s lighter gopher load
32GR
AA2460
27.8
4154
Warren’s coyote/prairie dog load
32GR
N133
26.0
4183
Coyote/PD load, clean burn
33GR
H4198
26.0
4322
Hot Load. Use with Caution!
33GR
N133
27.0
4255
Kevin: 0.388” 5 shot group
40GR
H335
25.0
3583
Kevin’s barrel break-in load
40GR
H4198
24.0
3907
Hodgdon “Extreme” Powder
40GR
IMR4895
26.0
3883
Kevin: 0.288″ 5-shot group
40GR
N133
25.0
3959
Kevin: 0.227″ 5-shot group
Warren’s Load Notes: My pet loads are all with IMI cases, 32gr Hornady V-Maxs, and Fed 205 primers (not match). These are the most accurate loads in my rifle so far. I haven’t even bothered with the 40s as I have the 20 PPC and 20 BR for those heavier bullets. I prefer the lighter bullets in the 20 Practical because I wanted to keep speed up and recoil down in this sporter-weight predator rifle. Also, the 32gr V-Max is exceptionally accurate and explosive. I like N133 the best as it burns so clean. IMI cases are tough and well-made.
Kevin’s Load Notes: I used Remington 223 cases, Hornady V-Max bullets, and Remington 6 1/2 primers to develop the above loads. CAUTION: all loads, both Warren’s and mine, should be reduced 20% when starting load development in your rifle. All load data should be used with caution. Always start with reduced loads first and make sure they are safe in each of your guns before proceeding to the high test loads listed. Since Weaver Rifles has no control over your choice of components, guns, or actual loadings, neither Weaver Rifles nor the various firearms and components manufacturers assume any responsibility for the use of this data.
Comparing the 20 Practical and 20 Tactical
Kevin tells us: “The 20 Practical and the 20 Tactical are almost identical cartridges. There are only slight differences in case Outside Diameter, shoulder angle, and case body length. The neck length on the 20 Tactical is a bit longer, but there is still plenty of neck on the 20 Practical to grip the popular bullets, such as the 32gr V-Max. Here are some specs:
Cartridge
Bolt face to shoulder
Shoulder O.D.
Shoulder Angle
Total length
20 Tactical
1.5232″
.360
30°
1.755″
20 Practical
1.5778″
.3553
23°
1.760″
Both the 20 Tactical and the 20 Practical are fine .20 caliber cartridges. Early on, the 20 Tactical was the more popular of the two because it had more publicity. However, my favorite would be the 20 Practical. Warren’s 20 Practical gives the SAME performance as the 20 Tactical without fire-forming, or having to buy expensive forming dies. So with the 20 Practical you do less work, you shell out a lot less money, yet you give up nothing in performance. What’s not to like? To create 20 Practical cases, just buy a .223 Rem Redding Type “S” Bushing Die set with a .230 or .228 bushing and have fun with this great little cartridge.”
A varmint shooter’s target is not conveniently placed at a fixed, known distance as it is for a benchrester. The varminter must repeatedly make corrections for bullet drop as he moves from closer targets to more distant targets and back again. Click HERE to read an interesting Varmint Forum discussion regarding the best method to adjust for elevation. Some shooters advocate using the scope’s elevation adjustments. Other varminters prefer to hold-over, perhaps with the assistance of vertical markers on their reticles. Still others combine both methods–holding off to a given yardage, then cranking elevation after that.
Majority View — Click Your Scope
“I zero at 100 yards — I mean really zero as in check the ballistics at 200 and 300 and adjust zero accordingly — and then set the scope zero. For each of my groundhog guns I have a click chart taped into the inside of the lid of the ammo box. Then use the knobs. That’s why they’re there. With a good scope they’re a whole lot more accurate than hold-over, with or without hash marks. This all assumes you have a good range finder and use it properly. If not, and you’re holding over you’re really just spraying and praying. Try twisting them knobs and you’ll most likely find that a 500- or 600- or 700-yard groundhog is a whole lot easier than some people think.” — Gunamonth
“I have my elevation knob calibrated in 100-yard increments out to 550. Range-find the critter, move elevation knob up…dead critter. The problem with hold-over is that it is so imprecise. It’s not repeatable because you are holding over for elevation and for wind also. Every time you change targets 50 yards, it seems as if you are starting over. As soon as I got completely away from the hold over method (I used to zero for 200), my hit ratios went way up.” — K. Candler
“When I first started p-dog shooting, I attempted to use the hold-over method with a 200-yard zero with my 6mm Rem. Any dog much past 325-350 yards was fairly safe. I started using a comeups table for all three of my p-dog rifles (.223 Rems and 6mm Rem). 450-yard hits with the .223s are fairly routine and a 650-yard dog better beware of the 6mm nowadays. An added benefit (one I didn’t think of beforehand) with the comeups table (elevation only), is that when the wind is blowing, it takes half of the variables out of the equation. I can concentrate on wind, and not have to worry about elevation. It makes things much more simple.” — Mike (Linefinder).
“I dial for elevation and hold for wind. Also use a mil-dot reticle to make the windage holds easier. For windage corrections, I watch for the bullet strike measure the distance it was “off” with the mil-dot reticle, then hold that much more the other way. Very fast once you get used to it.” — PepeLP
Minority View — Hold-Over is Better
“I try to not touch my knobs once I’m zeroed at 200 meters. Most of my varmint scopes have duplex reticles and I use the bottom post to put me on at 300 meters versus turning knobs. The reason I try to leave my knobs alone is that I have gone one complete revolution up or down [too far] many times and have missed the varmint. This has happened more than once and that is why I try not to change my knobs if at all possible.” — Chino69
“I have been using the hold over method and it works for me most of the time but the 450 yards and over shots get kinda hard. I moved to a 300 yard zero this year and it’s working well. I do want to get into the click-up method though; it seems to be more fool-proof.” — 500YardHog
Compromise View — Use Both Methods
“I use both [methods] as well — hold over out to 250, and click up past that.” — Jack (Wolf)
“I use the target knobs and crank-in elevation. I also use a rangefinder and know how far away they are before I crank in the clicks. I have a scope with drop dots from Premier Recticle and like it. No cranking [knobs] out to 600.” –Vmthtr
Share the post "Varminters Debate — Prefer Cranking Elevation or Holding Over?"
While there are many very, very talented women shooters, it’s still a bit unusual to see many ladies on a long-range firing line. It’s even more unusual to find a women shooter who regularly beats all the “good ol’ boys”. This week we feature Katy from California, who has competed in Varmint Silhouette matches with a very stylish and accurate Stolle 6BR. Along with husband/spotter Don (who shoots a 6mm Dasher), she has been one of “Top Guns” at the popular Pala Shooting Range in North San Diego County. Here’s a view of the Pala facility, looking down-range at the rows of silhouette targets:
Pala — A Mecca for Southern California Shooters
Near the Indian Casino and Resort in Pala, California is one of the longest rifle ranges in the state. Pala hosts a wide variety of shooting matches — cowboy action, lever action silhouette, black powder silhouette, hi-power silhouette, tactical pistol and rifle matches, to name a few. The black powder buffalo and tactical rifle matches use the longest range with 900-meter targets. Katy and her husband Don have competed in Varmint Rifle Silhouette matches, which were held monthly in years past. Range Info: Range.palatribe.com.
Katy tell us: “These Varmint Silhouette matches are a lot of fun! It’s very satisfying to see the little critters fly off the rail. A good spotter will note how the target flies when hit–‘Did it turn right or left? Did it lift up or fall back?’ Steel targets reveal more about real world ballistics than just a hole in a piece of paper. And nothing beats reactive targets for fun shooting.”
For Katy and Don, shooting is a family affair: “I started shooting the varmint rifle silhouette at the encouragement of husband Don. He bought/built himself a 6mmBR to shoot the varmint rifle match and re-barreled an old Hart-sleeved Remington 700 to fast-twist .223 for me to use. I did pretty well for a beginner, winning a match after just a few months of competition. Winning with that .223 had competitors scratching their heads. Frankly, it was just a fortuitous combination of great spotter, steady hold, and a good rifle. That .223 was certainly a very accurate piece. I always expected the bullet would hit right where the rifle was aimed, if we called the wind right. But like all good things, with time the .223’s accuracy began to fade. As the barrel finally gave up the ghost, a replacement was ready–a bright red Panda bear chambered in 6mm BR.
Beating the Guys at their Own Game
With my old .223, I won five varmint matches between December 2000 and April 2002. I also won my class (Master) in June, 2001. However, with the 6BR Panda, I shoot higher scores and have now had four match wins between May, 2003 and August 2004. And I won my class twice in 2003. Over time, as our competitors’ skills and firearms have improved, the criteria for shooter classification has been upgraded. Originally, one could miss 10% of the animals and qualify as a “Master” shooter. A few years ago, the criteria was tightened to 5% misses to earn “Master” status. This 6mmBR has kept me up in Master class.
I’ve done well enough with my little Red Panda that folks have been asking me about my shooting technique. Both Don and I shoot free recoil. We keep everything off the rifle except the trigger finger and thumb. Keep your shoulder back from the butt, and make sure your cheek doesn’t contact the stock and that your shooting cap doesn’t hit the scope. Fine-tune your elevation by squeezing on the rear bag. I use a front rest forearm stop to keep the rifle in the same place on the front rest. After firing, pushing the rifle back against the front stop usually verifies rifle tracking and allows a quick check of how far off the sighter shot’s impact was from point of aim.”
The Female Perspective — Katy’s Views on Shooting
We all know women can be crack shots. The little lady in the picture proved that more than a century ago. Competitive shooting is one of the few sports where women can and do compete head-to-head with men — and often win. [Amanda Elsenboss recently won the National High Power Championship and the National Long Range Championship. And Nancy Tompkins and her daughter Sherri Gallagher have won National shooting titles.] But the fact remains shooting is still very much a male-dominated sport. Here are some of my thoughts on how that might change.
Beneficial Aspects of Shooting
The first and most important benefit of competitive shooting is learning to handle a rifle/firearm safely. We’re well past the time when women should have conquered their fears of guns. An added benefit would be increasing a woman’s ability to respond to any threats. I remember when I was in college and we took my anti-gun roommate out to the range for a shooting lesson. She had a great time shooting away. She learned that firearms are not just “scary”, but also an enjoyable tool.
How to Get More Women Involved
Since we aren’t going to get the silencer legislation changed to improve women’s enjoyment of the sport, we will have to promote other aspects of shooting. I think shooting sports can increase self-confidence, giving women a sense of accomplishment and inner strength to remain calm under stress. It is very satisfying to see a positive result (at very long distance) of your focused efforts. Developing skill at any sport can improve one’s self-image and coordination. Encourage the women in your life to join you at the range. Believe it or not fellows, your wives and girl friends like to spend time with you. At Pala, some of the wives make the best spotters, even though they don’t shoot.
I find these varmint silhouette matches ideal from the standpoint of a woman’s participation. First, you get to lay down and shoot–that’s much more relaxed than classic position-shooting. Second, the really heavy rifle is supported on front and rear rests so that all you need to do is carefully guide the rifle, concentrate on the sight picture and pull the trigger when everything lines up. And, by the way, I clean house and prepare the meals, while my husband Don cleans the rifles and prepares the ammunition.
Dealing with Noise Pollution
The first thing a women notices at the range is how much noise these rifles make. How can anyone carry on a decent conversation, much less think with all the racket? Practice days are the worst–there is just constant gunfire with very few ceasefires. Matches are fine, because there is only gunfire during warm-up and then for 8 minutes during each relay. On the firing line, I wear both fitted earplugs and ear muffs to tolerate the decibels. Being heard and understood is always a problem during the match.
Shooters’ Techno-Babble–I Guess It Really Is a “Guy Thing”
One of my fellow female shooters commented that, at the range, the guys never seem to talk about anything but firearms and their accouterments at the range. Although I am familiar with the term “minutes of angle” I have gotten sloppy in my speech and generally just report how many clicks one needs to adjust for the wind or the sighter shot. Reading Don’s equipment discussion confused me when he kept referring to MOA. I have been with non-shooting friends several times when knowledgeable shooters start talking firearms. It is as if they are speaking a different language, and my friends look to me with a puzzlement on their faces. Well, in fact it has its own language and I think I’m getting finally getting able to speak it.
Katy’s 6BR — Technical Primer by Hubby and “Loadmaster” Don
Way back in 1990 a Precision Shooting magazine “Trading Post” advertisement offered a low-mileage, Panda-actioned .262″ neck, 6mm BR rifle and all the reloading accouterments. This light-varmint class rifle was built in the mid-1980’s around an unusual round Panda action with straight-fluted bolt. As configured, the gun had performed very well indeed–shooting many groups in the zeros. The action is glued into a Lee Six thumbhole BR stock and uses externally accessible pins to hang the 3 oz. trigger. The scope is an older 36X Leupold BR model, held by Kelbly rings on a Davidson base. The original barrel was a 4-groove, 14-twist, apparently made by Pat McMillan. A hand-written information tag taped to the underside of the barrel was discovered upon its removal, and indicates the barrel was fitted by JACO, April 1986. Anyone know who that is?
The 14-twist barrel could not stabilize any bullets greater than about 80 grains. It would keep an 80-grain Starke inside 0.4″ at 200m with a velocity of 3120 fps using 31.8 grains of Varget. However, the 80-grain bullets were blown all over by the winds out to 500 meters.
Past success with Pac-Nor pre-fit barrels inspired me to order a 28″, 4-groove, 8.6″-twist barrel chambered with their .262” neck 6mm BR reamer. Pac-Nor crowned and chambered the barrel; and, in this case, threaded it to fit a Panda action. After we installed the barrel on the action, we found that the bolt nose touched the conical barrel breech face. 0.010” needed to be removed from the cone face so that the bolt closed with a perfect fit. Headspace is now just right at 1.167″.
Load Development
My experience with a couple of other fast-twist 6BRs, one also chambered with Pac-Nor’s .262″ reamer, suggested that the 95gr Berger VLDs would work well the estimated 0.060″ freebore in Katy’s rifle. The goal was to get 2800-2900 fps velocity with inherent accuracy no worse than half the smallest silhouette size. That meant we needed a load that delivered repeatable 0.4 MOA accuracy or better.
A new batch of Lapua 6mm Norma BR brass was neck-turned to 0.0083″ wall thickness to fit the chamber and fire-formed during barrel break-in, following Pac-Nor’s guidelines. We tried a bunch of different moly-coated bullets at 200 meters, most with moderate charges of H322. The results of the bullet-testing ranged from poor (over an inch) to astonishing (68-grain, flat-base Eubers over 29.7 grains of H322 went into about .25″ at 200 meters!) But these flat-based bullets lacked the high ballistic coefficient we wanted for the varmint silhouette match. So we tried the 95-grain VLD Bergers (0.5+ BC) and produced several good loads, all sparked by Federal 205m primers. The best load seemed to be 28.2 grains H322 at 2860 fps, followed by 30.4 grains N135 at 2920fps, and 31.0 grains of Varget at 2890 fps.
All loads shot better than 0.4 MOA, but the H322 seemed a little more accurate, and about twice as much H322 was on hand. So, after about 120 shots the barrel was conditioned, brass formed and a match load selected for the 95 VLD Bergers. Bullets are seated about 0.010″ into the rifling for a typical cartridge LOA of 2.325”, which puts the heel of the 95 VLD boat-tail just below the case neck-shoulder line. Cases are sized with a Wilson neck bushing die that works only the upper 2/3 of the case neck to support the bearing surface of the seated bullet.
Don’s Handy Guide to Varmint Silhouette Shooting
Varmint Silhouette–Origins and Basics
Over a decade ago, a metallic silhouette match was devised for typical varmint rifles at the North County Shootist Association range near the hamlet of Pala, in north San Diego County, California. The course of fire used the conventional rifle silhouette range with banks of 10 special varmint targets sized 0.8 to 1.0 MOA (Minute of Angle) in width. At five different yardages, ten steel “critter” targets are set as follows: 200 Meters – Field Mice (“pikas”); 300 meters – Crows; 385 meters – Ground Squirrels; 500 meters – Jack Rabbits; 600 yards – Prairie Dogs. The folks at Pala run a tight ship, cycling multiple relays efficiently, so everybody gets to shoot 50 targets (10 each at five different yardages), and the show is usually completed by 1:00 pm. There’s a one-hour sight-in period starting at 8:00 am, and the match starts at 9:00 am sharp. Newcomers should definitely arrive no later than 7:45 am, because you may need that full sight-in period to acquire solid zeros at all five yardages.
Firearms are limited to field-portable, varmint-caliber rifles in either custom or factory class, and having a maximum 6.5mm bore, but bullets must weigh no more than 107 grains. You can shoot prone or from a bench using a front rest and bag rear. For more information, visit Range.palatribe.com.
Match Rules and Shooting Procedures
Matches are fired as a team — shooter and spotter. The course of fire typically consists of 10 steel, knock-down varmint animal targets at each of the five distances. After firing a sighter, targets are taken from left to right, one shot per target. Missed targets remain standing. Any target struck out of sequence is also a “miss”. The shooter’s objective is to sequentially knock-off (clean) all 10 targets. The spotter’s duties are to support the shooter in all aspects of shot preparation. First and foremost, the spotter tries to see each shot impact and call appropriate windage and elevation adjustments for the shooter. In shifty conditions, a good spotter is vital.
Let’s start at the beginning. Before the match there is usually an opportunity to fire a few fouling shots and check sight settings for load and distance. An initial read on conditions–mostly wind direction, strength and consistency–is also made. The spotter should checklist the shooter to make sure they are set up for the relay distance and have adjusted their sights to the correct elevation and windage.
It could be argued that for the shooter, the first shot at a given distance, the sighter shot, is the most important shot fired. Since the sighter targets are fixed (don’t fall over) and freshly painted, bullet impact is obvious to both shooter and spotter. If the bullet hits where expected–point of aim–the spotter then tracks and calls observed changes (mostly wind) relative to the shooter’s initial scope settings. If point of impact shifts on subsequent record targets or the shooter misses, appropriate sight adjustments are recommended to the shooter. Admittedly, it is sometimes difficult or impossible to see the point of impact on these small, reactive targets. However, an estimate of bullet strike can be made from target behavior such as rotation and/or impact trajectory.
The Guacamole Connection
Katy and Don are avocado farmers. From time to time they’d bring a few avocados to the range to give to the other shooters. In addition, on some months, Katy would bring some home-made Guacamole made from the avocados on their ranch. Katy says “Fellow shooters appreciate a batch of guacamole so much they bring their own chips to go with the dip. I keep getting suggestions that I go into the business of making and selling guacamole. Guess I could start by selling it at the range.”
Katy’s Guacamole Recipe
4 ripe avocados, peeled and pitted
1/2 lemon squeezed (I use Meyer lemons, lime juice is also good)
1/2 cup fresh salsa — your favorite variety
1 tsp garlic salt or fresh garlic chopped
All of the above quantities can be adjusted for taste. Mash the ingredients with a potato masher. Serve with chips, fresh vegetables (carrot sticks, celery, broccoli), or as garnish for tacos, burritos, taquitos, etc., and as special treat – spread on warm buttered toast for breakfast.
Good Shooting and Bon Appetit! — Don & Katy
No reproduction of any content is allowed without advanced permission in writing.
Share the post "Sunday Gunday: Katy’s 6mmBR for Varmint Silhouette Matches"
What’s better than a super-accurate 6BR rifle? Well, two super-accurate 6BRs. This week we feature a pair of tack-drivers owned Forum member Mark Schronce. These “Brothers in Arms” share similar stocks, but otherwise the components are different. Mark’s 17-lb gray laminate Light Gun features a Hall action, HV taper barrel, and muzzle brake. The 21-lb Heavy Gun, in “Desert Camo” laminate, boasts a trick dual-port BAT action, and full-contour 30″ barrel without brake. Both guns shoot tiny groups, track like they’re on rails, and give Mark a serious hardware advantage in club competition.
Mark provides this report: “The Light Gun started as my 22-250 AI varmint gun, with a Hall action and McMillan Hunter Benchrest stock. I wanted to build a proper Egg Shoot gun, so I had Richard Franklin (Richard’s Custom Rifles) chamber a Lilja 12-twist in 6mm BR Norma, with a .262″ neck. Using Fowler 80gr FB bullets, the gun shot great right out of the gate. (See my report, Egg Shoots and 600-yard 6 BR). I was curious about the heavier 6mm bullets, so I had Richard chamber and fit a 1:8″ Krieger in 6BR. But this time we went with a .271″ no-turn neck. The Krieger holds quarter-MOA with the heavy bullets, and, to my surprise, it shot the 80s as well as the 12-twist Lilja did. For the 2005 season, I ordered one of Richard’s latest 008 F-Class stocks. This new design is very comfortable to shoot and it’s much more stable in the bags than my old Hunter stock. That added stability will be a big plus for 600- and 1000-yard benchrest matches.
A Heavy Gun for 1000-yard BR and “Belly Benchrest” (F-Class)
I’ve been active in 1000-yard Benchrest for a few years, shooting my 6mm BS and 6mm BR Light gun in both Light and Heavy classes. I wanted to build a rifle for the Heavy Gun Class yet stay within the 22-lb F-Class limit. And I wanted it to have the best hardware I could buy. On a BAT ‘MB’ action (with Jewell trigger) we fitted a 30″ 8-twist 3-groove Lilja, 1.250″ diameter, no muzzle brake. Richard cut the chamber for 6mm BR Lapua Brass, .271″ no-turn neck, throated for Sierra 107gr MKs, matching my current Light Gun. The stock is a pillar-bedded Richard’s 008 1000-yd/F-Class model, with 10 coats of auto clearcoat, all work by Richard. Burris Zee rings hold a Leupold 8.5-25×50 LRT mounted on a BAT one-piece Weaver base. The Heavy Gun weighs in at 21 lbs, much lighter than most Heavy Guns (50 to 100 lbs). But with the 6BR’s light recoil, it’ll do just fine for long range, yet still make weight for F-Class.
Why a 6mm BR Chambering in a Heavy Gun?
I toyed with the idea of going with a 6BR Improved for Heavy Gun, but I’m not convinced the Improveds are worth the extra hassle of fire-forming, not to mention the added cost of custom dies. By way of background, I used to have a Rem-actioned rifle chambered in 6BR BS (Bill Shehane), which is very similar to the 6BR Dasher. I found the 6BR BS was only about 100 fps faster than a standard 6BR. For the shooting I do, that extra 100 fps is not critical. If, in the future, I feel I need more speed, I will go to a .243 AI or a 6.5-284. To be honest, I love the 6BR cartridge. Barrels last forever, and the accuracy can’t be beat. Yes a 6BR is a little light for everyday 1000-yard shooting, but on good days it can set world records. I may move up to a 6.5-284 some day, but for now I will stay with the standard 6mm BR. If I ever do want to go to a bigger caliber, the 8.5-inch BAT Machine MB action gives me this option.
Hall vs. BAT Light vs. Heavy
Comparing the two actions’ bolt lift, lock-up, fit, and finish, I feel they are equally good. However, the BAT can run stout loads with Federal 205 primers — loads that cratered Fed 205s with the Hall. I don’t know if this is a function of the actions’ engineering, or the barrels. I’ve got a Lilja on the BAT, while the Hall wears a Krieger. I do know the BAT has a tight-fitting firing pin, and that might make a difference.
Both my actions have a built-in recoil lug — a really nice feature when you are changing barrels, and one of the main reasons I favor custom actions over a Remington. I think anyone would be pleased with either the BAT or the Hall.
There is a big difference in shooting a Light Gun vs. a Heavy Gun, as you might expect. The Heavy Gun is more stable and recoils straight back. However, even at 21 pounds, the Heavy Gun actually recoils harder into your shoulder than the muzzle brake-equipped Light Gun. But if you take the Light Gun’s brake off, and put the action back in the old Hunter bench stock, the gun would jump, torque and roll. It’s much better with the 008 stock now, but still not as rock solid as the Heavy Gun. On recoil the 21-pounder just tracks straight back, no jumping, no yaw, no rolling–very impressive.
Load Development and Accuracy Results
Developed last year, my favorite Light Gun load is 30.5 grains Varget, CCI BR4 primers, and 106gr Clinch River VLDs, running 2825 fps. The Light Gun shoots other bullets very well, but the Clinch Rivers performed best, with groups in the 0.1s to the low 0.2s at 100 yds. I use Lapua brass of course.
I began my load development for the Heavy Gun with components I had from last year: Varget, N140, and N540 powders, plus Fed 205, CCI BR4, and CCI 450 primers. I also had a good selection of bullets: 95gr and 105gr Bergers, 105gr Lapua Scenars, 106gr Clinch Rivers, and 107gr Sierra MKs.
The Heavy Gun liked the Bergers right from the start. During break-in and fire-forming (with 95gr Bergers 0.20” into the lands, 30.0gr Varget and CCI 450s), the rifle shot in the low 0.2s at 100 yds, 0.3s at 200 yds, with a 0.182″ small group at 200 yards (see photo). I then moved up to the heavier bullets and again the Bergers stole the show. Best load for the Berger 105s (seated 0.15″ into the lands) was 30.5 grains Varget and Fed 205s at 2850 fps. At 100 yards, this recipe shot in the 0.1s to the low 0.2s with a small group of 0.089″. (By the way, this same load in my Hall Light Gun would crater the Fed 205 primers. I may have to change to CCI BR4 primers for the hot summer days.) After working with the 105s I wanted to see how the Heavy Gun performed with lighter bullets. I tried my favorite Egg Shoot and 600-yard load–80gr Fowlers pushed by 31.5 grains of Vihtavuori N135 with Fed 205 primers. The results were fantastic. The big BAT produced a 100-yard aggregate (five, 5-shot groups) in the 0.2s with an 0.129″ small group. Overall, at 200 yards, both guns could agg five 5-shot groups in the 0.3s and 0.4s. Eggs Beware!
Big, Strong, and Versatile ‘MB’ Action by BAT Machine
I looked at all the custom actions, and decided on a BAT model ‘MB’, configured Right Bolt, Left Port, Right Eject. The ‘MB’ action has some pretty unique features, including an integral recoil lug on the underside, and a recessed tenon (i.e. the threads start 1″ from the front of the receiver). The action is 8.5″ long, but with a 7.5″ bolt. The extra inch is added to the front. That provides extra bedding surface and room for a third pillar. The 8.5″ action length gives me the option to go up to a 6.5-284, while the dual ports should help give me the speed I need for the 10-round strings in Heavy Class. Also I can load from either side for F-Class.
Why did I choose a BAT? First, BAT quality is second to none. Moreover, BAT will custom-configure your port(s) and bolt for the same price, no added fees. Other action-makers charge extra for anything other than your basic Right Bolt, Right Port. This makes the BAT about the same price as a Stolle or Nesika, if you want a set-up like mine. The right-side ejection port is slightly smaller than the left feed port, but I can still feed 6BR cases from either side if I wish. The MB action is so big, the little BR case runs out of ejector as soon as the case leaves the chamber, so I push the case out to the right as I load the next round from the left. The BAT will eject a loaded 6BR round just fine, but a fired case only ejects sometimes. This action would work great with a longer round, such as a .243 AI or 6.5-284. If you want completely reliable 6BR ejection, you’ll need a smaller BAT action. But then, like my Hall standard action, the port would be too small for a 6.5-284.
Richard’s #008 Stock — How it Handles
The 008 stock is the best design I’ve ever shot off the bench. I like to hold my guns, and the 008’s grip profile gives me the control I like. The trigger is close enough for my short fingers. The underside of the buttstock is flat and completely straight (parallel to the barrel), so the gun tracks straight back. During recoil, the scope stays on target, making for quicker recovery time. In the picture at left, you can see that the underside of the fore-arm is relieved in the middle with raised strips on the left and right. These “rails” make for less surface area contacting the bags, less friction, and more consistent recoil. The high comb on the stock allows better prone shooting. For now, the stock is fine for what prone shooting I do. But if I do get seriously into into F-class I may want to add an adjustable comb or cheekpad. We’ll see.
Plans for Competition — The Lure of Hickory Groundhog Shoot Dollars
Some years ago, after building this pair of accurate 6mmBR rifles, Mark Schronce told us: “I can’t wait to see how this pair perform at long range. I will also take the Light Gun to the big Hickory GroundHog match in April, but I may put the barreled action back in the Hunter stock. This year you have to use bipods or sand bags, no front rest. [Editor: that is no longer the rule.] I don’t know if want to drill into my pretty new 008 stock for a bipod mount. I’ll let you know how it goes, and hopefully I’ll come back with some loot from the Shoot.” NOTE — that year Hickory offered about $8000 worth of prizes.
When you’re on a varmint expedition in the Western states you can bet, sooner or later, you’ll encounter serious winds. Here’s some advice on how to minimize the effects of cross-winds on your shooting, and easily improve your percentage of hits. In essence, you want to use your ability to change shooting positions and angles to put the wind behind you.
A benchrest or High Power shooter must operate from a designated shooting position. He must stay put and deal with the wind as it moves across the course, from whatever direction it blows.
Put the Wind at Your Back
By contrast, a varmint hunter can move around and choose the spot that provides the most favorable wind direction. In most cases you’ll get the best results by moving your shooting position so the wind is at your back. This will minimize horizontal wind drift. Once you’re in position, use wind flags to direct your fire in line with the prevailing winds. A varminter who calls himself “Catshooter” explains:
The String of Death
I remember the first time I was on a dog town in the Conata Basin, in the Badlands area of southwestern South Dakota. Along with two other guys, I drove out for 21 days of shooting, and I never saw wind like that before. If all four tires of our vehicle were on the ground, the weather man said these were “mild wind conditions”.
After the first four or five days, we got smart. We would park the truck on the up-wind side of the town so the wind was at our back. Then we took a piece of string on a 3-foot stick, and set it in front of the shooters, and let the string point at the mounds that we were going to shoot.
For the rest of the trip, we didn’t have to deal with wind drift at all. We just shot the dogs that the string pointed to. We started calling our simple wind pointer the “String of Death”.
We were hitting dogs at distances that I would not repeat here (with benchrest grade rifles). After the first time out, I always took a wind rig like that.
Benefits of Swivel Benches
In a large varmint field, you’ll want to orient your shooting position to put the wind at your back if possible. If you have a rotating bench such as this, you can further adjust your shooting orientation to work with the wind, not against it. You may also want to position simple flags (posts with colored tape) downrange to alert you to wind changes you may not notice from your shooting positions. If you can’t get a “wind at back” orientation, the next best set-up is with the wind coming straight at you — that also minimizes the wind drift on your shots.
The 6mmBR Norma cartridge has spawned many great variants in multiple calibers: 6mm Dasher, 6BRA, 22 BR, 22 Dasher, 30 BR and others. This article is about a handsome 22 BR Rem-action varmint rig.
Richard Franklin (who operated Richard’s Custom Rifles prior to his retirement), has built scores of varmint rifles, in many different calibers. One of Richard’s all-time favorite varmint rifles is a 1:14″-twist, 22 BR built on his Model 11 stock in laminated Black Walnut and fiddleback maple. Richard says the rifle is versatile and deadly accurate out to 400 yards. Richard uses a Leupold 8.5-25x50mm LRT with varmint reticle.
Richard’s 22 BR Varmint Rifle with Lilja Barrel
Richard tells us: “[Shown above] is my light walking varminter. It’s built on a blue-printed Stainless Steel Remington 700 short action and chambered as a no-turn 22 BR for Lapua brass. The bolt handle is a Dave Kiff replacement and I’ve fitted a Jewel BR trigger with bottom safety. The barrel is a Lilja, 1:14″ #6 contour with a muzzle diameter of .750″. I shoot the 40gr V-Max bullets in the rifle at 4000 FPS. It’s tough on hogs if you don’t try them too far. 400 yards is about the max with it.
Accuracy is outstanding and with Roy, Mike, my grandson and myself shooting this rifle I don’t believe it has missed more than three hogs out of over 100 we shot at one summer. This rifle is carried in a ceiling rack in the truck where it’s handy and is used by the first person that grabs it when a hog is sighted if we are moving between setups. The Varmint reticle on the Leupold (shown below) is nice for quick hold-overs as you change distances.”
At right is a another Franklin Model 11 stock in Birdseye maple. That photo shows the details of the thumbhole stock.
Editor’s Note: We have shot a 1:8″-twist 22 BR in varmint matches and it was very accurate with 80gr bullets. It actually shot flatter out to 500 yards than our 6mmBR running 105-grainers. If we were to build a new long-range, bolt-action varmint rifle it would probably be a 22 BRA, essentially a 22 BR with 40° shoulder. That gives you a very stable cartridge with a bit more capacity. The 22 BRA retains a longer neck compare to the 22 Dasher, which is also an excellent cartridge — versatile and accurate.
22 BR Rivals 22-250 Performance
With bullets in the 40gr to 60gr weight range, the 22 BR gives up very little in velocity to a 22-250, despite burning quite a bit less powder (30-32 grains for the 22 BR vs. 35-38 grains for the 22-250). With a match-quality chamber, the 22 BR will probably have an edge in accuracy over a 22-250, and you should experience longer barrel life. Here are some recommended 22 BR loads for 40-60gr bullets:
.243 Ackley Improved for Long-Range Varminting and Benchrest Competition
Whenever Matt Bianchini brings his bright yellow .243 Ackley to the firing line, heads turn. This is one truly handsome rig–as good-looking as it is accurate. Built to smoke varmints at long-range as well as compete in 1000-yard benchrest matches, this rifle is proof that competition improves the breed. Fitted with a Farley action, Jewell trigger, Leupold LRT scope, and Lilja or Krieger barrel, the Yellow Ackley is a “no compromise” match rifle that can run with the big dogs in 1K Benchrest competition. And with the Ackley’s ability to toss 106gr Clinch Rivers at 3350 fps, this is one flat-shooting, hard-hitting varmint rifle.
Ultra-Fast, Ultra-Smooth Farley Action…and One Wicked Paint Job
The heart of Matt’s rifle is a Farley action. Farleys have found favor with Benchrest competitors, because the bolt can be worked so fast. And the Farley is as smooth as it is speedy. The difference is quite noticeable if you compare it to a blue-printed Rem 700, or even a recent Stolle Panda. Farleys were true customs, built one at a time by the Farley family in Oklahoma. Unlike a BAT action which is machined from billet steel, a Farley starts with a stainless investment casting, much like Ruger pistol frames. It uses a cone bolt for smooth, yet solid lock-up.
One of the unique features of the Farley is the ejector–it can be switched on or off, depending on the shooter’s preference. So, if you’re load testing some hot rounds, you can turn the ejector off. In a match you can turn the ejector “on” to function normally. Matt is now a confirmed Farley fanatic. He tells us: “I’ve got quite a few other very nice actions, including Nesikas. But none of them are as slick as that Farley. When you work the bolt it feels like it’s on ball-bearings.”
Matt’s Screamin’ Yellow Ackley–The Need for Speed
.243 Ackley Improved Speed Demon
In a long-range varmint rifle, speed kills. Ultra-high velocities will deliver flatter trajectories and more explosive hits on critters. That’s where the .243 Ackley Improved really shines.
Matt has explored the upper limits of .243 Ackley Improved (AI) performance with his yellow long-range rig, fitted with a 29″ Lilja 3-groove, 1:8″-twist barrel. Using a stout load of Alliant Reloder 25, Matt’s “Screamin’ Yellow Ackley” has topped 3340 fps with Clinch River 106s. That’s serious speed for heavy 6mm bullets. This shows a well-built .243 AI leaves Dashers and 6XCs in the dust when it comes to pure velocity.
Ultimate Evolution of the .243 Winchester
Matt’s show-stopping rifle is a .243 Ackley Improved (40-degree shoulder, .271″ neck), chambered with a Manson reamer. On top of the stainless Farley “S” action, in Farley 30mm rings, sits a Leupold LRT (1/16 MOA dot) boosted to 18X-40X by Premier Reticles. Matt has SIX barrels for the gun, three Lilja 3-grooves, a couple Kriegers, and a Shilen.
Matt’s gun currently sports an 8-twist 29″ Lilja 3-groove HV taper that Matt says cleans up like a dream. The stock is a Shehane ST-1000 Tracker made in fiberglass by McMillan, with a BAT trigger guard and Shehane polished billet aluminum buttplate. Prior to final finishing, Matt worked over the flats and some of the angles. That’s why the facets are so well-defined on this rifle compared to some ‘glass Trackers you may have seen. The gun was chambered by Dave Bruno of Cheswick, PA.
Matt bedded the stock and applied the stunning Sikken “Viper” yellow paint job himself. That flawless, smooth-as-glass Screamin’ Yellow finish is no ordinary paint-job, but then Matt Bianchini is no ordinary do-it-yourself painter. His family runs an automotive body-shop, so he had access to premium paints and a quarter-million-dollar spray booth with all the latest technology. Still, Matt spent many hours on this stock to get everything right, trying a couple colors before he settled on a Sikken automotive “Viper Race Yellow” formulated for the Dodge Viper sports car. After careful prep work, Matt sprayed two coats of Viper Yellow, and then added three coats of high-grade automotive clear, which was then baked-on in a heat chamber. Matt also painted the Sinclair front rest to match the stock, and even polished the surfaces of the Hoehn windage top. A lot of effort, Matt told us, was required to achieve the results you see here.
3300 fps for 1000 Yards
Though Matt’s Ackley has harvested its share of varmints, the gun was built with 1000-yard benchrest competition in mind. At left is the firing line at Thunder Valley, Ohio. Yep those targets (upper right) are 1000 yards away. Now you know why Matt has a 40-power scope.
The Yellow Ackley weighs just under 17 pounds to meet IBS and NBRSA “Light Gun” weight limits. While Matt says his bullets don’t “go to sleep” for a couple hundred yards, this gun can still shoot 1/4″ groups at 100 yards and hold that accuracy much, much farther. Matt reports, “my best-ever group was five shots in .397″ at 400 yards. Yep, I got lucky with the conditions, but this is a very accurate rifle.”
.243 Ackley Improved–More Velocity, Less Case Stretch
by Bob Blaine, Sinclair International
Parker Ackley reluctantly developed the .243 Ackley Improved (“AI”). Ackley finally gave in to his customers’ requests to develop the .243 AI. He had always felt that the .243 Winchester was already an improved configuration, but he did say that the best thing to be gained by improving the .243 Winchester was to substantially reduce the case-stretching problems. The .243 Winchester parent case has always stretched brass, almost as bad as the Swift. Even though you get more velocity with the improved .243, I’ve also found that the improved version gives a bit more throat life than the parent case does.
The .243 AI delivers more velocity by virtue of enhanced case capacity–roughly five grains more H20 capacity than a standard .243 Winchester. The .243 AI has a water capacity of approximately 57 to 58 grains, compared to 52-53 grains for the standard .243 Winchester.
Loading for Long-Range
For long-range shooting, Matt loads 106gr Clinch Rivers with 47.5gr of Alliant Reloder 25 for his Krieger barrels, a little more powder with the Lilja 3-grooves. The Lilja load runs 3342 fps, with a 3.228″ OAL. Cases are neck-turned Lapua .243 Winchester. He uses Wilson inline seater and Wilson eck-sizer dies (.267″ bushing), and a custom, reamer-cut FL sizing die.
Not Just for BR, This Gun Can Hunt
While Matt has a big stable of varmint rifles, the Yellow Ackley has seen plenty of duty in the ‘Hog fields. Matt is from a farming family and he can shoot practically right out his back door (see top photo at the farm). He has nailed some big ground-hogs at 800 yards and beyond. The .243 AI does kick a bit compared to other varmint cartridges, but even with 105-106gr bullets, it’s not bad. He has considered adding a muzzle brake at some point to one of the barrels, just so he can see impacts better.
Screamin’ Yellow Dasher?
Matt originally thought of building the gun up as a 6BR or a 6BR Improved. He has a Manson reamer similar to a 6mm Dasher, with a 40-degree shoulder and .008″ body taper. He actually chambered a couple barrels with that 6BR Improved reamer, but he hasn’t shot them yet. He was so pleased with how the gun performed in .243 AI, that he saw no reason to change. And it may be a while before he slaps a Dasher-chambered barrel on the rig: “I really like the way it shoots as a .243 AI. I’m so impressed with it that I don’t want to mess with anything. And I don’t think I’ll be running out of Ackley barrels anytime soon.”
Since the .243 Win is such a popular cartridge, all the major die-makers offer reloading dies. It’s hard to go wrong with a Redding Type ‘S’ Full-length bushing die–item 77114 for the standard .243 Win and item 77420 for .243 AI. Whidden Gunworks also makes great .243 Win sizing dies (and custom .243 Win AI dies on request). These will both resize the case (and bump the shoulder) as necessary, and allow you to adjust neck tension with bushings. Alternatively, you can go with a body die, and a separate neck bushing die.
If you load primarily one brand of bullets, another slick set-up is to buy a Forster or Whidden full-length, non-bushing .243 Win sizing die, and then have Forster or Whidden hone the neck for your desired amount of tension. This elegant one-pass sizing solution produces very straight rounds with low run-out.
For bullet seating, both the Redding Competition Seater (item 55114) and the Forster Ultra-Seater (item U00034) work great for the standard .243 Win case. If you shoot a .243 Ackley, Redding’s .243 AI Comp Seater (item 55420) costs quite a bit more than the standard version Forster doesn’t list a .243 AI seater in their catalog. However, you can just run your chambering reamer into the inner sleeve of either seating die to fit the .243 Ackley Improved case.
If you want the “Cadillac” of production seater dies for the .243 Win, order the Wilson Stainless Micrometer seater (item 50-1114S) from Sinclair International. Costing only a few dollars more than a Redding Comp seater, this die is a joy to use, providing very positive control over bullet seating depth. When used with a quality arbor press, the Wilson offers unrivaled “feel” for bullet-seating force. This can help you monitor neck tension, one of the most critical factors in maintaining low ES and SD for long-range accuracy.
Share the post "Sunday GunDay: Matt’s Screamin’ Yellow .243 Ackley Improved"
Varminting for Fun — With Rimfires and Centerfires
One of the most fun things you can do with a rifle is to shoot varmints such as ground squirrels, prairie dogs, rockchucks, and groundhogs. There’s great satisfaction making a perfect hit on a critter that sends the beastie spinning in the air. Varminting also affords a great excuse to acquire more rifles, because it really does make sense to own and use multiple varmint rifles in various calibers.
Having multiple rifles on a varmint safari lets you preserve barrel life, and shoot lesser-recoiling calibers at the shorter distances. For example, with California ground squirrels, we like a .17 HMR inside 125 yards, then switch to a 20 Practical (20-223 Rem). For prairie dogs, you may want that 20 Practical, plus a nice .22 BR for 250-400 yards, and a .243 Ackley (or 6XC or 6mm CM) for long shots.
Seven Varmint Rifles — Rimfire and Centerfire
With 525,000 subscribers, the Backfire YouTube Channel is highly popular. The capable hosts provide honest, candid reviews. This video covers seven different varmint rigs. First off is the Air Arms TX 200 (00:25). Then the excellent .22 LR CZ 457 is featured (01:33), followed by a .223 Rem AR15-platform rifle (02:30). Next up is the .22 LR Christensen Arms Ranger 22 (03:40), which proved to be “crazy accurate”. Then the video showcases a Bergara Premier in 22-250 (04:20), an “excellent coyote gun that you could use on varmints as well”. Last up is the Ruger American Predator (05:20) in .17 HMR.
Five Varmint and Predator Rifles Reviewed
This video covers three major manufacturer centerfire varmint rifles: Remington Model 700 PCR (01:39), Winchester Model 70 Varmint Rifle (03:36), and Henry Long Ranger in .223 (08:02). The video also covers the Ruger American Rimfire Target rifle (07:04), and the interesting Stoeger RX20TAC Varmint Air Rifle (05:31). Airguns can be effective at close ranges on small varmints such as squirrels. But for an effective kill, we recommend at least a .17 Mach 2 (HM2) beyond 50 yards.
Three Varmint Rifles Reviewed — Savage .17 HMR, Ruger .22 Magnum, Howa .243 Winchester
This video covers two rimfires and a nice .243 Win centerfire. First up is a Ruger 77/22 in .22 WMR (Winchester Magnum Rimfire). This cartridge has a lot more punch than a standard .22 LR round. Next up is the very nice Savage A17 Thumbhole in .17 HMR. This semi-auto rifle offers nice ergonomics, good feed reliability, and very good accuracy at 100 yards (check out that 3-shot target at 100 yards). Last but not least, the video features the nice Howa 1500 Ranchland with Hogue stock, in this case chambered for the .243 Winchester. These Howas have a smooth-cycling action and nice HACT 2-stage trigger.
.17 WSM — The Most Powerful .17 Cal Rimfire
We think that every varmint hunter should own a nice .17 Cal rimfire rig. Out to 200 yards or so the .17 WSM or .17 HMR is very effective on small varmints. It’s nice to be able to shoot affordable ammo out of the box and not have to scrounge for hart-to-find powder and primers. This video features a superb .17 Cal varmint rig, the Primal Rights TS Custom chambered for the impressive .17 WSM cartridge.
Long Range Rockchuck Adventure with Gunwerks Crew
This Gunwerks video showcases varmint hunting in the Western USA. In this video Aaron Davidson and the Gunwerks crew try out some new rifles on some rockchucks. Most of the the rifles were suppressed but the host said the rockchucks took cover after the first shot, so this required good coordination among shooters and spotters. A 6XC varminter is featured at 2:44 and there’s some nice drone footage starting at 2:00.
.22-250 Nails Ground Squirrels and Rock Hyraxes in South Africa
Here’s an interesting video from South Africa. The video maker starts with shots on ground squirrels. His .22-250 blasts them into little pieces. They he switches to more distant targets, a furry ground-hog size animal called the Rock Hyrax, Cape Hyrax, or Dassie. Mature Rock Hyraxes weigh 4-5 kilograms and have short ears and tail. These Rock Hyraxes are found at higher elevations in habitats with rock crevices, allowing them to escape from predators (but not skilled varmint hunters).
Share the post "Saturday at the Movies: Varmint Rifle Video Showcase"
A varmint shooter’s target is not conveniently placed at a fixed, known distance as it is for a benchrester. The varminter must repeatedly make corrections for bullet drop as he moves from closer targets to more distant targets and back again. Click HERE to read an interesting Varmint Forum discussion regarding the best method to adjust for elevation. Some shooters advocate using the scope’s elevation adjustments. Other varminters prefer to hold-over, perhaps with the assistance of vertical markers on their reticles. Still others combine both methods–holding off to a given yardage, then cranking elevation after that.
Majority View — Click Your Scope
“I zero at 100 yards — I mean really zero as in check the ballistics at 200 and 300 and adjust zero accordingly — and then set the scope zero. For each of my groundhog guns I have a click chart taped into the inside of the lid of the ammo box. Then use the knobs. That’s why they’re there. With a good scope they’re a whole lot more accurate than hold-over, with or without hash marks. This all assumes you have a good range finder and use it properly. If not, and you’re holding over you’re really just spraying and praying. Try twisting them knobs and you’ll most likely find that a 500- or 600- or 700-yard groundhog is a whole lot easier than some people think.” — Gunamonth
“I have my elevation knob calibrated in 100-yard increments out to 550. Range-find the critter, move elevation knob up…dead critter. The problem with hold-over is that it is so imprecise. It’s not repeatable because you are holding over for elevation and for wind also. Every time you change targets 50 yards, it seems as if you are starting over. As soon as I got completely away from the hold over method (I used to zero for 200), my hit ratios went way up.” — K. Candler
“When I first started p-dog shooting, I attempted to use the hold-over method with a 200-yard zero with my 6mm Rem. Any dog much past 325-350 yards was fairly safe. I started using a comeups table for all three of my p-dog rifles (.223 Rems and 6mm Rem). 450-yard hits with the .223s are fairly routine and a 650-yard dog better beware of the 6mm nowadays. An added benefit (one I didn’t think of beforehand) with the comeups table (elevation only), is that when the wind is blowing, it takes half of the variables out of the equation. I can concentrate on wind, and not have to worry about elevation. It makes things much more simple.” — Mike (Linefinder).
“I dial for elevation and hold for wind. Also use a mil-dot reticle to make the windage holds easier. For windage corrections, I watch for the bullet strike measure the distance it was “off” with the mil-dot reticle, then hold that much more the other way. Very fast once you get used to it.” — PepeLP
Minority View — Hold-Over is Better
“I try to not touch my knobs once I’m zeroed at 200 meters. Most of my varmint scopes have duplex reticles and I use the bottom post to put me on at 300 meters versus turning knobs. The reason I try to leave my knobs alone is that I have gone one complete revolution up or down [too far] many times and have missed the varmint. This has happened more than once and that is why I try not to change my knobs if at all possible.” — Chino69
“I have been using the hold over method and it works for me most of the time but the 450 yards and over shots get kinda hard. I moved to a 300 yard zero this year and it’s working well. I do want to get into the click-up method though; it seems to be more fool-proof.” — 500YardHog
Compromise View — Use Both Methods
“I use both [methods] as well — hold over out to 250, and click up past that.” — Jack (Wolf)
“I use the target knobs and crank-in elevation. I also use a rangefinder and know how far away they are before I crank in the clicks. I have a scope with drop dots from Premier Recticle and like it. No cranking [knobs] out to 600.” –Vmthtr
Share the post "Varminters’ Debate — Cranking Elevation or Holding Over/Under"
Headed out for a varmint trip this summer, but don’t have the time (or the right tools) to load all your own ammo? Well don’t worry, we’ve found online ammunition vendors that carry a big selection of popular varmint cartridge types, from .17 caliber up to the popular 6mm varmint cartridges. OutdoorLimited.com offers a wide selection of rifle ammo types, including some hard-to-find types such as 22 Nosler and .221 Fireball. In addition, MidwayUSA has good small-caliber ammo available, including .204 Ruger, .223 Rem, and 22-250. MidwayUSA is a good place to start.
Shown below are some of the small-caliber varmint ammo types currently in stock at OutdoorLimited.com. NOTE: If you order any of this factory-loaded ammunition, you can save $10 on an order of $250 or more with CODE “10off250″.
Large Caliber Ammunition Available Also
Outdoor Limited has a big selection of larger-caliber ammunition for hunting rifles as well. You’ll find popular ammo types such as .270 Win and .308 Win, as well as big calibers such as the .338 Lapua Magnum. However, the ammo page is somewhat frustrating, as it shows some ammo varieties that are NOT in stock. You must click the photo for each ammo type to see if it is available.
Share the post "Factory Centerfire Varmint Ammunition Available Online"
This week’s featured firearm belongs to John “SnakeEye” Seibel, founder of the VarmintsForFun website. In recent years, John has become a “true believer” in the little 20-Caliber cartridges. He says this light-recoiling 20 PPC, Rampro-actioned pistol is perfect for a quick shot on a critter, taken from the front seat of his truck. John tells us: “A long-range pistol is an ideal truck gun in my opinion. It stows in a small area and doesn’t take up the room a rifle does. Just keep ear protection near by at all times! I’ve taken varmints as far as 400+ yards with this 20 PPC pistol, so why would you need a rifle?”
Perspectives on Pistols for the Varmint Hunter
by John Seibel
I decided to try my hand at shooting varmints with a pistol one day when I grew tired of wrestling a rifle around in the truck for a quick shot. Many times when traveling around on the farm you’ll spy a groundhog or fox that usually isn’t more than 200 yards away. A single-shot pistol like the Thompson Contender could fit the bill. With its compact length, around 20 inches, a long-barrel pistol can lay on the truck’s passenger seat for easy access. I usually keep my two leather brick-style sandbags laying beside the console and seat. I have a box made from hard rubber that I lay across the top of the door. I then lay the two bags on top. This makes a nice platform to rest the pistol’s forearm. I like to use a forearm that is at least two inches wide. That lets the gun lay steady—almost like you are shooting from a bench rest. For the shooting hand, I prefer a pistol grip with finger grooves and a slight overhang or flare for the web of your hand.
As for optics, I tried long-eye-relief pistol scopes but they lacked the magnification you need for long-range target shooting or varminting. Those pistol scopes have really long eye-relief because they are designed to work with the pistol held at arm’s length. When shooting at the bench or from a truck that’s not what you want. By the time you find the target and get your eye in the exact location, the varmint has moved on or died of old age! After much fiddling around with pistol-type scopes, I finally decided to use rifle scopes on my long-range pistols. The minimum I use is a 4.5-14×40. Eye relief on a Leupold 4.5-14x40mm is about 3.5 inches at 4.5 power. Field of view is better with rifle scopes too and it’s easier to acquire your target. For this type of shooting a light-recoiling caliber is essential or you will have scope-eye bad! I currently have three long-range pistols and use them to shoot 17M4, 20 PPC, 22 BR, and .223 Rem. The featured gun may be the most accurate of my pistols, and your editor thinks it’s the most handsome of the three.
The Rampro Pistol Project — Working with John Illum
A couple of years ago I called John Illum of Rampro about building the ultimate long-range pistol. It just so happens that John was a big time long-range pistol shooter. I told him that I wanted a gun that didn’t recoil badly and wouldn’t torque when fired. As I am a quadriplegic, with no grip in my hands, the gun had to handle well under recoil so I didn’t drop it. Recoil had to be straight back–no twisting.
Well Illum listened to me and came up with a gun that performs just the way I wanted. Illum suggested a rear grip stock of his own design. It has a 2.25″ wide forearm and a rear grip with a slight palm swell that fits your hand perfectly. Another nice feature is the finger grips. It has an extended overhang or “beavertail” that fits comfortably in the web of your hand. Of course it had to be walnut! I chose Rampro’s STP small action with a PPC bolt. His bolt uses a Sako-type extractor. The action is a single-shot. Being right-handed, I chose a right bolt, left port configuration. This works really well in a pistol. You can load with your left hand and see the round laying in the action–that’s what you want in a pistol without a safety.
Gun Specifications John Illum’s Rampro actions are chrome-moly steel. Commonly you’d see them blued, but I had him put a brushed nickel finish on the action and rings. From a few feet away it looks like stainless. The trigger is Illum’s own design set at 8 ounces, and there’s no creep that I can detect. The action has Remington barrel threads and will accept Remington type triggers. One neat thing is that the action was milled with an integral recoil lug (much like the current Surgeon Action). And the bolt is milled all in one piece–no soldered-on handles. My only gripe with this bolt handle is that it could be a tad longer, but it still is manageable for a single-shot. You’ll also note how slick and streamlined the scope rings are. Illum made those as well. His rings mount to the action via two screws from the inside of the ring, a very elegant set-up for sure. (I currently have a 6.5-20x40mm Nikon scope on this gun. If I had to do this project over again the only thing I would change would be installing a 30mm scope because I like ‘em!).
The barrel is a PacNor Super-Match heavy taper with flutes milled by John Illum, who did all the gunsmithing on this pistol. Twist rate is 1 in 12 inches, with an 11° crown, polished to a mirror finish. The barrel was bead-blasted on the exterior to cut glare. I had Illum cut a 20 PPC minimum-spec chamber, with a .237″ neck. That way I don’t have to turn necks on the Lapua Brass (220 Russian necked down to .204). This is a varmint gun–there’s no need for turned necks. [Editor’s Note: Rampro is no longer in business. However, John tells us “I haven’t had any problems with the action so far. If I did, most competent gunsmiths could fix them easily.”]
Handgun Handling Tips
If you want to shoot a long-range pistol but have never have shot this kind of gun before, try to find a mentor — someone with a gun like this who can school you a bit in the correct technique. The first thing you notice is that you have no comb or cheek piece to help align your head and neck. And getting used to the optics takes some practice. Most people fit a pistol-type (long eye-relief) scope, but these can be awkward to use, and somewhat frustrating at first — the field of view is very restricted. Move your head very slightly and you can lose the sight picture completely. You can solve that problem by using a standard rifle scope, but that will put your head very close to the eye-piece — just three to four inches. With that arrangement, if you don’t hold the gun correctly … POW instant scope-eye!
Now once you get the hang of shooting a long-range pistol you will find it can be just as accurate as a rifle. But there is a trick to shooting them. Shooting a long-range pistol is a whole new world — you need to hold it just right. If you don’t let the gun roll back a little (i.e. if you grip too hard) you will get vertical stringing. I hold my hand against the back of the grip to guide the gun but let it almost free recoil. Looking at how compact the pistol is, you might think “Hey, this would make an ideal ‘walking-around’ varminter.” Well, that’s not really the case. For real precision shooting a solid benchrest type set-up is a must. You can attach a bipod to a long-range pistol, but you would need a flat surface. A fence-post top would work pretty well without a bipod if you carry a small light bag. Overall though, this type of pistol works best as a sandbag gun. For a walking-around gun, you’d be happier with a rifle I think.
Load Development and Accuracy
When I built this gun, Hornady had just released the 32gr V-Max (see footnote), a good match for my barrel’s 1:12″ twist. I choose the 20 PPC because of the very good Lapua brass (220 Russian parent case). I figured teaming Lapua brass with the little .204 bullet would offer excellent accuracy combined with very low recoil. My expectations were fulfilled. The brass proved to be excellent and the PacNor loved the little V-Max pills.
I tried quite a few different loads and most powders that I tried worked very well. These included: H322, Benchmark, AA 2460, and Reloader 7. Amazingly, with just 14″ of barrel, all of these powders delivered impressive velocities–ranging from 3914 to 4074 fps. I settled on 48 Harrell’s clicks of Accurate Arms (AA) 2460, which drives the 32gr V-Maxs to 3995 fps.
With AA 2460 the gun will shoot in the low 3s at 100 yards consistently — as long as I steer the gun right, which takes some practice. I think groups in the low 0.3″ range is excellent for a non-benchrest factory bullet. Despite having no buttstock to grab, recoil on my 20 PPC pistol is very minimal — it just rocks back into your hand. The main problem is to keep the scope from smacking you, since I used a rifle scope with short eye-relief. Muzzle flash and noise are tolerable but DO NOT shoot one of these without good ear protection. Your ears are very close to the muzzle.
I also have a 20 PPC rifle built on a BAT action with a Richard’s #008 laminated stock cut down in size. That gun’s 1:9″-twist Lilja barrel lets me shoot the Berger 50gr LTB bullets. In the wind, these perform quite a bit better than the 32s. My two favorite loads for the 50 grainers are: a) 26.0gr VV N135, CCI 450 primers, 3615 fps; and b) 27.3gr Hodgdon Varget, CCI 450s, 3595 fps. The BAT 20 PPC also shoots really well with the 40gr V-Max, pushed by N135 and Fed 205M primers.
Pistol Action Legal Issues
One important thing to remember if you build a pistol is to make sure the receiver came from the factory as a pistol and was titled as a pistol. Rifle actions are illegal to use as a pistol. Yes, that’s a nonsensical law, but it’s still on the books. You can use factory pistol actions such as the XP 100.
If you want a new custom action such as a BAT (my favorite), you can order it as a pistol action and when you get it, register it as a pistol. Note, in some states there may be additional fees, waiting periods, or restrictions for pistol actions (as opposed to rifle actions). Check your local laws before ordering the action.
Future Trends in Varmint Hunting — Plenty of Twenties
I think these sub-caliber rounds, both 20s and the 17s, are the future of recreational varminting, at least out to medium distances. The Twenties offer low recoil, excellent accuracy, and components keep getting better and better. The bullet-makers are finally making high-quality bullets in appropriate weights. Compared to something like a 22-250, I’ve noticed that my 20 PPC rifle has a lot less noise, a plus when you want to be quiet around other people and varmints.
The flat trajectory is another big advantage in the field. With the 20 PPC, zeroed at 100 yards, I can pretty much hold dead center and get hits out to 300 yards or so without touching the scope to add elevation. [Editor: The same is true with the 20 Practical cartridge, basically a .223 Rem necked down to .20 Caliber. It has proven very accurate and easy to tune.]
The 20-Caliber cartridges we have now, in particular the 20 PPC and 20 BR, are very well-refined. You don’t have to do a lot of tuning or tinkering to have a very accurate, effective varmint-slayer. In fact, if I could dream up a signature “20 VFF” (Varmints For Fun) cartridge it would basically be the 20 PPC. In truth, nearly any of the popular 17- or 20-Caliber cartridges will perform well if you start with top-quality brass. The sub-calibers have less recoil and burn less powder, and there are very good components for most varmint and target-shooting applications. To me it seems that these small calibers work so well because of good components, low recoil, and efficient cartridge designs (particularly in the VarTarg and PPC cases).
WARNING: For your own safety, ALWAYS reduce all starting charges by 10% and work up carefully! Ambient temperature changes, powder lot variations, and differences in barrel friction can result in significantly increased pressures.
20 PPC LOAD MAP
Bullet GR
Maker
Powder
Charge
Primer
Case
Velocity fps
Barrel Twist
Comments
32
Hornady V-Max
H322
27.6
Rem 7½
Lapua
4000
Lilja 1:12
WarrenB Form Load
32
Hornady V-Max
AA 2460
29.5
Rem 7½
Lapua
3995
PacNor 1:12
SnakeEye Pistol Load
32
Hornady V-Max
H4198
25.1
CCI BR4
Lapua
4222
PacNor 1:12
A. Boyechko Load
39
Sierra BlitzKing
H322
26.0
Rem 7½
Lapua
3700
Lilja 1:12
WarrenB Load
39
Sierra BlitzKing
VV N540
28.8
CCI BR4
SAKO
4064
PacNor 1:12
D.Moore, Low 2s
40
Hornady V-Max
VV N135
27.8
Fed 205m
Lapua
3950
Lilja 1:9
SnakeEye Load
50
Berger LTB
VV N135
26.0
CCI 450
Lapua
3615
Lilja 1:9
SnakeEye Load
50
Berger LTB
Varget
27.3
CCI 450
Lapua
3595
Lilja 1:9
SnakeEye Load
Footnote: When first manufactured, the small Hornady 20-Caliber V-Max bullet was actually 33 grains, not 32 grains as sold currently. I still have some of the 33-grainers. I’ve observed no functional difference between the 33s and the current 32-grainers.
Share the post "Sunday Gunday: 20 PPC Pistol — Great for Varmint Adventures"
While a 16.5-pound benchrest gun is wonderfully stable on the bench, it’s not what you want in a field rifle. There is much to be said for a slim, light-weight, and easy-handling firearm when it comes to a walking varmint adventure. Eben Brown, who runs E. Arthur Brown Company, has created just such a rifle — the Model 97D Falling Block. When chambered for the 6PPC cartridge it delivered quarter-MOA accuracy in a splendidly portable package that tips the scales at just over six pounds without scope. The Model 97D is fairly unique in its lightweight and compact format — that makes it a great field-carry varmint rig. [Editor’s Note: This is an older article and we use some more recent photos of other model 97D Rifles to better illustrate the design and layout.]
Catalog photo of EABCO Model 97D Falling Block rifle.
Excellent Accuracy Made Easy for Sport Shooters
by Eben Brown, E. Arthur Brown Company
You don’t have to be a benchrest competitor to enjoy shooting one of the most accurate centerfire cartridges in the world, the 6mm PPC. With no complicated brass forming or finicky reloading processes, you can be shooting near half-inch groups right from the start and hone your skills to near quarter-inch groups by your second outing–at least that’s how it worked for me, and I’m NOT a good bench rest shooter! Developed by Louis Palmisano and Ferris Pindell, the 6PPC has won more bench rest accuracy competitions than any other cartridge. Easily made from Lapua .220 Russian brass, the 6mm PPC has a small primer and uniquely small flash hole that is credited for much of its inherent accuracy. The “short, fat” shape and nearly straight body contribute to efficient, consistent powder burning and stable chamber performance (it grips the chamber well during ignition).
The Brown Model 97D — A Slim, Accurate 6-Pound Rifle
The 97D was developed from the EABCO “BF” falling block silhouette pistols that have won world championships and set 500-meter distance records. In operation, the 97D falling block slides perpendicularly and closes the breech with absolutely zero camming leverage. This makes it a perfect test-bed to measure the chamber performance needed for hand-loading most other single-shot rifles accurately. At the reloading bench, I worked up a load with the now fully shaped 6mm PPC brass. I full-length sized the brass, trimmed, and primed each case the same as I would with any other cartridge, and began loading. With the resultant load, I easily shot a 5-shot 1/4″ group, a personal best for me. See target photo at right.
Making 6mm PPC Cartridges
Full-length size, prime, charge with powder, and seat a bullet… sounds like what you do with any other cartridge, doesn’t it? In fact, the only difference with 6mm PPC is that it has to be fired once (fire-formed) to expand to its final shape and size. But even fire-forming shots produce exceptional accuracy. I shot several 3/4″ groups while fire-forming at 100 yards, with my best group at nearly half-inch–so the time spent fire-forming was wonderful! In the photo, the parent .220 Russian case is on the left, while the fire-formed 6PPC case is on the right.
The EABCO 6mm PPC Chamber – 6PPC without Neck-turning!
We dimensioned our 6mm PPC chamber reamer to cut a chamber that fits Lapua 220 Russian brass closely without neck-turning. Naturally we recommend you use the Lapua brass for best results.
[Editor’s Note: We asked Eben if he had tried a 6BR chambering in a model 97D. He explained that, because of the extractor design, the falling block action works better with a smaller rim diameter: “The larger .308 rim width creates some issues. This design works best with cartridges no wider than the 30/30 case, or the 7.62×39 case, from which the 22 Russian case was derived. Cases with .308-sized rims develop more bolt thrust and work best with a different type of extractor than we use in the 97D. I love the 6BR, but I recommend the 6PPC for our 97D.”]
6mm PPC Reloading Data for Model 97D
The following loads were worked up in a Model 97D Rifle with 24″ barrel chambered for 6mm PPC with the chamber neck reamed to .275″ to fit Lapua brass without neck-turning. Lapua 220 Russian brass was full-length sized and fire-formed to 6mm PPC using 65gr V-Max bullets, CCI BR4 primers, and 24.5gr of VV N135 powder. Eben cautions: Load at Your Own Risk — Always start 10% low and work up
The following optimum loads were worked up with Vihtavuori N135, 58gr and 65gr V-Max bullets, and CCI BR4 primers. Please Note: There really is no “standard” for 6mm PPC. It can be finicky. But once you find what works best for you, the cartridge performs superbly. The accuracy will astound you.
Model 97D Specifications
OAL (with 24″ Barrel): 38″
Approx. Weight without Scope: 6-6.5 lbs.
Barrel: 17-26″ Chromoly or Stainless
Stock: Walnut w/Hardwood Grip Cap
Trigger: Tuned 16-24 ounces
This video shows the Loading Technique for Model 97D Rifle
Powder Selection — Choosing the Right Propellant
I’ve found that my maximum single-shot loads reach the same level of performance as bolt gun loads when I use one level slower burning powder type and proper chamber preparation. For example, when the VihtaVuori loading guide shows a maximum with VV N133, my best single shot load ends up being with the slower burning VV N135. Here’s the simplest way to proceed: Use a starting load from the loading guide and increase the powder charge until you detect some resistance to block movement with your thumb. Next, charge a case with that same amount of powder, tap it to settle, and look to see if the case is full to the base of the neck. If it’s not full, step up to the next slower-rated powder and repeat the load development process. There’s a powder burn rate chart for all brands of powder in the front of the current VihtaVuori Loading Guide. When you have the maximum load that will fill the case and still allow the 97D single-shot to open and eject freely after firing, you’re ready to shoot some groups!
Loading for Best Chamber Performance
In the model 97D rifle you can check chamber performance easily. After firing a shot, see if you can press the block downward with only your thumb on the top of the block. If it moves freely, you’ve got good chamber performance.
I use three pressure indicators when developing loads on the Model 97D. First I check the block with my thumb. Then I check to see if the cartridge sticks at all when ejecting. And finally, I check the primer for the excessive flattening that would indicate too much pressure. Generally, the hottest load that still allows the gun to open and eject freely ends up being my most accurate shooting load.
Chamber Preparation
Best chamber performance happens when a cartridge grips the chamber and does not drive backward significantly. When you want something to grip (rather than slip), you want to make sure there is no lubricant on the gripping surfaces. Case forming lube and gun oil are the two lubricants you want to remove. Clean your 6mm PPC cases after sizing (I wipe mine with a paper towel and Windex). Clean your chamber with a chamber sized jag and patch wetted with acetone. (Note: protect your chamber with a thin coat of Clenzoil when you’re not out shooting.)
Conclusions of a Single-Shot Sport Shooter
I love the 6mm PPC! It was easy to hand-load for the cartridge and it was easy to get excellent results. The group shot on this page was with the 65gr bullet and a rifling twist of 1:10. I usually recommend a 1:12 twist and the 58gr bullet because customers have reported superb accuracy (better groups than I can shoot). But the 5-shot ¼” group I shot with this set-up is my personal best ever–so naturally I’m thrilled!
While it’s hard to beat the 6PPC’s accuracy in a Model 97D rifle, my company currently offers the rifle in a variety of chamberings including 17 Hornet, 219 Donaldson Wasp, and 6mm BRM. The 97D Standard features a blued 24″ chrome-moly barrel, French Gray receiver, anodized buttstock transition, 2-ring scope mount and swivel studs.– Eben Brown
About the production Model 97D Rifles: “The 97D is a small frame single shot rifle that’s suitable for big game as well as small game and varmint hunting. It originally evolved from our World Champion long range silhouette pistol action and incorporates the same accurate gun making processes. The 97D action itself is inherently accurate and simple. Onto this we fit an EABCO Accuracy Barrel, precision turned and threaded between centers. Each chamber is individually reamed on-center and individually head spaced. We feel the crown is so critical to accuracy that we leave it until after the gun is finished. Our 11 degree target crowns are cut last and left bright — our trademark finishing touch.”


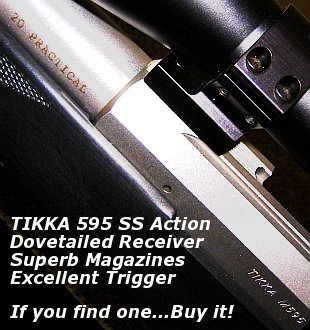 After building my 20 PPC, I wanted to do another .20 caliber, this time a repeater for predator hunting that could also serve as a gopher/prairie dog rifle. I wanted to use a Tikka M595 stainless sporter I had. This rifle is the ultimate repeater with an extremely smooth-feeding cycle from its single-column magazine. Since the Tikka was a .223 Remington from the factory, I first looked at possible case designs that would fit the magazine. The 204 Ruger was a very new round at the time and brass was scarce. I also didn’t care for the overly long case design or the standard throat dimensions of the cartridge. I then looked at the 20 Tactical. It was a nice cartridge but I didn’t like the fact that (at the time) an ordinary two-die Tac 20 set with just a plain full-length die and standard seater were $150. Not only did the costs bother me, but I was accustomed to using a Redding die set featuring a body die, a Type-S bushing neck die, and a Competition seater. To be honest, I also didn’t care for the 20 Tactical’s name–there is absolutely nothing tactical about the cartridge. I didn’t want to adopt a new cartridge based on what I perceived to be a marketing gimmick (that “tactical” title).
 Simply Neck Down .223 Rem to Make a 20-223 Wildcat
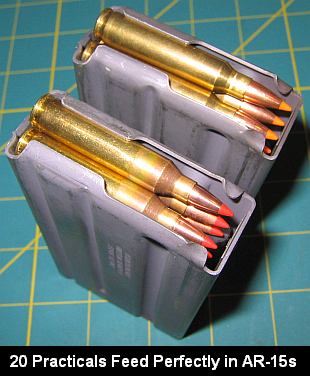 I chose Kevin Weaver at Weaver Rifles to fit and chamber the barrel to my rifle. Kevin does excellent work and is great to work with. Kevin liked the idea of the 20 Practical so much he agreed to purchase the project reamer. (BTW Kevin didn’t even need to purchase a Go/No-Go gauge, he just used an existing .223 Rem gauge.)
 Project Componentry
 Test Report–How’s It Shoot?
 Comparing the 20 Practical and 20 Tactical
 A varmint shooter’s target is not conveniently placed at a fixed, known distance as it is for a benchrester. The varminter must repeatedly make corrections for bullet drop as he moves from closer targets to more distant targets and back again.
 Minority View — Hold-Over is Better

 Beating the Guys at their Own Game
 Beneficial Aspects of Shooting
 Load Development

 Firearms are limited to field-portable, varmint-caliber rifles in either custom or factory class, and having a maximum 6.5mm bore, but bullets must weigh no more than 107 grains. You can shoot prone or from a bench using a front rest and bag rear. For more information, visit
 Let’s start at the beginning. Before the match there is usually an opportunity to fire a few fouling shots and check sight settings for load and distance. An initial read on conditions–mostly wind direction, strength and consistency–is also made. The spotter should checklist the shooter to make sure they are set up for the relay distance and have adjusted their sights to the correct elevation and windage.
 Katy and Don are avocado farmers. From time to time they’d bring a few avocados to the range to give to the other shooters. In addition, on some months, Katy would bring some home-made Guacamole made from the avocados on their ranch. Katy says “Fellow shooters appreciate a batch of guacamole so much they bring their own chips to go with the dip. I keep getting suggestions that I go into the business of making and selling guacamole. Guess I could start by selling it at the range.”


 Hall vs. BAT
 Load Development and Accuracy Results
 Big, Strong, and Versatile
 A benchrest or High Power shooter must operate from a designated shooting position. He must stay put and deal with the wind as it moves across the course, from whatever direction it blows.
 Benefits of Swivel Benches

 The 6mmBR Norma cartridge has spawned many great variants in multiple calibers: 6mm Dasher, 6BRA, 22 BR, 22 Dasher, 30 BR and others. This article is about a handsome 22 BR Rem-action varmint rig.
 Accuracy is outstanding and with Roy, Mike, my grandson and myself shooting this rifle I don’t believe it has missed more than three hogs out of over 100 we shot at one summer. This rifle is carried in a ceiling rack in the truck where it’s handy and is used by the first person that grabs it when a hog is sighted if we are moving between setups. The Varmint reticle on the Leupold (shown below) is nice for quick hold-overs as you change distances.”


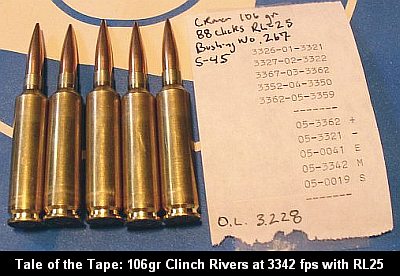
 Ultimate Evolution of the .243 Winchester


 If you load primarily one brand of bullets, another slick set-up is to buy a Forster or Whidden full-length, non-bushing .243 Win sizing die, and then have Forster or Whidden hone the neck for your desired amount of tension. This elegant one-pass sizing solution produces very straight rounds with low run-out.


 Large Caliber Ammunition Available Also


 John Illum’s Rampro actions are chrome-moly steel. Commonly you’d see them blued, but I had him put a brushed nickel finish on the action and rings. From a few feet away it looks like stainless. The trigger is Illum’s own design set at 8 ounces, and there’s no creep that I can detect. The action has Remington barrel threads and will accept Remington type triggers. One neat thing is that the action was milled with an integral recoil lug (much like the current Surgeon Action). And the bolt is milled all in one piece–no soldered-on handles. My only gripe with this bolt handle is that it could be a tad longer, but it still is manageable for a single-shot. You’ll also note how slick and streamlined the scope rings are. Illum made those as well. His rings mount to the action via two screws from the inside of the ring, a very elegant set-up for sure. (I currently have a 6.5-20x40mm Nikon scope on this gun. If I had to do this project over again the only thing I would change would be installing a 30mm scope because I like ‘em!).
 Handgun Handling Tips
 Load Development and Accuracy
 Pistol Action Legal Issues
 I think these sub-caliber rounds, both 20s and the 17s, are the future of recreational varminting, at least out to medium distances. The Twenties offer low recoil, excellent accuracy, and components keep getting better and better. The bullet-makers are finally making high-quality bullets in appropriate weights. Compared to something like a 22-250, I’ve noticed that my 20 PPC rifle has a lot less noise, a plus when you want to be quiet around other people and varmints.
 The Brown Model 97D — A Slim, Accurate 6-Pound Rifle
 Making 6mm PPC Cartridges
 The EABCO 6mm PPC Chamber
 The following optimum loads were worked up with Vihtavuori N135, 58gr and 65gr V-Max bullets, and CCI BR4 primers. Please Note: There really is no “standard” for 6mm PPC. It can be finicky. But once you find what works best for you, the cartridge performs superbly. The accuracy will astound you.
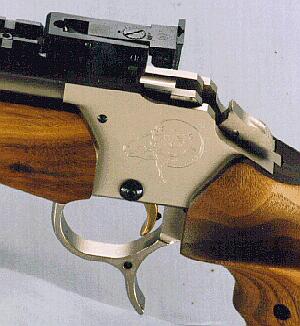 Loading for Best Chamber Performance