|
|
October 5th, 2013
 In this NSSF video, Ryan Cleckner shows how to set up a scope on a tactical or hunting rifle. Ryan, a former U.S. Army Sniper Instructor, notes that many shooters spend a small fortune on equipment, but fail to set up their rifle to use the optics optimally. Cleckner likens this to someone who owns an expensive sports car, but never adjusts the seat or the mirrors. In this NSSF video, Ryan Cleckner shows how to set up a scope on a tactical or hunting rifle. Ryan, a former U.S. Army Sniper Instructor, notes that many shooters spend a small fortune on equipment, but fail to set up their rifle to use the optics optimally. Cleckner likens this to someone who owns an expensive sports car, but never adjusts the seat or the mirrors.
Ryan notes that you want your head and neck to be able to rest naturally on the stock, without straining. You head should rest comfortably on the stock. If you have to consciously lift your head off the stock to see through the scope, then your set-up isn’t correct. Likewise, You shouldn’t have to push your head forward or pull it back to see a clear image through the scope. If you need to strain forward or pull back to get correct eye relief, then the scope’s fore/aft position in the rings needs to be altered. Watch the full video for more tips.
Tips on Mounting Your Scope and Adjusting Your Comb Height:
1. Normally, you want your scope mounted as low as possible, while allowing sufficient clearance for the front objective. (NOTE: Benchrest shooters may prefer a high mount for a variety of reasons.)
2. Once the scope height is set, you need to get your head to the correct level. This may require adding an accessory cheekpad, or raising the comb height if your rifle has an adjustable cheekpiece.
3. Start with the rifle in the position you use most often (standing, kneeling, or prone). If you shoot mostly prone, you need to get down on the ground. Close your eyes, and let you head rest naturally on the stock. Then open your eyes, and see if you are too low or too high. You may need to use a cheekpad to get your head higher on the stock.
4. If your scope has a flat on the bottom of the turret housing, this will help you level your scope. Just find a flat piece of metal that slides easily between the bottom of the scope and the rail. Slide that metal piece under the scope and then tilt it up so the flat on the bottom of the scope aligns parallel with the flats on the rail. Watch the video at 8:40 to see how this is done.

Video find by EdLongrange. We welcome reader submissions.
October 5th, 2013
When we first saw this product in 2010 at Cabela’s we thought: “Great idea… it’s amazing nobody else has offered a covered loading tray before”. Being able to cover your loading tray makes sense. With the cover in place, you can’t inadvertently drop something into the tray, or knock over cases filled with powder. Plus the covered cased eliminates the risk of contaminating cases with overspray from lubes or solvents. You can also keep loaded rounds protected from the elements before they’re packed into ammo carriers.
Now Midsouth Shooters Supply offers covered loading trays for just $8.62 (that’s a lot less than Cabela’s price). You can purchase the 50-round loading tray from Cabelas.com for $14.99 (item IK-215760) with a green base, or get the same thing with a red base from Midsouth for $8.62 (item 038-502032). Order Midsouth’s 30-45 cal model (item 038-502032) for 6BR and .308-sized rims. For loading .223 rounds, get the 9mm-223 model (Midsouth item 038-502033).

October 4th, 2013
 Many styles of bipods were used by F-TR shooters at the F-Class U.S. Nationals and World Championships recently held in Raton, NM. Most featured angled arms — either left/right arms or parallel pairs of arms on either side. With such designs, vertical height is controlled by adjusting the angle of the arms (and hence the distance between the feet). Widen the track and the gun goes down; narrow the track and the gun goes up. One bipod design, Dan Pohlabel’s FLEX Bipod, was very different than the norm. On the FLEX, there are no angled arms — the main blade is a solid piece of metal. Each leg has independent control for height via adjustable “feet” on either ends of the main piece. A ratcheting locking lever controls the cant. Many styles of bipods were used by F-TR shooters at the F-Class U.S. Nationals and World Championships recently held in Raton, NM. Most featured angled arms — either left/right arms or parallel pairs of arms on either side. With such designs, vertical height is controlled by adjusting the angle of the arms (and hence the distance between the feet). Widen the track and the gun goes down; narrow the track and the gun goes up. One bipod design, Dan Pohlabel’s FLEX Bipod, was very different than the norm. On the FLEX, there are no angled arms — the main blade is a solid piece of metal. Each leg has independent control for height via adjustable “feet” on either ends of the main piece. A ratcheting locking lever controls the cant.

Click photo below for full-screen version

Monte Milanuk, who tested an early version of the FLEX Bipod, explains: “The FLEX bipod is a very simple design — no Mariner’s wheel for vertical adjustment, no joystick head, no changing width as it goes up and down. And the FLEX bipod is very light (as are most, these days), but also very durable. An added bonus is that it breaks down very flat for airline travel. Once I take the feet off, remove the ratchet lever (with screw), the whole bipod nestles very nicely in the bottom layer of foam in my gun case (with cuts for the head etc. in the foam). If someone bashes the case hard enough to damage what is essentially a plate of spring steel, then I’ve got bigger worries.”

Monte likes the FLEX Bipod, but notes that it works best if you lean into the gun when shooting: “Not everyone wants a bipod that slides around like a hog on ice. Some people manage to get things tracking straight back and forth, almost like it was constrained by a front rest. Personally, I have a hard time doing that in a repeatable fashion. While the FLEX Bipod shoots quite well with a [loose] hold, it was designed for those of us who like to ‘lean’ into the gun a bit. Quite literally, the idea is that you get the feet to dig in slightly, and push against the rifle butt with your shoulder and the bipod will ‘flex’ or bow forward slightly. It is one of those things that sounds wonky until you try it. It may take a few times to get a feel for it, but once you do, it is surprisingly repeatable.”
The FLEX bipod’s designer, Dan Pohlabel, offers these instructions:
The bipod feet are shipped loose. Note there is a left foot and a right foot. Determine the balance point of your rifle and mount the bipod approximately two inches forward of that point. You may want to move it further forward after shooting. Experiment with its placement to minimize movement of the bipod. When setting up, first grab each foot and ‘dig’ them in to the shooting surface, dirt, gravel, grass, carpet — it doesn’t matter. After making sure each foot has a hold, raise or lower the bipod to your target and use the cant adjustment to level your rifle. Loading the bipod with your shoulder is the preferred method of position. For more info, visit Kreativ-Solutions.com or email flex-bipods [at] kreativ-solutions.com .


October 4th, 2013
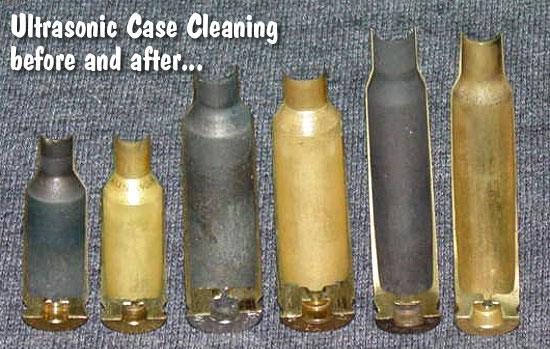
 With the price of premium brass topping $90/100 for many popular cartridges, it makes sense to consider annealing your brass to extend its useful life. Forum member Darrell Jones offers a full range of brass prep, brass forming, and brass restoration (annealing, ultra-sonic cleaning) at very affordable prices. Starting at just $15 per 100 cases ($20/100 for magnum cases), Darrell’s company, DJ’s Brass, will anneal your used brass using state-of-the-art Bench-Source annealing machines. Annealing plus ultrasonic cleaning starts at $25.00 per 100 cases ($30 for magnum cases larger than 0.473″ rim). If you just want your cases ultrasonically cleaned (no anneal), that costs $15 per 100 ($20/100 for magnum). With the price of premium brass topping $90/100 for many popular cartridges, it makes sense to consider annealing your brass to extend its useful life. Forum member Darrell Jones offers a full range of brass prep, brass forming, and brass restoration (annealing, ultra-sonic cleaning) at very affordable prices. Starting at just $15 per 100 cases ($20/100 for magnum cases), Darrell’s company, DJ’s Brass, will anneal your used brass using state-of-the-art Bench-Source annealing machines. Annealing plus ultrasonic cleaning starts at $25.00 per 100 cases ($30 for magnum cases larger than 0.473″ rim). If you just want your cases ultrasonically cleaned (no anneal), that costs $15 per 100 ($20/100 for magnum).
Custom Neck-Turning Services
Another great service DJ’s Brass provides is precision neck-turning. Darrell can neck-turn any size case to your specified neck-wall thickness. The price is $0.30 per case (normal size) or $0.40 (magnum size) with a $20.00 minimum order. And if you’ve got a bucket of brass to neck-turn, that’s fine with Darrell — he recently neck-turned 1500 pieces of brass for one customer!

DJ’s Brass can process everything from .17 Fireball all the way up to the big magnum cases. And the job gets done quickly. Darrell has a 10-day turn-around guarantee. For most jobs, Darrell tells us, he gets the processed brass to the Post Office within three business days. DJ’s Brass charges only actual shipping fees, using USPS flat-rate boxes. For more info, visit DJsBrass.com or call Darrell Jones at 205-461-4680. IMPORTANT: Contact Darrell for shipping instructions BEFORE sending any brass for processing. ALL BRASS MUST BE DE-PRIMED before you send it.

• Ultrasonic Cleaning + Annealing ($25.00/100 normal or $30/100 magnum)
• Ultrasonic Cleaning and Polishing ($15.00/100 normal or $20/100 magnum)
• Anneal Case Necks (after checking for splits) ($15.00/100 normal or $20/100 magnum)
• COAL Trim and Chamfer Case Mouths ($0.20 per case, $20.00 minimum order)
• Uniform, Square, and Chamfer Primer Pockets ($0.15 per case, $20.00 minimum order)
• Expand Case Necks and Anneal brass (Call for Price)
• Create False Shoulder for Fire-Forming (Call for Price) |
DJ’s Brass Offers Specialized Custom Services
Darrell tells us: “At DJ’s Brass, we can handle all your brass refurbishing needs. From ultrasonic cleaning to custom annealing for specific wildcat cartridges. We can expand your necks from .22 caliber to .30 caliber and anneal shoulders for consistent bump-back. We can turn your case-necks and trim the brass to your specs. For some cartridge types, I can pre-form cases to assist in fire-forming a wildcat cartridge. We also remove the carbon build-up in muzzle brakes. Don’t lose your accuracy by having carbon build up and close off the clearance required for the most accurate bullet release through a muzzle brake.” Note: Extra charges apply for neck-turning and neck expansion operations, or specialized cartridge-forming operations. Please call 205-461-4680 for special services pricing.
Darrell has cleaned and annealed cases for shooters from across the country. Here are testimonials (this Editor reviewed all the original emails so I can confirm these are real):
“Your services were good with a quick turn-around time. Quality of the case annealing looked great[.]” — Tom, in Alaska
“The [300 Win Ackley] batch you did for me came back looking great.” — Chuck, in Arizona
“Since I started using Lapua brass, I’ve gotten gotten enough reloads out of them to notice that the necks were no longer sealing as well as I’d like. A friend suggested annealing them. I remembered seeing DJ’s ad on AccurateShooter.com and thought I’d give him a try. Not only did my [.308 brass] come back sorted exactly as I had sent them out, all had been so thoroughly cleaned that I realized I had been leaving lube on them after forming. DJ had taken the time to enclose a note cautioning me to brush the inside case necks and do a full-length resize for the first loading. And all 200 cases were back in my hands in DAYS, not weeks! Great service, great price, great follow up.” — Jim, in Alabama
October 4th, 2013
 On October 3rd, Firearms Policy Coalition (FPC) Managing Director Brandon Combs, joined by California Association of Federal Firearms Licensees (CAL-FFL) Legislative Advocate Craig DeLuz, delivered 65,000 letters from individuals urging California Governor Jerry Brown to veto the 14 gun control bills currently on his desk. The gun bills include SB 374, a sweeping ban on semi-automatic rifles, as well as laws that would ban firearm repair parts, handgun sales, lead ammunition for hunting, and exempt the City of Oakland from longstanding state laws that preempt dangerous localized gun registration schemes, among others. SB 374 outlaws virtually all self-loading centerfire rifles with detachable magazines, regardless of magazine capacity. Even common hunting rifles with 3-rd flush mags are banned. On October 3rd, Firearms Policy Coalition (FPC) Managing Director Brandon Combs, joined by California Association of Federal Firearms Licensees (CAL-FFL) Legislative Advocate Craig DeLuz, delivered 65,000 letters from individuals urging California Governor Jerry Brown to veto the 14 gun control bills currently on his desk. The gun bills include SB 374, a sweeping ban on semi-automatic rifles, as well as laws that would ban firearm repair parts, handgun sales, lead ammunition for hunting, and exempt the City of Oakland from longstanding state laws that preempt dangerous localized gun registration schemes, among others. SB 374 outlaws virtually all self-loading centerfire rifles with detachable magazines, regardless of magazine capacity. Even common hunting rifles with 3-rd flush mags are banned.
“65,000 letters sends a very loud-and-clear message: Californians just don’t want these horrible new laws,” said CAL-FFL’s DeLuz of the tremendous response by California gun owners. FPC’s Brandon Combs said that that the fight is far from over and noted that people should keep calling and writing the Governor’s office every day. “We encourage all gun owners and Second Amendment supporters to send Governor Brown a letter through our fast, easy, and free gun rights activism tools at www.DemandRights.com.” “We will keep printing, faxing, and emailing letters to Governor Brown until the very end,” continued Combs. “Gun owners simply must keep up the pressure for these final few days.” Governor Brown has until October 14, 2013 to sign or veto the bills. Bills that are not vetoed will become state law. Governor Brown’s State Capitol office phone number is (916) 445-2841. You can email the Governor via this webpage: http://govnews.ca.gov/gov39mail/mail.php.
October 3rd, 2013
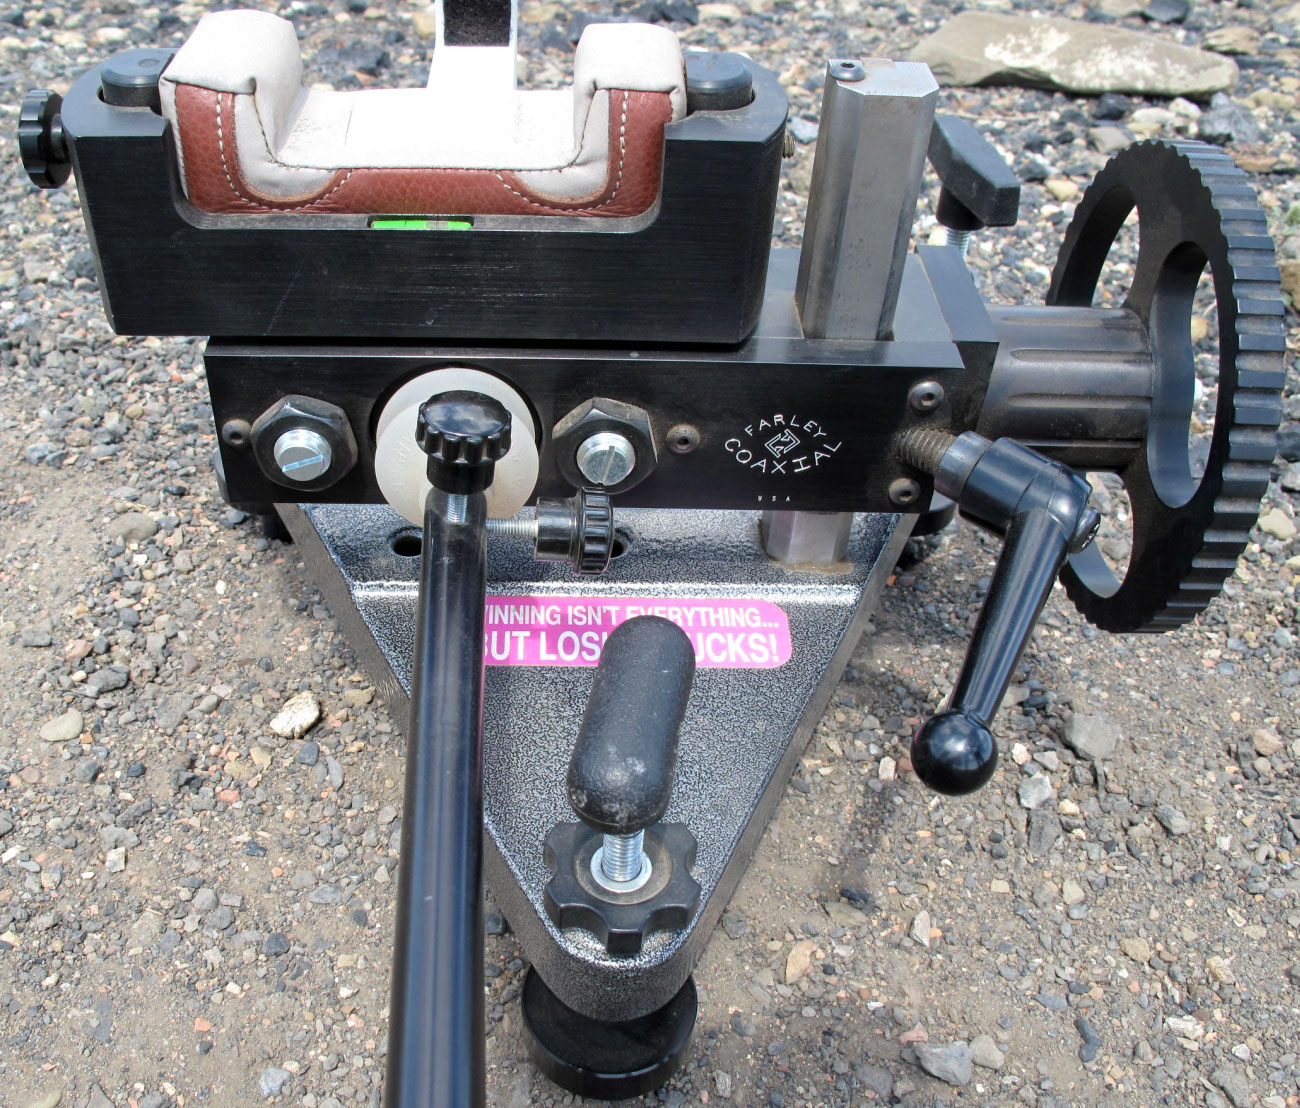
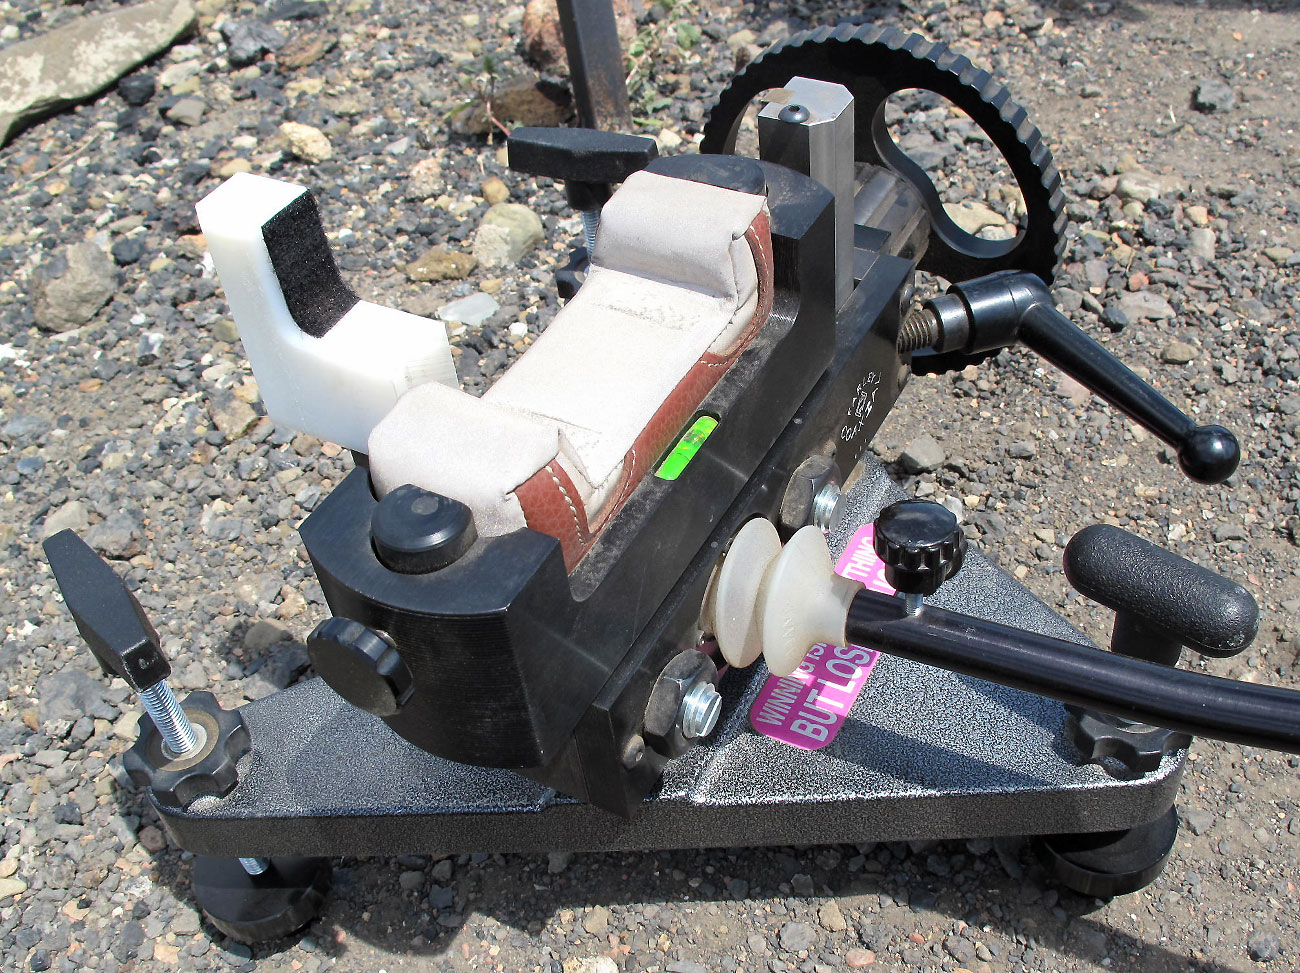
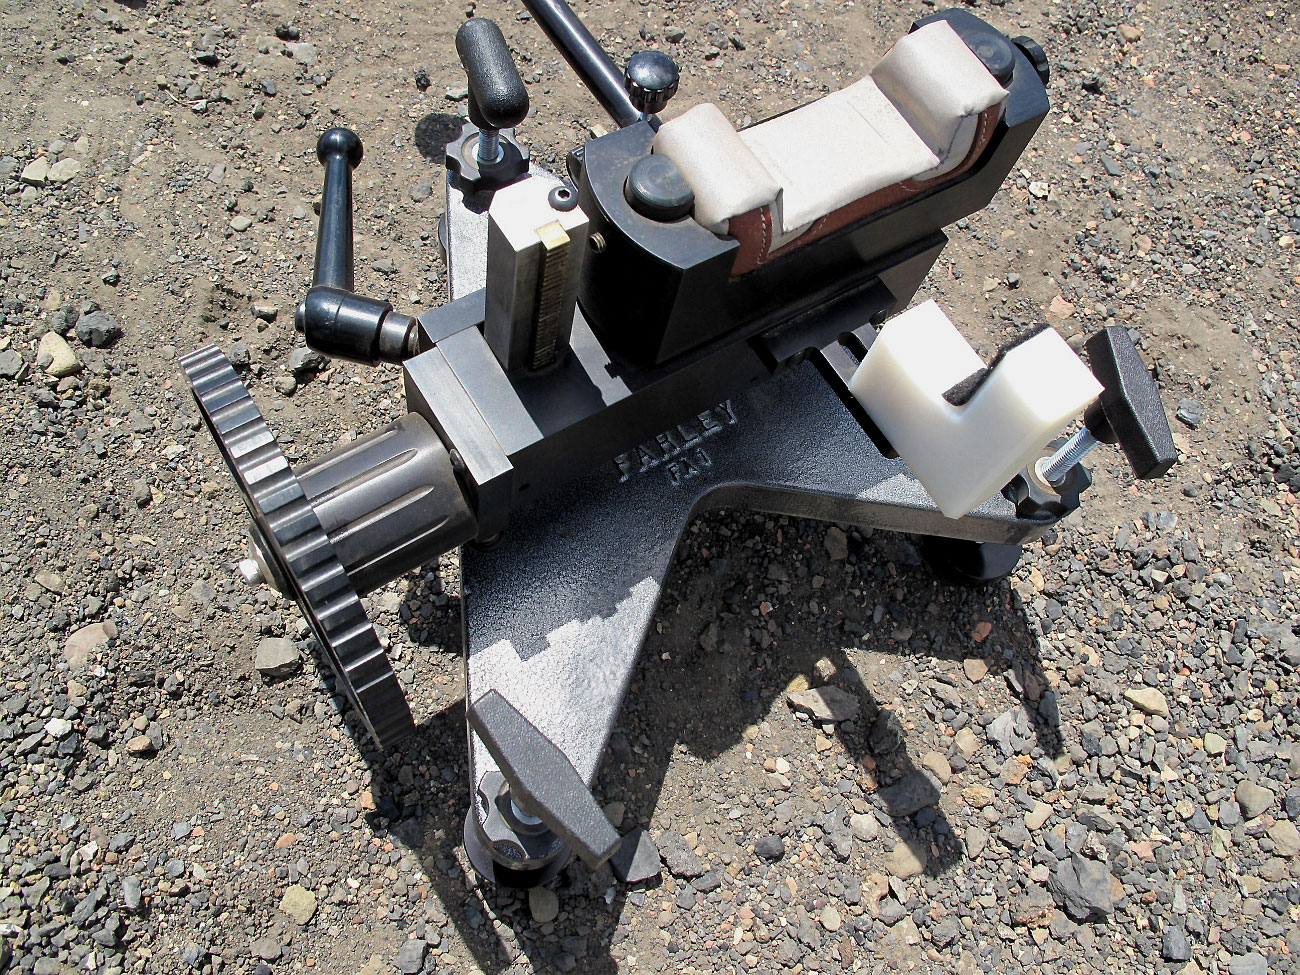
 At the F-Class Nationals in Raton, we saw a wide variety of front rests being used by F-Open shooters. One that caught our eye was a new prototype Farley Coaxial rest brought to the match by our friend Speedy Gonzalez. This one-of-a-kind Farley features a big wheel on the side for gross elevation adjustment, plus an extended locking arm. These two upgrades make the rest easier to use from the prone position. Up front is a new L-shaped Delrin forearm stop (Speedy say this would be black in the production version). Special large-diameter feet with extended “anchor shafts” complete the package. (See bottom photo.) Speedy used this rest at the Nationals and did very well, finishing second in the Master division, and in the top 15 overall among all Open-class shooters. At the F-Class Nationals in Raton, we saw a wide variety of front rests being used by F-Open shooters. One that caught our eye was a new prototype Farley Coaxial rest brought to the match by our friend Speedy Gonzalez. This one-of-a-kind Farley features a big wheel on the side for gross elevation adjustment, plus an extended locking arm. These two upgrades make the rest easier to use from the prone position. Up front is a new L-shaped Delrin forearm stop (Speedy say this would be black in the production version). Special large-diameter feet with extended “anchor shafts” complete the package. (See bottom photo.) Speedy used this rest at the Nationals and did very well, finishing second in the Master division, and in the top 15 overall among all Open-class shooters.
CLICK Photos Below to See Full-Screen Version.

Speedy says the folks at Farley hope to market the Big Wheel Coaxial with these F-Class upgrades by the end of 2013. Some of the items should be available for purchase separately, as upgrades to current Farley rests. Sorry, no pricing is available at this time.

The rest also sported a new Edgewood front bag with the new light-colored, super-slick bag material. Along with the new bag fabric, Speedy explained that there are subtle changes to the bag design and construction so that it holds its shape better and doesn’t “plump up” in the middle.


October 3rd, 2013
 There’s a new gun game focusing on defensive rifle skills — the NRA National Defense Matches (NDM). Think of this as IDPA with ARs. The inaugural NRA National Defense Matches will be held October 12-13, 2013 at Peacemaker National Training Center, in Gerrardstown, West Virginia. There’s a new gun game focusing on defensive rifle skills — the NRA National Defense Matches (NDM). Think of this as IDPA with ARs. The inaugural NRA National Defense Matches will be held October 12-13, 2013 at Peacemaker National Training Center, in Gerrardstown, West Virginia.
NDM programs are designed for all skill levels, with the goal of developing and exercising defensive rifle skills. There are three types of NDM matches. First, the basic-level match allows novices to shoot from a variety of positions at relatively close ranges out to 100 yards. Competitors will engage targets from standing, kneeling, prone, and ‘roll-over’ prone positions (to simulate actual defensive situations). Next is the advanced-level NDM. This type of match is held on multiple bays with targets placed at seven to 50 yards. Shooters must move quickly from one firing point to the next. The championship-level, open-terrain NDM, calls for shooters to maneuver through undulating forested terrain, engaging targets from difficult firing positions, at distances out to 500 yards. All NDM matches are conducted according to established general parameters, but the actual courses of fire can be adapted to the features of particular ranges, to suit the terrain and range lay-out. Watch the video to see how NDM matches are conducted.
National Defense Match Demonstration Video (Warning: Very Loud — turn speakers down.)
Story tip by EdLongrange. We welcome reader submissions.
October 3rd, 2013
Here’s a handy invention by Forum member RayJay from Georgia. It’s a simple wire clip that will hold the lid of your plastic ammo box fully open during use. RayJay explains: “Everybody probably uses the cheap plastic cartridge cases. The only problem I have with them is the lid is always in the way and sometimes when trying to open the lid farther the cartridge box tips and you can dump out the cases. I did some cogitating and came up with these .061″ music wire clips. They work great and the unexpected benefit is that the cases are more stable while sitting at the bench.”
RayJay adds: “The round wire is ideal because it still allows a cartridge to fit in the hole where the clip is placed. Now all I need to do is make another 15 or 20 so I can have one in every case I own.”

October 2nd, 2013
 The good folks at Kelbly’s have announced a great October sales promotion. If you buy a March scope — any March scope in stock — you’ll earn a $300.00 credit that can be used to purchase any other products Kelbly’s sells. That includes rings, reloading gear, bullets, and many more items you’ll find at www.Kelbly.com. The good folks at Kelbly’s have announced a great October sales promotion. If you buy a March scope — any March scope in stock — you’ll earn a $300.00 credit that can be used to purchase any other products Kelbly’s sells. That includes rings, reloading gear, bullets, and many more items you’ll find at www.Kelbly.com.
Jim Kelbly explains how this works:
“For the month of October only, buy a March Scope in stock and get $300.00 of credit towards Kelbly’s products and the Kelbly’s store. Kelbly’s now carries a number of reloading products and bullets. The credit can be used same day as scope purchase to get scope rings or anything else we sell. This sale is for any March Scope in stock. With over 150 scopes in stock there is a great selection of scopes. If you would like to see a inventory of scopes just email us and we will send [that] to you. If you have any questions just email or call. NOTE: Scopes will only be sold to U.S. citizens and shipped to U.S. addresses.”
For more information, email jim[at]kelbly.com or call (330) 683-4674 and ask about the October Promo.

October 2nd, 2013
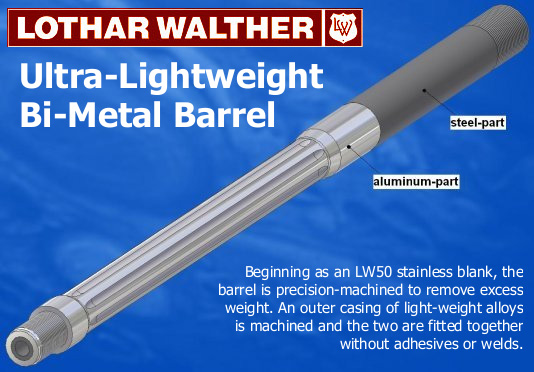
Less weight plus better heat dissipation — Sound good? Here is an innovative barrel technology that promises worthwhile performance benefits for hunters or match shooters. Lothar Walther (LW) has developed a new bi-metal barrel system that cuts weight dramatically while promising significantly-enhanced heat dissipation.
Walther’s Ultra-Lightweight Barrels combine steel with lightweight alloys. This results in a significant weight reduction without the use of carbon fiber, epoxy binders, or other heat-retaining materials. Beginning as an LW50 stainless blank, the barrel is precision-machined to remove excess weight. An outer casing of light-weight alloys is machined and the two are fitted together without adhesives. Basically you end up with the steel inner barrel inside a larger-diameter fluted aluminum outer barrel (see diagram). This gives you the ‘best of both worlds’ — light weight for ease of carry, and thick diameter for rigidity and enhanced heat dissipation. Near the action, the barrel remains all-steel.
The barrels come pre-chambered in your choice of caliber/cartridge, from .22LR up to .338 Lapua Magnum. Walther chambers the barrel — but a gunsmith is still required to finish the shoulder so that the headspace is set correctly for your action. These barrels are not inexpensive. A typical bi-metal Walther Barrel runs $850.00 – $875.00, for barrel lengths from 22″ to 30″. Threading for a muzzle brake or suppressor (if desired) is normally included in that price.
 We haven’t tested one of these bi-metal composite barrels, but the potential for significant weight savings is obvious — aluminum is a lot lighter than steel. What’s more, a metals expert we contacted said that a bi-metal system employing fluted aluminum over steel, if assembled properly, could dissipate heat much better than steel alone (given the same diameter). Stainless steel has a thermal conductivity factor of 16. Aluminum has a thermal conductivity factor of 250.* We haven’t tested one of these bi-metal composite barrels, but the potential for significant weight savings is obvious — aluminum is a lot lighter than steel. What’s more, a metals expert we contacted said that a bi-metal system employing fluted aluminum over steel, if assembled properly, could dissipate heat much better than steel alone (given the same diameter). Stainless steel has a thermal conductivity factor of 16. Aluminum has a thermal conductivity factor of 250.*
Our expert also pointed out that some other composite barrel systems on the market actually increase heat retention because they place insulating materials next to the inner steel barrel. (Carbon, Fiberglass, and Epoxy are all considered “insulating substances” as they have very low thermal conductivity*.) The LW system of aluminum over metal should avoid this mistake, our expert believes. Lothar Walther says: “Unlike solid steel barrels, this barrel sheds heat fast. VERY FAST!”
Half the Weight of Conventional Barrels
How much weight can you save? With a 1.200″ shank diameter and a muzzle diameter of 0.850″, the LW Ultra-Lightweight Barrel is less than half the weight of a standard varmint barrel of the same size. Walther claims its UltraLight Barrel can be “carried for long distances and stand up to heavy firing.” This, LW says, makes these barrels “perfect… for varmint and tactical uses”.
Pre-Chambered Ultra-Lightweight Barrels Available in .22 to .338 Calibers
Lothar Walther offers Ultra-Lightweight barrels in a full range of calibers from .22LR to .338. Each Ultra-Lightweight Barrel comes complete with chamber, crown, and breech threads. These barrels are fluted by the factory. If you order a LW Ultra-Lightweight barrel, Lothar Walter provides the services of a specialist trained in building guns with these barrels. To order one of Lothar Walther’s bi-metal barrels, CLICK HERE or contact Lothar Walthar at the address below:
Lothar Walther Precision Tools, Inc.
3425 Hutchinson Rd. – Cumming, GA 30040
Phone: 770-889-9998 | Fax: 770-889-4919
E-Mail: lotharwalther [at] mindspring.com
Website: www.lothar-walther.com
*Thermal conductivity is the quantity of heat transmitted through a unit thickness in a direction normal to a surface of unit area, due to a unit temperature gradient under steady state conditions. The factor values are based on this formula: W/(m.K) = 0.85984 kcal/(hr.m. °C). Here are thermal conductivty values for common materials: Aluminum, 250; Brass, 109; Steel (Carbon 1%), 45; Stainless Steel, 16; Carbon, 1.7; Brick dense, 1.3; Concrete (medium) 0.7; Epoxy, 0.35; Fiberglass, .04.
Story tip from EdLongRange. We welcome reader submissions.
|