There is so much to see at SHOT Show, with nearly 2000 exhibitors showcasing tens of thousands of products. SHOT Show is the largest trade show of its kind in the world, attracting 60,000+ attendees from more than 100 countries.
Thankfully there are many teams of reporters who covered SHOT Show this year, and they’ve now posted a wide selection of video reports. In today’s SHOT Show video showcase, we post our “pick of the litter” — ten of our favorite video reports from SHOT Show 2019, plus one great video “blast from the past”.
Our friend Erik Cortina is at Raton, NM this week at the F-Class Nationals. When he’s not shooting (or working) Erik produces YouTube videos. One of his most popular videos explained why you should full-length size cartridge brass. In no uncertain terms Erik says: “Quit Neck Sizing!!!” Watch the Video:
Why It’s Smart to Full-Length Size Your Brass
Commentary by Erik Cortina
Should You Full-Length Size Your Cartridge Brass?
Absolutely. Let Me Explain Why…
I have seen it time and time again, shooters on the line wrestling with their rifle trying to get the bolt closed while the wind is switching. They were too focused trying to get their bolt to close and getting their rifle settled back on the bags that they missed the wind switch. Bang… Eight! The straw that broke the camel’s back for me was at the 2017 Canadian Nationals. I was paired up with a young girl and she would try really hard to close the bolt on her rifle. The majority of the time she would get it to close, but often times she could not even get the round to chamber. She was focused on her rifle the entire time rather than on the conditions. When we completed our strings, she had five rounds that did not chamber our of 15! That is way too many!. I told her she needed to think about Full-length sizing with 0.002″ shoulder bump, or Controlled Full-length Sizing like I call it. I told her not to worry about losing accuracy. I told her that I full-length size all my rounds and asked if she noticed how smooth my bolt was and noticed my score. She said yes, they were both great!
Controlled Full-length Sizing Does NOT Harm Accuracy
I have found that Controlled Full-length Sizing does NOT hurt accuracy or shorten brass life. I find that I can focus much more on the conditions when I don’t have to think about chambering a round nor extracting it. It has become second nature. After firing, I keep my head welded to the stock, I open the bolt by placing my thumb on top of stock and rotating hand upwards. I reach in and retrieve spent case, place it back in ammo box, and pick up another loaded round and put in chamber. I verify conditions and when ready, I push the bolt in and close it with my index and middle finger.
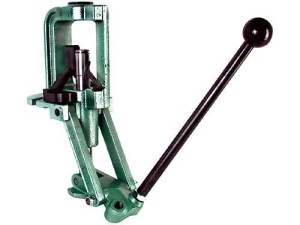
With Controlled Full-length Sizing you “bump” the shoulder around .002″ for bolt guns.* Image courtesy Sinclair International which carries a variety of Full-length dies.
Whidden Full-Length Sizing Dies by AccurateShooter.com Editor
For proper Full-length sizing, you want a quality die that’s a very good match to your chamber. For our project rifles we usually turn to Whidden Gunworks which offers both bushing and non-bushing FL dies. And if you want the hot new option, check out Whidden’s patent-pending, click-adjustable FL-sizing die. This gives instant, precise control over shoulder bump. It works great.
*With gas guns, such as the AR10, you may want to increase shoulder bump to .003″ or more. With some benchrest cartridges, .0015″ bump may prove optimal. But .002″ is a good starting point.
In this video, Forum member Erik Cortina shows how to create a custom modified case for use with the Hornady Lock-N-Load Overall Length Gauge (formerly the Stoney Point Tool). While Hornady sells modified cases for many standard cartridges, if you shoot a wildcat such as the 6mm Dasher or .284 Shehane, you’ll need to create a custom modified case*. And even if you shoot a standard cartridge such as the .308 Winchester you can get more consistent measurements if you make a custom modified case from a piece of brass fired in your chamber.
The process is straight-forward. Take a piece of brass fired in your chamber and full-length size it (with about .002″ shoulder bump). Then you need to drill out the primer pocket. Erik uses a mini-lathe for the operation, but this general process can be done with a drill press or other tools. Erik shows how to do this with a 0.290″ HSS (High Speed Steel) drill bit on a mini-lathe. After drilling the hole comes the tricky part — you need to tap the case with the precise 5/16″ x 36 threads per inch (tpi) right-hand thread that matches the male thread on the O.A.L. Gauge. This 5/16″ x 36 tpi tap is pretty uncommon, but you can order it from Amazon.com if you can’t source it locally.
If you use a mini-lathe, Erik suggests loosening the tailstock slightly, so it can float while cutting the threads. Erik also says: “Make sure you get the tap on pretty tight — it’s going to want to spin.” Erik turns the case at about 100 rpm when tapping the threads. Once the case and tap are rigged, the actual tapping process (see video at 6:00) takes only a few seconds. While the mini-lathe makes the tapping process go more quickly, the threading can also be done with other systems.
TIP: Don’t just make one modified case, make three. That gives you one for your range kit, one for your home reloading bench, plus a spare (since you WILL eventually lose or misplace one).
Here’s the Stuff You Need
5/16″-36 TPI Threading Tap
The required thread is somewhat uncommon. You need a 5/16″ – 36 tpi Right Hand Thread Tap. If you can’t find it locally, Amazon.com carries the correct tap. Erik notes: “The 5/16-36 tpi tap is not a common size. I think Hornady did this on purpose to make it more difficult for the average guy to make his own modified cases.”
0.290″ Drill Bit
Erik uses an 0.290″ HSS “L” drill bit. (This “L” Letter Gauge code designates a 0.290″ diameter bit). A close metric equivalent would be 7.3 mm (0.286″). Erik says: “A 9/32″ drill will also work but it will be harder to run the tap in since the hole will be .281″ instead of .290″ with the Letter Gauge L bit.”
Tips for Using O.A.L. Gauge with Modified Case
We’ve noticed that many folks have trouble getting reliable, consistent results when they first start using the Hornady O.A.L. Gauge (formerly the Stoney Point Tool). We’ve found this is usually because they don’t seat the modified case properly and because they don’t use a gentle, consistent method of advancing the bullet until it just kisses the lands.
Here is our suggested procedure for use the O.A.L. Gauge. Following this method we can typically make three of four measurements (with the same bullet), all within .001″ to .0015″. (Yes, we always measure multiple times.)
1. Clean your chamber so there is no build-up of carbon, debris, or lube. Pay particular attention to the shoulder area.
2. Screw the modified case on to the O.A.L. Gauge. Make sure it is seated firmly (and doesn’t spin loose). Note, you may have to re-tighten the modified case after insertion in the chamber.
3. Place your selected bullet so that the ogive (max bullet diameter) is behind the case mouth. This prevents the bullet from “snagging” as you insert the tool in the action.
4. Insert the O.A.L. Gauge into your chamber smoothly. Push a little until you feel resistance. IMPORTANT — You need to ensure that the shoulder of the modified case is seated firmly against the front of your chamber. You may have to wiggle and twist the tool slightly. If you do not have the modified case seated all the way in, you will NOT get a valid measurement.
5. Advance the bullet slowly. (NOTE: This is the most important aspect for consistency!). Push the rod of the O.A.L. tool gently towards the chamber. DON’T shove it hard! Easy does it. Stop when you feel resistance.
6. IMPORTANT. After gently pushing on the rod, give the end of the rod a couple forward taps with your finger. If your bullet was slightly skewed, it may have stopped too far back. Adding a couple extra taps will fix that. If the bullet moves after the taps, then again push gently on the rod. NOT too much! You just want to push the bullet until it just “kisses” the lands and then stops. Do NOT jam the bullet into the rifling. If you do that you will never get consistent results from one measurement to the next.
* For a $15.00 fee, Hornady will make a custom modified case for you if you send two fired pieces of brass. Send two fired cases and $15.00 check to: Hornady Manufacturing, Attn: Modified Cases, 108 S. Apollo St., Alda, NE 68810. More Info HERE.
How well can the little 6mm Dasher perform at 1000 yards when the conditions are good, and the shooter is riding a hot streak? Well here’s a shot-by-shot record of Scott Nix’s 4.554″ ten-shot group shot at Missoula, Montana at the Northwest 1000-yard Championship a few years back. All 10 shots were centered for a 100-6X score. That’s about as good as it gets. If Scott had stopped after 5 shots, his group would have been under three inches.
Video Demonstrates Amazing 1000-Yard Accuracy
Watch the video. You can see the group form up, shot by shot. It’s pretty amazing. Scott’s first shot (at the 45-second mark of the video) was right in the X-Ring, and four of Scott’s first five shots were Xs. That’s drilling them! This video was recorded from the pits at the 1000-yard line, during record fire.
When it comes to reloading hardware, some guys have to have the best of the best, regardless of cost. For those guys, K&M Precision has introduced an impressive new variable-speed, multi-station case prep center. This is quite a step up from other variable-speed case prep devices.*
K&M offers two versions, one with a single spindle (tool driver) running 50-200 rpm, and another modular design that can have up to six (6) spindles, running from 50 to 533 rpm. This Ferrari of case prep centers costs $2395.00 with all six spindles, with lesser prices for fewer spindles (e.g. $1795 with three spindles). The basic 50-200 rpm one-spindle machine costs $695.00. That’s still a pretty sizable investment. But for some guys, price is no object.
Watch Video to see six-spindle machine in action. Being able to adjust the speed within a broad rpm range really is a big deal. You can go slow when needed, then instantly bump up the rpm when you need to do other tasks at a higher rate. Cutting vs. brushing work best at different speeds.
The K&M Benchtop Case Prep Machine is an industrial-grade unit that features an industrial DC brushless motor for constant torque control over a speed range from 50 to 533 rpm (or 50-200 rpm for basic model). The speed can be quickly changed by simply rotating the dial switch and pressing to enter the speed. Watch the video to see the speed control in action. Models are available from one- to six-spindle configurations. The driven spindles feature a unique collet design that accepts ¼” hex shank tools that are oriented horizontally for natural ergonomics. Collet and idler spindles ride on oil-impregnated bronze bearings for smooth operation. You can use K&M-made tools or drive other types of tools using a ¼” hex tool shank adapter with either 8-32 or 3/8-24 threads. Each model has a spring-loaded spindle lock pin to hold the spindle position while setting tools or loading/unloading cartridges into the power adapter.
All machines come with quality hard case with foam, chip pan, chip brush, 1/4” hex drive adapter for 8-32 and 1/4” hex drive adapter for 3/8-24.
Product tip from EdLongRange. We welcome reader submissions.
* Lyman will soon introduce the Case Trim Xpress a single-head case trimmer with speed control for the trimmer head. RCBS offers a 6-station Case Prep Center, with variable speeds, controlled by a rheostat. Four of the six heads run up to 350 rpm, while the two high-speed heads run up to 550 rpm.
Hand-loaders have never had so many great choices in single-stage presses, with many different configurations and features. There are classic O-Frame presses, Coax-style presses, Open-front presses, Pyramid presses, and compact C-Frame presses. Here is our 2019 Single Stage Press Showcase with products from Forster, Frankford Arsenal, Hornady, Lee, Lyman, MEC, and RCBS. We’ve included short videos showing the features of these reloading presses.
If you are shopping for a new press you should look at the various features of each. You may prefer something classic like a Rock Chucker, or the innovative open-front MEC. If you are looking for a compact press to use at the range, the new Lyman C-Frame is very impressive for the price. And the Forster Co-Ax remains a great addition to any loading room.
MEC Marksman Single-Stage Press
If you are looking for a new, full-size single-stage reloading press, definitely consider the MEC Marksman. Created by the makers of the popular MEC shotshell reloading systems, the MEC Marksman combines a sturdy cast-iron frame with a modern open-front design. With a $189.99 street price the Marksman press cost roughly $20 more than an RCBS Rock Chucker, but the MEC offers some distinct advantages — such as an open front plus a floating shell-holder system.
Our friend Gavin Gear of UltimateReloader.com got his hands on a MEC Marksman press and put it through its paces. He came away impressed with the product, saying it delivers excellent performance, and has many impressive features. Gavin tells us: “Cast iron tools and machines are a lifetime investment. The made-in-USA MEC Marksman features ductile cast-iron construction, an open-front frame design for easy cartridge access, a new floating shell-holder design with a unique retention system, and ambidextrous handle setup.” MEC also offers a wide selection of accessories for the Marksman press, including a press riser/mount, shell-holder caddy, and die trays.
Frankford Arsenal M-Press Coaxial Reloading Press
Sorry, this new Frankford Arsenal coaxial M-Press has not started shipping yet so we don’t have a video. But MidwayUSA says it should arrive by mid-February 2019. We think this new M-Press should interest Forster Co-Ax fans. While the operation is similar to the Forster Co-Ax, there are some important differences. The new M-Press mounts on a flat surface, with nothing protruding below. That is significantly different than the Forster Co-Ax. The die block is different. It also appears that the shell-holder system is different. But this still self-aligns like a Forster Co-Ax. “A free-floating design allows the die and shellplate to move on two axis, so the case is always perfectly centered in the die, minimizing bullet runout.” The way the arms move is also different. In the Forster Co-Ax, the rods slide within the press frame and the part that holds the shell is fixed to them. In this design the rods are stationary and the part that holds the shell slides on them. However, the overhead handle certainly does copy the distinctive Forster design. NOTE: According to MidwayUSA, this M-Press does NOT have priming capability, unlike the Forster Co-Ax. Credit Boyd Allen for design analysis.
Forster Co-Ax Press
If you are not yet familiar with the many unique features of the Forster Co-Ax, we recommend you watch the video above, a very thorough video review by Rex Roach. This shows how the press operates and highlights the design elements which set the Co-Ax apart from every other reloading press on the market. This 14-minute video shows the key Co-Ax features, explaining how the floating case-holder jaws work (3:30 time-mark), how the dies are held in place (4:40 time-mark), how spent primers are captured (6:10 time-mark), and how to set the primer seating depth (10:00 time-mark). We’ve used a Co-Ax for years and we still learned a few new things by watching this detailed video. If you are considering purchasing a Co-Ax, definitely watch this video start to finish.
In recent years, Forster Co-Ax® presses have been somewhat hard to find, as demand has out-stripped supply. The Co-Ax has many dedicated fans, given its unique features, such as the floating case-holder jaws, and easy, rapid slide-in/slide-out die placement. We’ve also found that Co-Ax presses load very straight ammo and we like the ability to switch between short handle (good for bullet seating) and long handle (ideal for heavy case-sizing tasks). We also think the Forster Co-Ax has one of the best spent primer capture systems on the market — a straight drop into a removable plastic cup. Simple and it works.
Lyman Brass Smith Victory Single-Stage Press
Lyman’s New Victory Single-stage Press competes with the RCBS Rock Chucker Press. With beefy cast iron construction, the Victory’s strength and leverage rivals the Rock Chucker. If you like to prime on a press, this Victory has a priming system that’s much easier to use than the Rock Chucker system. The priming tube is right up front. Simply push the shuttle at the button of the tube to advance the primer into place. The entire primer-loading system can also be removed so it doesn’t interfere with case and bullet-handling operations. We generally prefer to prime cases separately using a dedicated hand- or bench-mounted tool, but the Victory press does the job nicely. Overall, the Victory is a great value in a full-size “O-Frame” press. It’s on sale now for $154.99 at Midsouth.
RCBS Rock Chucker Supreme Single-Stage Press
Nearly every serious hand-loader has owned or used the RCBS Rock Chucker press. This Editor still uses a Rock Chucker passed down by his brother 20 years ago. And yes, it is still going strong. The latest Rock Chucker Supreme single-stage press features an improved “upside-down Y-path” dual-bin spent primer catcher. Otherwise the Rock Chucker Supreme remains big, strong, versatile and sturdy. It has very strong linkages, with a compound leverage system providing plenty of power — FL-sizing is a breeze even with large, magnum cases. The 1″-diameter ram has 12.5 sq. inches of ram-bearing surface.
Some people may not know that the Rock Chucker offers a secondary 1 1/4″ x 12 thread for shotshell reloading dies and Piggyback 3 upgrade. The Rock Chucker Supreme retails for under $180.00 ($167.50 now at Bruno’s). The RCBS Rock Chucker is definitely a quality product that can last a lifetime. For heavy-duty sizing chores this remains one of the best choices in single-stage presses. We do recommend shopping around. You can sometimes get a pretty big discount on Rock Chuckers and RCBS has regular rebate programs.
Lyman Brass Smith Ideal C-Frame Compact Press
The Lyman Brass Smith Ideal Press is a very affordable, cast iron C-Frame reloading press. We think it is the new “class leader” in compact presses. This works great as a secondary press for your reloading room or a small press you can take to the range. The large front opening allows you to access the shell holder without hitting the support bar on other types of presses. Unlike other compact presses made from aluminum, Lyman’s Ideal press is cast iron so it is rigid and strong. The high-quality steel ram is one inch in diameter. The Brass Smith is a true ambidextrous press that can be accessed from either side and mounted the same. This is a great choice for a second, auxiliary press for depriming and bullet seating.
Hornady Iron Single Stage (Open-front) Press
In this “Reloading with Rosie” video, the attractive female host loads some ammo using the Hornady Iron Press. With a beefy, pyramid-style cast-iron frame with an open front, this press offers some advantages over a traditional “O-Frame” type press. Access is considerably easier, for one thing. And the top of the press includes slots to hold dies and tools — that’s really a very nice feature that saves time. Also an optional “automatic” priming system shuttles primers from a vertical tube in the back to the shell-holder in the front. That’s clever. Over all the Iron Press is a nice piece of engineering — good job Hornady.
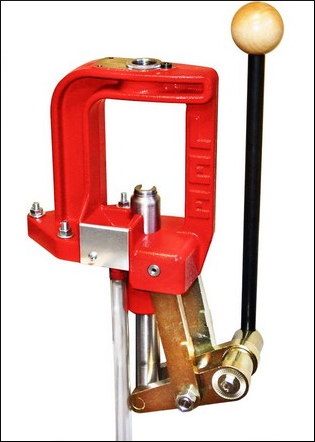
Lee Classic Cast (Iron) Breech Lock Press
The Lee Classic Cast Breech Lock Press offers excellent value for the money ($112.00 at Midsouth). Based on the proven design of the Classic Cast press, the updated Breech Lock series adds the quick-change die bushing and an improved primer drop system. This press is strong, with cast iron frame, all-steel linkage, and 12 square inches of ram bearing surface.
Lee says this press has the “largest opening and the longest stroke in the industry” among O-frame type presses. The handle can be mounted on either side. We love the fact that the handle angle can be adjusted, as well as the lever arm length — that allows you to adjust travel and leverage to suit your preference. Smart engineering.
The new spent primer drop features a large-diameter hollow ram with clear hose that drops primers straight to a bin — that’s simple and effective. The press is very rigid and the base is wide enough for good stability. We have one of these Classic Cast Breech Lock Presses in our reloading room and it works well.
How is a modern, metal-chassis rifle built? This very cool video from Masterpiece Arms answers that question. The nicely-edited video shows the creation of a Masterpiece Arms tactical rifle from start to finish. All aspects of the manufacturing process are illustrated: 3D CAD modeling, CNC milling of the chassis, barrel threading/contouring, chamber-reaming, barrel lapping, laser engraving, and stock coating. If you love to see machines at work, you will enjoy this video…
At the request of our readers, we provide select “Deals of the Week”. Every Monday morning we offer our Best Bargain selections. Here are some of the best deals on firearms, hardware, reloading components, optics, and shooting accessories. Be aware that sale prices are subject to change, and once clearance inventory is sold, it’s gone for good. You snooze you lose.
1. Brownells — Howa 1500 USA Flag Chassis Rifle, $1299.99
With its “battleworn” stars and stripes Cerakote finish, Howa’s USA Flag Chassis Rifle is an eye-catcher. AND this handsome Howa shoots as good as it looks. This .308 Win rifle features a quality 26″ barrel with factory muzzle brake. The Howa 1500 action cycles very smoothly (better than a Remington or Savage), and this rifle comes with Howa’s fine HACT 2-stage trigger. This rifle includes a 4-16x50mm Nikko Sterling scope mounted to an EGW +20 MOA scope rail, Luth AR buttstock, plus a 10-round detachable box magazine. Howa even includes a Buffalo River swivel bipod with 6″-9″ adjustable legs. With this rig, all you need is ammo! Price is $1299.99 with scope and bipod. NOTE: This is also offered in 6.5 Creedmoor, but that is currently out-of-stock. Check with other vendors.
2. Bruno’s — Nightforce Competition 15-55x52mm Sale, $2160.00
You can’t walk up to any respectable match line and not see a bevy of Nightforce scopes. The Nightforce 15-55x52mm Competition scope is still one of the very best scopes for serious F-Class and long-range competitors. Now Bruno’s is selling the 15-55x52mm NF for $2160.00 — that’s nearly $200 cheaper than other vendors. Bruno Shooters Supply has the Nightforce Competition 15-55x52mm optic as well as countless other Nightforce scopes on sale. Get yours now before prices go back up.
3. Midsouth Shooters Supply — End of Year Clearance Sale
End of year means CLEARANCE at Midsouth Shooters Supply, with prices up to SEVENTY PERCENT (70%) off normal pricing. We’ve posted just a few of the nearly 800 items we found in their clearance section and with prices that can’t be beat it’s worth your time to scour the pages. Head to the Midsouth clearance sale to what you can’t live without before you hit the range again. Note, this End-of-Year Clearance sale ends today December 31, 2018. Don’t hesitate if you see a bargain you like.
The Leupold Ventana S-1 15-45x60mm spotting scope offers a good 15-45X range of power along with a 60mm objective. For a competitor using the spotter mostly for watching mirage and shot markers, this may be all you need in a spotter. And this is compact and easy to transport in a range bag. As one Amazon reviewer said, “TERRIFIC scope! 45X is plenty. Most people with 60X scopes rarely use more than 40X power so I decided to go for this smaller, lighter scope. We used it on wolves in Yellowstone this week at distances of 1/2 to 1 mile. This scope is tack sharp. I was able to compare to Swarovski, Vortex, and Nikon and this Leupold seems just as sharp at a fraction of the price. The amount of eye relief is generous, even better than some of the Swarovskis I looked through.”
5. Midsouth — Hornady L-N-L Auto Progressive Press, $378.99
If you need large quantities of pistol or rifle ammo, it makes sense to get a progressive press. This auto-indexing, 5-station press will give you one loaded round for every complete cycle of the loading handle. We’ve used this Hornady Lock-N-Load AP Progressive press and can confirm that it works well. We actually prefer the rotary powder measure to the sliding powder system on Dillon progressives. We find it much easier to change load weights with the Hornady system (which uses inserts), and it is more precise with certain types of powder. This press also uses convenient quick-change die bushings. Right now you can save $113.00 with the $378.99 sale. NOTE: Press purchasers can get 500 free bullets through the Hornady Rebate Program but that ends 12/31/2018!
6. EuroOptic — Leica CRF 2000-B, $399.00
This may be the best deal we’ve seen on the vaunted Leica 2000-B Laser Rangefinder (LRF) with 7-power optic. This unit is rated out to 2000 yards on reflective objects (in real-world use it will laze a deer well past 800 if you can hold steady). The Leica 2000-B features air pressure and temperature sensors, plus on-board inclinometer. Angle correction works out to 1200 horizontal yards equivalent, with the true hold-over displayed in both MILs and MOA. The compact Leica CRF 2000-B weighs just 6.5 ounces and measures 4.5″ L x 2.25″ H x 1.25″ W. It has a waterproof outer shell.
Are you tired of using pan scales and trickling your charges just to spend a day at the range? Now for under $170.00 you can set your charges and watch them automatically drop quickly and efficiently. The Hornady Lock-N-Load auto charge powder dispenser gives you the confidence and speed whether you’re doing load development or just looking to make some rounds for a day at the range. With this $164.99 sale price, this Hornady dispenser over $90 cheaper than an RCBS Chargemaster Lite.
Have you ever been ready to run to the range and blow off a few rounds only to find that you’re out of targets? If you’re like us that’s one of the most frustrating things that can happen when heading to the club and nobody likes using printer paper and a marker to make a target. Pick up this 100 count set of sight-in targets and you won’t have to run to the store last minute or dig through the range trash cans hoping to find a barely-used target. This is a great value — only 18.4 cents per target!
9. Amazon — Caldwell Zeromax Rifle Rest, $28.99
No this basic, inexpensive rest won’t work for benchrest matches. However, it will suffice to sight-in a hunting or varmint rifle. AND it will do double duty as a cradle for rifle cleaning and maintenance. In fact this Caldwell rest is less expensive than some cleaning cradles than can’t be used for shooting at all. Pick up one of these Caldwell Zeromax Rests for only $28.99 and you’ll have a handy back-up rest you can keep in a vehicle or lend to a friend. Plus, some low-cost modifications can improve the rest’s adjustability. One purchaser noted: “The back foot is just a threaded bolt with a rubber end cap, but it does not turn or move. Changing the elevation with the front two bolts, and keeping everything level can be a challenge, so I added elevation adjustments to the back bolt as well. I did this by taking a bolt spacer from Ace Hardware super glued to a nut, and using that to lift or drop the back. Total cost was about $4.”
Credit Forum Member F-Class John for preparing most of this week’s deals.
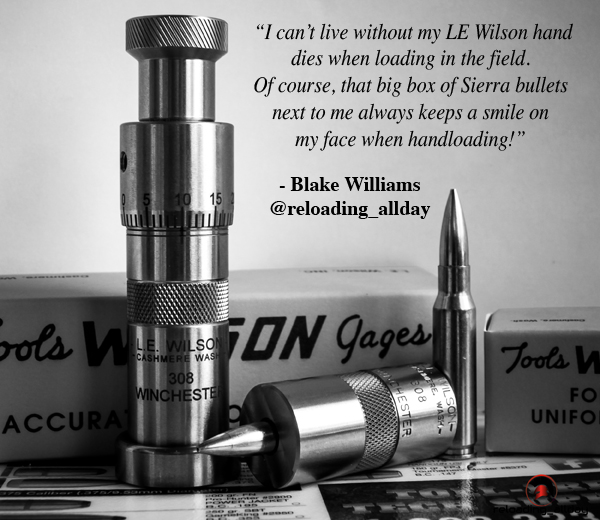
Sierra Bullets asked a few hand-loaders to reveal their favorite reloading tool or accessory: “What is your favorite ‘don’t know how you ever lived without it’ piece of reloading equipment?” Some of the answers are listed below. We were interested to see some high-tech, micro-processor items mentioned, such as the AMP Annealer, and the AutoTrickler powder dispenser. Old standbys, such as the rugged RCBS Rockchucker and Dillon 650, also made the favorites list. You can nominate your own favorite reloading hardware in the comments section of the Sierra Bullets Blog.
Sierra Bullets Ballistic Technician Philip Mahin answered: “A comparator gauge to measure from the base of a case to the ogive of the bullet. This bypasses the tip of the bullet, so I can repeat the same seating depth the next time I visit a specific combination.”
Bill, Editor of Rifleshooter.com, answered: “I have so many favorite reloading tools, it’s hard to pick one. But if I had to, it would be my Forster Co-Ax press. I like the ease [with which] you can change dies and that it doesn’t require traditional shell holders. It’s a great tool to have!”
Sierra Bullets Ballistic Technician Duane Siercks answered: “I don’t know that you would actually call this equipment, but the item that comes to mind would be my reloading room/shoot house. I had always had to squeeze everything into a corner or even an unheated shed. After we bought our current house, I built a garage and placed it so that I had a window looking down a 250-yard range. I built a dedicated room with heat and A/C. It contains my reloading bench and a shooting bench. The shooting bench lets me slide open the window and shoot down the range. It is very handy to not have to load everything up to go to the range. It also makes load development a lot simpler and efficient. I don’t know how I ever got along without it.
I also wonder what I did before I acquired the Lyman 1200 DPS Powder Dispenser. This has made the process so much simpler and much easier. I also have a Lee Precison Universal Decapping Die that I would gladly spend the money on again. This may be a small thing, but it certainly is handy. The Lee would accommodate some very large cases that some of the others were too small for.”
Jon Addis answered: “Putting an A&D FX-120i scale with AutoTrickler and Auto-Throw on the bench has changed the way I reload. It’s kernel accurate in about 15 seconds. Saves time and reduces a variable. And of course, the system is made better by the Area 419 Billet Adjustable base for the trickler and Billet Powder Cup.”
This video shows the AutoTrickler V2 and Auto-Throw Combo:
Sierra Bullets Chief Ballistician Tommy Todd answered: “A brass annealing machine and a RCBS Chargemaster complimented with a Sartorious scale.”
Sierra Bullets Ballistician Gary Prisendorf answered: “RCBS Rock Chucker Press, it’s built like a tank, and it will last me a lifetime.”
Sierra Bullets Production Manager Chris Hatfield also answered: “RCBS Rock Chucker single-stage reloading press.”
Jeremy Kisner answered: “My Giraud trimmer has taken [three operations] and combined them into one easy task. I can now size my brass and then sit down and trim, chamfer, and debur to a 0.001″ tolerance in one motion.”
Dan Blake answered: “My Annealing Made Perfect (AMP) annealer. With consistent neck tension being one of the largest contributions to small Extreme Spread on muzzle velocities, I believe this induction annealer is truly the best on the market.”
This manufacturer-produced video shows how the AMP annealing machine operates:
Trevor Aldinger answered: “Area 419 Master Funnel Kit. In the past I’ve used plastic funnels and even other metal ones. This system fits case necks and flows much better than any others I’ve used, and there is no static since it’s metal. We spend a lot of time and money to get precise charges, I don’t want to lose or miss a kernel because of a cheap funnel.”
Tyler Riley answered: “My RCBS bench primer (priming tool). It has a lot more leverage than a hand primer and still has a good feel to how tight primer pockets are. Makes it much easier on my hands to prime large runs, especially new brass with tight pockets.”
Craig Arnzen answered: “My Annealeez [annealing machine] is one of the best tools in my reloading room. Neck tension is SO important, and annealing every firing really helps with that. This is an inexpensive tool that can anneal a lot of cases at once, and help me produce more consistent ammo.”
Josh Temmen answered: “Time is critical for me so my RCBS Chargemasters are indispensable (pun intended.) They cut down on time at my reloading bench while maintaining the weight tolerances required for long range shooting.”
Josh Bartlett answered: “I have my Dillon 650 set up with Whidden floating tool heads to do decapping and sizing on my match ammo. The case feeder and progressive function of the press save me a TON of time when doing lots of several hundred rounds.”
Ryan Brandt answered: “… A quality set of calipers. My reloading room is full of very nice equipment but little does more to satisfy my perfectionism than a good check with the calipers.”
You’ve probably heard of cut-rifling, but did you know this process was invented in Germany nearly 500 years ago? Read on to learn more about how a cut-rifled barrel is made…
The cut-rifling process, used by leading barrel-makers such as Bartlein, Border, Brux, Krieger, and Obermeyer, can yield a very high-quality barrel with a long useful life. Cut-rifled barrels have been at the top in short- and long-range benchrest competition in recent years, and cut-rifled barrels have long been popular with F-Class and High Power shooters.
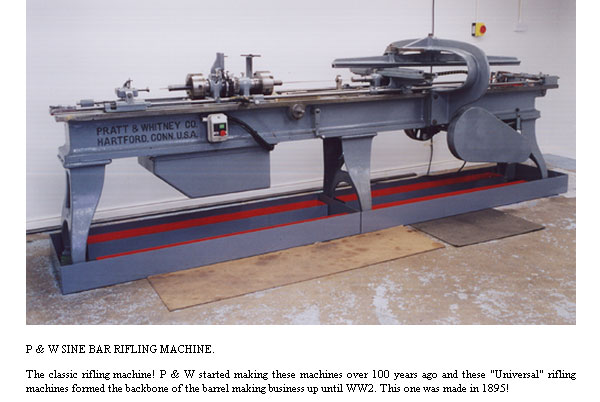
You may be surprised to learn that cut-rifling is probably the oldest method of rifling a barrel. Invented in Nuremberg around 1520, the cut-rifling technique creates spiral grooves in the barrel by removing steel using some form of cutter. In its traditional form, cut rifling may be described as a single-point cutting system using a “hook” cutter. The cutter rests in the cutter box, a hardened steel cylinder made so it will just fit the reamed barrel blank and which also contains the cutter raising mechanism.
Above is a computer animation of an older style, sine-bar cut-rifling machine. Some machine features have been simplified for the purposes of illustration, but the basic operation is correctly shown. No, the cut-rifling machines at Krieger don’t use a hand-crank, but the mechanical process shown in this video is very similar to the way cut-rifling is done with more modern machines.
Read About Cut-Rifling Process at Border-Barrels.com
To learn more about the barrel-making process, and cut-rifling in particular, visit FirearmsID.com. There you’ll find a “must-read” article by Dr. Geoffrey Kolbe: The Making of a Rifled Barrel. This article describes in detail how barrels are crafted, using both cut-rifling and button-rifling methods. Kolbe (past owner of Border Barrels) covers all the important processes: steel selection, hole drilling, hole reaming, and rifling (by various means). You’ll find a very extensive discussion of how rifling machines work. Here’s a short sample:
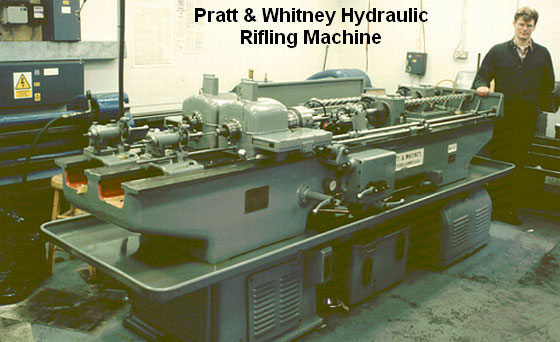
“At the start of World War Two, Pratt & Whitney developed a new, ‘B’ series of hydraulically-powered rifling machines, which were in fact two machines on the same bed. They weighed in at three tons and required the concrete floors now generally seen in workshops by this time. About two thousand were built to satisfy the new demand for rifle barrels, but many were broken up after the war or sold to emerging third world countries building up their own arms industry.
Very few of these hydraulic machines subsequently became available on the surplus market and now it is these machines which are sought after and used by barrel makers like John Krieger and ‘Boots’ Obermeyer. In fact, there are probably less of the ‘B’ series hydraulic riflers around today than of the older ‘Sine Bar’ universal riflers.
The techniques of cut rifling have not stood still since the end of the war though. Largely due to the efforts of Boots Obermeyer the design, manufacture and maintenance of the hook cutter and the cutter box have been refined and developed so that barrels of superb accuracy have come from his shop. Cut rifled barrel makers like John Krieger (Krieger Barrels), Mark Chanlyn (Rocky Mountain Rifle Works) and Cliff Labounty (Labounty Precision Reboring)… learned much of their art from Boots Obermeyer, as did I.” — Geoffrey Kolbe
Video find by Boyd Allen. Archive photos from Border-Barrels.com. In June 2013, Birmingham Gunmakers Ltd. acquired Border Barrels. Dr. Geoffrey Kolbe has set up a new company called BBT Ltd. which produces chamber reamers and other gunsmithing tools and gauges. (Thanks to L. Holland for the Kolbe update).


 How well can the little 6mm Dasher perform at 1000 yards when the conditions are good, and the shooter is riding a hot streak? Well here’s a shot-by-shot record of Scott Nix’s 4.554″ ten-shot group shot at Missoula, Montana at the Northwest 1000-yard Championship a few years back. All 10 shots were centered for a 100-6X score. That’s about as good as it gets. If Scott had stopped after 5 shots, his group would have been under three inches.


 If you are not yet familiar with the many unique features of the Forster Co-Ax, we recommend you watch the video above, a very thorough video review by Rex Roach. This shows how the press operates and highlights the design elements which set the Co-Ax apart from every other reloading press on the market. This 14-minute video shows the key Co-Ax features, explaining how the floating case-holder jaws work (3:30 time-mark), how the dies are held in place (4:40 time-mark), how spent primers are captured (6:10 time-mark), and how to set the primer seating depth (10:00 time-mark). We’ve used a Co-Ax for years and we still learned a few new things by watching this detailed video. If you are considering purchasing a Co-Ax, definitely watch this video start to finish.
 Nearly every serious hand-loader has owned or used the RCBS Rock Chucker press. This Editor still uses a Rock Chucker passed down by his brother 20 years ago. And yes, it is still going strong. The latest Rock Chucker Supreme single-stage press features an improved “upside-down Y-path” dual-bin spent primer catcher. Otherwise the Rock Chucker Supreme remains big, strong, versatile and sturdy. It has very strong linkages, with a compound leverage system providing plenty of power — FL-sizing is a breeze even with large, magnum cases. The 1″-diameter ram has 12.5 sq. inches of ram-bearing surface.

 The Lee Classic Cast Breech Lock Press offers excellent value for the money (


 Sierra Bullets Ballistician Gary Prisendorf answered: “