Here’s the latest leveling technology for shooters. The innovative “SEND iT” device is an electronic level featuring five colored LEDs along with a conventional bubble level. When the rifle is level, a single green LED lights in the middle. If you are off-kilter, blue or red warning LEDs alert you. There are five sensitivity levels (from 0.2° to 1.0° between lights). The Send iT level can be mounted vertically as well as horizontally and the electronics will auto-sense the correct position.
The makers of the SEND iT claim it is the “most accurate and fastest shooting level made”. The system mounts to a Picatinny-style scope rail, extending out to the left side. There are multiple modes, including leveling, battery check, and sleep mode. The LEDs can be dimmed for night use.
This Video Shows the SEND iT Level Sensitivity Settings:
The SEND iT level, offered by Long Range Arms (LRA), will debut at SHOT Show 2017. Price and Pre-Order info will be available in late January on the Long Range Arms Facebook Page.
Production wood rifle stocks, both laminates and hardwoods, are commonly made with stock duplicating machines. Stock duplicators allow a stock-maker to copy a master design faithfully and efficiently. The video below, from Colorado rifle-maker Michael Cuypers, shows a stock duplicator (in automatic mode) cutting a piece of Turkish Walnut, for a mauser 98. This machine rotates the blank while a spinning vertical cutting head shapes and trims the blank. This duplicator manually tracks the shape/profile of the master blank. To make another stock, this process needs to be repeated, with the master in place. For more information about this duplicating machine, visit www.riflebuilders.com.
Watch Stock Duplicator in Progress
Future Technology: We are starting to see stocks made with CNC milling machines that cut stock profiles based on three-dimensional scans of master stock designs. However, the traditional mechanical duplicator process in the video is still most commonly used by most of today’s stock-makers.
Turkish Walnut — Where to Get a Beautiful Blank
The Bijou Creek video above shows a Turkish Walnut stock being roughed out. Turkish Walnut is some of the most beautifully figured wood available — but it can be pricy. If you are looking for this kind of ultra-high-grade wood, it makes sense to shop carefully. You’ll find a wide selection of Turkish Walnut blanks at the HunterBid.com website. Hundreds of selections are available at auction. Prices start as low as $150.00. The finest blanks sell for $1,000 or more. New blank selections are added to the website every other day. HunterBid.com is run by Chiron Inc., which is 100% owned by the Ergin family who are of Turkish origin. Chiron maintains warehouses in Dover, NH and Istanbul, Turkey.
Video find by Boyd Allen. We welcome reader submissions.
Berger Bullets is becoming part of the Nammo Group, joining Lapua, Vihtavuori, and SK Ammo. This is big news, as it combines one of America’s leading bullet-makers with a major global enterprise that produces superior loaded ammunition, powder, bullets, and brass. This is potentially a boon for shooters as Nammo’s resources will help Berger increase production capacity, expand its line of products (including loaded ammunition), develop new bullet types, and invest in new, advanced machinery that should increase output and efficiency. In addition, we do expect to see new lines of loaded ammo combining Lapua brass with Berger match bullets. That combo will be tough to beat. Overall, this is a very positive development for Berger which will be able to call upon Nammo’s engineering expertise and advanced production technologies. It’s also a great thing for shooters, who can expect improved availability of the most popular Berger projectiles.
Berger Will Be Leaving California
As part of the acquisition of Berger Bullets by the Nammo Group, Berger plans to relocate its operations, moving its factory from the current Fullerton, California location. Berger will definitely be leaving California in the future.
Eric Stecker, Berger’s President, says the exact timing of the move has not yet been set, nor has the location been chosen. Arizona is high on the list of potential sites, but Berger is considering other states as well. Once the new factory location is determined, Eric says he expects the move to be completed “by December 2018 at the latest”.
In this exclusive AccurateShooter.com interview, Berger President Eric Stecker talks about Nammo’s acquisition of Berger Bullets and explains how that will bring about important positive changes, including increased production capability.
Notice from Berger Bullets
We take great pride and tremendous pleasure in announcing that Berger Bullets has joined forces with the Nammo Group. This Norwegian/Finnish corporation control many premium brands including Lapua (Brass, Bullets, Ammo), Vihtavuori Powder, and SK Rimfire Ammunition.
The joining of Berger Bullets with these world renowned, premium brands ushers in a new era of quality, performance and product availability for the discerning shooter. Today, under the Nammo Group ownership, we join three other companies that share a strong passion and commitment to precision shooting performance. We are very excited to join forces with these premium quality brands, which are committed to precision and quality.
Nammo Resources Will Help Berger Grow
The Nammo Group brings to Berger Bullets a level of support that is rivaled by few and bested by none. Nammo will support us in many areas including production capability expansion, advanced engineering, innovative product development, and the opportunity to share technology between all of these top quality brands.
Our immediate goal is to significantly improve the availability of Berger products. Throughout our history the demand for Berger Bullets has exceeded our capacity even as we’ve grown our output capabilities numerous multiples over the last few decades. Our first obligation to our customers is to improve the availability while we remain committed to our highest level of quality in the industry. Much of what has made Berger Bullets successful will remain unchanged. Bryan Litz is developing more great bullets for Berger and our technicians will still be answering your emails and calls.
Our website will remain at www.BergerBullets.com and all methods of contacts will remain the same for now. As we run across any changes, we’ll make sure we keep you updated on our website and through emails. So please, keep your information current on your email subscription and we promise to keep you posted.
The Nammo Group, www.Nammo.com, supplies high performance products to the aerospace & defense industry. Its core businesses are military and commercial ammunition; shoulder-fired systems; rocket motors; and demilitarization services. Nammo has 2,100 employees located in 12 countries.
Forum member Erik Cortina has produced a series of YouTube videos about reloading hardware and precision hand-loading. This week we feature Erik’s video review of the Forster Co-Ax® reloading press. The Co-Ax is unique in both design and operation. It features dual guide rods and a central handle. You don’t screw in dies — you slide the die lock ring into a slot. This allows dies to float during operation.
Erik does a good job of demonstrating the Co-Ax’s unique features. At 1:00 he shows how to slide the dies into the press. It’s slick and easy. At the two-minute mark, Erik shows how sliding jaws clasp the case rim (rather than a conventional shell-holder). The jaws close as the ram is raised, then open as it is lowered. This makes it easy to place and remove your cases.
At the 5:20 mark, Erik shows how spent primers run straight down into a capture cup. This smart system helps keep your press and bench area clean of primer debris and residues.
While many Co-Ax users prime their cases by hand, the Co-Ax can prime cases very reliably. The priming station is on top of the press. Erik demonstrates the priming operation starting at 4:20.
Smart Accessories for the Co-Ax from Inline Fabrications
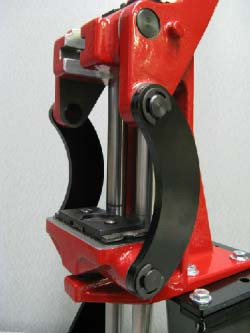
Lapua’s Kevin Thomas also owns a Co-Ax press, which he has hot-rodded with accessories from Inline Fabrications. Kevin tells us: “Check out the add-ons available from Inline Fabrications for the Co-Ax. I recently picked up a riser mount and a set of linkages for mine and love the results. The linkages are curved. When you replace the original straight links with these, the work area opens up substantially and the the press becomes much easier to feed.” CLICK HERE for Co-Ax Accessories.
Inline Fabrications Forster Co-Ax Accessories
Forster Co-Ax Curved Side Linkage (For Better Access)
Have you ever seen bullet trace? Do you know how to read trace? Well watch this NSSF video to learn how to recognize trace, and use trace to help adjust your aim on the target. Watch the video from 1:50 to 2:20 to see trace in slow motion. Watch carefully starting and you can see the trace in the milli-seconds before the bullet hits the target.
Rod Ryan of Storm Mountain Training Center explains how to read bullet trace: “If you’re looking through your spotting scope, and you focus on your target, and then back off about a quarter-turn counter-clockwise (in most cases) you’ll be able to focus a little closer to you and you’ll actually see this movement of air — it’s called the trace — going down range.”
Watch the Slow-Mo Trace Starting at 1:50. From 2:10 to 2:20 you can actually see the bullet hanging in the air just before it hits the target.
Trace is easier to see when there’s some moisture in the air. By following the bullet trace you can see if you shot is running high or low, left or right, even if you can’t see a shot imparct on the target. This is important, particularly when you’re attempting an steep-angled shot and it’s hard to see bullet impact on the ground near the target. Rod Ryan explains: “A lot of times we have an angular hill-top and you’re shooting directly into a [steep] drop [so] you can’t see any splash at all or any dirt flow after the miss happens. In this case the last thing you see is that trace.”
What you’re seeing is akin to the wake that forms behind a motorboat, but it is a trail of disturbed air rather than disturbed water. Ryan says: “It’s just like you’re looking down from space at a motorboat in the water, you can see that wake. Very close to the target, you can actually see it roll in… if you’re taking a shot at say… four, five, six hundred yards, it’s very prevalent, you can see it very well.”
Video find by EdLongrange. We welcome reader submissions.
Our friend Kirsten Joy Weiss has just released a useful video that shows how to refine your trigger control for better accuracy. In this video, Kirsten talks about the actual placement of a shooter’s index finger on the trigger. It is important to have the finger positioned optimally. Otherwise you can pull the shot slightly left or slightly right.
Kirsten tells us: “Finger placement on the trigger might not seem like a big deal, but it actually is. The reason for this is because, depending on where your index finger is placed on the trigger, [this] translates to different muscle interactions with the gun.” Watch this video to see Kirsten demonstrate proper finger placement (and explain problems caused by improper finger positioning).
Here Kirsten Illustrates how the index finger should be aligned along the face of the trigger shoe.
When you pull the trigger, you only want to engage the last section of your finger, in order to avoid unwanted muscle engagement and to achieve a smooth shot.
Remember there is a “sweet spot” between the crease (first joint) and the tip of the finger. If you position the trigger in that “sweet spot”, you should see an increase in your accuracy. Don’t make the mistake of putting the trigger in the crease of your finger, as shown below.
Effects of Incorrect Finger Placements
You want to place the trigger shoe between the end of your finger and the first joint. If you place the trigger on the very tip of you finger you’ll tend to push the rear of the rifle to the left when engaging the trigger, causing shots to go right (for a right-handed shooter). On the other hand, if you put the trigger in the crease (first joint), you’ll tend to bring the rear of the rifle to the right, causing shots to fall left. This is illustrated below for a right-handed shooter.
At the request of many Forum members, we’re reprising this archived video from past IBS 600-yard Shooter of the Year Samuel Hall. Without a doubt, Sam is one of the best mid-range benchrest shooters in the nation. While the video quality is rough (to say the least), Sam’s offers plenty of tips you can “take to the bank”. Even if you don’t shoot competitively, the techniques described here can improve your accuracy when shooting from a bench.
2008 IBS 600-yard National Champion Samuel Hall has prepared a 9-minute VIDEO showing his techniques for shooting from the bench. Sam covers a number of topics including bag set-up, body position, bolt manipulation, and loading skills. He also explains the importance of having a relaxed, comfortable posture and keeping your head in the same position shot to shot.
If you’re serious about accurate benchrest shooting, at ANY distance, you should watch this video. Sam’s tips can really help you. We guarantee it. While the video itself is grainy and wind noise affects the audio, you can still glean many great points from the video. From minute 8:00 on Sam shoots a 5-shot string on camera with his BAT-actioned, Leonard-stocked 6BR. Though he was fighting 20-mph winds Sam achieves a half-inch group at 200 yards. Quarter-MOA in such conditions is good shooting.
Our friend and product tester Joe Friedrich is the proud owner of a spectacular Pappas front rest. Built by James Pappas, this rest is used for both air rifle and rimfire benchrest matches. The fancy Pappas front rest is a shortened, front-support-only version of the Pappas one-piece rest, which is popular with rimfire benchresters. Pappas engineered this rest to comply with air rifle benchrest rules which do not allow use of integrated (one-piece) front and rear rests. The end result was a 30.8-lb masterpiece of machining. Sadly, James Pappas passed away in 2014. This beautifully-crafted rest, built in 2011, is one of the finest examples of his work — a fitting legacy.
The workmanship on this Pappas front rest is astounding. Accurately described as a “work of art” by Joe Friedrich, this rest, crafted of aircraft-grade aluminum, sets new standards for “Benchrest BLING”. It looks like it should be on display in an art museum. Nearly all components of this rest, including the adjustment controls, have been polished to a mirror finish.
Convenient Rear Windage and Elevation Controls
The Pappas front rest features separate fine-tuning controls for windage and elevation, plus a central gross-elevation control. Normally, once the rest is centered-up on the target, you can make all needed elevation and windage adjustments with the rear (fine-adjustment) controls. In the video below, Joe explains how the controls work as he practices with his modified Theoben Rapid MFR air rifle. (Note: In the last minute of the video, the back-lighting was so intensely bright that we lost detail in the foreground. We apologize for that flaw, but you can still hear the audio.)
Price for this Masterpiece? Don’t Ask…
If you are interested in getting a similar rest, visit PappasRimfireProducts.com, or call (325) 754-5771. Be forewarned — “If you need to ask about the price, you probably can’t afford it.” This is truly the “Rolls-Royce” of front rests, and it will be priced accordingly.
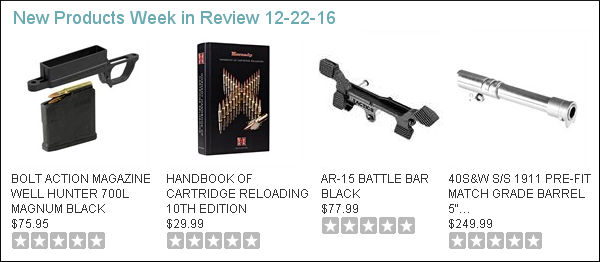
Some interesting products were featured in Brownell’s New Product Review this week. Brownells Merchandise Manager Paul Levy looks at a new Rem 700 Magwell system from Magpul, along with Hornady’s impressive new Handbook of Cartridge Reloading, 10th Edition. For a quick look at these and other new products, check out the Video below:
Magpul Magnum Long Action MagWell — This fits Long-Action Rem 700 and Rem clone actions. Priced at just $75.95, this composite “bottom metal” is light-weight polymer, with a handy ambidextrous magazine release on either side of the trigger guard. Designed to work with AICS-pattern long action magazines, this kit also includes one Magpul PMAG® 5ACL magnum magazine for .300 WM-based family of cartridges.
Hornady 10th Edition Reloading Manual — This was just released, so it is one of the most up-to-date load manuals in print. Hornady’s new Manual is very comprehensive. It includes new information for the 6.5 Creedmoor and other modern cartridge type.
Smith Tactics Battle Bar — For Black Rifle fans, this slick extension that makes it easier to operate an AR’s bolt release.
Nowlin Drop-In 1911 Pistol Barrels — Upgrade your 1911 with a new barrel in .40 SW or .45 ACP. If you have an older pistol with many thousands of rounds this can be a “drop-in” accuracy fix.
Note: If you are interested in these or other Brownells products, you can get free ground shipping for orders over $99.00. Use Code LYH at checkout.
Want to upgrade your AR’s trigger? Shooting USA and Brownells have created a video tutorial that shows how to remove a factory AR trigger and replace it with an upgrade. This video illustrates the procedures to follow and the tools you’ll need. Step-by-step, the video explains how to swap the factory trigger group for a self-contained ‘box style’ drop-in trigger module or a traditional (multi-part) trigger system with enhanced performance.
Many AR-15s come from the factory with a military-type trigger that has a long, gritty, heavy pull. Replacing that trigger is one of the best ways to improve your AR’s performance. You’ll be rewarded with a smoother pull, shorter take-up, and reduced pull weight. You will also have a choice between a single-stage and a dual-stage trigger.
The box-style, self-contained drop-in systems from companies like AR Gold, CMC, Timney, and Wilson Combat are the easiest to install. John Scoutten explains: “These self-contained systems … are very simple to install. In fact, all you do is remove the factory parts, drop in the whole system, replace your pins, and you’re done.” Conventional two-piece trigger groups are offered by DPMS, Geissele, JP Enterprises, and Rock River.
The key points of the video tutorial are also explained on the Shooting USA website with text and still pictures. Before you start your trigger project, review Shooting USA’s AR Trigger Upgrade Page. You’ll find helpful close-up photos on that page.


 Berger Will Be Leaving California




 Have you ever seen bullet trace? Do you know how to read trace? Well watch this NSSF video to learn how to recognize trace, and use trace to help adjust your aim on the target. Watch the video from 1:50 to 2:20 to see trace in slow motion. Watch carefully starting and you can see the trace in the milli-seconds before the bullet hits the target.