Think you can shoot fast with a bolt gun? Bet you can’t beat these Norwegian speed-demons. In 2019, Inge Hvitås set a Mad Minute World Record, putting 39 rounds inside a 16″ circle at 200 meters, all in a single minute. At the same match, another Norwegian ace fired 48 rounds in a minute, with 38 in the bullseye. Now that’s spectacular speed and accuracy. We first ran this story in 2019 when the record was set. Wikipedia reports this is still the current record. So we believe no one has ever put more rounds on a 16″ target at 200m (with a bolt-action rifle) than Inge Hvitås. We include videos showing Inge’s amazing sequence.
Watch Inge Hvitås Set New Mad Minute World Record:
NOTE: This video, hosted by Facebook, may be slow to load. But be patient — it’s amazing to watch! CLICK HERE to run this story all by itself, speeding up the video load.
Mad Minute World Record — 39 Hits in One Minute (60 seconds)
At the Haga shooting range in Norway, spectators witnessed spectacular speed shooting in 2019. Norwegian shooter Inge Hvitås set a Mad Minute Challenge World Record with 39 hits in ONE MINUTE at 200m. The target was a 40cm (15.75″) bullseye placed at 200m (218 yards). Fellow Norwegian Jesper Nilsstua also shot brilliantly, sending 48 rounds down-range in one minute. Jesper had 38 hits, missing the record by just one. Both shooters were using iron-sighted Sauer 200 STR target rifles, which are normally chambered for the 6.5×55 cartridge. For this event, magazines are limited to 5 rounds and shooters may use slings but no bipods or other support.
Amazing Bolt-Gun Cycling Speed — 48 Rounds in One Minute
Another Norwegian ace, Jesper Nilsstua, missed the Mad Minute Challenge record (by one hit), but boy was he fast. Dennis Santiago (who has done his own Mad Minute drill), was dazzled: “This dude didn’t get the new world’s record of 39 hits in 60 seconds. He ‘only’ got 38 hits after getting off an amazing 48 shots in 60 seconds. Watch the smoothness of his shooting. It’s amazing.”
NOTE to Readers: This video is hosted by Facebook. It may be slow to load. But it is worth watching.
For the Mad Minute Challenge in Norway, a standard 200m DFS target was used, with 1 point per hit within the black area which is 40cm (15.75″, or 6.9 MOA) in diameter.
Norwegian Mad Minute Challenge — Event Rules
The organizers of the event posted: “The Mad Minute Challenge [is] a modern edition of a old military drill. This is a place for sport shooters to … share experiences on the subject of speed shooting with bolt-action rifles. The Mad Minute Challenge is all about the sport! To make a attempt for the record everyone must follow these five simple rules:”
Rapid-Fire Shooting Comparison Video
To illustrate the remarkable speed of Norwegian champion Inge Hvitås, this video shows Inge (top of frame) compared with other skilled competitors shooting the same 1-minute course of fire in Lesja, Norway.
About the Original MAD MINUTE
“Mad Minute” was a pre-World War I term used by British Army riflemen during training at the Hythe School of Musketry to describe scoring a minimum of 15 hits on a target at 300 yards within one minute using a bolt-action rifle (usually a Lee-Enfield or Lee-Metford rifle). It was not uncommon during the First World War for riflemen to greatly exceed this score. The record, set in 1914 by Sergeant Instructor Alfred Snoxall, was 38 hits.
Listed as “Practice number 22, Rapid Fire” of The Musketry Regulations, Part I, 1909, this drill required at least 15 shots on the Second Class target at 300 yards. The exercise was just one of several annual tests to classify a soldier as a sharpshooter, first or second class shooter depending on the points achieved.
Research indicates the Second Class target was a 48″ x 48″ square with 24″ inner circle and 36″ outer circle. The sight mark was a central 12″ x 12″ shape representing a soldier. ALL hits scored points (3 for center circle, 2 for outer circle, 1 for outer square). NOTE: Though some sources say the Mad Minute drill used a 12″-diameter round target, this appears to be a mistake from Ian Hogg’s book “The Encyclopedia of Weaponry”. No other source mentions a 12″ circle, which would be a mere 3.82 MOA. In reality the true drill target was a 48″ x 48″ square, roughly 15 times larger. (From No.WikiPedia.)
Want to learn more about Long Range Shooting? Check out the NSFF “Elements of Long Range Shooting” videos hosted by ballistics guru Bryan Litz of Applied Ballistics. In this multi-part series, Bryan covers a variety of topics of interest to precision shooters. For today’s Saturday at the Movies special, we feature seven of Bryan’s videos. Watch other informative Long Range Shooting and Ballistics videos with Bryan Litz on the NSSF YouTube Channel.
Atmospherics and Density Altitude
Bryan Litz explains: “An important element in calculating an accurate firing solution for long-range shooting is understanding the effects of atmospherics on a projectile.” Atmospherics include air pressure, air temperature, and humidity. Bryan notes: “Temperature, pressure, and humidity all affect the air density… that the bullet is flying through. You can combine all those factors into one variable called ‘Density Altitude’.” Density Altitude is used by the ballistic solver to account for variables that affect bullet flight.
Bullet Ballistic Coefficients
A bullet’s ballistic coefficient (BC) basically expresses how well the bullet flies through the air. Higher BC bullets have less aerodynamic drag than lower BC projectiles. You will see BCs listed as either G1 and G7 numbers. These correspond to different bullet shape models. Generally speaking, the G7 model works better for the long, boat-tail bullets used for long-range shooting. Notably, a bullet’s drag is NOT constant in flight. The true BC can vary over the course of the trajectory as the bullet velocity degrades. In other words, “BC is dynamic”. That said, you can make very accurate drop charts using the BCs provided by major bullet-makers, as plugged into solvers. However, long-range competitors may want to record “real world” drop numbers at various distances. For example, we’ve seen trajectories be higher than predicted at 500 yards, yet lower than predicted at 1000.
Transonic Range
When considering your rifle’s long-range performance, you need to understand the limit of your bullet’s supersonic range. As the bullet slows below the speed of sound, it enters the transonic zone. This can be accompanied by variations in stability as well as BC changes. Bryan explains “once your bullet slows done below supersonic and you get into transonic effects, there are a lot more considerations that come into play. The drag of the bullet becomes less certain, the stability of the bullet can be challenged, and things related to long times of flight, such as Coriolis and Spin Drift, come into play. So whenever you are shooting long range you need to where your bullet slows down to about 1340 fps.”
Ballistics Solvers — Many Options
Bryan Litz observes: “When we talk about the elements of long range shooting, obviously a very important element is a getting a fire solution, using a ballistic solver. There are a lot of ballistic solvers out there… Applied Ballistics has smartphone Apps. Applied Ballistics has integrated the ballistic solver directly into a Kestral, and the same solver runs (manually) on the Accuracy Solutions Wiz-Wheel. The point is, if it is an Applied Ballistics device it is running the same solutions across the board.”
Bullet Stability and Twist Rates
In this video, Bryan Litz talks about bullet in-flight stability and how to calculate barrel twist-rate requirements for long-range bullets. Bryan explains that bullet stability (for conventional projectiles) is basically provided by the spinning of the bullet. But this spin rate is a function of BOTH the nominal twist rate of the barrel AND the velocity of the projectile. Thus, when shooting the same bullet, a very high-speed cartridge may work with a slower barrel twist rate than is required for a lower-speed (less powerful) cartridge. For match bullets, shot at ranges to 1000 yards and beyond, Bryan recommends a twist rate that offers good stability.
Scope Tracking — Tall Target Test
Have you recently purchased a new scope? Then you should verify the actual click value of the turrets before you use the optic in competition. While a scope may have listed click values of 1/4-MOA, 1/8-MOA or 0.1 Mils, the reality may be slightly different. Many scopes have actual click values that are slightly higher or lower than the value claimed by the manufacturer. The small variance adds up when you click through a wide range of elevation. In this video, Bryan Litz shows how to verify your true click values using a “Tall Target Test”. The idea is to start at the bottom end of a vertical line, and then click up 30 MOA or so. Multiply the number of clicked MOA by 1.047 to get the claimed value in inches. For example, at 100 yards, 30 MOA is exactly 31.41 inches. Then measure the difference in your actual point of impact.
Coriolis Effect
The Coriolis Effect comes into play with extreme long-range shots. The rotation of the earth actually moves the target a small distance (in space) during the long duration of the bullet’s flight. Bryan Litz notes that, in most common shooting situations inside 1K, Coriolis is not significant. At 1000 yards, the Effect represents less than one click (for most cartridge types). Even well past 1000 yards, in windy conditions, the Coriolis Effect may well be “lost in the noise”. But in very calm conditions, when shooting at extreme ranges, Bryan says you can benefit from adjusting your ballistics solution for Coriolis: “The Coriolis Effect… has to do with the spin of the earth. The consequence of that is that, if the flight time of the bullet gets significantly long, the bullet can have an apparent drift from its intended target. The amount [of apparent drift] is very small — it depends on your latitude and azimuth of fire on the planet.”
About Bryan Litz
Bryan began his career as a rocket scientist, quite literally. He then started Applied Ballistics, the leading company focusing on ballistics science for rifle shooting. A past F-TR Long-Range National Champion and Chief Ballistician for Berger Bullets, knows his stuff. His Applied Ballistics squad was the winning team at the 2017 King of 2 Miles event, and Applied Ballistics has earned major U.S. defense contracts.
The U.S. Army Marksmanship Unit (USAMU) published a series of reloading articles on its Facebook Page. In this article, the second in a 3-part series, the USAMU covers the process of loading competition pistol ammunition. The authors focus on two key elements — the taper crimp and the quality/uniformity of the original brass. If you shoot pistol competitively, or just want to maximize the accuracy of your handguns, read this article. The taper crimp tips are very important.
Loading Accurate Competition Pistol Ammunition — Part 2 of 3
Today, we resume our series on factors affecting accuracy in pistol handloads. Readers who missed Part One can visit our USAMU Facebook Page. [To read the first article in the series, search for March 28, 2018 to find that first installment, which is definitely worth reading.]
One often-overlooked aspect of handloading highly-accurate pistol ammunition is the amount of taper crimp used, and its effect on accuracy. (NOTE: this article pertains to loading for semi-autos – revolver crimp techniques involve some quite different issues.) Briefly, different amounts of taper crimp are used with various handloads to obtain best accuracy. The amount is based on bullet weight, powder burn rate and charge, plus other factors such as case neck tension. During machine-rest testing of experimental Service Pistol ammunition, many variables are examined. Among these, our Shop often varies a load’s crimp in degrees of 0.001″ when re-testing for finest accuracy.
How to Measure Taper Crimp on Pistol Cartridges
One question that often arises is, “How do I measure the taper crimp I’m putting on my cartridges?” Using the narrow part of one’s dial caliper jaws, carefully measure the case diameter at the exact edge of the case mouth on a loaded cartridge. It’s important to take several measurements to ensure consistency. Also, be sure to measure at several places around the case mouth, as case wall thickness can vary. After measuring 2-3 cartridges with a given crimp setting, one can be confident of the true dimension and that it can be repeated later, if needed.
However, for good results, one must use brass from one maker due to variances in case wall thickness. For example, the same degree of crimp that imparts a measurement of 0.471″ with Brand X brass may result in 0.469″ with Brand Y. Thus, for best accuracy, using brass from the same manufacturer is important — particularly for 50-yard Slow Fire. In a perfect world, it is better still to use brass from one lot number if possible. With the popularity of progressive presses using interchangeable tool heads, keeping separate tool heads adjusted for each load helps maximize uniformity between ammunition lots.
Brass Uniformity and Accuracy
Brass is important to pistol accuracy. While accurate ammunition can be loaded using brass of mixed parentage, that is not conducive to finest results, particularly at 50 yards. It is important for the serious competitor to pay attention to his brass – even if only for the 50-yard “Slow Fire” portions of “Bullseye” matches and practice. By segregating brass as described above, and additionally keeping track of the number of times a given batch of cases has been fired, one can ensure case neck tension and case length are at their most uniform.
Given the large volumes of ammunition consumed by active pistol competitors, using inexpensive, mixed surplus brass for practice, particularly at the “short line” (25 yards), is understandable. In NRA Outdoor Pistol (“Bullseye”), the 10-ring is relatively generous — especially for a well-trained shooter with an accurate pistol and load. However, for the “long line” (50 yards), purchasing and segregating a lot of high-quality brass to be used strictly for slow-fire is a wise idea. To keep track of your brass on the line, use a unique headstamp marking with 1 or 2 colors of marking pen ink.
Uniform Cartridge Overall Length is Important
Cartridge case Overall Length (OAL) uniformity as it comes from the factory is important to achieving utmost accuracy. More uniform case lengths (best measured after sizing) contribute to greater consistency of crimp, neck tension, ignition/burn of powder charge, headspace (rimless cartridges), etc. Cartridge case-length consistency varies noticeably by maker and, with lesser manufacturers, also from lot to lot. Some manufacturers are more consistent in their dimensions than others, and also in the hardness/ductility of their brass. Similarly, pay attention to primer brands, powder lot numbers, etc.
Consider Using a Lock-Out Die with Progressive Presses
When reloading pistol ammo with a Progressive press, we strongly recommend the use of a lock-out die, or other system that can detect double charges or low charges. If your progressive is manually advanced, the possibility of a double charge is very real — and that can have disastrous consequences.
On UltimateReloader.com website you’ll find an excellent two-part series on the function and set-up of the RCBS Lock-Out Die. This die prevents loading if a high or low powder charge is detected. The video above shows setup of the RCBS Lock-Out Die on the Dillon XL-650 progressive press.
With good factory rifle ammo costing $1.30 per round or more — a Laser BoreSighter could pay for itself in just a couple range sessions.
Laser BoreSighters — fitted to your chamber — help you get on target more quickly, particularly with factory firearms. Just activate the unit, slip it into the chamber and look for the red dot on the target. The laser dot is about 2″ in diameter at 100 yards, and is visible even in full sunlight. Right now you can get HQ Issue Sight-Rite BoreSighters starting at $19.99 at Sportsman’s Guide (member price is $17.99). These units have a durable brass metal body and the battery will run an hour.
Rifle and Shotgun Cartridge Types:
Sight-Rite Boresighters are offered for popular rifle and shotgun cartridge types including: .17 HMR, .22 LR, .223 Rem, .204 Ruger, .22-250, 6.5 Creedmoor, 7mm WSM, .30-30, 20 Gauge shotshell, 12 Gauge Shotshell. Sportsman’s Guide also offers Sightmark Pistol Laser BoreSighters for $26.99: .38 SPL/.357 Mag, 9mm, .40 SW, .44 Magnum, .45 ACP.
Amazon offers MidTen Laser Boresighters complete with 6 batteries (two sets). This runs $17.99 for the .223 Rem cartridge while a larger boresighter for .25-06/.270 Win/.30-06 Boresighter is $19.89.
In-chamber BoreSighters are much safer than the kind that you insert in the end of the barrel (or attach to muzzle). If you forget your laser bore-sight placed in the end of the barrel, and then fire a round, you can blow up your barrel and/or suffer serious injury — it HAS happened.
This video shows how to use in-chamber Sightmark laser boresighters. The HQ Issue Sight-Rite XSI boresighters work the same way:
The Henry AR-7 Survival rifle is a unique rifle. Weighing just 3.5 pounds, this little semi-auto rimfire can perform pest-control duties for a farmer or rancher, or serve as a utility rifle carried in a truck or ATV. The cleverly-designed AR-7 is affordably priced, just $299.99 at Sportsman’s Warehouse.
We think most gun-owners would enjoy adding an AR-7 to their collection. The Henry AR-7 breaks down for easy carry in a backpack or a vehicle. The barrel, receiver, and magazines all fit INSIDE the buttstock. That’s handy. And this little 3.5-pound rifle offers surprisingly good accuracy.
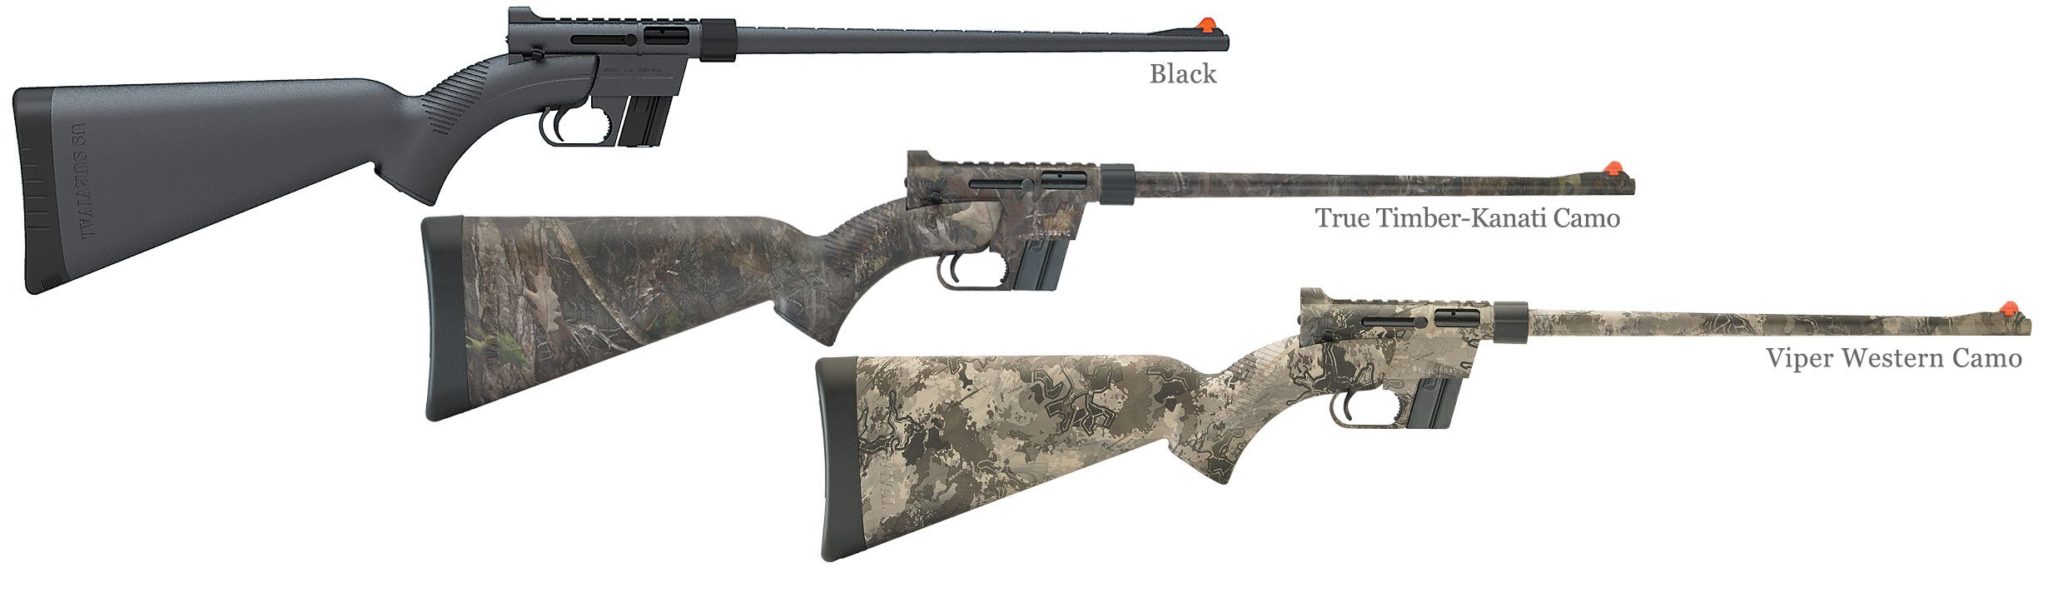
If you don’t like basic black, Henry offers two camo versions from the factory: True-Timber Kanati Camo, and Viper Western Camo. Click the photo below for full-screen (2048 pixel wide) image:
Or, if you have artistic skills (and confidence with spray cans), you can paint your AR-7 yourself, as this owner did. The talented gun-painter reports: “[This is a] great little gun that is accurate and I love how it packs away. I paint all my black guns. Already took a grouse at 16 yards.”
History of the Henry AR-7 Rifle
Starting in 1959 the AR-7 was provided to U.S. Air Force fliers as a survival rifle to use if they were stranded in a remote area. Today the AR-7 is a favorite of bush pilots, backpackers, and backcountry adventurers who, like their Air Force counterparts, need a rifle that’s easy to carry yet can take down small game. Like the original Henry U.S. Survival Rifle, this innovative, semi-automatic rimfire rig is lightweight (3.5 lbs.) and highly portable. At just 16.5″ long, with all components stowed, it easily fits into a backpack, or the cargo area of an ATV, truck, boat. or plane. The AR-7 is chambered in .22 LR so you can carry plenty of ammo without adding much weight to your gear. When disassembled, all the pieces fit inside the impact-resistant, water-resistant stock.
Assembly is as easy as attaching the receiver to the stock, inserting the barrel, and screwing on the barrel nut. In a few seconds, without any tools, the Henry U.S. Survival AR-7 is ready for action. It now comes standard with a steel barrel covered in tough ABS plastic with a protective coating for corrosion resistance. The Henry U.S. Survival AR-7 is available in three finishes; Black, True Timber Kanati Camo Pattern, and True Timber Viper Western Camo Pattern. All models are equipped with an adjustable rear sight and a blade front sight. As you can see below, the built-in storage can be used to hold magazines and ammunition as well as the rifle components.
Another AR-7 owner posted this review:
Simple Goodness: Henry AR-7 — Fun Modern Version of a Classic
Henry got this modern take of the AR-7 right. Gentle finger-tighten is all it takes to assemble. The funky orange plastic sight on the end of the barrel is kind of loud, but was also easy to target with. Brand spanking new, I was getting grapefruit-sized patterns out of each 8-round mag at 50 feet. For a compact take-down, was surprised that length-of-pull was satisfactory for a six-foot guy. It didn’t feel cramped.
For realistic backpack, bail-out, or bug-out situations this would be a smart choice. It was fussy with a single Rem Golden in the first mag… but after that no problems, and no issues at all with Federal and CCI. The safety is right-handed but large and easy to get used to. The charge handle retracts so [you must] pull it up before pulling back, but that motion seemed to become reflexive pretty quickly. The mag eject is in front of the trigger and pushes forward. All in all, [the AR-7 offers a] really nice, compact form factor. [It is] light, perfect for backpack plinking and … low-rent varmint sniping.
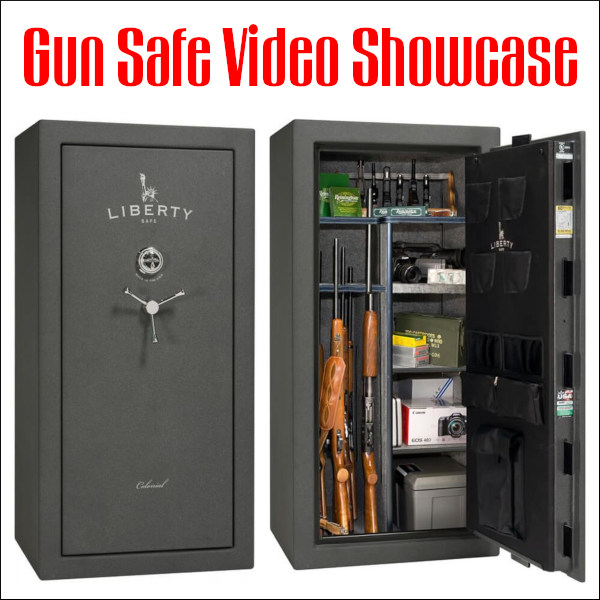
Today’s Saturday Showcase covers gun safes. Every firearms owner should have a secure, quality gun safe with ample capacity. There are numerous choices in gun safes — but we have one key bit of advice — buy BIGGER than you think you need, because your gun collection will likely grow over time. Also you should consider the fire rating of your safe. There are other key factors to consider, such as wall thickness, lock type, shelf and storage layout, and humidity control. We recommend that all Bulletin readers read our detailed, Gun Safe Buyers Guide. This in-depth 9400-word article covers ALL these topics:
Anti-Corrosion
Budget Safes
Bolt Layout
Door Seals
Fire Proofing
Handgun Storage
Hinges
Humidity Control
Installation Tips
Interior Layout
Interior Lighting
Locks–Dial vs. Digital
Modular Safes
Rotary Racks
Size and Weight
Temperature Control
Wall Thickness
Water Proofing
Technical Features of Gun Safes — What You Need to Know
This is a very sensible, informative video that examines the technical features of gun safes. You’ll learn about the steel “gauge” or thickness, the different types of hinges, lock controls, and fire-proofing options. We think anyone contemplating purchase of a large home safe should watch this video, prepared by a respected safe retailer in Las Vegas.
Assembly of SnapSafe Titan XXL Double Door Modular Safe
In this video Gavin Gear of UltimateReloader.com shows the unpacking and assembly of a large, twin-door SnapSafe modular safe. This video shows how individual panels are assembled one by one, and how the twin doors are attached. Gavin also shows the process of installing the interior insulation panels which provide basic fire protection. Remarkably, this entire XXL modular safe can be put together with simple tools in less than an hour. SEE Full Article HERE.
Features of a Quality Safe under $1000
Even if you already have a safe, this video is well worth watching. The host shows a variety of accessories and upgrades that all gun safe owners should consider. The host explains why you should have a dehumidifier or Golden Rod. He also shows how to install handy interior lights that activate automatically when the door is opened.
The Gun Vault — The Next Step Beyond a Jumbo Gun Safe
If you have a very large gun collection and are building a new custom home, you may want to consider a Gun Vault. This is essentially a large, secure room, with a very heavy door and thick walls. In this interesting video, Atlas builds a large walk-in gun vault using the Gallow Tech Shelving System and a Fort Knox Gun Vault door.
After the Fire — What Actually Happens in a Burned Safe
In this video, the hosts open a “fireproof” gun safe that went through an actual house fire. See what happens when a gun safe that is supposed to be fireproof actually is exposed to a major fire. The results are surprising to say the least. This video shows that you need to do your homework before buying a “fireproof” safe. Understand how the fire rating systems work, and learn how the interior materials and construction make a big different in real world fire protection.
Mechanical Locks vs. Electronic Locks — What You Need to Know
One important decision when buying a gun safe is the choice of locking mechanism. Should you go with a mechanical lock or an electronic lock? There are pros and cons to both dial locks and e-locks, and as long as you get a quality lock, neither is a bad choice. To help you make your decision, This video explains the differences between the two, and reasons why you might choose one over the other.
How to Assemble a Modular Safe with Simple Tools
For gun owners who move frequently, or who may live in an upstairs apartment or condo, a modular safe makes sense. Steelhead Outdoors, based in Minnesota, offers three different safes: Nomad 26, 32, and Nomad 38. The video below shows how to assemble a Steelhead Outdoors Nomad series safe. If you have basic skills, these safes can be assembled easily in 60-90 minutes. Steelhead recommends having two people to do the job. The entire safe ships in four (4) boxes. Wrenches are included with the safe.
This time-lapse video shows the entire process of assembling the safe, start to finish.
Guide to Quick Access Handgun Safes
A quick access safe can keep your pistol secure, but also readily accessible. But not all of these devices are created equal. This video explains the features you need in a small pistol safe. The video also examines the pros and cons of seven different handgun safes. We recommend that you do NOT keep your handgun safe in plain view, such as on a bedside table. There are other locations where you still have quick access, without tempting home intruders.
Wireless Hygrometer Reports Temperature and Humidity Inside Safes
The Hornady Security® Wireless Hygrometer monitors temperature and humidity in real-time, all without opening the gun safe. The wireless hygrometer employs a remote sensor inside your safe, which measures temperature and humidity data. This data is then sent to an external base display. Wireless technology eliminates the need to open the safe and check the storage environment, preventing temperature and humidity spikes from the outside air.
The display features a large touchscreen that shows current high/low data from both the base and remote units in Fahrenheit or Celsius. The hygrometer pairs with Hornady Security’s in-safe dehumidifiers to combat oxidation-causing moisture.
Gun Safe Installation Recommendations
Every safe, when possible, should be anchored in place with heavy-duty fasteners. Ideally, use multiple bolts in the bottom of the safe, anchored to concrete or solid foundation. Choose the appropriate lag bolts or anchors for the material below your safe. If you can’t mount to the floor, bolt the safe to wall studs. You can locate the position of the studs with an inexpensive electronic “Stud Sensor” available at home supply stores.
Check the thickness of your safe floor. If the steel on the bottom of your safe is fairly thin, place a steel backing strip between the bolt heads and the safe bottom. (Large washers will work, but a backing strip is better.) Without such reinforcement, the bolt heads may pull right through thin-gauge steel if the safe is rocked, or levered from the bottom with a pry-bar.
Locate your safe in the corner of a room or in a recess that blocks access to one or more sides of the safe. On many gun safes, the steel on the top, sides, and rear is thinner than on the door. Blocking access to the sides makes it much more difficult to use power tools on the sides, where the safe is most vulnerable. It’s also wise to place the safe in a relatively tight space with limited room to maneuver. Anything that makes the safe harder to move helps deter would-be thieves.
Many people place their safe in a garage or basement. That’s not necessarily a bad idea, but people also tend to store their tools in the same locations. Don’t store your power tools next to the safe. One safe-maker told us how a customer’s safe was defeated using the owners’ own cutting torch which was stored right next to the safe!
Inspect the area around the safe. Avoid locations where there are a lot of wood beams, paint cans, or other combustible material nearby. In the event of a serious house-fire, these items will fuel the flames, increasing the likelihood that items inside your safe will be heat-damaged. Chris Luchini, co-author of Rec.Gun’s Guide to Gun Safes, offers some practical advice: “Get an alarm system. If the burglars hear an alarm go off, they are less likely to stick round to finish the job. Alarms on both the house and the safe area are a good idea.”
If you hand-load pistol ammunition, you should definitely have a case gauge (aka “gage”) for each cartridge type you reload. Caliber-specific, precision-machined cylindrical gauges perform many important functions. They will instantly reveal if your rounds are too long or have excessive headspace. They will also show if your case is bulged or otherwise too fat to chamber easily. You can use the gauge with sized brass as well as loaded rounds.
Case gauges are a “must-have” for anyone loading handgun ammunition, particularly if you crank out large quantities of pistol ammo with a progressive press. An oversize round can cause a misfeed, jam, or other problem. That can ruin your day if you are in the middle of a shooting match. If you are relying on your handgun for self-defense, the last thing you want is a malfunction of any kind. This Editor personally runs every pistol round through a gauge before it goes into the ammo box.
UltimateReloader.com Video Shows How to Use Pistol Case Gauges:
Our friend Gavin Gear of UltimateReloader.com has prepared an excellent video that explains the benefits of pistol case gauges and shows how to use them. Gavin uses the quality gages produced by L.E. Wilson. These are available for the most popular handgun cartridges, both autoloader cartridges, and rimmed revolver cartridges. Gavin demonstrates gage use with .40 SW and .44 magnum cases.
Gavin states: “Using a case gage is very simple, and I would recommend that you add one of these gages to your reloader’s tool chest for each of the pistol cartridge types you reload. It may just save you a lot of time and hassle. Peace of mind is hard to put a price on!”
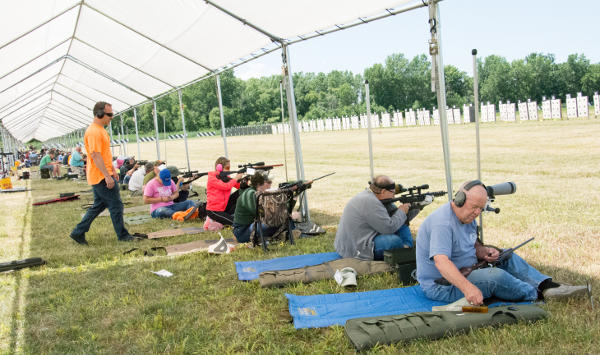
The CMP’s 2024 National Rimfire Sporter Match took place yesterday, July 13th, 2024 on the Viale Range at Camp Perry. Hundreds of participants took part in this major summer rimfire competition. Click HERE for 2024 Match Photos. One of the most popular events at Camp Perry, the Rimfire Sporter Match attracts hundreds of shooters from 8 to 80 years, novices as well as experienced competitors. It is a great event for shooters who want to have fun without spending a small fortune on rifle, optics, gear and ammo. Along with the major annual Camp Perry event, other Rimfire Sporter matches are held throughout the country in connection with the CMP’s Travel Games.
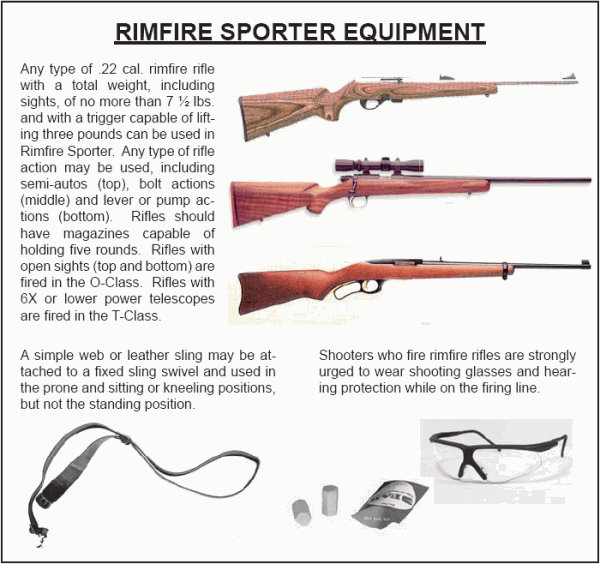
The CMP Rimfire Sporter discipline is for .22 LR smallbore (rimfire) rifles that weigh 7 1/2 pounds or less. Firing is done at 25 and 50 yards in prone, sitting, and standing positions, in slow and rapid-fire modes. Even with the vast number of competitors, the Rimfire Sport match proceeds efficiently. The CMP now has a special smart-phone App that helps speed up scoring. SEE 2024 Results.
Each summer, the major National Rimfire Sporter Match attracts hundreds of shooters to the shore of Lake Erie at Camp Perry. This year’s Rimfire Sporter Match at Camp Perry was held on Saturday, July 13, 2024. The CMP National Rimfire Sporter Rifle Match offers shooters a recreation-oriented competition where they use affordable, smallbore sporter rifles with either scopes or iron sights. All you need are a .22 LR rifle, sling, and ammo. Competitors will need a total of 60 rounds to fire the Rimfire Sporter Match plus any sighters or range alibis.
Three Classes for Rimfire Sporter
Rimfire Sporter competitors can fire in three different rifle classes. The O-Class rifles must have open sights. T-Class rifles have 6-power max scopes or receiver sights. The third class is TU Rimfire Class (Tactical and Unlimited). Competitors may enter in Single or Double Entry options and then select the rifle class(es) in which they will fire. Firing is done at 25 and 50 yards in prone, sitting and standing positions, in slow and rapid-fire modes. For each Class, awards are offered to High Juniors, High Seniors, and High Women as well as Overall Winners.
Rifles used during the competition may be manually operated or semi-automatic, shot hand-held with sling allowed. Competitors will complete slow fire prone, rapid fire prone, slow fire sitting or kneeling, rapid fire sitting or kneeling, slow fire standing and rapid fire standing shot sequences. Firing is done at 25 and 50 yards on a target with a 1.78″ ten-ring. The target is simple enough for a beginner to hit, yet challenging enough. See explanation of course of fire below. Competitors must supply their own quality ammunition for this match. For more info about the Rimfire Sporter Match, CLICK HERE.
The CMP Rimfire Sporter Rifle Match is an inexpensive, fun-oriented competition using .22 caliber sporter rifles (plinking and small game rifles). To compete, all you need is a basic rifle, safety gear, and ammunition. No fancy, high-dollar rifles are required. Many junior and senior clubs make the National Rimfire Sporter Match an annual tradition — bringing together marksmen of all ages. SEE 2024 CMP Games Rules PDF.
If there is a single CMP event at Camp Perry every summer that offers the highest level of shooter satisfaction, the most diverse group of competitors, and the lowest cost of entry, that would have to be the annual Rimfire Sporter Match. Shooters run a huge range of ages from young juniors to seniors in their 70s and 80s. And persons with disabilities can compete as well, with Adaptive Shooting Programs for physically-challenged competitors.
Each year, the Rimfire Sporter Match attracts hundreds of shooters to the shore of Lake Erie at Camp Perry. The CMP National Rimfire Sporter Rifle Match offers shooters a recreation-oriented competition where they use affordable, smallbore sporter rifles with either scopes or iron sights. All you need are a .22 LR rifle, sling, and ammo.
Rifles may be manually operated or semi-automatic, in three classes: the standard “O Class” for open-sighted rifles, “T-Class” for telescope-sighted rifles, and the “TU Class” for Tactical and unlimited rifles.
Rimfire Sporter Course of Fire
Competitors will complete slow fire prone, rapid fire prone, slow fire sitting or kneeling, rapid fire sitting or kneeling, slow fire standing, and rapid fire standing shot sequences. To learn more about the National Rimfire Sporter Match, CLICK HERE.
Rimfire Sporter Match Basics
The CMP Rimfire Sporter Rifle Match is an inexpensive, fun-oriented competition using .22 caliber sporter rifles (plinking and small game rifles) commonly owned by most gun enthusiasts. To compete, all you need is a basic rifle, safety gear, and ammunition. No fancy, high-dollar rifles are required.
The event is shot with standard sporter-type, rimfire rifles weighing no more than 7 ½ lbs, with sights and sling. Rifles may be manually-operated or semi-automatic. Shooters with manually-operated actions are given extra time in the rapid-fire stage to compensate for the difference.
There are three classes of competition — the standard “O Class” for open-sighted rifles, “T-Class” for telescope-sighted and rear aperture-sighted rifles and “Tactical Rimfire” class, which is a .22 caliber A4 or AR15 style rifle. Firing for all classes is done at 25 and 50 yards on a target with a 1.78″ ten-ring and an 18″ outer one-ring. Even new shooters can get hits on this target, but it’s still tough enough that a perfect 600×600 score has only been accomplished once as far as we know (Go to 2024 Results).
The Civilian Marksmanship Program (CMP) has a CMP Guide to Rimfire Sporter Shooting. This FREE, 48-page digital publication covers equipment, positions, course of fire, rules, scoring and much more. You’ll find helpful “how-to” sections on aiming, sight picture, hold control, and trigger control. Reading these instructional sections can benefit any prone or three-position competitive shooter.
Ever wanted to see how Nosler bullets and cartridges are made? Here’s your opportunity. The Rocky Mountain Elk Foundation (RMEF) has produced a video (“Quality First”) that offers a behind-the-scenes look inside Nosler’s Oregon factory that produces bullets, brass, and ammunition.
Video Showcases Nosler Production Facility and Ballistics Lab
RMEF representatives were provided with unprecedented access into Nosler’s famously-guarded manufacturing plant to show the technology used by Nosler to produce bullets and ammunition. The “Quality First” video showcases Nosler’s complex production processes that include technologically advanced machinery, and stringent quality control measures.
After the intro, this video illustrates Nosler’s bullet construction techniques with an excellent animation sequence. The video then showcases the Nosler ballistics lab, inspection room, and packaging line. The video shows the bullet construction techniques followed by a ‘walk-though’ in the factory, showing the machinery used to make bullets, brass, and ammunition.
Information Resources — Load Data and Nosler Blog
The Nosler website also features comprehensive LOAD DATA, plus informative content in the Nosler Blog. The Load Data page works well on smartphones. Go to the Load Data Index Page, then simply scroll down to a caliber. Then select your cartridge type and bullet weight(s). The rifle listings are quite comprehensive, covering .17 caliber up to .458 caliber. Here is an example of Nosler load data for the 6mm Creedmoor with popular 105-107gr bullets.
To help serve America’s many millions of new gun owners, Winchester has created a good online information site for first-time ammunition and firearms buyers as well as those just getting started in the shooting sports. Winchester’s New Shooters Site has many helpful articles plus a series of videos.


Research indicates the Second Class target was a 48″ x 48″ square with 24″ inner circle and 36″ outer circle. The sight mark was a central 12″ x 12″ shape representing a soldier. ALL hits scored points (3 for center circle, 2 for outer circle, 1 for outer square). NOTE: Though some sources say the Mad Minute drill used a 12″-diameter round target, this appears to be a mistake from Ian Hogg’s book “The Encyclopedia of Weaponry”. No other source mentions a 12″ circle, which would be a mere 3.82 MOA. In reality the true drill target was a 48″ x 48″ square, roughly 15 times larger. (From No.WikiPedia.)












 Every safe, when possible, should be anchored in place with heavy-duty fasteners. Ideally, use multiple bolts in the bottom of the safe, anchored to concrete or solid foundation. Choose the appropriate lag bolts or anchors for the material below your safe. If you can’t mount to the floor, bolt the safe to wall studs. You can locate the position of the studs with an inexpensive electronic “Stud Sensor” available at home supply stores.
 Locate your safe in the corner of a room or in a recess that blocks access to one or more sides of the safe. On many gun safes, the steel on the top, sides, and rear is thinner than on the door. Blocking access to the sides makes it much more difficult to use power tools on the sides, where the safe is most vulnerable. It’s also wise to place the safe in a relatively tight space with limited room to maneuver. Anything that makes the safe harder to move helps deter would-be thieves.