August is National Shooting Sports Month. The NSSF, through its “+ONE” campaigns, encourages all dedicated gun owners to invite a new shooter to the range this month. Here’s the challenge to our readers — make a commitment to introduce at least one new person to the shooting sports this summer.
The +ONE Movement — The Mission
The goal of the +ONE campaign is to build the ranks of shooters. The idea is basic — make a commitment to act as a MENTOR and encourage at least ONE new person to get involved. As the NSSF says: “If just one in three of America’s recreational shooters adds one new person to the shooting sports, we’ll secure a strong future for generations to come.”
Precision Rifle fans should watch Shooting USA this week. On Wednesday, August 2, 2023 Shooting USA offers a special edition devoted to the 2022 Armageddon Gear AG Cup Invitational. The AG Cup posts the biggest cash money match in Precision Rifle Competition. It’s an elimination format shot over three days of challenging competition on stages of fire created at K and M Precision’s ranges in West Tennessee. Match organizer, Tom Fuller joins John Scoutten to narrate the action and the award of the cash in extended coverage of the match.
This video shows highlights from the 2022 AG Cup, with many stages illustrated.
It’s the fourth year for the richest rifle tournament in the world. The AG Cup is the brainchild of Tom Fuller, the owner of Armageddon Gear, and to say it’s a success is a bit of an understatement. $75,000 in prize money was up for grabs, with a huge cash prize for the overall matche winner.
Shooting USA runs on the Outdoor Channel Wednesdays 9:00 PM Eastern and Pacific, 8:00 PM Central.
No Outdoor Channel on cable? Then you can subscribe to Stream the Broadcast on the internet.
During this week’s Shooting USA special, John Scoutten and Armageddon Gear’s Tom Fuller report the action and interview top precision rifle shooters. The Grand Prize of $20,000 was awarded for the best overall score, based on accuracy and time. There were also substantial cash prizes for each stage winner.
This 2022 AG Cup video has good footage of the stages and views downrange.
Arena Training Facility — 2300 Acres
The 2300-acre Arena Training Facility is a premier shooting facility with multiple shooting ranges from 50m to 2100m. Arena’s 1000-yard covered Known Distance range offers multiple benches, steel and paper targets out to 1000 yards. On Arena’s UKD (unknown distance) range shooters can engage steel out to 2300 yards. This 2100m UKD range boasts a 3-Story Shooting Tower, Air-Conditioned Shoot House, and multiple Positional Challenges.space.
Armaggedon Gear — Tactical Accessories Armageddon Gear, founded by former U.S. Army Ranger Tom Fuller, sells support bags, gun cases, slings, suppressor covers, scope covers, and a wide variety of other accessories popular with the PRS/NRL crowd. Armageddon Gear now provides products to the U.S. Military, Law Enforcement, as well as PRS/NRL competitors.
Splatterburst 1″ circles, 62 per sheet, 10-pk $9.99. These can be pasted on other paper backers.
We’ve all seen conventional splatter targets with a single large black bullseye. When a shot hits the target, a halo (usually neon yellow) appears around the bullet hole. This makes it easier to see your shot placements indoors, or at long range outdoors. Today we feature a variety of other targets that also offer the cool halo/splatter effect. We’ve found grids, multiple bull targets, sheets with 62 one-inch circle pasters, handgun training targets, and even white background splatter targets (that produce black halos). Try out some of these targets for fun (kids love plinking with splatter targets).
Today’s video showcase covers bore-sighting methods and technology. Bore-sighting the old-fashioned way — by looking down the bore of a rifle at a target — is not difficult. With a conventional bolt-action rifle, visual bore-sighting can be done quickly and easily. Rest your gun securely on bags, remove your bolt and set up a 50-yard target with a large bright orange or black center circle. Look through the back of the action and you should be able to sight down the bore with your own eyes just fine. There’s no need for expensive hardware. In fact it may be easier to bore-sight the “old-fashioned way” rather than try to see a laser in bright sunlight at 50 yards (or even 25).
However, with lever guns and semi-auto rifles, including the popular AR15, M1 Garand, and M1A, the design of the receiver may make it virtually impossible to sight down the bore with the naked eye. That’s where a modern laser bore-sighting device comes in handy. For those situations where a bore-sighting tool is needed, we recommend a laser bore-sighter that fits inside your chamber. An in-chamber laser device, as shown below, is handy and has less safety risk than a tool which fits in the end of the barrel.
How to Bore-Sight Your Rifle in Five Minutes
This video from Australia shows the basics of the bore-sighting process. First set up a target 50 yards (or closer) from your shooting station. Make sure the rifle is well-supported and stable. When the target is ideally centered in the BORE of the barrel, then adjust the reticle on your scope to center the crosshairs on the middle of the target. Then, after checking down-range, take a few test shots. Finally, move the target out to 100 yards and confirm your zero, as explained at the close of today’s article.
Vortex Shows How to Bore-Sight Rifles
This well-made, informative video from Vortex covers the basics of bore-sighting. Bore sighting your rifle is a simple way to establish an initial zero to get you on target faster and save you ammo at the range. Thankfully, it doesn’t take a ton of gear or ammunition to bore-sight a rifle effectively. Video host Jimmy from Vortex provides a handy, step-by-step guide in this 10-minute video.
Bore-Sighting Using a Barrel-Mounted Laser Bore-Sighter
If you wondered why a barrel-mounted laser bore-sighter was off-center? Or if you want to learn how to use one properly, this video shows how to safely and properly zero a scope using a barrel-mounted laser bore sight device. Another option is a small cartridge-sized laser that fits inside the chamber. These sell for under $25.00 and are convenient. There are safety advantages to in-chamber lasers.
Initial Bore-Sighting at Home (Before You Head to the Range)
This useful video shows how to bore-sight a rifle at home. This can save time (and money for ammo) when you do get to the range to confirm your scope’s zero. This home procedure works best if the target is well-illuminated while the rifle is in a shadowed area, creating the best contrast. Also make sure the rifle is on a steady support — such as a portable gun vise or sandbags front and rear.
Bore-Sighting with a Red Dot (Reflex) Sight
As with conventional scopes, if you have a red dot sight or reflex optic, you’ll need to bore-sight your rifle, then zero the optic. [Reflex sights use a reflex lens to project a dot or reticle onto the target, whereas red dot sights use a flat, reflective surface to display a red dot reticle.] In this video, retired Navy SEAL Mark Cochiolo demonstrates how to bore-sight then adjust a red dot. Bore sighting allows you to zero your red dot so that your shots hit near your intended point of impact.
Learn More about Bore-Sighting with Tools
To learn more about bore-sighting, you can view a detailed article on the Warne Scope Mounts website. This features through-the-barrel images and discussion of tools that fit in the chamber or barrel to project a laser beam down-range. Shown below are cartridge-sized projecting lasers that fit in a rifle’s chamber. These are available for a wide variety of cartridge/chamber sizes.
WARNING: If you use an in-barrel laser be sure to remove it BEFORE chambering a round. ANY obstruction in the barrel can cause serious injury or even death if you fire a round.
Bore Sight Grid Tool with Arbors
The Bushnell Bore Sight with Arbors is a bore-sighting tool that many gun stores and gunsmiths use. This device uses arbors but does not transmit a laser.
You attach the tool to the end of the barrel and align it with your scope. A grid is visible inside the bore-sighter. Look at that grid and then and align your scope’s reticle with the grid. This Bushnell unit ships with three expandable arbors in 22-270 caliber, 7mm-35 caliber, and 35-45 caliber.
How to Zero a Hunting Rifle Efficiently
Once you have bore-sighted your rifle to get “on target” successfully, then you want to zero your optic so that the shot falls exactly where you want it at your target distance, typically 100 yards. This Vortex video shows you how to quickly and efficiently sight-in and zero a hunting rifle before heading out into the field. This video explains a simple procedure that lets you get a solid zero in just three shots. Of course you probably want to fire a few more rounds to confirm your zero before you head off to your hunting grounds, but this will let you get on-target with a minimum amount of time and ammo expended. This helpful video now has 3.2 million views on YouTube!
Fouling Shots and Cold Bore Condition
If you recently cleaned your rifle, you may want to fire two or three fouling shots before you start this procedure. But keep in mind that you want to duplicate the typical cold bore conditions that you’ll experience during the hunt. If you set your zero after three fouling shots, then make sure the bore is in a similar condition when you actually go out hunting.
Now through Sunday, July 30th, 2023, classic military rifles will fill the firing lines at Camp Perry. The National John C. Garand, Springfield, Vintage and Modern Military Match (GSMM) commenced on the 26th, and will run through this upcoming Sunday the 30th, with the one-day Springfield M1A Match on Sunday only. (See CMP Camp Perry 2023 Calendar.) Some participants will shoot just one rifle type, but there is also a combined GSMM 4-Gun Aggregate. This GSSM Agg encompasses a series of position shooting matches on NRA SR targets at the CMP Nationals. As the matches are completed, day by day, results will be posted on the CMP National Matches Results Page.
This video shows the Garand Match at Camp Perry. The rifles are still the same a decade later…
The annual GSMM event is one of the most popular events at Camp Perry, drawing participants from around the nation. One of America’s top GSSM shooters is Brian Williams, who was profiled in our Daily Bulletin. The 4-gun Aggregate includes Garand, 1903 Springfield/1917 Enfield (or similar bolt rifle), M1 Carbine, and AR-type rifle for “Modern Military”. Remarkably, Brian has won the GSMM 4-Gun at the CMP National Matches in Camp Perry three years in a row — the inaugural 2017 4-Gun Agg, plus 2018 and 2019. Below, Brian offers some thoughts on the classic wood-stocked rifles used in GSMM competition.
The Classic Wood Guns of CMP 4-Gun Competition
Perspectives on M1 Garand, M1903A3, M1917, and M1 Carbine
Brian provides perspectives on the “Wood Gun” game, with suggestions on how to improve your performance with the M1 Garand, M1903 Springfield, M1917 Enfield, M1 Carbine, and other 20th Century military rifles. Brian explains what to look for
Q: What should one look for when acquiring older rifles for CMP 4-Gun Games — M1 Garand, M1903/1903A3, M1917, M1 Carbine? What are realistic budgets for these firearms? What kind of accuracy can one expect? What upgrades are important?
Brian: All of these military surplus rifles are out there, but they are getting harder to get your hands on. And, just like everything else, the prices continue to rise. Not that long ago you could get your hands on a M1 Garand for four or five hundred dollars. In today’s market they are usually about double that price. But understand that these rifles are all unique and all have a story to tell. No two are alike, or have the same story. Just like the guns themselves, there are fewer and fewer dedicated gunsmiths for these vintage rifles. But I promise if you look for a good smith, they are out there and they are some of the most interesting people you will ever meet.
M1 Garand — Of the four (4) centerfire guns I shoot in the CMP games, my favorite has to be the M1 Garand. There were over 6 million of them produced in a very short time period, and every single one has its own unique story, and that is just cool. M1 Garands are capable of good accuracy. I believe that a well-maintained M1 with at least a replacement barrel is capable of shooting between 1 and 1.5 MOA.
M1903A3 Springfield — I find that the sights on a M1903A3 are a little easier to see than the sights of the M1903, but both are very accurate rifles. Like most military rifles in the current climate the prices have risen dramatically, but there are some gems out there that can be had for far less than $1000. The nice thing about the Springfield rifle is that almost all of the accuracy than you would want can come from just replacing a worn out 80-year-old barrel. In terms of accuracy, I think a good M1903A3 can shoot 1 MOA most of the time.
M1917 Enfield — This rifle is the newest of my collection and it shoots very well, with just a new Criterion barrel — again about 1 MOA with iron sights. These rifles are very close in price to the M1903 Springfield. But if you do your homework and keep your eyes open, there are always great deals to be found. I actually prefer shooting the M1917 to my M1903A3, due primarily to the M1917’s cock-on-close bolt which allows smoother cycling.
Public domain photo from Armémuseum (The Swedish Army Museum).
M1 Carbine — By 1945 there had been more M1 Carbines built than Garands. Today the Carbine can be harder to find, and due to the scarcity the price has shot up and most military M1 Carbines are going for more than $1000 at this point. The great thing about the M1 Carbine is that as long as you have a good ammo supply this rifle can shoot. Honest. I have had countless numbers of people that tell me that there is not an M1 carbine that will shoot. I can tell you from experience that they will, but you are going to have to put in some time with one to learn how to get it to shoot where you want it.
The M1 Carbine shoots the .30 Carbine round, with 110gr bullet going about 1990 FPS. In comparison, the .30-06 Springfield round used in the M1 Garand is almost three times more powerful than the .30 Carbine.
After purchasing a new set of dies from Forster, Hornady, Redding, or Whidden Gunworks, you’ll want to disassemble the dies, inspect then, and then remove the internal grease and/or waxy coatings placed on the dies by the manufacturer. Below are two videos that show how to de-grease and clean dies as they come “out of the box” from the manufacturer. The videos also explain how to clean your dies after regular use. Cleaning your dies helps remove carbon, brass shavings, lube residues and other stuff that can get inside the dies.
In the first video, from Creedmoor Sports, Bill Gravatt (Creedmoor’s President) shows various methods for cleaning dies both when new and after they have accumulated carbon and lube after use. This video is definitely worth watching. In the second video, a Hornady technician shows the method for degreasing dies before first use. A convenient aerosol spray cleaner is used in the video. You can also use a liquid solvent with soft nylon brush, and cotton patches. NOTE: After cleaning you may want to apply a light grease to the external threads of your dies.
Creedmoor Sports Die Cleaning Video with Bill Gravatt
Hornady Video Showing Aerosol Cleaner
Clean Your Sizing Dies and Body Dies Regularly
These same techniques work for cleaning dies after they have been used for reloading. Many otherwise smart hand-loaders forget to clean the inside of their dies, allowing old case lube, gunk, carbon residue, and other contaminants to build up inside the die. You should clean your dies fairly often, particularly if you do not tumble or ultrasound your cases between loadings. It is most important to keep full-length sizing and body dies clean. These dies accumulate lube and carbon residue quickly.
Product Review by F-Class John
Case preparation is critical for precision reloading. One must trim cases, debur/chamfer case mouths, clean necks, spruce up primer pockets and do other important tasks. Complete case prep can involve many separate processes, each requiring its own tools. With each of those tools comes additional cost as well as the need for more storage and bench space. To make case prep easier, faster, and more convenient Lyman created the Case Prep Xpress (#ad). The Case Prep Xpress, introduced a few years back, combines up to five prep stages into one well-built, stable, versatile unit. Watch this video to see the machine in action:
The Case Prep Xpress features five (5) independently-turning spindles all with the common 8/32 thread. This allows you to attach multiple tools supplied with the unit PLUS many other screw-on prep tools. For our testing we started out using a variety of the 12 included tools and found they cover the majority of case prep tasks. Lyman supplies deburr and chamfer tools, pocket uniformers, reamers and cleaners, as well as an assortment of neck brushes.
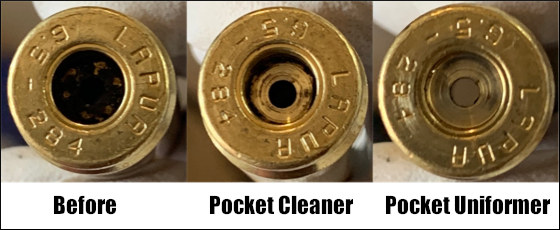
The deburr and chamfer tools worked really well, creating beautiful bevels all while leaving a nice flat edge across the top of the neck which is critical for accuracy and brass life. We found the primer pocket cleaning tool did a good job, but for truly clean pockets we recommend using the primer pocket uniforming tool, which very efficiently removes even hard residues.
The benefit of having interchangeable heads is that you can add your own accessories. We like to use a bore brush with bronze wool wrapped around it for use inside our necks. This worked perfectly once we screwed it in. In fact, we couldn’t think of any 8/32-threaded accessory that wouldn’t work well on this machine. Another great design feature is how all the accessories are oriented straight up. This allows for perfect visual alignment of your cases onto the tools which is critical — especially when performing cutting operations such as primer pocket uniforming.
Along with the five power stations there are six female-threaded storage spots on the sides where tools can be placed to ensure they don’t get lost. We like this feature since there will be more than five accessories you want to use and having them easily available is a great feature. You can keep 11 tools right on the machine (5 on top, 6 on the sides). That way you don’t have to dig through storage bins.
The Case Prep Xpress has a removable front bin to hold brass shavings, and there are two circular trays on either side of the bin. In front is a long tray that holds the provided brush. This makes it relatively easy to clean off brass shavings and other debris from case prep processes.
SUMMARY — Versatile Case Prep Xpress Is A Good Value
For the money, Lyman’s Case Prep Xpress is tough to beat. It performs multiple tasks well while being stable and easy-to-use. Yes there are some multi-spindle prep centers that offer variable or fast/slow RPM spindles while the Lyman’s spindles are all fixed RPM. (See, e.g. the RCBS Brass Boss). However those other systems don’t include all the convenient on-board storage of the Case Prep Xpress, and are typically more expensive. The Lyman Case Prep Xpress sells for about $170-$190 “street price”. It’s currently on sale for $179.99 on Amazon (#ad). This makes the Lyman Case Prep Xpress a fine value — it offers great versatility while saving space and saving money compared to buying five or more separate, powered tools.
As an Amazon affiliate, this site can earn revenues through sales commissions.
Here’s a simple task you can do that will give your seater die a more perfect fit to your match bullets. You can lap the inside of the seater stem so that it matches the exact profile of the bullet. This spreads out the seating force over a larger area of the bullet jacket. That allows smoother, more consistent seating, without putting dents, creases, or sharp rings in your bullets.
This process is demonstrated here by our friend Erik Cortina of Team Lapua-Brux-Borden. Erik, one of the nation’s top F-Class shooters and a skilled machinist, explains: “Here I’m lapping my new seater die stem with lapping compound. I chuck up a bullet in the lathe and lap the inside of the seating stem. I put lapping compound on the bullet and also in the stem. You can do the same with a hand drill and bore paste. You can see in the piture below how much contact area the stem has on the bullet after being lapped. This bullet is a Berger 7mm 180-grain Hybrid. ”
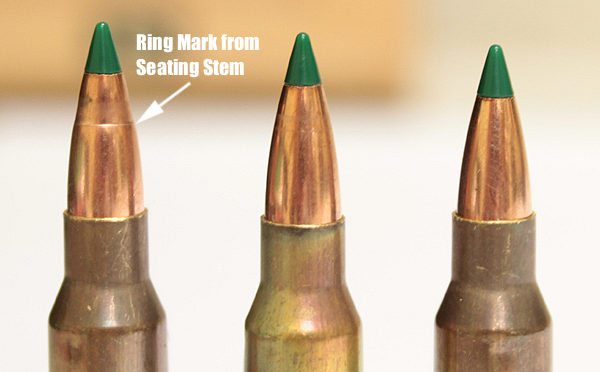
It can be helpful but it’s not necessary to make your seating stem an exact match to a bullet, particularly if you’re loading hunting or varmint rounds. But it is helpful to do some mild internal stem polishing. This should eliminate any ring (or dent) that forms on the bullet jacket during seating.
Sharp edges on a seating stem can cause a ring to be pressed into the bullet jacket — especially with compressed loads that resist downward bullet movement.
Q2: Is there any down-side to the process?
Not really. However, if you shoot many different bullet types for a particular cartridge, you may not want to conform the stem aggressively to one particular bullet design. Lightly lap the inside of the stem to remove burrs/sharp edges but leave it at that. A light lap will prevent a ring forming when seating bullets.
Savage Arms offers a series of Shooting Tips in the Savage Blog. Here is a helpful article from Team Savage Shooter Stan Pate. This covers how to ship your rifle safely, and then re-establish zero properly when the gun is reassembled after transport.
Traveling with Firearms — Important Advice
Traveling with firearms can be stressful. You must comply with multiple regulations and then trust your expensive guns to airline baggage handlers. And after arrival you’ll need to put your rifles back together and confirm the zeros. This article offers helpful travel advice from Team Savage shooter Stan Pate. Pate has traveled the globe competing with match rifles. Here he shares his tips for making trips easier on you and your firearms.
Easier Air Travel With Firearms
TSA isn’t nearly as careful with your rifles as you are. Proper storage before sending your firearm up a conveyer belt and into the belly of a plane is critical. Stan Pate spends lots of time each year traveling the skies and has devised a system for keeping his rifle safe when going to and from.
“Never travel with your firearm completely assembled,” Pate cautions. “A fully assembled firearm is much heavier [as a total unit] than one that has been broken-down and stored [in separate sections]. More weight creates more in-the-case movement, which can result in damage. I learned this the hard way years ago. My rifle was actually broken in half when traveling to an international competition. Record your torque settings, use those settings during reassembly and your return to zero should be no problem.”
“Be sure to check on current TSA rules and regulations before travel to be aware of any changes that may effect how you pack your rifles,” says Pate.
Rifle Reassembly and Resetting Zero
The quicker you can reestablish your zero, the quicker you can relax and stop worrying about if your rounds are going to hit their mark during competition. Pate, over the years, has developed a system for rifle reassembly and getting back to zero as quickly as possible. While his torque settings may not be the same as yours, the process can still be used.
“The barreled-action goes back on the stock, and then I tighten all three receiver screws finger tight,” says Pate. “Next, I tighten the front two receiver screws down to 35-inch pounds. The rear receiver screws on this particular rifle likes 15-inch pounds. [Note: Proper torque settings will vary with your action and stock type. Most actions have TWO screws, not three.] Scope attachment comes next, and I follow manufacturer settings when tightening it down. All that’s left to do now is go zero your rifle.”
This video explains an efficient method to Re-Zero your rifles
Here is the original Sierra manufacturing facility in Whittier, CA.
In August 22, 2017 Sierra Bullets was acquired by Clarus Corporation (NASDAQ: CLAR), a Utah-based holding company that also owns Black Diamond Equipment Ltd., makers of ski and mountain gear/apparel. Sierra remains one of America’s leading producers of bullets and loaded ammunition. This article covers Sierra’s notable history, and also reviews Sierra’s processes for crafting and testing bullets.
Sierra Bullets — How It Got Started
Report Based on Story by Carroll Pilant, Sierra Bullets Media Relations Manager
What became Sierra Bullets started in the late 1940s in a Quonset hut in California. In 1947, three aircraft machinists, Frank Snow, Jim Spivey, and Loren Harbor, rented machine space to produce rivets for aircraft along with fishing rod guides and rifle front sight ramps. In the post-WWII years, sport shooting was becoming hugely popular, but quality ammunition was in short supply. For shooting enthusiasts, reloading was the solution to the ammo supply shortage. Snow, Spivey, and Harbor recognized this, creating Sierra Bullets to help fill the void. Before long, they were selling a 53-grain match bullet to the Hollywood Gun Shop. These bullets are still in production today as the Sierra #1400 53-grain MatchKing.
A few years later, an accomplished competitive shooter named Martin Hull joined Sierra. Hull helped develop new bullet types and served as manager of Sierra’s ballistics laboratory for nearly 20 years. With Hull’s help, Sierra’s output grew rapidly. The California company outgrew several locations before it moved to a large facility in Santa Fe Springs, CA, in 1963.
New Owners and New President in the Late Sixties
In 1968, the Leisure Group bought Sierra Bullets. Other Leisure Group companies included Lyman Reloading, High Standard Manufacturing Company, Yard Man, Thompson Sprinkler Systems, Flexible Flyer Sleds, and Dodge Trophies (Which made the Oscar and Rose Bowl Game trophies).
Soon after purchasing Sierra, the Leisure Group hired Robert Hayden as President and General Manager. Hayden was a mechanical engineer who had worked for Remington Arms. Hayden remained the president of Sierra for 42 years, retiring in 2012 when Pat Daly became president.
Sierra Moves to Missouri
In 1990, Sierra relocated to Sedalia, Missouri, where the company remains today. Sierra Bullets now employs over 100 people including five full-time ballistic technicians who answer daily reloading and firearms questions by both phone and e-mail.
The Making of MatchKings — How Sierra Produces SMKs
All Sierra bullets begin life as a strip of gilding metal, an alloy consisting of 95% copper and 5% zinc. To meet Sierra’s strict quality requirements, the gilding metal requires three times more dimensional and quality control standards than is considered standard in the copper manufacturing industry.
A blanking press stamps out a uniform disc and forms the cup that will be drawn into the MatchKing jacket. The cup is then polished and sent to a draw press to be drawn into a jacket that is longer than needed for the future MatchKing, thus allowing for the trim process. Press operators constantly check concentricity to make sure we have only quality jackets. The jackets then go to a trimmer where they are visually inspected again.
After being polished a second time, the jacket travels to the bullet press. In the meantime, 80-pound lead billets are being extruded into lead wire for the cores where great care is taken so that the core wire is not stretched. The core wire is lightly oiled before continuing to the bullet press to be swaged.
The lead core wire and trimmed jacket meet at the bullet press where the first stage forms a boattail on the jacket. The lead core is then formed on top of the bullet press and fed down into the jacket. In one stroke of the press, the MatchKing is formed.
Quality control technicians pull samples from each lot of MatchKings to make sure they meet Sierra’s stringent standards. Samples are then sent to Sierra’s 300-meter underground test range (shown below) to be shot for accuracy on mechanical mounts referred to as “unrestricted return to battery rests” that Sierra designed and built in-house.
After inspection, the bullets are placed in the familiar green box along with reloading labels. They are then shrink-wrapped and shipped all over the world.
Sierra Factory Ammunition with Modern Tipped Bullets
Sierra also produces popular competition and hunting factory ammunition. Sierra’s modern GameChanger hunting ammunition has shown very good performance and consistency. For the GameChanger line, Sierra re-engineered its MatchKing bullet into a hollow point design for quick expansion and fitted it with a green tip for ballistic uniformity. The lead-core GameChanger bullets deliver excellent penetration and expansion at a variety of ranges.