In this video, Forum member Erik Cortina shows how to create a custom modified case for use with the Hornady Lock-N-Load Overall Length Gauge (formerly the Stoney Point Tool). While Hornady sells modified cases for many standard cartridges, if you shoot a wildcat such as the 6mm Dasher or .284 Shehane, you’ll need to create a custom modified case*. And even if you shoot a standard cartridge such as the .308 Winchester you can get more consistent measurements if you make a custom modified case from a piece of brass fired in your chamber.
The process is straight-forward. Take a piece of brass fired in your chamber and full-length size it (with about .002″ shoulder bump). Then you need to drill out the primer pocket. Erik uses a mini-lathe for the operation, but this general process can be done with a drill press or other tools. Erik shows how to do this with a 0.290″ HSS (High Speed Steel) drill bit on a mini-lathe. After drilling the hole comes the tricky part — you need to tap the case with the precise 5/16″ x 36 threads per inch (tpi) right-hand thread that matches the male thread on the O.A.L. Gauge. This 5/16″ x 36 tpi tap is pretty uncommon, but you can order it from Amazon.com if you can’t source it locally.
If you use a mini-lathe, Erik suggests loosening the tailstock slightly, so it can float while cutting the threads. Erik also says: “Make sure you get the tap on pretty tight — it’s going to want to spin.” Erik turns the case at about 100 rpm when tapping the threads. Once the case and tap are rigged, the actual tapping process (see video at 6:00) takes only a few seconds. While the mini-lathe makes the tapping process go more quickly, the threading can also be done with other systems.
TIP: Don’t just make one modified case, make three. That gives you one for your range kit, one for your home reloading bench, plus a spare (since you WILL eventually lose or misplace one).
Here’s the Stuff You Need
5/16″-36 TPI Threading Tap
The required thread is somewhat uncommon. You need a 5/16″ – 36 tpi Right Hand Thread Tap. If you can’t find it locally, Amazon.com carries the correct tap. Erik notes: “The 5/16-36 tpi tap is not a common size. I think Hornady did this on purpose to make it more difficult for the average guy to make his own modified cases.”
0.290″ Drill Bit
Erik uses an 0.290″ HSS “L” drill bit. (This “L” Letter Gauge code designates a 0.290″ diameter bit). A close metric equivalent would be 7.3 mm (0.286″). Erik says: “A 9/32″ drill will also work but it will be harder to run the tap in since the hole will be .281″ instead of .290″ with the Letter Gauge L bit.”
Tips for Using O.A.L. Gauge with Modified Case
We’ve noticed that many folks have trouble getting reliable, consistent results when they first start using the Hornady O.A.L. Gauge (formerly the Stoney Point Tool). We’ve found this is usually because they don’t seat the modified case properly and because they don’t use a gentle, consistent method of advancing the bullet until it just kisses the lands.
Here is our suggested procedure for use the O.A.L. Gauge. Following this method we can typically make three of four measurements (with the same bullet), all within .001″ to .0015″. (Yes, we always measure multiple times.)
1. Clean your chamber so there is no build-up of carbon, debris, or lube. Pay particular attention to the shoulder area.
2. Screw the modified case on to the O.A.L. Gauge. Make sure it is seated firmly (and doesn’t spin loose). Note, you may have to re-tighten the modified case after insertion in the chamber.
3. Place your selected bullet so that the ogive (max bullet diameter) is behind the case mouth. This prevents the bullet from “snagging” as you insert the tool in the action.
4. Insert the O.A.L. Gauge into your chamber smoothly. Push a little until you feel resistance. IMPORTANT — You need to ensure that the shoulder of the modified case is seated firmly against the front of your chamber. You may have to wiggle and twist the tool slightly. If you do not have the modified case seated all the way in, you will NOT get a valid measurement.
5. Advance the bullet slowly. (NOTE: This is the most important aspect for consistency!). Push the rod of the O.A.L. tool gently towards the chamber. DON’T shove it hard! Easy does it. Stop when you feel resistance.
6. IMPORTANT. After gently pushing on the rod, give the end of the rod a couple forward taps with your finger. If your bullet was slightly skewed, it may have stopped too far back. Adding a couple extra taps will fix that. If the bullet moves after the taps, then again push gently on the rod. NOT too much! You just want to push the bullet until it just “kisses” the lands and then stops. Do NOT jam the bullet into the rifling. If you do that you will never get consistent results from one measurement to the next.
* For a $15.00 fee, Hornady will make a custom modified case for you if you send two fired pieces of brass. Send fired cases and $15.00 check to: Hornady Manufacturing, Attn: Modified Cases, 108 S. Apollo St., Alda, NE 68810. More Info HERE.
Our friend Robert Whitley of ARX Enterprises LLC has learned, through careful measurement and testing, that some barrels threaded 5/8″ x 24 tpi at the muzzle may not deliver optimal accuracy. The reason is that the end of the barrel can bell out slightly, like a trombone, because too much steel has been removed. This is particularly true with .30-caliber barrels, but it can also be a problem with smaller caliber barrels (even 6mm). Robert demonstrates this phenomenon in the video below. All gunsmiths, and anyone considering threading a barrel, should watch the video. At 1:00 – 1:30 Robert gauges a 5/8″ x 24-threaded .30-Caliber barrel. You can see the belling effect clear as day.
“When setting up a commercial barrel in the lathe, we noticed that the maximum-sized bushing that would fit in the bore at the chamber end was almost .0015” smaller [than what would fit] at the muzzle. That precipitated my pin-gauging of a number of different commercial barrels that were threaded for 5/8” x 24 tpi. What I found is what’s shown on the video.” – R. Whitley
Solve Problem with a Larger Thread Diameter
If 5/8″ x 24 threading is potentially harmful to accuracy, is there a solution? Yes, you simply need to leave a little more steel on the barrel. (See Video starting at 02:40.) Frank Green of Bartlein barrels states: “We get these questions all the time. I say run the largest thread diameter that is possible.” Robert Whitley has found that a 3/4″ x 28 tpi threading does not cause the “belling effect”. Accordingly Robert recommends 3/4″ x 28 if you need to thread your barrel for a muzzle brake or suppressor. Robert explains: “We only make 3/4” x 28 tpi muzzle brakes and that’s what we recommend to customers.”
“See how much meatier the 3/4″ threading is vs. the 5/8″. The 3/4″ threading offers a lot more metal around the bore. There’s a lot less opportunity for the bore to become bell-mouthed…” – Robert Whitley
Barrel Threading Diameter — What’s Important to Know By Robert Whitley
In truth, the 5/8” x 24 tpi threading never came out of any accuracy-based think tank or set-up, it’s a military .30-Cal threading for barrels that someone has to carry around (they needed to keep the barrel weight down so it was smaller in diameter and the threading had to work with that situation). People have somehow assumed because the military uses that threading for certain things that it must mean that it’s also fine for a highly accurate rifle too, but that’s not really correct.
I don’t think there is any better and realistic option than the 3/4” muzzle threading, and we also do it so there is no relief cut behind the threads on the barrel (i.e. put the relief cut on the brake or jam nut, don’t chop down on the muzzle of the barrel). For some reason many have a hard time grasping that the metal at the muzzle end of a rifle is “sacred” and you should not cut it down any more than absolutely necessary. A little threaded pencil diameter nub on the end of a barrel is not ideal for accuracy especially if it’s threaded and you need to torque on it. I cringe when I see a barrel with something like an MTU or Heavy Varmint contour, only to have an itty-bitty pencil thin threaded nub right at the muzzle so someone can “screw on a can” or a muzzle brake.
Lessons Learned Over the Years
A number of years ago I did a 30BR rifle project with Craig Kostyshyn who was big in the 30BR game and he made some of the best 30BR rifle barrels for benchrest competition. When I did the project I wanted a medium-heavy Palma type contour barrel I could use and also have a muzzle turndown for a front sight band. When he found out I was going to have the muzzle turned down he said “whoa, I need to provide for that when I make the barrel because if you turn the front down later you’ll be shooting a trombone” (i.e. the muzzle bore dimension would open up).
What he did was rough contour the barrel with the turndown (about .010” oversize) before he lapped the barrel, then when he lapped the barrel he took it easy in the muzzle area and worked the back of the barrel more. I thought he was a little bit excessive in his concerns but the barrel shot great and I wasn’t going to argue with him, after all he was shooting groups in the ones. I kind of just filed that away and never thought about it until recently when I went to have Fred from Sabreco do some chamber re-work on a commercial .30-caliber barrel I had. When setting up the barrel in the lathe and indicating things Fred noticed that the maximum-sized bushing that would fit in the bore at the chamber end was almost .0015” smaller [than what would fit] at the muzzle and he mentioned it to me. That precipitated my pin- gauging of a number of different commercial barrels I had that were threaded for 5/8” x 24 tpi. What I found is what’s shown on the video.
NOTE: This is a copyrighted article. Do not reproduce or re-link more than 75 words without written permission from AccurateShooter.com.
These days, everything is “tactical”. Along with tactical rifles, there are tactical shoes, tactical lunch-boxes, tactical seat-covers, and yes, even tactical bacon. So we guess it’s no surprise that the tactical community now has it’s own pay-to-play talkline, 1-900-TAC-TALK, modeled after those “adult” chatlines where you pay by the minute for a little aural stimulation. With the new Operator Hotline you won’t hear sexy girls talk. Instead the “operators standing by” are, well, “operators” in the tactical sense. For just $3.99 per minute you can talk about tactics, weapons, and gear. On special request, the chat hosts will even work the actions of real weapons. The Operator Hotline claims that all comms are secure so you can reveal your “deepest, most secret tactical fantasies”.
Preview the Operator Hotline in this Video (No Charge)
The Operator Hotline is a pay-per-minute interactive phone service. For just $3.99 per minute you can “talk tactical” with real operators decked out in full tactical gear. Why anyone would want to do that is beyond us. But this new service has proven very popular with young American males.
Tactical Products — Why They Appeal to Men
Tom Clopin, a product designer for a major outdoor company, wasn’t surprised that a fantasy chat-line has been launched, given the fact that tactical products are sold to fulfill macho role-playing fantasies. The designer told us: “You have to understand something. Most products are sold on image not function. Tactical gear is no different. In fact this market is more about costume play and gear fetishism than it is about function or utility. Make something look sort-of milspec, put a bunch a useless loops on it and call it tactical, and it will sell. Selling Molle gear to wannabee operators is just like selling leather chaps to Harley-riding, wannabee land pirates.”
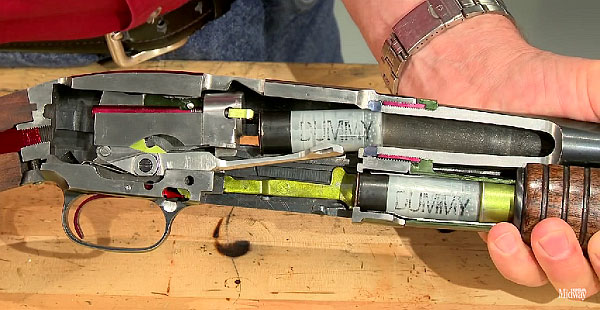
Even wonder how a pump shotgun works? Then watch this fascinating video from MidwayUSA. The operation of a pump-action shotgun is illustrated with a special cut-away version of a Winchester Model 12. The shotgun has been modified to reveal the inner workings. This cut-away Model 12 still loads and ejects dummy shells, but you can see how the lugs, slides, locks, ramps, springs and other internal parts work. You’ll be amazed how complicated this old pump-gun is. (The Model 12, Winchester’s first hammerless shotgun, is one of the most popular scatterguns ever made. Over 2,000,000 were sold.)
Skip Ahead to 3:00 to See Cut-Away in Action
To see how the Model 12 works, you can skip forward to the 3:00 minute mark in the video. The first part of the video shows how the Model 12 was “sliced and diced” to expose the inner workings. Larry Potterfield of MidwayUSA explains that “the factories often used cut-aways as sales tools to show how a specific model operated”. In addition the U.S. Military used cut-aways for training purposes.
Here is the cut-away completed. Even the pump grip has been sliced to reveal the inner workings.
Here’s a close-up, showing how the bolt retracts to eject a round.
A round has been picked up from the feed tube, and then is lifted into the chamber.
In most parts of the country it’s still too early for a prairie dog safari. Spring has barely sprung, and the critters haven’t come out to play. If you are missing the fun of a prairie dog hunt, here’s an arcade-type shooting game that lets you blast the critters to your heart’s content. Just use your mouse to move the crosshair and click to shoot. A hit on a can is worth one point, a hit on a prairie dog is worth two.
Hint: Try re-centering the crosshair after each shot — that way you never have to move more than halfway across the screen when the p-dog pops up. Go to it and have fun!
WARNING: LOUD AUDIO with SHOOTING NOISES!! If you click on this link, a page will load and very loud audio starts running automatically. If you are at work, turn down your speakers!
NOTE: When the new page loads, if you click “Play Game” the loud talking will stop.
We know many of our readers live on farms or ranches. When driving around these properties you may want to keep a firearm handy for pest control or to deal with feral animals. If you live in the country, chances are good you have utility vehicles — such as ATVs, Gators or tractors — and transporting guns safely to allow for easy access is essential. In this video, American Handgunner magazine Editor Roy Huntington highlights some inexpensive solutions for safely transporting guns on various outdoor utility vehicles. Roy shows set-ups for an E-Z-Go Cart, a Honda 4×4 ATV, and a John Deer tractor. Of course, as Huntington explains, always practice the four firearm safety rules. Roy cautions that you should never transport a shotgun or rifle with a round in the chamber, and be very careful when getting in or out of the vehicle if you have a gun in your hands.
New Polaris ATV Features Non-Pneumatic Tires
If you’re thinking about buying a ranch or hunting vehicle, here’s something to drool over — the new Sportsman WV850 H.O. from Polaris. This hard-working ATV features non-pneumatic tires, which employ a lattice structure developed for the U.S. military. The Sportsman WV850 H.0. features 600-lb load-carrying capacity (on stout steel racks), power steering, and a massive 11.75 gallon gas tank. That’ll get you out into the backwoods!
American Handgunner video find by EdLongrange. We welcome reader submissions.
You’ve got to hand it to those crazy Canucks — they’ve managed to combine the quintessential Canadian sport, Ice Hockey, with skeet/trap shooting. This is just the thing to do with a good friend on a sunny winter’s day with snow still on the ground.
Watch Video — See Girl Shoot Clay Flung with Hockey Stick
Here’s how it works. A launcher is set up with a sheet of cardboard on a snow ramp. A clay pigeon is placed at the base of the ramp. Then the “flinger”, armed with a regulation hockey stick, sends the clay pigeon up the snow ramp and into the air. (Follow-through is important.) Then it’s just like regular skeet shooting. The shooter brings scattergun to bear and tries to hit the clay on the fly. With a good hit, it disintegrates in a black puff.
Kudos to Canada’s Danielle Bergen and her sharp-shooting friend for producing a great video. Overhead views were filmed with a camera-equipped flying drone.
Skockey in the Winter Olympics?
We wonder how this combo-sport was invented (large quantities of Molson Beer may have been involved we suppose). This new hybrid sport doesn’t have an official name yet. We suggest “Skockey” (“skeet” + “hockey”). Whatever you call it, we like this new sport. Who knows, maybe we’ll see Skockey in the Winter Olympics some day.
This video will give you chills (starting at about the 0:25 mark). We need to remember to follow all the firearms safety rules, and apply them all the time. At the range, all it takes is one brief moment of inattention to create a life-threatening situation. Never assume the downrange area is safe. Use your own eyes and ears.
This video shows a competitor shooting a stage at an action pistol match. He starts when instructed by the Range Safety Officer (RSO). But unbeknownst to both RS0 and competitor, a volunteer is downrange working on targets. Watch carefully. At 0:27 the shooter sweeps left to right, engaging a paper silhouette target to his right. Then, at 0:30, as he begins a mag change, his head turns downrange. A few yards away is a white-shirted range worker! The shooter yells “Hey what’s going on?!”
What’s going on indeed… The RSO should have ensured that nobody was downrange before the shooter even stepped up to the firing line. If other competitors standing to the side had been alert, they might have seen the worker changing targets and called for a halt. And the target-worker himself — even if he was wearing earmuffs, he should have noticed that live fire had commenced just yards away…
We also have to wonder about the stage design. This set-up made it very difficult to see downrange. The white panels (see 0:10-0:20) definitely hid the target worker from view. In hindsight, given the way the stage was laid out, this was truly an “accident waiting to happen”. It’s fortunate that no one got injured in this incident. But this chilling video provides a lesson to all shooters — “Safety First”.
How could this “near-fatality” have been averted? Post your comments below.
In the above video, a spokesman for Horus Vision explains how and why scopes can experience zero shift. First, just cleaning the gun can cause a small shift in point of impact. Second, when you re-tighten rings and ring bases, this can cause a change in zero. Horus recommends that you use a torque wrench to confirm that you maintain the same torque settings each time. The same goes for action screw tension — tensioning your action screws can shift the point of impact.
Other factors that can cause a change in zero:
Temperature
Dramatic ranges of temperature will change your zero, because the air density affects the velocity of the bullet. With increased temperature, there may be a higher velocity (depending on your powder).
Gun Handling and Body Position
You rifle’s point of impact will be affected by the way you hold the gun. A “hard hold” with firm grip and heavy cheek weld can give you a different POI than if you lightly address the gun. Even when shooting a benchrest gun, the amount of shoulder you put into the rifle can affect where it prints on paper.
Type of Rifle Support — Bench vs. Field
Whenever you change the type of rifle support you use, the point of impact can shift slightly. Moving from a bipod to a pedestal rest can cause a change. Similar, if you switch from a mechanical rest to sandbags, the gun can perform differently. That’s why, before a hunt, you should zero the gun with a set-up similar to what you would actually use in the field — such as a rucksack or shooting sticks.
Transportation of Firearms
Even if you don’t mishandle your weapon, it is possible that a shift of zero could occur during transport. We’ve seen zero settings change when a tight plastic gun case put a side load on the turrets. And in the field, if the turret knobs are not covered, they can rub against clothing, gear, storage bags, scabbard, etc. If the knobs turn, it will definitely move your reticle slightly and cause your point of impact to be off.
You’ve probably heard the term “Terminal Ballistics”. But do you really know what this refers to? Fundamentally, “Terminal Ballistics” describes the behavior of a projectile as it strikes, enters, and penetrates a target. Terminal Ballistics, then, can be said to describe projectile behavior in a target including the transfer of kinetic energy. Contrast this with “External Ballistics” which, generally speaking, describes and predicts how projectiles travel in flight. One way to look at this is that External Ballistics covers bullet behavior before impact, while terminal ballistics covers bullet behavior after impact.
The study of Terminal Ballistics is important for hunters, because it can predict how pellets, bullets, and slugs can perform on game. This NRA Firearm Science video illustrates Terminal Ballistics basics, defining key terms such as Impact Crater, Temporary Cavity, and Primary Cavity.
External Ballistics, also called “exterior ballistics”, is the part of ballistics that deals with the behavior of a non-powered projectile in flight.
Terminal Ballistics, a sub-field of ballistics, is the study of the behavior and effects of a projectile when it hits its target.


 These days, everything is “tactical”. Along with tactical rifles, there are tactical shoes, tactical lunch-boxes,


 In most parts of the country it’s still too early for a prairie dog safari. Spring has barely sprung, and the critters haven’t come out to play. If you are missing the fun of a prairie dog hunt, here’s an arcade-type shooting game that lets you blast the critters to your heart’s content. Just use your mouse to move the crosshair and click to shoot. A hit on a can is worth one point, a hit on a prairie dog is worth two.


