This week’s episode of Shooting USA TV, the first of the new year, is definitely worth watching. The lead story focuses on the 35th Annual Bianchi Cup — the richest and most prestigious match in the handgun shooting sports. Competitors shoot four stages over a three-day period, and everyone aims for that perfect score: 1,920. Watch this episode on Wednesday, January 7, 2015 to see the world’s best handgunners in action.
The Legendary Lee Enfield
This week, Shooting USA also features the Lee Enfield MK III, also known as the SMLE for “Short Magazine Lee Enfield”. Introduced in 1907, the SMLE was the primary British infantry weapon during WWI. The Lee Enfield’s speed of cycling, versatility, and reliability made it one of the great 20th-Century battle rifles. “I’ve never read a disparaging word by a WWI British soldier against his Enfield,” says Firearms Historian Garry James. “His government [gave] him a really good firearm.”
Julie Golob Talks About Carry Handguns
In the Pro Tip segment of the January 7th broadcast, Smith & Wesson Pro shooter Julie Golob offers advice for first-time gun buyers. Julie reviews various options among revolvers and semi-automatic pistols. She discusses factors to consider: weight, balance, firepower, ease of use and concealability.
Sharpshooter (and competitive smallbore shooter) Kirsten Joy Weiss tried a special New Year’s trick shot for 2015. In keeping with the festive New Year’s spirit, Kirsten attempted to shoot the cork off a champagne bottle. After a few unsuccessful tries, she managed to hit the cork with at least two shots. But alas the cork did not fly. She actually hit the cork, but it did not release. That was surprising…
Undaunted, Kirsten changed her strategy, aiming for the neck of the bottle. This duplicates the process of “sabering” a champagne bottle — a method of liberating the bubbly by slashing off the end of the neck with a blade. Aiming for the neck of the bottle, Kirsten successfully blew off the top of the bottle. (Apparently, when “sabering” it is actually the pressure within the champagne bottle which does most of the work).
In this NSSF Video, Ryan Cleckner, a former Sniper Instructor for the 1st Ranger Battalion, defines the term, “Minute of Angle” (MOA) and explains how you can adjust for windage and elevation using 1/4 or 1/8 MOA clicks on your scope. This allows you to sight-in precisely and compensate for bullet drop at various distances.
For starters, Ryan explains that, when talking about angular degrees, a “minute” is simply 1/60th. So a “Minute of Angle” is simply 1/60th of one degree of a central angle, measured either up and down (for elevation) or side to side (for windage). At 100 yards, 1 MOA equals 1.047″ on the target. This is often rounded to one inch for simplicity. Say, for example, you click up 1 MOA. That is roughly 1 inch at 100 yards, or roughly 4 inches at 400 yards, since the target area measured by 1 MOA increases in linear fashion with the distance.
This video shows the process of single-point, cut-rifled barrel-making by one of the world’s best barrel manufacturers. See Krieger barrels being made, start to finish. Krieger cut-rifled barrels have set numerous world records and are favored by many top shooters. The video show the huge, complex machines used — bore-drilling equipment and hydraulic riflers. You can also see how barrels are contoured, polished, and inspected.
For anyone interested in accurate rifles, this is absolutely a “must-watch” video. Watch blanks being cryogenically treated, then drilled and lathe-turned. Next comes the big stuff — the massive rifling machines that single-point-cut the rifling in a precise, time-consuming process. Following that you can see barrels being contoured, polished, and inspected (with air gauge and bore-scope). There is even a sequence showing chambers being cut.
Here is a time-line of the important barrel-making processes shown in the video. You may want to use the “Pause” button, or repeat some segments to get a better look at particular operations. The numbers on the left represent playback minutes and seconds.
This article originally appeared in Sinclair Intl’s Reloading Press Blog, which has been merged into the Gun Tech Section on Sinclair’s website, www.SinclairIntl.com
Steps to Minimize Bullet Run-Out
Poor bullet run-out can cause poor and inconsistent accuracy, and variations in bullet velocities. The truer the loaded round, the more consistent your results will be on paper and across the chronograph.
Measuring Concentricity
We all know that low run-out is the goal. But how can you tell if your run-out is high or low? Run-out is generally measured in thousandths of an inch with a concentricity gauge. There are many concentricity gauges to choose from that work well. Some work on loaded rounds only, some have a bullet straightening feature, and a few work on both loaded rounds and empty cases for checking case neck concentricity. The tool of choice for the Sinclair Reloading Tech Staff is the Sinclair Concentricity Gauge (Part # 09-175).
This tool is a mainstay on my bench, and it is used about as much as I use my reloading press! The tool uses two sets of bearings that are set on lateral, length-adjustable anodized aluminum blocks to accommodate cartridges from .221 Fireball-sized cases up to .50 BMG. The indicator is set on a height adjustable swiveling base on a stand that can be used for checking bullet or case neck run-out. The adjustable blocks ride aligned in a precision-milled slot. The entire set up is on an anodized base plate that gives excellent support during the process that is crucial to operation and accuracy. Basically the operation consists of placing a loaded round (for checking bullet run-out) or an empty case (for case run-out) on the bearings with the indicator end touching the chosen point to be measured. The case is easily spun with one finger as the indicator measures the amount of run-out. Once this process has been done a few times it is a fast and accurate means of measurement. In terms of indicator type being used, whether dial or digital, I actually prefer a standard dial indicator over the digital type. My reason for this choice is that you can see the needle jump when run-out is present. I believe this to be easier and faster than looking at digital numbers while measuring. In the video below, Sinclair’s Bill Gravatt shows how to use the Sinclair Concentricity Gauge correctly.
Sizing Steps to Minimize Run-Out
One of the most common steps in the reloading process that contributes to bullet run-out occurs is the sizing operation. If improper techniques are used or there are issues with the sizing die set up, a once perfectly concentric case can become out of whack. By using the proper dies for your application, properly setting up the die/shell holder or floating the de-capping/expander assembly, you can eliminate problems before they happen.
Many of us on the technical staff choose the Redding Type-S series of dies. These are full-Length or neck sizing dies that utilize a removable/changeable neck bushing (sold separately) to size the neck according to your application. These dies are machined with true precision and quality in mind. The Type-S dies come with a standard de-capping assembly with a caliber-specific expander ball in place. In addition to this an undersized retainer to hold the de-capping pin is included with the die. In my experience with these dies I use the standard expander ball with new, unfired brass on the initial re-size. I will then use the undersized retainer in place of the expander ball with brass that has been fired. I have found this step crucial in my reloading regiment to minimize bullet run out. The use of the expander ball can cause a few thousandths of run-out when the case is being pulled back out of the sizing die. With the undersized retainer in place the only thing that touches the neck of the case in sizing is the bushing. If you prefer to use an expander ball, Redding offers caliber specific carbide floating expander balls that fit on the de-capping rod. This free floating expander ball will self center on the case neck, and reduce the amount of run-out that can be caused by a standard expander ball.
When setting up a Type-S sizing die, set the neck bushing into the die with the numbers facing down toward the body of the die. Tighten the de-capping assembly until it contacts the bushing and then back it off ¼ of a turn. This allows the bushing to free float in the die. You should be able to hear the bushing rattle if you shake the die. Having the bushing free floating self centers the neck, and again minimizes any run-out that can occur.
If you prefer other brands of sizing dies there are a few tricks that people use to minimize run-out as well. Many reloaders claim that the use of an O-ring at the base of the de-capping assembly lock nut will float the assembly and help self center during sizing. Another trick that has been used is to remove the retaining pin on the shell holder slot on the press ram, and use an O-ring in its place to hold the shell holder in place. This allows the shell holder to self center during sizing as well.
Seating Steps to Minimize Run-Out
Run-out issues can arise during the bullet seating process. To reduce run-out during seating, use a high-quality die with a sliding sleeve. The sliding sleeve perfectly aligns the case with the bullet to be seated. Good examples of these dies are the Redding Competition Micrometer bullet seating dies, Forster Ultra Seaters, or RCBS Competition Seating dies. All of these dies utilize a micrometer top to precisely set seating depth. They are all very high quality dies that have tight tolerances to maximize bullet straightness during seating.
We receive many questions about seating long pointed bullets such as the Berger VLD or Hornady A-Max. One problem that the reloader faces with longer bullets is that they are so long that the standard seating stem is not machined deep enough to contact these bullets properly. The point of the bullet “bottoms out” in the stem and the result is off-center seating and/or rings and dents on the bullet nose. If you plan on using such bullets, you should purchase a “VLD” style seating stem, which is cut to accommodate the longer bullets. The use of this stem results in truer seating of the bullet without leaving a ring or marring the tip of the bullet.
Besides using a traditional press and threaded seating die, another great way to get a true bullet seat is by using an arbor press and Wilson chamber-type seating die. These dies are cut to very tight tolerances and have proven themselves as the main choice for bench rest enthusiasts. The design of the die positively aligns the case with the bullet as they are both captured by the die before the bullet is pushed straight into the case by the stem. These seating dies are available with the standard seating cap and stem or an additional micrometer top can be added for precise adjustment. Wilson also offers a stainless seating die with an integral micrometer seating head.
Finally another trick used by many in the seating process is to turn the case while the bullet is being seated. Some people claim this will keep things straight. What they do is raise the ram in increments while seating and rotate the case in the shellholder in increments of 90 degrees from the original starting while the bullet is being seated. Personally I have tried this and have seen no significant difference at all. However you may be the judge of this one. It makes sense, and maybe I should try this a little more before I rule it out.
After the Rounds Are Loaded — Batch Sorting by Concentricity Levels
No matter how meticulous you are, and no matter how good your components and tools are, run-out will still show up. Reloaders can drive themselves crazy trying to make each and every loaded round a true “0” in run-out. You will still see some minimal amount no matter what you do. Set yourself a standard of maximum allowable run-out for your loads. For instance for my Long Range 600- and 1000-yard F-Class loads I like to see .002” or less. I average .0015” and see a few in the range up to .004”. I spin each loaded round on my Sinclair Concentricity Gauge and sort them by run-out. Those that run over .002” I use for sighters or practice. Though achieving zero run-out (on every round) isn’t possible, minimizing run-out can definitely help your performance. Not only will your loads shoot better but you will have one less thing to worry about when you are lining up the sights on the target.
Want to watch some very cool super-slow-motion videos of projectiles drilling bugholes and blasting through stuff? Then check out these videos from Remington’s R&D Center. We guarantee you’ll be entertained. You’ll find some truly amazing high-speed videography. Many video sequences are captured with ultra-high-speed cameras running hundreds of thousands of frames per second. This allows stunning slow-motion playback.
You’ve no doubt heard the term “tack-driver”. Are there rifles that really drive tacks? Well Remington has given us something just as good — a “nail driver”. In the video below, you can see a bullet “hit the nail on the head”, driving a nail into the target. Very cool indeed…
Driving Tacks — Hitting Nailheads with Bullets (Slow Motion)
Remarkable High-Speed Photography Shows Bullet Performance
You can see some amazing things — bullets busting concrete blocks, smashing through wood, drilling ballistic gelatin, and tearing through skin and gel (so you can see how bullets would perform in game animals). Our favorite sequence shows five shots forming a nice, clustered group — you can actually see the bullets fly into the paper target one after another. Here are some of the video highlights.
Five Shots with .30-06 into Paper (Slow Motion)
Busting Concrete Blocks with Bullets (Slow Motion)
Bullets Penetrate through Skin and Gelatin (Slow Motion)
Dances with Gel (Slow Motion)
Story tip from EdLongRange. We welcome reader submissions.
If you do anything on our site today, watch this movie from Beretta, start to finish. Among the scores of videos we have featured in 2014, this movie, entitled “Human Technology”, is certainly a candidate for “Video of the Year”. It’s that good. You’ll see an amazing blend of ultra-modern manufacturing technology along with old-world artisanship — “a mesmerizing meld of the high-tech and the traditional”. (Quoting Daniel Xu, Outdoor Hub.)
“Human Technology is a singular and symbolic movie, its cast entirely made up of Beretta workmen, thus illustrating the perfect synthesis between craftsmanship and technology,” Beretta writes. This artistic movie by Ancarani Studio illustrates all the aspects of the manufacturing of a high-end Beretta shotgun. This video is a study in contrast. The movements of robotic assembly machines are juxtaposed with the centuries-old craftsmanship of stock carvers. Beautifully filmed and edited, this video will amaze and entertain anyone who loves fine firearms. (Full-screen HD Recommended.)
Zoom for Best Viewing
We strongly suggest you watch this excellent video in 720p or 1080p High-Definition, Full-Screen Mode. To do this, after starting the video, click the gear icon and select 1080p (or 720p if you have a slower connection). After setting the resolution, click the four-corner box to enter Full-Screen Mode. When you’ve finished watching the movie, click the “Esc” key to return to your normal browser screen.
Think 3-position shooting is a dull game? You may think differently after watching this “must-see” video from the 2014 European Shooting Championship in Moscow. Great imagery, superb editing, and a stirring sound-track combine into one of the most uplifting shooting videos we’ve seen. If you love competitive shooting, you should watch this video, which features dynamic movement and fast cuts, like a movie trailer. Most footage is from the Women’s Air Rifle competition, but Men’s Air Pistol events are also featured. We recommend viewing in Full-Screen HD. Enjoy!
Watch Video from European Shooting Championship (Movie Trailer Style):
NOTE: Click the Full-Screen Icon to Watch in 720p or 1080p High-Definition.
This video was compiled for the 2014 European Shooting Confederation Championship in Moscow, Russia. This video was posted on the Russian Shooting Union (RSU) YouTube Channel. Music is “Fire of Zeus” by Ryan Amon.
The 6.5 Guys, a dedicated duo of Pacific NW rifle shooters, have created an interesting series of shooting-related videos on their 6.5 Guys YouTube Channel. In this video, The 6.5 Guys set up and demonstrate the Bench-Source cartridge brass annealing machine. The video explains how to set up the machine, how to attach and adjust the torches, and how to “fine tune” the flame and dwell time to achieve best results.
To complement this video, the 6.5 Guys (aka Ed and Steve) have published an Annealing Tech Talk article on 65guys.com. If you own an annealing machine, or are getting started with cartridge annealing, you should read that article. It covers basic annealing principles, and gives useful tips on temp control, dwell time, and frequency of annealing. After the video, we feature highlights from this article.
Temperature Control
We use 750° Tempilaq applied inside the case neck to indicate that the proper temperature has been achieved. If you turn off the lights, you will notice that the brass just barely starts to turn color. As you go beyond the 750° mark we observed that the case mouth will start to flare orange — you can see this with the lights on. From our research, we understand that this is the result of zinc burning off. We adjust the time on our machine between the point that the Tempilaq turns liquid and the flame starts to turn orange. In other words, if the flame is starting to turn orange reduce the time. We let the cases air cool — we don’t quench them in water.
The case starts to flare orange here, during a set-up test. Dwell time was then reduced slightly.
Flame Orientation
We aim the flame at the neck-shoulder junction. Some folks like to aim it at the neck and others the shoulder. When you see how the two flames meet and spread out vertically, it probably doesn’t make that much of a difference.
Here you can see the flame points aimed at the neck-shoulder junction.
Case Coloration
Cases will turn color after annealing, but the degree of color change is not a reliable indicator. We have noticed that the appearance of cases will vary depending on brass manufacturer, brass lot, light source, and how long ago the case was annealed.
How Often Should You Anneal?
Some shooters anneal every time while others choose a specific interval. We noticed work hardening around five firings that resulted in inconsistency in shoulder setback and neck tension, so we choose to anneal every three firings. Your mileage will vary depending on how hot your loads are and how aggressively you resize.
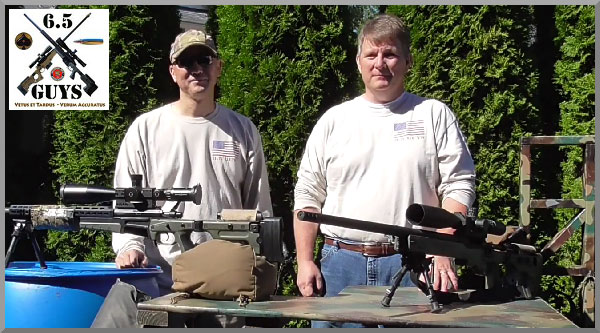
Who are the 6.5 Guys? They are Ed (right) and Steve (left), a pair of avid shooters based in the Pacific Northwest. They have released 22 Videos on the 6.5 Guys YouTube Channel.
Chris Cheng, Top Shot Season 4 Champion, has launched a new weekly series of YouTube webcasts, The Second Scoop. Each week Cheng will provide a timely mix of Second Amendment news, gun-related gear reviews, and marksmanship topics. Cheng’s Second Scoop commentaries offer insight, a bit of humor, and “first looks” at new shooting sports products.
In this Thanksgiving week edition of The Second Scoop, Chris focuses on the Ferguson, Missouri Grand Jury decision which spurred violent riots. Then Chris explains the impact of a court decision on California’s waiting periods for firearm purchases. In his “gear talk” segment, Chris talks about the brand new Taurus Curve, an innovative .380 ACP compact carry gun. With a distinctive curved frame, this little “equalizer” is the first-ever production pistol with integrated LED lights and a targeting laser.
Chris releases a new Second Scoop video each Tuesday. Watch all of Cheng’s Second Scoop webcasts (as well as his gun review videos) on the Top Shot Chris Cheng YouTube Channel.


 Sharpshooter (and competitive smallbore shooter) Kirsten Joy Weiss tried a special New Year’s trick shot for 2015. In keeping with the festive New Year’s spirit, Kirsten attempted to shoot the cork off a champagne bottle. After a few unsuccessful tries, she managed to hit the cork with at least two shots. But alas the cork did not fly. She actually hit the cork, but it did not release. That was surprising…
 Measuring Concentricity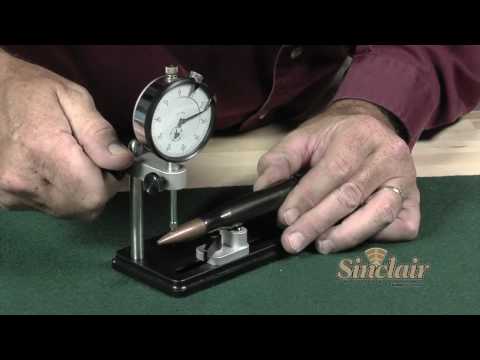
 Many of us on the technical staff choose the Redding Type-S series of dies. These are full-Length or neck sizing dies that utilize a removable/changeable neck bushing (sold separately) to size the neck according to your application. These dies are machined with true precision and quality in mind. The Type-S dies come with a standard de-capping assembly with a caliber-specific expander ball in place. In addition to this an undersized retainer to hold the de-capping pin is included with the die. In my experience with these dies I use the standard expander ball with new, unfired brass on the initial re-size. I will then use the undersized retainer in place of the expander ball with brass that has been fired. I have found this step crucial in my reloading regiment to minimize bullet run out. The use of the expander ball can cause a few thousandths of run-out when the case is being pulled back out of the sizing die. With the undersized retainer in place the only thing that touches the neck of the case in sizing is the bushing. If you prefer to use an expander ball, Redding offers caliber specific carbide floating expander balls that fit on the de-capping rod. This free floating expander ball will self center on the case neck, and reduce the amount of run-out that can be caused by a standard expander ball.
 Want to watch some very cool super-slow-motion videos of projectiles drilling bugholes and blasting through stuff? Then check out these videos from


 Zoom for Best Viewing


 The 6.5 Guys, a dedicated duo of Pacific NW rifle shooters, have created an interesting series of shooting-related videos on their