The LEE Hand Press Kit comes complete with: Breech Lock Hand Press, Ram Primer fittings, Powder Funnel, Case Lube, and one Breech Lock Quick Change Bushing.
The LEE Breech Lock Hand Press is a useful addition to any reloader’s tool collection. This Hand Press allows you to resize brass or seat bullets while at the range or away from your loading room. No it won’t replace your Co-Ax or Rockchucker, but this is a handy piece of gear. And it’s very affordable. Midsouth sells the LEE Breech Lock Hand Press Kit, with everything shown above, for $68.99. Or you can buy just the Hand Press by itself for $52.99 at Titan Reloading. That’s a great deal.
LEE Hand Press Quick-Change Die Functionality
This LEE Press includes the Breech Lock Quick-Change Die Feature, so you can instantly change dies with just a twist of the wrist. One Breech Lock Quick Change Bushing is included. The Breech Lock Hand Press is light and compact. It tips the scale at a mere 1 3/4 pounds and overall product length is 11.5″. Note: the maximum overall length cartridge the LEE Hand Press can accept is 3.650 inches.
While we don’t recommend the Hand Press for major full-length sizing chores, it does a good job seating bullets. This makes it a handy “field expedient” tool when doing load development at the range. For example you can experiment with seating depth by loading a batch of cartridges at home with the bullets deliberately seated long. Then, at the range, you can re-seat the bullets progressively shorter (in a series of rounds), until you find the optimal Cartridge OAL.
LEE’s Hand Press is also great for decapping operations. One verified buyer reports: “I mostly use it for decapping while watching TV, with a universal decapper die. Of course it is also useful for other operations. I wouldn’t love sizing large rifle cases with it, but if you’ve prepped your cases on a bigger press you could comfortably take it to the range for load development, one round at a time, working right there at the line instead of making a bunch of loads at home that you’ll have to disassemble later. It’s smaller and more lightweight than it looks[.]”
Using LEE Hand Press to Load at the Range
To learn more about using the LEE Hand Press in the field with a compact scale, read Reloading Without a Bench on GunsAmerica.com. Author Christopher Mace explains: “Whether you want a better way to do load development, the capability to reload out of your ‘bugout bag’, or you’re short of space but wanting to get into reloading, the LEE Loaders and the LEE Hand Press offer you some options.”
In discussions of ballistics, you’ll see references to “tangent”, “secant”, and “hybrid” bullet shapes. We know that, for many readers, these terms can be confusing. To add to the confusion, bullet makers don’t always identify their projectiles as secant or tangent designs. This article provides a basic explanation of tangent, secant, and hybrid ogive bullet designs, to help you understand the characteristics of these three basic bullet shapes.
Tangent vs. Secant vs. Hybrid
Most match bullets produced today use a tangent ogive profile, but the modern VLD-style bullets employ a secant profile. To further complicate matters, the latest generation of “Hybrid” projectiles from Berger Bullets feature a blended secant + tangent profile to combine the best qualities of both nose shapes. The secant section provides reduced drag, while the tangent section makes the bullet easier to tune, i.e. less sensitive to bullet seating depth position.
Berger Bullets ballistician Bryan Litz explains tangent and secant bullet ogive designs in a glossary section of his Applied Ballistics website, which we reprint below. Bryan then explains how tangent and secant profiles can be combined in a “hybrid” design.
How Bullet Ogive Curves are Defined
While the term “ogive” is often used to describe the particular point on the bullet where the curve reaches full bullet diameter, in fact the “ogive” properly refers to the entire curve of the bullet from the tip to the full-diameter straight section — the shank.
Understanding then, that the ogive is a curve, how is that curve described?
LITZ: The ogive of a bullet is usually characterized by the length of its radius. This radius is often given in calibers instead of inches. For example, an 8 ogive 6mm bullet has an ogive that is a segment of a circular arc with a radius of 8*.243 = 1.952”. A .30-caliber bullet with an 8 ogive will be proportionally the same as the 8 ogive 6mm bullet, but the actual radius will be 2.464” for the .30 caliber bullet.
For a given nose length, if an ogive is perfectly tangent, it will have a very specific radius. Any radius longer than that will cause the ogive to be secant. Secant ogives can range from very mild (short radius) to very aggressive (long radius). The drag of a secant ogive is minimized when its radius is twice as long as a tangent ogive radius. In other words, if a tangent ogive has an 8 caliber radius, then the longest practical secant ogive radius is 16 calibers long for a given nose length.”
Bryan Litz Explains Hybrid Design and Optimal Hybrid Seating Depths
Ogive Metrics and Rt/R Ratio
LITZ: There is a number that’s used to quantify how secant an ogive is. The metric is known as the Rt/R ratio and it’s the ratio of the tangent ogive radius to the actual ogive radius for a given bullet. In the above example, the 16 caliber ogive would have an Rt/R ratio of 0.5. The number 0.5 is therefore the lowest practical value for the Rt/R ratio, and represents the minimum drag ogive for a given length. An ogive that’s perfectly tangent will have an Rt/R ratio of 1.0. Most ogives are in between an Rt/R of 1.0 and 0.5. The dimensioned drawings at the end of my Applied Ballistics book provide the bullets ogive radius in calibers, as well as the Rt/R ratio. In short, the Rt/R ratio is simply a measure of how secant an ogive is. 1.0 is not secant at all, 0.5 is as secant as it gets.
Hybrid Bullet Design — Best of Both Worlds?
Bryan Litz has developed a number of modern “Hybrid” design bullets for Berger. The objective of Bryan’s design work has been to achieve a very low drag design that is also “not finicky”. Normal (non-hybrid) secant designs, such as the Berger 105gr VLD, deliver very impressive BC values, but the bullets can be sensitive to seating depth. Montana’s Tom Mousel has set world records with the Berger 105gr VLD in his 6mm Dasher, but he tells us “seating depth is critical to the best accuracy”. Tom says a mere .003″ seating depth change “makes a difference”. In an effort to produce more forgiving high-BC bullets, Bryan Litz developed the hybrid tangent/secant bullet shape.
While devotees of this site are hard-core accuracy addicts, who normally shoot tiny groups with sophisticated Benchrest and Varmint rifles, we should not overlook the pure fun of shooting a classic iron sights lever-action rifle at reactive targets. Lever guns are fun to shoot, easy to transport, AND they require a lot less maintenance than your modern black rifle.
Drilling a tight 1/4-MOA group is very satisfying. But for simple, basic shooting fun, it’s hard to beat a slicked-up, “race-ready”, Winchester-clone lever gun. In fact, this Editor’s favorite rifle for “fun shooting” is my 20″ Uberti Model 1866 “Yellowboy” Lever gun. Shooting low-recoil .38 Special rounds at steel targets from a standing position offers old-fashioned shooting satisfaction. When I invite a new shooter to the range, I usually bring the 1866 Yellowboy, and let the newbie shoot steel at 50 yards. New shooters (of all ages) love the look and feel of the rifle, and the low recoil. The typical response is: “Wow, that was fun!”.
My rifle features a slicked-up action and lightened trigger. After a “CodyMatic” action job by cowboy gunsmith Cody Conagher, my Yellowboy’s lever can be cycled with just one finger. Trigger pull is about a pound and a half. The high-gloss, blued octagonal barrel is very accurate and the mirror-finish bore cleans up easily.
Based on the Model 1866 Winchester, Uberti’s Yellowboy, and its Model 1873 “older brother”, feature a toggle-link action that is extremely smooth. The toggle action design also keeps the linkages separate from the chamber so the gun runs extremely clean. After firing 100 rounds or more, all you need to do is wipe off the bolt and breech-face with some solvent and run a bore-snake down the bore a few times. To be honest, the Yellowboy is more fun to shoot at steel than my AR Carbine. And maintenance-wise, for every five minutes I spend cleaning the 1866, I’ll spend an hour detail-stripping and cleaning the AR. The shooting-to-cleaning ratio favors the lever gun by orders of magnitude.
These Italian-made Winchester clones are very handsome, with nicely figured wood under a durable clearcoat. You can polish the brass receiver to keep it shiny, or leave it alone to develop an authentic, dulled patina. Uberti’s Model 1873 features a steel receiver with gorgeous color case-hardening.
After the fun factor, what’s the best thing about Uberti lever guns? Resale value. I can sell my 1866 for quite a bit more than I paid for it. Over the past decade, the price of Italian-made Uberti lever guns has been steadily rising. This means that older rifles fetch a premium on the used market.
Thanksgiving, November 28, is just 10 days away. In a few days, a large percentage of Americans will be on the road to visit relatives. We know many of our readers have concealed carry permits or will otherwise be traveling with firearms. When crossing into different states with guns in a vehicle, you need to be mindful of all state and local laws and restrictions.
Five Worst States for Traveling with Firearms
This article appears in the Cheaper Than Dirt Shooter’s Log.
The U.S. is a patchwork of confusing and cumbersome laws that change the rules of what you can carry, where you can carry, and whether you can possess the firearm, ammunition of magazine at without running afoul of the local laws. Now, if every state was like Vermont, law abiding gun owners could freely travel with their firearms with no worries. Unfortunately, many states have a history of being hostile to traveling gun owners.
The federal “Firearms Owner Protection Act” allows travel through any state as long as the firearm is unloaded, in a locked case, and not easily accessible to the passengers. However, that is not to say that certain states that are less friendly to firearms have not created their own laws that would snare unsuspecting otherwise law-abiding firearm owners. This led us to name the Top 5 States to Avoid while traveling with a firearm this holiday season.
CONNECTICUT
Connecticut does not have any gun reciprocity agreements with other states. This means nonresidents are not allowed to carry handguns in Connecticut under a permit issued by another state.
HAWAII
Every person arriving into the state who brings a firearm of any description, usable or not, shall register the firearm within three days of the arrival of the person or the firearm, whichever arrives later, with the chief of police of the county where the person will reside, where their business is, or the person’s place of sojourn. GET Hawaii Firearms INFO HERE.
MASSACHUSETTS
Massachusetts imposes harsh penalties on the mere possession and transport of firearms without a license to carry. Prospective travelers are urged to contact the Massachusetts Firearms Records Bureau at (617) 660-4780 or contact the State Police. GET Massachusetts Firearms INFO HERE.
NEW JERSEY
New Jersey has some of the most restrictive firearms laws in the country. Your firearm must be unloaded, in a locked container, and not accessible in the passenger compartment of the vehicle. The New Jersey Supreme Court ruled that anyone traveling within the state is deemed to be aware of these regulations and will be held strictly accountable for violations. If you’re traveling through New Jersey, the N.J. State Police website provides information regarding transporting firearms within state lines. GET New Jersey Firearms INFO HERE.
NEW YORK
Use extreme caution when traveling through New York state with firearms. New York’s general approach is to make the possession of handguns and so-called “assault weapons” illegal. A number of localities, including Albany, Buffalo, New York City, Rochester, Suffolk County, and Yonkers, impose their own requirements on the possession, registration, and transport of firearms. Possession of a handgun within New York City requires a New York City handgun license or a special permit from the city Police Commissioner. This license validates a state license within the city. Even New York state licenses are generally not valid within New York City unless a specific exemption applies. Possession of a shotgun or rifle within New York City requires a permit, which is available to non-residents, and a certificate of registration.
More Scary States for Gun Owners
Here are six other jurisdictions (five states and DC) where you need to be wary when traveling. California, for example, treats all handguns in vehicles as “loaded” if there is ammunition loaded into an attached magazine. It’s wise, when in California, to have handguns unloaded in a LOCKED case, with all ammunition or magazines in a separate section of the vehicle. These states (and DC) all have laws that can trap unsuspecting gun-owners. Be wary.
California
Delaware
Dist. of Columbia
Illinois
Maryland
Rhode Island
Winter is right around the corner, with December just two weeks away. Even now there is snow on the ground in Montana, Wyoming, Colorado and other northern and mountain states. And a major winter storm is predicted to hit America with snow and cold temperatures ahead of Thanksgiving week travel. Last week Denver had 20 inches of snow — the biggest November snowfall in over 40 years.
If you plan to go shooting or hunting in the weeks ahead, while the weather is below freezing and snow is on the ground, you need to be prepared. You should always have the right equipment and make sure that you can contact help if something goes wrong (such as not being able to start your vehicle).
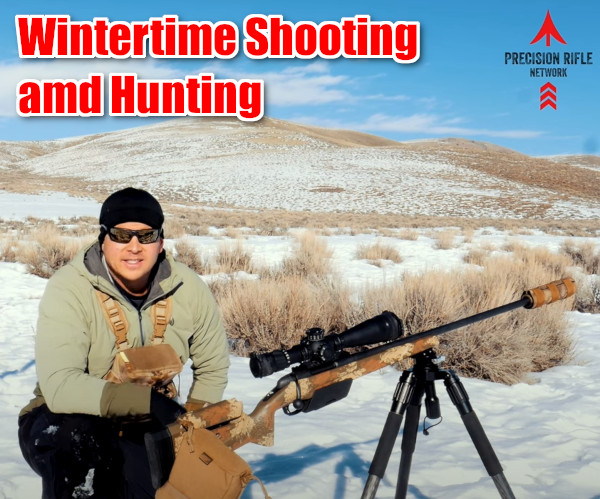
The folks at the Precision Rifle Network have created a good video on winter shooting and hunting. Host Marcus Hom provides his TOP 10 TIPS for wintertime shooting/hunting adventures. We recommend that any 4-season shooter watch this video.
TOP 10 TIPS for Winter Shooting and Hunting:
1. Wear Good Sunglasses — With snow on the ground, wearing sunglasses is a must because of the extra reflected light. You can get good sunglasses that also have ANSI Z87.1-approved impact protection.
2. Wear Protective, Moisture-Proof Clothing — Wear a set of Bibs and a long jacket. This will prevent you from getting snow inside your clothing when shooting prone.
3. Take Care of Your Hands — Bring good winter gloves, preferably with a waterproof outer layer. Make sure the inner gloves can work with your trigger/trigger guard.
4. Bring a Good Tripod — A tripod keeps you elevated so you can avoid laying down in snow or slush. That, in turn, avoids body heat loss. “Keeping out of the snow and shooting from an elevated position is pretty important in the wintertime.”
5. Protect Optics and Action — Keep your scope lenses and action clear of moisture, snow, and fog. You will want to have good caps on both lenses. Make sure the action remains closed, and consider some kind of wrap over the action until you’re ready to load and shoot.
6. Ranging Challenges — Laser range-finders don’t perform optimally with intense, bright, ambient light. Also, if it’s showing you may get false readings from snow particles. So take multiple readings to ensure you have the right distance. Also, if you have a reticle with MOA or MIL marks, and you know the size of your target, then you can range the target with the scope.
7. Drop and Windage Info (DOPE) Chart — Bring a waterproof, hard copy dope chart. Out in the field on cold days, a phone battery dies fast, and you’ll want to preserve that battery for emergency phone use if needed. So, you should keep a good old-fashioned drop chart in a waterproof laminate.
8. Muzzle Velocity Issues — Cold temperatures can lower muzzle velocity. Before you go, get an idea of how your velocity will change with low temperatures. Some powders are more sensitive to temperature than others, causing a noticeable reduction in muzzle velocity. A load you’ve worked out in summer may shoot LOW in winter because the actual velocity is low. Even with a “temperature stable” powder you may see a 10 fps slow-down. Do some winter velocity testing if you can before you go.
9. Keep Your Ammo Warm — A simple way to avoid muzzle velocity changes with low ambient temperatures is to keep you ammunition ON YOUR BODY. Have a pouch under your layered clothing where the ammo can be kept relatively warm. See video: 07:50
10. Safeguard Keys and Valuables — Keep keys and valuables in a secure, zippered pocket. “There is nothing worse than losing something… keys, phone, wallet. It’s really hard to find something when its buried under [many] inches of snow”. We also recommend keeping a spare vehicle key hidden on your car/truck. There are magnetic holders that can keep that spare key secure but safely hidden from view.
Winter Hunting — Success with Snow on the Ground
There has been snow on the ground for much of November in many areas of the country. Hunters have had to cope with the snow and cold temperatures. Our hunting editor, Colton Reid, recently returned from a successful deer hunt in the mountains of Utah. He said it was beautiful, but you needed really high-quality outdoor clothing — otherwise you could get in trouble. You need to stay warm and dry.
With careful planning, and some skilled tracking, Colton had success, making a perfect hit on a buck at 300 yards. The animal dropped instantly. Colton brought back a good harvest of deer meat, which formed part of the Thanksgiving feast for his family.
Colton offered these 5 TIPS for hunters. These apply in any season, but are even more important in winter with freezing temps and snow on the ground:
1. Have a Plan — know where you plan to go and when. Try to be where you want in the early morning and early evening hours when deer are likely most active.
2. Take Your Time — If you spot a deer and get too excited and don’t take your time you may spook him. Go slow and glass. If possible, wait for the animals to bed down and relax. Then work out the best way to approach your prey. Remember, “You get so few opportunities, don’t screw it up!”
3. Glass More, Walk Less — Let your eyes do the walking — get good binoculars and use them. With their heightened senses of smell and hearing, deer/elk are able to spot you way better than you can spot them. If you are walking around a lot, chances are you are getting spotted by your prey.
4. Pace Yourself When Packing Out — If you DO succeed, and bring down a big buck, will you be able to dress the animal and carry out the meat? Always be prepared to hike out with extra weight. If you are successful, make sure not to waste the meat you worked so hard for. Choose a pack that can help you carry a heavy load. Remember, this is not an insignificant challenge — you may be carrying 60 to 100 extra pounds in addition to your other gear. Again, take your time. Rest as needed. Don’t hurt yourself.
5. Always Enjoy the Experience — Have fun, and appreciate your hunt, whether you bag a buck or not. It is a privilege to experience the wilderness and to get away from the city. Enjoy it while you’re out there. And keep your spirits up. You may get tired, but remember that ‘comes with the territory’. At the end of the day, yes you may be exhausted. And you may want to quit and go home. But stay positive, stay focused. Be patient, the experience is worth it.
Winter Solace in the Backcountry
There is a nice thread in our Forum appropriately entitled “Winter Time”. You’ll find some great backcountry images taken by our Forum members. Winter is a special time in the outdoors. Forum member JDP explains: “Winter is the best time to shoot! One of the few of life’s ironies that works in my favor. The range is empty and barrels keep cool, no bugs, no waiting on people, no mirage. Yup, this world needs more thin blooded snow birds. This cool weather is terrible and dangerous, tell your friends! Do people get lonely while shooting or something? It’s the true holiday season in multiple ways.”
Forum member DNorton posted: “I live way up north where our white sandy beaches look like this!”
You have probably watched one of the excellent shooting sports videos Ryan Cleckner has done for the NSSF. Ryan’s Understanding Minute of Angle (MOA) video (see below) has been viewed over 3.6 million times! Ryan is noted for his ability to explain complex topics in an easy-to-comprehend manner.
Cleckner has also authored a hugely popular book, the Long Range Shooting Handbook, which expands on the topics covered in his popular video series. This book is the #1 Best Seller on Amazon in its category. You can view Sample Chapters from Ryan’s book — just click “Read Sample” on the Amazon product page.
As a long-range shooting expert, Ryan Cleckner has impressive credentials. Cleckner was a special operations sniper (1/75 Rgr) with multiple combat deployments, and he has served a U.S. Army sniper instructor. Currently he works as a firearms industry executive and attorney.
The Long Range Shooting Handbook is divided into three main categories: What It Is/How It Works, Fundamentals, and How to Use It. “What It Is/How It Works” covers equipment, terminology, and basic principles. “Fundamentals” covers the theory of long range shooting. “How to Use It” gives practical advice on implementing what you’ve learned, so you can progress as a skilled, long range shooter.
Ryan Cleckner’s best-selling Long Range Shooting Handbook is designed as an introduction to important fundamental concepts such as MOA vs. MILs, External Ballistics, and Environmental Effects. Included are personal tips and advice based on Cleckner’s years of experience as a sniper instructor.
Iain Harrison, editor of Recoil Magazine, said: “Whether you’re looking to dip a toe into the complex world of long range shooting, or you’re a seasoned shooter with years of trigger time, Ryan Cleckner’s book will prove to be excellent reference material. Well written and easy to understand, it covers all the essential topics that a well-rounded shooter needs to master.”
In this video, Ryan Cleckner reviews proper technique for rifle shooters. A stable platform, sight alignment, sight picture, and trigger control are key fundamentals to shooting properly.
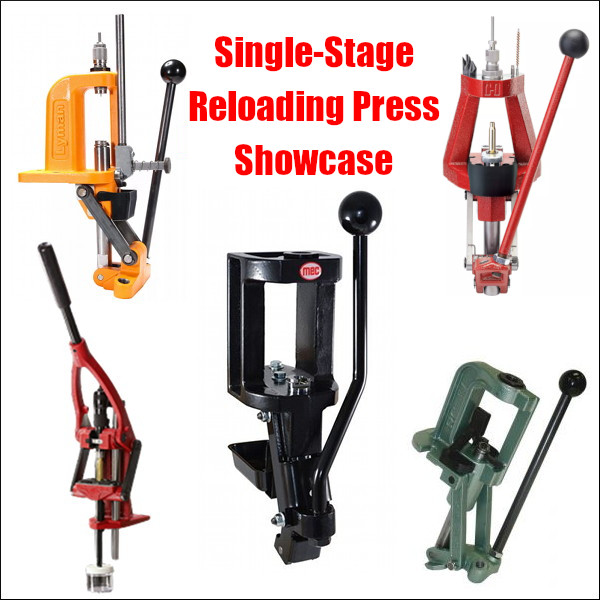
Hand-loaders have never had so many great choices in single-stage presses, with many different configurations and features. There are classic O-Frame presses, Coax-style presses, Open-front presses, Pyramid presses, and compact C-Frame presses. Here is our 2019 Single Stage Press Showcase with products from Forster, Hornady, Lee, Lyman, MEC, and RCBS. We’ve included short videos showing the features of these reloading presses.
If you are shopping for a new press you should look at the various features of each. You may prefer something classic like a Rock Chucker, or the innovative open-front MEC. If you are looking for a compact press to use at the range, the Lyman C-Frame is very impressive for the price. And the Forster Co-Ax remains a great addition to any loading room.
MEC Marksman Single-Stage Press
If you are looking for a new, full-size single-stage reloading press, definitely consider the MEC Marksman. Created by the makers of the popular MEC shotshell reloading systems, the MEC Marksman combines a sturdy cast-iron frame with a modern open-front design. If you are looking for a new, full-size single-stage reloading press, definitely consider the MEC Marksman. Created by the makers of the popular MEC shotshell reloading systems, the MEC Marksman combines a sturdy cast-iron frame with a modern open-front design. With a $245.49 street price, the MEC Marksman press now costs more than an RCBS Rock Chucker Supreme press, but the MEC offers some distinct advantages — such as an open front plus a floating shell-holder system.
Our friend Gavin Gear of UltimateReloader.com got his hands on a MEC Marksman press and put it through its paces. He came away impressed with the product, saying it delivers excellent performance, and has many impressive features. Gavin tells us: “Cast iron tools and machines are a lifetime investment. The made-in-USA MEC Marksman features ductile cast-iron construction, an open-front frame design for easy cartridge access, a new floating shell-holder design with a unique retention system, and ambidextrous handle setup.” MEC also offers a wide selection of accessories for the Marksman press, including a press riser/mount, shell-holder caddy, and die trays.
Forster Co-Ax Press
If you are not yet familiar with the many unique features of the Forster Co-Ax, we recommend you watch the video above, a very thorough video review by Rex Roach. This shows how the press operates and highlights the design elements which set the Co-Ax apart from every other reloading press on the market. This 14-minute video shows the key Co-Ax features, explaining how the floating case-holder jaws work (3:30 time-mark), how the dies are held in place (4:40 time-mark), how spent primers are captured (6:10 time-mark), and how to set the primer seating depth (10:00 time-mark). We’ve used a Co-Ax for years and we still learned a few new things by watching this detailed video. If you are considering purchasing a Co-Ax, definitely watch this video start to finish.
In recent years, Forster Co-Ax® presses have been somewhat hard to find, as demand has out-stripped supply. The Co-Ax has many dedicated fans, given its unique features, such as the floating case-holder jaws, and easy, rapid slide-in/slide-out die placement. We’ve also found that Co-Ax presses load very straight ammo and we like the ability to switch between short handle (good for bullet seating) and long handle (ideal for heavy case-sizing tasks). We also think the Forster Co-Ax has one of the best spent primer capture systems on the market — a straight drop into a removable plastic cup. Simple and it works.
Lyman Brass Smith Victory Single-Stage Press
Lyman’s sturdy Victory Single-stage Press is a full-size unit that competes with the RCBS Rock Chucker Press. With beefy cast iron construction, the Victory’s strength and leverage rivals the Rock Chucker. The press operates smoothly and the handle can be mounted on either side.
If you like to prime cases using a press, this Victory press has a priming system that’s much easier to use than the RCBS Rock Chucker system. The priming tube is right up front, with multiple primers loaded vertically in a tube. Simply push the shuttle at the button of the tube to advance the primer into place.
For convenience, the entire primer-loading system can also be removed so it doesn’t interfere with case and bullet-handling operations. We generally prefer to prime cases separately using a dedicated hand- or bench-mounted tool, but the Victory press does the job nicely.
Overall, the Victory is a great value in a full-size “O-Frame” press with sturdy construction and a solid Lyman warranty. It is available now for $208.52 on Amazon.
RCBS Rock Chucker Supreme Single-Stage Press
Nearly every serious hand-loader has owned or used the RCBS Rock Chucker press. This Editor still uses a Rock Chucker passed down by his brother 20 years ago. And yes, it is still going strong. The latest Rock Chucker Supreme single-stage press features an improved “upside-down Y-path” dual-bin spent primer catcher. Otherwise the Rock Chucker Supreme remains big, strong, versatile and sturdy. It has very strong linkages, with a compound leverage system providing plenty of power — FL-sizing is a breeze even with large, magnum cases. The 1″-diameter ram has 12.5 sq. inches of ram-bearing surface.
Some people may not know that the Rock Chucker offers a secondary 1 1/4″ x 12 thread for shotshell reloading dies and Piggyback 3 upgrade. The Rock Chucker Supreme retails for $213.79 now at Powder Valley and qualifies for a $35 RCBS rebate, lowering your net cost to $178.79 (after rebate). The RCBS Rock Chucker is definitely a quality product that can last a lifetime. For heavy-duty sizing chores this remains one of the best choices in single-stage presses. This is a good time to buy a RCBS press with the current RCBS Rebate Program.
Lyman Brass Smith Ideal C-Frame Compact Press
The Lyman Brass Smith Ideal Press is a very affordable, cast iron C-Frame reloading press. We think it is the new “class leader” in compact presses. This works great as a secondary press for your reloading room or a small press you can take to the range. The large front opening allows you to access the shell holder without hitting the support bar on other types of presses. Unlike other compact presses made from aluminum, Lyman’s Ideal press is cast iron so it is rigid and strong. The high-quality steel ram is one inch in diameter. The Brass Smith is a true ambidextrous press that can be accessed from either side and mounted the same. This is a great choice for a second, auxiliary press for depriming and bullet seating. It is now just $119.66 at Precision Reloading.
Hornady Iron Single Stage (Open-front) Press
In this “Reloading with Rosie” video, the attractive female host loads some ammo using the Hornady Iron Press. With a beefy, pyramid-style cast-iron frame with an open front, this press offers some advantages over a traditional “O-Frame” type press. Access is considerably easier, for one thing. And the top of the press includes slots to hold dies and tools — that’s really a very nice feature that saves time. Also an optional “automatic” priming system shuttles primers from a vertical tube in the back to the shell-holder in the front. That’s clever. Over all the Iron Press is a nice piece of engineering — good job Hornady. It is offered for $314.78 at Precision Reloading.
Lee Classic Cast (Iron) Breech Lock Press
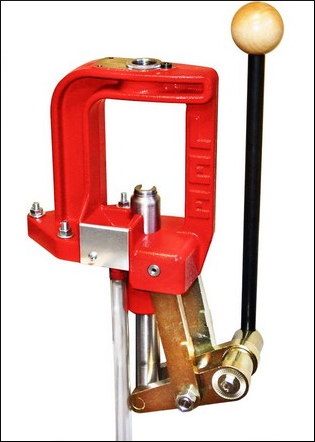
The Lee Classic Cast Breech Lock Press offers excellent value for the money ($190.99 at Midsouth). Based on the proven design of the Classic Cast press, the updated Breech Lock series adds the quick-change die bushing and an improved primer drop system. This press is strong, with cast iron frame, all-steel linkage, and 12 square inches of ram bearing surface.
Lee says this press has the “largest opening and the longest stroke in the industry” among O-frame type presses. The handle can be mounted on either side. We love the fact that the handle ANGLE can be adjusted, as well as the lever arm length — that allows you to adjust travel and leverage to suit your preference. Smart engineering.
The new spent primer drop features a large-diameter hollow ram with clear hose that drops primers straight to a bin — that’s simple and effective. The press is very rigid and the base is wide enough for good stability. We have one of these Classic Cast Breech Lock Presses in our reloading room and it works well.
This article comes from the Criterion Barrels website. It provides good, conservative advice about barrel cleaning. Understand that cleaning methods may need to be adapted to fit the amount and type of fouling (and the particular barrel). In general, we do try to minimize brushing, and we follow the procedures Criterion recommends respecting the crown/muzzle. We have also had very good success using wet patches followed by Wipe-Out bore foam. Along with the practices outlined by Criterion below, you may want to try Wipe-Out foam. Just be sure to use a fitted cleaning rod bore guide, to keep foam out of the action recesses and trigger assembly.
The above video shows how to apply Wipe-Out or other bore-cleaning foam. We use a slightly different method. First, we use 3-4 wet patches to remove loose carbon fouling. Then we apply the foam as shown, but usually from the muzzle end (with bore guide in chamber). Here’s the important point — after 20-30 minutes, once the bubbles have dissipated, we apply the foam a second time, getting more of the active ingredients into the barrel. We then patch out, as shown, after 3-4 hours.
What is the Best Way to Clean a Rifle Barrel?
We are asked this question quite frequently alongside requests for recommended break-in procedures. Improper barrel cleaning methods can damage or destroy a barrel, leading to diminished accuracy or even cause a catastrophic failure. When it comes to barrel maintenance, there are a number of useful techniques that we have not listed. Some techniques may work better with different barrel types. This series of recommendations is designed to incorporate a number of methods that the Criterion Barrels staff has used successfully both in the shop and on their personal rifles. Please feel free to to list your own recommendations in the below comments section.
We recommend the use of the following components during rifle cleaning:
• Cloth patches (sized for the appropriate caliber)
• Brass jag sized properly for your bore [Aluminum and Nylon Jags also work]
• One-piece coated cleaning rod
• General bore cleaner/solvent (Example: Hoppes #9)
• Copper solvent of your choosing (Example: Sweets/KG 12)
• Fitted cleaning rod bore guide
• Plastic AP brush or toothbrush
• Q-Tips
• Plastic dental picks
• CLP or rust preventative type cleaner
There are a number of schools of thought relating to the frequency in which a barrel should be cleaned. At minimum we recommend cleaning a barrel after each shooting session to remove condensation, copper, and carbon build-up. Condensation is the greatest immediate threat, as it can cause the barrel to rust while the rifle sits in storage. Copper and carbon build-up may negatively impact future barrel performance, increasing the possibility of a failure in feed or function. Fouling should be removed whenever possible.
The below tips will help limit the wear of different parts of your barrel during routine maintenance, helping extend the life of the barrel and improving its performance.
The Lands and Grooves
This portion of the barrel may experience reduced efficiency due to copper fouling and cleaning rod damage. If copper fouling takes place during the initial break-in of the rifle, make sure to check our barrel break-in article.
For regular maintenance we suggest using a single piece coated cleaning rod rather than the traditional segmented rod or bore snake. While segmented rods and bore snakes may be convenient for field use, the corners between the segments may bow out and catch on the lands, scraping along the length of the rifling. Residual grit and particles from expended cartridges may also get caught between segments, resulting in an abrasive surface working its way down the length of the barrel. Most bore snakes will remove significant amounts of carbon fouling, but may fall short in the removal residual carbon buildup and copper fouling during deep cleaning. Good rods can be sourced from multiple manufacturers, but we have found good results using both Pro-Shot and Dewey brand products.
General cleaning requires the use of patches rather than nylon or brass bore brushes. Brass brushes may be required when aggressive cleaning is required, but can lead to unnecessary wear on the barrel if used frequently. This is not due to the nature of the soft brushes themselves, but from the abrasive particles of grit that become embedded in the material that is being run repeatedly through the bore. We recommend the use of bore guides when cleaning from both the muzzle and breech. These bore guides will help serve to protect the crown and throat from cleaning rod damage.
If significant resistance develops while running the cleaning rod through the bore, no attempt should be made to force it in further. Back the rod out and inspect the barrel to determine the cause of the resistance. The jag may be pushing between a bore obstruction and the rifling, digging a divot into the barrel before pushing the obstruction back through the muzzle. One way to minimize the risk of a stuck rod is by utilizing a slightly smaller patch during the initial push.
The process of cleaning the length of the rifling is relatively straightforward:
1. Check to make sure the rifle is safely unloaded.
2. Carry out any necessary disassembly procedures prior to cleaning.
3. Remove bolt (if possible) and insert fitted cleaning rod bore guide in action.
4. Soak a patch in bore solvent (similar to Hoppes #9).
5. Center and affix the patch on the brass jag, inserting it into the chamber end of the barrel. A misaligned patch may cause the jag to damage the lands of the rifling, so make sure the patch is centered on the jag. [Note, an aluminum or nylon jag will not show a “false positive”.]
6. Run the patch the full length of the barrel, retracting it upon reaching the end of the muzzle.
7. Let the solvent sit for a minute.
8. Continue to run patches through the bore until carbon residue is minimized.
9. Run a dry patch through the bore to ensure carbon residue has been removed.
10. Soak a patch in copper solvent (Sweet’s or KG-12).
11. Run the patch through the bore, leaving it to sit for 3-5 minutes (do not let solvent sit for more than 15 minutes.*)
12. Repeat this process until no blue residue remains on the patches.
13. Run a patch of Hoppes #9 and a dry patch through the bore to neutralize the copper solvent.
14. Inspect the barrel prior to reassembling the rifle, verifying that no bore obstructions remain.
*Please note that some ammonia-based copper solvents may prove to be corrosive if left sitting in the barrel for an extended period of time. It is essential that these solvents be removed within 15 minutes to avoid ruining the bore.
The Crown
The crown is the portion of the barrel where the bullet loses contact with the lands and grooves and proceeds to exit the firearm. The area most critical to accuracy potential is the angle where the bullet last touches the bore of the barrel.
Avoid damage to this area by using a plastic toothbrush and CLP type cleaner to scrub the crown from the exterior of the barrel. Even the most minimal variation in wear to the crown will negatively impact barrel performance, so be careful to avoid nicking or wearing away this part of the barrel.
Whidden Gunworks makes great sizing and seating dies. The Whidden full-length sizing die with neck bushing is very popular because it allows you to “tune” the neck tension by using different bushings, with larger or smaller inside diameters. In this video, John Whidden explains how to choose a the right bushing size for use with your neck-sizing and full-length sizing bushing dies.
For most applications, John suggest starting with the caliper-measured outside diameter of a loaded cartridge (with your choice of bullet), and then SUBTRACT about three thousandths. For example, if your loaded round mics at .333, then you would want to start with a 0.330 neck bushing. John notes, however, that you may want to experiment with bushings, going down a thousandth and up a thousandth. With thin In addition, as your brass ages and the necks harden, you may want to change your bushing size.
Quick Tip: Try Flipping Your Bushings
You may also want to experiment with “flipping” your neck bushings to alternate the side that first contacts the neck of the case. (One side of the bushing is usually marked with the size, while the other side is unmarked.) So try “number side up” as well as “number side down”.
Some folks believe that one side of the bushing may allow a smoother entry, and that this can enhance concentricity. Other people think they can get very slightly more or less neck tension depending on how the bushing is oriented. This is a subtle effect, but it costs nothing to experiment.
If one bushing orientation proves better you can mark the “up” side with nail polish so that you can always orient the bushing optimally. NOTE: We have confirmed that some bushings are actually made with a slight taper. In addition, bushings may get distorted slightly when the brand name and size is stamped. Therefore there IS a reason to try both orientations.
Here’s a November video bonus for our Daily Bulletin readers. Today we showcase three of the most amazing 3D “cutaway” gun animations ever created. Watch the operations of a pump shotgun, bolt-action rifle, and semi-automatic pistol. The superb cutaway views show details of the firearms’ internal parts, and show how ammunition cycles start to finish. Each of these videos took hundreds of man-hours to create, and each has been watched many millions of times.
Remington 870 Pump-Action Shotgun
This 3D animation shows how a Remington 870 pump-action shotgun works. The animation is superbly done, showing every aspect of the internal operation. Folks, if you have any interest in shotguns you should definitely watch this video start to finish. This shotgun video has received 3.9 million views in just 10 days!
The video’s talented creator, Matt Rittman states: “Cinema 4D was used to create each individual part, as well as animating everything. Substance Painter was used to create the wood stock and fore-end textures. Corona renderer was used for final output of lighting and textures.” See more of Matt’s 3D videos on his popular YouTube Channel.
This 3D animation showing how a Mauser Karabiner 98K (KAR 98K) bolt-action rifle works. The Karabiner 98K is a controlled-feed bolt-action rifle based on the famous Mauser M98 system. Video creator Matt Rittman notes: “Cinema 4D was used to create each individual part, as well as animating everything. Substance Painter was used to create the wood stock texture. Corona renderer was used to render everything. This animation took me over 500 hours to create.” This video has been watched over 21 million times!
Every bolt-action rifle owner should watch this remarkable video. It shows key processes which are common to many actions — Cocking the Bolt, Feeding from magazine, Engagement of Bolt Lugs, Activation of Trigger and Movement of Firing Pin, and Extraction with Ejection. The modeling of the inside of the bolt and fire-control group is excellent. This really is a superb video that will help rifle owners understand what happening inside their guns as the bolt is cycled. See more of Matt’s 3D videos on his popular YouTube Channel.
This 3D animation demonstrates how a modern semi-automatic, double-action-only Glock 19 handgun works. Cinema 4D was used to create each individual part, as well as animating everything. Substance Painter was used to create the main textures. Corona renderer was used to render everything. This animation took me over 500 hours to create. one of the most-watched gun videos ever created, this Glock 19 animation has been viewed over 78.6 MILLION times!
Video Highlights for Glock 19 Pistol
0:00 Intro
0:11 Basic Function
0:39 Case Extraction
0:47 Cartridge Loading
1:02 Trigger Reset
About Matt Rittman, the 3D Animator/Artist These three amazing videos were all created by the gifted computer graphics artist Matt Rittman. On his Matt Rittman YouTube Channel, Matt states: “I’m a 3D Generalist/Motion Designer from Des Moines, Iowa. I have always enjoyed animation and illustrating how things work. I’m especially interested in cars and anything mechanical.
My aim for this channel is to provide easy to understand how-it-works 3D animations. I will occasionally be releasing tutorials centered around Cinema 4D and the different capabilities of the software.”


 LEE Hand Press Quick-Change Die Functionality


 Hybrid Bullet Design — Best of Both Worlds?




 With careful planning, and some skilled tracking, Colton had success, making a perfect hit on a buck at 300 yards. The animal dropped instantly. Colton brought back a good harvest of deer meat, which formed part of the Thanksgiving feast for his family.



 If you are not yet familiar with the many unique features of the Forster Co-Ax, we recommend you watch the video above, a very thorough video review by Rex Roach. This shows how the press operates and highlights the design elements which set the Co-Ax apart from every other reloading press on the market. This 14-minute video shows the key Co-Ax features, explaining how the floating case-holder jaws work (3:30 time-mark), how the dies are held in place (4:40 time-mark), how spent primers are captured (6:10 time-mark), and how to set the primer seating depth (10:00 time-mark). We’ve used a Co-Ax for years and we still learned a few new things by watching this detailed video. If you are considering purchasing a Co-Ax, definitely watch this video start to finish.
 Lyman’s sturdy Victory Single-stage Press is a full-size unit that competes with the RCBS Rock Chucker Press. With beefy cast iron construction, the Victory’s strength and leverage rivals the Rock Chucker. The press operates smoothly and the handle can be mounted on either side.
 Nearly every serious hand-loader has owned or used the RCBS Rock Chucker press. This Editor still uses a Rock Chucker passed down by his brother 20 years ago. And yes, it is still going strong. The latest Rock Chucker Supreme single-stage press features an improved “upside-down Y-path” dual-bin spent primer catcher. Otherwise the Rock Chucker Supreme remains big, strong, versatile and sturdy. It has very strong linkages, with a compound leverage system providing plenty of power — FL-sizing is a breeze even with large, magnum cases. The 1″-diameter ram has 12.5 sq. inches of ram-bearing surface.

 The Lee Classic Cast Breech Lock Press offers excellent value for the money (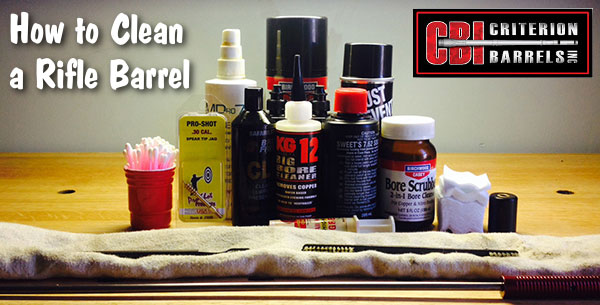

 Quick Tip: Try Flipping Your Bushings

 These three amazing videos were all created by the gifted computer graphics artist Matt Rittman. On his


