Tomorrow, September 28th, is National Hunting and Fishing Day, held each year on the fourth Saturday of September. To help the avid hunters among our readers, here are Twenty Tips that can help ensure a safe and successful hunt. These tips have been compiled from our AccurateShooter Hunting Forum, with help from Hunting Editor Colton Reid (who has already been out hunting this month). Some items are preparatory — such as working with maps, sighting in the rifle, and improving physical fitness. We also talk about equipment — having the right gear, from proper boots to a GPS for multi-day hunts.
Of course there are entire volumes written on hunting, but these 20 Tips can benefit all hunters. Follow these suggestions and you should have a safer hunting experience with greater likelihood of success. If you liked these pointers, you’ll find two dozen more helpful hints on the NSSF Website.
Preparations Before The Hunt
1. Map Your Hunt and Notify Others — Before your hunt, make a plan and notify friends and family members about WHERE you are going and your intended return date and time. Print out a Google Satellite map and locate landmarks and trailheads. Mark where you plan to park your vehicle and give a copy of this map to friend and/or family members. A hunter may injure himself by falling off a rock, or tumbling in a creek-bed. After that kind of injury the hunter may be confused or unable to walk. If you get stranded in the wilderness, you want trusted persons to know where you are. So, before you leave on a trip, provide a map to a friend or family member. Show them where you will leave your vehicle, and where you expect to be every day of your hunting adventure.
2. Licenses and Permits — Make sure you have a valid hunting licenses and all the necessary tags. Begin this process with ample time before your intended hunt(s). The NSSF adds: “If you are crossing state or national borders, find out about any special considerations you must take care of. Border crossings can mean knowing about firearm transport laws or Chronic Wasting Disease-related regulations.”
3. Work on Your Fitness — On a multi-day hunt you may be trekking many miles. You need to be in good shape. If you are out of shape you may be putting yourself in a precarious situation, particularly if you underestimate the terrain difficulty. As the NSSF says: “Not being able to handle the conditions lessens your chances of success, can turn a great experience into an agonizing one and can endanger your health.”
4. Do Your Homework — Study the area you will be hunting. Talk to other hunters. Look at satellite photos. Get a real sense of the walking and terrain challenges. For a multi-day hunt, MAKE a PLAN. The NSSF states: “Eliminate surprises. Learn as much about where you will be staying, the area you will be hunting, what the weather might be like and what you need to bring[.]”
5. Rifle and Ammo — Make sure your rifle is sighted-in and your ammo is tested. Sight-in your rifle with the ammo you plan to use on your hunt. CLICK HERE for 4-Shot Sight-in Method. After sighting-in from the bench, confirm your zero by shooting from typical hunting positions (kneeling and with forearm supported on a rock or post).
6. Shooting Positions — Practice the shooting positions you will use in the field. Practice sitting, kneeling, and prone positions. You should also practice with shooting sticks, using your day pack as a rest, and with a bipod. Try to have a rock-steady rest before taking your shot.
7. Back-Up Irons — If possible, select a rifle with back-up iron sights. While modern scopes are very durable, they can and do fail (glass can crack). If you’ve invested a lot of time and money in your hunt, back-up iron sights can keep you in the game even if your riflescope fails.
8. Communications and GPS — Bring a GPS if you are in a wilderness area far from civilization. It’s a good idea to bring a cell phone, but you may not have coverage if you’re quite a distance from populated areas. A smart-phone also doubles as a digital camera to record your trophies. For navigation and safety, consider getting Garmin inReach Explorer+. This high-tech handheld unit features interactive SOS, connecting you to the GEOS 24/7 search-and-rescue monitoring center. They also allow you to send and receive text messages, no matter where you are, via advanced inReach satellite technology. Yes you can communicate even if you are miles from the nearest cell tower.
9. Select Good Gear — Make sure you have GOOD BOOTS that are comfortable — you’ll spend a lot of time on your feet. You may want a pack with harness for your rifle so you have both hands free. On a multi-day trip, make sure you can carry enough water, and that you will stay warm enough at night. Good practices for backpacking apply to multi-day hunts.
10. Make a Gear Checklist — Create a complete checklist of the gear and supplies you need. That includes arms, ammunition, rangefinder, binoculars, proper clothing (including spare clothes), hunting accessories, sleeping gear (on multi-day hunts), toiletries, medications. Don’t forget a good first aid kit — lots of bad things can happen during any wilderness trip. You can cut a hand, break an ankle or worse.
During The Hunt
11. Have a Plan — know where you plan to go and when. Try to be where you want in the early morning and early evening hours when deer are likely most active.
12. Take Your Time — If you spot a deer and get too excited and don’t take your time you may spook him. Go slow and glass. If possible, wait for the animals to bed down and relax. Then work out the best way to approach your prey. Remember, “You get so few opportunities, don’t screw it up!”
13. Glass More, Walk Less — Let your eyes do the walking — get good binoculars and use them. With their heightened senses of smell and hearing, deer/elk are able to spot you way better than you can spot them. If you are walking around a lot, chances are you are getting spotted by your prey.
14. Riflescopes Are Not Binoculars — Never use a riflescope as a substitute for binoculars. The temptation to do so is real, but when one does this, one is by definition pointing the muzzle of the gun at unknown targets. We like binoculars with built-in rangefinders. When glassing at long range, try supporting your binoculars on your pack.
15. Be Sure of Your Target before Shooting — Every year during whitetail season, farmers are forced to spray-paint their cattle or risk having them “harvested” by hunters who don’t bother confirming the species in their sights. Hunters with “buck fever” can make mistakes. When in doubt, don’t shoot.
16. Know When to Unload — When finished hunting, unload your firearm before returning to camp. You should also unload your gun before attempting to climb a steep bank or travel across slippery ground.
17. Bring Hearing Protection — While pursuing and stalking your prey you’ll want full sensory use of your ears. But when you’re finally ready to take the shot, slip in hearing protection. A shot from a large-caliber hunting rifle can exceed 170 decibels. Unprotected exposure to noise from a SINGLE 170+ dB shot can cause permanent hearing damage. (Source: ASHA.org). If you make a follow-up shot, you double that noise hazard. Therefore a hunter with a non-suppressed rifle should have hearing protection available.
You can keep a pair of easy-to-use quick-insert ear plugs on a cord around your neck. Or, get a lightweight neck band with earbuds, such as the Sellstrom Band, Peltor Band, or 3M Safety Band, all with a good 25 dB or better Noise Reduction Rating. You can keep these lightweight bands around your neck for quick deployment before you shoot.
“Once a hunter is successful, the REAL work begins.” — Colton Reid
18. Harvesting the Animal — When dressing your animal, be careful with the meat. You’ll want very sharp knives. Some hunters prefer knives with replaceable, razor-sharp blades. Don’t rush the task. Make sure you don’t get moisture or dirt on meat. The three spoilers of meat are heat, moisture, and dirt.
19. Pace Yourself When Packing Out — If you DO succeed, and bring down a big buck, will you be able to dress the animal and carry out the meat? Always be prepared to hike out with extra weight. If you are successful, make sure not to waste the meat you worked so hard for. Choose a pack that can help you carry a heavy load. Remember, this is not an insignificant challenge — you may be carrying 60 to 100 extra pounds in addition to your other gear. Again, take your time. Rest as needed. Don’t hurt yourself.
20. Remember to Enjoy the Experience — Our Hunting Editor, Colton Reid, offers this sage advice to all hunters, but particularly to novices: “Have fun, and appreciate your hunt, whether you bag a buck or not. It is a privilege to experience the wilderness and to get away from the city. Enjoy it while you’re out there. And keep your spirits up. You may get tired, but remember that ‘comes with the territory’. At the end of the day, yes you may be exhausted. And you may want to quit and go home. But stay positive, stay focused. Be patient, the experience is worth it.”
CLICK HERE for Hunter Training/Mentoring Programs State-by-State.
Visit WhereToHunt.org
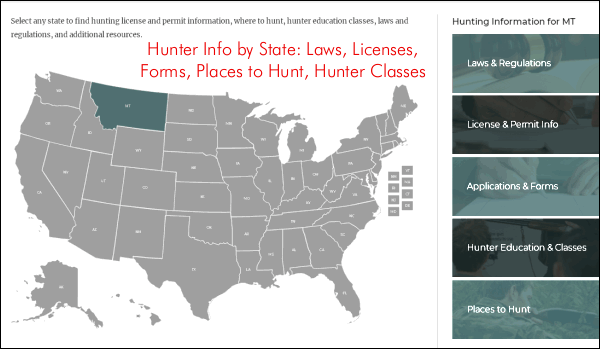
There’s a great online resource for hunters that will help you find game locations in your state and ensure you have all the proper permits and game tags. WheretoHunt.org features an interactive map of the country. For all 50 states, the NSSF has compiled information about hunting license and permits, where to hunt, hunter education classes, laws and regulations and more. For each state you’ll also find a link for required applications and license forms.
Hunting season is coming soon around the country. If you want to get hunting tips from experts, here is a great audio “infotainment” resource. Leupold offers podcasts, 40-75 minutes in length, on a variety of topics of interest to hunters and precision shooters. A podcast is like a radio show that’s available 24/7, at your convenience. When you want to “tune in”, via your home computer or mobile devices, just visit the Leupold Podcast Page.
Oregon-based optics-maker Leupold & Stevens (“Leupold) offers the “Core Insider” podcast series. These podcasts deliver hunting advice and recount successful hunting trips — such as Caribou hunting in Alaska. Other Leupold podcasts provide optics info, industry intel, and tech tips. Leupold’s Core Insider podcasts can also be accessed directly from Leupold.com. From the Leupold Podcast Home Page, you can stream the podcasts live or download for later listening.
You can also stream these podcasts via iTunes and Spotify.
The Leupold Core Insider Podcasts cover a wide variety of shooting and hunting topics. One early episode features Leupold team members Kyle Lamb and Buck Doyle discussing long-range shooting, while recent Episode 55 explains how Binoculars and Rangefinders function. There are now 96 Leupold Podcasts available online for FREE.
This impressive 15-round group was shot by Jim See of Elite Accuracy.
Different Shooting Disciplines Demand Different Levels of Precision/Accuracy
In the rapid-fire 3-Gun game, you could probably “clean” most stages with a 2-MOA rifle. By contrast, in the short-range group benchrest game, to compete with the best, you’ll need a rifle that shoots in the “ones” (i.e. 0.1-0.19 MOA) in perfect conditions. In 1000-yard F-Class competition, the top shooters want a rifle that will hold one-third-MOA of vertical at that distance.
What is your standard of accuracy? How good is “good enough”. Jim See, a skilled gunsmith and successful PRS competitor, recently answered that question for his tactical discipline. For the kind of matches Jim shoots, he likes to have a rifle that will hold half-MOA for five (5) shots, 3/4-MOA for 15 shots, and 1 MOA for twenty shots. Remarkably, Jim’s rifle can do that with factory ammo. Above is an impressive 15-shot group shot with .260 Remington Federal Premium Ammo.
“I say it all the time, my loads need to print 5 under 1/2″, 10 under 3/4″, and 20 under 1″. It’s simple, if a hot barrel will keep 20 rounds fired in succession under my standard it will be a good barrel and load for Precision Match Shooting. Federal Premium Gold Metal Match .260 with Sierra bullets made the cut for me today. 15 consecutive shots under 3/4 MOA.” –Jim See
It’s said that you “can never have too much accuracy”, but there are acceptable standards for each discipline, and they’re not the same. A 100/200 yard Benchrest shooter will be sorely disappointed with a rifle/ammo set-up that can only deliver half-MOA. On the other hand, a PRS competitor like Jim See can achieve great success with a lesser degree of precision. This means you can save time and money. You can run your barrels longer between cleanings, and you don’t have to go “full OCD” when loading your ammo. The PRS shooter does not need to weigh-sort primers, or load powder to single-kernel standards. Proof is the performance. Jim See recently took third place at the Spearpoint Shootout, and he has been a podium finisher at other events. Learn more about Jim’s gunsmithing and training operations at EliteAccuracy.com.
Download This Load Development Target
Jim’s target seemed a bit familiar. AccurateShooter.com created this Diamond and Dot Target a few years back. On each aiming point, there are high-contrast black horizontal and vertical lines for aligning your cross-hairs. The gray circle lets you see the bullet impacts above, without obliterating the red diamond, which is quite useful for precise aiming (we put fine cross-hairs on the points of the diamond). This target sheet includes data entry tables below each of the three aim points. There are many other free targets out there, but this format is very popular. We’re pleased to see Jim using it. You can download this and dozens of other FREE Targets from the AccurateShooter.com Target Page.
Small patches are not very efficient at distributing bore cleaning liquids inside your bore. The problem with a tight-fitting patch is that the solvent gets squeezed off in the first few inches. You can switch to a smaller jag, or a bore mop, but there is an even better way to get an ample amount of solvent in your bore. Just spray directly into the bore with a wash bottle, an inexpensive plastic bottle with an L-shaped dispensing neck, tapered at the end.
When using the wash bottle, you can either just plug the breech and spray from the muzzle end (where most copper fouling is), or, alternately, put the wash bottle neck directly in the chamber and spray forward. When spraying from the chamber forward, you may need to use a rubber O-Ring to seal off the action… depending on the bore size and the particular wash bottle’s neck spout diameter. We prefer to plug the breech and squirt from the muzzle.
Bottle Solvent Application Method Works Great for Smaller Bores
Using wet patches or wet brushes is an inefficient way to really saturate the tight bores of 17s, 20s, and 22s. Even with a cotton bore mop, most of the solvent will be squeezed out before it gets to the end of the bore, where most copper fouling occurs. For these smaller 17, 20, and 22-caliber bores, you can just take the wash bottle and stick the tapered nozzle right in the chamber. The tapered end will press fit in the throat, sealing off the chamber. With the barrel slightly nose-down, give the bottle a couple good squirts until the solvent mists out the muzzle. In just a few seconds, this will put more solvent in the bore than a half-dozen wet patches.
A solvent-filled wash bottle is also handy for wetting your brushes. It’s much easier to saturate a bore brush (without spilling solvent on your stock), by using the wash bottle. You can get wash bottles from USPlastic.com, Amazon.com, or lab supply stores. CLICK HERE for $4.98 wash bottle.
Ever wonder how rifles, actions, stocks, optics, suppressors, and ammo components are produced in factories around the world? Today’s Saturday at the Movies installment features fascinating videos filmed inside major firearms industry factories including BAT Machine, ZEISS, Norma, SAKO, Nosler, CCI and Federal.
BAT Custom Rifle Actions — Factory Tour and Owner Interview
BAT Machine Co. makes some of the finest custom actions you can buy. Numerous national and world records have been set with BAT actions. To create this video, Ultimate Reloader’s Gavin Gear visited the BAT Machine production center in Post Falls, Idaho. Gavin talked with BAT’s founder Bruce Thom. The video features extensive footage of advanced CNC machines used to produce the superb BAT actions. If you own a BAT action, or hope to acquire one some day, definitely watch this video. CLICK HERE for Full Story.
Norma Ammunition Factory — Cartridge Creation Start to Finish
Norma has released a fascinating video showing how bullet, brass, and ammunition are produced at the Norma Precision AB factory which first opened in 1902. You can see how cartridges are made starting with brass disks, then formed into shape through a series of processes, including “hitting [the cup] with a 30-ton hammer”. After annealing (shown at 0:08″), samples from every batch of brass are analyzed (at multiple points along the case length) to check metal grain structure and hardness. Before packing, each case is visually inspected by a factory worker.
The video also shows how bullets are made from jackets and lead cores. Finally, you can watch the loading machines that fill cases with powder, seat the bullets, and then transport loaded rounds to the packing system. Guys, watch this video! You won’t be disappointed. The camera work and editing are excellent — there are many close-ups revealing key processes such as annealing and head-stamping.
SAKO Factory Tour in Finland
SAKO produces some of the best hunting rifles you can buy. SAKO, along with its sister company Tikka, operates sophisticated production facilities in Finland. In the video below, Canadian journalists visit the SAKO factory where rifles are made. It is interesting to see how stocks are made and barrels are bored and contoured. SEE More HERE.
Nosler Bullet Manufacturing
Ever wanted to see how Nosler bullets and cartridges are made? Here’s your opportunity. The Rocky Mountain Elk Foundation (RMEF) has produced a video (“Quality First”) that offers a behind-the-scenes look inside Nosler’s Oregon factory that produces bullets, brass, and ammunition. RMEF representatives visited Nosler’s famously-guarded manufacturing plant to show the technology used by Nosler to produce bullets and ammunition. After the intro, this video illustrates Nosler’s bullet construction techniques with a cool animation sequence. The video then showcases the Nosler ballistics lab, inspection room, and packaging line. SEE more HERE.
Video Showcases Nosler Production Facility and Ballistics Lab
ZEISS Sport Optics
ZEISS is a world leader in lens and optics technology. Along with ultra-high quality lenses used in production of computer chips and special optics for high-tech medical equipment, ZEISS produces great optics for hunters and shooters. ZEISS lenses are renowned for their sharpness, clarity, and high light transmission. ZEISS has a new series of LRP S3 and LRP S5 First Focal Plane scopes which promise to be favorites among PRS/NRL competitors and long-range hunters.
Silencerco Suppressor Fabrication Start to Finish
Here’s a cool video that shows the entire production process for a SilencerCo Octane pistol suppressor start to finish. Beginning with the raw materials, this video shows a wide variety of cutting, milling, drilling, burnishing, fitting, metal bathing, surface finishing, and laser etching processes. If you have any interest in production methods you’ll want to watch this video all the way through, and maybe a second time.
Rimfire Ammo Production at CCI/Speer and Federal Factories
YouTube host 22Plinkster got a chance to tour the CCI/Speer production facility in Lewiston, Idaho. This large plant produces both rimfire and centerfire ammunition. While touring the plant, 22Plinkster was allowed to capture video showing the creation of .22 LR rounds from start to finish. This is a fascinating video, well worth watching.
This revealing video shows all phases of .22 LR ammo production including cupping, drawing, annealing, washing, drying, head-stamping, priming, powder charging, bullet seating, crimping, waxing, inspection, and final packaging.
Field & Stream Tours Federal Ammo Plant in Minnesota
A while back Field & Stream toured the Federal ammunition production facility in Anoka, Minnesota. This large plant produces both rimfire and centerfire ammunition. While touring the plant, the reporter was allowed to capture video showing the creation of .22 LR rounds from start to finish. This is a fascinating video, well worth watching. Click speaker icon for sound.
Note to Viewers — After Starting Video, Click Speaker Icon to HEAR audio!
The Manufacturing Process for .22 LR Rimfire Ammunition Shooting Sports USA explains: “Rimfire cartridge cases are the oldest self-contained cartridge in existence, having been in continuous production since the mid-1850s. Rimfire cases are drawn from a thin piece of brass and formed with a hollow rim. A priming compound is then forced into the case using centrifugal force, where it is charged with powder and a bullet is seated in the mouth of the case. The case is then crimped around the bullet to ensure sufficient push and pull when the round is fired. When the firing pin strikes the thin brass rim of the case, the hollow rim is crushed and the primer is ignited.” Source: SSUSA.org 9/2/2017.
Many shooters these days clean their cartridge brass ultrasonically, or wet-tumble their cases with stainless media (above). Both methods get brass clean and shiny, inside and out. However, when those wet-cleaning processes are completed, you’re left with a pile of soaking wet brass. How do you dry your brass quickly and efficiently, without unsightly water spots? Read on for some great answers…
In our Shooters’ Forum, Member Terry asked: “How do you dry your brass after Ultrasonic cleaning?” In a Reloading Forum Thread, many smart suggestions were posted. A dozen fellow members outlined a variety of effective case-drying procedures, which work equally well for both wet-tumbled brass and ultrasonically-cleaned cases. Here are the Top 10 brass-drying suggestions from our Forum members.
TOP TEN Ways to Dry Cartridge Brass After Wet Cleaning
1. Food Dehydrator — Shake the brass in towel to get the bulk of water off. Next leave in the food dehydrator for 45 minutes or until there are no signs of moisture inside the cases. — Lawrence97
2. Lyman 5-Level Case Dryer — Rinse off cleaning solution(s), then load brass by type into racks in Lyman Cyclone Case Dryer. This is easier to load/unload than food dehydrators and holds more cases.
3. Hot Water + Compressed Air — Rinse all your cases as a batch using scalding hot water from the kitchen sink. Hot water evaporates off of brass very very quickly. Then hit them with compressed air. Takes 10 minutes. Simple. — SG4247
4. Oven Dry in Pre-Heated Oven — After pre-heating to 200° or so, turn off oven and put brass inside on a tray. Most important! Tell your wife what you are doing so she doesn’t crank it up to 425 to heat pizza! — MClark
NOTE: Many other members suggested oven drying at 150-200°. We recommend turning OFF the oven so you don’t cook your brass if you forget to remove the cases.
5. Towel Dry then Warm with Heat Gun — Roll brass in a towel until no more water shakes out. Lay out on cardboard box top and blow off with Harbor Freight heat gun. $9.99 on coupon. Two minutes of heated air and about half hour of wait and they are good to go. This is with primers removed. — Shaggy357
6. Compressed Air, then Sun Dry Outside – I rinse the brass, then blow them out with compressed air. Then, dependent on the time of year, lay them on a towel in the sun. — HogPatrol
7. Dishwasher on Dry Cycle – In the winter, I drop my wet brass cases neck-down on the rack pegs in the dishwasher, then turn on the dry cycle. In the summer…well, I’m in Texas. They go to the porch for a bit. — Toolbreaker
8. Alcohol Rinse then Air or Oven Dry — Rinse in 90% Isopropyl alcohol and either let air dry or stick in 175° oven for half an hour. Alternatively, use a dehydrator. — Zipollini
9. Slow Air-Dry in Loading Blocks — I have a reloading block with holes drilled in it. I simply load the block up and let it air-dry in the cupboard for a couple of days. — JCS
10. Wipe with Towel Then Anneal Normally with FLAME Annealer — This thread is stirring my OCD side. Seems complicated for just drying — my brass dries just fine when I anneal it. This entire process can’t take an hour per batch. When finished, the brass is cleaned, annealed, and ready to size. — CHLuke
NOTE: This is NOT recommended for use with electronic AMP annealers. Use this ONLY with flame annealers.
Deprime, then tumble brass with stainless media, water, Lemishine, and dish detergent.
Shake them easily in a strainer to knock out most media then grab 4-5 pieces, shake them over the bucket for the last of the media then inside a towel.
Finally blow out the primer pockets and wipe with a towel, load in the Annealeez flame annealer.
Talented sharpshooter Kirsten Joy Weiss is featured in an episode of NRA All Access. The show covers Kirsten’s development as a competitive shooter, and her success as a trick-shot artist with her own popular YouTube channel. Here’s the All Access segment featuring many of Kirsten’s most famous trick shots.
During the video Kirsten also talks about her background in shooting and how she wants to be a good ambassador for the shooting sports, “spreading the positive reality of shooting”. Kirsten explains: “The fun challenge and joy of shooting is important to me because I really wanted to be a positive example. So when the media says the ‘guns are a bad thing and nobody does anything good with guns’, they can say ‘Well, what about her [Kirsten]’?”
Kirsten: “I think that it’s important for young girls to have somebody that they can look up to… I feel responsibility to show young shooters coming up, especially females, that you can respect yourself and shoot a gun as well.”
A gifted “natural” shooter, Kirsten started shooting fairly late — at age 16. Despite her relatively late start, she learned very quickly, and managed to earn a place on the University of Nebraska shooting team. That literally opened up a new world for Kirsten: “During the course of my career, I’ve had a lot of success. I’ve gone to World Cups… in Zagreb, Croatia, in Munich, Germany. I’ve won National Championships, and got on to the U.S. Olympic short list, so it’s been a good career.”
Proper Cheek Weld
No matter what your discipline — smallbore, silhouette, High Power, F-Class, or even PRS — it’s vital to have a consistent cheek weld for every shot. You want your head to be in the same position on the stock each time. This helps ensure proper eye-to-sights/optic alignment and consistent rifle balance.
In this video, Kirsten explains how to find the best position for your head on the stock, which may require adjusting the cheekpiece and/or length of pull. Then Kirsten demonstrates how to maintain consistent cheek weld shot after shot.
Kirsten tells us: “A lot of people don’t think of shooting as a sport, but it absolutely is, and I would even go so far as to say that it is an art form.” We don’t know if this is art, sport, or magic, but very few shooters have the skill or flexibility to make this upside-down shot…
This can be very important — even life-saving. For example, with a hang fire, i.e. a round that does not fire immediately, it is vital to keep the gun pointed DOWN-RANGE. And with a squib load, which may have left a round inside the barrel, it is vital to UNLOAD and NOT take another shot! If you did, the gun could blow up in your hand when the second, full-charge bullet hits the trapped bullet.
The Five Topics Covered Are:
Misfeed (aka Tip-Up)
Double Feed
Stovepipe (Failure to Extract)
Misfire / Hangfire
Squib Load
1. Misfeed or Tip-Up: With any misfeed you should stop firing. With the muzzle pointed safely down-range, remove the magazine, then pull the slide back and remove the round that did not feed. Check the slide for dirt, debris, and check the round that did not feed. After re-inserting the magazine, make sure the mag is seated properly.
2. Double-Feed: This is a fairly common issue with some gun types with worn springs or cheap magazines. Again you want to remove the magazine. CTD states: “Remove the magazine and cycle the action until your double-fed rounds fall out — always keeping the muzzle pointed in a safe direction[.]”
3. Stove-Pipe: This occurs when the case of a fired round does not eject fully. There can be many causes — damaged extractor, low-pressure powder charge, dirty chamber, or greasy cartridge brass. In addition the issue is common with old, worn-out recoil springs. To avoid Stove-Pipes, replace the recoil spring every 4000 rounds, and make sure your chamber is clean and the extractor is not chipped or damaged.
4. Misfires and Hang-Fires: There are multiple causes for misfires (“click no bang”) and hang-fires (slow ignition). There can be a defective primer, the firing pin could be damaged, the powder many have been bad, or the case not filled properly. With a misfire, keep the gun pointed down-range at least one minute. If the case does not fire, eject it but leave it on the ground. With a hang-fire (delayed ignition after firing pin strike), keep the gun pointed down-range, then drop the magazine and eject the (new) unfired cartridge in the chamber and inspect the gun when completely empty.
5. Squib Load: A squib load is when the gun fires, but the actual case ignition is very light with little noise, smoke, or recoil. This can be because the case had a primer but no powder. Or it can be because the powder did not ignite. Squib loads can be very dangerous in rapid-fire situations. If you EVER get a squib load STOP immediately! Do NOT fire another round! This is because the squib may have left a bullet inside the barrel.
Ever wondered what the air around a moving supersonic bullet really looks like? Check out this video from the Bryan Litz Ballistics Facebook page. This is a Schlieren video* of a 6mm 109gr Berger LRHT bullet at about 2800 fps as fired from Francis Colon’s PRS rifle at the Applied Ballistics Lab.
Bryan Litz notes: “You can clearly see the compression (shock) wave at the front of the bullet. A compression wave is formed when the air has to move faster than the speed of sound to get out of the way, which is certainly the case for this bullet which is moving about 2.5 times the speed of sound (Mach 2.5).
That shock wave is the ‘snap’ you hear when bullets fly past you if/when you’re downrange. Also, compressing the air into a shockwave takes energy, and that energy comes directly out of the forward velocity of your bullet and gets converted into heat and noise as the shock wave forms and dissipates.
The turbulent wake at the base of the bullet shows where/how base drag applies. The third and smallest component of drag for a supersonic bullet is skin friction drag, which is a viscous boundary layer effect, and is the least visible in this image. So as you head to the range or the hunting stand, think about the absolute violence your bullets are committing in the atmosphere, before they even reach the target!”
You can spend thousands on a rifle, but that expensive hardware won’t perform at its best if you have poor trigger technique. One key element of precision shooting is trigger control. Our friend Kirsten Joy Weiss has produced a good video that shows how to refine your trigger technique for better accuracy. In this video, Kirsten talks about the actual placement of a shooter’s index finger on the trigger. It is important to have the finger positioned optimally. Otherwise you can pull the shot slightly left or slightly right.
Kirsten tells us: “Finger placement on the trigger might not seem like a big deal, but it actually is. The reason for this is because, depending on where your index finger is placed on the trigger, [this] translates to different muscle interactions with the gun.” Watch this video to see Kirsten demonstrate proper finger placement (and explain problems caused by improper finger positioning).
When you pull the trigger, you only want to engage the last section of your finger, in order to avoid unwanted muscle engagement and to achieve a smooth shot. Remember there is a “sweet spot” between the crease (first joint) and the tip of the finger. If you position the trigger in that “sweet spot”, you should see an increase in your accuracy. Don’t make the mistake of putting the trigger in the crease of your finger, as shown below.
Effects of Incorrect Finger Placements
You want to place the trigger shoe between the end of your finger and the first joint. If you place the trigger on the very tip of you finger you’ll tend to push the rear of the rifle to the left when engaging the trigger, causing shots to go right (for a right-handed shooter). On the other hand, if you put the trigger in the crease (first joint), you’ll tend to bring the rear of the rifle to the right, causing shots to fall left. This is illustrated below for a right-handed shooter.




 Small patches are not very efficient at distributing bore cleaning liquids inside your bore. The problem with a tight-fitting patch is that the solvent gets squeezed off in the first few inches. You can switch to a smaller jag, or a bore mop, but there is an even better way to get an ample amount of solvent in your bore. Just spray directly into the bore with a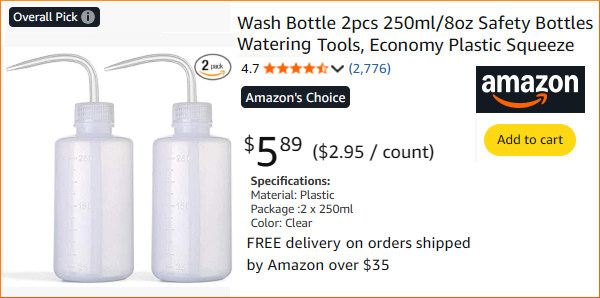


 Norma has released a fascinating video showing how bullet, brass, and ammunition are produced at the


 5. Towel Dry then Warm with Heat Gun — Roll brass in a towel until no more water shakes out. Lay out on cardboard box top and blow off with Harbor Freight heat gun. $9.99 on coupon. Two minutes of heated air and about half hour of wait and they are good to go. This is with primers removed. — Shaggy357

 A gifted “natural” shooter, Kirsten started shooting fairly late — at age 16. Despite her relatively late start, she learned very quickly, and managed to earn a place on the University of Nebraska shooting team. That literally opened up a new world for Kirsten: “During the course of my career, I’ve had a lot of success. I’ve gone to World Cups… in Zagreb, Croatia, in Munich, Germany. I’ve won National Championships, and got on to the U.S. Olympic short list, so it’s been a good career.”


