We have used NO-LEAD Cleaner in rimfire benchrest rifles similar to this modified Suhl 150-1. It helped restore accuracy with minimal brushing.
Made by the same smart folks that created Wipe-Out™, and Carb-Out™, NO-LEAD Brushless Lead Remover™ really works. Honest. If you are an active rimfire shooter, or if you shoot cast lead-alloy bullets in centerfire rifles and pistols, you should try this product. We now use NO-LEAD in our rimfire benchrest rifles, and in some centerfire guns that receive a steady diet of soft-alloy cast bullets (90%+ lead). (With rimfire guns, you don’t need to use NO-LEAD very often — maybe every 300-400 rounds unless you have a real fouler of a barrel.)
If you’ve got stubborn lead fouling in a rimfire barrel, or on a pistol’s muzzle brake/compensator, you should definitely give this stuff a try. We don’t know how but it does soften lead deposits. The manufacturer says you don’t need brushes, but we found that a bit of brushing (after NO-LEAD application) can help remove more serious lead build-up.
Yes we were surprised to find a lead remover that really works. We tried a half-dozen other lead “cleaners” that promised to dissolve lead and most of them, we discovered, are nearly useless. There’s a reason for that, as the lead alloys used in bullets don’t react to typical petrochemical-based solvents. It took the Wipe-Out chemists over five years to perfect this water-based solution that really does dissolve lead.
NO-LEAD Cleaning Procedure — Read Carefully NO-LEAD Lead Remover is a clear, red gel that is easy to apply. Just swab it in your bore (or on muzzle brakes) with wet patches or bore mop and let it sit for a few minutes. (The manufacturer says you can leave the NO-LEAD for up to 20 minutes, but that long of a dwell time does not seem necessary with our rimfire barrels.) When it contacts lead it will start to foam and you’ll see that the NO-LEAD solvent turns a pastel pink when it dissolves lead. The pink comes from the formation of lead oxide. After the recommended dwell time, simply patch out the dissolved lead deposits (you can also use a nylon brush for stubborn lead build-up).
NOTE: After cleaning, it is very important that you get all the NO-LEAD out of your barrel, and neutralize it. We recommend following the application of NO-Lead with Wipe-out or Patch-Out to neutralize the NO-LEAD, clear the bore, and remove residual carbon and copper fouling. If you don’t have Wipe-Out or Patch-out, flush the barrel thoroughly with Rubbing Alcohol or even a solution of Dawn dish detergent — then re-oil the bore.
Be Sure to Neutralize NO-LEAD After Use
Remember that N0-LEAD is a strong, slightly acidic chemical that needs to be neutralized after use. If you leave it on a nice, blued barrel for too long, it can harm the bluing. NO-LEAD will remove all the surface oils from the barrel bore. For this reason it is recommended that you neutralize NO-LEAD with Wipe-Out, or Patch-Out, which both contain effective corrosion inhibitors. If you don’t have those products, once you’ve flushed the NO-LEAD with something like rubbing alcohol, then follow with a gun oil. Caution: A petroleum-based gun oil will NOT, by itself, neutralize NO-LEAD. You need to neutralize first, then apply the corrosion inhibitor (or do it all in one step with Wipe-Out or Patch-Out).
Where to Buy NO-LEAD Lead Remover
NO-LEAD Lead Remover costs $19.50 for an 8 oz. squeeze bottle with a flip-top spout. This product is sold directly by Sharp Shoot-R Precision Products through Sharpshootr.com, or you can purchase NO-LEAD through many other online vendors. For more information, send an email via the Sharp Shoot-R Contact Form or or contact SharpShoot-R at (785) 883-4444. You can ask for Terry Paul, Sharp Shoot-R’s owner and the master chemist who developed the NO-LEAD formula.
Chart created with Ammoguide’s Visual Comparison Tool. Visit Ammoguide.com to learn more.
One of our forum members was looking for a very accurate, mid-sized 6.5mm cartridge for target working and coyote hunting. There are many great options including the 6.5 Grendel, 6.5×47 Lapua, 6.5 Creedmoor, and Remington .260 (a 6.5-08). If you are considering the 6.5×47 you should read our 6.5×47 Cartridge Guide authored by the 6.5 Guys. This and other 6.5mm cartridges are covered in this introduction to 6.5 mm cartridges prepared by Eben Brown, President of Eabco.com.
Quick Guide to 6.5mm Cartridges
by Eben Brown, EABCO.com, (E. Arthur Brown Co. Inc.)
The current popularity of 6.5mm cartridges in the USA has been a long time in coming. I won’t go into my opinions on why it took so long to catch on. The important thing is that it finally HAS caught on and we’re now so fortunate to have a wide selection of 6.5mm cartridges to choose from!
6.5mm Grendel – Developed by Alexander Arms for the AR15 and military M4 family of rifles. The Grendel fits the dimensional and functional requirements of these rifles while delivering better lethality and downrange performance. [Editor: The little 6.5 Grendel delivers a lot of performance from a small package. This is one of the most accurate cartridge options for the AR15 platform.]
6.5mm BRM – Developed by E. Arthur Brown Company to give “Big Game Performance to Small Framed Rifles” — namely our Model 97D Rifle, TC Contender, and TC Encore. Velocities of 2400-2500 fps with 140gr bullets puts it just under the original 6.5×55 Swede performance.
6.5mm x 47 Lapua – Developed by Lapua specifically for international 300m shooting competitions (with some interest in long-range benchrest as well). Case capacity, body taper, shoulder angle, and small rifle primer are all features requested by top international shooters. You can expect velocities of 2500-2600+ with 140 gr bullets.
6.5mm Creedmoor – Developed by Hornady and Creedmoor Sports, the 6.5mm Creedmoor is designed for efficiency and function. Its shape reaches high velocities while maintaining standard .308 Winchester pressures and its overall length fits well with .308 Win length magazines. You can expect velocities of 2600-2700+ fps with 140gr bullets. [Editor: Yep, we know some PRS guys are loading hotter than that in bolt guns. We recommend you try the 120-130 grain bullets also with this cartridge. That may put you in a better accuracy node.]
This video reviews 6.5 Creedmoor Cartridge Brass options:
.260 Remington – Developed by Remington to compete with the 6.5mmx55 Swedish Mauser that was (finally) gaining popularity in 1996. By necking down the 7mm-08 Remington to 6.5mm (.264 cal), the .260 Remington was created. It fit the same short-action [receivers] that fit .308 Win, .243 Win, 7mm-08 Rem, etc. You can expect velocities of 2600-2700 fps with 140gr bullets in the 260 .Remington.
[Editor’s Note: In the .260 Rem, try the Lapua 120gr Scenar-Ls and/or Berger 130gr VLDs for great accuracy and impressive speeds over 2950 fps.]
6.5mm x 55 Swedish Mauser – This was the cartridge that started the 6.5mm craze in the USA. It is famous for having mild recoil, deadly lethality on even the biggest game animals, and superb accuracy potential. Original ballistics were in the 2500 fps range with 140gr bullets. Nowadays handloaders get 2600-2700+ fps.
[Editor’s Note: Tor from Scandinavia offers this bit of 6.5x55mm history: “Contrary to common belief, the 6.5×55 was not developed by Mauser, but was constructed by a joint Norwegian and Swedish military commission in 1891 and introduced as the standard military cartridge in both countries in 1894. Sweden chose to use the cartridge in a Mauser-based rifle, while Norway used the cartridge in the Krag rifles. This led to two different cartridges the 6.5×55 Krag and 6.5×55 Mauser — the only real difference being safe operating pressure.”]
6.5-284 Norma — This comes from necking the .284 Winchester down to .264 caliber. Norma standardized it for commercial ammo sales. The 6.5mm-284 was very popular for F-Class competition and High Power at 1,000 yards. However, many F-Class competitors have switched to the straight .284 Win for improved barrel life. 6.5-284 velocities run 3000-3100+ fps with 140gr bullets.
.264 Winchester Magnum – Developed by Winchester back in 1959, the .264 Win Mag never really caught on and may have delayed the ultimate acceptance of 6.5mm cartridges by US shooters (in my opinion). It missed the whole point and original advantage of 6.5 mm cartridges.
The Original 6.5mm Advantage
The special needs of long-range competition have skewed things a little. However the original advantages of 6.5mm cartridges — how deadly the 6.5mms are on game animals, how little recoil they produce, and how easy they are to shoot well — still hold true today.
Talented sharpshooter Kirsten Joy Weiss is featured in an episode of NRA All Access. The show covers Kirsten’s development as a competitive shooter, and her success as a trick-shot artist with her own popular YouTube channel. Here’s the All Access segment featuring many of Kirsten’s most famous trick shots.
During the video Kirsten also talks about her background in shooting and how she wants to be a good ambassador for the shooting sports, “spreading the positive reality of shooting”. Kirsten explains: “The fun challenge and joy of shooting is important to me because I really wanted to be a positive example. So when the media says the ‘guns are a bad thing and nobody does anything good with guns’, they can say ‘Well, what about her [Kirsten]’?”
Kirsten: “I think that it’s important for young girls to have somebody that they can look up to… I feel responsibility to show young shooters coming up, especially females, that you can respect yourself and shoot a gun as well.”
A gifted “natural” shooter, Kirsten started shooting fairly late — at age 16. Despite her relatively late start, she learned very quickly, and managed to earn a place on the University of Nebraska shooting team. That literally opened up a new world for Kirsten: “During the course of my career, I’ve had a lot of success. I’ve gone to World Cups… in Zagreb, Croatia, in Munich, Germany. I’ve won National Championships, and got on to the U.S. Olympic short list, so it’s been a good career.”
Kirsten tells us: “A lot of people don’t think of shooting as a sport, but it absolutely is, and I would even go so far as to say that it is an art form.” We don’t know if this is art, sport, or magic, but very few shooters have the skill or flexibility to make this upside-down shot…
An Important Anniversary Eighty-one years ago today, Allied forces crossed the English Channel and began the assault of Europe that meant the end of Nazi occupation and the end of WWII in the European Theatre. There are few of those assaulters left today, but we all owe them a debt of gratitude. They’re part of that “Greatest Generation” that preserved freedom in its time of greatest peril. And we thank them all. — The Shooting Wire
Back in 2014, Forum member Robert Chombart posted this message from his home in Normandy, France: “On the occasion of the 70th anniversary of D-Day, I … salute the memory of the thousands of American soldiers who sacrificed their youth to liberate France, with … particular [respect] for those who rest in Normandy ground.” Today, 80 years after that historic invasion day, it is important we never forget the sacrifice of those who gave their lives on the beaches of Normandy.
Today we should remember those who crossed the Channel to begin the liberation of Europe. Thousands of soldiers, sailors, and aviators gave their lives on June 6, 1944. Their sacrifice on “The Longest Day”, allowed people throughout Europe to enjoy freedom. We should remember those brave warriors, and never forget that freedom is not free — it requires continuing vigilance and sacrifice.
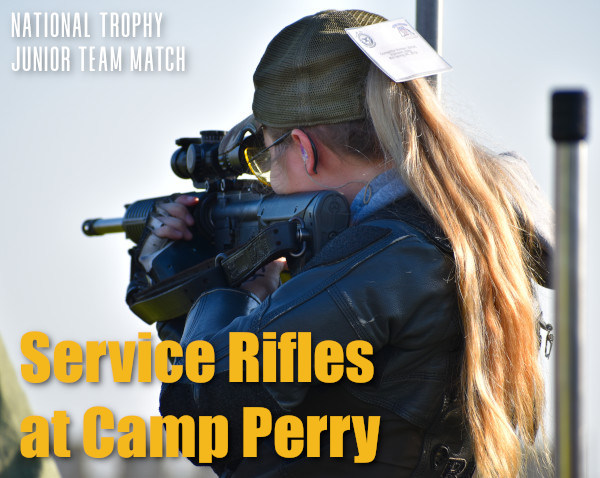
In Service Rifle competition in the United States, scopes are currently limited to a maximum magnification of 4.5 power (4.5X). Both the NRA and CMP rulebooks stipulate that variable and fixed scopes cannot exceed this power, and the objective lens diameter must not exceed 34mm.
Service Rifle Scope Configuration Rules
Maximum Magnification: 4.5x power is the max magnification allowed for Service Rifles.
Variable Power Limit: If using a variable scope, it can have any magnification range as long as it cannot be dialed higher than 4.5X.
Lens Size: 34mm is the maximum allowed objective lens diameter.
Sight Consistency: The same optical sight must be used for all stages of a course of fire. Changing optics between slow-fire and rapid-fire strings is prohibited.
Mount Height: The scope centerline must be no higher than 3.5 inches above the barrel bore centerline.
Popular Service Rifle Optics
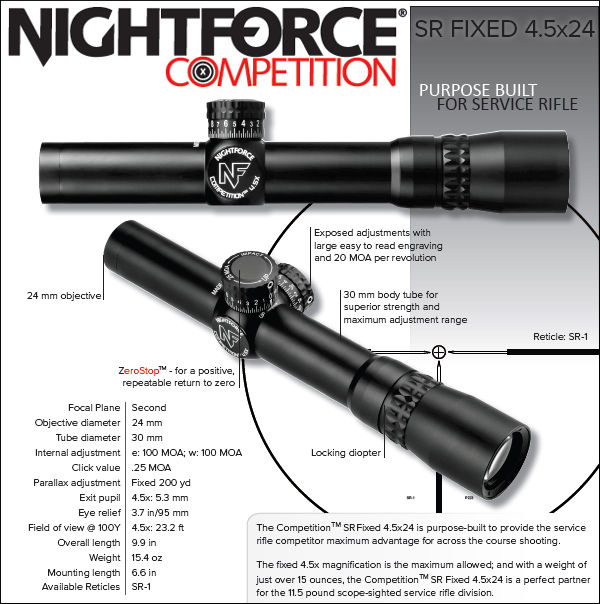
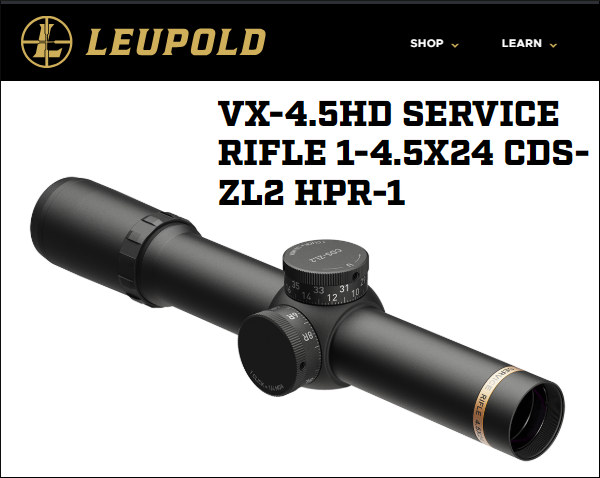
Because of the 4.5X power limit and 34mm max objective size, Service Rifle competitors typically run purpose-built AR-optimized service rifle optics or tactical low-power variable optics (LPVOs). The most popular service rifle optics include:
Sightron S-TAC 1-4.5X24mm SR-1/AR-1 Scope
Nightforce Competition SR Fixed 4.5x24mm
Leupold VX-4.5HD Service Rifle 1-4.5x24mm CDS-ZL2 HPR-1
Photo by SFC Brandon Green, 2018 National High Power Champion.
The prestigious CMP National Matches will be held at Camp Perry, Ohio this summer, July 12 through August 9, 2026. The President’s 100 Match runs Monday, July 27th, followed by Individual and Team Trophy Matches. And the Garand and Modern Military events kick off on August 1st, while 600-yard Mid-Range rifle matches run August 3-4, with Long Range following, concluding with the Palma Team match on August 9.
For those competing at Camp Perry this summer, we offer some insights from Tyrel Cooper, a multi-time National Champion. A past member of the USAMU, Cooper’s shooting resume includes five national championships (one each in 2008, 2011, 2012, and two in 2013). He won the 2013 NRA National Long Range Championship, as well as the 2013 NRA National Service Rifle Championship. In this article, written in 2014, Cooper explains the mental preparation that helped him win National Titles in 2013.
Below is a 2012 file photo of Ty Cooper shooting a service rifle. Cooper won the 2013 Long Range Championship using a Nesika-actioned bolt gun chambered in 7mm SAUM.
Mental Preparation by Tyrel Cooper Getting focused mentally is an important part of preparation for Perry. In 2011 I was chasing Sherri Gallagher, since then I have been chasing Brandon Green[.] If I get beat by a Service Rifle I am going to make him or her work for it. So there is your peak into my mental process. I go for the top and if I am hanging with them then the Service Rifle National Championship will come, Kind of like how I shoot for X’s and Tens will come.
Now I understand everyone is at different levels. You have to figure out what your goals are and then lie to yourself that you’ve already achieved them. Here is a trick that I used back in 2008: When I was a kid just starting out, my Dad made me read several books on shooting. One of them being With Winning In Mind by Lanny Bassham. One of the things I remember from his book is that he would make notes and place them where he would see them often. They contained his goals or stated he was already a world champion. I took a page from his book and did the same thing.
I made 3×5 cards and wrote my personal best 500 and 800 aggregate scores and taped on the horn of my truck, above the radio in my truck, on my laptop and a few other places I would see them often. Every time I saw those I would tell myself that I average those scores and I would get used to seeing them. By doing this you are lying to yourself to overcome the mental blocks the subconscious mind lays out for you.
I went from my worst year in 2007 to winning my first National Championship in 2008. I kind of slacked off in 2009 because I had reached my goals and didn’t set new ones and it showed, so I had to find new goals and motivation which I did and that pushed me back to the top.
Long story short, this is a mental sport and you have to figure out what you need to do to perform at your highest levels and breaking through those mental road blocks. You have to figure out how to get yourself to relax and control your mind keeping calm when you are shooting a personal best, either standing or on the day.
Here is a tip from my mental process from shooting. First I shoot for Xs, I took the line from the movie The Patriot and applied it to my shooting, “Aim small, miss small” and it is true. If you accept wide shots then you will keep shooting wide shots.
Winning Techniques for Rifle Competition
Slow, Solid, Smooth, Center
Always focus on the positive and good shots, and what you did physically and mentally, when you shot them. When I am nervous and need to calm myself down I tell myself: slow, solid, smooth, center.
Slow
I want my movement to be slow…
I can shoot Tens and Xs all day with slow movement.
Solid
Solid like a rock, a rock doesn’t move and that’s how I want my positions. By saying solid it reminds me to go through my little checks to make sure I am doing what I need to do make that happen.
Smooth
Smooth — that is my trigger word for smooth movement. You don’t want fast choppy movement but slow and smooth. This also reminds me to be smooth on the trigger. You can be smooth-fast or you can be smooth-slow but you have to be smooth and most people aren’t when they think they are. Just before leaving the USAMU, I walked up and down the line of five shooters during a rapid fire string and only one of them was smooth with their trigger control. It’s the second most important thing when it comes to shooting.
Center
This reminds me that I want my shots in the middle. It is just a positive reinforcement of where I want my shots to go. I shoot a reverse flat tire so it also kind of reminds me as to what I am looking for.
Countdown to CMP National Matches:
Story Tip from ELR Researcher. We welcome reader submissions.
Want to learn the basics of position shooting? Then you should check out an article by Gary Anderson, DCM Emeritus, in On the Mark digital magazine (Summer 2014, pp. 6-13). This article covers all the key elements: body position (prone, sitting, standing), sling use/adjustment, sight picture, aiming process, and trigger control. While this 8-page article was specifically written for Rimfire Sporter shooters, the techniques described by Anderson apply to all types of position shooting, whether you shoot air rifles, smallbore rifles, or centerfire rifles.
Here’s what Anderson says about aiming — how to keep your sights steady and get them centered on the middle of the target:
Trigger Contact and Center As soon as aiming at the target begins, the index finger must move from the trigger-guard to contact the trigger. It is important to get initial pressure on the trigger as soon as aiming begins. Then the shooter must focus on the sight picture and centering the sight picture movements over the aiming point. No one, not even champion shooters, can hold the aligned sights perfectly still. The sights are going to move a little bit or a lot, depending on the shooter’s skill level. The secret is to center those sight picture movements over the aiming point on the target (see trace illustration) before pulling the trigger.
When the sight picture movements on the target are centered, the last step in firing the shot is to add… smooth pressure on the trigger until the shot breaks.
Anderson also discusses the 5 Basics of Shot Technique:
BONUS: Olympic Gold Medalist Jamie Gray
Here’s an interesting video about three-position shooting. Produced by GOnra Media, this video demonstrates rifle hold and body alignment for prone, standing, sitting, and kneeling positions. Olympic Gold Medalist Jamie Gray demonstrates the proper stance and position of arms and legs for each of the positions. Ideally, in all of the shooting positions, the shooter takes advantage of skeletal support. The shooter should align the bones of his/her arms and legs to provide a solid foundation. A shooter’s legs and arms form vertical planes helping the body remain stable in the shooting position.
Gun Storage Check Week is the time to ensure your firearms are stored safely and securely. NSSF, the Firearm Industry Trade Association, is promoting Gun Storage Check Week, June 1-7, 2025, to remind gun owners to review their storage practices to prevent accidents, suicides and thefts. During this week, check your gun safe(s), and ensure your firearms are stored correctly and locked down properly. Also use secure gun cases when transporting firearms to the range. When traveling by air, use proper TSA-approved gun cases and comply with transport rules.
“Securely storing guns when they’re not in use can save lives. It’s really that simple,” said Joe Bartozzi, President and CEO of NSSF. “No one wants their gun in the hands of an unsupervised child, a person in crisis, someone who does not understand how to safely operate firearms, or a thief. If something bad happens because your gun isn’t stored securely, you’ll regret it, probably forever.”
This video covers gun safety rules and secure storage of firearms.
Gun Storage Check Week’s safety resources highlight many options to store firearms securely so that guns are off limits to unauthorized persons. Secure gun storage devices include:
Cable Locks — Available free of charge through NSSF’s Project ChildSafe® program Lock Boxes — Secure storage solution for guns kept for home security and in vehicles Lockable Gun Cases — for security, portability, and travel Full-size Gun Safes — For owners with multiple firearms to protect against fire and theft.
Enter to Win a Biometric Pistol Lock
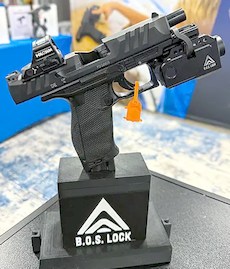
Visitors to GunStorageCheck.org can enter the Gun Storage Check Week Sweepstakes to win a B.O.S. Lock Fusion. This innovative firearm safety device mounts to a handgun’s accessory rail, combining a biometric slide lock with an integrated tactical light and green laser.
The B.O.S. Lock Fusion is the world’s first biometric slide lock that integrates a tactical light and laser into a single, high-performance locking device. Go to GunStorageCheck.org to register. One winner will be chosen.
NOTE: Gain 5 extra entries by watching any of the firearm safety or suicide prevention videos after you complete the entry form.
How and Why to Create a Dummy Round
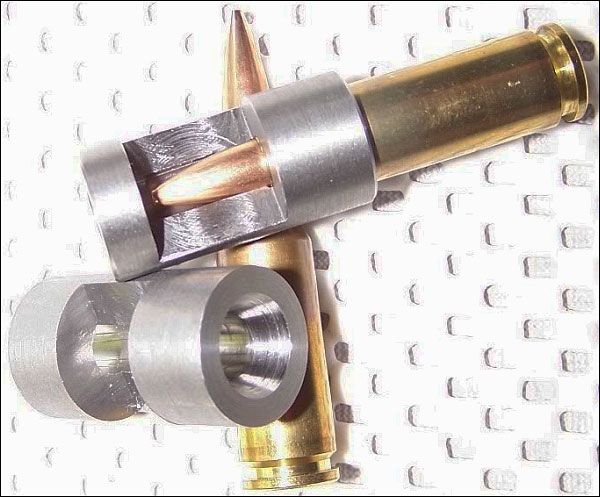
When you have a new custom rifle built, or a new barrel fitted to an existing rifle, it makes sense to create a dummy round. This should have your preferred brass and bullet types, with the bullet positioned at optimal seating depth. A proper dummy round helps the gunsmith set the freebore correctly for your cartridge, and also ensure the proper chamber dimensions.
Respected machinist, tool-maker, and gunsmith Greg Tannel of Gre-Tan Rifles explains: “I use the dummy round as a gauge to finish cut the neck diameter and throat length and diameter so you have [optimal] clearance on the loaded neck and the ogive of the bullet just touches the rifling.” He recommends setting bullet so the full diameter is just forward of the case’s neck-shoulder junction. “From there”, Greg says, “I can build you the chamber you want… with all the proper clearances”.
Greg Tannel has created a very helpful video showing how to create a dummy round. Greg explains how to measure and assemble the dummy and how it will be used during the barrel chambering process. Greg notes — the dummy round should have NO Primer and No powder. We strongly recommend that every rifle shooter watch this video. Even if you won’t need a new barrel any time soon, you can learn important things about freebore, leade, and chamber geometry.
Must Watch Video — This has been viewed over 810,000 times on YouTube:
This has been a very popular video, with over 810,000 views! Here are actual YouTube comments:
That is the best explanation I’ve ever seen. Thank you sir. — P. Pablo
Nice video. You do a very good job of making this easy for new reloaders to understand. I sure wish things like this were available when I started reloading and having custom rifles built. Once again, great job, and your work speaks for itself. — Brandon K.
Beautiful job explaining chambering clearances. — D. Giorgi
Another Cool Tool — The Stub Gauge
When you have your gunsmith chamber your barrel, you can also have him create a Stub Gauge, i.e. a cast-off barrel section chambered like your actual barrel. The stub gauge lets you measure the original length to lands and freebore when your barrel was new. This gives you a baseline to accurately assess how far your throat erodes with use. Of course, as the throat wears, to get true length-to-lands dimension, you need take your measurement using your actual barrel. The barrel stub gauge helps you set the initial bullet seating depth. Seating depth is then adjusted accordingly, based on observed throat erosion, or your preferred seating depth.
With the 6mm Dasher cartridge becoming popular with PRS/NRL competitors as well as the benchrest crowd, we thought it was time to re-visit a special rifle chambered for the 6mm Dasher wildcat. This gun has a great story behind it. Forum member Bob A. (aka “Killshot”) used his “Forum Classifieds Special” to beat all comers in the F-Class Division in the American-Canadian Match and the Long Range Regional Match in 2013 in Sacramento, CA.
Bob’s 6mm Dasher sports a blue-printed Rem 700 action. Who says you need a high-dollar custom action to run with the big dogs? In fact, this same gun, built with components sourced from AccurateShooter Forum Classified Ads, set a Sacramento F-Class range record of 200-17X a few years back. In this story, Bob talks about the build, and he explains his methods for loading ultra-accurate Dasher ammo.
Bob’s Budget-Build Dasher F-Classer
I wanted to build a proper rifle for F-Open but needed to keep it simple and, well, cheap. I found a solid “base” to build on in the form of a Dave Bruno-built, “pre-owned” 6-6.5×47 Lapua that I located in the AccurateShooter Forum classifieds in late 2011. The base action was a trued and blue-printed Remington 700 receiver circa 1971 with a spiral-fluted bolt. It was in a Shehane ST1000 stock painted sky blue and had a Jewell 1.5-oz BR trigger. I sent the bolt to Greg Tannel (Gretanrifles.com) to have the firing pin hole bushed and sleeved, the ejector removed and the hole filled and the face trued. I upgraded to Tannel’s Light Steel firing pin assembly while it was out.
Having the working bits completed, I needed a barrel. So I went to the AccurateShooter classifieds again and found a 1:8″-twist, 30″ x 1.25″ (diam.) Bartlein with a 0.236″-land bore. I called Dave Kiff and explained my pursuit and he recommended his PT&G “world record” 6 Dasher reamer (.2704″ no-turn neck and .104″ freebore). A month or so later the reamer and gauges arrived.
I had the barrel chambered by Marc Soulie of Spartan Precision Rifles (510-755-5293, Concord, CA). Marc is a great builder and I’m pleased to call him a friend.
The rifle got its good looks from a Pennsylvania artist named Kenny Prahl. His Prahl Designs shop (724-478-2538) added the white ghost-flames over the existing sky blue metallic paint.
Looks Great, Shoots Better
Fire-forming showed great promise — ten-shot groups of half an inch at 200 yards were typical. I lost only one case to a split neck and the “blow lengths” are good and consistent. This was followed up with load development which saw 100-yard, five-shot groups in the .1s and .2s as the rifle showed its preference for Reloder 15 over Varget powder, and for CCI 450s over all other primers. The bullet of choice was the ever-popular Berger 105gr Hybrid Target.
In February 2012 I began shooting the Dasher in monthly club matches at the Sacramento Valley Shooting Center, the home range of a number of excellent F-Class, Benchrest and High Power shooters. Using a Farley Coaxial rest up front (also picked up from a WTB ad on AccurateShooter’s Forum) and an Edgewood bag in the back, I gradually improved my gun-handling to the point where I could shoot a respectable score. This was very different from the bipod shooting I’d done in the past in F/TR.
Dasher Loading Tips
My chamber is set up for blue box Lapua 6mmBR brass. My case preparation is straight-forward. I fire-form with virgin cases right out of the box. I don’t size them but I will give the primer holes a good look and clean up the flash hole with a .058″ bit in a pin vise. To fire-form, I seat a Berger 108gr BT .030″ into the lands over a standard 6mmBR load of Varget.
For match loads, I use Alliant Reloder 15. While Varget is less sensitive to temp changes, RL15 has given me lower extreme spreads and better long range control. [Bob acknowledges that every barrel is unique, so a different powder, such as H4895 might work better for you.]
I clean my fired cases with stainless steel media in a Thumler’s rotary tumbler after every firing. I anneal after every other firing using a Bench-Source machine which is very well made and easy to operate. I use a Whidden full length bushing die with Redding bushings for sizing.
After sizing, I chamfer the inside of the neck with the K&M tool which has a pilot rod centered in the flash hole. Then I’ll give the neck and mouth a “once over” with some 0000 steel wool. I finish loading off with a Redding Competition Seating Die with the micrometer top.
I use a carbide ball on the expander rod of the full length sizing die. I use a .266″ TiN-coated bushing and the ball just kisses the inside walls of the sized neck. I get very consistent neck tension this way and have had no issue with split necks.
Seating Depth Considerations
With fire-formed brass, the junction of the bullet’s bearing surface and boat-tail is above the neck/shoulder junction of the case, so I have no issues with donuts. You can see how a loaded round looks in the photo at left. For occasional trimming, I use a very nice little Possum Hollow trimmer that indexes on the case shoulder.


 Made by the same smart folks that created Wipe-Out™, and Carb-Out™, NO-LEAD Brushless Lead Remover™ really works. Honest. If you are an active rimfire shooter, or if you shoot cast lead-alloy bullets in centerfire rifles and pistols, you should try this product. We now use NO-LEAD in our rimfire benchrest rifles, and in some centerfire guns that receive a steady diet of soft-alloy cast bullets (90%+ lead). (With rimfire guns, you don’t need to use NO-LEAD very often — maybe every 300-400 rounds unless you have a real fouler of a barrel.)
 Where to Buy NO-LEAD Lead Remover

 .260 Remington – Developed by Remington to compete with the 6.5mmx55 Swedish Mauser that was (finally) gaining popularity in 1996. By necking down the 7mm-08 Remington to 6.5mm (.264 cal), the .260 Remington was created. It fit the same short-action [receivers] that fit .308 Win, .243 Win, 7mm-08 Rem, etc. You can expect velocities of 2600-2700 fps with 140gr bullets in the 260 .Remington.


 A gifted “natural” shooter, Kirsten started shooting fairly late — at age 16. Despite her relatively late start, she learned very quickly, and managed to earn a place on the University of Nebraska shooting team. That literally opened up a new world for Kirsten: “During the course of my career, I’ve had a lot of success. I’ve gone to World Cups… in Zagreb, Croatia, in Munich, Germany. I’ve won National Championships, and got on to the U.S. Olympic short list, so it’s been a good career.”




 Getting focused mentally is an important part of preparation for Perry. In 2011 I was chasing Sherri Gallagher, since then I have been chasing Brandon Green[.] If I get beat by a Service Rifle I am going to make him or her work for it. So there is your peak into my mental process. I go for the top and if I am hanging with them then the Service Rifle National Championship will come, Kind of like how I shoot for X’s and Tens will come.


 As soon as aiming at the target begins, the index finger must move from the trigger-guard to contact the trigger. It is important to get initial pressure on the trigger as soon as aiming begins. Then the shooter must focus on the sight picture and centering the sight picture movements over the aiming point. No one, not even champion shooters, can hold the aligned sights perfectly still. The sights are going to move a little bit or a lot, depending on the shooter’s skill level. The secret is to center those sight picture movements over the aiming point on the target (see trace illustration) before pulling the trigger.





 Dasher Loading Tips
 I use a carbide ball on the expander rod of the full length sizing die. I use a .266″ TiN-coated bushing and the ball just kisses the inside walls of the sized neck. I get very consistent neck tension this way and have had no issue with split necks.


