Headed to SHOT Show in January? It will be a huge event, with a new twin-building layout. As before hundreds of exhibitors will be in the Venetian EXPO Center. But next door, the new Caesar’s Forum building will house scores of other exhibitors, and there is a new Outdoors Pavilion. Check it out:
This animation shows the layout of SHOT Show 2022, with the multiple buildings and levels. At the end you can see the new elevated walkway connecting the Venetian facility with the new Caesar’s Forum building. NOTE: This video will auto-run once. Click the button lower left to replay or pause.
FREE SHOT Show 2022 Mobile Apps
As in years past, FREE Mobile Apps are available for both iOS and Android users. These handy Apps provide interactive maps, schedules of seminars, plus a full directory of exhibitors. One of the best features of the App is that you can plot the most efficient route among multiple booths. That saves considerable time. To download the SHOT Show Mobile App for Android (Google) and iOS (Apple), go to SHOTmobile.com.
This 59-page digital resource contains the full list of exhibitors, along with maps, activity schedules, resource links, and much more. If you will be attending SHOT Show in January, this Notebook provides a wide collection of important information all in one place.
There is a special website with detailed maps of all the exhibitor locations. IMPORTANT: You can type in the name of a vendor, such as LAPUA, and this page will display that vendor’s booth on the appropriate floor map. This is very helpful for planning. CLICK HERE to search vendors on Floor Plan.
Frankly, we are not big fans of Red Dot sights, as they are not a good choice for precision rifle shooting beyond 100 yards. But Red Dot sight systems do have a place for pistol shooters, night-time hunters, and folks defending their home and property at short range.
Those considering purchasing a Red Dot sight system should read the Ammoland Red Dot Review by former U.S. Army Ranger Rex Nanorum. Rex took four affordable (under $200) Red Dot optics into the field, putting them through their paces. Rex notes: “Red dot sights are excellent options for those wanting a lightweight upgrade to iron sights and those prioritizing speed over the maximum accurate range.”
Rex tested the five Red Dot units, evaluating them based on multiple key factors: weight, brightness settings, ingress resistance to moisture and particulates, range performance, and battery life.
We recommend you read the full review, which includes detailed discussion of multiple factors. But there were some interesting “take-aways” from Rex’s Ammoland review.
Dot Size — The Bushnell has a 3 MOA central Dot, while the other units have a 2 MOA Dot.
Weight — The four units are similar, weighing 5.3 to 6.6 ounces.
Battery Life — The Bushnell TRS-26 and Primary Arms Microdot enjoyed a huge advantage in battery-life, with a claimed 50,000 hours! The Nikon SuperDot offers 14,000 hours, while the Vortex Crossfire delivers only 7000 hours.
Intrusion Resistance — All four units claim to be fog-proof, shock-proof, and water-resistant, typically good for 30 minutes immersion at 1 meter water depth. But the Nikon unit also has a particulate-ingress resistance rating. In the real world, keeping dust out may be more important than the ability to survice a half-hour dunking. In dry states such as Arizona, dust is a bigger issue than water.
The Primary Arms Microdot Earned Top Honors in Ammoland’s Test:
Overall, based on a variety of factors, Rex the reviewer rated the Primary Arms Microdot “best in test”, followed by the Bushnell TRS-26 in second place. The Nikon placed third, while the Vortex was ranked fourth. Rex was somewhat disappointed with the Vortex’s battery life and brightness controls.
Newer Bushnell TRS-26 has larger objective and longer battery life than older TRS-25:
Review of Higher-Priced ($400-$1000) Red Dot Optics
If you’re willing to pay $400 or more for a Red Dot optic, there are many good options. The same reviewer, Rex Nanorum, has tested and ranked five more costly Red Dot Sights:
Do you know which one of your eyes is dominant? It’s easy to determine eye dominance with a simple exercise. Pick an object about 6-10 feet away (a light switch or door knob works well). Make an “OK” sign with your right hand (see photo) and hold that about 18″ from your face. Now, with both eyes open, look through the circle formed by your thumb and index finger. Center the circle on the object, so you can see the object in the middle.
Now, here’s the important part — while still holding your hand up, centered on the object, first close your right eye. If you don’t see the object anymore, then your right eye is dominant. If you still see the object, then repeat the procedure with the left eye shut and right eye open. If you don’t see the object when your left eye (only) is closed, then you are left-eye dominant.
The digital archives of Shooting Sports USA contain many interesting articles. A while back, Shooting Sports USA featured a “must-read” expert Symposium on Eye Dominance, as it affects both rifle and pistol shooting. No matter whether you have normal dominance (i.e. your dominant eye is on the same side as your dominant hand), or if you have cross-dominance, you’ll benefit by reading this excellent article. The physiology and science of eye dominance is explained by Dr. Norman Wong, a noted optometrist. In addition, expert advice is provided by champion shooters such as David Tubb, Lones Wigger, Dennis DeMille, Julie Golob, Jessie Harrison, and Phil Hemphill.
Top Rifle Champions Talk About Eye Dominance:
David Tubb — 11-Time National High Power Champion
I keep both eyes open, always. Some use an opaque blinder in rifle or shotgun shooting. If you close your non-dominant eye, you will not get as good a sight picture. If your aiming eye is not your dominant eye, you have even more of a problem to overcome.
Lones Wigger — World, National and Olympic Champion Rifleman
Shooters should try to use the dominant eye unless the vision is impaired and the non-dominant eye has better vision. You should always shoot with both eyes open since this will allow the shooting eye to function properly.
Dennis DeMille — National Service Rifle Champion
I close my non-shooting eye initially. Once I pick up my sight picture, it’s not something I focus on. For those that use a patch, I recommend that they use something white to block their view, rather than cover the eye.
Bruce Piatt — 2015 World Shooting Championship Winner
Some shooters, especially those with nearly equal or cross-dominance, will naturally find themselves squinting one eye. When anyone does this, you are also closing your dominant eye to some extent and adding stress to your face.
This article originally appeared on the USAMU Facebook Page. The USAMU regularly published reloading advice for many years. Check the Facebook archives for related USAMU articles.
Here at the U.S. Army Marksmanship Unit (USAMU), we receive inquiries from shooters at many skill levels. One of the most frequent questions we are asked is, “What equipment do you recommend I buy to start handloading?”
Often, the handloader will be focused on producing ammo in quantity, and a big concern is whether to begin with a single-stage vs. a progressive press. However, there is one critical item that often gets overlooked as folks talk about the especially interesting topics such as reloading die brands and types, scale types and brands. And, what might that item be?
“When all else fails, read the what?” Yes, we recommend those new to handloading actually begin with reading the early chapters of one or, preferably two quality handloading manuals. They contain copious information on basic handloading safety, how to choose and use components, and how to recognize and avoid potentially dangerous conditions. Of course, they also do a fine job of teaching new loaders the correct methods of adjusting dies, determining safe loads and improving accuracy. Beginners can recognize and avoid many potential pitfalls, shortening the learning curve tremendously.
As a government entity, we aren’t able to make specific brand-name recommendations as such. However, recent manuals from the major bullet and powder manufacturers, especially those who emphasize accuracy and match-type bullets are generally a wise choice.
Handloaders often come to prefer one or two maker’s manuals over others for various reasons. Asking a friend who’s already an experienced loader which manuals they recommend is a good start. Borrowing one or more to read before purchasing is another.
This is a good way to both save money and get a feel for the variety of component types and data that are available. Comparing differences in data from different manuals in the same caliber, with the same powder and bullet weight can be an eye-opener. It is also a wise step in researching any loading project before one begins—and the reasons for the differences are fully explained in the manuals!
The AMU recommends buying proven, high-quality equipment. It should have a reputation for great durability, good ergonomics and reasonable-to-excellent precision. In addition, ask fellow shooters which companies have a good reputation for support after the sale. Several of the better handloading companies set the bar very high.
Video Shows Special Features of Forster Co-Ax Reloading Press
With the better ones, it’s common to call to order small replacement parts and receive them at no charge in the mail immediately thereafter. Other companies don’t enjoy such a sterling reputation. Often, these focus on cheap equipment made with low-quality materials, aimed at those to whom cost is the prime consideration.
Good quality equipment not only leads to less frustration, faster production, better results and less misery — it is also an excellent investment. Certain companies’ products sell virtually instantly on the used market and retain high resale value. Other gear from less well-regarded companies is much more difficult to sell. Moreover, it brings far less of its original purchase price—if it can be sold at all.
Ask veteran handloaders — preferably those who are still very active in the shooting sports — which equipment they prefer, and why. After getting specific recommendations, search for reviews of that equipment, as well as possible alternates and newer designs. Learn the steps of operating the various options, and evaluate them for efficiency, effort and precision. A little research can pay big dividends here!
Holiday Greetings to Our Readers
Merry Christmas and Happy Holidays to all our readers and especially our 60,000+ Forum Members. This marks our 17th Christmas “in business”, and the site is stronger than ever thanks to our Gold and Silver Forum members and industry sponsors. AccurateShooter.com is now accessed by over 500,000 visitors every month, who enjoy our Feature Articles, Daily Bulletin, Shooters’ Forum, and our Facebook Page. Part of the reason for that success is the hard work of our dedicated staff and volunteer helpers.
Unsung Heroes Deserve Recognition
I want to acknowledge those guys who have really helped out the site. Number one is skilled F-Class shooter Praveen K. who serves as our System Admin. Along with being a talented trigger-puller, Praveen is a super-smart computer wizard who has kept our servers running smoothly and helped with vital software upgrades. Praveen has also done some key product tests for the site. We also thank Andy B., our Xenforo ace who has contributed vital Forum software solutions.
A huge “thank-you” goes to F-Class John who finds weekly bargains for the Bulletin and tests new products. John produces gear/hardware reviews for the Daily Bulletin with informative videos showcased on his YouTube Channel. John’s work has become a highlight of our Bulletin content. We also regularly feature videos from wind wizard Keith Glasscock, and product tests from Gavin Gear of UltimateReloader.com. We thank Boyd Allen and EdLongRange who supply story leads for the Daily Bulletin. And we wouldn’t be here without Jeff Williams, who handles site donations by mail. We have a great place to test rifles thanks to our valued friend Joe Friedrich. Other important contributors include: Bryan Litz of Applied Ballistics, Bill Marr of Rifleshooter.com, Jason Baney of EuroOptic.com, and Dennis Santiago. These folks have contributed stories, reviews, and and videos. I also want to recognize Hunting Editor Colton Reid and Norway’s Thomas Haugland. All these men (and many others) have aided the site.
Praise for our Site Sponsors and Advertisers
We also want to thank our major sponsors, without whose support the site could not provide the full AccurateShooter.com experience, with an active Forum, an archive of in-depth articles, and fresh content 365 days a year in our Daily Bulletin. We’re grateful to ALL our sponsors and advertisers. In particular, we want to acknowledge the major companies which have been strong supporters of this site for many years: Capstone Precision Group (Berger, Lapua, SK, Vihtavuori), Bruno Shooters Supply, Bullet Central, EuroOptic, Graf & Sons, Krieger Barrels, Midsouth Shooters Supply, Powder Valley Inc., Precision Reloading, Whidden Gunworks, and Zeiss Sports Optics. Their continuing support helps us keep up the flow of information and serve our readers and Forum members.
“Science tells us that exposure to continuous noise of 85 dB for eight hours is enough to cause permanent hearing loss, and worse, spikes of 130 dB and more can result in permanent hearing damage instantly.” Source: NRA Blog.
The Risk of Hearing Loss
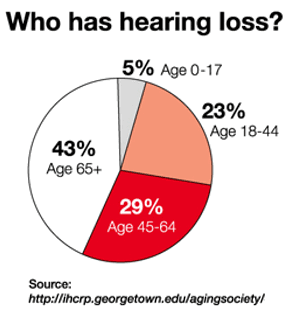
Hearing loss can be progressive and irreversible. If you are a shooter, this is serious business. As the NRA Blog cautions: “You may not even realize you’re harming your hearing. Hearing loss occurs gradually, and can go effectively unnoticed until symptoms become severe. By then, the damage is done.”Effective hearing protection is a must whenever you are shooting firearms or when you are in the vicinity of gun-shots. For ultimate protection, we recommend a good set of tapered foam earplugs, topped by ear-muffs. However, there are situations when you may prefer lighter-weight hearing protection that can be quickly removed. For example, if you are standing well behind the firing line as an observer, or if you are working as a rangemaster or waddie some distance away from the shooters.”
Sound Levels for Common Noises:
9mm Luger pistol: 160 dB
Jet aircraft engine (near): 140 dB
.22 LR pistol: 134 dB
Normal human pain threshold: 120 dB
Noisy Nightclub: 110 db
Riding Motorcycle at 65 mph: 103 db
Power Lawnmower: 95 dB
Hearing damage possible: 85 dB (sustained for 8+ hours)
Ringing Telephone: 80 dB
Normal conversation: 60 dB
What about suppressors? If you use a suppressor is it OK to dispense with hearing protection? Not really. Even the most effective suppressors, on the smallest and quietest calibers (.22 LR), reduce the peak sound level of a gunshot to between 110 to 120 dB. To put that in perspective, according to the National Institute for Occupational Safety and Health (NIOSH), that is as loud as a jackhammer (110 dB) or an ambulance siren (120 dB). For normal caliber handguns and rifles, suppressed sound levels routinely exceed 130 dB, just shy of OSHA’s “hearing safe” threshold of 140 dB. Accordingly, we recommend use of hearing protection even when shooting suppressed.
1. Ear Muffs — Max Protection and Compact Options
The highest current USA Noise Reduction Rating is 34 dB NRR. To get that kind of protection, you need pretty big muffs, but thankfully, you don’t have to spend big bucks. For under $15.00 you can buy quality ANSI-approved muffs with a 30+ dB Noise Reduction Rating. Chose the 34 NRR G&F Pro Muffs at $10.99 or the more comfortable 30 NRR Walker EXT Range Muffs for $12.75. Both products have padded head-bands which retract.
Many hunters and competitive shooters prefer low-profile ear muffs. As these typically have a lower Noise Reduction Rating, perhaps NRR 22-24, we recommend running earplugs under muffs, particularly when you are at a busy range or shooting a match. If you use low-profile electronic muffs, such as Howard Leight Impact Sport Muffs, you should still be able to hear range commands even with plugs underneath.
2. Electronic Plugs — New Technology with Adjustable Volume
For maximum hearing protection we still recommend good muffs over quality foam ear plugs, there is a new option available. A variety of companies now offer electronic ear buds that include small speakers so you can hear range commands and conversations. Please note — these MUST be specially-designed protective in-ear devices. Do NOT just use ear-buds designed for music playback!
Howard Leight recently introduced new Impact Sport In-Ear plugs with an impressive 29 dB Noise Reduction Rating (NRR). That NRR is better than most compact ear muffs. The plugs automatically compress amplification when loud impulse sounds (like gunshots) exceed 85dB. Internal amplification allows you to hear range commands and conversations. The cord connecting the plugs includes twin, handy volume controls. These plugs come with moldable earhooks with 3 different ear tip sizes. The base unit (dark green color) is $85.39 on Optics Planet. A deluxe model with BlueTooth is also available for $113.62 on Amazon. With the BlutTooth version you can take phone calls.
3. Foam Earplugs — Small, Inexpensive, but Essential
20 Pairs
50 Pairs
Quality foam earplugs offer great hearing protection at low cost. These Howard Leight NRR33 Max plugs are your Editor’s favorite foam earplugs. Between shooting, motorcycling and mowing lawns, I probably have Max plugs in my ears 3-4 days a week. These Leight Max plugs are very effective, easy to insert/remove (with the flared ends), and they seem to be less abrasive in the ear canal than some other brands. Right now you can get 20 pairs of these NRR33 Leight Max plugs for just $8.88 or 50 pairs for $11.90.
Note, if you prefer thin, light-weight earmuffs, we recommend running earplugs underneath for double protection while shooting firearms (or when you’re on the firing line). Sound experts tell us that running plugs and muffs together can effectively improve your effective noise reduction by 4-7 dB NRR.
Hearing bands are inexpensive, lightweight, and are handy for special situations, such using hedgetrimmers and noisy power tools, when you may need to frequently remove the protection. These banded products are a also a very good form of hearing protection for hunters. You can keep them handy around the neck while spotting game, and then insert the plugs before shooting. We have tried two types of banded hearing protection, the Howard Leight Quiet Band (shown above) (25 dB NRR), and the Radians Rad-Band (23 dB NRR). The Leight Quiet Band is quite durable and the plugs can be replaced.
Radians Rad-bad is very light-weight, with Jelli™ Plugs that are comfortable, washable, and reusable. Peltor also offers Sport Banded Earplugs but we think those are a bit flimsy and the NRR seems exaggerated.
This time of year, deer and elk hunters throughout the Northern Hemisphere trek into the wilds in search of game. To celebrate the hunting lifestyle, we’re reprising a story from Europe that showcases the beauty of nature that can be experienced on a hunting trip.
If you need a break from your hum-drum day at the office, how about taking a virtual vacation to Norway, where you can explore the scenic mountains in the Fjord region?
Forum member Kenneth Skorpen (aka “Sal”) has created a cool video of a deer-hunting trip he took in Norway. He didn’t bag a buck on this trip, but the walk in the Fjordland mountains took Kenneth through some spectacular scenery. (At the 11:25 time mark you’ll see an amazing sunset over the Fjord.) Kenneth did encounter a doe that had fallen down the mountain, and apparently broken its neck (14:35 time mark). The terrain is very steep, and Kenneth observed that: “I feel fortunate to be able to do this, but I also feel very tired in my legs. Did you know that the hares around here have shorter left legs due to the steep hills?”
More Hunting/Shooting Videos from Norway
You can watch more interesting hunting and shooting videos from Norway on Kenneth Skorpen’s Streken Vertebrae YouTube Channel. Here are some links:
And here is another Skorpen video showcasing beautiful Norwegian landscapes. This was filmed during a February rifle testing session with targets at 1100 and 1400 meters. You’ll see some stunning snow-capped scenery here, starting at the 4:30 time mark.
In this video, former Army Ranger sniper team leader Ryan Cleckner explains how proper head and scope position is a critical component to accurate shooting. Ryan finds that some shooters place the scope too far forward or too far rearward. If the scope is too far back you may have issues with eye relief and stock reach to shoulder. If it is too far forward, you may have cheek-weld problems or get neck strain. Cleckner cautions: “When you are in a good prone position, you don’t want any strain in your neck muscles or back.”
In the video, Cleckner offers a simple method to check your scope position:
“To see if your scope is set up properly … close your eyes, lay your head on your gun, get completely comfortable, and only when you are set-up, then open your eyes. If you can’t see clearly through your scope, CHANGE something [such as comb height or scope position]”.
“When you open your eyes, if you see some scope shadow [i.e. the black ring around the edge of the scope picture], figure out which way you need to move your head to get rid of that shadow, and then make adjustments to either your position, the rifle, or the scope.”
“Very often you’ll open your eyes and realize you need to move further back or further forward. Instead of moving your position [or head], move the scope and get it set up properly.”
Tip on Viewing Your Reticle:
Cleckner: “Sometimes it can be difficult to focus between the target and the reticle, even with the parallax adjusted properly. I recommend you focus only on the reticle. Just like the front sight on a rifle or a handgun, that reticle is what you can control, and it’s what matters. Focus on a crisp, clear reticle, in a stable platform, and all that’s left is trigger control.”
Long Range Shooting Handbook — A Good Resource
Cleckner’s Long Range Shooting Handbook covers a wide range of topics important for precision marksmanship — both shooting skills and technical matters. You can view Sample Chapters from Ryan’s Book on Amazon.com. Cleckner’s book is designed as an intro to key concepts such as MOA vs. Mils, External Ballistics, and Environmental Effects. Included are personal tips and advice based on Cleckner’s years of experience as a sniper instructor and special operations sniper.
The Long Range Shooting Handbook is divided into three main categories: What It Is/How It Works, Fundamentals, and How to Use It. “What It Is/How It Works” covers equipment, terminology, and basic principles. “Fundamentals” covers the theory of long range shooting. “How to Use It” gives practical advice on implementing what you’ve learned, so you can progress as a skilled, long range shooter.
Ryan Cleckner was a special operations sniper (1/75 RGR) and he served as a U.S. Army sniper instructor. Currently he works as a firearms industry executive and practicing firearms attorney.
For today’s Sunday GunDay story we showcase seven interesting metal-chassis rifles. While we love the look and feel of wood and fiberglass, metal does have its advantages. It can be crafted very straight and true, and the designs can achieve a very low center-of-gravity without sacrificing rigidity. In addition, a precisioned machined metal chassis tends to track extremely well.
Massive IBS Heavy Gun Milled from Solid Aluminum Billet
This remarkable 70-lb IBS Heavy Gun, was machined from solid aluminum billet, by Bruce Baer. It rests on a G&G Alvey rest split in the middle to comply with rules. This “heavy metal” CNC-machined wonder is a work of art designed for the 1000-yard game in the Heavy Gun class. Wood stocks, and to a lesser extent fiberglass stocks, are more forgiving, offering greater damping and recoil absorption. However, metal stocks offer superior rigidity, and the CNC machining allows tracking surfaces to be perfectly parallel.
Williamsport limits Heavy Guns to 100 pounds. Under IBS and NBRSA rules weight is unlimited. You will see a few massive 200-lb behemoths at IBS matches, but most competitors find that something in the 60-90 pound range works best. Bruce Baer explains, “You can’t stop a gun from recoiling. If it doesn’t recoil it will jump. If it jumps you might as well go home because you won’t shoot a good group. So it is pointless to try to build a gun so heavy as to eliminate all recoil. The more you restrict the rifle’s recoil the more temperamental that rifle will be. The 200-pounders just don’t out-perform something in the 60- to 80-pound range, and I think the optimal weight is 60-70 pounds.”
Bruce Baer likes the 70-lb overall weight for a heavy gun: “Extreme mass is not necessarily an advantage. Watch a locomotive starting up from zero–it will vibrate from one end to another. If the gun is too heavy I think it will vibrate at the start of recoil and that will kill accuracy. I want the gun to start from recoil with very little effort so it will be smooth from start to stop.”
Water-Cooled World Record-Setting Wondergun
We like “outside of the box” thinking. And in the world of competitive shooting, it can’t get more unconventional than this. But this radical liquid-cooled benchrest rig wasn’t just a crazy experiment — it actually delivered the goods. This IBS Heavy Gun, built by Joel Pendergraft, produced a superb 10-shot, 3.044″ group that stood as an International Benchrest Shooters (IBS) 1000-Yard Heavy Gun record for seven years, not being broken until 2016.
Using this water-cooled wondergun, Joel shot the record-breaking group in April 2009 at Hawks Ridge, NC. This monster features a .30-Caliber 12-twist, 4-groove Krieger barrel inside a water-filled sleeve (like on a liquid-cooled machine gun). Joel shot BIB 187gr flat-based bullets in Norma brass, pushed by a “generous amount” of Alliant Reloder 25 and Federal 210M primers. The cartridge was a big custom wildcat Joel listed as “.300 Ackley Improved”.
Pendergraft’s 3.044″ 10-shot group was a great feat, breaking one of the longest-standing, 1000-yard IBS World Records. And Joel’s 3.044″ record stood for 7 years!
Richard King’s Radical .223 Rem F-TR Skeleton Rifle
Here’s something exotic from our Gun of the Week archives. We like this rig because it is so radical (we doubt that you have ever seen anything quite like it). Gun-builder Richard King calls this his “Texas-T”, noting that “this is my personal gun, built the way I wanted it. I know it’s radical and some may not care for it. But it works.” The rig was designed to shoot F-TR, but it can also be converted easily to shoot F-Open with a front rest.
Richard reports: “This is pretty much an all-aluminum rifle. The action is a Kelbly F-Class with a Shilen stainless steel competition trigger. The scope is a 1″-tube Leupold 36X with a Tucker Conversion set in Jewell spherical bearing rings. The .223 barrel is 30″ Pac-Nor 3-groove, 1:6.5″-twist mounted in a V-type barrel block. The bipod has vertical adjustment only via a dovetail slide activated by a stick handle. It works like a joy-stick, but for vertical only. I adjust for windage by moving the rear sandbag.”
Richard likes how the barrel block works: “With the barrel block forward, the vibrations should be at a low frequency. Instead of one long rod whipping, I now have two short rods (barrel halves) being dampened. This is my fourth barrel block gun. They work, but so does a good pillar-bedded action. [This rifle] is designed for my style of shooting. It is not meant to be a universal ‘fit all’ for the general public. However, I will say the design is adaptable. I can easily convert the system to run in F-Open Class. I would drop a big-bore barreled action into the V-block, slide on a heavier pre-zeroed scope and rings, add plates on the sides up front to bring the width to 3″, and maybe a recoil pad.”
F1 F-Open Chassis from Competition Machine
Along with his famed tube-guns, Gary Eliseo of Competition Machine has designed a modern, low-profile chassis system for F-Open competition. Assembled with Cerakoted aluminum beams, these F1 F-Open chassis systems offer great tracking with an ultra-low center of gravity.
Here is the F1 Chassis with “Marine Corps Red” powder coat finish. Read Full Report.
This F1 aluminum alloy chassis stock features a super-low center of gravity, plus adjustable length of pull, cheek rest, and drop. The stock is available in a wide choice of Cerakote finishes. The current Model F1 chassis features a action block mounting system to fit most actions. There was also an earlier version that had a free-floated action with the barrel in a barrel block, secured with epoxy. Both F1 versions (action block and barrel block) shot great, with excellent performances in competition.
Gen 1 F1 F-Open Chassis System with Barrel Block
State Championship Win with Home-Built Aluminum Stock
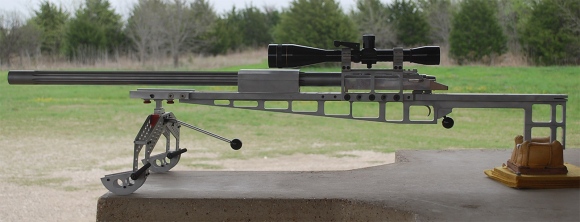
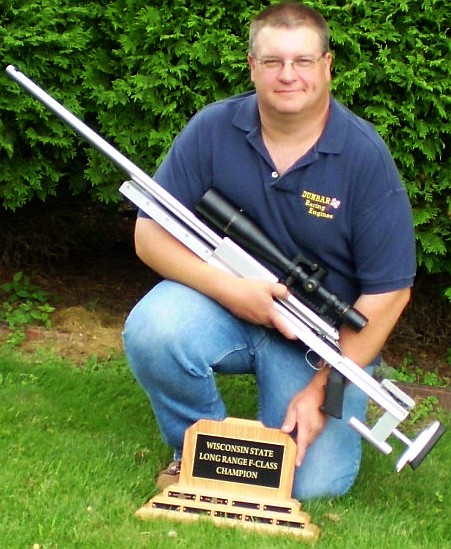
While most of the stocks featured above were crafted by professionals, the properties of aluminum allow it to be used by persons with some basic mechanical skills and metal-working tools. Here’s proof. Back in 2009, Forum Member John Dunbar (aka JD12) crafted his own aluminum F-Open stock. And he used that impressive metal stock to win the Wisconsin State F-Class championship. READ Full Story.
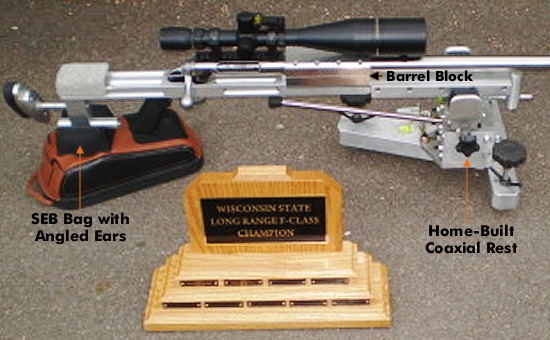
The stock for John’s “home-built” .284 Winchester was mated with a Savage target action. John designed and fabricated the aluminum stock himself. It features a central barrel block clamping a 32″ Brux barrel. Get this — John completed the rifle only 5 days before the match: “I finished machining/assembly on Monday night, did load workup Wednesday and Thursday nights, loaded rounds Friday night, and headed to Lodi at 4:30 on Saturday morning.” John even made his own co-axial front rest (see below)
When Fiberglass Fails, Aluminum Stock Saves the Day
Australian Mark Fairbairn performed a “Quick Fix” during the 2018 Berger SW Nationals. Mark’s F-Open rifle, in a conventional fiberglass stock, was giving him random vertical during one yardage: “I had a bit of a problem with elevation — the stock was hitting somewhere [causing vertical]. I was X-X-X then a shot popped up in the 9 ring with no good reason. So I figured I better put a new stock on it. I got my old aluminium stock I brought from Australia and quickly adjusted it to fit on the Stolle.”
Right on the firing line berm Mark swapped his barreled action into the metal stock of his own design. The clock was ticking… but the story had a happy ending. For the next yardage Mark shot a brilliant 150-7X, not dropping a point. So the “Quick Fix” did the trick. As they say Down Under — “Good on Ya, Mate!”
Home-Built Aluminum Chassis with Innovative A-Arm Bipod
Here is another home-built rig featuring an aluminum chassis mated to a Savage barreled action via a forward-mounted barrel block. This rig was crafted by Forum member Patrick Lundy, who followed the maxim: “If you can’t buy it, then build it.”
Patrick Lundy was so impressed with a fellow shooter’s barrel-block rifle, that he build a similar match gun himself, complete with barrel block and aluminum chassis. Patrick was inspired by a metal stock belonging to Peter Gagne. But he added his own custom touches, including an innovative “A-Arm”-design bipod for shooting in F-TR class. The gun has been very successful in competition. READ FULL Report
Pat told us: “This new stock was a milestone in my shooting career — it was my very first attempt to build a stock. I wasn’t much of a wood worker but I did have a talent for building with metal. The stock was fabricated from 6061 T6 aluminum. With this gun I was able to shoot from a rest or a bipod.”
Pat crafted the bipod from aluminum tubing: “The bipod was a very rigid A-frame design with welded aluminum tubing. I added slippery feet under the pod skis to facilitate smoother recoil. I realized that a wide-stance bipod had to recoil the same on both sides or the group would string horizontally.” Here is the innovative “A-Arm” bipod that Pat Lundy built for his rifle.
Most competitive shooters are pretty good about bore cleaning (some may even clean their bores too aggressively). However, we’ve found that many shooters neglect the chamber area and the bolt lug recesses. It’s too easy to clean the bore, slip out the guide rod and say “I’m done.” Sinclair Int’l explains why it’s important to clean the action interior: “Shooters use a lot of grease and oil on their bolts to reduce friction and to prevent wear[.] Unfortunately, both of these compounds attract grit, powder and primer residues. Cleaning your receiver is especially critical [with] custom actions where the fit between the action and bolt is held to very tight tolerances. Routine cleaning of the action will prevent unnecessary wear on the bolt body, locking lugs, and the action raceways/guide rails. Frequent action cleaning is also essential to keeping the trigger area free of debris which can cause trigger hang-ups and failures.”
Your rifle deserves a clean action and lug recesses. For action cleaning, our friend Danny Reever favors the PMA Action Cleaning tool. This handy tool speeds up the cleaning process, letting you do a better job in less time. Danny reports: “I’ve been using the PMA Action Cleaning Tool Kit for quite some time. Previously, I used one of the old style (round knob) action-cleaning tools with cylindrical cotton rolls. I think the PMA Action Cleaning Tool Kit is easier to use, and possibly achieves better results. Read Full Tool Review.
Cleaning the Chamber
Combustion by-products, lubricants, and solvent residues can collect in your chamber. Severe build-up of grease and carbon can interfere with chambering. Also some solvents will promote corrosion. You need to keep your chambers clean.
1) Install a clean cotton mop of the correct size on the end of a chamber rod and insert the mop into the chamber. Rotate the mop several times to remove any brush bristles left behind and any excess solvent that was between the rod guide snout and the end of the chamber. Make sure the chamber is dry. Prior to storing a rifle you can oil the chamber but make sure the oil is removed prior to firing the rifle.
2) Alternatively, install an old bore brush on a chamber rod, overlap a couple of patches on the brush bristles, and wrap them around the brush completely. Then insert the patch-covered brush into the chamber while rotating it to remove the excess solvent and debris. Push it firmly into the neck area of the chamber. A similar method is to pierce a large patch on the end of the brush loop and insert it into the action, again rotating the brush as you push the patch up against the breech.
Cleaning the Lug Recess Area
The action lug recess area is one of the dirtiest places on a bolt-action rifle. To properly clean this area, always use a tool designed for the task, such as the $29.99 Sinclair Action Cleaning Tool (part # ACT1) which is part of the full Sinclair Action Cleaning Tool Kit ($49.99, part #ACT2).
1) Insert a cotton roll or cleaning felt into your lug recess cleaning tool and wet both ends and the face of the cotton roll/felt with solvent.
2) Insert the tool into the action and push it forward until it is positioned fully in the lug recess area and rotate the tool head several times. Then reverse the rotation for another few turns. While rotating the tool move it slightly in and out to cover the entire recess area and to also clean the breech face.
3) Remove the tool from the action and inspect the surface of the felt or cotton roll. If there is quite a bit of residue on both sides of the felt/roll, then repeat with another wet felt/roll.
4) When you feel the recess area is completely clean, insert a dry cotton roll into the tool and rotate the tool head to remove any remaining solvent and debris. If necessary, use a second dry cotton roll.
5) You can follow this step up with another pass of a mop or patches into the chamber to get any debris or solvent that pushed forward out of the lug recess area.


 Do you know which one of your eyes is dominant? It’s easy to determine eye dominance with a simple exercise. Pick an object about 6-10 feet away (a light switch or door knob works well). Make an “OK” sign with your right hand (see photo) and hold that about 18″ from your face. Now, with both eyes open, look through the circle formed by your thumb and index finger. Center the circle on the object, so you can see the object in the middle.


 Handloaders often come to prefer one or two maker’s manuals over others for various reasons. Asking a friend who’s already an experienced loader which manuals they recommend is a good start. Borrowing one or more to read before purchasing is another.
 Holiday Greetings to Our Readers


 The Risk of Hearing Loss


 If you need a break from your hum-drum day at the office, how about taking a virtual vacation to Norway, where you can explore the scenic mountains in the Fjord region?