There is an excellent article about primers on the Shooting Times website. We strongly recommend you read Mysteries And Misconceptions Of The All-Important Primer, written by Allan Jones. Mr. Jones is a bona fide expert — he served as the manager of technical publications for CCI Ammunition and Speer Bullets and Jones authored three editions of the Speer Reloading Manual.
This authoritative Shooting Times article explains the fine points of primer design and construction. Jones also reveals some little-known facts about primers and he corrects common misconceptions. Here are some highlights from the article:
Size Matters
Useful Trivia — even though Small Rifle and Small Pistol primer pockets share the same depth specification, Large Rifle and Large Pistol primers do not. The standard pocket for a Large Pistol primer is somewhat shallower than its Large Rifle counterpart, specifically, 0.008 to 0.009 inch less.
Magnum Primers
There are two ways to make a Magnum primer — either use more of the standard chemical mix to provide a longer-burning flame or change the mix to one with more aggressive burn characteristics. Prior to 1989, CCI used the first option in Magnum Rifle primers. After that, we switched to a mix optimized for spherical propellants that produced a 24% increase in flame temperature and a 16% boost in gas volume.
Foiled Again
Most component primers have a little disk of paper between the anvil and the priming mix. It is called “foil paper” not because it’s made of foil but because it replaces the true metal foil used to seal early percussion caps. The reason this little disk exists is strictly a manufacturing convenience. Wet primer pellets are smaller than the inside diameter of the cup when inserted and must be compacted to achieve their proper diameter and height. Without the foil paper, the wet mix would stick to the compaction pins and jam up the assembly process.
There is an informative article on the NRA’s American Hunter website regarding suppressor use for hunting. The article, What Hunters Need to Know About Suppressors, answers common questions about licensing, tax stamps, and suppressor types. The article explains the history of the $200 tax stamp which must be paid when acquiring a suppressor:
“Why the Tax? In 1934 … the federal government, while battling gangsters such as Al Capone, heavily restricted silencers with passage of the first National Firearms Act. Hoping to gain an advantage on criminals that often had better weapons than cops, the Feds placed a mandatory ‘sin’ tax on silencers that was so high it would effectively ban their purchase by all but the wealthiest individuals. In 1934, $200 was the equivalent of $3,500 today. The $200 tax still stands despite no evidence that a simple metal tube is capable of causing crime.” — American Hunter
The American Hunter article also discusses how well suppressors actually reduce noise. User should be aware that the sound level of a large, centerfire hunting cartridge will still exceed 130 decibels (dB) on average, even with a typical suppressor (silencer) in place. For that reason, we recommend that hunters continue to wear ear protection even when they shoot suppressed.
For example, Thunder Beast Arms says its latest Ultra 9 Suppressor will reduce the report of a .308 Win to 132-134 dB: “The ULTRA 9 will suppress a typical .308 bolt-action rifle down to approx. 132-134 dB. It also has very little or no ‘first round pop’ (FRP) in most applications.” NOTE: These dB levels are measured in accordance with MIL-STD-1474D using BK 2209 SLM offset one meter from muzzle.
How Loud Are Unsuppressed Rifles?
Firearms Are Loud — 140 dB to 175 dB. Audiology group ASHA explains: “Almost all firearms create noise that is over the 140-dB level. Exposure to noise greater than 140 dB can permanently damage hearing. A small .22-caliber rifle can produce noise around 140 dB, while big-bore rifles and pistols can produce sound over 175 dB. Firing guns in a place where sounds can reverberate, or bounce off walls and other structures, can make noises louder and increase the risk of hearing loss. Also, adding muzzle brakes or other modifications can make the firearm louder. People who do not wear hearing protection while shooting can suffer a severe hearing loss with as little as one shot[.] Audiologists see this often, especially during hunting season when hunters and bystanders may be exposed to rapid fire from big-bore rifles, shotguns, or pistols.” Source: ASHA, Recreational Firearm Noise Exposure.
How Much Does a Good Suppressor Really Reduce Firearm Sound Levels?
That depends on the rifle, the cartridge, and the effectiveness of the suppressor. The American Hunter article explains: “Suppressors retard the speed of propellant gases from the cartridge that rapidly expand and rush out of the barrel. It’s these gases that produce the loud boom that’s heard for miles. A suppressor’s series of internal baffles slows these gases so they are not all released at once, thereby muffling the sound.” Many good commercial suppressors can achieve 30-35 dB sound suppression. However, Zak Smith of Thunder Beast Arms says: “There are a bunch of manufacturers who publish values that are not reproducible, or use an ad-hoc test instead of a mil-spec test. In many cases we’ve tested the exact same suppressors they’ve advertised with 30-40 dB reductions and found they are actually in the high 20s instead.”
Again, for this reason, we recommend that hunters use ear protection, such as electronic muffs, even when shooting suppressed.
Choosing a Suppressor for Hunting Use
The American Hunter article explains that there are many types of suppressors on the market. Bigger suppressors are heavier, but they normally are more effective. You also have a choice in muzzle attachments:
“For most hunting applications, direct thread is the best choice. If you intend to buy only one suppressor yet you have multiple guns, it’s advantageous to buy a model sized and rated for the largest caliber you intend to use. While a suppressor made specifically for a .223 Rem. will reduce the sound of that round slightly better than a model made for .30 caliber, for example, you can use a .30-caliber can for smaller calibers — but not vice-versa. In general, the bigger the can, the more it reduces sound. Smaller suppressors, however, are easier to carry in the woods.” — American Hunter
States Where Suppressor Ownership is Allowed
Currently, the following 42 states allow private ownership of suppressors: AL, AK, AZ, AR, CO, CT, FL, GA, ID, IN, IA, KS, KY, LA, ME, MD, MI, MN, MS, MO, MT, NE, NV, NH, NM, NC, ND, OH, OK, OR, PA, SC, SD, TN, TX, UT, VT, VA, WA, WV, WI, WY. NOTE: Suppressors are legal in Connecticut and Vermont, but hunting with silencers is not allowed in those states.
How to Apply for a Suppressor
To acquire a quality suppressor, you’ll first need to shop around, comparing verified performance. Unfortunately some manufacturer’s dB claims are exaggerated. Give due consideration to size, weight, and durability. When you’ve selected a brand and model, find a Class 3 dealer authorized by the ATF to sell suppressors. You must fill out ATF Form 4, get fingerprinted, and pass a background check. Along with two completed copies of Form 4, submit your fingerprint card, passport photo and a check for $200 to the ATF. Then you wait for the ATF to process your application. American Hunter says the average ATF suppressor processing wait time is now nine months.
BENEFITS OF SILENCERS
NOISE REDUCTION
According to OSHA, the threshold for a hearing safe impulse noise is 140 dB. Without hearing protection, exposure to any impulse noise over 140 dB causes varying degrees of permanent noise-induced hearing loss, which can also lead to tinnitus. Most well-engineered silencers take the dB level of their host firearm well below 140 dB, making those silencers effective primary hearing safety devices. You should always still wear hearing protection (muffs or plugs) when using suppressors.
RECOIL REDUCTION
By containing the explosion at the muzzle, suppressors significantly reduce perceived recoil energy, reduce the rifle’s rearward movement on recoil, and reduce rifle torquing and muzzle flip. The reduction of recoil (and rifle torquing/hopping) lessens shooter fatigue and helps the shooter get his sight picture back on target rapidly after firing. With smaller calibers, a suppressor may enable the shooter to maintain a nearly-continuous sight picture, following the shot into the target. In addition, by reducing felt recoil (and muzzle blast), a suppressor can help inexperienced shooters avoid flinching.
Top is a CZ 457 MTR; middle Anschutz with BR stock; bottom is Bergara B14R in DPT Chassis.
With the variety of rimfire disciplines, from cowboy action to Olympic three-position smallbore, there are countless different rimfire designs on the market — bolt guns, lever guns, single-shots, toggle-links and more. These may shoot the same ammo, but they certainly vary in looks and ergonomics. This is testimony to human creativity.
In our Shooters’ Forum, you’ll find a long-running thread showcasing rimfire rifles for plinking, hunting, 3P Target Shooting, Silhouette, Rimfire F-Class, NRL22 and more. Here are some of the notable recently-posted rifles in that Forum thread, with brief build/component details.
ARA Benchrest Rifle with Stiller Action, Shilen Ratchet Barrel
Forum member Peebles24 showcased his cool flame-paint-job .22 LR benchrest rifle against a scenic, snowy background (never too cold to shoot right?). “I had a new rifle built this past fall by Mark Penrod at Penrod Precision. Stiller 2500X action, Shilen ratchet barrel, Jewell trigger, McMillan stock, Harrell’s tuner, Sightron SIII 10-50×60mm glass. I’m shooting it off my Arnold Machine one-piece rest made locally by Cliff Arnold. I visited the Lapua Testing Center East and got a case of Midas+.” For ammo testing results, click photo at right.
In late April the gun competed in its first ARA benchrest match in Wabash, Indiana.
Beautiful MasterClass-Stocked Rifle for Rimfire F-Class
Here is a handsome rifle belonging to Forum member Redd. Set up for prone Rimfire F-Class-style competition, this rig features a Shilen Ratchet barrel with Erik Cortina Tuner fitted to a Stiller 2500X action. It boasts a beautiful MasterClass figured Walnut stock and rides on a SEB Joy-Pod bipod up front. The optic is a Nightforce 40x45mm Competition.
CZ 457 .22 Magnum Transformed with KRG Bravo Stock
Forum member JAS-AS purchased a .22 Magnum CZ which he revived as a training rig with a new stock. He posted: “I use a CZ457 in .22 Magnum mainly as a trainer — bipod and rear bag kind of stuff. It has evolved over the last year or so. Next change will be a Lilja barrel. This because it can shoot brilliantly (at times) but not consistently. And accuracy degrades as it gets minimally dirty. Also, it doesn’t like 40gr rounds — the groups open up to 1.5 MOA. It’s at its best with 30 and 35 grain rounds running at up to 2250 fps. I believe that to be a twist-rate issue.”
The “Before” photo shows the rifle “as purchased” with a Nikon Monarch 4-16x42mm mildot scope. The “After” image shows the CZ 457 as modified. JAS-AS notes: “I added a bunch of stuff: KRG Bravo stock, Vortex Strike Eagle 5-25x56mm FFP scope, new bipod and Precision Underground bag, trigger spring. With this setup I shoot at 100 yards+ exclusively.” Show at right is a 9-shot group with the rifle at 100 yards. Three-shot groups at 100 have been below half-MOA.
Savage Mark II Squirrel/Field Rifle
This Savage Mark II rifle isn’t fancy, but it has brought much satisfaction to its owner, Forum member “Ohio Varmint Shooter”. He posted: “Just a nice field gun. Less than $200 (without scope). Cheap wooden stock, thin pencil barrel. My squirrel/field gun. There is absolutely nothing special about this… except it’s lefthanded. It shoots fine, preferring CCI standard velocity rounds. I did splurge and put a more-than-needed scope on it. Most scopes with fixed parallax (in this category), have it fixed at 50 yards. I wanted variable parallax so I could set it at 35 yards. I don’t know if it really makes any difference, but I do try to go for accurate head shots. The scope is also a little overkill in magnification, but it does help with the head shots and my aging eyes.”
“As a youth in the 70s, I always dreamed of a left-handed bolt. So getting back into shooting/hunting about 8 years ago, I was delighted to discover this gun. Growing up I had a semi-auto 22, but being a lefty … it would spit powder on my face.” — Ohio Varmint Shooter
Tikka T1x Action in Eliseo Competition Machine Chassis
Here is Gary Eliseo’s personal Rimfire Match Target Rifle with Tikka T1x action. The T1x action is carried in Competition Machine Rimfire Chassis. Gary also posted some recent 100-yard groups, using SK rifle match ammo in this rifle. Gary runs Competition Machine LLC and produces the chassis system for this cool rig, along with outstanding Across-the-Course, High Power, and F-Class chassis systems for rimfire and centerfire rifles.
Vudoo Action Benchrest Rifle with Benchmark 3-Groove Barrel
Here is a classy benchrest rig belonging to Forum member FCJIM. It features a Vudoo LBRP action, Benchmark 3-groove barrel, Harrell’s Precision tuner, NightForce Benchrest scope, and McMillan Edge stock. The stock work was done by Doan Trevor, while FCJIM did the metal work himself, using a Nevius reamer. This rig likes to shoot ELEY Black and Lapua Midas+ ammo.
Last but not least, here is a “blast from the past”. This classic lever-action single shot is crafted by CPS Rifles (Paul Shuttleworth), a boutique gun-maker specializing in single-shot rifles, particularly reproductions of the Stevens 44 1/2. Note the richly-figured wood and the lovely color case-hardening on the receiver. There is a dual Set Trigger system. You pull one trigger through a relatively long stroke until it clicks. The the second trigger breaks the shot (and drops the hammer) with just a few ounces of pull weight. This rig, fitted with MPA Vernier-type tang sights, belongs to Forum member “Mills” from Texas.
The popular BarrelCool is a compact barrel-cooling device that also serves as an empty-chamber safety flag. A small, battery-powered fan drives cooling air through the barrel’s bore. Yes it really works — manufacturer-provided data shows that BarrelCool significantly reduces the time it takes to cool down a hot barrel. Look at the chart above to see what to expect.
In the past, folks have tried various methods to cool barrels: water flushed through the bore, CO2 tanks, even battery-operated fish pumps. BarrelCool is a simpler, less costly, and much handier solution. Priced at $39.99, this small device can definitely save you time at the range. Potentially it can save you money by extending barrel life. To see how Barrelcool works, watch th videos below that show the BarrelCool units in both bolt-action and AR-type rifles.
BarrelCool Range Reports from Forum Members
Forum members have been impress with the BarrelCool device. Member Comrade Terry said: “At the range, I spend a good bit of time waiting for the barrel to cool between shot strings. I fired my usual 50 rounds today, and (though it was 85° today) I was able to leave the range 30-40 minutes earlier than usual thanks to the BarrelCool. I like it!” Another Forum member, J-Rod, reports “Did some load development on my new rifle. This used to take forever due to the barrel heating up outside in full sun (90° ambient). I’d say this little gem cut about two hours off my normal shooting time. I got home early and the wife was happy — what’s that worth?”
How and Why BarrelCool Was Invented
BarrelCool originated from the idea that cease-fire periods would be a great time to cool a barrel. During cease-fires, most ranges and matches require empty chamber flags in the gun so that the range officer and everyone on the firing line can see visually that the gun is in a safe condition. The BarrelCool does double duty — cooling the barrel while serving as an empty-chamber indicator.
BarrelCool inventor Bryan Sumoba explains: “Previous barrel-cooling methods required additional steps such as running patches down the bore, or a fan that gets in the way of a required empty-chamber flag. BarrelCool now allows the shooter to cool the barrel while having the empty-chamber flag in the firearm.”
Sumoba says BarrelCool significantly shortens the time needed to cool down a hot barrel: “In controlled testing, it took about half the time to cool the barrel from 140 degrees F to 100 degrees F. Our customers also report significant reductions in the time it takes to cool down a hot barrel. At an F-Class match in Sacramento, one shooter fired 25 shots out of his 7mm RSAUM and got the barrel to the point where it was too hot to touch. We placed BarrelCool in his firearm and within 30 minutes, the barrel was back to near-ambient temperature.”
Using three (3) CR123A batteries, a BarrelCool unit can operate for 7-10+ hours. BarrelCool fits both AR-style rifles as well as most bolt action rifles. The Hi-Viz yellow color stands out on the firing line and BarrelCool is small enough to fit in most range or gun bags. Manufactured in the USA, Barrelcool can benefit competition, precision, or recreational shooters who need to cool down their barrels more rapidly, while displaying “safe condition” on the firing line. For more information, or to order for $34.99, visit www.barrelcool.com.
BATTERY TIP: We recommend rechargeable CR123A batteries for use in the BarrelCool. These can last many seasaons and can be charged at home or in a vehicle. Keep a spare set in your range bag. A 4-pack of C123A Lithium Batteries with USB recharger unit is $29.99 on Amazon
Take a look at that unusual target below. We bet you’ve never seen one of these before. It’s a 50-Yard Sighting Target for the M1 Garand (and other .30-06 Springfield vintage military rifles). It’s designed to allow a rifleman to confirm his zeros for multiple yardages all the way out to 1000 yards. But importantly, he can establish those zeros at a very “short” shooting facility, since the target is positioned at a mere 50 yards.
Here’s how it works. The target is placed at fifty (50) yards. You start at the bottom, aiming at the black circle. Then check your come-up table and work your way up, clicking step-by-step to the various horizontal lines set for 200, 300, 500, 600 and 1000 yards. This is NOT “spray and pray” — you need to have a pretty good idea of the clicks you need, based on your ammo’s ballistics. This target is calibrated for the U.S. Military M72 Ball Ammo. The targets are available from Champion’s Choice ($0.75 each) or from Creedmoor Sports (12 for $5.95).
Kevin Thomas used this target to get zeroed for a D-Day Anniversary Match at the Talladega Marksmanship Park a few seasons back. Kevin used the target for both his M1 Garand as well as his M1903A1 Springfield, both chambered for the .30-06 Springfield cartridge.
Zeroing at a Short Distance — How to Use the 50-Yard Sighting Target, by Kevin Thomas
As part of my preparation for the Garand Match at the CMP’s Talladega Marksmanship Park, I needed to zero my new M1 Garand, but I was crunched for time. I didn’t have time to get to my normal range and confirm zeros at actual yardages. But a 50-yard zero target came to the rescue. Made for M1s using the M72 National Match ammo, the target allows the shooter to establish fairly good zeros at 200, 300, 500, 600 and 1,000 yards if you’ve got access to a 50-yard range.
I have no idea when these 50-yard Sighting Targets were first developed, but they’ve been around for at least as long as I’ve been involved in this game (longer than I care to admit). It consists of a tall target, with a smallish black bullseye located at the bottom center. The bullseye is an aiming point only. Extending through the top of the target is a vertical line that runs directly up the center, to nearly the top of the paper. Across this, there are intersecting horizontal lines that are marked 200, 300, 500, 600 and 1,000.
The target was designed for the M1 Garand rifle using then-issued M72 National Match ammunition. This ammo launched a 173gr FMJBT bullet at approximately 2,640 FPS. It was a good load in its day, supersonic out to the 1,000-yard line. While that ammo is fairly scarce these days, this isn’t a problem for the handloader. My standard match load for the M1 Garand utilizes the 175gr Lapua Scenar HPBT, and delivers remarkably similar ballistic performance. Thus my normal Garand load translates nicely to this 50-yard target. Yes, this is by design. No point in reinventing the wheel when Lake City has already established what works!
In use, the shooter sets the target up at a measured 50 yards, and (this is critical) checks the vertical line with a plumb bob or a carpenter’s level, to ensure that it is absolutely vertical. Once the target is set, the rifle is fired and the group noted. From there, it is a simple matter of zeroing it normally to bring the groups into alignment with the vertical line, at the elevation needed for a particular range. Once your group is hammering the intersection of the vertical line and the horizontal line marked “200”, you have established your 200-yard zero for that rifle. Record the number of clicks, and you’re good to go. Raise the impacts up to coincide with the line marked “300” and you now have a 300-yard zero as well. And so on, right up the target. Record those settings in your data book, and you’re ready to go to the range at the full distances. If done carefully, you may be in the X-Ring, but at the very least, you’ll be well-centered and ready to get some hard dope recorded for future shoots.
The same target can also be used with an M14/M1A, at least at the shorter distances. The ballistics of the M118 and the current M118LR are similar enough that this will get you on target at the full distances, probably requiring just a half MOA or so change from the 50 yard zero you recorded. Same bullets, moving at a slightly more sedate 2,550 fps, you’ll be in the ballpark at least.
Note the owner’s name, “S. Limbourne” was engraved on the bolt release (and trigger guard, see below).
Competition rifles don’t need to be beautiful, as long as they shoot. But who doesn’t like a spectacular figured-wood stock, particularly when it is combined with a superb custom action and a tack-driving barrel. This custom .284 Winchester F-Class Open division rig was crafted by gunsmith Thomas “Speedy” Gonzalez for competitive shooter Scott Limbourne. The handsome Bacote wood stock comes from Cerus Rifleworks, while the action is a polished Borden RBRP BRMXD. Two Brux 1:9″-twist barrels were chambered for the project, both finished at 32″. The stock is also fitted with a R.A.D. Recoil System. This rig has top-of-the-line hardware all around.
Action: Borden BRMXD – Polished
Rail: 20 MOA Polished
Chambering: .284 Winchester
Trigger: Jewell BR – Blueprinted
Barrel: (2x) Brux 32″ 1:9″ Twist
Stock: Cerus F-Open in Exhibition Grade Bacote
Recoil System: R.A.D. System
Extras: Carbon Fiber Tunnel Plate, Custom Engraving Work on Action, Trigger Guard, and Bolt Release.
You’ll find other impressive rigs on Speedy’s Facebook Page. If you’d like a superb custom rifle like this, call Thomas “Speedy” Gonzalez at 972-672-6630, or send email to: speedy.godzilla [at] msn.com.
Can you form a wildcat cartridge such as the 6 Dasher without expending primer, powders, and bullets? Absolutely. Using the hydro-forming method you can form improved cases in your workshop with no firing whatsoever, so there is no wear on your precious barrel. Watch this video to see how it’s done:
6 Dasher Case Hydro-Forming Demonstration:
Forum member Wes J. (aka P1ZombieKiller) has produced a helpful video showing how to form Dasher cases use the Hornady Hydraulic forming die kit. This includes a two-part die (body and piston), and a special shell holder. To form the case, you insert a primer in your virgin brass, top the case off with with a fluid (water or alcohol), then run the case up into the Hydro-forming die. A few stout whacks with a hammer and your case is 95% formed.
This same procedure can be accomplished with a Whidden Gunworks 6mm Dasher hydraulic form die. We like the Whidden hydro-forming die for its production quality and consistent results. This Whidden system works great according to our Forum members.
Hydro-Forming Procedure Step-by-Step:
1. Insert spent primer in new 6mmBR brass case.
2. Fill with water or alcohol (Wes prefers alcohol).
3. Wipe excess fluid off case.
4. Place case in special Hornady shell-holder (no primer hole).
5. Run case up into Hydraulic forming die.
6. Smack top piston of forming die 3-4 times with rubber mallet or dead-blow hammer.
7. Inspect case, re-fill and repeat if necessary.
8. Drain alcohol (or water) into container.
9. Remove primer (and save for re-use).
10. Blow-dry formed case. Inspect and measure formed case.
Wes achieves very uniform cartridge OALs with this method. He measured ten (10) hydro-formed 6 Dasher cases and got these results: two @ 1.536″; 2 @ 1.537″; and 6 @ 1.538″.
Three or Four Whacks Produces a 95%-Formed Case
With a Whidden or Hornady hydro-forming die, hydraulic pressure does the job of blowing out the shoulders of your improved case. The process is relatively simple. Place a spent primer in the bottom of a new piece of brass. Fill the case with water, and then slip it into a special Hornady shell-holder with no hole in the middle. Then you run the case up into the forming die. Now comes the fun part. You gently insert a plunger (hydraulic ram) from the top, and give it three or four stiff whacks with a mallet (or better yet, a dead-blow hammer). Remove the plunger and you have a 95% formed case, ready to load.
Special Shell-Holder
Hornady supplies a shell holder made specifically for the hydro die; there’s no hole in the bottom of it. Just insert a spent primer into the primer pocket and you’re ready to go. The spent primer, combined with the solid shell holder, keeps the water from seeping out of the primer pocket. The primer pushes out a little bit during this process, but it’s impossible for it to come out because of the way the shell holder is designed. The shell holder has a grove which allows the case to slide out of the shell holder even when the primer protrudes a bit.
All shooters, even rimfire enthusiasts, should always wear ear protection when at the range. A typical rifle gunshot is very loud — in the region of 140 to 170 decibels (the pain threshold is 130-140 db). Without ear protection, you can permanently damage your hearing during a single shooting session. We all know older shooters who are partially deaf, or who suffer from Tinnitus, because they didn’t use earplugs or muffs when they were younger.
How Humans Hear Sounds — Amazing Video Reveals All
The human sense of hearing involves multiple delicate internal membranes, bones, organs, and nerves. Shooters understand the importance of protecting their hearing, but they may not understand the bio-mechanics of human hearing. We hear sounds through Auditory Transduction. Sound waves vibrate the ear drum (tympanic membrane), but that is only the beginning. These vibrations are passed along via tiny rocker-arm-like bones to be “processed” in a spiral chamber, the cochlea.
This remarkable VIDEO explains how humans hear sounds. We strongly recommend you take the time to watch and learn. The hearing you save may be your own!
Click Speaker Icon to turn on the video’s soundtrack.
Vibrations moving through the cochlea are separated into frequencies and then sent as neural messages to the brain. It is an astonishingly complex process, one that truly seems miraculous when you examine the bio-engineering involved. In the video above, the process of human Auditory Transduction is explained and illustrated with 3D animation. You really should watch this amazing video. By the end you will have a new-found appreciation for your ability to hear.
Every shooter should own a pair of Electronic muffs, even if you prefer shooting with earplugs and/or standard muffs. Electronic muffs are great when you are spotting for other shooters or are working near the firing line. They let you hear ordinary conversations while still providing vital hearing protection. You can also wear ear-plugs under muffs for extra sound attenuation.
Plugs PLUS Ear-Muffs — Benefits of “Doubling-Up” Hearing Protection
According to OHS Online: “The combined attenuation of an ear plug and an ear muff is not simply the algebraic sum of the performance of each individual protector. This is due to an acoustic and vibratory interaction between the ear muff and the ear plug that causes them to behave together as a system rather than as independent hearing protectors.
Generally speaking, when you combine two hearing protectors, with muffs over ear plugs, you can expect a Noise Reduction Rating improvement from 3 and 10 dB compared to the higher-rated hearing protector by itself. OSHA [now advises] 5 dB as the [typical] benefit offered by combining hearing protectors.” Source: OHSonline.com
Want to improve your understanding of Ballistics, Bullet Design, Bullet Pointing, and other shooting-related tech topics? Well here’s a treasure trove of gun expertise. Applied Ballistics offers dozens of FREE tech articles on its website. Curious about Coriolis? — You’ll find answers. Want to understand the difference between G1 and G7 BC? — There’s an article about that.
“Doc” Beech, technical support specialist at Applied Ballistics says these articles can help shooters working with ballistics programs: “One of the biggest issues I have seen is the misunderstanding… about a bullet’s ballistic coefficient (BC) and what it really means. Several papers on ballistic coefficient are available for shooters to review on the website.”
Credit Shooting Sports USA Editor John Parker for finding this great resource. John writes: “Our friends at Applied Ballistics have a real gold mine of articles on the science of accurate shooting on their website. This is a fantastic source for precision shooting information[.] Topics presented are wide-ranging — from ballistic coefficients to bullet analysis.”
Here are six (6) of our favorite Applied Ballistics articles, available for FREE to read online. There are dozens more, all available on the Applied Ballistics Education Webpage. After Clicking link, select Plus (+) Symbol for “White Papers”, then find the article(s) you want in the list. For each selection, then click “Download” in the right column. This will send a PDF version to your device.
To help serve America’s many millions of new gun owners, Winchester has created a new online information site for first-time ammunition and firearms buyers as well as those just getting started in the shooting sports and hunting. Winchester’s New Shooters Site has many helpful articles plus a series of videos.
Winchester’s New Shooters Site also incorporates the NSSF’s WHERE-To-SHOOT Resource, the internet’s most comprehensive listing of gun ranges. The Where-to-Shoot section makes finding a local range easy. Simply input your location and max desired distance, and the site will generate a list of nearby indoor and outdoor ranges with a Google map.
“More than 12 million people since the beginning of 2020 purchased a firearm for the first time, and that is in addition to the more than 56 million people in the U.S. who currently target shoot,” said Matt Campbell, vice president of sales and marketing for Winchester Ammunition. “As an industry leader, we are committed to helping educate people about the many topics surrounding firearms, ammunition, safety and more. More and more people want to participate in the shooting sports and hunting. Our audience is diverse and growing, and this platform will be an excellent resource.”
— Skill-level filtering, allowing new shooters to find the most relevant content
— New video series and blog posts with entry-level topics
— Product recommendations for firearms and ammunition
— Tips and training (shooting fundamentals)
— Safety and storage
About Winchester Ammunition
Winchester was founded in 1866, 155 years ago. Winchester is now the largest small caliber ammunition enterprise in the world providing a huge variety of pistol, rifle, and shotgun ammunition. Learn more about Winchester by visiting Winchester.com or Winchester’s Facebook Page.


Size Matters


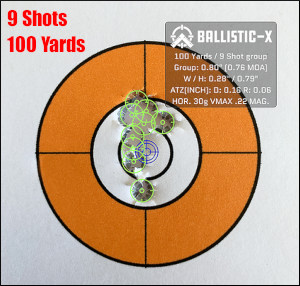 Forum member JAS-AS purchased a .22 Magnum CZ which he revived as a training rig with a new stock. He posted: “I use a CZ457 in .22 Magnum mainly as a trainer — bipod and rear bag kind of stuff. It has evolved over the last year or so. Next change will be a Lilja barrel. This because it can shoot brilliantly (at times) but not consistently. And accuracy degrades as it gets minimally dirty. Also, it doesn’t like 40gr rounds — the groups open up to 1.5 MOA. It’s at its best with 30 and 35 grain rounds running at up to 2250 fps. I believe that to be a twist-rate issue.”


 Hydro-Forming Procedure Step-by-Step:
 Special Shell-Holder
 All shooters, even rimfire enthusiasts, should always wear ear protection when at the range. A typical rifle gunshot is very loud — in the region of 140 to 170 decibels (the pain threshold is 130-140 db). Without ear protection, you can permanently damage your hearing during a single shooting session. We all know older shooters who are partially deaf, or who suffer from


