Legal Heat, a major firearms training firm*, has released the 2021 Edition of the 50 State Guide to Firearm Laws and Regulations. For each state, this $20 book covers key firearms laws, lists prohibited areas, and provides key statutory references for further research. With over 20,000 gun laws nationwide affecting concealed carry permit holders, Legal Heat’s 50 State Guide helps gun owners stay informed about important gun statutes and regulations.
The Legal Heat 50 State Guide is an authoritative reference guide on concealed carry and transport laws with concise synopses, including legal citations. Written and edited by attorneys and firearms instructors. This full-color, $20 book provides a comprehensive overview of state and Federal gun laws, serving as a quick reference guide for travelers.
GET FREE Legal Heat APP for Android or Apple
Along with the $20 print book, there is a FREE Legal Heat APP that provides the same information at no cost to you. Just download the App to your smartphone or tablet. CLICK HERE to learn more about the FREE 50-State Law App. There are FREE versions for both Android (Google) and iOS (Apple). This is the only APP with comprehensive Concealed and Open Carry Law summaries written by attorneys.
Key Topics Covered in Dedicated Sections
The Legal Heat 50 State Guide has specific sections dedicated to important topics, such as Gun Transport at Airports, Police Stops, Inter-State Travel, and Purchasing/Selling. Having these and other key topics clearly outlined is one of the compelling reasons to buy the book. Here are the Key Topics:
- Airports
– Police Encounters
– State-to-State Firearms Transport in Vehicle
– Purchasing/Selling A Firearm
– Castle Doctrines
– AMTRAK
- U.S. Army Corps Of Engineers Land
– National Parks And Monuments
– BLM Land
– Indian Reservations
– May Issue Vs. Shall Issue States
– Contact Info For Attorney Generals
State by State Law Summaries
For every one of the 50 U.S. STATES, there is a dedicated summary covering:
1. All Prohibited Areas for Firearms
This Section Is Essential Knowledge For All Concealed Firearm Permit Holders. 2. Self-Defense and Firearms Laws 3. Reciprocity (Recognition of Other State’s Permits)
This lists ALL firearm permits from other states that are recognized. 4. Self Defense And Firearm Laws Statutory References (For Additional Research) 5. Ratings of Each State for “Friendliness” to gun owners.
Video Summary of 50 State Firearms Guide
This video covers the highlights of the Legal Heat 50 State Guidebook. This shows the 2018 Edition, but the latest 2021 Edition contains all those elements, updated with current law changes.
* With over 250,000 certified students, Legal Heat claims to be the nation’s largest firearms training company. Legal Heat provides in-person as well as online training, and works with major gun retailers including Cabela’s, Bass Pro Shops, and Sportsman’s Warehouse. CLICK HERE for more information on Legal Heat Training Programs.
The Biden State Department has banned imports of Russian-made firearms and ammunition. Russian firearms and ammo importation will be blocked for a minimum of 12 months starting September 7, 2021. The State Department Notice states:
New sanctions imposed today under the CBW Act include:
Restrictions on the permanent imports of certain Russian firearms. New and pending permit applications for the permanent importation of firearms and ammunition manufactured or located in Russia will be subject to a policy of denial.
Action Will Harm U.S. Firearms Owners
The Gun Owners of America (GOA) criticized the action, stating it will NOT achieve its stated purpose, but will only harm American hunters, shooters, and gun owners:
“It is clear to us that the intention is not to harm Russia but rather to hinder the acquisition of firearms and ammunition by American citizens.
Once again, the Biden Administration’s actions are misplaced. Ending imports by licensed importers will not stop drug dealers, murderers, and other assorted street criminals. It will, however, harm legitimate U.S. businesses while driving up the cost of other ammunition due to more buyers chasing a smaller supply.
We recognize the devastating implications these sanctions would have on individual gun owners amidst a national ammunition shortage. We are currently exploring administrative, congressional, and legal avenues to respond to these new sanctions.”
Ammo Shortages Will Worsen Dean Weingarten cautions that the new ban will lead to more ammo shortages:
“This is the second round of sanctions imposed on Russia by the United States over the Aleksey Navalny incident. The first round of sanctions did not ban the importation of Russian ammunition or firearms.
It is unclear how long supplies in the pipeline will last. The announcement is likely to rekindle the ammunition bubble for calibers commonly imported from Russia, such as 7.62×54, 7.62×39, 5.45×39, 5.56×45, and even match grade .22 ammunition.”
Over the past 18 months, popular ammo types, such as .223 Rem and 9mm, have been hard to find at reasonable prices. The high cost of .223 Rem centerfire ammo has driven more folks to shooting .22 LR rimfire ammo, both for fun and practice. This Sunday we look at a smart solution that allows you to shoot .22 LR ammo from your existing .223/5.56 AR-15 platform rifle. This is great because it allows low-cost training with no change in rifle balance, ergonomics, and/or optics.
The CMMG Bravo .22 LR Conversion Kit provides a replacement bolt/bolt carrier along with three 25-round magazines with special .22 LR-fitted followers and ammo slots. This allows you to shoot rimfire ammo from any AR-15 chambered for the .223 Rem (5.56×45). The CMMG Bravo has an integrated extension that fits into your current chamber. The rimfire bullet passes through this extension and then enters the barrel.
The CMMG Bravo conversion Kit comes with blowback-operated .22 LR bolt carrier, rubber protector for bolt carrier tip, and three 25-round polymer magazines. To use, simply replace the rifle’s .223 Rem bolt and carrier with the Bravo .22 LR conversion unit and load up the included magazine(s) with rimfire ammo.
To use the CMMG Kit, simply remove the centerfire bolt/bolt carrier, and replace it with the CMMG silver colored bolt shown above. CMMG states: “For best performance use a round-style hammer as notched hammers can cause function issues.” Testers have stated that high-velocity .22 LR ammo works best, and CMMG notes that “36gr plated-nose bullets have proven to be the best choice for function.” The copper-plated bullets help reduce fouling.
Ultimate Reloader Tests CMMG .22 LR Conversion Kit
Our friend Gavin Gear of UltimateReloader.com recently tested the CMMG .22 LR AR Conversion Kit. He observed that installation was very straight-forward and the CMMG magazines worked well. He and fellow tester Travis Fox shot the unit both slow-fire and rapid-fire successfully.
Gavin and Travis found the CMMG Kit easy to install and fun to use. With an AR that can shoot both .223 Rem and .22 LR, it’s like having “two guns in one”. Travis was impressed with the ease of use: “It is so simple to change over to the CMMG .22 LR AR kit! It took me about 68 seconds the very first time I tried. Each time after that it took me about 40 seconds — it’s that simple. It takes longer to fully load one of the mags than it does to switch over from .223/5.56 to .22 LR and back.”
The AR shot very well with the higher-velocity ammo types. 100% functioning was achieved with both 40gr Federal Game Shok ammo and American Eagle High Velocity 38gr Copper-plated HP ammo. NOTE: CMMG does recommend high-velocity Copper-plated rimfire ammunition.
Maintenance Tip — After converting back to your centerfire .223 Rem (5.56), Travis says “make sure to clean the gas tube and components as .22 LR tends to run dirty”. READ Full Test on UltimateReloader.com.
CMMG Bravo Conversion Kit Gets Thumbs Up from Gavin and Travis
“Does this conversion kit get the Ultimate Reloader stamp of approval? Absolutely! In these times of ammunition/component scarcity this gives options to shooters. Finding bulk .22 LR can sometimes be easier than 223/5.56. This kit gives that option at a great price. Any chance to keep skills up and familiarize new shooters to a platform is a good thing. Basically two rifles for a lot less than another rifle.”
How to Install CMMG Bravo .22 LR Conversion Kit
The Brownells video below shows the installation process step-by-step:
In this instructional video, a Brownells gunsmith demonstrates (step by step) how to install, disassemble, clean, lubricate, and reassemble the CMMG AR-15 .22 LR Conversion Kits. Clear the rifle and make safe before you start the conversion. Separate the upper and lower, remove the standard bolt carrier group. You then install the conversion bolt and connect the upper and lower as normal.
Details of CMMG .22 LR Conversion Kit
“For years I’ve had a CMMG conversion kit. It’s a drop-in system that’s … very reliable and it’s accurate. The [CMMG conversion] has lower recoil [and is] great for training. Even though ammo prices have gone through the roof, .22 LR is still cheaper to shoot than anything else.” — SootchGear
This SootchGear video shows how to install the CMMG Bravo unit. The video also compares the original CMMG .22 LR bolt assembly with the latest integrated CMMG Bravo at 2:00-3:50. The older unit had a brass adapter and separate chamber insert. The host also tests a CMMG-equipped AR with various types of ammo. Watch a rapid-fire sequence starting at 1:48 time-mark.
Field Test with Two ARs — Rapid Fire .22 LR Testing
The video below demonstrates rapid-fire .22 LR performance with two different ARs using CCI Mini-Mag ammo. The CMMG conversion is fast and easy: “In a matter of seconds you go from 5.56 to .22 LR”. Watch rapid-fire at 5:40 with CCI Mini-Mags in red/black rifle. Then the tester shoots a variety of ammo in a .223 Wylde-chambered all-black AR, starting at 9:40. The Mini-Mags worked flawlessly, but there were a couple fail-to-cycle sequences in extreme rapid-fire with cheaper “bulk” ammo. The lesson here is use good quality, high-velocity ammo.
NOTE: This 2018 video shows an earlier CMMG .22 LR conversion bolt that features a brass adapter and separate chamber insert. The current CMMG Kit has unitized bolt without a separate adapter or insert.
Interestingly, the Mini-Mag .22 LR ammo shot fine in the .223 Wylde-chambered AR. However, CMMG cautions: “Since .223 WYLDE is NOT a mil-spec chamber, we cannot guarantee fit or function with our 22LR conversion kits.”
Reviews from CMMG Bravo .22 LR Rimfire Conversion Kit Purchasers:
“Get it. Bought this for my Rock River AR. Bolt system goes in [easily] and fits perfectly. Took it to the range and put over 150 rounds through, only failing to feed/fire two rounds. I most definitely recommend this product to anyone looking to shoot their standard AR-15 .223 rifle on a budget.” — Pew P.
“I got this just yesterday and in two days time I have put a couple thousand rounds through it and no hick-ups. I have no complaints.” — Seth
“Best buy for anyone during this ammo crisis. Ammo is extremely expensive and hard to find. It was a ‘no-brainer’ once I found this kit. Ran 200 rounds to break it in for about $20 and had maybe 3 failures. Accurate up to 50 yards (I haven’t tried further) without optic adjustments.” — Joshua M.
“Purchased one of these in January. Took it to the range shortly after for my daughters to try out. We have three ARs and this thing functioned flawlessly. We practiced swapping out the 5.56 carrier with this back and forth, flawless. Enjoyed it so much now I’m purchasing another one.” — J.B.
“Great product. I bought this due to the high cost of ammo. I wanted to still shoot my AR and this was an alternative. This thing works great… works flawless with different types of .22 LR, from premium CCI to the cheap stuff. I recommend this to anyone thinking about getting one.” — Thom
* You can get also CMMG Conversion Kits from Brownells with one (1) 25rd mag for $219.99, or with three (3) 25rd mags for $249.99. There is also a CMMG kit with three (3) 10-rd mags for $249.99 for areas with capacity restriction.
Dennis DeMille shows a young competitor at the CMP Western Games how to adjust his leather sling.
The NRA High Power Over-the-Course (OTC) National Championship will be held at Camp Atterbury over the next 7 days. Firing will be done in multiple positions — prone, sitting/kneeling, and standing. Proper support and adjustment of the sling is vital for successful High Power competition. In this short article, Dennis DeMille, a past Service Rifle Champion, explains how to set-up a sling on match rifles.
Setting-Up a Leather Service Rifle Sling for Competition
So you made the mistake of disassembling your leather service rifle sling, or are intimidated about how to use one? In this Creedmoor Sports InfoZone video, Dennis DeMille (past Creedmoor G.M.) explains how to set up and use a sling. The covers the basics — Dennis starts with a totally disassembled leather service rifle sling and shows you how to set it up properly.
Tip: “Many shooters shy away from using a leather sling because they have never been taught how to use one. That’s unfortunate. In my opinion a leather sling offers more support than a web sling, which is important when competiting with the heavier than normal rifles.”
Configuring the Sling for the Standing (Offhand) Position
In this second in a series of Creedmoor InfoZone videos on the setup and use of the leather service rifle sling, Dennis DeMille details how to configure and best utilize the leather service rifle sling while shooting from the standing position.
Tip: “Putting the Frogs in different hole will change the amount of added elevation a sling provides.”
Looking at Sling Types — Comparing the Features
In this video Dennis showcases a large variety of shooting slings. He explains the strong points of each type so you can choose the sling best suited to your discipline and shooting style.
The Benefits of Dry-Fire Training
Once you know how to set up your sling properly, you’ll want to practice. Dennis DeMille stresses the importance of dry-fire practice with sling and shooting coat. Dry-Fire training is essential to the sling disciplines. Dennis DeMille, a national Service Rifle Champion, told us that, for every minute he spent in actual competition, he would spend hours practicing without ammunition. While in the USMC, Dennis would practice in the barracks, working on his hold and dry-firing:
“The most important thing is to spend time off the range practicing. Most of what I learned as a High Power shooter I learned without ammunition — just spending time dry firing and doing holding exercises. Holding exercises will really identify the weak parts of your position. The primary purpose of dry firing is to get you used to shooting an empty rifle. If you can shoot a loaded rifle the same way you shoot an empty rifle then eventually you will become a High Master.”
Here is a cool video that shows the entire production process for a SilencerCo Octane pistol suppressor start to finish. Beginning with the raw materials, this video shows a wide variety of cutting, milling, drilling, burnishing, fitting, metal bathing, surface finishing, and laser etching processes.
If you have any interest in production methods you’ll want to watch this video all the way through, and maybe a second time.
SilencerCo states: “From cutting metal to chemical baths, to extensive quality control every step of the way, our streamlined process is more than just a few steps.” We think you may be surprised by how many steps are involved in producing this silencer (aka “suppressor”).
The Octane is a user-maintainable, multi-caliber centerfire pistol silencer featuring a modular mounting system for use across a wide range of hosts. High strength, stainless steel CTA™ (Click Together Assembly) baffles are easily disassembled for cleaning. This design makes the Octane one of the most durable small-caliber suppressors on the market.
In its Octane 45 review, SilencerShop notes: “When it comes to ease of maintenance, the Octane 45 is probably the simplest .45 suppressor on the market. It uses the new click-together baffle system from Silencerco/SWR – which allows the suppressor to come apart like a monocore suppressor, while providing performance that is closer to a K-Baffle design.””
Wouldn’t it be great if you could put up one BIG target that would handle a myriad of important tasks at the range: Zeroing, Load Development, Click Value Verification, and Click Tracking Repeatability Tests. Well the team at Box to Bench Precision (B2B) has developed what may be the most versatile (and biggest) precision targets ever developed. With ultra-accurate grid geometry, and razor-sharp printing, B2B’s targets set a new standard for target precision.
Click Tracking Grid Target The best procedure for checked the true value of your scope click values is to use a tall target that can dial in at least 25 MOA of “up”, and check where your cross-hairs air compared to exact pre-measured reference lins. B2B developed an advanced target just for that task. The 30″ tall by 23.5″ wide Rex Grid Target (shown below) provides a highly precise grid for testing elevation and windage clicks. The unique grid design has small tics denoting 1/4 MOA, 1/2 MOA, and 3/4 MOA. 1 MOA is marked with a “+” and the 5, 10, 15, 20, & 25 MOA elevation lines are bolded for better visibility. There are aiming points at 5 MOA intervals over the full grid.
This same target can also be used for “Box Tests” that verify click values and repeatability. with a box test you start in one corner with the initial shot (we recommend doing this with a warm barrel after a couple foulers). They you add “up” clicks to go straight up and take a second shot. Next add horizontal clicks to go across for the third shot. Then click down (the same number of cliks you went up) for the fourth shot. As a last step you reverse your horizontal clicks and take a fifth shot. If you have a good rifle and the scope clicks are repeatable, your fifth and final shot will be touching the first shot.
B2D’s Rex Grid Target can be used for Box Tests, as can B2B’s popularhttps://bit.ly/2BBe1jYLoad Development and Scope Tracking Target (left below) and B2B’s Sniper’s Hide 100-yard Target (right below).
B2B’s 100 Yard Long Range Load Development and Scope Tracking Target will perform many functions. This big, 30″ x 23.5″ target has specific aiming points for various tasks. In the upper left, there are 11 small orange circles for precision load testing. Over on the upper right are 7 more small, orange circles for doing a Seating Depth Comparison test.
The bottom half of the target has larger black-on-white circles that serve multiple functions. Use the corner circles to do a “Box Test” to confirm scope tracking. There’s another great feature on this target — running up the center of the target is a tall line that shows elevation in both MILs and MOA. That helps you confirm the TRUE click values of your optic. You’d be surprised how many scopes are slightly off — not exactly 1/4 MOA, 1/8 MOA, or 1/10 Mil as advertised. That’s why Long Range shooters absolutely need to verify their click values.
Buyers Praise the B2B Targets
We’ve handled the B2B Targets, which are printed on high-quality, tear-resistant card stock. We can attest the printing is very precise — with accurate elevation and windage values. These aren’t your ordinary targets — they are LARGE — nearly three feet tall. Verified buyers praise these targets:
“Thank you for talking to me about the MIL and MOA markers on your targets. They are very accurate. While using the Long Range 100-Yard Load Development/Scope Tracking target and my new scope, it helped me realize that my scope wasn’t tracking correctly (both turrets). So, I sent the scope to the manufacturer. When it came back, and using your target as my known constant… the scope is now ‘spot-on’ accurate. These targets are a great tool to gain a better understanding of your rifle, scope, turrets etc., all on one sheet.” — Stan, 2018
“Almost too nice to put holes in. I was in the printing industry for 35 years and these are really well done. Quality paper and precise printing … able to see bullet holes easily with these!” — Dan, 2018
IBS 1000-Yard National Championship
The IBS 1000-Yard Benchrest National Championship took place this past weekend, August 14-15, at the scenic Deep Creek Shooting Range outside Missoula, Montana. The Match was well attended, with 66 shooters in the Light Gun (LG) division, and 62 in Heavy Gun (HG). The venue was beautiful (as always), but conditions were challenging at times. One shooter noted: “The wind was brutal the last relay. Many shooters DQ’d”.*
Despite the tough conditions, there were some very impressive performances. Jason Walker took the Overall title, based on combined LG and HG standings. Shooting well in both classes, Jason (aka “LRPV” in our Shooters’ Forum) finished 3rd in LG and 6th in HG. Jason’s LG group size Agg was an impressive 4.357″. Nick Howlett was second Overall. Steve Simons won the LG division while James Bradley topped the HG field.
Jason Walker
Nick Howlett
James Bradley
Richard Jette
Dave Way
Top Five LG Overall
Steve Simons
David Torgerson
Jason Walker
Todd Zaun
Richard Jette
Top Five HG Overall
James Bradley
Jason Walker
Nick Howlett
Jason Peterson
Tom Mousel
Winners photo courtesy Jason Walker, 2021 IBS 1000-Yard Two-Gun Champion.
Gunsmith Alex Wheeler, who built many of the top-finishing rifles, noted: “Congratulations to the winners, you pulled your way to the top in some pretty tricky conditions. It was good to see every one again as well as meeting some in person for the first time.”
Equipment Used by Light Gun and Heavy Gun Competitors
The equipment lists, for both Light Gun and Heavy Gun, were heavily dominated by Krieger barrels. The Overall Winner and both LG and HG class winners used Kriegers. There were also many Bartlein barrels and Lilja barrels. But surprisingly, the equipment lists only showed 5 Brux barrels in Light Gun and 3 Brux barrels in Heavy Gun. BAT actions were the most common in both divisions, followed by Borden actions.
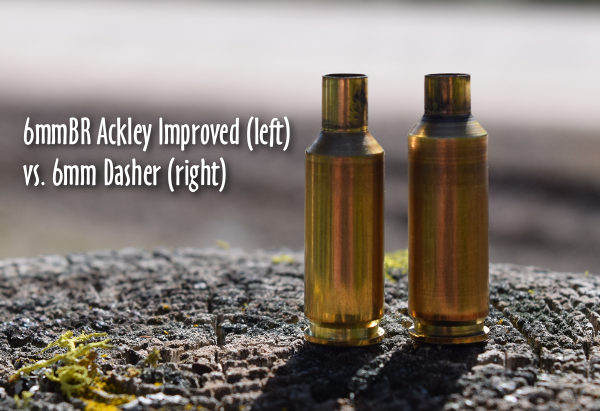
The vast majority of the shooters ran a 6mm cartridge in both Light Gun and Heavy Gun divisions. These were overwhelmingly 6mm Dashers and 6 BRAs. The 6 BRA (aka 6mmBR Ackley Improved) has a 40-degree shoulder like the Dasher, but with a longer neck. There were a half-dozen .300 WSMs in Heavy Gun division, and a couple 7mm RSAUMs, but the 6 Dashers and 6 BRAs dominated the field, even in HG.
Overall Winner Jason Walker was shooting two 6mm Dasher rifles. Both guns had BAT actions, Krieger barrels, and Nightforce scopes. Jason’s Heavy Gun had a Maxi-Tracker stock while his Light Gun had a PR&T LowBoy stock. In both rifles, he ran a 6mm Dasher loaded with Vapor Trail bullets pushed by Hodgdon Varget powder and CCI BR4 primers. Jay Cutright did the barrel work while Gordy Gritters worked on the PR&T stock. (NOTE: Jason changed to the LowBoy stock after the LG equipment list was submitted.)
Light Gun Overall winner Steve Simons was running a 6 BRA in Light Gun. Steve’s LG, smithed by Alex Wheeler, had a BAT action, Krieger barrel, Wheeler LRB stock, and Vortex scope. He loaded his 6 BRA cases with Vapor Trail bullets, Hodgdon H4895 powder, and CCI 450 Primers.
Heavy Gun Overall winner James Bradley was also running a 6 BRA in Heavy Gun. Again this had a BAT Action, Krieger barrel, Wheeler LRB stock, and Vortex scope. The rig was smithed by North Ridge Rifles. James shot Vapor Trail bullets, H4895 powder, and Federal 205M primers.
Looking back at the firing line from the target berm.
Deep Creek Range
The Deep Creek Range in Missoula, MT is one of the nicest places to shoot in the Intermountain West region. The range is located in the mountains within a few minutes drive of Missoula, and there is camping on-site. When conditions are good at Deep Creek, records get broken. To learn more about shooting at Deep Creek, contact Jamey Williams at jameydan[at]gmail.com.
Here is an aerial view of the Deep Creek Range (Drone video by David Gosnell):
* One shooter at the match reported that: “Our last HV gun relay of the Match produced 11 DQs out of 13 competitors.” We have not confirmed this, but even if there were just a handful of DQs is is unfortunate for those HG competitors.
** This is the Heavy Gun Overall, as designated on the right top. However, the columns are erroneously titled “Light Gun”. If you compare the two linked results pages, you will see that they are NOT the same.
Berger Twist-Rate Stability Calculator On the Berger Bullets website you’ll find a handy Twist-Rate Stability Calculator that predicts your gyroscopic stability factor (SG) based on mulitiple variables: velocity, bullet length, bullet weight, barrel twist rate, ambient temperature, and altitude. This cool tool tells you if your chosen bullet will really stabilize in your barrel.
How to Use Berger’s Twist Rate Calculator
Using the Twist Rate Calculator is simple. Just enter the bullet DIAMETER (e.g. .264), bullet WEIGHT (in grains), and bullet overall LENGTH (in inches). On its website, Berger conveniently provides this info for all its bullet types. For other brands, we suggest you weigh three examples of your chosen bullet, and also measure the length on three samples. Then use the average weight and length of the three. To calculate bullet stability, simply enter your bullet data (along with observed Muzzle Velocity, outside Temperature, and Altitude) and click “Calculate SG”. Try different twist rate numbers (and recalculate) until you get an SG value of 1.4 (or higher).
Gyroscopic Stability (SG) and Twist Rate
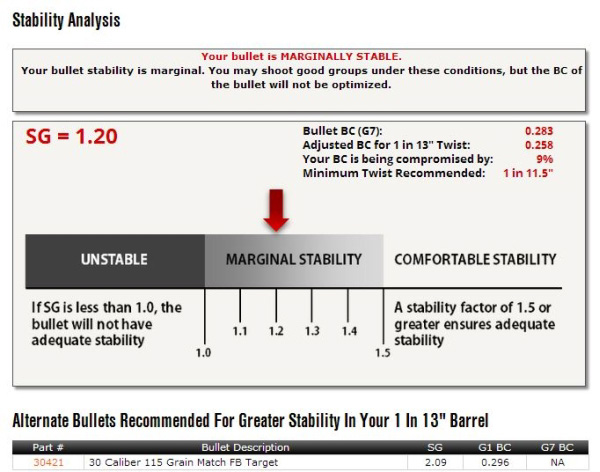
Berger’s Twist Rate Calculator provides a predicted stability value called “SG” (for “Gyroscopic Stability”). This indicates the Gyroscopic Stability applied to the bullet by spin. This number is derived from the basic equation: SG = (rigidity of the spinning mass)/(overturning aerodynamic torque).
If you have an SG under 1.0, your bullet is predicted not to stabilize. If you have between 1.0 and 1.1 SG, your bullet may or may not stabilize. If you have an SG greater than 1.1, your bullet should stabilize under optimal conditions, but stabilization might not be adequate when temperature, altitude, or other variables are less-than-optimal. That’s why Berger normally recommends at least 1.5 SG to get out of the “Marginal Stability” zone.
In his book Applied Ballistics For Long-Range Shooting (3rd Ed.), Bryan Litz (Berger Ballistician) recommends at least a 1.4 SG rating when selecting a barrel twist for a particular bullet. This gives you a safety margin for shooting under various conditions, such as higher or lower altitudes or temperatures.
Story idea from EdLongrange. We welcome reader submissions.
For today’s Sunday GunDay story, we head across the Atlantic to the famed Bisley range in the United Kingdom (UK). There the historic Imperial Meeting took place last month. This shooting competition is steeped in history, first being held 161 years ago in 1860. Today we highlight the .300 WSM rifles shot by F-Open winner (and Forum member) Gary Costello. Gary came home with a huge haul of trophies. He won the F-Open Grand Agg on V-count scoring 665-76V, 19Vs more than second place Lance Vinall’s 665-57V. In the UK the “V” is equivalent to our “X”, and the target has five number rings, with five being the highest numerical shot value.
Gary posted: “Finally cooled down after the Bisley Imperial Meeting. What a week, 8 trophies, 14 gold medals, two silver, two bronze and the big one — the Grand. It was an experience shooting in 86+ F degree heat and at some unusual times. Congratulations to all the medal and comp winners, in particular to second-place Lance Vinall, who shot a great match”.
About the Imperial Meeting at Bisley in the UK
The Imperial Meeting is a large, multi-discipline rifle shooting match contested annually in the United Kingdom. This article spotlights Gary Costello, who won the 2021 Imperial F-Open division with his pair of handsome .300 WSM rifles.
The first Imperial Meeting event was contested on Wimbledon Common, in southwest London, in 1860 when Queen Victoria fired the first shot and gave a prize of £250 to the best individual marksman. Originally the Meeting was only available to Volunteers (regular and reserve military personnel) using the issued service rifle of the day.
Today the UK National Rifle Association holds the Imperial Meeting as an open competition with the aim to promote and encourage marksmanship throughout the Queen’s (or King’s) dominions. The event has grown to include many different disciplines. The largest entry is for Target Rifle, which dominates the final week of the Meeting and culminates with the final of the Queen’s Prize. The Queen’s Prize remains the premier award for the Meeting’s top shot, with the £250 prize still given to the winner.
Host to the competition is the National Shooting Center at Bisley, the world-renowned range complex which can host virtually all forms of shooting from air rifle to 1200-yard full-bore matches. Set in 3000 acres of heathland, Bisley is unique in character with a wide variety of ranges.
Report from Imperial Meeting at Bisley by Gary Costello
The recent 2021 Imperial Meeting was the 152nd event of its kind. Last year was my first Meeting and it was a condensed version as the COVID lockdown had just been relaxed (but later revived). This 2021 Imperial was the full version. In F-class we had 15 scheduled matches, held at 300, 500, 600, 900 and 1000 yards. In these matches you get two sighters and the 15 shots for record. This year was my second Imperial Meeting. Lots of shooters were keen to enjoy some shooting freedom now that the UK national lockdowns had ended. However the NRA was still practicing COVID safety protocols.
Three very prestigious competitions are qualifiers for the final matches. These three are: the St. Georges, the Donaldson, and the Farquharson (named after George Farquharson, the father of F-Class). The finals add another three matches if you qualify. Also there are three range Aggregates which qualify for medals/trophies.
Twin Winning .300 WSM F-Open Rifles
Gary brought TWO .300 WSM F-Open match rifles to the Imperial Meeting. Gary notes: “I had two .300 WSM rifles ready for the competition. I have managed to tune both rifles to take the same ammo and seating depth allowing me to alternate and use the same lot of ammo. My philosophy was to alternate both rifles as to not cause too much attrition/wear (due to the high round count and multiple matches). One .300 WSM rifle has a Borden BRMDX action, with some Thomas “Speedy” Gonzales mods and the trademark Speedy bolt shroud fluting. This has a 1:9.5″-twist Benchmark 5-groove barrel, actually chambered by Stuart Anselm at GS Precision Engineering Services.”
Gary’s second .300 WSM F-Open rifle features a BAT M RBLP dual port fitted with a 1:10″-twist Bartlein barrel (supplied by Speedy), with action tuned and modified by Speedy. Both rifles are chambered virtually identically. Both rifles have Cerus stocks, blueprinted Jewell triggers, and Ezell PDT tuners.
The rifles are supported with a Lenzi front coaxial rest and a Lenzi rear bag, spec’d to the Cerus stocks.
Match .300 WSM Load — Berger Bullets, Norma Brass, H4350, Fed 210M
I run the .30 Cal Berger 215gr Hybrid bullet exclusively. I have not found a better long range bullet for F-Class. I use neck-turned Norma .300 WSM brass, H4350 powder, and Federal 210gm match primers. Unfortunately H4350 is not available in the UK anymore, but I was lucky to buy up a decent amount before it was banned. I anneal the Norma brass with an AMP 2 annealer every firing. But I do NOT trim and chamfer after every firing — only when the brass gets to the point of requiring it.
Here is the .300 WSM compared to a .284 Shehane (7mm), another popular F-Open cartridge Cartridge comparison image by Kris Wilson, aka “Willow” on our AccurateShooter Forum.
The .300 WSM has been described as a “super-sized Dasher”.
OPTICS — March 10-60x56mm High Master Scopes
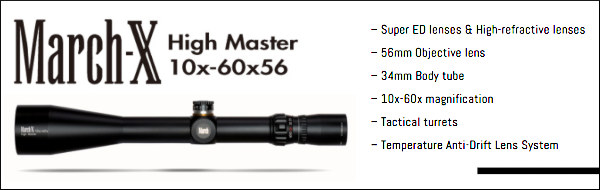
Both .300 WSM rifles have March 10-60x56mm High Master (HM) riflescopes. Gary notes: “In my slightly biased opinion, this scope is simply the best F-Class and long-range scope money can buy. I was using a MTR-3 reticle in one scope and the slightly thinner MTR-1 reticle in the other. The HM temp lens system is astonishingly clear and bright. It’s very easy on the eye, reducing strain and fatigue during long shoots.”
March optics have a clever system which enables shooters to use their scopes like a FFP scope on specific zoom power. The MTR1 and MTR3 reticles are subtended with hash marks at 1 MOA on 40X and 2 MOA at 20X, this allows the shooter to calibrate the necessary hold from a sighting shot without even looking at a plotting sheet, it also makes very precise hold over and follow up shots, (which proved invaluable during the week with the very switching and changing conditions) it also gives you the choice to turn down the power if mirage and conditions call for it.
March 10-60×56 HM scopes feature a Temp anti-drift lens system. This has really proved its worth in searing temps. The clarity and image quality helped me achieve three personal bests and wins. (TIP: Use the MD disk supplied with your scope if you have one. Mine never left the rifle all week.) In fact I actually stopped using my spotting scope on some of the shoots as I could see mirage better through the March than anything else.
Mental Preparation — Be Confident and Consistent
I went into the Imperial after having a very good season so far. I was unbeaten in three National 2-day matches. So my confidence was high and I was feeling good about the competition. This confidence proved a massive advantage — you have to believe in your abilities.
My main focus was to be consistent. At the Imperial it’s almost impossible to win every single competition, as there are 18 in total. However one must not to make too many mistakes and be consistent. As Brian Litz says, a “train wreck” will finish your comp. However if you stay consistent and only drop a few points here and there, you will be all right, as most other competitors will drop a few points as well. The key is not to make BIG mistakes.
Here’s an example of avoiding the “train wreck” disaster when conditions are tough:
Final Final — the Farquharson. It was super hot, the wind was up and conditions were very tricky, I knew this was going to be a survival match and it was. I saw many 3s going in, however I did have a pretty good hold on the conditions losing a few 4s but nothing major until a big fat 3 came out of nowhere. But I persevered and did not let this upset me as I could see lots of points being lost around me. When the dust had settled I won by 2 points in this match and 4 points overall in the Aggregate.
Physical Fitness — Training Is Important
I have been working hard on my physical fitness for the past two years (after a pretty serious condition). Fitness really helps in a long competition and especially in the heat, with the stress it can cause. During the Imperial match, vehicles are only allowed in certain areas so you have to be able to hand-carry your shooting kit all over the range, a very large area. In recent months, I’ve dropped 25 pounds in weight. That helped — I found myself very physically able to cope with the exertions.
Reloading Advice from Gary Costello
Check and Double-Check Everything! Often I have found errors and mistakes which would not bode well for accuracy.
Label Everything! This is especially important when preparing for a long competition, and when shooting different rifles.
Choose a Temp-Stable Powder. Make sure you select a powder that is not sensitive to temp variations. Hodgdon, and Alliant would be my choice, and of course some Vihtavuori powders.
Load to the MIDDLE of your Accuracy Node. This way you can allow for warmer or cooler temps and conditions. I see lots of guys just pick the fastest speed and/or smallest group. But that can get you in trouble on hot days.
Use Quality Tools and Dies. Buy the best reloading gear your budget allows. Quality kit will last forever and stand you in good stead.
Thanks to Speedy, Cerus, and March Scopes
A big mention has to go to my good friend and master gunsmith Thomas (“Speedy”) Gonzales. This man is a legend and has taught me more about the dark arts than anybody. I think he produces the finest rifles known to man. Give credit also to Cerus Rifleworks. All my rifles have Cerus stocks and they are just awesome. Final mention is to March Optics. I have the honor to work with this company since 2010. I believe they make the finest optics in the world.
Gary also shot with the winning White Horse Lodge F-TR Team coached by Stuart Anselm.
Many of our readers have been interested in learning how modern bullets are made. While a “boutique” bullet-maker, supplied with appropriate cores and jackets, can craft bullets using relatively simple hand dies and manual presses, factory production is different. The major bullet-makers, such as Barnes, employ huge, complex machines to craft their projectiles on an assembly line.
Modern hunting bullets are made with a variety of sophisticated (and expensive) machines, such as Computer Numerical Control (CNC) lathes, giant multi-stage presses, and hydraulic extruding machines that draw lead ingots into lead wire. Barnes offers an “inside look” at the bullet production process in a series of videos filmed at its Mona, UT factory. We’ve embedded four videos from the series here. These videos can also be viewed on the Barnes Bullets YouTube Channel.
Milling Slots in TSX All-Copper Bullet
This video shows how the slots (between the drive bands) in the TSX all-copper bullet are cut. The slots reduce the bearing surface that contacts the rifling. This helps reduce friction and heat, extending the life of barrels used with all-metal, drive-band bullets:
Varminator Bullets Produced in Jumbo Transfer Press
Here is the transfer press used in the production of Varminator and MPG Bullets. The process begins with a giant spool of flat copper material. The copper is stamped into jackets and eventually the formed Varminator bullets are ejected one by one into a bucket.
CNC Lathe Turns Bullets Automatically
In the video below, a Bar-Feed CNC crafts mono-bloc bullets from metal bar stock. Barnes uses a small CNC lathe to turn .50-caliber bullets from brass bar stock. We’re not sure which bullet is being made in this video. The material looks to be sintered metal. In the close-ups you can gold-colored shavings from when the machine was previously used for CNC-turned brass bullets.
Accuracy Testing in 100-yard Tunnel
Barnes regularly tests bullet samples for accuracy. In the video below, a Barnes technician loads sample rounds and tests them for accuracy in a 100-yard tunnel. The rounds are shot through a special fixture — basically a barreled action connected to parallel rods on either side. This allows the testing fixture to slide straight back on recoil (see it move back at 1:07-08 minute mark).
Upside-Down Trigger — Application for Unlimited Benchrest Competition?
Note how the tester actuates the trigger, which points UPWARDS, just the opposite of a normal rifle. The technician lightly taps the upward-pointing trigger shoe with a metal rod. Could this upside-down trigger work in benchrest shooting — perhaps with railguns? It could make for an interesting experiment.
Story suggestion by EdLongrange. We welcome reader submissions.


 The Benefits of Dry-Fire Training


 The best procedure for checked the true value of your scope click values is to use a tall target that can dial in at least 25 MOA of “up”, and check where your cross-hairs air compared to exact pre-measured reference lins. B2B developed an advanced target just for that task. The 30″ tall by 23.5″ wide Rex Grid Target (shown below) provides a highly precise grid for testing elevation and windage clicks. The unique grid design has small tics denoting 1/4 MOA, 1/2 MOA, and 3/4 MOA. 1 MOA is marked with a “+” and the 5, 10, 15, 20, & 25 MOA elevation lines are bolded for better visibility. There are aiming points at 5 MOA intervals over the full grid.


 IBS 1000-Yard National Championship







 Many of our readers have been interested in learning how modern bullets are made. While a “boutique” bullet-maker, supplied with appropriate cores and jackets, can craft bullets using relatively simple hand dies and manual presses, factory production is different. The major bullet-makers, such as


