This week Shooting USA TV has a great show, well worth watching. This episode features the history of U.S. military service rifles. Starting with the Trapdoor in 1873, and ending with the M14 in the 1960s, this episode traces 90 years of battle rifle development. This history lesson ends right before the general adoption of the M16 5.56x45mm infantry rifle.
In addition to history, today’s show talks about using Tripods in Precision Rifle Competition. PRS and NRL shooters can learn multiple ways to use a tripod for support during stages. These methods are explained by Staff Sergeant Tyler Payne from the USAMU Action Shooting Team.
Shooting USA airs Wednesday 9:00 PM Eastern and Pacific, 8:00 PM Central on the Outdoor Channel. You can also watch Shooting USA any time online via Vimeo.com. Subscribe for $3.99 per month or pay just $0.99 per episode.
History of American Service Rifles
The Trapdoor was the first cartridge-firing service rifle, replacing cap and ball rifles. Then came the evolution to better, faster-cycling service rifles used in two World Wars, Korea, and the early Vietnam era. Those rifles were the Krag Jorgensen, 1903 Springfield, M1 Garand, and M14.
The Krag Jorgensen Served 1892 to 1907. First Smokeless Cartridge Rifle.
Caliber: 30-40 Krag
The 1903 Springfield Served as Primary Service Rifle 1903 to 1936.
Cartridge: .30-06 Springfield
The M1 Garand Served 1936 to 1958. First Semi-Auto Service Rifle.
Cartridge: .30-06 Springfield
The M14 Served 1959 to 1964. First Select Fire Primary Service Rifle.
Cartridge: 7.62x51mm NATO (.308 Winchester)
Tripod Tips for Precision Rifle Shooters
This week’s Shooting USA episode has a great USAMU Pro Tips Segment showing how to use a tripod for rifle support. Along with clamping the rifle on the top of the tripod, you can used the deployed legs for support in multiple ways.
SSG Tyler Payne explains: “If you’re presented with a barricade where you can support the front of the gun, the tripod really shines as a rear support. With the front of the gun and the rear of the gun both supported, it’s like shooting off of a bench.”
Shooting USA is available On Demand via Vimeo.com. Watch a single episode for $0.99, or get a full-month subscription for $3.99 and watch as many shows as you like with limited commercial interruptions.
If you will be flying with firearms this winter, you should read this article. You need to familiarize yourself with current Federal Regulations on gun transport before you get anywhere near an airport. Thankfully, the Transportation Security Administration (TSA) has a web page that states the important requirements for airline passengers traveling with firearms and/or ammunition.
You’ll want to visit the TSA Firearms and Ammunition webpage, and read it start to finish. In addition, before your trip, you should check the regulations of the airline(s) with which you will fly. Some airlines have special requirements, such as weight restrictions.
Here are the TSA’s key guidelines for travel with firearms:
TSA FIREARM Guidelines
1. When traveling, comply with the laws concerning possession of firearms as they vary by local, state and international governments.
2. If you are traveling internationally with a firearm in checked baggage, please check the U.S. Customs and Border Protection website for information and requirements prior to travel.
3. Declare each firearm each time you present it for transport as checked baggage. Ask your airline about limitations or fees that may apply.
4. Firearms must be unloaded and locked in a hard-sided container and transported as checked baggage only. As defined by 49 CFR 1540.5, a loaded firearm has a live round of ammunition, or any component thereof, in the chamber or cylinder or in a magazine inserted in the firearm. Only the passenger should retain the key or combination to the lock unless TSA personnel request the key to open the firearm container to ensure compliance with TSA regulations. You may use any brand or type of lock to secure your firearm case, including TSA-recognized locks.
5. Bringing an unloaded firearm with accessible ammunition to the security checkpoint carries the same civil penalty/fine as bringing a loaded firearm to the checkpoint. You may find information on civil penalties at the Civil Enforcement page.
6. Firearm parts, including magazines, clips, bolts and firing pins, are prohibited in carry-on baggage, but may be transported in checked baggage.
7. Replica firearms, including firearm replicas that are toys, may be transported in checked baggage only.
8. Rifle scopes are permitted in carry-on and checked baggage.
TSA Ammunition Guidelines
1. Ammunition is prohibited in carry-on baggage, but may be transported in checked baggage.
2. Firearm magazines and ammunition clips, whether loaded or empty, must be securely boxed or included within a hard-sided case containing an unloaded firearm. Read the requirements governing the transport of ammunition in checked baggage as defined by 49 CFR 175.10 (a)(8).
3. Small arms ammunition (up to .75 caliber and shotgun shells of any gauge) must be packaged in a fiber (such as cardboard), wood, plastic, or metal box specifically designed to carry ammunition and declared to your airline.
4. Ammunition may be transported in the same hard-sided, locked case as a firearm if it has been packed as described above. You cannot use firearm magazines or clips for packing ammunition unless they completely enclose the ammunition. Firearm magazines and ammunition clips, whether loaded or empty, must be boxed or included within a hard-sided, locked case.
5. Please check with your airline for quantity limits for ammunition.
More Airline Travel Tips from Tom McHale
Tom McHale has written an excellent article for the Beretta Blog, Ten Things You Need to Know about Flying with Guns. We suggest you visit the Beretta Blog to read this informative story. Here are two of Tom McHale’s Travel Tips:
Weigh your gun case and ammunition
Most airlines will allow up to 11 pounds of ammunition. And, like any luggage, you will be charged more for any baggage weighing more than 50 pounds. This sounds like a lot, but when traveling to the Crimson Trace Midnight 3 Gun competition last year, my case with shotgun, rifle, pistol and ammunition tipped the scale past the 50 pound mark.
Pack ammo in the same locking case
This is another area that’s misunderstood and full of internet myth. Your ammo just needs to be stored in some type of safe container and not loose. Technically, you can keep ammunition in magazines, but I wouldn’t recommend it. It meets the letter of the law storage requirement, but too many airline and TSA agents will give you grief. Use a plastic ammo box or original cardboard packaging and you’ll be fine carrying that in the same lockable case as your gun.
*Please see, United States Code, Title 18, Part 1, Chapter 44 for information about firearm definitions.
Today’s featured rifle comes from the land Down-Under — Australia. This impressive .300 WSM F-Open rig has top-tier components/accessories from multiple countries. From the USA comes the Borden BRMXD action, Krieger barrel, McMillan Kestros ZR stock, and R.A.D. 2 recoil system. The 10-60x56mm March scope comes from Japan. The Lenzi rear bag is from Italy, and the SEB front rest is from Indonesia, with a Rodzilla top from America. This rifle is brand new, and just had its first competitive test this weekend, emerging with the top 600m Aggregate. By all indication, this .300 WSM F-Open beast is a winner.
Impressive .300 WSM F-Open Rifle from Australia
This rifle belongs to Kris Wilson, aka “Willow” on our AccurateShooter Forum. Just last week Kris posted in the Pride and Joy Rifle thread: “Got my latest build up and running — a .300 WSM F-Open rifle. Never shot a .300 WSM (Winchester Short Magnum) before today and I have to say that, while the recoil is on the sharp side, it’s entirely manageable thanks to the stock design and front rest.” Kris resides in Sydney, New South Wales, Australia and shoots at the Hornsby RSL Rifle Club. He is his club’s current F-Open Champion, even with some very tough competition — his club boasts two Australian F-Open championship-winning club members. Kris loves the F-Class game: “I started rifle shooting in 2015 when I was introduced to the world of F-class through shopping for a riflescope. Once I saw what F-class was all about, I was hooked.”
Kris produced this video on December 5, 2020. He reports: “Here is my first real outing with my new .300 WSM. I had previously sighted in at 50 meters at an indoor range to establish a wind zero. Had a rough idea of velocity so I threw together two loads to run at 600 meters. Our Aussie targets have a max numerical ring value of 6 (equivalent to “10” on USA targets). On Stage One I shot a 60.8X (60.10X max possible), grouping about 3.7 inches. On Stage Two, shown in this video, I shot a a 66.9X (66.11X max possible) with a 3-inch grouping. I took first place in both stages and won the overall Aggregate for the day. That earned me a Christmas ham and turkey for my trouble!”
.300 WSM Rifle Hardware, Cartridge Choice, and Reloading
Report by Kris Wilson, NSW, Australia
Stock: McMillan Kestros ZR with R.A.D. 2 system. 70% black, 15% grey, 15% red.
Action: Borden Rimrock BRMXD, left bolt, right port, left eject. The action is fully DLC coated and fitted with a +20 MOA rail
Trigger: TriggerTech Diamond
Barrel: Krieger 1:10″-twist, 4 groove finished at 31″ and fitted with an Ezell tuner.
Scope: March High Master 10-60x56mm with MTR-1 reticle, illuminated
Rings: ARC M10 High Rings
Front Rest: SEB Mini Rest, with Rodzilla Rest Top system
Rest Feet: Bryan Blake (F-Class Products) adjustable stainless feet
Rear Support: Lenzi (Italy) LR Rear bag, with custom metal base plate
Cartridge Selection — Why the .300 WSM Was Chosen over a 7mm Cartridge
I set out with the goal of building my ultimate F-Open rifle. Now “ultimate” is of course subjective, but I did not want to leave any stone unturned when it came to building a .300 WSM. When researching the equipment for my new build I had a couple of ideas in mind. I was already shooting a 7mm, in the form of a 280AI which had served me well, but I already had plans to switch to a .284 Shehane with the introduction of Peterson .284 Win brass, coupled with the fact Norma stopped making 280AI brass (Note: Peterson now makes 280AI brass). While I was reasonably well-covered with my .284 Shehane, I wanted something with a bit more horsepower to hold up at long range in choppy conditions. A lot of the top guys here shoot 7mm SAUMs but I wasn’t keen on going down that path. Why? For every accurate SAUM I’ve seen, I’ve seen others struggle and given that the 7mm SAUM seems to be particularly hard on barrels, I wanted something that could match the 7mm SAUM ballistically, but have better barrel life.
After plenty of research on AccurateShooter.com, and speaking with some shooters, both locally and in the USA, I decided to give the .300 WSM a go. This cartridge is not particularly popular in Australia for F-Open, primarily because most states enforce muzzle energy restrictions, so pushing the .300 WSM to its potential simply isn’t viable for many shooters here. It IS viable in my home state however, along with the ACT, so I can at least use it in major competitions in two Australian states without having to run at lower nodes where it would otherwise be trumped by the 7 SAUM shooters. I was also attracted to the cartridge through its general design, having a 35-degree shoulder angle similar to the inherently accurate .284 Winchester. I also think the .300 WSM resembles a super-sized Dasher, another devastatingly accurate cartridge. Most .300 WSM shooters report ease of tuning, another key factor I considered.
Choice of Stock, Action, and Barrel
My gunsmith, Matt Paroz (aka MattP on the AccurateShooter Forum) is one of Australia’s top gunsmiths as well as one of Australia’s top F-Open shooters. He knows what it takes to build match-winning rifles. Matt is also an agent for McMillan stocks and I was sold on the Kestros ZR after seeing how it well it tracked — the lower center of gravity it offers cannot be underestimated once you start stepping up in caliber size. I had previously seen a couple of rifles that Matt built for an Australian F-Open team member and I was blown away not only by the quality of the builds, but how well the components worked with one another. I already own a Barnard action, a match-winning action in its own right, but I was desperate to get my hands on a Borden. I liked the fact that Jim Borden times his actions as they leave his factory, so I ordered a BRMXD, left bolt, right port, left eject. I ordered my BRMXD fully DLC-coated, for both longevity and aesthetics.
I opted for a TriggerTech Diamond trigger which has been timed to the action and offers a level of crispness the factory Barnard trigger cannot replicate. The synergy between action and trigger is just superb. I managed to get my hands on a 10-twist, 4-groove Krieger barrel that looks like a winner so far. Finished at 31″, this barrel has been super-easy to tune so far, with Berger 215gr hybrids showing very good promise. NOTE — Overall the rifle comes in 500 grams (1.1 lbs.) below F-Open max weight, so the next barrel will probably finish at 32″.
The barrel sports an Ezell tuner. I don’t touch the tuner until I’ve sorted my load and bullet seating depth. The tuner just affords me that extra flexibility in tightening up an already good grouping. At the end of the day, like any competitive shooter, I’m chasing tight vertical and horizontal, something which will run inside 1 MOA at 1000 yards. If I drop a shot, I want it to be my fault, not the rifle’s.
About my optics choice — when the chance to own a March High Master came up, I didn’t think twice. I have used March previously and got a sneak peek through an original High Master prototype which was doing the rounds in Australia. With superb image quality, it left a lasting impression. March has built up an excellent following and reputation in Australia, and so far I have to say it was money well spent. The March is held in place with a set of beefy ARC M10 rings.
The rest of my F-Open setup includes a modified SEB Mini up front, with a Rodzilla Rest top and Bryan Blake adjustable feet. I chose the SEB Mini because it has a wide, stable footprint but relatively light weight. That makes the Mini easier to transport. At the rear I use an extremely well-crafted Lenzi LR bag which sits on a custom rear plate. This heavy combination keeps things nice and planted. That aids in straight tracking.
Reloading for the .300 WSM — Process and Die Choice
When it comes to reloading, I keep it simple and don’t over-think things. I use Norma .300 WSM brass. I ensure case mouths are always deburred on the inside and out but I do not neck turn. I am set up to turn necks with a 21st Century unit, but after neck turning previously for a 6mm SLR, I just didn’t see a noticeable benefit in doing so. I always full length re-size after firing and prefer bushings, generally opting for .002″ of neck tension on anything I shoot. So far it seems to be working. With my .300 WSM I run a Redding Type-S full-length bushing die with a .335 bushing. A loaded round comes in at 0.337″ across the neck and I opted for a no-neck turn reamer which comes in at 0.343″, so there’s plenty of clearance. I use a Forster micrometer seating die. I prefer the feel of the Forster and I use Redding dry lube media to assist in smooth bullet seating.
Reloading room with MEC single-stage press on left and AutoTrickler with Force Restoration Scale on right. Note there are plenty of bullets — Kris got his supplies before the shortage.
I use an AMP Annealer and anneal after every firing. Powder charges are measured and dropped with a V3 AutoTrickler and A&D FZ500i scale. The 215gr Berger Hybrid seemed like a pretty good place to start as far as bullet selection. I point them with a Whidden bullet pointing die. Powder options can sometimes be a contentious choice and if you’re lucky you’ll get a couple of powders which will work well in any given barrel. For my .300 WSM I use Alliant Reloder 23. It is very temp-stable. My primer of choice is S&B Standard Large Rifle Primers. How does it all come together? The first nine shots through the barrel while zeroing the scope resulted in an ES of 17 and SD of 6 — promising signs for a light initial load of 63 grains.
First Test in Competition — Kris Earns Victory at 600m with his .300 WSM
The first real test came after only 19 rounds had gone down the barrel. My local range and district had its annual Christmas shoot with Christmas hams and turkeys awarded to discipline winners. I was up against a decent field with two members from the Australian F-Open team running against me — one sporting a .284 Win and the other a 7mm SAUM. I ran two different loads using Reloder 23. I was hoping to be in the vicinity of 2920 fps with my pointed Berger 215gr hybrids. What made this a bit harder was not being able to run my LabRadar prior to the shoot. Based on user comments on the 215gr hybrids, I jumped them 20 thousandths, hoping they would hold together and not end up with a shotgun grouping on target.
My first sighting shot at 600 meters was a 4 which landed high, but windage was good. I wound down 1 MOA and the second sighter was a 5. My first scoring shot was an X. I proceeded to shoot clean, scoring a 60.8X (100.8X on a USA target), with the group measuring 3.7 inches. Quite a good start for shots 20-31 through the barrel! For Stage 2, we were only allowed one sighter with 11 shots to count (66.11 max possible). I knew my second load was a touch higher so I came down several clicks, and my first sighter was an X. This second stage load grouped tighter, shooting clean again with a 66.9X, with 11 shots in 3 inches. That was good enough to take first place in both stages and win the overall Aggregate for the day. See HEXTA target screen capture below. American readers take note — a SIX in Australia is the same as a TEN in your USA system.
Suffice to say I was very pleased with how things turned out! Despite the bigger bang this rifle makes, the Kestros ZR and R.A.D. 2 system made it remarkably compliant. The recoil is sharp but the R.A.D. system just takes all the sting out of it — it reminded me of shooting my old 280AI in terms of felt recoil. I was able to get back on target with a minimum of fuss and didn’t find the rifle fatiguing at all, so it gets a massive thumbs up from me. This just illustrates how important component selection and rifle set-up is to the overall experience. Going home with a Christmas ham and Turkey was an added bonus!
CONCLUSION — The .300 WSM is Very Effective for F-Open
With recent trends in F-Open equipment, such as rifle stock technology making a lower center of gravity possible, bigger F-Open options such as the .300 WSM are now quite manageable. That’s not to say this caliber is a pussy cat — it definitely kicks more than the .284s out there. But with my choice of components, the recoil is manageable and the R.A.D. 2 system takes the sting out, so I’m not left nursing a sore shoulder at the end of a stage. The rifle is off to a very positive start so far but I know it’s capable of more. The lead up to Christmas will keep me busy fine-tuning a load in time for the NSW State Title match to be held in late January 2021. With COVID-19 halting most competitive shooting in Australia in 2020, this 2021 NSW competition is sure to prove popular. I intend to have my .300 WSM rifle humming in time for it.
Kris Wilson (NSW, Australia) Talks About Competitive Shooting
When I was introduced to F-Class shooting, I was fascinated with the level of accuracy shooters were obtaining with their rifles and it was something that just drew me in. Since then it has been a gradual learning curve, not to mention the fact everyone I have met has been super friendly and willing to share their knowledge. The shooting fraternity is a great community to be part of…. Mixing it with Australia’s best is what drives me right now.
For the past two years I have taken competition more seriously as I hope to represent Australia in the future. In my first Nationals match in 2019, I finished 15th out of 30 F-Open shooters. I then finished 7th in the 2019 NSW State Championships, with every shooter above me having been a state or national championship winner, including current F-Open world champion Rod Davies. 2020 has been different due to COVID-19 — unfortunately many of Australia’s state championships and prize shoots were cancelled. But I’ve been working hard to maintain my skills and the new rifle is motivation. As reloading equipment and rifle components continue to improve, it’s a great sport which encourages learning and provides many opportunities to keep improving your shooting.
Sinclair International has created a series of helpful articles on rifle cartridge reloading. Today’s feature lists ten basic steps for precision hand-loading, with links to longer, detailed Sinclair Int’l technical articles providing more complete information. There’s a lot of helpful info here guys, if you click all the links to access the ten “long form” articles.
Tying It All Together: 10 Steps To Precision Handloads
Feature based on article by Roy Hill, Brownells/Sinclair Copywriter
Sinclair Int’l offers a series of detailed articles on hand-loading precision rifle ammunition. The articles are included in Sinclair’s GunTech Articles Archive, but sorting through the index to find each article takes time. To help you access all these articles quickly, here’s a handy summary of ten key topics, with links to longer articles covering each subject in detail.
Part 1: The first step in making high-quality handloads is to carefully choose the best brass for your application. You need to know how to identify the different types of brass and how to choose the best kind for the ammo you want to load. CLICK HERE for Part 1.
Part 2: Even high-quality brass can have burrs around the flash hole that can interfere with the primer flame and cause inconsistent ignition – which can lead to shot groups opening up. Flash hole deburring is a critical step in making sure primers ignite powder consistently. CLICK HERE for Part 2.
Part 3: The next step is to make sure the primer pockets are square and uniform. Like flash hole deburring, primer pocket uniforming may reduce variations in primer ignition by ensuring more consistent primer seating. CLICK HERE for Part 3.
Part 4: Making sure all your cases are precisely the same length is crucial, especially when you use cases that have been fired before. Case trimming is the way to get there. CLICK HERE for Part 4.
Part 5: After trimming, cases still have to be resized. In order for them to work through the resizing die, they have to be lubricated. The case lube method you choose is crucial to making precision handloads. CLICK HERE for Part 5.
Part 6: Now it’s time to choose the dies that will resize your cases. There are several important options to consider in selecting the right sizing dies. CLICK HERE for Part 6.
Part 7: Wait! You’re not quite ready to start sizing yet. There’s yet more to consider before you start cranking cases through the press. Learn more about setting up and adjusting your sizing dies. CLICK HERE for Part 7.
Part 8: Once the cases are completely prepped, it’s time to start putting fresh components back into them. We start off by seating primers. CLICK HERE for Part 8.
Part 9: After the primers are seated, it’s time to drop in the powder. There are several tools that will help you handle powder for precision handloads. CLICK HERE for Part 9.
Part 10: The final step in the process is carefully seating the bullet to just the right depth. And then… you’re ready to try your loads at the range. CLICK HERE for Part 10.
Shooting Sports USA has an article of interest to competitive shooters who also enjoy hunting. This article was authored by Josh Honeycutt, a highly-accomplished hunter. To explain how competitive shooting can improve hunting skills, Honeycutt interviewed two leading pro shooters who both hunt: Doug Koenig and Bruce Piatt. The story outlines eight ways competitive shooting can help develop shooting skills and a mental awareness that will help hunters. Thorough the eight points, the article explains how skills learned in competition can help deliver better results during your hunts.
You’ve probably heard of cut-rifling, but did you know this process was invented in Germany nearly 500 years ago? Read on to learn more about how a cut-rifled barrel is made…
The cut-rifling process, used by leading barrel-makers such as Bartlein, Blake, Brux, Krieger, and Obermeyer, can yield a very high-quality barrel with a long useful life. Cut-rifled barrels have been at the top in short- and long-range benchrest competition in recent years, and cut-rifled barrels have long been popular with F-Class and High Power shooters.
You may be surprised to learn that cut-rifling is probably the oldest method of rifling a barrel. Invented in Nuremberg around 1520, the cut-rifling technique creates spiral grooves in the barrel by removing steel using some form of cutter. In its traditional form, cut rifling may be described as a single-point cutting system using a “hook” cutter. The cutter rests in the cutter box, a hardened steel cylinder made so it will just fit the reamed barrel blank and which also contains the cutter raising mechanism.
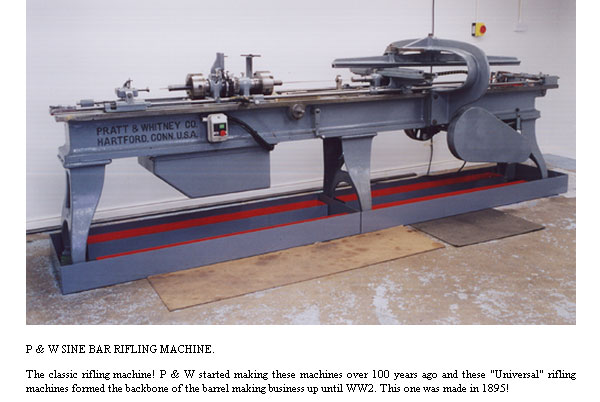
Above is a computer animation of an older style, sine-bar cut-rifling machine. Some machine features have been simplified for the purposes of illustration, but the basic operation is correctly shown. No, the cut-rifling machines at Krieger don’t use a hand-crank, but the mechanical process shown in this video is very similar to the way cut-rifling is done with more modern machines.
Read About Cut-Rifling Process at FirearmsID.com
To learn more about the barrel-making process, and cut-rifling in particular, visit FirearmsID.com. There you’ll find a “must-read” article by Dr. Geoffrey Kolbe: The Making of a Rifled Barrel. This article describes in detail how barrels are crafted, using both cut-rifling and button-rifling methods. Kolbe (past owner of Border Barrels) covers all the important processes: steel selection, hole drilling, hole reaming, and rifling (by various means). You’ll find a very extensive discussion of how rifling machines work. Here’s a short sample:
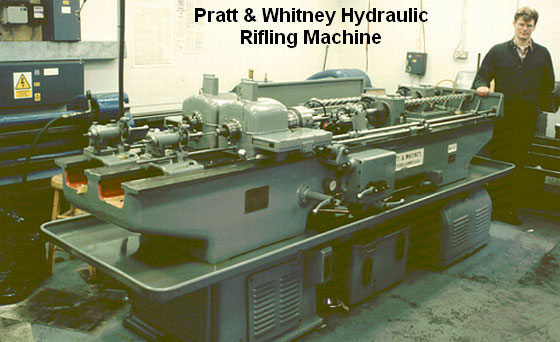
“At the start of World War Two, Pratt & Whitney developed a new, ‘B’ series of hydraulically-powered rifling machines, which were in fact two machines on the same bed. They weighed in at three tons and required the concrete floors now generally seen in workshops by this time. About two thousand were built to satisfy the new demand for rifle barrels, but many were broken up after the war or sold to emerging third world countries building up their own arms industry.
Very few of these hydraulic machines subsequently became available on the surplus market and now it is these machines which are sought after and used by barrel makers like John Krieger and ‘Boots’ Obermeyer. In fact, there are probably less of the ‘B’ series hydraulic riflers around today than of the older ‘Sine Bar’ universal riflers.
The techniques of cut rifling have not stood still since the end of the war though. Largely due to the efforts of Boots Obermeyer the design, manufacture and maintenance of the hook cutter and the cutter box have been refined and developed so that barrels of superb accuracy have come from his shop. Cut rifled barrel makers like John Krieger (Krieger Barrels), Mark Chanlyn (Rocky Mountain Rifle Works) and Cliff Labounty (Labounty Precision Reboring)… learned much of their art from Boots Obermeyer, as did I.” — Geoffrey Kolbe
Video find by Boyd Allen. Archive photos from Border Barrels. In June 2013, Birmingham Gunmakers Ltd. acquired Border Barrels. Dr. Geoffrey Kolbe has set up a new company called BBT Ltd. which produces chamber reamers and other gunsmithing tools and gauges. (Thanks to L. Holland for the Kolbe update).
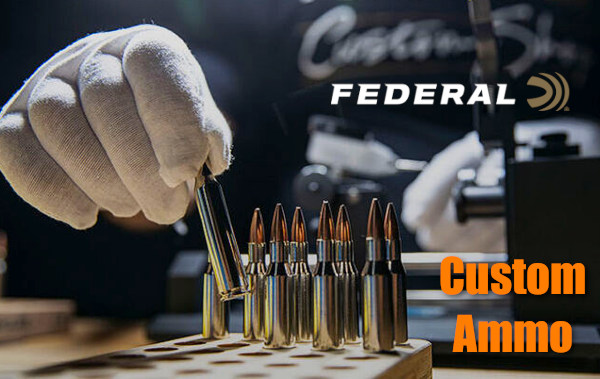
Don’t have time to hand-load your own ammo, or don’t have all the equipment and dies needed? There’s a new option — something that’s actually quite revolutionary in the ammo industry. Federal is now offering custom-loaded ammunition. You choose the cartridge type and bullet type and Federal technicians put the ammo together. Think about it — this could be an interesting option for hunters who only need a few rounds a year, or if you want to try out a bullet/cartridge combo for the first time.
“Each round is painstakingly handloaded to order by our team of expert engineers in our state-of-the-art reloading workshop. Veteran craftsmen combine the best components with extra quality checks at every stage for the most consistent velocity, accuracy, and overall performance. Loads are then hand-checked for final inspection and cleaned before being custom-packed in durable, personalized packaging.”
26 Centerfire Rifle Cartridge Types + Many Bullet Options
Currently, you can choose from 26 rifle cartridge types and a wide selection of quality bullets from Barnes, Berger, Sierra, Nosler, Federal, Hornady, Swift, and more. NOTE: Federal Custom Shop ammo will be sold direct-to-consumer only. Along with rifle ammo, Federal will offer custom TSS Shotshells.
Bullet Types Offered: BARNES TIPPED TSX, BERGER HYBRID HUNTER, HORNADY ELD-X, NOSLER ACCUBOND (and Accubond LR), NOSLER PARTITION, SIERRA MATCHKING, SWIFT A-FRAME, WOODLEIGH HYDRO SOLID; and Federal TERMINAL ASCENT, TROPHY BOND BEAR CLAW, TROPHY BONDED SLEDGEHAMMER, TROPHY COPPER.
Please note: Federal Custom Shop ammunition is built to order — not pulled out of inventory in a warehouse. As such, please allow more time for processing and delivery. Typically, your Custom Shop order will take two weeks to build, plus standard delivery time. The Custom Shop handloading center is located at Federal’s main factory in Anoka, Minnesota. For more information, including how to order, what specific load options are available, and shipping details, visit: FederalPremium.com/custom-shop.html.
“If it’s not in Federal’s vast catalog as factory-loaded ammo, we may have it listed on our website as a load we will custom hand-load for you,” notes Federal Ammunition President Jason Vanderbrink. “For example, Barnes 120-grain Tipped TSX in 6.5-284 Norma and 28-gauge TSS turkey loads aren’t products we list in our catalog, but you can certainly order them through our Custom Shop.”
Many shooters are familiar with ballistics tables, weather programs, and even wind meters for smart devices, but few may know about a very handy Leveling Tool that comes factory-installed on Apple iPhones. The leveling function is a little-known option in Apple’s Compass App. It works well for a multitude of tasks.
There are a numerous reasons that a leveling tool should be in every rifleman’s range bag. From leveling optics during mounting to figuring out how much extra compensation is going to be required for a tricky angled shot, knowing just how far off things are from plumb can go a long way towards realizing success in the field.
This writer has used the leveling app on his iPhone to level a rifle on a rest while at the range. It definitely worked for “field expedient” leveling duties. That’s especially important for long-range applications. Just one degree of cant (tilt) can move your point of impact 7 inches at 1000 yards.
Of course, the iPhone level doesn’t use an actual bubble to find angles. Rather, it relies on the device’s sophisticated accelerometer to do so, and with a great degree of accuracy. Navigating to the level is done by first selecting the Compass App (Utilities folder), at which point the device will need to be calibrated by rotating it a full 360 degrees. Once the compass is fully calibrated, simply make swipe LEFT gesture to bring up the level — it will start operating immediately. Swipe right to return to compass. NOTE: On some newer iPhones the Level feature is part of the Measure App, so to access it you go to Utilities > Measure, and it’s listed at the bottom.
From there, use is intuitive and easy, like most iPhone Apps. Switching from horizontal plane to vertical is done by simply changing the physical axis of the phone. How do you know when you’ve got things just right — well the entire lower half of the screen turns green when everything is perfectly level. You’ll also see a zero° read-out, like this:
Bottom Line: If you already own an iPhone, you should definitely give this App a try. The price is right (free), and for a wide variety of tasks the iPhone Level App is actually pretty handy.
For Android Phone Users — FREE Leveling Apps
Don’t have an iPhone? No worries — there are a multitude of Bubble Level Apps available for Android OS phones. We found over 40 leveling Apps. Most are free, others cost a few dollars. Most of these Apps work in multiple orientations. Choose the App that offers the display views you find most convenient or pleasing to the eye. You may want to try two or three before you settle on a favorite.
SAF, NRA File Appeal Brief in Federal Challenge of WA Gun Control Measure
Attorneys representing the Second Amendment Foundation, National Rifle Association, two Washington state gun retailers and three private citizens have filed an appeal brief with the U.S. Ninth Circuit Court of Appeals in their challenge of gun control Initiative 1639 (I-1639), a measure adopted two years ago in the Evergreen State. This appeal in the case of Mitchell vs. Atkins seeks to overturn I-1639’s ban on semi-auto rifle ownership for Washington citizens 18-20 years of age.
The lawsuit challenges the measure on the grounds that it violates the commerce clause by banning sales of rifles to non-residents, and that it unconstitutionally impairs the rights guaranteed by the First, Second and Fourteenth Amendments, and Article I Section 24 of the Washington State constitution by preventing the sale to otherwise qualified adults under age 21 of certain rifles.
The 45-page brief asserts that I-1639: “infringes the rights protected by the Second Amendment and enjoyed by law-abiding adults of all ages. The interstate sales ban violates the Interstate Commerce Clause”. A district court judge in Tacoma dismissed the case in August, and plaintiffs promptly filed notice of appeal with the Ninth U.S. Circuit Court in San Francisco.
The initiative prohibits young adults ages 18-20 from purchasing and owning so-called “semiautomatic assault rifles” — defined as literally ANY self-loading rifle, regardless of caliber. Tens of millions of semi-automatic rifles are in use today by law-abiding citizens of all ages for hunting, competition, predator and varmint control, recreational shooting and personal/home protection.
“We’re asking the Ninth Circuit to reverse a ruling by the lower federal district court, and remand this case back for further action”, said SAF founder/Executive V.P. Alan M. Gottlieb. “The constitutional rights of law-abiding citizens should never be subject to a popular vote, and we are hopeful the Appeals court agrees.”
Plaintiffs are represented by Seattle attorney Joel B. Ard and Spokane attorney David K. DeWolf. The case is known as Mitchell v. Atkins.
The Second Amendment Foundation (www.saf.org) is the nation’s oldest and largest tax-exempt education, research, publishing and legal action group focusing on the Constitutional right and heritage to privately own and possess firearms. Founded in 1974, The Foundation has grown to more than 650,000 members and supporters and conducts many programs designed to better inform the public about the consequences of gun control.
22Plinkster runs of the most popular gun-centric YouTube channels. His videos have been watched by hundreds of thousands of firearms fans. Many of 22Plinkster’s videos involve trick shots, such as shooting a .22LR through 100 balloons, but he also does serious reviews. He’s actually a competent marksman who has shot a vast collection of .22 LR/22 WMR pistols and rifles, making him a qualified rimfire expert (as well as a trick-shot artist and showman). Today we feature five 22Plinkster Firearms Videos, plus a bonus Vudoo Gun Works video review from GunsandTactics.com.
Vudoo Gun Works Ravage Precision .22 LR Rifle
Last Sunday we featured an NRL22 rimfire competition rig built with a Vudoo Gun Works V-22 action. For this Sunday GunDay article, we showcase a complete Vudoo rifle, a mag-fed Ravage with Ridgeback stock. 22Plinkster declared: “It’s a Tack-Driver … this .22 LR Rifle is the most accurate .22 LR bolt-action rimfire rifle I have ever shot in my life.” And he notes that he has shot Anschutz, Lithgow and other quality rifles.
Firing from a Lead Sled, 22Plinkster starts out at 50 yards, and produced a 0.335″ group at 50 yards using Lapua Midas+ ammunition (4:00 time-mark). Then this session gets really impressive. Continuing with Lapua Midas+ ammo, this Vudoo Ravage produced a sub-half-inch group at 100 yards*. You can watch that Midas+ group form up from 7:20 to 8:25 in the video. Then, with ELEY Tenex ammo, he produced a 0.707″ group (10:30) and an even smaller group (11:55). This complete rifle is available from Vudoo Gun Works for $2545.00 without optics.
22Plinkster says Vudoo’s Ravage is a top choice for NRL22/PRS rimfire matches and Rimfire ELR competitions: “This is the cream of the crop. [Many] people who are winning PRS rimfire matches are shooting Vudoos. What sets this rifle apart from a lot of the other Match 22 rifles is what it does past 300 yards. A lot of rifles — Anschutz, Lithgow, CZ — shoot really good out to 300 yards. But after 300 yards, their accuracy diminishes big-time.”
Vudoo V22 Ravage with a fluted 18″ Kukri barrel in an Urban Camo Grayboe Ridgeback stock.
If you are interested in getting a Vudoo rimfire rifle, then definitely watch this 20-minute Guns & Tactics video. It provides extensive accuracy testing for multiple ammo types with verified group sizes. Then the reviewer shows the working details of the rifle, including the bolt, trigger system, and magazine. The video also includes field testing from bipod as well as competition-type practical stages out to nearly 400 yards.
Savage A22, 22 Magnum (WMR) Rifle Field Test
The Savage A22 is the .22 WMR “big brother” to Savage’s popular A17 17 HMR rifle. In this video, 22Plinkster demonstrates that the A22 is a very reliable semi-auto that can deliver near-1 MOA accuracy when the barrel is clean. This rifle retails for about $390.00.
Smith & Wesson Model 41 .22 LR Pistol Review
The S&W Model 41 is a classic American rimfire target pistol. Beautifully crafted, the Model 41 boasts a superb trigger, comfortable grip, and excellent accuracy. New or used, a Model 41 would be a fine addition to any firearms collection.
Volquartsen Scorpion .22 LR Pistol Review
The Scorpion demonstrated exceptional accuracy in the hands of 22Plinkster. It comes with a large target-style grip. With a built-in compensator, the Scorpion stays on target with almost no muzzle rise. The comp can be easily switched out with a suppressor (See video at 3:00 time-mark).
S&W Victory Vs. Ruger Mark IV Pistol Shoot-Off
22Plinkster liked both pistols. He favored the grips on the Ruger while preferring the S&W’s trigger. He felt the Ruger’s iron sights were best for precision work, but he noted that the green dot fiber optic sights on the S&W Victory worked better for speed work.
*Footnote regarding 22Plinkster Measured Groups: At least one of the measured groups (in close-up view) does NOT show the exact same group which formed in the preceding video sequence. You can tell from the shot placements relative to the center of the target — it’s a different group. Still we believe that 22Plinkster did shoot very small groups with this rifle at 50 and 100 yards. We just think 22Plinkster’s video editing may have been out of sequence. You can tell the group measured with calipers is not the same as the group shown forming top right in the preceding live video.


 Many shooters are familiar with ballistics tables, weather programs, and even