Project by Shiraz Balolia, President of Grizzly Industrial
The lowboy stock you see above started as an experiment. I had an extra Masterclass F-Class stock that had gone through two actions, four beddings, and multiple modifications over the years. I figured that there was nothing to lose if the experiment did not work out.
After deciding on the design, the stock was carefully leveled in every direction and milled to the precise dimensions for attaching the side pieces, which would be glued to the original stock.
Curly Maple and Bubinga wood were laminated to get the exact thickness of the side pieces so that the total width of the fore-end would be just under the total width allowed for F-Open stocks.
Two guide pins made of Bubinga were drilled through each side so that the sides would not move when glued to the milled stock.
Once the sides were glued to the blank, the stock was once again trued on the mill so it was perfectly flat and square with the back (see below).
The stock was then sent to Keith Weill at KW Precision who did an incredible bedding job on the new BAT M action. The stock was then sent out for spraying a clear finish. Normally I spray my own stocks, but I did not have time for this stock, so that part was subbed-out. The finger grooves and “Shiraz” inlay had been done by me a few years prior during the old stock’s heyday.
Modified Stock Has Significantly Lower Center of Gravity
The rifle was then assembled, a March 10-60x56mm High Master scope was installed, and break-in was completed on the new barrel. At the range, the stock performed great. The stock rides one-half-inch lower in the front bag and really feels good.
Bartlein Barrel Is Chambered in .300 WSM
I was pleased to find that the Bartlein barrel I have on this gun cleaned up very well during barrel break-in and this “experiment” may turn into this being one of my best-performing guns. All of my F-Open match guns are .300 WSM (Winchester Short Magnum), and so is this one.
Are you a do-it-yourself kind of guy with a creative eye? Then you’ll love the Target Generator from the folks at ShooterShed.com. This free, interactive webpage allows you to design a variety of fun targets, including grids, benchrest-type Score Shooting targets, sight-in targets, and even playing card targets. Choose the paper size and orientation (vertical or horizontal), then select the number of target elements on the page. For example, you could have four (4) bulls or 52 playing cards. You can include a grid on the target, or tell the program to include load information blocks. For bullseye targets, you can control the number, color, and spacing (diameter) of the rings. LINK to TARGET GENERATOR.
The program provides a preview of each target you generate. If you like a particular design, save the file, and then print as many targets as you want. Check it out, this program is fun and handy to use. Here are four (4) targets your Editor created just for this article. With a bit of practice, you can be generating your own custom targets in minutes. Have fun.
About the Creator of the Target Generator
The Target Generator program was created by Rod Brown of Sheridan, Wyoming. Rod tells us: “I build custom rifles and coach shooters. I’ve got a 100-yard range out my back door. I shoot short- and long-range benchrest competitively around the country. I’m a full-time software development consultant and an FFL holder. When I’m not developing custom software for my clients, I’m usually fiddling in the shop, building a custom benchrest rifle, traveling to a match, chambering a barrel, or reloading some ammunition.
Story tip from Boyd Allen. We welcome reader submissions.
Jason Cohen’s “We the People” patriotic .284 Shehane F-Class rifle. It has already demonstrated great promise, scoring second place in its very first match, a 3×20 at 1000 yards in Wyoming.
Rifle Report by Jason Cohen
The rifle began its life as a Will McClosky Cerus stock. I approached Will at the Berger SW Nationals about a rifle I wanted to build. I wanted to do something different — PAINT it. He said he had just the stock that I could use, and sent that to Bryan Blake at Blake Machine. I chose Bryan for two reasons — first, I have shot with him a few times at National matches and he is approachable and very helpful. Second I visited his shop during the SWN in February and liked what I observed and how he approached things. Bryan never seems to be happy with the status quo. He is always trying new ideas.
I noticed that Bryan had been adding aluminum rails to the front of Cerus stocks to lower the center of gravity and improve tracking. I asked him to modify my stock and fit it with the new forearm rails, shown in the photo below. I sent him a Panda F-Class action with a +20 MOA Picatinny rail. Bryan did all the stock work and fitted the action, rails, and RAD recoil pad. Everything turned out flawless.
The barrel is a Blake Machine 1:8″-twist finished at 32 inches. It was fitted to my action by Dale Woolum of Woolum Accuracy. Dale chambers all my barrels on all my rifles. Dale also threaded the barrel for a Woolum Accuracy tuner. This has proven to be a valuable tool in my load development. On this build, I am trying a Bix’N Andy trigger for the first time.
The 284 Shehane has a proven record of accomplishments and that is why I have chosen it. I use Lapua brass (6.5-284 necked-up), CCI BR-2 primers, Hodgdon H4350 powder, and Berger 184gr bullets. All these components have been a successful combination that has worked flawlessly in my other rifle.
.284 Shehane Load Development
Load development for me starts with each new barrel. I screw on the new barrel, fire 25 rounds of whatever I have left over and then clean it. I push out to 600 yds and do a ladder test in round-robin format. I start 0.6 grains lower than my last charge that worked. I work up from that reduced charge weight in increments of 0.3 grains. The paper tells the rest of the story. Once I get something that works well at 600 yards I go back in work around that by 0.1 grains. After that I play a little with seating depth and look for a change. I will occasionally mess with the tuner and tighten things up if possible.
About the Patriotic Paint Job
So I had the idea of painting the stock because there are so many wood stocks with clear coat these days. Unless you really get some exotic woods they all seem to blend together. I have nothing against clear-coated wood, but I wanted something different, as this was my first all-wood rifle. (For short-range benchrest, I was shooting a Bob Scoville carbon stock and Terry Leonard laminate).
We started with all white on the stock and came up with the idea of an American Flag on the buttstock. I was thinking of ribbons on the front in red and blue but we could not get the layout right. Then the idea of “We the People” popped into the head. My painter said “awesome!” and he was able to airbrush the stock with a little yellow and brown to give it that vintage paper look.
The front rest is a SEB Max (see above). I chose the Max because I was shooting Group Benchrest first then made the transition to F-Class. This rest proves to be versatile in all my shooting — Short- and Long-Range Benchrest AND F-Class. The rear bag is a Edgewood EDGEbag Gator. The gun gets transported in a Pelican Hard case when I travel. Locally, I use a Champions Choice soft bag.
Jason Jumped to Open Class after Starting with F-TR
This “We the People” rifle will be one of my primary rifles for F-Open competition. I will run it through its paces shortly and see how well it does. I have high hopes of it being an great gun. I shoot primarily local and regional matches — Colorado, Wyoming, and possibly Nebraska this summer. I will travel to the F-Class Nationals in Raton as well. I used to shoot F-TR before this and made the transition to Open last season. This is my second season shooting F-Open. 2018 was my first National event and was a learning experience for me. But I was hooked after that match.
Tips for F-Class Competitors
Get some good equipment and eliminate having issues that can be caused by budget builds. It’s OK to be frugal, but sometimes cutting corners will cause you more problems and have you chasing your tail. If you’re looking for the “recipe for success”, get a good action plus a top-tier barrel and great glass.
The .284 Shehane — Accurate and Forgiving Wildcat
The 284 Shehane is amazing, very forgiving and not temperamental. I choose this because I really did not know otherwise and was steered to the Shehane by a friend. Its proven track record helped as well. Straight .284 or Shehane — you cannot go wrong. I run a 184gr Berger at about 2850 FPS and get great brass life in my other rifles. I usually start to consider tossing the brass around 15 firings. Primer pockets start to get a little looser and the brass seems to need more sizing than the newer brass with less firings.
Shooting Sports USA has a fascinating article about the Perpetual Trophies awarded in national-level NRA matches. The story recounts the history behind the elaborate trophies, some from the 1870s. SSUSA’s Jennifer Pearsall writes: “The pieces of wood, stone and precious metal … are more than just instant recognition of achievement. They are the link of the American shooter’s present to his or her patriotic past. As you read this legacy of the NRA ranges, their founders, and the long list of cups, bowls, and plaques, realize that the history of competitive shooting is undeniably a significant part of the foundation of this country”. Read Full Trophy Story HERE.
Stunners in silver. Above are the NRA Leech Cup (left) and Wimbledon Cup (right).
The NRA was co-founded by Col. William Church and Gen. George Wood Wingate (ranked Captain at the time). Both Church and Wingate hoped to improved the marksmanship skills of American soldiers. One of the newly-formed NRA’s first actions was to issue: “An Act to Establish a Rifle Range and Promote Skill in Marksmanship”. That led to the opening of the famed Creedmoor Range, with a special inaugural match in June of 1873.
Many of the awards presented in the first NRA matches were cash or firearms. Some of these firearms were heavily embellished works of art. In the very first match, a member of the 22nd New York Regiment took home a gold-mounted Winchester Model 1866 valued at $100 — big money for the time.
In the 1870s shooting competitions were social as well as sporting events. Ladies and gentlemen came to watch and cheer the winners. This illustration, originally from Harpers Weekly, portrays the shooters and the viewing gallery at the 1876 Grand Centennial Championship—the “Palma” Match.
The Leech Cup — A Gift from Ireland
The Leech Cup was created for the first meeting of the American and Irish shooting teams. The elaborate cup was presented by Major Arthur Leech, captain of the the Irish team, to the Amateur Rifle Club of New York. This masterpiece of Irish silver-smithing was later given to the NRA in 1901 by the New York Club. Today, the Leech Cup is the oldest trophy offered in overall NRA competitive target shooting, awarded through the National High Power Long Range Championships.
The Wimbledon Cup
The Wimbledon Trophy was a gift from the NRA of Great Britain. It was given, as a gesture of sportsmanship, after the the U.S. Team was denied the ability to compete in England’s Elcho Shield match, then limited to Britain, Scotland, and Ireland. To maintain friendly competitive relations, the British presented the Americans with a large, engraved, lion-footed tankard trophy to be awarded each year to the Champion U.S. long-distance rifleman.
The Palma Team Trophy
Originally named the Centennial Trophy, in honor of the Centennial celebration of the independence of the United States of America, the Palma Trophy was commissioned from Tiffany’s at a cost of $1,500. The trophy was a full-sized replica of a Roman Legion standard, executed in bronze with silver and gold inlay. On the banner of the standard was the legend, “In the name of the United States of America to the Riflemen of the world”. Above the banner was an eagle, bearing in its talons a wreath of palm leaves and a plaque on which was the single word, “PALMA”, the Latin word for palm tree, which was used by the Romans to signify victory, or the ultimate in excellence.
Because the word Palma was so easily seen, the trophy soon became known as the “Palma Trophy”, and by 1878 was referred to officially by that name. The original seven and one-half foot trophy is now lost, having not been seen since at least 1954. Serving in its place is a copy which was commissioned by Dr. Herbert M. Aitken of Eau Claire, WI. The copy was made from the original Tiffany blue-prints at a cost of $32,500. Dr. Aitken has given this copy of the Palma Trophy to the NRA for use in the Palma Match. The trophy is retained by the winning team until the next Palma Match.
In 2008, the Palma Trophy was returned to the NRA, and it was decided that the trophy, once refurbished, will travel to the host nation for the match every four years, then returned to the NRA for safekeeping.
The first competition for the Palma Team was a challenge match for which the British Commonwealth nations were invited. The match was fired in 1876 at the old Creedmoor Range on Long Island as part of the Centennial celebration of the United States. Teams representing Scotland, Ireland, Canada, Australia, and the United States took part. The match is currently fired on a four-year interval.
Emil Praslick III is widely recognized as one of the greatest wind wizards on the planet — a master at identifying wind value and direction, and predicting wind cycles. As coach of the USAMU and top civilian teams, Emil has helped win many high-level championships. In the three videos we feature today, Emil, who works with Capstone Precision Group (Berger, Lapua, SK, Vihtavuori) and Team Applied Ballistics, explains how to determine wind direction and velocity using a variety of indicators. Praslick, now retired from the U.S. Army, was an 18-time National and 2-time World Champion coach with the USAMU.
Video ONE: Wind Theory Basics — Understanding “Wind Values”
In this video from UltimateReloader.com, Emil explains the basics of modern wind theory. To properly understand the effect of the wind you need to know both the velocity of the wind and its angle. The combination of those variables translates to the wind value. Emil also explains that the wind value may not be constant — it can cycle both in speed and velocity. Emil also explains some of the environmental conditions such as mirage that can reveal wind conditions.
Video TWO: Determining the Direction of the Wind
Key Point in Video — Find the Boil
Emil explains how to determine wind direction using optic. The method is to use spotting scope, riflescope, or binoculars to look for the “Boil” — the condition in mirage when the light waves rising straight up. The wind will generate that straight-up, vertical boil in your optics when it is blowing directly at you, or directly from your rear. To identify this, traverse your scope or optics until you see the boil running straight up. When you see that vertical boil, the direction your optic is pointing is aligned with the wind flow (either blowing towards you or from directly behind you).
Video THREE: The No Wind Zero Setting
In this second video, Emil defines the “No-Wind Zero”, and explains why competitive shooters must understand the no-wind zero and have their sights or optics set for a no-wind zero starting point before heading to a match. In order to hit your target, after determining wind speed and direction, says Emil, “you have to have your scope setting dialed to ‘no wind zero’ first.”
Coach of Champions — Emil Praslick III
SFC Emil Praslick III, (U.S. Army, retired) works with Berger Bullets and Applied Ballistics. Emil served as the Head Coach of the U.S. National Long Range Rifle Team and Head Coach of the USAMU for several years. Teams coached by Emil have won 33 Inter-Service Rifle Championships. On top of that, teams he coached set 18 National records and 2 World Records. Overall, in the role of coach, Praslick can be credited with the most team wins of any coach in U.S. Military history.
Ric Horst’s 7 WSM is a game-slayer with serious long-range accuracy. Here’s a hunting rifle (with tactical trappings) that performs as well as some purpose-built benchrest rifles, delivering half-MOA ten-shot groups at 1000 yards–from bipod no less! That was noteworthy in itself. But Ric’s rifle, built to take game in Wyoming’s backcountry, also proves the viability of the 7mm Win Short Mag as a true precision cartridge. With the capacity to drive hard-hitting, ultra-high-BC bullets, the 7 WSM is a bonafied rival to the big 30s. This rifle sets a very high bar for long-range hunting rigs.
The Challenge: Creating the Ultimate Long-Range Hunting Rifle
Q: Tell us how you got interested in the 7 WSM and how you got started on this project?
Ric Horst: Chris Matthews and I were invited to help out with a new hunting show on a cable network. We wanted to showcase a rifle that wasn’t typical for the TV program which was about Antelope and Mule Deer hunting in Wyoming. We considered a variety of calibers, but then Sierra announced their new 175gr (.284) MatchKing and that got our attention. In Wyoming, the key thing in choosing a caliber is the availability of good high-BC bullets–the wind will own you out here. After seeing Sierra’s projected BC for the 175s this seemed to be a no brainer. So I told Chris to make the rifle a 7mm WSM.
Q: What were your objectives with this project rifle? Sounds like you wanted to build a state of the art long-range hunting rig?
Our goals were simple–we wanted a tack-driver with long-range capabilities, from 400 to 1000 yards. Really, at the time, the choice of the 7 WSM was easy–no one else was really doing it, and if they were, they weren’t talking about it. So we wanted to be the first make it work, one way or another. There were actually no real surprises or problems along the way, other than it was the first time I was shooting a 7mm and the accuracy of the 175gr bullets was better than I expected. I have total faith in Chris’s gunsmithing abilities. This 7 WSM is the sixth rifle he’s built for me–and they’ve all been tack-drivers.
Q: Give us your perspectives on living and shooting in Wyoming. What makes it such a great hunting ground? How do the game mix and terrain dictate your selection of a rifle?
My requirements for my rifles are, I guess, unique. I like tactical-style rifles. This “style” seems to fit my type of hunting here in Wyoming–tough, rugged terrain where you need to be able to make the long shot should one present itself. Living in Wyoming? Well, if you choose to live in the “out of town” places you need to be well-prepared and tough. Going to town means a 50-mile trip. You don’t just run to the convenience store if you need something. Plus the weather is hard in the winter and always windy. We joke that we have just two seasons, three months of summer and nine months of winter. Our spring and fall are each about two weeks long.
Despite the weather, Wyoming is a great place for a hunter. Game here is second to none: deer (whitetail and mulies ), antelope, elk, sheep, moose, plus varmints galore. What is great about my location is that I can shoot just about anytime I want. I have the ability to shoot as far as 3500 yards out my back door if I choose. Here’s a shot of my playground.
Putting It Together: Exceptional Components and Accurate Ammo
Q: Your 7 WSM has logged 10-shot groups at 1000 yards that could win many 1K benchrest matches. What kind of components does it take to deliver this kind of accuracy?
There is nothing super-exotic in this rifle, but it IS fitted out with some of the best components on the market. We did start with a factory action, however, a Remington 700 short action. Chris trued the action, added an SSG over-sized bolt knob, and fitted the action with a Broughton 5C, 9-twist #7 contour barrel finished at 24″. To reduce recoil we added a Badger brake. The stock is a fiberglass McMillan HTG (General Purpose Hunting) stock in Desert Camo. (This McMillan stock design replicates the original M40A1 Marine Sniper Rifle stock.) Since this is a repeater we added a Wyatts Mag Box. The gun features Badger bottom metal, Badger scope rail and Badger Rings. The Scope is a 4-16 Nikon Tactical, which, so far, has proven to be excellent. All the metal is Teflon-coated in Mil-Spec OD Green. I have a bubble-level mounted on the scope rail.
Q: To achieve the results you’re getting you must have exceptional hand-loads. What is your reloading procedure and do you have any “secret tips” to share?
I use Winchester-brand brass and Winchester Large Rifle Magnum primers. My current load is 64.0 grains of H4831sc for the Hornady 162s (2950 fps) and 61.0 grains of H4831sc for the Sierra 175s (2830 fps).
The only sizing dies I have used are the Basic Redding FL dies–I have since started using the Forester Ultra-Seater and used it when I shot the outstanding groups. My reloading technique is pretty basic. I full-length size and trim all to length. I use the RCBS powered Trim Mate™ station to do most of the brass prep. I do use the VLD case mouth deburrer. I uniform the primer pocket and chamfer as well. I then fire-form those prepped cases. I’ve noted that the new brass usually shoots just as well as fire-formed cases. I then use the FL die to bump the shoulder back .002″. I haven’t really noticed and major difference between Forester and Redding dies except price. I don’t have any “special” secret loading techniques. If you use quality components, I’ve found that you don’t need to weigh this weigh that etc. I tried that for years and it never really showed results to justify the time and effort. I quit doing all the weighing ( except for bullets ) and I shoot just as well. The two things I am anal about are the powder charge and seating depth–these all have to be exactly the same for each round!
I do take time to uniform the brass. First, when I get a bag of brass, I’ll check to make sure all the flash holes are centered, and I’ll pitch the ones that aren’t. Then I’ll measure the shortest case and trim all to that length (after ensuring that fits my chamber). Next, I’ll uniform the primer pockets, and debur and bevel the flash hole on both sides. Beveling both sides is one trick I think helps keep ES down. By beveling the flash side it basically takes the flash and tapers/funnels it to the hole. I think you get more consitency with the primer flash this way. Finally I’ll debur/champfer the inside and outside of the neck using a VLD chamferer.
After firing the cases once, I clean them all up and make one pass on the neck turner just to “clean” the necks to a consistient diameter. Note, I am not necessarily turning for a specific diameter because I have enough clearance to start with. I do this light turn just for consistency. Sometimes the neck turner might only shave a bit off one side.
Q: What’s your load-testing procedure? Do you have any special methods to evaluate/tune your loads?
Again, my methods are pretty simple. I start with the Sierra Load Manual, select the bullet weight, then find the max load for a recommended accurate powder. I like Hodgdon powders, so I start with an “H” powder with an appropriate burn rate, drop the “max” load about 0.5 grains and start there. Typically there is a sweet spot within half a grain up or down from that starting point. I usually seat my bullets to touch the lands or seat just in a bit. I feel this makes up for any bullet-run out when seating them.
When load-testing, I try to get 100-yard groups to be half an inch or less (quarter-MOA is pretty good for me, but not something I can count on regularly.) I then go to the 300- and 500-yard steel plates to see if the load holds its accuracy. If it does, then the load is good to go. However, I will shoot a 5-shot group every now and again to see if I am still in tune. In fact I was re-testing the 162gr A-Max and 175 gr SMK loads the day I shot the screamers at 1013 yards. Two great groups back to back.
Q: How does your 7 WSM perform in terms of recoil and accuracy? Has it met your expectations?
This rifle is by far one of the most fun rifles I have ever had. The recoil is very minimal with either of the loads and the rifle just plain flat-out shoots. The break-in took all of 21 rounds I think. This rifle shoots sub-2″ groups at 500 yards all day every day (often closer to 1″). Note that I don’t do any shooting from a bench and rests except for the initial load work up. The rest of the time I shoot from a bipod. I would really like to stress that I shoot exclusively with bi-pod and “sand-sock”. So many guys out there think that you have to shoot from a bench to get outstanding results. This simply isn’t true. If you are a disciplined shooter and have correct shooting techniques you can do amazing things from any shooting position. Long Range doesn’t have to be from a rest or bench!
What makes this rifle special is that it has an identical twin, built by Chris for my hunting partner Steve. Both rifles shoot exactly the same–same accuracy, same velocity, same trajectories. I never shot a 1K group with Steve’s gun, but at other distances, including 500 yards, it has performed identically to mine. I shot a sub-moa group of 12 shots one day with the Twins. I shot six shots from each rifle, alternating rifles between shots. Remember this is from the prone position and off a bipod–same load, two different rifles–and it produced a single, sub-MOA group. Now that’s consistency. Both these rifles I call point and shoot rifles–point them on target and they’ll shoot it.
Q: What technique do you use when shooting from bipod?
I basically do Froggy’s technique when shooting from a bipod. I get my natural point of aim, then push forward a bit to pre-load the bipod legs. In gripping the stock, I use just my two middle fingers to apply firm pressure straight back into my shoulder. I’m careful not to torque with the thumb or pinky finger. With my focus on the intended point of aim, I’ll let the cross hairs blur a bit and gently press the trigger until it goes boom. Then follow through, watch for the impact, and chamber the next round.
Looking Out to 1000 Yards, and the Results from Ric’s 7 WSM
Well folks, it’s July 6th already — the means we’re moving into “peak heat” summer conditions. It’s vitally important to keep your ammo at “normal” temps during the hot summer months. Even if you use “temp-insensitive” powders, studies suggest that pressures can still rise dramatically when the entire cartridge gets hot, possibly because of primer heating. It’s smart to keep your loaded ammo in an insulated storage unit, possibly with a Blue Ice Cool Pak if you expect it to get quite hot. Don’t leave your ammo in the car or truck — temps can exceed 140° in a vehicle parked in the sun.
To learn more about how ambient temperature (and primer choice) affect pressures (and hence velocities) you should read the article Pressure Factors: How Temperature, Powder, and Primer Affect Pressure by Denton Bramwell. In that article, the author uses a pressure trace instrument to analyze how temperature affects ammo performance. Bramwell’s tests yielded some fascinating results.
For example, barrel temperature was a key factor: “Both barrel temperature and powder temperature are important variables, and they are not the same variable. If you fail to take barrel temperature into account while doing pressure testing, your test results will be very significantly affected. The effect of barrel temperature is around 204 PSI per F° for the Varget load. If you’re not controlling barrel temperature, you about as well might not bother controlling powder temperature, either. In the cases investigated, barrel temperature is a much stronger variable than powder temperature.”
Powder Heat Sensitivity Comparison Test
Our friend Cal Zant of the Precision Rifle Blog recently published a fascinating comparison test of four powders: Hodgdon H4350, Hodgdon Varget, IMR 4451, and IMR 4166. The first two are Hodgdon Extreme powders, while the latter two are part of IMR’s Enduron line of propellants.
The testers measured the velocity of the powders over a wide temperature range, from 25° F to 140° F. Hodgdon H4350 proved to be the most temp stable of the four powders tested.
Many leading shooting sports online retailers are offering money-saving promotions this holiday weekend. With appropriate discount codes you can save 10%, get free shipping, or qualify for other significant savings. Here are some of the best current promotions we’ve found. Note — these promo codes change frequently. Check www.Retailmenot.com for new codes after these expire.
Precision Reloading offers three ways to save for this holiday weekend. The sale runs through 11:59 pm on July 8, 2019 and applies to in-stock inventory.
Natchez Shooters Supplies is offering multiple specials right now. But act quickly — these deals expire at 11:59 pm CDT on July 4, 2019. With these promo codes you can save 10% right off the top, and/or get Free Shipping or Free Hazmat.
Pyramyd Air is offering 11% Off nearly every product in stock, during its 4th of July Sale with runs through July 6, 2019 at 11:59 pm. In addition, orders over $150.00 qualify for Free Shipping.
Free Digital Directory of Gun Industry Companies
How would you like INFO on hundreds of firearms industry companies all in one place, complete with phone numbers, websites, and street addresses? You get all that and more in Shooting Industry magazine’s latest Buyer’s Guide. This free resource is available via a searchable web database, as well as a digital eBook version that you can print out.
Looking for your favorite companies such as Berger Bullets, Forster, Hodgdon, Lapua, Lyman, McMillan, Nightforce, Nosler, and Redding? You’ll find all these companies plus hundreds more in the Buyer’s Guide. Just go to the Buyer’s Guide WebPage to search by company name. Alternatively, launch the Digital Buyer’s Guide, pages 44-89 of Shooting Industry’s July 2019 Edition. The Industry Directory is a one-stop 46-page resource with contact information for companies in every segment of the firearms industry — ammo, barrels, complete rifles, pistols, reloading gear, stocks, and more.
NOTE: If you can’t access either site with the Chrome Browser, try FireFox or Safari.
Story Tip courtesy EdLongRange. We welcome reader submissions.
Coalinga Range in California. At dawn we could clearly see 7mm and .30 Cal bullet holes at 1000 yards.
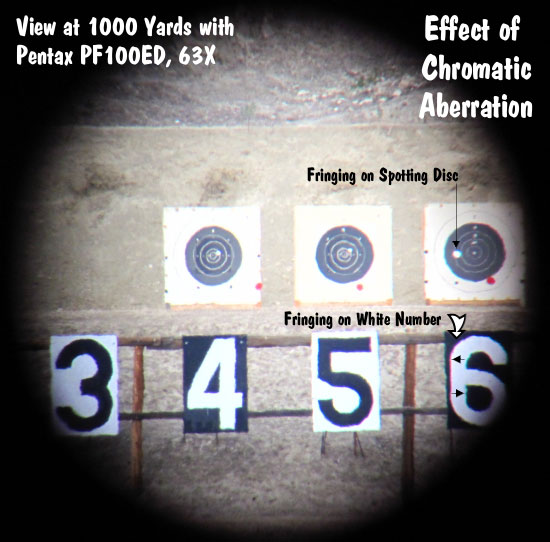
While attending the CA Long Range Championship a few seasons back, we had the opportunity to test the performance of a high-magnification (63X) spotting scope in near-ideal conditions (maybe the best I’ve ever witnessed). On the event’s last day we arrived at 5:45 am, literally as the sun was cresting the horizon. I quickly deployed our Pentax PF-100ED spotting scope, fitted with a Pentax SMC-XW 10mm fixed-power eyepiece. When used with the 100mm Pentax scope, this 10mm eyepiece yields 63X magnification. Befitting its $359.00 price, this eyepiece is extremely clear and sharp.
At the crack of dawn, viewing conditions were ideal. No mist, no mirage, no wind. The first thing this Editor noticed was that I could see metal nail heads on the target boards. That was astonishing. As soon as the first practice targets went up, to my surprise, I could see 6.5mm, 7mm, and 30-caliber bullet holes in the white at 1000 yards. No lie…
That’s right, I could see bullet holes at 1000. I know many of you folks may not believe that, but there was no mistaking when I saw a 7mm bullet cut the white line separating the Nine Ring and Eight Ring on the target in view. (I was watching that target as the shot was fired and saw the shot-hole form). And when I looked at the 30-cal targets, the bullet holes in the white were quite visible. In these perfect conditions I could also make out 3/8″ bolt heads on the target frames.
The Human Factor
When viewing the bullet holes, I was using my left naked eye (no safety glasses or magnification). I also had a contact lens in my right eye (needed for distance vision). To my surprise, while I could see the bullet holes without much difficulty with my left eye, things were fuzzier and slightly more blurry with the right eye, even when I re-focused the scope.
Then I invited 3 or 4 shooters to look through the scope. One younger guy, with good eyes, said immediately: “Yeah, I can see the holes — right there at 4 o’clock and seven o’clock. Wow.” Some older guys, who were wearing glasses, could not see the holes at all, no matter what we did to the scope’s main focus and diopter adjustment.
The lesson here — if you have to wear glasses or corrective contact lenses, just that extra bit of optical interference may make a difference in what you can see through the scope. Basically anything that goes between the scope eyepiece and your eyeball can degrade the image somewhat. So… you may be better off removing your glasses if you can still obtain good focus sharpness using the diopter adjustment and focus ring. I did the left vs. right eye test a half dozen times, and I could definitely see small features at 1000 yards with my naked eye that I could not see with my right eye fitted with a contact lens. (I did have to re-focus the scope for each eye, since one had a corrective lens while the other did not.)
Mirage Degrades Image Sharpness and Resolution
The “magic light” prevailed for only an hour or so, and then we started to get some mirage. As soon as the mirage appeared I was no longer able to see raw bullet holes, though I could still easily see black pasters on the black bulls. When the mirage started, the sharpness of the visible image degraded a huge amount. Where I could see bullet holes at dawn, by mid-morning I could barely read the numbers on the scoring rings. Lesson: If you want to test the ulimate resolution of your optics, you need perfect conditions.
Chromatic Aberration Revealed
As the light got brighter and the mirage increased I started to see blue and red fringing at the edges of the spotting disk and the large numerals. This was quite noticeable. On one side of the bright, white spotting disc you could see a dark red edge, while on the other side there was a blue edge (harder to see but still present).
The photo below was taken through the Pentax spotter lens using a point and shoot camera held up to the eyepiece. The sharpness of the Pentax was actually much better than this photo shows, but the through-the-lens image does clearly reveal the red and blue fringing. This fringing is caused by chromatic aberration — the failure of a lens to focus all colors to the same point. Chromatic aberration, most visible at high magnification, causes different wavelengths of light to have differing focal lengths (see diagram). Chromatic aberration manifests itself as “fringes” of color along boundaries that separate dark and bright parts of the image, because each color in the optical spectrum cannot be focused at a single common point on the optical axis. Keep in mind that the Pentax does have “ED” or low-dispersion glass, so the effect would be even more dramatic with a cheaper spotting scope.
If you wonder why top-of-the-line spotting scopes (such as the $3558.00 Swarovski ATS-80 ) cost so much, the answer is that they will deliver even LESS chromatic aberration at long range and high magnification. With their exotic apochromatic (APO), ultra-low-dispersion glass, a few ultra-high-end spotting scopes can deliver an image without the color edging you see in the photo above.
The Pentax PF-100ED is a heck of a spotting scope. Any scope that can resolve bullet holes at 1000 yards is impressive. But if you want the ultimate in optical performance, with minimal chromatic aberration, you may need to step up to something like the 88mm Kowa Prominar TSN-88A with Flourite Crystal lenses ($3999.00 with eyepiece), or the 82mm Leica APO-Televid ($3649.95 with 25-50X eyepiece).
EDITOR’s NOTE: The purpose of this report is to show what is possible… in IDEAL conditions. With this Pentax 100mm, as well as a Swarovski 80mm, we have often been able to resolve 6mm bullet holes at 600 yards. But again, that performance requires really good viewing conditions. By 10:00 am at my range, even with the 100mm Pentax at 75 power, seeing 6mm bullet holes is “iffy” at best. So don’t go out and mortgage the house to buy a $4000 optic with the hope that you’ll be able to spot your shots at 1000 yards. If conditions are anything less than perfect, you’ll be lucky to see bullet holes at 500 yards. The real solution for very long-range spotting is to set up a remote target cam that broadcasts a video picture to a screen at your shooting station.


 The Palma Team Trophy


 There is nothing super-exotic in this rifle, but it IS fitted out with some of the best components on the market. We did start with a factory action, however, a Remington 700 short action. Chris trued the action, added an SSG over-sized bolt knob, and fitted the action with a Broughton 5C, 9-twist #7 contour barrel finished at 24″. To reduce recoil we added a Badger brake. The stock is a fiberglass
  I use Winchester-brand brass and Winchester Large Rifle Magnum primers. My current load is 64.0 grains of H4831sc for the Hornady 162s (2950 fps) and 61.0 grains of H4831sc for the Sierra 175s (2830 fps).
 This rifle is by far one of the most fun rifles I have ever had. The recoil is very minimal with either of the loads and the rifle just plain flat-out shoots. The break-in took all of 21 rounds I think. This rifle shoots sub-2″ groups at 500 yards all day every day (often closer to 1″). Note that I don’t do any shooting from a bench and rests except for the initial load work up. The rest of the time I shoot from a bipod. I would really like to stress that I shoot exclusively with bi-pod and “sand-sock”. So many guys out there think that you have to shoot from a bench to get outstanding results. This simply isn’t true. If you are a disciplined shooter and have correct shooting techniques you can do amazing things from any shooting position. Long Range doesn’t have to be from a rest or bench!


 To learn more about how ambient temperature (and primer choice) affect pressures (and hence velocities) you should read the article


 While attending the CA Long Range Championship a few seasons back, we had the opportunity to test the performance of a high-magnification (63X) spotting scope in near-ideal conditions (maybe the best I’ve ever witnessed). On the event’s last day we arrived at 5:45 am, literally as the sun was cresting the horizon. I quickly deployed our Pentax PF-100ED spotting scope, fitted with a Pentax SMC-XW 10mm fixed-power eyepiece. When used with the 100mm Pentax scope, this 10mm eyepiece yields 63X magnification. Befitting its $359.00 price, this eyepiece is extremely clear and sharp.
 Then I invited 3 or 4 shooters to look through the scope. One younger guy, with good eyes, said immediately: “Yeah, I can see the holes — right there at 4 o’clock and seven o’clock. Wow.” Some older guys, who were wearing glasses, could not see the holes at all, no matter what we did to the scope’s main focus and diopter adjustment.
 Chromatic Aberration Revealed