Bryce Towsley has authored an informative article on Reclaiming .223 Rem Brass. Writing for Shooting Illustrated Online, Towsley confesses: “I’m a brass horder…. I end every shooting match on my hands and knees. If the rest of the competitors want to litter the range with their discarded cases, I see it as my civic duty to clean up the mess.” If you burn through a lot of .223 Rem ammo on the varmint fields or in multi-gun matches, we suggest you read Towsley’s article.
Towsley advises that you need to be cautious with range pick-up brass: “Range brass is full of dirt, dust, sand and debris that can be damaging to loading dies, as well as causing other problems.” So, range pick-up brass must be cleaned and then sorted carefully. Towsley explains that you should toss brass that is badly dented, and you have to make sure to remove the primer pocket crimp in military brass. This can be done with a crimp reamer or a swaging tool such as the Dillon Super Swage 600. The latter works well, but Towsley cautions: “For the swager to work properly, you must sort the cases by brand and lot, and then readjust the swager for each new lot.”
Trimming Quantities of Brass
Before loading, “reclaimed” range brass should, of course, be full-length sized and you should trim all the brass to the same length. “Cases that are too long can cause all kinds of problems”, explains Towsley.
We envy the system Towsley uses to trim brass. He has a Dillon Rapid Trim 1200B set up on the top of a single-stage press: “You simply insert a case into the shell holder and raise the ram to trim it instantly. The process is so fast, it almost feels like cheating.” The Rapid Trim is a very neat gadget — it even has an attachment for a vacuum hose to remove the cuttings. The photo at right shows a 1200B installed on a Dillon progressive press.
We definitely recommend you read Bryce Towsley’s Reclaiming Range Brass Article from start to finish. The article offers useful advice that will help you reload any rifle cartridge — not just .223 Rem range brass. Towsley also showcases many good labor-saving devices that can speed up and simplify the process of bulk rifle cartridge reloading.
Pac-Nor Production Manager Casey Dichter says the Sunnen hone produces a consistency in bore diameter that is much superior to hand-lapping. The Sunnen machine has all but eliminated the standard pre-rifling lap. “You can really tell the difference between a bore that was honed before rifling and one that was [only] lapped”, notes Dichter.
Gun Barrel Honing System Hits Target for Pac-Nor Barreling
Manufacturing precision rifle barrels has always been something of an art that involves hand lapping of the bore surface twice, before and after the rifling profile is cut or swaged in by a rifling button. In fact, a bright, hand-lapped bore is considered one of the hallmarks of a precision rifle barrel, despite the inherent variations from manual work done by people who get bored and tired from the monotonous chore. Pac-Nor Barreling, Inc. set its sights on this issue more than a year ago and hit the X-ring with the newly developed Sunnen HTE honing machine. The machine has all but eliminated Pac-Nor’s pre-rifling lap, which is the more difficult and time-consuming of the two laps. Pac-Nor is also producing as many custom barrels as ever, but with a slightly smaller staff. “Our objectives with the hone were to build a better product with less labor, and the honing machine has exceeded my expectations,” said Pac-Nor Production Manager Casey Dichter. “The hone produces a consistency in bore diameter that is head and shoulders above lapping, within two to three millionths of an inch end-to-end when it’s really dialed in,” he said. “This, in turn, improves the consistency of the rifling process by minimizing variation in the depth of the grooves. We still finish lap after rifling, but it’s easier because we just polish off the fine crosshatch finish that may be left after honing and rifling.”
The Sunnen hone secures the barrel blank in a 3-jaw chuck, with honing oil pumped into one end while the tool works from the opposite end. Sunnen’s specialized Long Bore Tool uses metal-bond diamond or CBN superabrasives to quickly remove reamer marks, waviness, tight spots and other imperfections left by upstream processes.
Honing is an ideal replacement for hand lapping barrel blanks before rifling. It quickly removes reamer scratches and surface waviness without labor-intensive hand lapping. A typical 600-grit abrasive can produce a 6-10 microinch Ra (0.15 to 0.25 µm) finish in a reamed barrel blank. By producing a consistent bore diameter (±0.0001″ or less), parallelism, roundness and surface finish end to end, honing yields more consistent performance from rifling buttons and cutters, resulting in a constant groove depth. The ideal bore geometry reduces distortion of the bullet shape.
Pac-Nor’s barrel-making process starts with cutting and facing premium bar stock, followed by gun drilling, done by four Pratt & Whitney twin-spindle machines and an Eldorado CNC twin spindle. After reaming, the barrels are gauged for size. Depending on the condition of the reamer, 0.0004″ to 0.0007″ of material is left in the bore. This must be manually lapped out or honed out to final size for rifling. “Everyone who works here has done hand-lapping,” said Dichter. “It’s an unpleasant job, particularly if the reamer is starting to get dull. Lapping may take 10 to 45 minutes, depending on the caliber of the barrel. We tried to shorten this, but when chatter marks get ‘ironed’ into the surface by the rifling button, the finish lap is even longer and more difficult, so there is no advantage. With lapping, too, there is potential for variation, simply because it’s a manual process. Lapping can also be a production limiter and in our region we have a very small labor force to draw on when we want to grow.”
Pac-Nor cuts and faces premium bar stock, then gun drills on one of five twin-spindle machines, followed by reaming of the blanks. This rack of barrel blanks awaits completion.
The company had explored honing in the nineties, but re-visited the idea when Sunnen introduced its HTE honing machine in 2014. The HTE is a horizontal machine that can hone small-bore rifle barrels, with a diameter range of 0.150″ to 0.790” (4-20 mm), and lengths up to 60″ (1,524 mm). Designed specifically for long small bores, the machine features an extremely sensitive drive and tool feed system that provide maximum protection against tool overload/breakage. Tool specific force limits and run settings are stored in the touch-screen PC control, allowing the system to sense tight sections in the bore and correct them automatically.
Sunnen also developed a new Long-Bore Tool (LBT) designed to take on industry’s most difficult honing challenges in small bores of .17 caliber rifle barrels. The tool quickly remove reamer marks, waviness, tight spots and other imperfections left by upstream processes. The LBT utilizes metal-bond diamond or CBN super-abrasives for high productivity, long life and fast cycle times. Precision-machined of through-hardened tool steel, the LBT can produce bore accuracies of 0.000027″ (0.0006 mm) for diameter, roundness, and taper – from first part to last.
“We are currently honing about 80 percent of what we make and will do more as we acquire the tools in different calibers,” said Dichter. “Although there is a trade-off in cycle time and abrasive cost for additional honing, we are still able to run our reamers two to three times longer than when we lapped alone. With a hand lap, the time and effort increase when the reamer is getting dull.”
After honing, each barrel is inspected again before rifling with a pull-button. Pac-Nor makes its own Accu-Twist carbide rifling buttons and can provide different rifling styles, including polygonal, per the customer’s choice. A button is attached to a rod and the rod is pulled through the barrel. The company’s hydraulic rifling machine utilizes a CNC-machined twist bar with a helix angle that matches the twist rate requested by the customer. The final twist rate is confirmed afterward using a Barrel-Scan electro-optical twist measurement system.
The barrel is then stress-relieved in a tempering furnace, followed by contouring of the outer shape and final, finish lapping of the bore. “During the finish lap, you can really tell the difference between a bore that was honed before rifling and one that was lapped,” said Dichter. “You can easily sense any remaining tight or loose spots in the bore. The diameter uniformity and roundness of the honed bore are superb. The lap also feels different in a honed bore.”
In competitive shooting where winning scores may be separated by thousandths of an inch, a few millionths of an inch improvement in the uniformity of a Pac-Nor barrel may make a big difference for a skilled shooter. For more information, visit www.sunnen.com or contact:
Sunnen Products Company
Mr. Bob Davis
Global Communications Mgr.
Sunnen Products Company
Tel: 314-781-2100
bdavis [at] sunnen.com
About Pac-Nor Barreling Inc.
Pac-Nor Barreling is a true custom manufacturer catering to bolt-action rifle shooters. The company’s principle markets are law enforcement, military, competitive shooters and hunters. Started in 1984 by avid shooter and company President Chris Dichter, Pac-Nor is now in its second generation under his son, Casey. In addition to barrel manufacturing, the shop will install the barrel on a customer’s action, or add features such as muzzle brakes or fluting on bolts and barrels etc.
The shop runs two shifts per day. A day shift of ten people produces 30-40 custom barrels of different calibers in 416R stainless or chrome-moly steel. A night shift of three people produces one type of barrel — about 50 AR-15 barrels per day for a rifle OEM.
by Tony Chow
In recent years, the use of electronic trainer systems has revolutionized training in all disciplines of position shooting. By capturing (and illustrating) key performance variables like the steadiness of a shooter’s hold, accuracy of aiming, and the timeliness of trigger release, these devices can offer tremendous insights into the strengths and weakness of a shooter’s position and technique, making high-level marksmanship training less voodoo and more of a science.
Until now, electronic trainers all suffered from one critical limitation: the inability to be used outdoors in live fire training. Now, however, SCATT has introduced the next-generation MX-02 electronic trainer, a product that can finally support outdoor live firing in broad daylight, as well as dry firing indoors. In addition, the MX-02 is the first electronic trainer to support centerfire rifles. It goes without saying that, when we at AccurateShooter.com were offered an MX-02 test unit to review, we jumped at the opportunity.
How the SCATT MX-02 Works
The SCATT sensor mounted on the end of the barrel has a digital camera that “sees” the black bullseye in the target, even in broad daylight outdoors. Using the bullseye as a reference, the SCATT software tracks the movement of the muzzle relative to the center of the target. The unit can plot these movements as a continuous trace, which appears on a monitor as a squiggly, colored line. Data points from the trace are also available in a tabular spreadsheet format. This allows the shooter to “crunch the numbers”, revealing strengths and weaknesses in his gun-handling and aiming technique.
In our testing, we confirmed that, like SCATT’s earlier indoor-only WS-01, the MX-02 offers excellent support for indoor dry-fire training, which will continue to be the primary means through which position shooters sharpen their fundamental skills. Since the new SCATT uses the same familiar Windows software for data capture and analysis as its predecessors, shooters and coaches upgrading to MX-02 will have no learning curve to overcome, and newcomers to the SCATT platform can tap into the wealth of institutional knowledge accumulated over the years by the shooting community on how to interpret shot data.
It’s in the support for outdoor live firing, however, that SCATT MX-02 distinguishes itself from its predecessors and the competition. Shot trace data captured by MX-02 during live firing turned out to be every bit as valuable (and revealing) as we had hoped. The ability to correlate SCATT tracing with real shots on target gave us a better understanding of the shooting process, and helped the reviewer, already a high-level smallbore prone shooter, uncover a significant problem in his shooting. SCATT MX-02’s outdoor capability is therefore an invaluable feature, particularly for experienced shooters aspiring to world-class performance.
In summary, SCATT MX-02 is an outstanding product that delivers on its promises. We heartily recommend it, both for first-time users of electronic training aids, and also for those shooters who may wish to upgrade their current electronic training system. The MSRP for SCATT MX-02 is $1,799, $500 more than its predecessor, the SCATT WS-01, which is still available. In my view, the $500 premium for the MX-02 is justified by the MX-02’s enhanced capabilities, making it a better long-term investment.
Our complete, 3600-word MX-02 review of the SCATT MX-02 can be accessed through the link below. This full review contains many more photos plus detailed field test results. For the time being, the review only covers our experience with the product in smallbore shooting. An upcoming addendum to the review will include test results from centerfire shooting. Those attending SHOT Show in Las Vegas next week can examine SCATT MX-02 in person. SCATT will have the MX-02 on display at Booth 111.
Readers who have just recently discovered the Daily Bulletin may not realize that AccurateShooter.com has hundreds of reference articles in our archives. These authoritative articles are divided into mutiple categories, so you can easily view stories by topic (such as competition, tactical, rimfire, optics, shooting skills etc.). One of the most popular categories is our Technical Articles Collection. On a handy index page (with thumbnails for every story), you’ll find over 100 articles covering technical and gunsmithing topics. These articles can help you with major projects (such as stock painting), and they can also help you build more accurate ammo. Here are five popular selections from our Technical Articles archive.
Complete Precision Case Prep. Jake Gottfredson covers the complete case prep process, including brass weight sorting, case trimming, primer pocket uniforming, neck-sizing, and, case-neck turning.
Stress-Free Pillar Bedding. Richard Franklin explains how to do a top-quality bedding job, start to finish.
OnTarget Software Review. Our Editors test free software that measures shot groups with great precision. We explain how to use the program and configure advanced features.
Savage Action Tuning. Top F-TR shooter Stan Pate explains how to enhance the performance of your Savage rifle by optimizing the torque settings of the action screws.
Stock Painting Instructions. Step-by-step guide for stock painting by expert Mike Ricklefs. Mike shows both simple coverage and fancy effects.
With barrels, one wonders “Can a little more length provide a meaningful velocity gain?” To answer that question, Rifleshooter.com performed an interesting test, cutting a .308 Win barrel from 28″ all the way down to 16.5″. The cuts were made in one-inch intervals with a rotary saw. At each cut length, velocity was measured with a Magnetospeed chronograph. To make the test even more interesting, four different types of .308 Win factory ammunition were chronographed at each barrel length.
Test Barrel Lost 22.7 FPS Per Inch (.308 Win Chambering)
How much velocity do you think was lost, on average, for each 1″ reduction in barrel length? The answer may surprise you. With a barrel reduction from 28″ to 16.5″, the average speed loss of the four types of .308 ammo was 261 fps total. That works out to an average loss of 22.7 fps per inch. This chart shows velocity changes for all four ammo varieties:
Summary of Findings: The average velocity loss per inch, for all four ammo types combined, was 22.7 FPS. By ammo type, the average loss per inch was: 24.6 (Win 147 FMJ), 22.8 (IMI 150 FMJ), 20.9 (Fed GMM 168gr), and 22.5 (Win 180PP).
Interestingly, these numbers jive pretty well with estimates found in reloading manuals. The testers observed: “The Berger Reloading manual says for the 308 Winchester, ‘muzzle velocity will increase (or decrease) by approximately 20 fps per inch from a standard 24″ barrel’.”
How the Test Was Done
The testers described their procedure as follows: “Ballistic data was gathered using a Magnetospeed barrel mounted ballistic chronograph. At each barrel length, the rifle was fired from a front rest with rear bags, with five rounds of each type of ammunition. Average velocity and standard deviation were logged for each round. Since we would be gathering data on 52 different barrel length and ammunition combinations and would not be crowning the barrel after each cut, we decided to eliminate gathering data on group sizes. Once data was gathered for each cartridge at a given barrel length, the rifle was cleared and the bolt was removed. The barrel was cut off using a cold saw. The test protocol was repeated for the next length. Temperature was 47° F.”
CLICK HERE to Read the Rifleshooter.com Test. This includes detailed charts with inch-by-inch velocity numbers, multiple line charts, and complete data sets for each type of ammo. Rifleshooter.com also offers ballistics graphs showing trajectories with different barrel lengths. All in all, this was a very thorough test by the folks at RifleShooter.com.
Much Different Results with 6mmBR and a Longer Barrel
The results from Rifleshooter.com’s .308 barrel cut-down test are quite different than the results we recorded some years ago with a barrel chambered for the 6mmBR cartridge. When we cut our 6mmBR barrel down from 33″ to 28″, we only lost about 8 FPS per inch. Obviously this is a different cartridge type, but also our 6mmBR barrel end length was 5″ longer than Rifleshooter.com’s .308 Win start length. Velocity loss can be more extreme with shorter barrel lengths (and bigger cartridges). Powder burn rates can also make a difference.
How would you like to “reach out and touch” someone 203 kilometers away (about 110 nautical miles)? Well America’s Navy may soon be able to do exactly that with an amazing new, high-tech weapon system. BAE Systems has developed (and successfully test-fired) an electro-magnetic rail gun that fires a 23-lb projectile at Mach 7 — (about 5300 mph or 7800 fps). This futuristic weapon can send its projectile 110 nautical miles (126 mi / 203 km), five times the range of the big 16″ guns on WWII-era battleships. This railgun has serious “knock-down” power — at Mach 7, that projectile carries a whopping 32 megajoules of energy. BreakingDefense.com says: “23 pounds ain’t heavy. But it sure hurts when it hits you going at seven times the speed of sound.”
Watch Video to See Navy Rail-Gun in Action:
The latest prototype of the railgun developed by defense contractor BAE, in conjunction with the Office of Naval Research, can accelerate a projectile up to Mach 7 within 10 milliseconds. The gun uses no gunpowder to generate propelling force. Compared to an item on a smaller scale, the railgun projectiles resemble crossbow darts, except they deliver such massive Kinetic Energy they don’t need to carry explosive ordnance. The railgun can strike targets 110 nautical miles away.
To prepare a charge, the ship stores electricity in the pulsed power system. Next, an electric pulse is sent to the railgun, creating an electromagnetic force accelerating the projectile. Because of its extreme speed, the projectile eliminates the hazards of storing high explosives in the ship. Each shot costs about $25,000 — but that’s cheap compared to the price of a missile.
“It’s like a flux capacitor,” chief of Naval research Rear Admiral Mathias Winter said in a video posted by Reuters Friday. “You’re sitting here thinking about these next generation and futuristic ideas, and we’ve got scientists who have designed these, and it’s coming to life.”
The Electromagnetic Railgun Innovative Naval Prototype (INP) was initiated in 2005. The goal during Phase I was to produce a proof-of-concept demonstration at 32 mega-joule muzzle energy, develop launcher technology with adequate service life, develop reliable pulsed power technology, and assess component risk reduction for the projectile.
Phase II, which started in 2012, advanced the technology to demonstrate a repeatable-rate fire capability. Thermal-management techniques required for sustained firing rates will be developed for both the launcher system and the pulsed power system. The railgun will begin testing at sea in 2016.
John Weber, a 70-year-old from England, was given a metal mug by his grandfather in 1945. Though his grandfather had a “good eye” for antiques, John never thought the metal mug was worth much. He played with it as a child, and even used it as a target for his air rifle. The mug, assumed to be brass, has languished in a shoe box under Weber’s bed for decades.
Well, it turns out Weber’s old mug may be the world’s most expensive plinking target! The cup is actually made of solid gold, and is a rare, ancient artwork, crafted over 2300 years ago. The unusual mug, decorated with twin, opposite-facing female heads, was appraised with a value exceeding one-quarter million dollars ($250,000)!
According to news reports, Weber decided to have the old mug (thought to be brass) appraised when he moved from his house. He was shocked to learn that the mug is a Persian gold treasure, beaten out from a single sheet of gold before the time of Alexander the Great. Experts said the type of gold and the way the cup was hammered was “consistent with Achaemenid gold and gold smithing” dating back to the third or fourth century BC. The Achaemenid Empire ruled most of the Middle East and was conquered by Alexander the Great in 330 BC. Could this cup be one of Alexander’s war trophies? What stories could it tell from the past 2300 years?
Ancient Gold Cup Brings $99,000 at Auction
The rare cup was sold at auction by Duke’s Auction house in southwest England in June, 2008. Though the Cup was valued much higher by experts, it only fetched £50,000, or roughly $99,000 U.S. Dollars (at 2008 exchange rates). John Webber said he was still very pleased with that result.
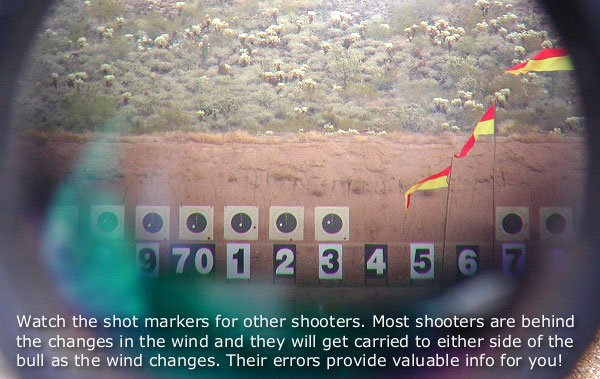
To succeed in long-range shooting matches, given the high level of competition these days, you’ll need solid wind-reading abilities. We’ve found an article by SFC Emil Praslick III, retired USAMU Service Rifle coach and U.S. Palma Team Coach, that can help you make better wind calls in competition.
Emil Praslick, now retired from the U.S. Army, is considered one of the best wind gurus in the United States, if not the world. During his service with the USAMU he authored an excellent two-part article on wind reading that is available on the CMP (Civilian Marksmanship Program) website. Both articles contain helpful illustrations, and are “must-read” resources for any long-range shooter–not just Service Rifle and Highpower competitors.
Part One covers basic principles, tactics, and strategies, with a focus on the 200-yard stages. Emil writes: “There are as many dimensions to ‘wind reading’ as there are stages to High Power competition. Your tactical mindset, or philosophy, must be different for the 200 and 300 yard rapid-fire stages than it would be for the 600 yard slow-fire. In the slow-fire stages you have the ability to adjust windage from shot to shot, utilizing the location of the previous shot as an indicator. Additionally, a change to the existing conditions can be identified and adjusted for prior to shooting the next shot.”
In Part Two, Praslick provides more detailed explanations of the key principles of wind zeros, wind reading, and the “Clock System” for determining wind values: “The Value of the wind is as important as its speed when deciding the proper windage to place on the rifle. A 10 MPH wind from ’12 o-clock’ has No Value, hence it will not effect the flight of the bullet. A 10 MPH wind from ‘3 o’clock’, however, would be classified as Full Value. Failure to correct for a Full Value wind will surely result in a less than desirable result.”
Praslick also explains how to identify and evaluate mirage:
Determine the accuracy of the mirage. Mirage is the reflection of light through layers of air that have different temperatures than the ground. These layers are blown by the wind and can be monitored to detect wind direction and speed.
Focus your scope midway between yourself and the target, this will make mirage appear more prominent. I must emphasize the importance of experience when using mirage as a wind-reading tool. The best way to become proficient in the use of mirage is to correlate its appearance to a known condition. Using this as a baseline, changes in mirage can be equated to changes in the value of the wind. Above all, you must practice this skill!
Click HERE for more excellent instructional articles by Emil Praslick and other USAMU Coaches and shooters.
The Giraud power trimmer indexes off the shoulder of the case. It is costly, but offers high production rates, trimming to length and chamfering in one operation.
The folks at PMA Tool, makers of arbor presses, neck-turning tools, and other case-prep tools, offer some good advice about case trimming on the PMA Tool Blog. Here we reprint a PMA blog post that explains case trimming basics and helps you choose the right case-trimming tool for your needs.
Case Trimming Basics
Trimming the cartridge case to the proper length is a crucial step in case preparation that should not be overlooked or underestimated. The cartridge case or the rifle can be damaged, or even worse you get badly injured. In most instances cases should be trimmed after firing and sizing. Trimming new brass is necessary for a lot of wildcats and can be beneficial in some instances, but by and large, trimming new brass is not necessary for most situations (unless you are neck-turning). Cases should be trimmed after you have sized the case, because the expander ball on the decapping pin can (and will) stretch the neck. Those of us who neck size should get into the habit of trimming after sizing as well. This is a good rule of thumb to go by, and hopefully it will keep you safe during the reloading and shooting process.
There are so many case trimmers out there that work, deciding which one is right for you can be confusing. Even though I have trimmed thousands of cases, using about every method possible, I can’t answer the question of what case trimmer is right for you because of all the variables that may be involved. I can, however shed some light on the subject.
The two most popular designs of trimmers either index (1) off the base or the head of the case, (2) off the shoulder or datum line of the case. There are pros and cons to each and it all depends on what you are willing to live with.
Indexing off the Base (Case Head)
Let’s talk about the first one I have listed, indexing off the base, or the head of the case. The pros to this method are that you can achieve a very accurate over all length and that is after all, what it is all about. The cons to this method are that you can get some variation doing it this way. Let me explain, the base is not always square to the body or can be damaged during firing especially if it is fired through a military style rifle with a very aggressive ejector. These cases should be discarded, but sometimes they can be overlooked. This condition can lead to an over all length that is incorrect. The case head being out of square will be corrected upon firing, however that case will wind up being shorter than the rest of your cases, possibly creating a difference in the neck tension on the bullet. The more you can do to eliminate variables in your reloads the better off you are going to be. This method can also be very slow, and if the user gets careless the result will be a inconsistent over all length.
Indexing off the Shoulder (Datum Line)
The second method I mentioned, trimming off the shoulder or the datum line of the case, has its pros as well. I have found this to be the quickest of the methods and very accurate as well. After the case has been sized through the die the dimensions (particularly the headspace) of the cases are usually very uniform and exact, this allows the case to be trimmed by indexing off the shoulder. This method can be done very quickly, by hand, or by powering either the case, or the trimmer. You also don’t have to worry about the case heads being out of square with the body using this method. Generally the trimming time is cut in half, and this leads to greater focus on the job, without becoming careless.
The PMA Micro-Adjust Case Trimmer indexes case length off of the shoulder of a properly fire-formed and full-length re-sized case. We accomplish this through the use of interchangeable Delrin™ inserts which capture the shoulder and neck of the case. This insert is contained in a spring-loaded tool head that rides on a linear bearing. When the case is captured within the tool head the tool head rotates along with the case, the spring allows for the case to self-align squarely to the cutter and allows you to control the feed rate into the cutter.
— Indexes off shoulder for easy, consistent trim length
— Fully rotating head with bearing for smooth operation keeps cuts square
— Large, ergonomic design fits the hand well
— Sharp carbide cutter for quick, smooth cuts with minimal bur
— Cases captured in Delrin™ (completely non-marring material)
— Spring loaded head allows complete control of rate of feed.
Our trimmer can be used in three ways. The first method utilizes our PMA Tool caseholder drivers and your power screwdriver, drill, case lathe, drill press or lathe. Trimming via this method the case is spun and fed into the trimmer while it is held in your hand. In the second method, the trimmer’s adjustment knob is removed (after adjusting and locking the setting) and the cutting shaft is chucked in a drill, drill press or lathe. Using this method, the case itself is held by hand and fed into the cutter. We’ve found this to be the quickest method to trim.
Summary
The choice is yours to make. I hope that this was some help to you, whether you are looking for your first trimmer or looking to replace the trimmer you have. Just remember to always put safety first and accuracy second, and you will start making little bug holes in no time.
Story Tip by EdLongrange. User Submissions are welcome.
Do you shoot with a SEB joystick-equipped bipod, or are you considering acquiring a “Joy-Pod” for your F-TR rifle? Then you should read this article. Here Sebastian (“Seb”) Lambang, the inventor and builder of the SEB joystick bipod, offers tips on shooting with this impressive piece of engineering. Seb explains some techniques that can help with tracking and getting back on target. You can ask SEB questions about his Joy-Pod in this Shooter’s Forum Thread.
Joy-Pod Shooting Tipsby Seb Lambang
1. Be sure that the rear bag is settled before starting to shoot. Tap your stock into the bag. Then move your rifle back and forth, while checking your reticle. If it tracks straight, vertically perfect, and comes back to the original point of aim, it’s fine. If not, re-adjust.
2. If you use the Pod-Pad, be sure it is fully settled before starting to shoot. Tap the top where the feet rides on using your palm — you wan to create a flat top. To be sure the Pod-Pad does not move or slide, remove any gravel or pebbles under the pad — these can act as roller bearings.
3. Be sure your shooting mat is NOT springy or spongy. This is very important. Use a proper mat, or cut it if possible so your rear bag rests directly on the ground. Use a heavy rear bag. You can use a sand-filled doughnut (not a rigid spacer) to stabilize the bag on uneven ground. These doughnuts are relatively inexpensive and really work.
4. Be sure your whole body position is correct, so your shoulder is square. “Follow” the recoil with your shoulder, don’t push “against” it. Don’t move too much. Don’t make unimportant movements during your shooting string. Always be as consistent as you can in all things — how you hold the rifle, even how you breathe before taking the shot.
This young lady shooter is using a first generation Joy-Pod. The newer versions have flat, ski-like feet.
5. Be sure your rifle and rear bag are aligned. You want the slot between the ears of the bag perfectly aligned with your barrel. (You can use a yardstick or a piece of string to help with the alignment).
6. Use a heavy rear bag. The heavier and the more stable, the better.
7. It does not matter (from my own experience) whether you light-hold the joystick or leave the joystick in the air when you shoot (see Darrell Buell video — he shoots “hands off”). I believe the bullet already exits the muzzle before the joystick moves in your fingers. I lightly hold the joystick myself, just as I would hold a billiard stick.
Watch Darrell Buell shooting his .375 CheyTac equipped with a counter-balanced Joy-Pod. Note how the gun comes straight back, and how Darrell can release the joystick before breaking the shot.
SUMMARY — When It All Comes Together
If everything is set up right, and done correctly, your rifle will track beautifully straight and your reticle will come back or very close to the original point of aim, every time. If you have to change the Joy-Pod, rear bag, or your body position after a shot, there could still be something wrong with your set-up, alignment, or body position. When everything is right, you can also see your own score in the scope after every shot you make (after initial recoil). You also should not have to change the bipod’s setting, the height, the cant etc., at all. You only need to adjust for the current condition with the joystick, the joystick will do it all. That’s why we call our bipod the JOY-Pod.
SEB JOY-POD Joystick Bipod, and POD-PAD
Weighing in at just 18 ounces (510 grams), the Gen 2 Joy-Pod is unlike any other bipod on the market. Designed specifically for weight-restricted shooting classes, the Joy-Pod offers smooth and precise joystick-controlled aiming. The Gen 2 model offers up to 14 degrees of cant and an improved design that functions with up to 50 pounds of rifle weight. Each Joy-Pod comes with a Weaver rail adapter. The optional Pod-Pad accessory is designed expressly for the Joy-Pod. It works filled or unfilled with the Joy-Pod’s sleds to bring you back to your shooting position easily. CLICK HERE for more information, or visit SebRests.com.
.308 Win Tactical Rifle fitted with Joy-Pod on Pod-Pad. CLICK HERE for Video.


 Bryce Towsley has authored an informative article on Reclaiming .223 Rem Brass. Writing for Shooting Illustrated Online, Towsley confesses: “I’m a brass horder…. I end every shooting match on my hands and knees. If the rest of the competitors want to litter the range with their discarded cases, I see it as my civic duty to clean up the mess.” If you burn through a lot of .223 Rem ammo on the varmint fields or in multi-gun matches, we suggest you read Towsley’s article.
 Trimming Quantities of Brass


 To succeed in long-range shooting matches, given the high level of competition these days, you’ll need solid wind-reading abilities. We’ve found an article by SFC Emil Praslick III, retired USAMU Service Rifle coach and U.S. Palma Team Coach, that can help you make better wind calls in competition.
 Part One covers basic principles, tactics, and strategies, with a focus on the 200-yard stages. Emil writes: “There are as many dimensions to ‘wind reading’ as there are stages to High Power competition. Your tactical mindset, or philosophy, must be different for the 200 and 300 yard rapid-fire stages than it would be for the 600 yard slow-fire. In the slow-fire stages you have the ability to adjust windage from shot to shot, utilizing the location of the previous shot as an indicator. Additionally, a change to the existing conditions can be identified and adjusted for prior to shooting the next shot.”


