|
|
April 16th, 2016

The Giraud power trimmer indexes off the shoulder of the case. It is costly, but offers high production rates, trimming to length and chamfering in one operation.
The folks at PMA Tool, makers of arbor presses, neck-turning tools, and other case-prep tools, offer some good advice about case trimming on the PMA Tool Blog. Here we reprint a PMA blog post that explains case trimming basics and helps you choose the right case-trimming tool for your needs.
Case Trimming Basics
Trimming the cartridge case to the proper length is a crucial step in case preparation that should not be overlooked or underestimated. The cartridge case or the rifle can be damaged, or even worse you get badly injured. In most instances cases should be trimmed after firing and sizing. Trimming new brass is necessary for a lot of wildcats and can be beneficial in some instances, but by and large, trimming new brass is not necessary for most situations (unless you are neck-turning). Cases should be trimmed after you have sized the case, because the expander ball on the decapping pin can (and will) stretch the neck. Those of us who neck size should get into the habit of trimming after sizing as well. This is a good rule of thumb to go by, and hopefully it will keep you safe during the reloading and shooting process.
There are so many case trimmers out there that work, deciding which one is right for you can be confusing. Even though I have trimmed thousands of cases, using about every method possible, I can’t answer the question of what case trimmer is right for you because of all the variables that may be involved. I can, however shed some light on the subject.

The two most popular designs of trimmers either index (1) off the base or the head of the case, (2) off the shoulder or datum line of the case. There are pros and cons to each and it all depends on what you are willing to live with.
Indexing off the Base (Case Head)
Let’s talk about the first one I have listed, indexing off the base, or the head of the case. The pros to this method are that you can achieve a very accurate over all length and that is after all, what it is all about. The cons to this method are that you can get some variation doing it this way. Let me explain, the base is not always square to the body or can be damaged during firing especially if it is fired through a military style rifle with a very aggressive ejector. These cases should be discarded, but sometimes they can be overlooked. This condition can lead to an over all length that is incorrect. The case head being out of square will be corrected upon firing, however that case will wind up being shorter than the rest of your cases, possibly creating a difference in the neck tension on the bullet. The more you can do to eliminate variables in your reloads the better off you are going to be. This method can also be very slow, and if the user gets careless the result will be a inconsistent over all length.

Indexing off the Shoulder (Datum Line)
The second method I mentioned, trimming off the shoulder or the datum line of the case, has its pros as well. I have found this to be the quickest of the methods and very accurate as well. After the case has been sized through the die the dimensions (particularly the headspace) of the cases are usually very uniform and exact, this allows the case to be trimmed by indexing off the shoulder. This method can be done very quickly, by hand, or by powering either the case, or the trimmer. You also don’t have to worry about the case heads being out of square with the body using this method. Generally the trimming time is cut in half, and this leads to greater focus on the job, without becoming careless.

The PMA Micro-Adjust Case Trimmer indexes case length off of the shoulder of a properly fire-formed and full-length re-sized case. We accomplish this through the use of interchangeable Delrin™ inserts which capture the shoulder and neck of the case. This insert is contained in a spring-loaded tool head that rides on a linear bearing. When the case is captured within the tool head the tool head rotates along with the case, the spring allows for the case to self-align squarely to the cutter and allows you to control the feed rate into the cutter.
— Indexes off shoulder for easy, consistent trim length
— Fully rotating head with bearing for smooth operation keeps cuts square
— Large, ergonomic design fits the hand well
— Sharp carbide cutter for quick, smooth cuts with minimal bur
— Cases captured in Delrin™ (completely non-marring material)
— Spring loaded head allows complete control of rate of feed.
Our trimmer can be used in three ways. The first method utilizes our PMA Tool caseholder drivers and your power screwdriver, drill, case lathe, drill press or lathe. Trimming via this method the case is spun and fed into the trimmer while it is held in your hand. In the second method, the trimmer’s adjustment knob is removed (after adjusting and locking the setting) and the cutting shaft is chucked in a drill, drill press or lathe. Using this method, the case itself is held by hand and fed into the cutter. We’ve found this to be the quickest method to trim.
Summary
The choice is yours to make. I hope that this was some help to you, whether you are looking for your first trimmer or looking to replace the trimmer you have. Just remember to always put safety first and accuracy second, and you will start making little bug holes in no time.
Story Tip by EdLongrange. User Submissions are welcome.
April 10th, 2016

Do you shoot with a SEB joystick-equipped bipod, or are you considering acquiring a “Joy-Pod” for your F-TR rifle? Then you should read this article. Here Sebastian (“Seb”) Lambang, the inventor and builder of the SEB joystick bipod, offers tips on shooting with this impressive piece of engineering. Seb explains some techniques that can help with tracking and getting back on target. You can ask SEB questions about his Joy-Pod in this Shooter’s Forum Thread.
Joy-Pod Shooting Tips by Seb Lambang
1. Be sure that the rear bag is settled before starting to shoot. Tap your stock into the bag. Then move your rifle back and forth, while checking your reticle. If it tracks straight, vertically perfect, and comes back to the original point of aim, it’s fine. If not, re-adjust.
2. If you use the Pod-Pad, be sure it is fully settled before starting to shoot. Tap the top where the feet rides on using your palm — you wan to create a flat top. To be sure the Pod-Pad does not move or slide, remove any gravel or pebbles under the pad — these can act as roller bearings.

Photo Courtesy Busselton Rifle Club, Australia.
3. Be sure your shooting mat is NOT springy or spongy. This is very important. Use a proper mat, or cut it if possible so your rear bag rests directly on the ground. Use a heavy rear bag. You can use a sand-filled doughnut (not a rigid spacer) to stabilize the bag on uneven ground. These doughnuts are relatively inexpensive and really work.
4. Be sure your whole body position is correct, so your shoulder is square. “Follow” the recoil with your shoulder, don’t push “against” it. Don’t move too much. Don’t make unimportant movements during your shooting string. Always be as consistent as you can in all things — how you hold the rifle, even how you breathe before taking the shot.
This young lady shooter is using a first generation Joy-Pod. The newer versions have flat, ski-like feet.

5. Be sure your rifle and rear bag are aligned. You want the slot between the ears of the bag perfectly aligned with your barrel. (You can use a yardstick or a piece of string to help with the alignment).

6. Use a heavy rear bag. The heavier and the more stable, the better.
7. It does not matter (from my own experience) whether you light-hold the joystick or leave the joystick in the air when you shoot (see Darrell Buell video — he shoots “hands off”). I believe the bullet already exits the muzzle before the joystick moves in your fingers. I lightly hold the joystick myself, just as I would hold a billiard stick.
Watch Darrell Buell shooting his .375 CheyTac equipped with a counter-balanced Joy-Pod. Note how the gun comes straight back, and how Darrell can release the joystick before breaking the shot.
SUMMARY — When It All Comes Together
If everything is set up right, and done correctly, your rifle will track beautifully straight and your reticle will come back or very close to the original point of aim, every time. If you have to change the Joy-Pod, rear bag, or your body position after a shot, there could still be something wrong with your set-up, alignment, or body position. When everything is right, you can also see your own score in the scope after every shot you make (after initial recoil). You also should not have to change the bipod’s setting, the height, the cant etc., at all. You only need to adjust for the current condition with the joystick, the joystick will do it all. That’s why we call our bipod the JOY-Pod.
SEB JOY-POD Joystick Bipod, and POD-PAD
Weighing in at just 18 ounces (510 grams), the Gen 2 Joy-Pod is unlike any other bipod on the market. Designed specifically for weight-restricted shooting classes, the Joy-Pod offers smooth and precise joystick-controlled aiming. The Gen 2 model offers up to 14 degrees of cant and an improved design that functions with up to 50 pounds of rifle weight. Each Joy-Pod comes with a Weaver rail adapter. The optional Pod-Pad accessory is designed expressly for the Joy-Pod. It works filled or unfilled with the Joy-Pod’s sleds to bring you back to your shooting position easily. CLICK HERE for more information, or visit SebRests.com.
.308 Win Tactical Rifle fitted with Joy-Pod on Pod-Pad. CLICK HERE for Video.

April 1st, 2016

A new statute passed in California will bar state employees (as well as teachers, police personnel, and health care workers) from using a variety of firearms terms in official communications. California Assembly Bill 2243, authored by Assemblyman Tony Fulenzo (D. Los Angeles), defines over 30 gun-related words as “hate speech”. Under existing California law, any words/phrases defined as “hate speech” are proscribed (forbidden) in official publications, school textbooks, and all public-sector communications (including email). By effect of AB 2243 then, dozens of gun-related nouns, verbs, and adjectives will be banned, and “shall no longer be uttered or used in the State of California by any public agent or employee”.
Assemblyman Fulenzo said his intent in sponsoring AB 2243 was to alter public attitudes toward firearms, and in particular, to convince school children that firearms are bad. “We want to prevent young kids from perceiving firearms as ‘cool’ or ‘exciting’. The best way to do that is to bury the subject altogether. We need to dismantle the ‘gun culture’. That begins with banning the words themselves.”
 Fulenzo said AB 2243 was inspired by existing bans on racist “hate speech”: “We don’t want children to read about guns or talk about guns. The first step, therefore, is to remove firearms-related words from textbooks, classroom presentations, and state documents. This is not something new. California has done the same thing with hateful words directed at minority groups. In California, by law, we have banned the use of the ‘N’ word (and other racist terms) in official state publications and school textbooks. Now we are just following that practice and banning the ‘G’ word (i.e. ‘gun’) and similar firearms-related hate speech”. Fulenzo said AB 2243 was inspired by existing bans on racist “hate speech”: “We don’t want children to read about guns or talk about guns. The first step, therefore, is to remove firearms-related words from textbooks, classroom presentations, and state documents. This is not something new. California has done the same thing with hateful words directed at minority groups. In California, by law, we have banned the use of the ‘N’ word (and other racist terms) in official state publications and school textbooks. Now we are just following that practice and banning the ‘G’ word (i.e. ‘gun’) and similar firearms-related hate speech”.
Ban on Gun Words in Arizona Next?
Meanwhile, in neighboring Arizona, anti-gun groups have called for the passage of similar legislation banning the use of firearms-related terminology.

Permitted Word Equivalencies for Banned Firearm Terms
When enacted into law, AB 2243 will ban more than 30 firearm-related words, including “gun”, “pistol”, “rifle”, “bullet” and other commonly-used words. Where it is necessary to reference a firearm, as in a police report, AB 2243 provides for substitute words or phrases. AB 2243 recognizes that, in some instances, it will be necessary to mention firearms-related facts in official documents. By using these officially-designated substitute words, firearms-related facts can be logged without resort to banned “hate speech”.
| Gun = “Gunk”
Pistol = “Piddle”
Rifle = “Ripple”
Shoot = “Suit”
Bullet = “Mullet”
Cartridge = “Partridge” |
How to Use CA-Approved Substitute Words:
Under AB 2243, if an official report requires description of a hate speech item, then the approved replacement words shall be used instead of the prohibited terms. For example, if a state-funded hospital treats a pistol wound, this shall be listed as a “piddle wound” in the medical report. Likewise the recovery of cartridges at a crime scene by police shall be recorded as a “partridge recovery” in the incident report.
|
New Law Does Not Restrict Speech by Non-Governmental Entities
This new law only applies to “public sector” entities (schools, police/sheriff agencies, hospitals/health clinics, state and municipal agencies). Private businesses, including newspapers and web sites, will still be allowed to use firearms-related words without the threat of prosecution. Likewise, private citizens will still be allowed to say “gun”, “pistol”, or “rifle” etc. in their own private communications. However internet posting of hate speech involving forbidden firearm words will be monitored by a new California State Agency. This new Agency, the California Office of Firearms Hate Speech (COFHS) will be funded by a new 5% sales tax on firearms ammunition and components.
March 30th, 2016

Are you a fan of 6.5mm rifle cartridges? Then you should visit TargetShooter Magazine and read Laurie Holland’s latest “magnum opus”. Laurie recounts the development of 6.5mm rifle cartridges and examines a host of “six-fives” including the well-known 6.5×55 Swede and more esoteric cartridges such as the 6.5×58 Vergueiro. Laurie looks at a variety of military 6.5mm cartridges, including Japan’s 6.5×50 Arisaka, as well as some big 6.5mm Magnums. This Editor shot a .260 Remington (essentially a necked down .308 Win) for quite a while. I was pleased to see that Laurie discusses the .260 Rem, along with its bigger brother, the 6.5-06.
Part One of a four-part series, this is a LONG article, which runs over 4000 words. There are more than a dozen photographs, showing both cartridge types and bullet types. In addition, cartridge specs are presented in two detailed tables. Here is a list of the notable 6.5mm cartridges Laurie references (and we may have missed a few):
6.5×47 Lapua
.260 Remington (6.5-08)
6.5×50 (Arisaka)
6.5×52 Carcano
6.5x53R Mannlicher
6.5×54 Mannlicher-Schoenauer
6.5×55 Swedish |
6.5×57 Mauser
6.5×58 Vergueiro
6.5×68 RWS
6.5-284 Norma
6.5-06 (6.5/.30-06)
6.5mm Remington Magnum
.264 Winchester Magnum |

In early 20th century the 6.5x54mm Mannlicher-Schoenauer was a highly-regarded hunting cartridge.
Here is a sample from Laurie’s 6.5mm Cartridge History:
The 6.5×55 Swedish Mauser and Other Early Designs
Thanks to the 6.5X55mm and its common name of ‘Swedish Mauser’ (it was a joint Swedish / Norwegian military development truth to tell), not forgetting first rate Lapua, Norma, and Sako ammunition and components, many associate the 6.5s with Scandinavian countries. However, the two Nordic nations weren’t alone in adopting 6.5mm designs during the back end of the 19th century, moreover Germany and Austria did as much to popularize the caliber. The Netherlands, Italy, Japan, Romania, Portugal and Greece took the small caliber military route too, although some later decided to convert at least partially to larger bores.
However, once armies started to adopt lighter, pointed bullets at improved velocities in the .30-class designs starting with the German 7.92mm 153gr bulleted S-Patrone of 1905 which produced the then astonishing MV of 2900 fps in the G98 rifle, the 6.5s lost out as contemporary propellants couldn’t handle smaller calibers as efficiently. It’s significant that while some early users moved to larger caliber service rifles, no country [other than Japan] has adopted 6.5mm in the last 110 years although there have been some unsuccessful initiatives recently.
Prior to WW2, there had only been a single American attempt to produce a 6.5, the brilliant cartridge designer and riflemaker Charles Newton with his eponymous 256 design of 1913 which used a shortened and necked-down 30-06 case. The Western Cartridge Company loaded ammunition for Newton, a 129gr expanding bullet at a claimed 2760 fps MV and obtained in a longer barrel than those fitted to production rifles.

RWS introduced the powerful 6.5X68mm in 1939 and it is still in use in Europe.
March 24th, 2016

We are in the midst of “March Madness” — the annual NCAA college basketball tournament. Here’s a clever piece by Hap Rocketto that examines the game of B-Ball and explains why shooting targets is actually more difficult than shooting hoops. This story originally appeared in the Hap’s Corner section of Pronematch.com. Hap is a rare talent in the gun world — a serious shooter who also has unique insights, and a great sense of humor. We recommend you visit Pronematch.com to enjoy the many other interesting Hap’s Corner postings.
 by Hap Rocketto by Hap Rocketto
I know shooting is tougher than basketball…. Come on, just how difficult is it for five tall guys to help each other toss a big ball into a basket? Granted basketball is more physically demanding than shooting a rifle, but I think that blasting a quarter-size group into the center of the target at 100 yards all by yourself is a far more difficult task than working as a team to dunk a ball.
Therefore, in the style of Late Night talk show host David Letterman, I have constructed a list of ten reasons why rifle shooting is tougher than basketball.
| TOP TEN REASONS Why Rifle Shooting is Tougher Than Basketball
10. When you get tired in basketball the coach just calls time out and replaces you with someone fresh. Not so in shooting.
9. When’s the last time a basketball player had to make a shot with the sun in his eyes?
8. How often does a basketball player have a perfectly good shot blown out by the wind?
7. If a basketball player places a shot a little higher than intended, no problem. The backboard causes the ball to bounce into the basket. No such luck in shooting.
6. Rifle matches commonly run all day. When was the last time you saw a basketball game run more than an hour or so?
5. If you’re not making your shots in basketball, you can just pass the ball to someone who is hot. No such convenience in shooting.
4. Rifle bullets travel faster than the speed of sound (roughly 300 meters per second). Basketballs top out at around 15 meters per second.
3. A basketball player can shoot from anywhere on the court that is convenient and comfortable. All riflemen shoot from the same distance.
2. A basketball player may shoot as often as the opportunity arises and is not limited to the number of shots taken. A rifle match requires that each rifleman shoot the same number of record shots. If they shoot more than allowed, then a penalty follows.
1. And the Number One reason why shooting is tougher than basketball is that, if you miss a shot in basketball you, or a team mate, can just jump up, grab the ball, and try again. Try that in shooting.
The only real similarity between the two sports is that a competitor attempts to score points by shooting. In rifle it is through a hard-hold and easy squeeze in prone, sitting, kneeling and standing; while in basketball it is via hook shots, jump shots, lay-ups, or the dramatic, ever crowd-pleasing, slam dunk. |
 About the Author: Hap Rocketto is a Distinguished Rifleman with service and smallbore rifle, member of The Presidents Hundred, and the National Guard’s Chief’s 50. He is a National Smallbore Record holder, a member of the 1600 Club and the Connecticut Shooters’ Hall Of Fame. A historian of the shooting sports, his work appears in Shooting Sports USA, the late Precision Shooting Magazine, The Outdoor Message, the American Rifleman, the CMP website, and Pronematch.com. About the Author: Hap Rocketto is a Distinguished Rifleman with service and smallbore rifle, member of The Presidents Hundred, and the National Guard’s Chief’s 50. He is a National Smallbore Record holder, a member of the 1600 Club and the Connecticut Shooters’ Hall Of Fame. A historian of the shooting sports, his work appears in Shooting Sports USA, the late Precision Shooting Magazine, The Outdoor Message, the American Rifleman, the CMP website, and Pronematch.com.
Credit John Puol for finding this article and communicating with Hap Rocketto.
March 23rd, 2016

4140, 4150, 316, 17-4, 6061, 7075-T6 — What is the significance of these numbers? No, they’re not winning lottery numbers. These are all designations for metals commonly used in firearm and barrel construction. 4140 and 4150 are carbon steels, with 4150 often used in mil-spec AR15 barrels. 316 and 17-4 are grades of stainless steel. 316 is “marine grade” stainless, while 17-4 has 17% chromium and 4% nickel. 17-4 is a harder steel used in barrels and receivers. 6061 and 7075-T6 are aluminum alloys. 6061 is “aircraft grade” aluminum, often used for rings and trigger guards, while 7075-T6 is a much stronger, heat-treated aluminum commonly used in AR15 uppers.
 You can learn about all these metals (and more) in the online archives of RifleShooter magazine. You can learn about all these metals (and more) in the online archives of RifleShooter magazine.
Written by Patrick Sweeney, RifleShooter’s Guide to Gun Metal summarizes the primary types of steel and aluminum used in gun and barrel construction. Sweeney explains the nomenclature used to define metal types, and he outlines the salient properties of various steel and aluminum alloys. This is a useful resource for anyone selecting components or building rifles. We recommend you print out the page, or at least bookmark it.
Metals by the Number
The number system for steel classification came from the auto industry. Sweeney explains: “The Society of Automotive Engineers uses a simple designating system, the four numbers you see bandied about in gun articles. Numbers such as 1060, 4140 or 5150 all designate how much of what [elements are] in them. The first number is what class—carbon, nickel, chromium, and so forth. The next three numbers [list other elements in the alloy]. 4140, also known as ordnance steel, was one of the early high-alloy steels. It has about 1 percent chromium, 0.25 percent molybdenum, 0.4 percent carbon, 1 percent manganese, around 0.2 percent silicon and no more than 0.035 percent phosphorus and no more than 0.04 percent sulphur. That leaves most of it, 94.25 percent, iron.”
Aluminum Alloys
Numbers are also used to differentiate different types of aluminum alloys. Sweeny writes: “Aluminum is used in firearms in two alloys: 7075 and 6061. 6061 is commonly referred to as ‘aircraft aluminum’ and has trace amounts of silicon, copper, manganese, molybdenum and zinc. 7075 is a much stronger alloy and has markedly larger amounts of copper, manganese, chromium and zinc.” 7075 Aluminum has significantly better corrosion resistance, and that’s why it is used for AR receivers. The “T6″ you often see appended to 7075 refers to a heat-treating process.
Aluminum (or “Aluminium” in the UK) is a chemical element in the boron group with symbol Al and atomic number 13. It is a silvery-white, soft, nonmagnetic, ductile metal. Aluminum is the third most abundant element, and the most abundant metal, in the Earth’s crust. (Wikipedia)

To learn more about the metals used in your firearms’ barrels, rings, receivers, and internal parts, read Sweeney’s article in RifleShooterMag.com. Taking the time to read the article from start to finish will expand your knowledge of metal properties and how metals are chosen by manufacturers and gunsmiths. CLICK to Read Guide to Gun Metal.
Story Tip by EdLongrange. We welcome reader submissions. Aluminum Alloy chart courtesy AluminiumDesign.net.
March 22nd, 2016

Top to bottom – Remington firing pin assembly with ISS, Tubb SpeedLock alloy-composite system without ISS (current versions have dual, opposite-wound springs), and Remington short action firing pin assembly without ISS.
Each Wednesday, the U.S. Army Marksmanship Unit publishes a reloading “how-to” article on the USAMU Facebook page. Last week’s “Handloading Hump Day” article covered mechanical issues and related ignition irregularities that can cause vertical fliers even with good ammunition in an otherwise excellent rifle. We highly recommend you read this article, which offers some important tech tips.

Vertical Dispersion: Mechanical/Ignition Issues?
Poor or inconsistent ignition has long been known to be one of the “usual suspects” when one encounters vertical fliers that just shouldn’t be there. By having a sense of some of the basic principles involved, and a few basic areas to check, the shooter may avoid colsiderable frustration, not to mention time, expensive loading components and barrel wear.
 Is your well-built rifle of high-quality components plagued with vertical fliers across more than 1-3 handload combinations? Consider the bedding, crown and scope/sight mounts. Are they correct? If so, then you might check for ignition issues before boldly undertaking an extensive, expensive, and quite possibly fruitless quest for the “magic handload”. Is your well-built rifle of high-quality components plagued with vertical fliers across more than 1-3 handload combinations? Consider the bedding, crown and scope/sight mounts. Are they correct? If so, then you might check for ignition issues before boldly undertaking an extensive, expensive, and quite possibly fruitless quest for the “magic handload”.
SEEING IS BELIEVING: While the author had been aware for many years that poor ignition should be considered and ruled out when dealing with vertical fliers in an otherwise-excellent rifle, actually seeing the problem and its almost instantaneous cure really drove the lesson home.
He was working with a “dot” rifle – a .22 LR match rifle that really stacked bullets into little piles at 50 yards and beyond. With one lot of ELEY Tenex, it produced consistent “bughole” groups at 50, but with another, selected lot of Tenex, similar groups were regularly ruined by single, vertical fliers that did not appear in other rifles. Rather than spending days burning up expensive, select ammunition looking for “magic lots”, he contacted a well-respected rimfire gunsmith and explained the situation.
Without so much as batting an eye, the highly-experienced ‘smith tore into the rifle’s action, and quickly found the cause(s) of the problem. He discovered a demonstrably weak firing pin spring, plus a chip out of the face of the firing pin where it contacted the cartridge rim.
After replacing and tuning the offending parts, the rifle immediately began shooting tiny, bughole groups with the previously “unacceptable” lot of Tenex. Centerfire rifles can also benefit from ensuring positive, consistent ignition. A wise riflesmith is literally worth his weight in gold!
So, what are some issues we as shooters can inspect in our rifles to help determine if ignition woes could be part of our problem? At the club level, ask yourself if that “experienced” Remington, Winchester 70, or even Springfield-based match bolt gun you’re using is still running its’ original 40-80 year-old factory striker spring? If so, a new replacement is cheap insurance against current or future problems. (And BTW, it might be best to stick to the normal, factory-spec spring weight. A super-powerful spring can cause vertical, just as a weak one one can.) Along with that, a routine check for proper firing-pin protrusion is a quick preventive measure that can rule out potential issues.
Other areas to consider are the centering and consistency of the firing pin’s operation in the bolt. Admittedly, with the increasing use of precision-machined custom actions, this is becoming less an issue every day. Below is the firing pin assembly from a custom BAT action:

However, particularly with factory actions, a very quick and easy check is to remove the bolt, let the firing pin go forward, and look at the firing pin tip through the firing pin hole. Is the tip off-center in the hole, and possibly striking it as it moves forward? Is the hole out-of-round or burred from being struck repeatedly? If so, a trip to the riflesmith is likely in order.
Similarly, machining issues in the bolt/firing pin system can lead to rough and erratic firing pin movement, in which the firing pin drags against an internal surface of the bolt. In high-quality rifles these issues are relatively rare, but not unheard-of, and it takes mere minutes to rule them out. It may be worthwhile to remove the cocking piece/firing pin/spring assembly and look for any unusual gouges, dings, peening, burrs or signs of abnormal wear.
This task is especially easy with Winchester 70s, Springfields, and the similar Mauser 98s, involving little more than the push of a button and unscrewing the cocking piece assembly. This is just one of the many reasons these tried-and-true actions have earned such a loyal following in the field, among hunters who must maintain their rifles away from a shop.

Particularly with older rifles, watch for and remove excess grease (or even Cosmoline!) from both the firing pin assembly and inside the bolt. This can help improve firing pin speed and consistency. Other bolt-action designs may need a take-down tool or other measures.
As part of this inspection, AFTER ENSURING THE RIFLE IS UNLOADED, slowly cock the rifle, dry-fire, and repeat several times. Listen carefully near the action for inconsistency in the sounds it generates. Does the striker falling make the same sound each time? Do you hear or feel grinding upon operation? If so, where?
Be sure to check the operation of the cocking piece (bolt shroud), firing pin within the bolt shroud, the cocking piece cam and the rear of the bolt body where the cocking piece cam operates. As with our examination for abnormal wear marks discussed above, look for marks indicating roughness or a possible need for light polishing. Then, clean and lightly grease the bearing surfaces while you’re at it.
Remington 700 bolt shroud and cocking cam

These are relatively easy checks that shooters can undertake to perform a preliminary inspection on their own. Other mechanical issues can also cause ignition issues, chiefly centered around the action of the trigger, sear and sear spring. If these are suspected, a trip to an experienced, qualified riflesmith for diagnosis is recommended. We hope you find this information helpful! Join us again next week, and in the meantime, enjoy the shooting sports safely!
March 22nd, 2016

Hearing loss can be progressive and irreversible. If you are a shooter, this is serious business. You need to use effective hearing protection every time you go to the range. Even if you are away from the firing line, gunshot noises can damage your hearing. Good foam earplugs costs mere pennies but they can prevent deafness in your later years. Many folks also wear muffs over plugs. Some other shooters prefer the custom-molded ear plugs. Electronic muffs can be useful when you are away from the firing line because they allow you to converse.
Here are some comments from Forum members on the subjects of hearing loss and the need for proper ear protection. You can join the discussion in this FORUM THREAD:
“If you are young and don’t want to end up with profound hearing loss like I have… ALWAYS ALWAYS ALWAYS use hearing protection. This is from a guy who is social security/medicare eligible, has two Re-Sound aids at a not so cheap $2000.00 EACH… and now has religion! When I was young [we] never wore ear gear and laughed at the ringing after 100 rounds of 12 gauge at the skeet range. Now we live with the consequences. Be smarter than I was!” — Gary0529
“Take it from a 70-year-old that has been shooting 49 years. I now have a Re-Sound hearing aid in the left ear and a Cochlear Implant in my right. I still cannot hear. Custom molded plugs are best. Some are sold at gun shows and some are made by the folks that make hearing aids. They are cheap as compared to this $200,000 implant. DO IT NOW for everyone around guns.” — Richard King, King’s Armory
“Say WHAT? You have to type a little louder! I used to shoot without any muffs, when I was ‘young and indestructible’, and now I have about 40% loss. When I take youngsters and friends shooting, they get muffs and plugs. I’m not allowed suppressors where I live. I would use them if I could.” — Josh B.
“For what it’s worth, I wear both ear plugs and muffs that have NO sound adjustment capability. As a youngster (15) I wore no ear protection either in shooting or motorcycle riding. I kept doing that until entering military service at age 18 where we had to wear ear plugs at the range. Started wearing ear plugs after that, except when motorcycle riding. At around age 53 my hearing started going south as a result of my own stupidity as a youngster and now some 15 years later I only have about 45% of my hearing left. So beware all — there is a price to pay if you don’t protect your hearing.” — Shynloco

Important Safety Considerations:
1. The NRR (noise reduction rating) is determined by “experimenter” fit, not user fit, and trained listeners during the testing period. This results in inflated protection numbers compared to real-world protection.
2. Any disruptions in the protector/skin seal will greatly reduce the effectiveness. Think eye glass temple bars, lots of hair, ear wax, etc. A 5% leak results in a 50% reduction in effectiveness.
3. Double protection gives only 5-10 dB extra protection.
4. Bone conduction gives about 50 dB protection so hearing protectors are the weak link[.]
5. Keep the protectors in/on your ears. Over 8 hours, if you remove them for only 30 minutes (cumulative), the effective protection is cut in half.
So, if you are using a really good muff with NRR of 33 and a foam plug with NRR of 27, the real-world NRR would be about 35 dB, at best. This would attenuate a gunshot by that amount. The key is time versus exposure. Limit the exposure and you limit the dose. — DelS
Ear Protection for Small Children
Don’t forget to protect your kids if you take them to the range (or loud rock concerts). Parents of very young infants should consider Baby BanZ Muffs, which are designed for infants 0-2 years. These small-sized muffs can protect toddlers’ hearing when loud machinery is running, during fireworks displays, or other noisy activities. These really work for tiny tots. One mother reports: “I bought these for my two-month old and they work great! He’s never fought us putting them on. He’s now falling asleep with them. He’s slept through a demolition derby and a rowdy wedding reception. I’m ordering another pair for my nephew.” Another mom says: “We bought these when we took our four month-old to a loud event. They fit her head well and were well-padded. She looked very comfortable, so comfortable in fact that she slept for most of her first rock concert. I’d say they worked exceptionally well!”
March 19th, 2016

Jay Christopherson is AccurateShooter.com’s systems administrator — he keeps the servers up and running. Jay is also a very talented rifle shooter who holds a carry permit. Recently, Jay acquired a Walther PPS M2, a compact, defensive carry pistol. Here Jay reviews that pistol, which is now his “go-to” handgun when he chooses to carry a firearm pursuant to his CCW permit.
The Walther PPS M2, Single-stack 9mm is a Comfortable, Reliable Everyday Carry Pistol.
Looking for a new carry pistol in a single-stack, 9mm configuration, I tested out the slim (1″-wide) Walther PPS M2, with three different magazine capacities. For someone who has carried a 5″-barreled, .45 ACP model 1911 for the last few years, the switch to a single-stack 9mm was a big change — but a welcome one in terms of weight and comfort. I like my big 1911, but the PPS M2 gives me the feeling that if it’s needed, it’ll be a safe, effective, and reliable option. I still love my 1911, but when it comes to carry, the 1911 will stay in the safe while I “pack” the smaller, lighter PPS.
Click Image for Large View of Pistol Specifications Sheet

Like many of AccurateShooter.com’s readers, I have a permit to carry a concealed firearm and I use the privilege regularly. I’m no great shakes with a pistol, having focused most of my efforts on long-range rifle shooting, but I do spend enough time at the pistol range to ensure that I am familiar with my weapon and comfortable shooting it out to ranges where I might encounter a situation requiring its use.
Part of being responsible is selecting a carry weapon that you can be comfortable with, both using and carrying. Now, I’ll admit that I’ve focused a lot on the former, but not as much on the latter. I’m an unabashed fan of John M. Browning’s crowning (in my opinion) achievement, the Colt .45 ACP M1911. My current 1911, with a 5” barrel, is not the easiest pistol in the world to carry comfortably. While I love shooting it, carrying it is another situation altogether. I’ve tried many different configurations, but found myself carrying it less and less.
And so, I decided that I needed to enter the world of the 9mm single stack for a carry weapon. There are a lot of reasons why I chose to go that direction, but it’s a highly subjective and personal subject (some of the arguments out there are pretty heated), so I won’t bore you with mine. Suffice it to say, there’s plenty of available information for you to make an informed decision. To help with testing, Walther Arms was kind enough to provide a new Walther PPS M2, in 9mm, for evaluation.
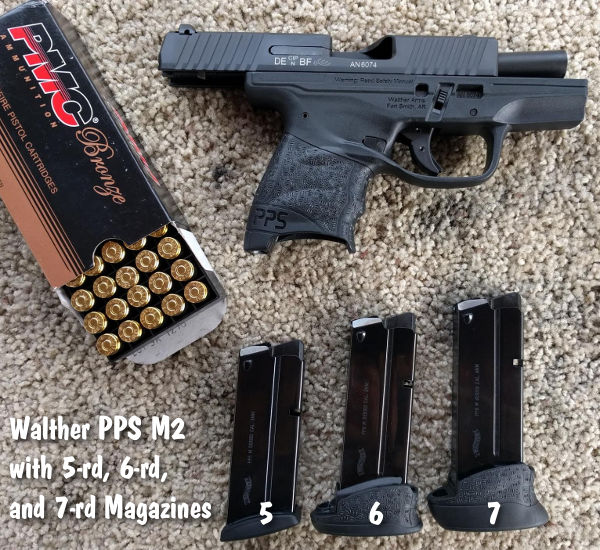
Three Magazine Options
Along with the PPS M2, Walther provided three magazines — the 5-round standard mag plus 6-round and 7-round extended magazines. I tried all three magazines, both for carry/fit, and at the range to see if they would affect my ability to shoot the pistol. For reference my hands are roughly 9.25″ wide — according to the Internet, the average hand size for a male is 7.44″, so I guess I’ve got larger than average hands. The shortest magazine was a bit too short for me to grip comfortably — my pinky finger had zero engagement and my two-hand grip suffered for it. The middle magazine let my pinky engage the grip partially, but was still not ideal. The longest magazine fit perfectly. My guess is that if your hand is in the average range, the middle magazine will work for you. For women, I think the smallest grip will work nicely. My wife has an average hand span for females and thought that the smallest grip felt pretty natural for her.
The trigger is fair — the takeup is smooth, the trigger breaks relatively cleanly and predictably, but a rough spot on the Glock-style trigger safety lever wore against my finger, leaving it feeling a bit raw. It’s fairly minor and something that can easily be resolved. And even with my larger fingers, I still had no problem with trigger guard clearance. Disassembly is fairly easy, though the take-down lever takes some effort to work. [Editor — on the PPS M2 I tried at SHOT Show, the small slide-stop lever was hard to manipulate.]
After having carried my 1911 around quite a bit, I found the Walther PPS M2 to be much lighter and easier to carry (I use a Clinger holster). I rarely notice it, even when getting into and out of a car. With the PPS M2 it’s easy to carry without “printing”, at least with the appendix carry method I prefer.
General Function and Accuracy Testing
I took the pistol down to the range to test it out and get a feel for it. I bought a variety of 115 grain FMJ ammunition to test including PMC and Blazer brass-cased 9mm. I ran about 400 rounds through the little Walther. None of the ammo experienced any sort of issue and the pistol never failed to perform flawlessly. With 400 rounds through the PPS M2 cleanly, I am confident to carry the PPS M2 when I feel the need to carry.
I set up targets at 15 feet and 30 feet — remembering that I’m looking for a personal defense/carry pistol and that I don’t practice for competition! At both ranges, shooting all three magazines, I had no problems putting together groups that are more than accurate enough for “center mass”.

 During a second testing session, I shot the pistol for accuracy with my forearms rested on sandbags. The results were impressive. Above is a seven-shot (7-shot) group at 10 yards (30 feet) with the CCI Blazer Brass ammo. At right is a group shot at 5 yards (15 feet), forearms rested, with the PMC ammo. The one shot that went up outside the group was probably me, the shooter. Remember this is a very small, light-weight pistol that does have some muzzle flip. I’ve seen other tests done with the Walther PPS M2, at longer ranges in the hands of skilled shooters and producing much cleaner groups. During a second testing session, I shot the pistol for accuracy with my forearms rested on sandbags. The results were impressive. Above is a seven-shot (7-shot) group at 10 yards (30 feet) with the CCI Blazer Brass ammo. At right is a group shot at 5 yards (15 feet), forearms rested, with the PMC ammo. The one shot that went up outside the group was probably me, the shooter. Remember this is a very small, light-weight pistol that does have some muzzle flip. I’ve seen other tests done with the Walther PPS M2, at longer ranges in the hands of skilled shooters and producing much cleaner groups.
Summary — Walther PPS M2 is a Keeper
Overall, I really like the 9mm single stack Walther PPS M2. It’s a very handy, manageable pistol. After testing the gun for AccurateShooter.com I decided to purchase the pistol and keep it. That’s the ultimate vote of confidence. This gun shoots comfortably, accurately and reliably, and most of all, the PPS M2 is comfortable to carry. When I choose to carry, should I ever need a firearm, I have every confidence in the Walther PPS M2.
March 8th, 2016

Estimating Actual Cost per Round by Caliber
This article comes from the USAMU, which provide shooting and reloading tips on its Facebook Page. This week’s USAMU TECH TIP outlines a ballpark-estimate method of calculating the actual cost per round of different calibers. Some applications, and some shooters, by virtue of their high level of competition, require the very best ballistic performance available — “Darn the cost, full speed ahead!
If you are in serious contention to win a major competition, then losing even a single point to inferior ballistic performance could cost you a national title or record. However, this “horsepower” does come at a cost! Some calibers are barrel-burners, and some offer much longer barrel life. Look at this comparison chart:
Estimated Cost Per Round by Cartridge Type
Below are some estimated total expense per round (practice and competition) based on component costs, type used, expected barrel life and a standard, chambered barrel cost of $520.00 across calibers.
5.56x45mm: $0.46/round (barrel life 6,000 rounds)*
6mmBR: $0.81/round (barrel life 2800 rounds)
6XC: $0.97/round (barrel life 2200 rounds)
.308 Win: $0.80/round (barrel life 4500 rounds)
6.5-284: $1.24/round (barrel life 1100 rounds)
*Note the high round count estimate for 5.56x45mm. This is a bit deceptive, as it assumes a period of “lesser accuracy” use. The USAMU says: “Much of the difference you see here between 5.56 and .308 is due to using the 5.56 barrel for 100-200 yard training with less-expensive, 55gr Varmint bullets after its long-range utility is spent”. |
Moreover, while some applications require specialized, high-cost components, others do not. And, if the shooter is still relatively new to the sport and hasn’t refined his skill to within the top few percentile of marksmen, a more economical caliber choice can help stretch a limited budget. Translation: More skill per dollar!
In this post, the prices for all items mentioned here were taken from a major component supplier’s current advertisements, and all brass was of top quality, except in the case of 5.56mm. There, 200 top-quality, imported cases were reserved for 600-yard shooting, and the other brass used was once-fired Lake City surplus.
Cartridge cases were assumed to be loaded 10 times each. [Your mileage may vary…] Bullet prices assumed the use of less-expensive, but good-quality match bullets for the bulk of shooting as appropriate.
The cost of top-tier, highly-expensive match bullets was also calculated for a realistic percentage of the shots fired, based on ones’ application. Barrel life by caliber was taken from likely estimates based on experience and good barrel maintenance.
Brass Costs Based on 10 Loads Per Case
Often, handloaders may calculate ammunition cost per round by adding the individual costs of primers, powder charges and projectiles. Many don’t consider the cost of brass, as it is reloaded several times. Here, we’ll consider the cost of enough top-quality brass to wear out a barrel in our given caliber, at 10 loads per case, except as noted above.
Don’t Forget Amortized Barrel Costs
Few shooters factor in the full, true cost of barrel life. Depending on caliber, that can dramatically increase the cost per round. For example, consider a long-range rifle in 6.5/284 caliber. This cartridge performs amazingly well, but at a cost. Ballpark estimated barrel life [in a top-quality barrel] is 1100 rounds. Some wear out faster, some last longer, but this gives a rough idea of what to expect.
Accurate barrels are a joy to use, but they are an expendable resource!

A top-quality barrel plus installation was estimated at about $520.00. At 1100 rounds, barrel life adds $0.47 per round to our total cost. Thus, what had started out as an [components-only estimate, with brass cost] of $0.76/round now totals $1.24 per shot!
Cost Considerations When Choosing a Catridge Type
Some shooters might ask themselves if they could meet their present needs with a more economical caliber. If so, that equates to more practice and matches per available dollar, and more potential skill increase on the available budget.
Each shooter knows his skill level, practice needs, and shooting discipline’s requirements. Some might shoot NRA Service Rifle or Match Rifle using a 5.56mm with a long barrel life. Others might be Match Rifle shooters faced with choosing between, say, a 6mm BR vs. 6XC. A realistic assessment of ones needs, performance-wise, may help guide the shooter toward a caliber that’s most optimized to their needs at the moment.
Admittedly, the factors affecting cost for any individuals circumstances can vary significantly. However, hopefully this will provide one useful method of evaluating one’s training and competition choices, based on their skill, goals and needs.
|


