|
|
September 27th, 2014
Forum Member Roy B. has found a website with scores of well-researched articles about guns and shooting. The Firearms History Blog features a wide variety of posts on myriad subjects, from early black powder firearms to modern match rifles. You’ll find tons of information on gun design, barrel-making, action types, and firearms testing equipment. To access hundreds of articles, click on the Firearm History Blog Archive Menu on the left side. Click the navigation arrows to access monthly collections one by one. Some of the best articles are from 2010, so be sure to check those archives too! Here are some of our favorites:
Testing Firearms: Measuring Chamber Pressure
(Comment: Crusher Gauges were used through until the 1960s, when cheap Piezo-electric tranducers became available.)

Barrel Making: Making a Modern Steel Barrel (Two Parts)
(Comment: Barrel drilling process explained — interesting process.)
Metal Treatments: Ferritic Nitrocarburizing/Melonite/Tenifer
(Comment: Meloniting creates a super-hard surface layer; this has been used to extend barrel life.)
Barrel Making: Forming Rifling with Electric Discharge Machining (EDM)
(Comment: This advanced EDM method can also be used to cut chambers.)
History of Gun Cleaning Methods/Solvents
(Comment: Old-timers used some pretty weird concoctions such as “Rangoon Oil”.)
History and Engineering of Sound Suppressors (Two Parts)
(Comment: Interesting cut-away illustrations of suppressor baffles.)
Utility Firearms: Powder-Activated Tools
(Comment: There are construction tools that use gunpowder to drive fasteners into steel and concrete.)
Testing Firearms: History of Proof Testing (Two Parts)
(Comment: Fascinating article, worth a read.)

More Interesting Articles on RVB Precision Website
These and other articles on the Firearms History Blog will give you many interesting hours of reading — Enjoy! And while you’re cruising the web, definitely check out Roy’s own RVB Precision website. It features many interesting DIY gun and reloading projects, such as Fabricating a 17 HMR Bore Guide, Building a Swivel-Top Varminting Bench, and Fabricating a Unertl-type Scope Mount.
September 18th, 2014

RifleShooter Magazine released a list of the Ten Greatest Lever Guns of All Time. Writing for RifleShooter, Brad Fitzpatrick examined a wide selection of lever guns produced in the past 150 years, and came up with this short list of ten “all-star” lever action rifles:
|
Browning BLR
1860 Henry Rifle
Marlin 336
Marlin 1895/444
Ruger 96/44 |
Savage Model 99
Winchester Model 1873/73
Winchester Model 1888/88
Winchester Model 1892/92
Winchester Model 1894/94 |
As with all “Top 10″ lists, this will be controversial. Where is the Winchester model 1866 “Yellowboy”, the favorite of Native Americans? Where is the iconic Winchester model 1895, the beloved gun Teddy Roosevelt called “Big Medicine”? But other choices are hard to fault. The Henry Rifle, the first popular cartridge lever gun, surely belongs on the list. And, believe it or not, the Winchester Model 94 is the best-selling sporting rifle of all time in the USA, according to RifleShooter.


So what do you think of RifleShooter’s Top 10 list? Does it make sense, or did RifleShooter magazine get it wrong? If you go to the RifleShooter website, you can vote for your favorite lever gun among the ten candidates listed above. (Scroll to bottom of page for poll.)
Fitzpatrick writes: “The lever action played a very legitimate role in America’s westward expansion. It could bring meat to your table or protect your land and assets against rustlers.
Nostalgia aside, the lever gun is an effective hunting tool for those willing to live within its limitations. While it can’t beat a bolt gun with a light trigger and free-floated barrel in a long-range shooting competition, a lever action in the right hands can be rather accurate, especially given new advancements in rifle design and bullet technology.”
September 16th, 2014
 On the NRA’s American Rifleman website you’ll find a helpful article that provides basic tips on avoiding legal entanglements when traveling from state to state with firearms in your vehicle. The basic advice is to plan out your trip in advance, researching all state and local laws that will apply. This can be a daunting task, but a Federal law, the Firearms Owners’ Protection Act (FOPA) does provide some protection for travelers. On the NRA’s American Rifleman website you’ll find a helpful article that provides basic tips on avoiding legal entanglements when traveling from state to state with firearms in your vehicle. The basic advice is to plan out your trip in advance, researching all state and local laws that will apply. This can be a daunting task, but a Federal law, the Firearms Owners’ Protection Act (FOPA) does provide some protection for travelers.
According to the NRA: “FOPA shields you from local restrictions if you’re transporting firearms for lawful purposes. Under FOPA, notwithstanding any state or local law, a person is entitled to transport a firearm from any place where he or she may lawfully possess and carry such firearm to any other place where he or she may lawfully possess and carry it, if the firearm is unloaded and locked out of reach. In vehicles without a trunk, the unloaded firearm must be in a locked container other than the glove compartment or console.”
The NRA cautions that: “Laws vary place-to-place, and if you do anything other than pass through a state, you must obey all local laws. This is especially true when you are carrying a loaded firearm in your vehicle or on your person. There’s no shortcut here. You need to map out your trip state-by-state to be sure you stay legal during your trip.”
Resources for Travelers
The American Rifleman article also lists useful print and online resources you can consult to learn more about laws that apply when traveling with firearms:
Guide to the Interstate Transportation of Firearms (From NRA ILA.)
Federal Firearms Regulations Reference Guide (BATFE publication.)
BATFE’s State Laws and Published Ordinances — Firearms, 2010-2011
BATFE’s Answers To Frequently Asked Questions
State Gun Laws at a Glance (Includes interactive chart with info on state laws.)
State-by-State Handgun Laws (Website summarizes laws by state.)
The Traveler’s Guide to the Firearm Laws of the Fifty States (Printed handbook.)

Chrysler’s Outdoorsman Series Trucks offer an optional “RamBox” with locked rifle storage.
September 5th, 2014
Joe Hendricks of Team Remington is the 2014 NRA High Power National Champion. This is Joe’s first National High Power championship, and he accomplished it through a gutsy, come-from-behind victory on the final day. This was no easy win for Joe, aka “Joesr” on our AccurateShooter Forum.
Here’s the story of Joe’s 2014 victory at Camp Perry. One thing that made Joe’s victory even more memorable was that both Joe’s father and Joe’s son were there to witness the win. Three generations of Hendricks men were at Camp Perry to see his achievement. That’s a great thing for a family.

Down by Too Many Points and Too Many Xs
By Joe Hendricks, Nat’l High Power Champion (2014)
On the last day of the High Power Championship, believe it or not I felt no pressure — because I really didn’t think I had a chance to win it all. I knew the leaders would clean the day and my only hope was that possibly one or two would falter enough to allow me third place. All I was trying to do was shoot Xs, so that I could move past two of the people in front of me and (maybe) secure 3rd place. I started the day tied for third on points with two other competitor, but in fifth place when you figured in X-count.
Yes I was watching the board going into the final day and so many people say “Don’t watch the board!”. However, for me, looking at the board motivates me.
The best I could do at 300 yards was a 200-6X, with nice groups, but not centered. That was not enough Xs and I knew I wasn’t moving up the leader board. I knew that simply shooting a 200 score wasn’t going to cut it and I still had work to do to get onto the podium (i.e. earn third place). At that point I figured I was still tied for third (disregarding X-count).
So I went to the 600-yard line with goal of getting on to the podium. I was shooting for third at that point. I figured maybe with two cleans I could grab third place.
Understand I know my competition and I know I’m shooting against the best High Power marksmen in the world. There were two people who have won this match before and several deserving champions just behind. So at this point, I’m wasn’t giving myself a chance to win — I was hoping to place third.
The first string at 600 yards went well with nothing less than a 10. I shot a normal 200-10X, meaning 10s and Xs were mixed up with no wide shots. Apparently others faltered when I shot clean (all 10s or Xs) — I didn’t know that after the first string at 600 I was actually in the lead….
Click Image to See Full-Size Photo

Pulling it Together: Five Xs for the Final Five Shots
The second string at 600 yards was strange. I shot five Xs in my first 6 or 7 shots and then ran a string of 10s that were either wide or corner shots. So, after 15 shots, I wasn’t getting better, I was getting worse. I needed to get my act together (and right quickly).
I took a moment to regroup and said to myself: “Stop this. We are not doing this today…” (i.e. we are NOT going to break down with just five shots to go). That’s something I heard Ken Roxburgh said to my son during their team match.
That thought process changed my attitude, and it seemed to relieve the pressure, so I was able to concentrate on every shot. I was re-focused and ready to roll. I know Perry, I know the wind at Perry and I had confidence in my 6CM cartridge to shoot 10s through the final five shots.
That confidence paid off — in the final five shots I broke every shot dead center and every shot came up an X!
I don’t care where you place at Perry, if your final shot is an X you have something to take back for next year. Running five Xs in a row to end Perry is special. But, ironically, I can not say that running five Xs in a row to win Perry is a feeling I can actually remember, because, at the time, I thought I had finished third, not first….
After finishing the last string, I had a 1798 point total. I packed up my stuff, went over to the Remington golf cart, and told Ken Roxburgh that I was fairly sure I had placed third overall.
“Down 13… How About You?”
I then walked down the line and I saw Brandon Green from the USAMU congratulating Norm Houle on winning. I paused for a moment and then walked over to Norm and asked him: “What did you shoot?” Norm replied: “I was down 13, how about you?” I then answered “Down 11″. Norm gave me a huge handshake and then it hit me. I had won.
I was a feet away from my father. I went to him and said I think I won. Pricelessly, Dad said “Won what?” Then it hit him. Literally in tears, He called my mother to report the good news.
At that point I realized this Championship wasn’t my life’s work, it was his. THANK YOU DAD!
My son Joe Hendricks Jr. was in the pits and didn’t yet know about my first-place finish. He is 18 and has his own hopes for a rifle championship someday. When he came back from the pits, I said to him: “You don’t know…” He looked at me and said “Know what?”. I said “I won”, and he asked “Won what?”. Then I told him: “The whole thing.” I have never seen him smile the way he did at that moment.
Next we call my wife on the phone (she was staying in Port Clinton, but wasn’t at the range that day). I tell her I won, and she says “Won what?” Again, I reply “The whole thing … I won the whole thing.” I hear only silence on the phone, then she says “Are you serious?” I reply, “Yes I am” and then there is a long pause, after which she says: “Joe, you aren’t messing with me are you?” I tell her: “No, I’m serious, come out here, you’ll see…” She pauses then says, “OK I will… but if you are messing with me YOU WILL PAY.” My girls say she almost wrecked the car driving out to the range.
So my wife finally shows up at the Remington Team trailer. As she was getting out of the car she says “If you are [fooling] with me I will kill you. Did you really win?” In fact, she asked me three times before she believed it had actually happened.
By this time Ken Roxburgh of Remington (my coach) had also called Carl Bernosky. Carl Bernosky has been a huge part of my shooting since I young. Having Carl be so excited about my win means nearly as much to me as the win itself. What a great day!

Joe wanted to thank his sponsors Remington and Berger Bullets. The 6CM Cartridge he shoots is a wildcat based on the .243 Winchester. Joes uses slow-burning H1000 powder and he shot Berger 105gr 6mm Hybrids at Camp Perry this year.
August 30th, 2014
 The February 2013 edition of Shooting Sports USA magazine has an interesting feature by Glen Zediker. In this Transporting Success, Part I article, Zediker explains the advantages of loading at the range when your are developing new loads or tuning existing loads. Glen, the author of the popular Handloading for Competition book, discusses the gear you’ll need to bring and he explains his load development procedure. In discussing reloading at the range, Glen focuses on throwing powder and seating bullets, because he normally brings enough sized-and-primed brass to the range with him, so he doesn’t need to de-prime, re-size, and then re-prime his cases. The February 2013 edition of Shooting Sports USA magazine has an interesting feature by Glen Zediker. In this Transporting Success, Part I article, Zediker explains the advantages of loading at the range when your are developing new loads or tuning existing loads. Glen, the author of the popular Handloading for Competition book, discusses the gear you’ll need to bring and he explains his load development procedure. In discussing reloading at the range, Glen focuses on throwing powder and seating bullets, because he normally brings enough sized-and-primed brass to the range with him, so he doesn’t need to de-prime, re-size, and then re-prime his cases.
Zediker writes: “Testing at the range provides the opportunity to be thorough and flexible. You also have the opportunity to do more testing under more similar conditions and, therefore, get results that are more telling. Once you are there, you can stay there until you get the results you want. No more waiting until next time.”
Zediker starts with three-shot groups: “I usually load and fire three samples [with] a new combination. I’ll then increase propellant charge… based on the results of those three rounds, and try three more. I know that three rounds is hardly a test, but if it looks bad on that few, it’s not going to get any better.”
Glen reminds readers to record their data: “Probably the most important piece of equipment is your notebook! No kidding. Write it down. Write it all down.”

 There’s More to the Story… There’s More to the Story…
Editor’s Note: In Zediker’s discussion of loading at the range, he only talks about throwing powder and seating bullets. In fact, Glen opines that: “there is little or no need for sizing.” Well, maybe. Presumably, for each subsequent load series, Zediker uses fresh brass that he has previously sized and primed. Thus he doesn’t need to de-prime or resize anything.
That’s one way to develop loads, but it may be more efficient to de-prime, re-size, and load the same cases. That way you don’t need to bring 50, 80, or even 100 primed-and-sized cases to the range. If you plan to reload your fired cases, you’ll need a system for de-priming (and re-priming) the brass, and either neck-sizing or full-length sizing (as you prefer). An arbor press can handle neck-sizing. But if you plan to do full-length sizing, you’ll need to bring a press that can handle case-sizing chores. Such a press need not be large or heavy. Many benchresters use the small but sturdy RCBS Partner Press, an “O-Design” that costs about $79.00. You may even get by with the more basic Lee Precision Compact Reloading Press, shown in Zediker’s article. This little Lee press, Lee product #90045, retails for under $30.00.

August 23rd, 2014
Are you a gun-loving number cruncher? Then you need to read a new Shooting Industry Magazine Report. This report, filled with reams of hard data from the past two decades, reveals the state of the gun-making industry. You may be stunned to see how firearm production has skyrocketed in the past few years. In fact, total U.S. firearm production rose to 8,872,456 units in 2012, compared to 6,351,479 in 2011. That’s a 39.7% increase. SEE MORE STATS.

U.S. Gun-Makers Set Production Records
The top three firearm manufacturers all increased production substantially in 2012 compared to 2011, setting new production records. In 2012, the #1 American gun-maker, Ruger, boosted production 48% over 2011 levels. The #2 company, Remington Arms, raised production 13% in 2012, while #3 Smith and Wesson increased production 31% in 2012 compared to the year before. What’s more, in 2012, each one of these three U.S. manufacturers built more than a million firearms. That’s an historic first according to Shooting Industry Magazine.
More Guns = Higher Demand for Ammo and Reloading Components
If you have been wondering “Where did all the powder and .22 LR ammo go?”, take a good look at the chart above. There has been an enormous boost in production in recent years. Unquestionably, many of the buyers of all those new guns are looking for ammo to shoot. This helps explain why ammo and reloading components are in short supply.
Gun Sales Are Below Record 2013 Levels, But Are Still Very High
Gun sales peaked in 2013, and there has been a slow-down in 2014. However, it does look like 2014 sales will outpace 2012. The Shooting Industry Magazine report declares: “During May 2014, NICS conducted 877,655 (NSSF-adjusted) background checks. While this was a 9.9% decrease, compared to May 2013, it was the second highest May in NICS history. More importantly, it was a 4% increase over May 2012. This trend — a decrease in background checks compared to 2013, but an increase compared to 2012 — is reflected in the early months of 2014.”
Report Tip from EdLongrange. We welcome reader submissions.
August 8th, 2014

Story based on report by Lars Dalseide for NRABlog.com
You could say shooting is in her blood. Raised in a home where national titles were about as regular as Johnny Carson on late night, it was only a matter of time until Michelle Gallagher won a National NRA Rifle title of her own. Or, as is the case this year, a fourth National NRA Long Range Rifle Championship.
“I started shooting when I was about 7,” Gallagher explained. “Mom was taking me and Sherri (her sister) to the range ever since we were little kids. “
As with most shooters, it all started with smallbore. Working on stance, trigger control, and reading the wind, the light rifle fulfilled every shooting desire until an international match in New Zealand for the Palma World Championships. “I saw those Palma team jackets and that was it. I wanted one of those jackets. So we went home and Mid (her stepfather Middleton Tompkins) built me a Palma gun.”
Michelle Gallagher with Tompkins Trophy for the NRA Long Range High Power Rifle Championship.

Though the desire for a jacket was strong, the switch from smallbore to high power didn’t come without complications. In fact, Gallagher admits to shooting with her eyes closed for the first six months.
“It was such a big kick.”
Soon the kick wasn’t so big. Using the skills she acquired in smallbore, Gallagher rose through the ranks until winning her first NRA Long Range High Power Rifle title three years later. With two more championships under her belt, she ultimately achieved her initial High Power goal in 2007 with a spot on the United States International Palma team.
Jacket and all.
Preparing for the NRA Rifle Championships
Gallagher doesn’t shoot much of the sling rifle these days. In fact, the last time she wrapped said sling around her left arm and sent a few shots 1000 yards down range was the 2013 NRA Long Range High Power Championships. Which begs the question — how did she manage to win without any practice?
“I’ve been shooting F-Class.”
Now how does shooting on a bipod make you a better sling rifle shooter?
“You have to take the targets into consideration,” she began. “On F-Class targets the 10 ring is [the size of the High Power] X-Ring. So the wind calls have to be spot on, there’s not as big a cushion as you get with sling rifles. And I think that helps a lot.”
Another part of Gallagher’s preparation that helps a lot is her relationship with her parents. World class shooters on their own, their status has changed from mentors to peers. An odd situation at first, the family eventually found a way to make it work.
“They still help me a lot, but they ask for my advice as well. They taught me a great deal and I’ve tweaked that with my own experience. Now we’re building off of each other rather than just me asking for advice.”
Michelle (right) gets advice from mother Nancy Tompkins (left) while SSG Brandon Green looks on.

Rediscovering her NRA Long Range stride 13 years after her last win means Michelle is likely to stick around the sling rifle arena for a little while longer. The thrill of the NRA Championships still puts a twinkle in her eye: “There’s just something about shooting here at Camp Perry … It’s just special.”
August 4th, 2014
 Shiny brass — it may not shoot more accurately, but it does make you feel better about your hand-loaded ammo. While it’s not necessary to get brass “bright and shiny” after every firing, it is a good idea to clean powder residue, grime, and grit off your brass before you run cases into sizing dies. There are many ways to clean cartridge cases. A quick wipe with solvent on a patch may suffice for recently-shot cases. Older brass with baked-on carbon may require lengthy tumbling. Ultrasonic cleaning is another popular option that gets your brass clean inside and out. Shiny brass — it may not shoot more accurately, but it does make you feel better about your hand-loaded ammo. While it’s not necessary to get brass “bright and shiny” after every firing, it is a good idea to clean powder residue, grime, and grit off your brass before you run cases into sizing dies. There are many ways to clean cartridge cases. A quick wipe with solvent on a patch may suffice for recently-shot cases. Older brass with baked-on carbon may require lengthy tumbling. Ultrasonic cleaning is another popular option that gets your brass clean inside and out.
Sinclair International has a series of helpful videos on brass cleaning. These short “how-to” videos, hosted by Bill Gravatt, Sinclair’s past President, cover the various processes you can use — tumbling, ultrasonic cleaning, chemical cleaning, and cleaning by hand.
Video ONE — Cleaning Brass in Vibratory or Rotary Tumbler
TIP: Brass that has recently been shot will clean more easily than brass that has been sitting many days or weeks. If your tumbling media is fresh the job should be done in an hour or less. It’s your choice whether to tumble with primers removed or with primers still in the cases. If you choose to tumble with primers out, we suggest you deprime with a depriming die, rather that put dirty brass into your sizing die. Some people like to add a teaspoon of liquid polish to the media. This does work, cutting tumble time, and making your brass more shiny. However, if you add liquid polish, do that BEFORE you add the brass and let the tumbler run for a 15 minutes to get the polish completely mixed into the media. Otherwise you can else up with gooey gunk inside your cases — a very bad thing.
Video TWO — Ulstrasonic Case Cleaning
TIP: There are many different types of solutions you can use. Soapy water suffices for some folks, particularly if you add a little Lemi-Shine. The Hornady and Lyman solutions work well, and can be used multiple times, provided you strain the solution to remove dirt and grit after cleaning sessions. Many ultrasonic cleaning machines have timers. Experiment with dwell time to see how long you need to immerse your brass. A very small amount of Ballistol in the solution will help lubricate your necks on the inside. This can make bullet seating go more smoothly, with more consistent neck tension.
Video THREE — Chemical Cleaners (Soaking without Ultrasound)
TIP: After using chemical cleaners, such as the Iosso solution, you need to water-rinse your brass thoroughly. A kitchen strainer helps with this (see video at 0:20). Also, don’t forget your brass in the chemical solution — follow the manufacturers recommendations and don’t exceed the recommended dwell time. Chemical cleaners work surprisingly well to remove grease and grime, and the solution can be re-used multiple times. However, if you want your cases to look bright and shiny (like new brass), you will probably have to tumble.
Video FOUR — Manual Cleaning (By Hand)
TIP: Keep some oversize patches in your range kit. At the end of your shooting sessions, wipe off your fired brass with a patch dampened with a mild, non-corrosive solvent (once again Ballistol works well). Before the carbon sets up on your brass it is very easy to remove. For tougher jobs, you can use 0000 Steel Wool (as Bill recommends in the video). You may find that timely hand-cleaning lets you avoid tumbling altogether — or you may choose to tumble (or ultra-sound) your brass only after a half-dozen or so firings.
August 2nd, 2014
 Brux Barrels, based in Lodi, Wisconsin, has earned a reputation for producing great-shooting tubes. Brux-made barrels have won their fair share of matches, and set some notable records in the process. Last year, Rodney Wagner shot the smallest five-shot, 600-yard group (.0349″) in the history of rifle competition, using a Brux barrel chambered for the 6mm Dasher. Brux Barrels, based in Lodi, Wisconsin, has earned a reputation for producing great-shooting tubes. Brux-made barrels have won their fair share of matches, and set some notable records in the process. Last year, Rodney Wagner shot the smallest five-shot, 600-yard group (.0349″) in the history of rifle competition, using a Brux barrel chambered for the 6mm Dasher.
Folks often ask us why Brux barrels shoot so well. “What’s the secret?” they ask. We can only answer with what Brux explains on its own website: “To make a cut-rifled barrel you have to start off with the proper ingredients: the best steel available, skill, and experience. Since there are really only two main suppliers of barrel-quality steel, the skill and experience is what really makes a barrel maker stand out.” Here is how Brux’s co-owners, Norman Brux and Ken Liebetrau, explain all the procedures involved in making a Brux cut-rifled barrel:
| Brux Barrel-Making Process, Start to Finish
We start out with either 4150 chrome-moly or 416R stainless steel double stress-relieved bar stock. The bar stock starts out at 1-9/32″ in diameter and 20-24 feet long so we cut it to length.
Step two is to rough-contour the outside of the barrel blank in a lathe.
Thirdly, the blank gets mounted into a Barnes gun drill. The cutter bit has holes through which oil or coolant is injected under pressure to allow the evacuation of chips formed during the cutting process. This is called “oil-through” or “coolant-through”. Without this, you wouldn’t want to even attempt drilling a hole 30” long and under ¼” in diameter. The combination of a 3600rpm and good flushing allows us to drill a beautifully straight and centered hole .005” under “land” diameter at a rate of 1” per minute.
Clean the barrel.
Next the blank is sent back to the lathe to machine the finished contour of the outside.
Clean the barrel again.
Now, the blank is sent on to the Pratt & Whitney reamer in which an “oil through” reaming tool is used to cut away the extra .005” left in the drilling process. The reamer makes an extremely accurate bore size and after it is finished the bore will have a better surface finish and will be at the proper “land” diameter.
Clean the barrel again.
In the sixth step we hand lap each barrel to remove any slight tool marks that may have been left by the reamer and inspect every one with a bore scope. If the barrel doesn’t meet our standards for surface finish and tolerance it doesn’t get any further.
Clean the barrel again.
The barrels then go onto the rifling machine which is responsible for cutting the all so familiar grooves in the bore. A caliber/land configuration-specific rifling head is used to progressively shave away small amounts of steel to form the rifling grooves. This is accomplished by simultaneously pulling the rifling head through the reamed blank as the blank is spun at a controlled rate. After each cut, the blank is rotated 90 degrees (for a four-land configuration) and after one full rotation (360 degrees) the rifling head is slightly raised to shave off the next bit of material. This process is repeated until we reach groove diameter.
Clean the barrel again.
Lastly, the barrel is hand-lapped again (to ensure a smooth bore), and a final inspection is performed with the bore scope.
The barrel is cleaned one last time, wrapped, packed, and shipped to [the customer]. |
Anyone reading this detailed description of the Brux barrel-making process will doubtless come away with a new appreciation for the time, effort, and dedication required to produce a premium match-grade cut-rifled barrel. Obviously, there are no easy shortcuts and great attention to detail is required each step of the way. As shooters we’re lucky that we have barrel-makers so dedicated to their craft.
Credit James Mock for steering us to this Barrel Making 101 feature on the Brux website.
July 30th, 2014
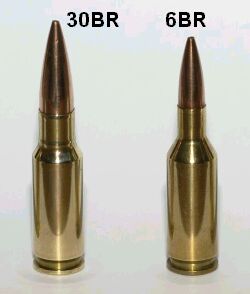 The 30BR is an amazing little cartridge. However, 30BR shooters do have to neck-up 6mmBR brass and then deal with some issues that can arise from the expansion process. One of our Forum members was concerned about the donut that can form at the new (expanded) neck-shoulder junction. Respected bullet-maker Randy Robinett offers tips on how to deal with the “dreaded donut”. The 30BR is an amazing little cartridge. However, 30BR shooters do have to neck-up 6mmBR brass and then deal with some issues that can arise from the expansion process. One of our Forum members was concerned about the donut that can form at the new (expanded) neck-shoulder junction. Respected bullet-maker Randy Robinett offers tips on how to deal with the “dreaded donut”.
The Forum member was concerned about thinning the brass if he turned his 30BR necks after expansion: “Everything I have found on 30BR case-forming says to simply turn off the bulge at the base of the neck caused by the old 6BR shoulder. I expanded my first case and measured the neck at 0.329″ except on the donut, where it measures 0.335″. Looking inside the case… reveals a groove inside the case under the donut. Now, it is a fact that when I turn that neck and remove the donut, the groove is still going to be there on the inside? That means there is now a thin-spot ring at the base of the neck that is .005 thinner than the rest of the neck. Has anyone experienced a neck cracking on this ring?”
Randy Robinett, who runs BIB Bullet Co., is one of the “founding fathers” of the 30BR who help prove and popularize the 30 BR for benchrest score shooting. Randy offers this advice on 30BR case-forming:
While the thinner neck-base was one of our original concerns, unless one cuts too deeply INTO the shoulder, it is not a problem. For my original 30BR chamber, thirty (30) cases were used to fire 6,400 rounds through the barrel. The cases were never annealed, yet there were ZERO case failures, neck separations, or splits. The case-necks were turned for a loaded-round neck diameter of .328″, and, from the beginning, sized with a .324″ neck-bushing.
The best method for avoiding the ‘bulge’ is to fire-form prior to neck-turning (several methods are successfully employed). Cutting too deeply into the shoulder can result in case-neck separations. I have witnessed this, but, with several barrels and thousands to shots fired, have not [personally] experienced it. The last registered BR event fired using that original barrel produced a 500-27x score and a second-place finish. [That’s] not bad for 6K plus shots, at something over 200 firings per case.
Check out the 30BR Cartridge Guide on AccurateShooter.com
You’ll find more information on 30BR Case-forming in our 30 BR Cartridge Guide. Here’s a short excerpt from that page — some tips provided by benchrest for score and HBR shooter Al Nyhus:
30BR Case-Forming Procedure by Al Nyhus
The 30BR cartridge is formed by necking-up 6BR or 7BR brass. You can do this in multiple stages or in one pass. Most of the top shooters prefer the single-pass method. You can use either an expander mandrel (like Joe Entrekin does), or a tapered button in a regular dies. Personally, I use a Redding tapered expander button, part number 16307. This expands the necks from 6mm to .30 cal in one pass. It works well as long as you lube the mandrel and the inside of the necks. I’ve also used the Sinclair expander body with a succession of larger mandrels, but this is a lot more work and the necks stay straighter with the Redding tapered button. This button can be used in any Redding die that has a large enough inside diameter to accept the BR case without any case-to-die contact.
Don’t be concerned about how straight the necks are before firing them the first time. When you whap them with around 50,000 psi, they will straighten out just fine! I recommend not seating the bullets into the lands for the first firing, provided there is an adequate light crush-fit of the case in the chamber. The Lapua cases will shorten from approx. 1.550″ to around 1.520″ after being necked up to 30-caliber I trim to 1.500″ with the (suggested) 1.520 length chambers. I don’t deburr the flash holes or uniform the primer pockets until after the first firing. I use a Ron Hoehn flash hole deburring tool that indexes on the primer pocket, not through the case mouth. — Al Nyhus
|


