|
|
October 19th, 2008
Is an FFL required to ship a long gun out of state? Can you use the U.S. Mail to ship firearms? Can you ship guns directly to a manufacturer for repairs?
Answers to these and many other questions are provided in the Firearms Shipping Guide created by Gunbroker.com, the leading online firearms auction site. The article does a decent job summarizing applicable Federal law and includes handy links to the statutes themselves so you can read them word for word.

We find that folks are often confused between the rules for handguns and long guns. Handguns may NEVER be shipped through the U.S. Mails unless you are an FFL holder. By contrast, a “civilian” (i.e. non license-holder) CAN ship a rifle or shotgun via the U.S. Postal Service. In fact the USPS may be the most economical and reliable shipping choice for long guns these days.
Another common misconception is that you need the services of an FFL for outbound shipping of a firearm. While placing your outbound shipment in the hands of an FFL-holder can have some benefits, if the recipient is a valid Federal FFL, and you have received a copy of his license for verification, you CAN ship a long gun yourself to the address on the license. You can also ship a handgun directly to an FFL holder (or the manufacture for repair), but you must use a common carrier such as FEDEX or UPS. (Only a licensed manufacturer, dealer, or importer can legally ship a handgun via the US Post Office.)

| 48″ MidwayUSA ‘Quick Ship’ Box, #897166, $15.99. A foam-lined double-cardboard box offers some protection for your firearm. But we recommend you put valuable pistols and long guns in a sturdy plastic or metal hard case, INSIDE a cardboard shipping container. Make sure the contents can’t move around inside the box. Always insure for full replacement value (including tax and transfer fees). Photograph the gun BEFORE it’s shipped so you can document its original condition should it arrived damaged. |
October 16th, 2008
Confused about the meaning of a term such as “meplat”, “magnaflux” or “obturate”? Need to know the OAL of an unusual Wildcat such as the .218 Donaldson Wasp? Well CCI and MidwayUSA offer handy answers on the web. CCI’s Shooters’ Glossary is a very complete collection of gun-related and reloading terms. MidwayUSA’s GunTEC Dictionary contains short descriptions of hundreds of cartridges, plus definitions of thousands of shooting-related words and phrases. How many of you knew that “Maggie’s Drawers” is “a colloquial term used for the red flag once used by pit workers to signal a missed shot at high-power rifle competitions”?

Consulting the dictionary, we learned that “Magnus Force” was not a Tom Selleck TV show. Rather, “Magnus Force is the movement of a bullet in the direction it is rotating (and downward) due to the lower air pressure surrounding it. The low pressure pocket is caused by the effect of the bullet’s fast rotation on the surrounding air.” MidwayUSA’s GunTEC dictionary even includes short “bios” of notable firearms inventors and marksmen, including J.M. Browning, Fredrich von Martini, and Peter Paul Mauser. A serious shooting buff could spend hours browsing the GunTEC dictionary, learning new facts (and a ton of obscure trivia.)
October 11th, 2008
Right now the NBRSA 100-Yard/200-Yard Nationals is wrapping up. Tony Boyer and other legends will be hauling away trophies, but some newcomers also did very well in very challenging (and windy) conditions. If you’re interested in learning more about the most accurate form of shooting, Benchrest Hall of Famer Speedy Gonzalez has prepared a comprehensive Guide to Benchrest Competition. It covers all aspects of the game: gear selection (hardware), reloading methods and tools, plus shooting skills and strategies. All of this is available on the web for free, thanks to Speedy and the Swedish Benchrest Shooters Assn. (SWBSA). CLICK HERE to read Speedy’s very complete BR Guide.

Speedy’s article is a gold-mine of info on shooting components and specialized reloading tools. It is also richly illustrated with high-quality photos showing gun components and reloading gear. Many of the photos show tools that have been sectioned so you can view the internals.


Speedy also discusses bullet design, and load tuning. There is a very informative section on Time Management and Target Management that will benefit all competitive shooters, no matter what their discipline.
October 4th, 2008
Cooper Firearms and the 20 VarTarg cartridge are featured in Varmint Hunter Magazine, a publication of the Varmint Hunters Association (VHA). Author Thomas Tabor recounts the fascinating history of Dan Cooper’s successful Montana-based company. Tabor then field-tests a Cooper Model 21 Montana Varminter chambered in 20 VarTarg.
CLICK HERE to Download Cooper Firearms 20 VarTarg Story (.PDF File)

The 20 VarTarg is based on the 221 Fireball case necked-down to 20 caliber. Invented in 1995 by Todd Kindler (of Small Caliber News), the VarTarg is an accurate and ultra-efficient cartridge. With just 18-19 grains of powder the VarTarg can drive a 32gr bullet at 3750 fps.
Tabor explains the simple procedure for forming 20 VarTarg cases and compares the VarTarg to other popular 20 caliber cartridges. He notes that “the popularity of the 20 VarTarg is growing dramatically, particularly with both varmint hunters and [small caliber] target shooters. While the .204 Ruger offers about 200 fps higher velocity, Tabor argues that: “the 20 VarTarg is a superior cartridge in some ways to the 204 Ruger… based on the fact that the VarTarg is considerably more efficient.”
 Tabor visited the varmint fields to give the 20 VarTarg Cooper a real-world test: “As was expected, the 20 VarTarg was an exceptional performer on ground squirrels. Out to 250 yards both the cartridge and rifle were deadly accurate.” Tabor was impressed by the little VarTarg. He found that the VarTarg rivaled the larger .204 Ruger, while being kinder to barrels since the VarTarg burns much less powder.
Overall, this article is a “must-read” for all Cooper Firearms fans. There are many interesting anecdotes about the early years of the company, and the author provides a wealth of useful info for anyone thinking about buying or building a 20-caliber varmint rifle.
Photos © 2008 VHA, All Rights Reserved
August 30th, 2008
One of the great things about our Shooters’ Forum is that many uniquely talented shooters share their knowledge and test findings. One of those experts is “bsl135″ aka Bryan Litz. Bryan is no ordinary “weekend warrior”. He graduated from Penn State with a degree in Aerospace Engineering. He then began a career as a missile design engineer at Wright-Patterson Air Force Base. He has written many ballistics programs and technical papers dealing with long-range flight dynamics of projectiles. Bryan is also a superb long-range shooter, holding an NRA High Master Classification. At this year’s NRA National Championships at Camp Perry, Bryan beat 258 other competitors to win the Palma Individual Trophy Match. Bryan shot a remarkable 450/26x, not dropping a single point.
Breaking News: Just today, Bryan won the Ohio State Midrange Championship, an iron sights event with 15 shots each at 300, 500, and 600 yards. Bryan shot a spectacular 450/39X. Again, Bryan didn’t drop a point and his X-count would make this a new National Record, pending certification. Congrats Bryan!

Bryan also has his own website with a number of authoritative articles. Topics include: Bullet Design, Meplat Trimming, Gyroscopic and Coreolis Drift, Palma Bullet Analysis, How Ballistics Programs Work, and Ballistic Coefficient Testing. CLICK HERE to visit BRYAN LITZ Website.
7mm Bullet BC Testing — Evaluating the Numbers
Bryan does a lot of testing for bullet-makers, evaluating the performance of various bullet types. One thing he has observed is that manufacturers’ published BCs may vary considerably even for two bullet designs that appear to be nearly identical. In our Forum, Bryan offered this interesting analysis of the 7mm Berger 180gr VLD and the similar 7mm JLK 180gr VLD:
“I’ve developed a repeatable procedure for test firing bullets to determine ballistic coefficient. If you get Precision Shooting Magazine, the March issue has one of my articles about test firing the Berger .30 cal 155gr VLD. Long story short, my test procedure uses acoustic sensors in 200-yard increments to measure time of flight out to 600 or 1000 yards. My BC measurements are repeatable to within +/- 2%, usually within +/- 1%.
I have tested several 7mm bullets. Of particular interest are the Berger 180gr and JLK 180gr bullets. If you look at these bullets side by side, it’s hard to tell a difference between them. I believe the JLK bullet dies were made from the same set of prints as the Berger VLD (Design by Bill Davis of Tioga Engineering). So … why would these bullets have different [published] BCs? They’re the same weight and the same basic shape [with very minor differences in OAL and bearing surface length]. This is just the kind of smoke and mirrors that makes shooters think there is something mysterious about BCs and exterior ballistics that’s beyond the realm of human understanding. I was pleased with the results of my testing of these two bullets: the BC is virtually the same, as expected. All is right with the world.”


Drag Models — G7 is better than G1 for long-range Bullets
Most ballistics programs use the default G1 drag model. Bryan believes the G7 standard is preferrable for long-range, low-drag bullets: “Part of the reason there is so much ‘slop’ in advertised BCs is because they’re referenced to the G1 standard which is very speed sensitive. The G7 standard is more appropriate for long range bullets. Here are the results of my testing for these two bullets:
G1 BCs, averaged between 1500 fps and 3000 fps:
Berger 180 VLD: 0.659 lb/in²
JLK 180: 0.645 lb/in²
The reason the BC for the JLK is less is mostly because the meplat was significantly larger on the particular lot that I tested (0.075″ vs 0.059″; see attached drawings).
For bullets like these, it’s much better to use the G7 standard. The following BCs are referenced to the G7 standard, and are constant for all speeds.
G7 BCs:
Berger 180 VLD: 0.337 lb/in²
JLK 180: 0.330 lb/in²
Many modern ballistics programs, including the free online JBM ballistics program, are able to use BCs referenced to G7 standards. When available, these BCs are more appropriate for long range bullets.”
[Editor’s NOTE: BCs are normally reported simply as an 0.XXX number. The lb/in² tag applies to all BCs, but is commonly left off for simplicity.]
Effect of Bullet Pointing
Bryan has also tested the effect of pointing bullets. He’s determined that this does have a positive (if small) effect on ballistics. Bryan writes: “I have measured the Berger 180 VLD in both nominal and pointed meplat configurations. Pointing the meplat from 0.059″ to 0.039″ increases the G7 BC from 0.337 lb/in² to 0.344 lb/in². This results in less than 2″ difference in 1000-yard wind drift (10 mph 90°). The improvement is small, perhaps negligible for standard decimal prone targets with large scoring rings. The improvement is more significant for F-Class targets with smaller scoring rings. That being said, I do point my own Berger 180 VLDs that I shoot in prone competition. It’s fast, easy, doesn’t hurt anything, and every little bit helps.”
August 23rd, 2008
The NRA’s American Rifleman Online website has an excellent article this month that shows how to construct a rock-solid Reloading Bench. There are plenty of photos, and a detailed set of Bench Blueprints showing all dimensions and listing all needed materials. This bench is very well designed, with many deluxe features, such as an upper drawer with fitted slots for die boxes, and large lower drawers with 100-lb rated slides to store heavy materials or tools. If you have good wood-working skills this would be an excellent project for the fall or winter (but if you’ve never done anything but assemble IKEA furniture, you may want to stick to a simpler design).

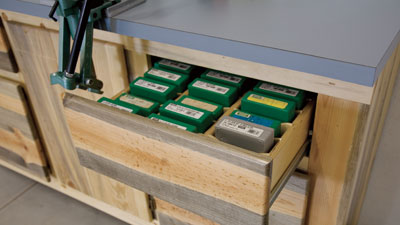
The author, Dave Campbell, offers good advice on building the bench top: “I ripped a sheet of 3/4″ AC plywood into two 24″ wide pieces and cut them to 72″ long. Then I glued them together to form a 72″ long, 1 1/24″ thick top. The trick here is to keep the edges smooth and flat so that the laminate will adhere properly and without voids. I chose a light grey laminate finish for the top because it’s easier to see what I am working on and keep clean. If you have never worked with laminate, remember it’s prudent to glue and rout the edges flush before gluing on the top. The top was attached to the carcass with eight steel L-shaped angle brackets and No. 10×1 1/4″ wood screws.”
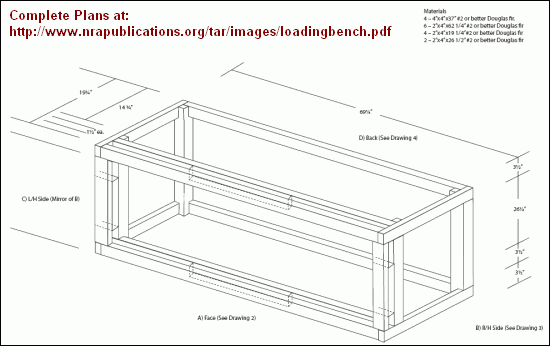
Photos Copyright © 2008 The National Rifle Association, used by permission
August 10th, 2008
New visitors to this site may not be familiar with our AccurateShooter BLOG. If you like our Daily Bulletin, you’ll also enjoy the monthly BLOG. While the Bulletin has been running for about 18 months, our regular BLOG goes back to April 2005. You’ll find many interesting features and Tech Tips in the “back issues” of the BLOG. The four or five most recent editions of the BLOG are collected on our BLOG ARCHIVE Page. From there you can click links to access older months, all the way to April 2005. You’ll find a search button so you can find past BLOG articles by topic or keyword.
Be forewarned–there’s lots of good reading material in our Blog Archive–you could easily spend an entire day reading the mini gear reviews, reloading tips, and test reports. In January 2006, for example, you’ll find an interesting Barrel Length Test we commissioned. We started with a 33″ 6BR barrel and then cut it down to 28″ in one-inch increments, measuring the velocity at each length on Jackie Schmidt’s railgun. The results may surprise you.

July 31st, 2008
 A quality borescope is a pricey tool, but once you have the opportunity to use one, it is hard to imagine how you ever did without it. Rifle Shooter magazine has an excellent article about using a Gradient Lens Corp. HawkEye BoreScope.
In this feature, What the Eye Can See, writer Terry Wieland explains how to inspect for defects in new barrels, how to recognize different kinds of fouling (in both barrels and brass), and how to spot throat erosion in its early stages. The current generation of HawkEyes can be attached to a still or video camera to record digital images of your bore. The most interesting part of the article is on the second page. There, author Wieland provides photos of various types of internal flaws that can appear in barrels. This will help you spot pitting, excessive land wear, rust damage, and damage from corrosive primers.

Wieland also explains that BoreScopes aren’t just for barrels: “The borescope has other uses as well. It can be used to examine the interior of a cartridge case to look for the beginnings of a case separation or to examine the interior of a loading die that is giving you trouble. When you consider the number of tubular objects that play such an important role in rifle shooting, it is a wonder we were ever able to function without such a method of studying bores.”
July 14th, 2008
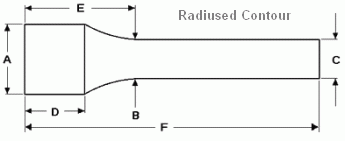
 Are you re-barreling a BR rifle and need to know if you will still make weight? Or perhaps you are trying to select the right contour to hit an optimal carry weight for a new varmint rifle? Dan Lilja offers FREE software that will calculate barrel weight for straight contour, straight taper, and radius-tapered barrels. Dan’s software even calculates how fluting alters barrel weight.
For general info on barrel weight calculation for straight and straight tapers, read this article on Lilja’s website. Click HERE for another article explaining weight calculation with barrels that have a radiused (curved) contour section.
Here are the free software programs offered by Dan Lilja. Right click and “Save As”:
Straight Contour (.exe file) | Straight Contour (Excel file)
Contoured Barrels with Radius (Excel file)
June 9th, 2008
 Successful marksmanship is the product of a complex system, part biological (the shooter), and part mechanical (the rifle). Too often, in our fascination with things mechanical, we forget the human, physical side of the sport. The March edition of the CMP’s “The Mark” newsletter features an excellent article by Amber Darland on physical training for shooters. Darland, a certified Personal Trainer, is also a top-level competitive shooter. A U.S. Olympic Team alternate, she was on the American World Championship Team in 2002, and was a member of the Univ. of Alaska NCAA Rifle Team, which won four National Championships while she was there.
Garland says shooters should be involved in three kinds of exercise to improve their physical conditioning: 1) Aerobic Exercise to strengthen the cardiovascular system; 2) Anaerobic Exercise (such as weight lifting) to build muscle strength and stamina; and 3) Flexibility exercises.
 Strength Training
Garland notes that strength training helps in many ways: “Weight training also increases your kinesthetic connections and awareness (your ability to notice internal changes in muscle position and
tension). The more you utilize your brain-to-muscle connections, the more you will be able to tap into them to correct positional errors and normal, day-to-day changes in muscle tension.”
Improving Flexibility is Key
Garland stresses that flexibility training can be very helpful, even for older, F-Class or Benchrest shooters: “Of all aspects of fitness, [flexibility] is probably the most utilized by shooting athletes, though not consistently in most cases. Flexibility is important for several reasons including injury prevention and positional consistency. The more pliable and flexible your joint capsules, the more readily they will handle unanticipated stress. An athlete who performs flexibility work on a regular basis will have pliable, supple, relaxed muscles that are not bound by constant tensions and immobility.”
CLICK HERE to Read Full Article (.pdf Download, p. 17)
|


