|
|
June 5th, 2008

Sierra Bullets offers a vast, FREE online library, derived from the 4th and 5th Editions of The Sierra Loading Manual. On Sierra’s ExteriorBallistics.com website, you’ll fine dozens of technical articles, plus useful reference charts for powder burn rates, bullet BCs, and measurement conversions. There’s even a comprehensive Glossary of Shooting Terminology. Overall, ExteriorBallistics.com offers hundreds of pages of great, FREE information.

Tech articles from Sierra’s 5th Ed. Manual that are available online include:
Section 2-2.1 The Ballistic Coefficient Explained
Section 2.3 How the Ballistic Coefficient is Measured
Section 2.3.2 Initial Velocity and Time of Flight Method
Section 2.3.3 Doppler Radar Method
Section 2.4 Lessons Learned from Ballistic Coefficient Testing
Section 3.0 Exterior Ballistic Effects on Bullet Flight
Section 3.1 Effects of Altitude and Atmospheric Conditions
Section 3.2 Effects of Wind
Section 3.3 Effects of Shooting Uphill or Downhill
Section 3.4-3.4.1 Trajectory Considerations for Sighting-In
Section 3.4.2 Determining Zero Range from Firing Test
Section 3.4.3 Sighting in for a Change in Shooting Location
Section 3.5 Point Blank Range
Section 4.2 Yaw of Repose and Resulting Crossrange Deflection
and much, much more….
In addition to the ballistics articles listed above, ExteriorBallistics.com offers a detailed Reloading Section covering equipment and loading methods. Some of the more useful reloading articles include:
Scale and Measures
Case Inspection
Neck- and Full-length Sizing
Bullet Seating.
May 30th, 2008
Many of our readers enjoy classic military rifles as well as precision BR rigs and varmint rifles. Now through June 30th, MidwayUSA has Boyd’s M1 Garand replacement stocks on sale for just $89.99, marked down from $104.99 (item 107223). Boyd’s Garand stocks are fully-inletted and crafted from quality American Walnut. Very slight trimming and sanding may be required, but otherwise this is a “drop-in” stock.

There is a superb article by Jamie Magnum on SurplusRifle.com that explains how to install a Boyd’s Walnut stock on your Garand. The author provides complete step-by-step instructions showing how to remove the old stock, and attach the new stock. Through a series of 75 photos, the article covers every aspect of the job, including inletting, and making sure all the metal connectors are attached properly.

CLICK HERE for Downlodable .PDF version of Garand Article.
SurplusRifle.com is an online service of Tennessee Gun Parts, Covington, TN, 1-866-472-4986.
May 24th, 2008
If you haven’t been checking our Home Page regularly, you may have missed our recently-released article about Online Auctions and Forum Classifieds. This guide explains how you can sell rifles, reloading gear, and shooting accessories on the internet, via Forum Classifieds as well as firearms auction sites such as GunBroker.com and Auction Arms.

In a comparison chart, we provide the listing costs and auction fees for the big sites so you can clearly understand how much an auction or advert will cost BEFORE you post. You’ll also find helpful tips on how to price your sale items and how to write your “ad copy” to get the best results.
 The article stresses the importance of photography in auction and classifieds listings.
If you have a big-ticket item that you want to sell fast, you’ll need sharp, quality photos, and plenty of them. We explain how to take better photos for your listings and how to resize them to fit the online formats.
Lastly, the article covers current eBay policies. While eBay prohibits listings of firearms and “any firearm part that is required for the firing of a gun”, there are still many products you can sell on eBay successfully, such as gun stocks, reloading dies, and gun safes.
May 18th, 2008
The May 2008 issue of On The Mark, the CMP’s newsletter for junior shooters, has a feature by Gary Anderson on building the proper standing position. Though focused primarily on juniors, all 3P High Power, Service Rifle, and Silhouette shooters can benefit from this article.
CLICK HERE to Download Newsletter as .pdf file
Tips on Hand Position
Here is sample of Gary’s advice: “It is critical not to force the rifle up or down to get the sights pointing at the target. The correct way to do this is to select a left hand-wrist position that fills the support gap between the left hip and the rifle fore-end. A good mid-range starting position is to keep the wrist straight and either set the rifle on top of a closed fit or support the rifle between the thumb and the first knuckle.

Either of these options will work well for most shooters. However, shooters with proportionately longer arms and shorter torsos will have rifle sights pointing high with either of these hand positions. By breaking the wrist and resting the rifle in the flat of the hand or by keeping the wrist straight and dropping the rifle down into the fork of the hand they should be able to comfortably bring the sights down to the target.
Conversely, shooters with proportionately shorter arms and longer torsos need a wrist-hand position that adds more length to the support column. They can achieve this by resting the rifle between the spit fingers and thumb, up on the second knuckles or, highest of all, on the thumb and fingertips.”


In his article, Anderson also explains how to correct the most common mistakes in the standing position:
“1. Incorrect body turn—too little or too much body turn makes it impossible to have a straight column of support under the rifle and upper body and difficult to balance[.]
2. Left elbow not under rifle—incorrect elbow positioning misaligns the column of support.
3. Left hip not under rifle—incorrect hip position misaligns the support column and makes good balance more difficult.
4. Butt too low in shoulder—when the head is tipped down too far to see through the sights comfortably, the butt must be raised in the shoulder and a higher left hand-wrist position must be selected.
5. Left arm not relaxed down onto side or hip—this means the rifle is being supported with muscles instead of bones—relax the arm down onto the side or hip and, if necessary, select a higher hand position.”
The May Issue of On The Mark contains many other useful articles, including a feature on Aerobic Fitness by 2003 Smallbore (3P) National Champion Amber Darland.
(Photos © Copyright 2008 CMP, used by permission.)
March 22nd, 2008
 On LongRangeHunting.com, you’ll find a good article about wind reading by Shawn Carlock. Shawn Carlock is a veteran law enforcement marksman and the current USPSA national precision rifle champion. Shawn offers good advice on how to estimate wind speeds and directions using a multitude of available indicators — not just your wind gauge: “Use anything at your disposal to accurately estimate the wind’s velocity. I keep and use a Kestrel for reading conditions….The Kestrel is very accurate but will only tell you what the conditions are where you are standing. I practice by looking at grass, brush, trees, dust, wind flags, mirage, rain, fog and anything else that will give me info on velocity and then estimate the speed.”

Shawn also explains how terrain features can cause vertical wind effects. A hunter positioned on a hilltop must account for bullet rise if there is a headwind blowing up the slope. Many shooters consider wind in only one plane — the horizontal. In fact wind has vertical components, both up and down. If you have ever piloted a small aircraft you know how important vertical wind vectors can be. Match shooters will also experience vertical rise when there is a strong tailwind blowing across an up-sloping berm ahead of the target emplacements. Overall, Shawn concludes: “The more time you spend studying the wind and its effect over varying terrain the more successful you will be as a long-range shooter and hunter.”
February 23rd, 2008

The current issue of The First Shot, the CMP’s online magazine, features a well-written article on Prone Shooting Technique by SPC Matthew Sigrist of the U.S. Army Marksmanship Unit (USAMU). The article covers all the major points of gun hold and body position: hand position, elbow position, stock weld, buttstock placement, and sling position/tension.

SPC Sigrist breaks down the prone position into “fundamentals” and explains how you put each element together to create a stable body position: “The fundamentals are the building blocks of a position. Much like the framework of a house, a correct application of the fundamentals ensures a solid and stable structure. Since each person’s position will depend on their particular body build and shape, there is no ‘perfect position’ that applies to everyone. Experience, practice and knowledge of the correct fundamentals will dictate the best position for you.”
SPC Sigrist also demonstrates the two basic variations of the leg position when shooting prone: open/spread legged, and bent-legged.


For any service rifle, highpower, cross-course, or prone shooter, this helpful article can improve your performance in the prone position.
February 18th, 2008
As we noted recently, the case of District of Columbia vs. Heller, is slated to be heard by the U.S. Supreme Court on March 18, 2008. This landmark case squarely presents the High Court with the question whether the Second Amendment of the U.S. Constitution affords an individual right to own firearms.
Along with many other interested organizations, the National Shooting Sports Foundation (NSSF) has filed a “friend of the court” Amicus Brief in the D.C. v. Heller case. The NSSF’s well-researched brief provides a fascinating history of the Second Amendment, explaining the factors which gave rise to its adoption. We recommend you read the brief and save it for future reference.
CLICK HERE to READ NSSF AMICUS BRIEF (.pdf format)

February 17th, 2008
If you shoot a 22-250, or are just interested in the history of the cartridge, Peterson’s RifleShooter Magazine offers a fascinating article by Terry Wieland. The author explains how the 22-250 was developed in the late 1930’s and was initially known as the 22-250 Varminter. In 1963 the round gained popularity when Browning chambered it in a production rifle — even before factory-loaded ammo was available. Then, in 1965, the round became “official” when Remington standardized the 22-250 with “Remington” added to the name. Remington produced 22-250 Rem ammo and sold Rem 700s chambered in the “new” cartridge.
Once Remington got involved, the round became hugely popular. According to Wieland: “Overnight, it seemed, the .22-250 established itself as the dominant high-velocity .22. Winchester had just discontinued the .220 Swift and replaced it with the oddball .225 Winchester, a rimmed cartridge that was gone in less than a decade. Everyone ignored the .225 while falling over themselves to chamber the .22-250.”

January 13th, 2008
Accurate, modular, and supremely versatile, the AR15 is America’s favorite semi-auto rifle. But let’s face it, the AR is a maintenance hog.
 There are various schools of thought when it comes to maintaining an AR. Some folks prefer to run their AR “dry” with minimal lube on the lugs and friction surfaces. Other shooters prefer to run their ARs “wet”, with lots of lube. But whatever your preference, you need to clean your AR regularly. And nothing is more important that the AR’s bolt/carrier assembly. Because it is involved in feeding, firing, and extracting, the AR-15 bolt/carrier assembly can be considered the most critical portion of the AR-15 system.
The editor of the Top Quark Blog has created an excellent illustrated AR15 Bolt Take-Down Guide that shows how to disassemble an AR15 bolt and carrier for regular cleaning. Even if you’re an experienced AR15 shooter, you can learn something from this page (sample at left), and you may want to bookmark it for future reference. The photos are large and clear and there are helpful hints for each step of the process.
The author knows his stuff and offers some important insights. For example, he notes that “Extractor springs in most AR15 bolt assemblies are fairly weak, and this can lead to various extraction-related failures. One of the few high points about Colt assemblies is their usage of higher-strength extractor springs. You can tell the difference by looking at the inner plastic insert. ‘Normal’ springs feature a blue plastic insert, Colt strong springs have a black insert.”
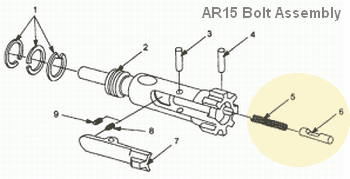
There is one notable oversight on this page — the author doesn’t cover disassembly and cleaning of the ejector assembly. This is actually quite important. A few small brass shavings, combined with carbon and lube in the ejector slot, WILL cause malfunctions. In fact, when this editor is called to diagnose problem ARs, the first things I look at (after swapping magazines) are the ejector recess and the slot for the extractor. Clogged ejectors are responsible for fail-to-ejects and other jams. It is essential that you keep the ejector hole clean. Old, gooey lube residues mixed with carbon and tiny brass shavings in the ejector recess will create all sorts of problems. As shown in the diagram below, it is simple to remove the ejector (#6) and ejector spring (#5), by drifting the ejector retaining pin (#4).
December 28th, 2007
The First Shot, the CMP’s Online magazine, has released a new article by Spc. Tyrel Cooper of the U.S. Army Marksmanship Unit (USAMU). In his article, Straight to the Rear, Spc. Cooper describes proper trigger hand and finger positions and how to best “break the shot”.
Cooper explains: “Trigger control is one of the two main principles of shooting that we teach. You can have the best position in the world with perfect sight alignment, but if you have bad trigger control, you have wasted all that effort that you put into your position and sight alignment.”

This well-written article will help anyone who shoots off-hand, or who uses an AR or Spacegun-type rifle with a vertical pistol grip. Here are some more tips:
“Good trigger control begins with a good firing hand position. Place your firing hand high on the pistol grip, with a good firm grip. Grip tension should be like giving someone a hand shake or holding a child’s hand while walking across a street. A good firm grip [helps you] move your trigger finger without moving your other fingers. Try this, hold out your firing hand with fingers extended; now try moving your trigger finger to the rear as if you were pulling the trigger. Unless you concentrate very hard on moving just your trigger finger, other fingers will move. Now make a fist as if you were grabbing a pistol grip, now you can move your trigger finger freely without introducing movement in the other fingers.”
“I’m sure you have heard advice to place the tip or the pad of your finger on the trigger. This is true if you have short stubby fingers and that’s where the index finger naturally rests, but if you have long fingers like myself you want more of your finger around the trigger…. By placing your finger where it naturally rests on the trigger you are ensuring that you are pulling the trigger straight to the rear, and this also allows you to get more leverage on the trigger.”
CLICK to READ FULL ARTICLE
|


