|
|
April 9th, 2026

Do you need to find an FFL for a firearms transfer in your local area? Or perhaps you are selling a gun and need it shipped to an FFL in another city or state. Thankfully, there are two good online resource that can, in a matter of seconds, provide a list of Federal Firearms License holders in the area you need. These web resources will even locate those FFLs on a map AND list the fees they typically charge for transfers.
Sportsman’s Guide FFL Finder
The first resource is the Sportsman’s Guide FFL LOOKUP Page. This online search tool is fast and easy to use. Simply enter a Zip Code and then select a radius (in miles) within which to find FFLs. Here is an example for Billings, Montana with Zip Code 59103. Note that the transfer fees are listed for the first three “In-Network” FFLs. Click on each FFL business name to get more details.

 Gunbroker FFL Finder Gunbroker FFL Finder
A good second resource is offered by GunBroker, the online gun trading/auction site. Gunbroker offers a handy online FFL Finder. This resource allows you to quickly find an FFL by zip code or state. Along with the FFL business name, this also lists fees. Click the “Map It” button to see a local map.
Gunbroker states: “Use our FFL Finder to locate FFL dealers in your area. You can search for FFL dealers by your zip code or by state. Use our FFL finder to get in touch with a local FFL dealer in order to complete your firearms purchase, or sign up to be part of our FFL Dealer Network.”
Shown below are the FFL Finder results for Billings, Montana and Zip Code 59103:

April 9th, 2026

How Krieger Builds Barrels
This video shows the process of cut-rifled barrel-making by Krieger Barrels, one of the world’s best barrel manufacturers. Krieger cut-rifled barrels have set numerous world records and are favored by many top shooters. The video show the huge, complex machines used — bore-drilling equipment and hydraulic riflers. You can also see how barrels are contoured, polished, and inspected.
For anyone interested in accurate rifles, this is absolutely a “must-watch” video. Watch blanks being cryogenically treated, then drilled and lathe-turned. Next comes the big stuff — the massive rifling machines that single-point-cut the rifling in a precise, time-consuming process. Following that you can see barrels being contoured, polished, and inspected (with air gauge and bore-scope). There is even a sequence showing chambers being cut.
Click Arrow to Watch Krieger Barrels Video:
Here is a time-line of the important barrel-making processes shown in the video. You may want to use the “Pause” button, or repeat some segments to get a better look at particular operations. The numbers on the left represent playback minutes and seconds.
Krieger Barrel-Making Processes Shown in Video:
00:24 – Cryogenic treatment of steel blanks
00:38 – Pre-contour Barrels on CNC lathe
01:14 – Drilling Barrels
01:28 – Finish Turning on CNC lathe
01:40 – Reaming
01:50 – Cut Rifling
02:12 – Hand Lapping
02:25 – Cut Rifling |
02:40 – Finish Lapping
02:55 – Outside Contour Inspection
03:10 – Engraving
03:22 – Polish
03:50 – Fluting
03:56 – Chambering
04:16 – Final Inspection |

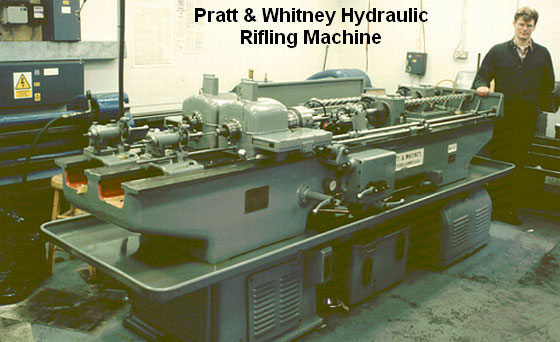
“At the start of World War Two, Pratt & Whitney developed a new, ‘B’ series of hydraulically-powered rifling machines, which were in fact two machines on the same bed. They weighed in at three tons and required the concrete floors now generally seen in workshops by this time. Very few of these hydraulic machines subsequently became available on the surplus market and now it is these machines which are sought after and used by barrel makers like John Krieger and ‘Boots’ Obermeyer. In fact, there are probably less of the ‘B’ series hydraulic riflers around today than of the older ‘Sine Bar’ universal riflers.” — Geoffrey Kolbe, Border Barrels.
April 9th, 2026

Most competitive shooters are pretty good about bore cleaning (some may even clean their bores too aggressively). However, we’ve found that many shooters neglect the chamber area and the bolt lug recesses. It’s too easy to clean the bore, slip out the guide rod and say “I’m done.” Sinclair Int’l explains why it’s important to clean the action interior: “Shooters use a lot of grease and oil on their bolts to reduce friction and to prevent wear[.] Unfortunately, both of these compounds attract grit, powder and primer residues. Cleaning your receiver is especially critical [with] custom actions where the fit between the action and bolt is held to very tight tolerances. Routine cleaning of the action will prevent unnecessary wear on the bolt body, locking lugs, and the action raceways/guide rails. Frequent action cleaning is also essential to keeping the trigger area free of debris which can cause trigger hang-ups and failures.”

Your rifle deserves a clean action and lug recesses. For action cleaning, our friend Danny Reever favors the PMA Action Cleaning Tool. This handy tool speeds up the cleaning process, letting you do a better job in less time. Danny reports: “I’ve been using the PMA Action Cleaning Tool Kit ($79.95) for quite some time. Previously, I used one of the old style (round knob) action-cleaning tools with cylindrical cotton rolls. I think the PMA Action Cleaning Tool Kit is easier to use, and possibly achieves better results. CLICK HERE to Read Full Tool Review.
Cleaning the Chamber
Combustion by-products, lubricants, and solvent residues can collect in your chamber. Severe build-up of grease and carbon can interfere with chambering. Also some solvents will promote corrosion. You need to keep your chambers clean.

1) Install a clean cotton mop of the correct size on the end of a chamber rod and insert the mop into the chamber. Rotate the mop several times to remove any brush bristles left behind and any excess solvent that was between the rod guide snout and the end of the chamber. Make sure the chamber is dry. Prior to storing a rifle you can oil the chamber but make sure the oil is removed prior to firing the rifle.
2) Alternatively, install an old bore brush on a chamber rod, overlap a couple of patches on the brush bristles, and wrap them around the brush completely. Then insert the patch-covered brush into the chamber while rotating it to remove the excess solvent and debris. Push it firmly into the neck area of the chamber. A similar method is to pierce a large patch on the end of the brush loop and insert it into the action, again rotating the brush as you push the patch up against the breech.
Cleaning the Lug Recess Area
The action lug recess area is one of the dirtiest places on a bolt-action rifle. To properly clean this area, always use a tool designed for the task, such as the $24.99 Sinclair Action Cleaning Tool (Brownells #749003115) which is part of the full Sinclair Action Cleaning Tool Kit ($48.99 at Brownells, #749004651).

1) Insert a cotton roll or cleaning felt into your lug recess cleaning tool and wet both ends and the face of the cotton roll/felt with solvent.
2) Insert the tool into the action and push it forward until it is positioned fully in the lug recess area and rotate the tool head several times. Then reverse the rotation for another few turns. While rotating the tool move it slightly in and out to cover the entire recess area and to also clean the breech face.
3) Remove the tool from the action and inspect the surface of the felt or cotton roll. If there is quite a bit of residue on both sides of the felt/roll, then repeat with another wet felt/roll.
4) When you feel the recess area is completely clean, insert a dry cotton roll into the tool and rotate the tool head to remove any remaining solvent and debris. If necessary, use a second dry cotton roll.
5) You can follow this step up with another pass of a mop or patches into the chamber to get any debris or solvent that pushed forward out of the lug recess area.
Cleaning Tips from The Sinclair Int’l Reloading Press, used courtesy Sinclair Int’l, All Rights Reserved.
April 7th, 2026

SUMMARY: Powder can have a very long shelf life. You need to watch for changes in smell and color. A reddish tinge, almost like rust on the powder, is a bad sign, as is a foul odor, not to be confused with a normal chemical smell. Either of these signs indicate it is time to dispose of your powder by means other than shooting.
Ever wondered about the stability of the propellants in your reloading room? There are some important things you should know about powder storage, to ensure consistent powder performance and safety. Western Powders (which has been acquired by Hodgdon) published an informative Q & A series entitled Dear Labby: Questions for our Ballistics Lab . Here are some excerpts that pertain to powder storage and shelf life. Worried that your powder may be too old? Western’s experts explain how to check your propellants for warning signs.
Proper Powder Storage
Q: I live in southern Arizona where it is very hot. I am told powders will become unstable if stored in an area not air-conditioned. My wife says no powder or primers in the house. Can powder be stored in a refrigerator? What about using a fireproof safe? I would appreciate your ideas. — M.C.
Lab Answer: SAAMI guidelines are pretty clear on issues of storage. They recommend storing smokeless powder in containers that will not allow pressure to build if the powder is ignited — ruling out gun safes and refrigerators.
CLICK HERE to Read SAAMI Guidelines for Powder Storage (PDF)
In their original containers, the lifespan of smokeless powders is quite long, even in hot, arid climates. In fact the lifespan is typically longer than the average handloader would need to store them. Stored safely in a garage or outbuilding, your powder should last years. If you see the powder developing a reddish tint, or giving off a foul odor, it is time to discard it.
Clumps in Powder Container
Q: I ordered some of your Accurate 1680 powder back about in December. I just now opened it … and it is full of clumps. My knowledge tells me that means moisture. Am I wrong? I just now broke the seal and it has been stored in a ammo can with desiccant packs around it and a dehumidifier running 14-16 hours a day. I can’t imagine this being my fault, if this does indicate moisture. I don’t know if the pink part on the label is suppose to be red or not, but it is definitely pink, so if it was red I am wondering if I was shipped an old container? I hope that this isn’t bad and I am stuck with it…
Lab Answer: All powder contains a certain amount of moisture. When the powder is stored or during shipping, it can go through temperature cycles. During the cycling, the moisture can be pulled to the surface and cause clumping. Clumping can also be caused by static electricity if too dry or the powder has limited graphite content. You can break up the clumps before metering and they shouldn’t be a problem. This will not affect the powder performance, so your product is fine. Accurate 1680 labels are designed in Pink. As a side note, specification for testing powder is at 70° F and 60% humidity.
Shelf Life and Packaging Dates
Q: Does powder ever get to old to use and what identifying marks does your company put on the canister for when it is made, You have helped me out a while ago when I asked about keeping my cowboy shooting under 950 fps and it works great less stress on the hand and the recoil is very minimum. — R.B.
Lab Answer: On one pound bottles, the number is on the corner in a silver box. If the powder was poured today, it would read 012815 followed by a lot number. The whole number would look something like 012815749. Eight pound bottles have a sticker on the bottom with an obvious date code. The lot number appears above the date.

April 7th, 2026

Forum member Kevin (aka “N10Sivern”), revealed he needs some help with a compulsion — a compulsion to keep buying more and more guns and ammo. Particularly ARs, all shapes and sizes of ARs. Way too many ARs. You could say he has an ARdiction….
In a Forum Thread from a few seasons back, Kevin posted:
“I may need an intervention. Trying to clean my office and pulled this stuff out. I’m missing an AR10 lower somewhere and an AR15 upper. I’ll find them before the day is done. I have a big box full of parts as well, and 4 barrels still in the cardboard tubes. Sigh. This is gonna be a lot of Cerakoting for me.”
Another Forum member said: “For the love of God, man. Delete this thread lest you be accused of hoarding!”
Kevin replied: “I guess I am hoarding a little. But it’s good hoarding right?”
And then he posted this “Mail Call” photo:

Kevin’s caption: “It only gets worse. Mail Call today: 20″ .308 Ballistics Advantage barrel, 26″ Savage 25-06 barrel, 700 pieces of .38 special, 300 pieces of .357 magnum, 500 pieces .308 Win, gas tube, Hornady Modified Case Gauge. I have more crap on the way too.”
Forum Member’s Chime In…
Kevin’s “Need Intervention” post drew plenty of comments from other Forum Members:
“God! It is so refreshing to see that my illness is widespread with little hope (or desire) for a cure. I smiled reading each post.” — Gary0529
“You know you have a problem when you open a drawer and find components you forgot you bought.” — JoshB
“It’s not hoarding if you intend to use it. Says he who has 12,000 primers.” — Uthink
“I guess I’ll go ahead and volunteer to help you with your obviously much needed intervention… send me the pictured items and then you’ll no longer have to deal with those nasty temptations. Just think about it, you’ll have less clutter in your office plus you’ll not have to fret over the need for any cerakoting either. I’m just one human being volunteering to help out another fellow human who needs help!” — PikesPG
April 5th, 2026

Do you have .20-Cal fever? Do you yearn to see what a 4200+ fps projectile can do to an unsuspecting prairie dog? Well you could go out and purchase a 204 Ruger rifle, fork over the money for a new, complete die set, and hope that the brass is in stock. Warren B (aka “Fireball”) has a more cost-effective solution. If you have .223 Rem dies and brass, all you need to shoot the 20 Practical is a new barrel and a .230″ bushing to neck down your .223 Rem cases. Warren’s wildcat is simple, easy, and economical. And the 20 Practical matches the performance of the highly-publicized 20 Tactical with less money invested and no need to buy forming dies or fire-form cases. Warren’s cartridge was aptly named. Practical it is.
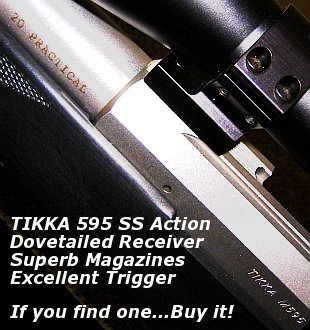
20 Practical Tikka 595 Bolt Action for Varminting
by Warren B (aka “Fireball”) and Kevin Weaver
 After building my 20 PPC, I wanted to do another .20 caliber, this time a repeater for predator hunting that could also serve as a gopher/prairie dog rifle. I wanted to use a Tikka M595 stainless sporter I had. This rifle is the ultimate repeater with an extremely smooth-feeding cycle from its single-column magazine. Since the Tikka was a .223 Remington from the factory, I first looked at possible case designs that would fit the magazine. The 204 Ruger was a very new round at the time and brass was scarce. I also didn’t care for the overly long case design or the standard throat dimensions of the cartridge. I then looked at the 20 Tactical. It was a nice cartridge but I didn’t like the fact that (at the time) an ordinary two-die Tac 20 set with just a plain full-length die and standard seater were $150. Not only did the costs bother me, but I was accustomed to using a Redding die set featuring a body die, a Type-S bushing neck die, and a Competition seater. To be honest, I also didn’t care for the 20 Tactical’s name–there is absolutely nothing tactical about the cartridge. I didn’t want to adopt a new cartridge based on what I perceived to be a marketing gimmick (that “tactical” title). After building my 20 PPC, I wanted to do another .20 caliber, this time a repeater for predator hunting that could also serve as a gopher/prairie dog rifle. I wanted to use a Tikka M595 stainless sporter I had. This rifle is the ultimate repeater with an extremely smooth-feeding cycle from its single-column magazine. Since the Tikka was a .223 Remington from the factory, I first looked at possible case designs that would fit the magazine. The 204 Ruger was a very new round at the time and brass was scarce. I also didn’t care for the overly long case design or the standard throat dimensions of the cartridge. I then looked at the 20 Tactical. It was a nice cartridge but I didn’t like the fact that (at the time) an ordinary two-die Tac 20 set with just a plain full-length die and standard seater were $150. Not only did the costs bother me, but I was accustomed to using a Redding die set featuring a body die, a Type-S bushing neck die, and a Competition seater. To be honest, I also didn’t care for the 20 Tactical’s name–there is absolutely nothing tactical about the cartridge. I didn’t want to adopt a new cartridge based on what I perceived to be a marketing gimmick (that “tactical” title).

Warren B, aka “Fireball”, with his Tikka 595. With its smooth action and phenolic single-column mag, it cycles perfectly in rapid fire.
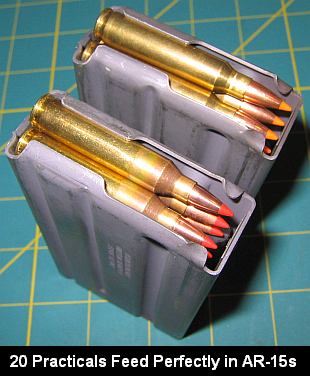
 Simply Neck Down .223 Rem to Make a 20-223 Wildcat Simply Neck Down .223 Rem to Make a 20-223 Wildcat
I decided the best thing to do for my purposes was to simply neck down the .223 Rem case and make a 20-223. I already had the dies, the brass, and a rifle that would feed it perfectly. I decided to call the cartridge the 20 Practical because as you will see in this article, it truly is a very practical cartridge. In addition to the generous and inexpensive availability of brass and dies, the 20 Practical is an easy case to create, requiring no fire forming as a final step. Simply neck your .223 Rem cases down, load and shoot.
[Editor’s Note: Over the years, other shooters have experimented with .223 Remington cases necked down to .20 caliber, some with longer necks, some with different shoulder angles. Warren doesn’t claim to be the first fellow to fit a .20-caliber bullet in the .223 case. He gives credit to others who did pioneering work years ago. But he has come up with a modern 20-223 wildcat that involves no special case-forming, and minimal investment in dies and tooling. He commissioned the original PTG 20 Practical reamer design, and he and Kevin did the field testing to demonstrate the performance of this particular version.]
 I chose Kevin Weaver at Weaver Rifles to fit and chamber the barrel to my rifle. Kevin does excellent work and is great to work with. Kevin liked the idea of the 20 Practical so much he agreed to purchase the project reamer. (BTW Kevin didn’t even need to purchase a Go/No-Go gauge, he just used an existing .223 Rem gauge.) I chose Kevin Weaver at Weaver Rifles to fit and chamber the barrel to my rifle. Kevin does excellent work and is great to work with. Kevin liked the idea of the 20 Practical so much he agreed to purchase the project reamer. (BTW Kevin didn’t even need to purchase a Go/No-Go gauge, he just used an existing .223 Rem gauge.)
Before Kevin ordered the reamer, I talked over the reamer specs with him. My priorities were tolerances on the tight end of the .223 Rem SAAMI specification, a semi-fitted neck with no need for neck-turning, and a short throat so that we could have plenty of the 32gr V-Max in the case and still touch the lands. I also wanted this short throat in case [anyone] wanted to chamber an AR-15 for the 20 Practical. A loaded 20 Practical round will easily touch the lands on an AR-15 while fitting into the magazine with no problem. With its standard 23-degree shoulder, the 20 Practical case also feeds flawlessly through an AR-15.
As for the barrel, I only use Liljas on my rifles. I have had great luck with them. They have always shot well and they clean up the easiest of any barrels that I have tried. I had previously sent my Tikka barreled action to Dan Lilja so that he could program a custom contour into his equipment and turn out a barrel that would perfectly fit the factory M595 sporter stock. There isn’t much material on an M595 sporter stock so the contour had to match perfectly and it did. Dan Lilja now has this custom contour available to anyone who would like to rebarrel their M595 sporter with one of his barrels.
There Are Plenty of Good .204-Caliber Varmint Bullet Options

How to Form 20 Practical Cases — Simple and Easy
Forming 20 Practical cases is very easy. No fire-forming is required. Start with any quality .223 Rem brass. Then simply run the case into your bushing die with the appropriate bushing and call it done.
 Project Componentry Project Componentry
My 20 Practical rifle started out as a Tikka Model 595 Stainless Sporter in .223 Remington. Though the M595 is no longer imported, if you shop around you can find M595 Sporters for bargain prices. Mine cost under $500. I think the action alone is worth that! The receiver has a milled dovetail for scope rings plus a side bolt release like expensive BR actions. The bolt cycles very smoothly. Ammo is handled with super-reliable 3- or 5-round detachable single-column magazines (FYI, Tikka’s M595 22-250 mags will feed a 6BR case flawlessly.) We kept the standard Tikka trigger but fitted it with a light-weight spring. Now the trigger pull is a crisp 1.8 pounds–about as good as it gets in a factory rifle. We replaced the factory tube with a custom, 24″, 3-groove Lilja 12-twist barrel. Dan Lilja created a special M595 sporter contour to allow a perfect “drop-in” fit with the factory stock. For optics, I’ve fitted a Leupold 4.5-14x40mm zoom in low Talley light-weight aluminum mounts. All up, including optics and sling, my 20 Practical weighs just under 8.5 pounds.
 Test Report–How’s It Shoot? Test Report–How’s It Shoot?
I sent the barrel and barreled action to Kevin and in a very short time it was returned. Kevin did a perfect job on the rifle. I had asked him to try to match the bead blasted finish of the Tikka when he finished the new barrel. It came out perfect and the only way one can tell it is a custom is the extra two inches of length and the “20 Practical” cartridge designation.
So, no doubt you’re asking “how does she shoot?” Is my “prototype”, first-ever 20 Practical an accurate rig? In a word, yes. Even with the standard factory stock, and light contour barrel, it can shoot 3/8″ groups. Take a look at the typical target from this rifle. This is from an 8.5-pound sporter with a very skinny fore-end and a factory trigger.
Gunsmith’s Report from Kevin Weaver
The 20 Practical: Origins and Development
Editor’s NOTE: We can’t say for sure who first necked down the .223 Rem to .20 caliber and chambered a rifle for that wildcat (as opposed to the .20 Tactical). But here is an account from way back in 2006 when the Warren B first came up with the idea of a .20 Practical cartridge, complete with reamer specs.
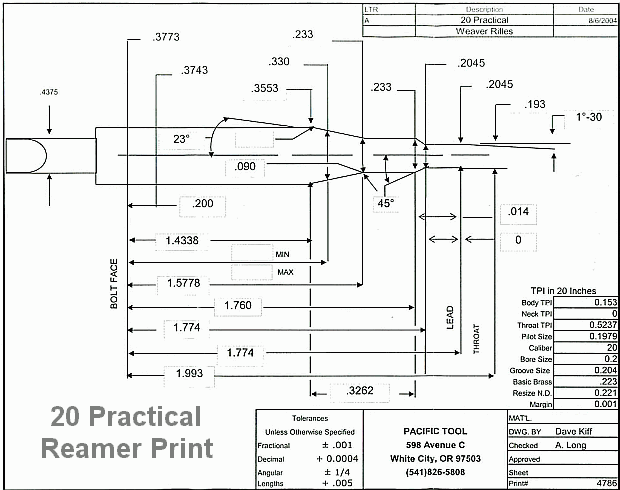
A year ago I received a call from Warren with a great idea. Warren asked “Why couldn’t we simply neck down the .223 Remington case to 20 caliber and get basically the same performance as the 20 Tactical? This way you can forgo the expensive forming dies that are needed for the 20 Tactical.” The idea made perfect sense to me, and I saw no major technical issues, so we got started on the project. I ordered a reamer from Dave Kiff at Pacific Tool & Gauge (PTG) with a .233″ neck. The .233″ neck should allow for a simple necking-down of the 223 Remington case to produce the 20 Practical in just one step. No fire-forming necessary! Furthermore, the PTG 20 Practical reamer Dave created should work with any available .223 Rem brass, commercial or military.
The first 20 Practical round was launched down range (through Warren’s Tikka) just a few months later. The brass formed as easily as expected. All one needs is a Redding type “S” bushing die with a .230 bushing and with just one step I had a .20 caliber case ready to shoot. Warren is brilliant. [Editor’s Note: We concur. For more details on Warren’s case-forming methods and his tips for adapting .223 Rem dies, read the technical sections further down the page.]
It would be almost six months later until I got around to building a dedicated test rifle chambered for the 20 Practical. I used a Remington 722 action, Remington synthetic semi-varmint stock, and a 24″ Douglas stainless steel XX 12-twist barrel. I formed and loaded about 30 cases using Remington brass in about 20 minutes. I used a .223 Rem seating die to seat the 20 Practical bullets. The .223 seating stem seated the small 20-Cal bullets just fine. The first loads sent the 40gr Hornady V-Max bullets down range at a modest 3500 FPS. I did not shoot for groups. I just wanted to use this load to sight in the rifle and break in the barrel. Load development was painless–I used reduced .223 Rem loads for 40gr bullets and worked up from there. In the table below are some of my preferred loads as well as Warren’s favorite recipes for his 20 Practical.
| Bullet Wt. |
Powder |
Charge Wt. |
Velocity FPS |
Comments |
| 32GR |
H4198 |
24.1 |
4025 |
Warren’s lighter gopher load |
| 32GR |
AA2460 |
27.8 |
4154 |
Warren’s coyote/prairie dog load |
| 32GR |
N133 |
26.0 |
4183 |
Coyote/PD load, clean burn |
| 33GR |
H4198 |
26.0 |
4322 |
Hot Load. Use with Caution! |
| 33GR |
N133 |
27.0 |
4255 |
Kevin: 0.388” 5 shot group |
| 40GR |
H335 |
25.0 |
3583 |
Kevin’s barrel break-in load |
| 40GR |
H4198 |
24.0 |
3907 |
Hodgdon “Extreme” Powder |
| 40GR |
IMR4895 |
26.0 |
3883 |
Kevin: 0.288″ 5-shot group |
| 40GR |
N133 |
25.0 |
3959 |
Kevin: 0.227″ 5-shot group |
| Warren’s Load Notes: My pet loads are all with IMI cases, 32gr Hornady V-Maxs, and Fed 205 primers (not match). These are the most accurate loads in my rifle so far. I haven’t even bothered with the 40s as I have the 20 PPC and 20 BR for those heavier bullets. I prefer the lighter bullets in the 20 Practical because I wanted to keep speed up and recoil down in this sporter-weight predator rifle. Also, the 32gr V-Max is exceptionally accurate and explosive. I like N133 the best as it burns so clean. IMI cases are tough and well-made. |
| Kevin’s Load Notes: I used Remington 223 cases, Hornady V-Max bullets, and Remington 6 1/2 primers to develop the above loads. CAUTION: all loads, both Warren’s and mine, should be reduced 20% when starting load development in your rifle. All load data should be used with caution. Always start with reduced loads first and make sure they are safe in each of your guns before proceeding to the high test loads listed. Since Weaver Rifles has no control over your choice of components, guns, or actual loadings, neither Weaver Rifles nor the various firearms and components manufacturers assume any responsibility for the use of this data. |
|
 Comparing the 20 Practical and 20 Tactical Comparing the 20 Practical and 20 Tactical
Kevin tells us: “The 20 Practical and the 20 Tactical are almost identical cartridges. There are only slight differences in case Outside Diameter, shoulder angle, and case body length. The neck length on the 20 Tactical is a bit longer, but there is still plenty of neck on the 20 Practical to grip the popular bullets, such as the 32gr V-Max. Here are some specs:
| Cartridge |
Bolt face to shoulder |
Shoulder O.D. |
Shoulder Angle |
Total length |
| 20 Tactical |
1.5232″ |
.360 |
30° |
1.755″ |
| 20 Practical |
1.5778″ |
.3553 |
23° |
1.760″ |
Both the 20 Tactical and the 20 Practical are fine .20 caliber cartridges. Early on, the 20 Tactical was the more popular of the two because it had more publicity. However, my favorite would be the 20 Practical. Warren’s 20 Practical gives the SAME performance as the 20 Tactical without fire-forming, or having to buy expensive forming dies. So with the 20 Practical you do less work, you shell out a lot less money, yet you give up nothing in performance. What’s not to like? To create 20 Practical cases, just buy a .223 Rem Redding Type “S” Bushing Die set with a .230 or .228 bushing and have fun with this great little cartridge.”
April 5th, 2026

Looking to improve your competition skills? The Shooting Sports USA website has scores of informative articles that can help your score higher at your next shooting tournament. You’ll find articles on wind reading, position shooting, match strategies, and much more.
One great Shooting Sports USA article, Shooting is 90% Mental, was penned by Chip Lohman (SSUSA’s former Editor). With the help of two very smart Ph.D types, Judy Tant and Mike Keyes, Lohman examines the mental processes involved in the shooting sports. Chip’s co-authors have impressive credentials. Dr. Judy Tant is a Clinical Psychologist and National Bullseye Pistol Champion. Dr. Michael J. Keyes, is a licensed Psychiatrist and former physician for the U.S. Shooting Team.
CLICK HERE to Read Full Article in Shooting Sports USA Online Magazine.
Visualization, Brain Function, and Muscle Memory
If you shoot competitively, this is definitely a “must-read” article. The authors examine how the brain functions under stress, how “visualization” can be used to improved performance, how “brain speed” can be enhanced through proper training, and how the brain stores learned routines into “muscle memory.” And that’s just for starters — the article gives many concrete examples of techniques top shooters have employed to improve their “mental game” and shoot higher scores.
Brain Speed and Trigger Control:
 Research: Scientists believe that the newer frontal lobe may not be able to keep up with “deep” brain signals that transmit at nearly 300 mph. This is explained when athletes talk about “letting go”, rather than over-thinking the shot. Research: Scientists believe that the newer frontal lobe may not be able to keep up with “deep” brain signals that transmit at nearly 300 mph. This is explained when athletes talk about “letting go”, rather than over-thinking the shot.
This conscious signal can take up to 0.3 seconds from recognizing the desired sight picture to moving the trigger finger — too long to capture the opportunity for a perfect shot. However, if the signal is initiated spontaneously in the cerebellum where such procedures are thought to be stored through repetition, the reaction speed is much quicker. Signals are processed by the “deep brain” almost twice as fast as the problem-solving frontal lobes.
Mental Preparation for Shooting Matches
Below are tips from Emil Praslick III, former USAMU coach. Considered one of the best wind readers on the planet, Praslick also was known for his ability to help his shooters master the “mental game”.

Thinking Your Way to Success
by Emil Praslick III
Why does it seem that the same small group of shooters wins the majority of the matches? What is the difference among shooters who are technically equal? Confidence. A confident shooter is free to execute his shots without the fear of failure, i.e. shooting a poor shot.
Negative thoughts (can’t, won’t be able to, etc.) will destroy a skilled performance. The mind’s focus will not be on executing the task, but on projecting fear and self-doubt. Fear is the enemy, confidence is the cure. How does a shooter on the eve of an important match … attain the confidence needed to perform up to his potential? A pre-competition mental plan can assist in acquiring that positive mental state. The plan can be broken down into a few phases.
Build a feeling of preparedness. Developing and executing a plan to organize your equipment and pre-match routine will aid you in feeling prepared on match day.
Avoid negative and stressful thoughts. Focusing on “winning” the match or shooting for a specific score (like making the “cut” or making the President’s 100) can cause undue stress. Good shooters focus on aspects that are within their control: their sight picture, their sight alignment, their position. Each shot should be treated as an individual event.
Train stage-specific tasks during your practice sessions. Instead of shooting matches or practice matches only, include some drills that focus on your problem areas. Training in this manner will assist your level of confidence.
As part of your pre-match routine, imagine yourself shooting perfect shots. Visualize getting into the perfect position, acquiring a perfect sight picture, and perfect trigger control.
Marksmanship Mental Training Books
April 1st, 2026

A new statute passed in California will bar state employees (as well as teachers, police personnel, and health care workers) from using a variety of firearms terms in official communications. California Assembly Bill 22408, authored by Assemblyman Tony Fulenzo (D. Los Angeles), defines over 30 gun-related words as “hate speech”. Under existing California law, any words/phrases defined as “hate speech” are proscribed (forbidden) in official publications, school textbooks, and all public-sector communications (including email). By effect of AB 22408 then, dozens of gun-related nouns, verbs, and adjectives will be banned, and “shall no longer be uttered or used in the State of California by any public agent or employee”.
Assemblyman Fulenzo said his intent in sponsoring AB 22408 was to alter public attitudes toward firearms, and in particular, to convince school children that firearms are bad. “We want to prevent young kids from perceiving firearms as ‘cool’ or ‘exciting’. The best way to do that is to bury the subject altogether. We need to dismantle the ‘gun culture’. That begins with banning the words themselves.”
 Fulenzo said AB 22408 was inspired by existing bans on racist “hate speech”: “We don’t want children to read about guns or talk about guns. The first step, therefore, is to remove firearms-related words from textbooks, classroom presentations, and state documents. This is not something new. California has done the same thing with hateful words directed at minority groups. In California, by law, we have banned the use of the ‘N’ word (and other racist terms) in official state publications and school textbooks. Now we are just following that practice and banning the ‘G’ word (i.e. ‘gun’) and similar firearms-related hate speech”. Fulenzo said AB 22408 was inspired by existing bans on racist “hate speech”: “We don’t want children to read about guns or talk about guns. The first step, therefore, is to remove firearms-related words from textbooks, classroom presentations, and state documents. This is not something new. California has done the same thing with hateful words directed at minority groups. In California, by law, we have banned the use of the ‘N’ word (and other racist terms) in official state publications and school textbooks. Now we are just following that practice and banning the ‘G’ word (i.e. ‘gun’) and similar firearms-related hate speech”.
Ban on Gun Words in Oregon Next?
Meanwhile, in neighboring Oregon, anti-gun groups have called for the passage of similar legislation banning the use of firearms-related terminology. And there have been protests in Arizona also.

Permitted Word Equivalencies for Banned Firearm Terms
When enacted into law, AB 22408 will ban more than 30 firearm-related words, including “gun”, “pistol”, “rifle”, “bullet” and other commonly-used words. Where it is necessary to reference a firearm, as in a police report, AB 22308 provides for substitute words or phrases. AB 22408 recognizes that, in some instances, it will be necessary to mention firearms-related facts in official documents. By using these officially-designated substitute words, firearms-related facts can be logged without resort to banned “hate speech”.
| Gun = “Gunk”
Pistol = “Piddle”
Rifle = “Ripple”
Shoot = “Suit”
Bullet = “Mullet”
Ammo = “Venmo”
Cartridge = “Partridge” |
How to Use California-Approved Substitute Gun-Related Words:
Under AB 22408, if an official report requires description of a hate speech item, then the approved replacement words shall be used instead of the prohibited terms. For example, if a hospital treats a pistol wound, this shall be listed as a “piddle wound” in the official medical report. Likewise the recovery of cartridges at a crime scene by police shall be recorded as a “partridge recovery” in the incident report.
|
New Law Does Not Restrict Speech by Non-Governmental Entities
This new law only applies to “public sector” entities (schools, police/sheriff agencies, hospitals/health clinics, state and municipal agencies). Private businesses, including newspapers and web sites, will still be allowed to use firearms-related words without the threat of prosecution. Likewise, private citizens will still be allowed to say “gun”, “pistol”, or “rifle” etc. in their own private communications. However internet posting of hate speech involving forbidden firearm words will be monitored by a new California State Agency. This new Agency, the California Office of Firearms Hate Speech (COFHS) will be funded by a new 5% sales tax on firearms ammunition and components.
April 1st, 2026

After you’ve become an NRA Life member what’s next? Well now you can extend your NRA membership into the afterlife, the great beyond. For just five thousand bucks, you can now show your commitment to the Second Amendment for all eternity. The NRA has announced that it will, for the first time ever, offer Perpetual Memberships so you can enjoy being an NRA member from your grave. The new “After-Life” Perpetual Membership confers many benefits, including continuing insurance on firearms in ones estate, NRA-branded headstones (see above), and perpetual magazine subscriptions to a surviving spouse or designated beneficiary. In addition, upon the passing of an After-Life Member, the NRA will donate $100.00 to the NRA program of his/her choice.
How to Become an NRA Member Forever
The NRA After-Life Perpetual Membership has been introduced by the NRA as the request of many current NRA Life members who want a permanent, perpetual affiliation with the NRA. A step-up from the $1500 Life Membership, the new After-Life Membership normally costs $7500.00, but this month the After-Life Membership costs just $5000.00. As a special Promotion in connection with the 155th Annual NRA Annual Meetings and Exhibits in Houston, TX (April 16-19, 2026), the new After-Life Membership will discounted 33% for the entire month of April, 2026. For a mere $5000.00 (after discount) the NRA After-Life Membership secures an individual’s support for the Second Amendment throughout eternity.

Help Defend the Second Amendment in the Future
Many celebrities, business leaders, and avid shooters have NRA Life Memberships. Until today, that was longest-duration NRA membership available. Now, with the introduction of the After-Life Perpetual Membership, current Life Members can secure their affiliation with the nation’s leading gun rights organization for all time, in perpetuity. When you think about it, $5000.00 is a small price to pay for the assurance that you will continue to support freedom and the Second Amendment long after you’re gone. And while you’re still alive and well, you should definitely attend the 2026 NRA Annual Meetings & Exhibits in Houston, April 16-19, 2026. CLICK HERE to register.
All NRA After-Life Perpetual Members will receive a handsome yet somber yellow-on-black sweatshirt.

March 31st, 2026
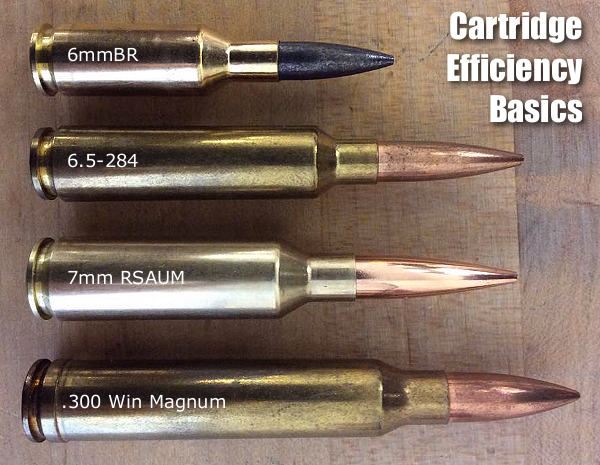
Efficient cartridges make excellent use of their available powder and case/bore capacity. They yield good ballistic performance with relatively little recoil and throat erosion.

Cartridge Efficiency: A Primer (pun intended!) by USAMU Staff
The U.S. Army Marksmanship Unit (USAMU) published a series of reloading articles on its Facebook Page. In this article, the USAMU discusses cartridge case efficiency and its benefits. While this is oriented primarily toward NRA High Power Rifle and Long Range (1000-yard) competition, these factors also apply to medium/big game hunters. Assuming one’s rifle and ammunition are accurate, key considerations include ballistic performance (i.e., resistance to wind effects, plus trajectory), recoil, and throat erosion/barrel life.
Efficient cartridges make excellent use of their available powder and case/bore capacity. They yield good ballistic performance with relatively little recoil and throat erosion. A classic example in the author’s experience involved a featherweight 7x57mm hunting/silhouette rifle. When loaded to modern-rifle pressures, just 43-44 grains of powder pushed a 139gr bullet at 2900 fps from its 22″ barrel. Recoil in this light rifle was mild; it was very easy to shoot well, and its performance was superb.
An acquaintance chose a “do everything” 7mm Remington Magnum for use on medium game at short ranges. A larger, heavier rifle, it used ~65 grains of powder to achieve ~3200 fps with similar bullets — from its 26″ barrel. Recoil was higher, and he was sensitive to it, which hampered his shooting ability.
Similarly efficient calibers include the 6mm BR [Norma], and others. Today’s highly-efficient calibers, such as 6mm BR and a host of newer developments might use 28-30 grains of powder to launch a 105-107gr match bullet at speeds approaching the .243 Winchester. The .243 Win needs 40-45 grain charges at the same velocity.
Champion-level Long Range shooters need every ballistic edge feasible. They compete at a level where 1″ more or less drift in a wind change could make the difference between winning and losing. Shooters recognized this early on — the then-new .300 H&H Magnum quickly supplanted the .30-06 at the Wimbledon winner’s circle in the early days.
The .300 Winchester Magnum became popular, but its 190-220gr bullets had their work cut out for them once the 6.5-284 and its streamlined 140-142gr bullets arrived on the scene. The 6.5-284 gives superb accuracy and wind performance with about half the recoil of the big .30 magnums – albeit it is a known barrel-burner.
Currently, the 7mm Remington Short Action Ultra-Magnum (aka 7mm RSAUM), is giving stellar accuracy with cutting-edge, ~180 grain bullets, powder charges in the mid-50 grain range and velocities about 2800+ fps in long barrels. Beyond pure efficiency, the RSAUM’s modern, “short and fat” design helps ensure fine accuracy relative to older, longer cartridge designs of similar performance.
Recent design advances are yielding bullets with here-to-fore unheard-of ballistic efficiency; depending on the cartridge, they can make or break ones decision. Ballistic coefficients (“BC” — a numerical expression of a bullet’s ballistic efficiency) are soaring to new heights, and there are many exciting new avenues to explore.
The ideal choice [involves a] balancing act between bullet BCs, case capacity, velocity, barrel life, and recoil. But, as with new-car decisions, choosing can be half the fun!
Factors to Consider When Evaluating Cartridges
For competitive shooters… pristine accuracy and ballistic performance in the wind are critical. Flat trajectory benefits the hunter who may shoot at long, unknown distances (nowadays, range-finders help). However, this is of much less importance to competitors firing at known distances.
Recoil is an issue, particularly when one fires long strings during competition, and/or multiple strings in a day. Its effects are cumulative; cartridges with medium/heavy recoil can lead to shooter fatigue, disturbance of the shooting position and lower scores.
For hunters, who may only fire a few shots a year, recoil that does not induce flinching during sight-in, practice and hunting is a deciding factor. Depending on their game and ranges, etc., they may accept more recoil than the high-volume High Power or Long Range competitor.
Likewise, throat erosion/barrel life is important to competitive shooters, who fire thousands of rounds in practice and matches, vs. the medium/big game hunter. A cartridge that performs well ballistically with great accuracy, has long barrel life and low recoil is the competitive shooter’s ideal. For the hunter, other factors may weigh more heavily.
Cartridge Efficiency and Energy — Another Perspective
Former Lapua staffer Kevin Thomas explains that efficiency can be evaluated in terms of energy:
“Cartridge efficiency is pretty straight forward — energy in vs. energy out. Most modern single-based propellants run around 178-215 ft/lbs of energy per grain. These figures give the energy potential that you’re loading into the rifle. The resulting kinetic energy transferred to the bullet will give you the efficiency of the round. Most cases operate at around 20-25% efficiency. This is just another way to evaluate the potential of a given cartridge. There’s a big difference between this and simply looking at max velocities produced by various cartridges.”
|


