Efficient cartridges make excellent use of their available powder and case/bore capacity. They yield good ballistic performance with relatively little recoil and throat erosion.
Cartridge Efficiency: A Primer (pun intended!)by USAMU Staff
The U.S. Army Marksmanship Unit (USAMU) published a series of reloading articles on its Facebook Page. In this article, the USAMU discusses cartridge case efficiency and its benefits. While this is oriented primarily toward NRA High Power Rifle and Long Range (1000-yard) competition, these factors also apply to medium/big game hunters. Assuming one’s rifle and ammunition are accurate, key considerations include ballistic performance (i.e., resistance to wind effects, plus trajectory), recoil, and throat erosion/barrel life.
Efficient cartridges make excellent use of their available powder and case/bore capacity. They yield good ballistic performance with relatively little recoil and throat erosion. A classic example in the author’s experience involved a featherweight 7x57mm hunting/silhouette rifle. When loaded to modern-rifle pressures, just 43-44 grains of powder pushed a 139gr bullet at 2900 fps from its 22″ barrel. Recoil in this light rifle was mild; it was very easy to shoot well, and its performance was superb.
An acquaintance chose a “do everything” 7mm Remington Magnum for use on medium game at short ranges. A larger, heavier rifle, it used ~65 grains of powder to achieve ~3200 fps with similar bullets — from its 26″ barrel. Recoil was higher, and he was sensitive to it, which hampered his shooting ability.
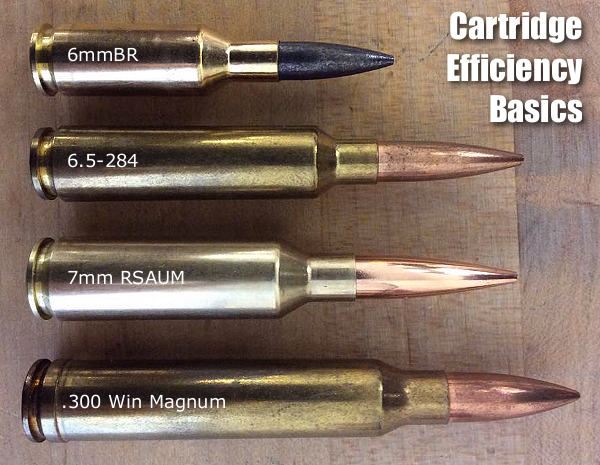
Similarly efficient calibers include the 6mm BR [Norma], and others. Today’s highly-efficient calibers, such as 6mm BR and a host of newer developments might use 28-30 grains of powder to launch a 105-107gr match bullet at speeds approaching the .243 Winchester. The .243 Win needs 40-45 grain charges at the same velocity.
Champion-level Long Range shooters need every ballistic edge feasible. They compete at a level where 1″ more or less drift in a wind change could make the difference between winning and losing. Shooters recognized this early on — the then-new .300 H&H Magnum quickly supplanted the .30-06 at the Wimbledon winner’s circle in the early days.
The .300 Winchester Magnum became popular, but its 190-220gr bullets had their work cut out for them once the 6.5-284 and its streamlined 140-142gr bullets arrived on the scene. The 6.5-284 gives superb accuracy and wind performance with about half the recoil of the big .30 magnums – albeit it is a known barrel-burner.
Currently, the 7mm Remington Short Action Ultra-Magnum (aka 7mm RSAUM), is giving stellar accuracy with cutting-edge, ~180 grain bullets, powder charges in the mid-50 grain range and velocities about 2800+ fps in long barrels. Beyond pure efficiency, the RSAUM’s modern, “short and fat” design helps ensure fine accuracy relative to older, longer cartridge designs of similar performance.
Recent design advances are yielding bullets with here-to-fore unheard-of ballistic efficiency; depending on the cartridge, they can make or break ones decision. Ballistic coefficients (“BC” — a numerical expression of a bullet’s ballistic efficiency) are soaring to new heights, and there are many exciting new avenues to explore.
The ideal choice [involves a] balancing act between bullet BCs, case capacity, velocity, barrel life, and recoil. But, as with new-car decisions, choosing can be half the fun!
Factors to Consider When Evaluating Cartridges
For competitive shooters… pristine accuracy and ballistic performance in the wind are critical. Flat trajectory benefits the hunter who may shoot at long, unknown distances (nowadays, range-finders help). However, this is of much less importance to competitors firing at known distances.
Recoil is an issue, particularly when one fires long strings during competition, and/or multiple strings in a day. Its effects are cumulative; cartridges with medium/heavy recoil can lead to shooter fatigue, disturbance of the shooting position and lower scores.
For hunters, who may only fire a few shots a year, recoil that does not induce flinching during sight-in, practice and hunting is a deciding factor. Depending on their game and ranges, etc., they may accept more recoil than the high-volume High Power or Long Range competitor.
Likewise, throat erosion/barrel life is important to competitive shooters, who fire thousands of rounds in practice and matches, vs. the medium/big game hunter. A cartridge that performs well ballistically with great accuracy, has long barrel life and low recoil is the competitive shooter’s ideal. For the hunter, other factors may weigh more heavily.
Cartridge Efficiency and Energy — Another Perspective
Former Lapua staffer Kevin Thomas explains that efficiency can be evaluated in terms of energy:
“Cartridge efficiency is pretty straight forward — energy in vs. energy out. Most modern single-based propellants run around 178-215 ft/lbs of energy per grain. These figures give the energy potential that you’re loading into the rifle. The resulting kinetic energy transferred to the bullet will give you the efficiency of the round. Most cases operate at around 20-25% efficiency. This is just another way to evaluate the potential of a given cartridge. There’s a big difference between this and simply looking at max velocities produced by various cartridges.”
At the request of our Shooters’s Forum members, we’re repeating an excellent article by Steven Blair on wind reading. Steven, a top F-Class shooter, talks about mirage, topography effects, tail winds, and other subtle factors that can cause frustration for shooters. Steve explains that wind effects can be complex — there’s more going on than just velocity and angle. You need to notice things like berm locations and effects of temp changes over the course of the day.
Wind Reading Tips for Competitive Shooters by Steven Blair, Past California State Long Range F-Open Champion
Assess the Terrain and How the Wind Will Interact with It
Before you begin a match, take a few minutes to look around the range at the terrain, any obstructions, range topography (berms and backstop), and trees, buildings or structures that could affect wind flow over the range. Imagine what might happen if the wind was from the left or right, headwind or tailwind. Depending upon the direction, significant effects may be seen on range. A head or tail wind may ripple across the berms, causing elevation changes, both high and low. A tall side berm, like the east side berm at Ben Avery, may cause turbulence when the wind comes from that direction. Blocking features might shield most of the wind but a break along the range can funnel strong gusts through the gap with no other indications. Take a few notes about the effects of different wind directions and refer to them if the prevailing direction changes. (Tip courtesy Tony Robertson.)
Use a Spotting Scope, Even When Shooting a Scoped Rifle
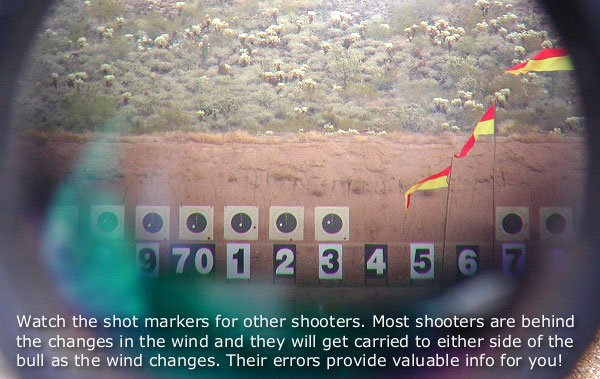
A good spotting scope can “see” mirage much more clearly than even an expensive rifle scope. Take your spotting scope to the line and position it as sling shooters do, close enough to use without much movement. Focus the scope approximately 1/3 of the way down range or where the most significant wind effects are likely to occur. Take a quick look while waiting for pit service, glance at the flags and compare to your scope sight picture. I often see ambiguous indications at the target through the rifle scope, but see a clear indication of wind direction and speed through the spotting scope at the shorter distance. When shooting the Arizona Palma Championship at Ben Avery last weekend, I was scoring while the wind was coming from the east. Shooters up and down the line were out to the left, losing points. Mirage at the target looked moderate and the flags weren’t indicating strong wind. As I focused the spotting scope back, the mirage suddenly looked like it was flowing twice as fast around 500 yards than it was closer or farther. It wasn’t until I realized that the access road cut through the berm there that I understood what was happening. (Tip courtesy Gary Eliseo.)
Don’t Over-React to Something That May Be an Anomaly
On ranges with sizable berms, a headwind or tailwind can cause significant elevation problems. It is generally not possible to see or predict when this will occur. When the conditions exist that cause elevation changes and other competitors are experiencing the same problem, the best strategy is to ignore it. Certainly, avoid shooting when the head or tail wind is gusting, the same as you would in a crosswind. But, if you react to random, range-induced elevation changes, the only likely result is to make it worse. Whether the problem is caused by range or ammunition, maintain your waterline hold until you have evidence that something has fundamentally changed.
My .284 Shehane will usually require a click or two down during a string as the barrel warms. That is normal and manageable. But, if your shots are just bouncing up and down in the 10 ring, leave it alone. The same is also true of an occasional gust pushing a shot into the 9 ring. If the conditions have not changed and one shot just went out, it may be the result of a random occurrence that was not predictable. (Tip courtesy “School of Hard Knocks”.)
Adjust Spotting Scope Focus and Magnification as Needed to View Mirage vs. Target Details
In F-Class we only need to see mirage, spotters, and scoring disks. That does not take a lot of magnification. My scope is a Nikon 25-75x82mm ED. It is a superb scope for the money and makes it trivial to see minor variations in mirage. It is good to have the high magnification available, and it can always be reduced if necessary. I use different power settings for different situations.
Setting Magnification Levels
During a match, in very good viewing conditions, I set my spotting scope at 75X, full power. The mirage is more subtle in the morning and greater magnification is needed.
During a match with heavy mirage I set my spotting scope at about 40X. I have no problem seeing mirage, even at this magnification.
When practicing at 300 yards or closer I set my spotting scope at max power (75X) so I can see the little 6mm holes from my 6BR rifle. I usually need to focus back and forth between shots to see both bullet holes and mirage.
Steven Blair, 2012 California State Long Range F-Open Champion, has been shooting since childhood and competing for over 30 years. Before retiring, Steve spent 16 years in Engineering and IT with General Atomics. He has held Engineering and Marketing positions with several firearms companies and worked on projects from pistols to 155mm howitzers.
The Applied Ballistics Facebook Page features great, interesting new content posted multiple times each week. This resource features videos, test results, accuracy tips, and samples from Bryan Litz’s excellent books on ballistics and the three volume series on Modern Advancements in Long Range Shooting. Here are some highlights from Applied Ballistics’ Facebook posts from the past two weeks. Plus there’s a discount code, READ2026, that can save you 25% on Applied Ballistics books purchased in the month of March.
.22 LR Super Slow Motion Video — Watch the Bullet!
Watch .22 LR Rimfire Projectile Exiting Rifle Muzzle
This video, filmed with an ultra-high-speed camera, shows the milliseconds in time as a .22-caliber bullet travels the first 11 inches after leaving a .22 LR rifle barrel. Applied Ballistics states: “Notice that the bullet is fully obturated to the internal bore dimension — the step/rebate that exists on the unfired bullet where it meets the case gets expanded (obturated) and doesn’t exist on the fired bullet.”
How Important is Case Fill Ratio — You May Be Surprised
Conventional reloading practice is to select a powder that gives you a good case fill, meaning 90%-100% fill ratio for the cartridge and bullet you’re using. But why?
Some say that a higher fill ratio is good because it prevents the powder from settling differently in the case (which could lead to inconsistent ignition and greater MV SD). This explanation sounds good, and went unchallenged for a long time. However, Applied Ballistics has done some interesting testing that sheds new light on the density issue.
Modern Advancements in Long Range Shooting – Vol. 2 contains the results of Applied Ballistics tests of five different cartridge types — .223 Rem to .338 Lapua — loaded with different powders to produce fill ratios of 80%, 90%, and 100%. The testers wanted to see if 100% fill ratios actually gave better results (lower MV SDs) than the lower fill ratios.
Results of testing 3 different loads in 5 different cartridges — The highest MV SD was in fact measured in an 80% fill ratio load. However, the lowest MV SD was also measured for a different 80% load! Seems like the more we learn, the more questions we have. An informative Applied Ballistics podcast covers the Fill Ratio test. Visit Thescienceofaccuracy.com to access this and interesting podcasts.
EDITOR’s NOTE: There were multiple comments from Facebook readers stating that fill ratios 90% and above worked more consistently for them. And the reloading manuals warn against very low fill ratios.
Get 25% Off Applied Ballistics Books in March 2026
Applied Ballistics, through its Science of Accuracy webstore, is currently offering big savings on its popular books — considered to be the best print resources about rifle accuracy/ballistics ever published. This month you can save 25% on all Applied Ballistics book titles by respected expert (and past national champion) Bryan Litz. Use Code READ2026 to get 25% of one or more of these books.
Get 25% OFF Applied Ballistics Books! Use code: READ2026 at checkout.
We like well-executed DIY (Do-It-Yourself) projects. You can save money with DIY projects, and often create something unique and special that can’t be purchased from any vendor. That’s the case with this very cool double shooting bench built by Jacob D., a pilot and 6.5 Creedmoor shooter. The design of the bench is smart — it allows two right-handed shooters, but it can also handle a right-hander and a left-hander. (The lefty sets up in the right half of the bench.)
Jacob, who flies for Arizona’s Mesa Airlines, built his own side-by-side benchrest shooting bench. He then posted photos of this on the 6.5 Creedmoor Group Facebook Page. We like this — very nice work Jacob!
Jacob writes: “Sighting in my new Ruger Precision Rifle with Leupold VX3i LRP 6.5-20x50mm and Burris tactical rings, using my benchrest table I built. Very happy with the combo!”
There is plenty of room for two shooters and two rifles on Jacob’s big and sturdy DIY shooting bench.
You may have heard the phrase “blueprinting an action”, but do you know what that really means? Do you know what operations are done to an action during the blueprinting process? To help you understand, gunsmith Bill Marr of RifleShooter.com has created a helpful article showing a Rem 700 blueprinting job start to finish. This article spotlights how the procedures can be done with manual tools. Bill, who runs 782 Custom Gunworks Ltd., can also perform many of these operations with modern automated machinery. In fact, Bill has written a follow-up article on Truing a Rem 700 receiver with a Lathe.
Bill explains: “Blue-printing, or truing a rifle action, ensures the receiver face, threads, lugs, bolt lugs, and bolt face are square to the center line of the receiver.” In Bill’s informative article, Bill shows how he blueprints a Remington 700 short action receiver with .308 Win bolt face. He covers the following procedures step by step:
Action Disassembly
Ream Minor Diameter of Receiver Threads
Square the Receiver Lugs
Square the Face of the Receiver
Lap the Bolt Lugs
Square the Bolt Face
Bill employed a variety of tools from Brownells to complete the blueprinting job, including: Remington 700 Armorer’s Kit; Manson Receiver Accurizing Kit; Bolt Lapping Kit; Bolt Face Truing Tool; Manson Receiver Ring Facing Cutter; Multi-Vise with Jaw Pads; Silicone Carbide Abrasive; and Do-Drill Cutting Oil.
Highlights from the Rifleshooter.com article:
1. Chasing the Threads
We use the bushings to guide the receiver tap. This chases the threads and ensures they are square.
2. Truing the Receiver Face
Using the receiver facing tool, the front of the receiver is trued. The tool is placed over the tap and turned by hand. We used Do Drill to lubricate it.
3. Lapping the Lugs
The bolt lapping tool screws into the front of the action and applies rearward pressure on the bolt face. A little bit of lapping compound is placed on the front of the receiver lugs. The bolt handle is then raised and lowered repeatedly. Note — it is critical that we do not get any lapping compound on any other surfaces.
4. Truing the Bolt Face
On this bolt, the central part of the bolt face was low. After the truing operation, this Rem 700 bolt face is now completely square to the action.
IMPORTANT: Rifleshooter.com states: “This article highlights our project and is presented for information purposes only. This provides an overview of the process and should not be attempted without the guidance and supervision of an experienced gunsmith“.
Initial radar testing shows an interesting stability trend for slugs vs. pellets: drag is minimized for pellets in slower-twist barrels, while drag of slugs is minimized for a faster twist. Also, consistency of drag/BC is best when drag is minimized (BC maximized).
Show below are test data for .300 caliber 44.5 grain Slug and .300 caliber 44.8 grain Pellet, both shot from an air rifle around 800 FPS. Experienced air rifle shooters told us to expect this so it’s nice to see the measurements supporting this trend!
So why is fast twist good for slugs while bad for pellets and vice versa? Air rifle pellets with a skirt are mostly drag-stabilized, not spin-stabilized. So, they don’t need much if any spin at all to fly point forward; the skirt catches the air like the fins of a rocket. As such, spinning the pellets faster only becomes a problem of dynamic stability. If I had any suggestion after looking at this data, it would be to try an even slower twist for pellets, perhaps a 1:60″ (one turn in 5 feet) or even 1:120″.
Slugs are spin-stabilized so it reasons that more spin suppresses yaw and maximizes BC, to a point. Based on these results, it appears the slug is reaching max stability/BC with the 1:22″ and the 1:18″ provides no further benefit. Again, these are just initial findings, we’re eager to explore further in the coming weeks! To view our recent Air Rifle projectile testing, with full 8-minute video, CLICK HERE.
All shooters, even rimfire enthusiasts, should always wear ear protection when at the range. A typical rifle gunshot is very loud — in the region of 140 to 170 decibels (the pain threshold is 130-140 db). Without ear protection, you can permanently damage your hearing during a single shooting session. We all know older shooters who are partially deaf, or who suffer from Tinnitus, because they didn’t use earplugs or muffs when they were younger.
How Humans Hear Sounds — Amazing Video Reveals All
The human sense of hearing involves multiple delicate internal membranes, bones, organs, and nerves. Shooters understand the importance of protecting their hearing, but they may not understand the bio-mechanics of human hearing. We hear sounds through Auditory Transduction. Sound waves vibrate the ear drum (tympanic membrane), but that is only the beginning. These vibrations are passed along via tiny rocker-arm-like bones to be “processed” in a spiral chamber, the cochlea.
This remarkable VIDEO explains how humans hear sounds. We strongly recommend you take the time to watch and learn. The hearing you save may be your own!
Click Speaker Icon to turn on the video’s soundtrack.
Vibrations moving through the cochlea are separated into frequencies and then sent as neural messages to the brain. It is an astonishingly complex process, one that truly seems miraculous when you examine the bio-engineering involved. In the Video above, the process of human Auditory Transduction is explained and illustrated with 3D animation. You really should watch this amazing video. By the end you will have a new-found appreciation for your ability to hear.
⏺ Dual-function electronic muffs — great for range communications
Every shooter should own a pair of Electronic muffs, even if you prefer shooting with earplugs and/or standard muffs. Electronic muffs are great when you are spotting for other shooters or are working near the firing line. They let you hear ordinary conversations while still providing vital hearing protection. You can also wear ear-plugs under muffs for extra sound attenuation.
Plugs PLUS Ear-Muffs — The Benefits of “Doubling-Up” Your Hearing Protection
According to OHS Online: “The combined attenuation of an ear plug and an ear muff is not simply the algebraic sum of the performance of each individual protector. This is due to an acoustic and vibratory interaction between the ear muff and the ear plug that causes them to behave together as a system rather than as independent hearing protectors.
Generally speaking, when you combine two hearing protectors, ear muffs over ear plugs, you can expect an increase [in noise reduction] of between 3 and 10 dB over the higher-performing hearing protector. OSHA [now advises] 5 dB as the [typical] benefit offered by combining hearing protectors.” Source: OHSonline.com
Brian Williams is one of the top CMP match shooters in the nation. At the 2021 CMP Eastern Games, Brian won both the 3-Gun and 4-Gun Aggregates. He also won the 4-Gun at the CMP National Matches in Camp Perry three years in a row — the inaugural 2017 4-Gun Agg, plus 2018 and 2019. Due to COVID, there were no CMP Camp Perry National Matches in 2020, but Brian has been a leading competitor in subsequent seasons and he’ll be at Camp Perry this summer.
Given his remarkable, consecutive “three-peat” in the CMP 4-Gun Aggregate at Camp Perry, it cannot be questioned that Brian is the leading CMP 4-Gunner in the nation. In this article, Brian provides perspectives on the “Wood Gun” game, with suggestions on how to improve your performance with the M1 Garand, M1903 Springfield, M1917 Enfield, M1 Carbine, and other 20th Century military rifles. While Brian also shoots his AR15 for the 4-Gun, today’s article focuses on his favorite firearms — his classic “Wood Rifles”.
VIDEO Showcase — Brian Williams Shoots M1903A3 Prone
The Classic Wood Guns of CMP 4-Gun Competition
Perspectives on M1 Garand, M1903A3, M1917, and M1 Carbine
Q: What should one look for when acquiring older rifles for CMP 4-Gun Games — M1 Garand, M1903/1903A3, M1917, M1 Carbine? What are realistic budgets for these firearms? What kind of accuracy can one expect? What upgrades are important?
Brian: All of these military surplus rifles are out there, but they are getting harder to get your hands on. And, just like everything else, the prices continue to rise. Not that long ago you could get your hands on a M1 Garand for four or five hundred dollars. In today’s market they are usually about double that price. But understand that these rifles are all unique and all have a story to tell. No two are alike, or have the same story. Just like the guns themselves, there are fewer and fewer dedicated gunsmiths for these vintage rifles. But I promise if you look for a good smith, they are out there and they are some of the most interesting people you will ever meet.
M1 Garand — Of the four (4) centerfire guns I shoot in the CMP games, my favorite has to be the M1 Garand. There were over 6 million of them produced in a very short time period, and every single one has its own unique story, and that is just cool. M1 Garands are capable of good accuracy. I believe that a well-maintained M1 with at least a replacement barrel is capable of shooting between 1 and 1.5 MOA.
M1903A3 Springfield — I find that the sights on a M1903A3 are a little easier to see than the sights of the M1903, but both are very accurate rifles. Like most military rifles in the current climate the prices have risen dramatically, but there are some gems out there that can be had for far less than $1000. The nice thing about the Springfield rifle is that almost all of the accuracy than you would want can come from just replacing a worn out 80-year-old barrel. In terms of accuracy, I think a good M1903A3 can shoot 1 MOA most of the time.
M1917 Enfield — This rifle is the newest of my collection and it shoots very well, with just a new Criterion barrel — again about 1 MOA with iron sights. These rifles are very close in price to the M1903 Springfield. But if you do your homework and keep your eyes open, there are always great deals to be found. I actually prefer shooting the M1917 to my M1903A3, due primarily to the M1917’s cock-on-close bolt which allows smoother cycling.
M1 Carbine — By 1945 there had been more M1 Carbines built than Garands. Today the Carbine can be harder to find, and due to the scarcity the price has shot up and most military M1 Carbines are going for more than $1000 at this point. The great thing about the M1 Carbine is that as long as you have a good ammo supply this rifle can shoot. Honest. I have had countless numbers of people that tell me that there is not an M1 carbine that will shoot. I can tell you from experience that they will, but you are going to have to put in some time with one to learn how to get it to shoot where you want it.
The M1 Carbine shoots the .30 Carbine round, with 110gr bullet going about 1990 FPS. In comparison, the .30-06 Springfield round used in the M1 Garand is almost three times more powerful than the .30 Carbine.
Reloading for .30-06 Springfield Rifles
Tech Report by Brian Williams
Reloading for a military surplus gun as different than loading for a modern precision rifle in my opinion. There are a few tasks that care over from one to the other, but the main goal is slightly different. The Target that is being shot in the CMP games matches has a rather generous 10 ring, and with a little larger target you focus needs to change from a round with ultra accuracy to a round that is safe and functions well in your particular rifle.
Bullet Selection — With the .30-06 for my Garands and Springfields I stick mostly with 168gr bullets plus some 155-grainers. These bullet weights have just worked for me in the past.
Cartridge Brass (Milsurp vs. Commercial) — I use both military and commercial brass, having success with each. I do prefer commercial brass as it is easier to prep for the first reload. Military brass usually has a primer crimp of some kind that needs to be removed, and I have found that trimming these cases can sometimes leave you scratching your head as the OAL on military cases varies considerably.
Power Charge and Dispensing — I have always had good success with Hodgdon H4895 powder. My load has always been right around 47.0 grains, with both the 168gr and 155gr bullets. I also use the Auto-Trickler to drop all of my powder charges. This is a fantastic piece of equipment that not only gives super-consistent powder charges quickly, but it also makes one less thing that you have to worry about while on the firing line. With the Auto-Trickler, there is never a question about the powder charge in your ammo. As for primers, I have been shooting CCI 200 Large Rifle primers for many years and have never had an issue.
Case Care and Trimming — With most of the .30-06 brass that I use, I will only reload them 5 times maximum. I don’t push the brass too much, because the Garand’s semi-auto cycling can be tough on the cases. I also trim my cases for OAL each reload cycle. I use a Giraud power trimmer, so trimming is relatively quick and easy.
The chambers in some of the older rifles are not perfectly-machined like a modern high-end rifle. This can cause the brass to grow a little inconsistently, so I find trimming every load cycle helps to make sure that everything stays in a nice safe spec.
Case Annealing — A few years ago I started to anneal my .223 Rem service rifle brass. Now I have added that process for all my match ammunition. I anneal after every firing. It is a rather easy step as I can have my auto-feeding Annealeez machine running while doing something else, so annealing does not add a great deal of time or effort to the reloading process.
The .30-06 case was the father of the .308 Winchester, which was adopted as the 7.62×51 NATO cartridge. Brian has another Garand chambered in .308 Win which he shoots in Service Rifle Class in the President’s Match and NTI Match at Camp Perry.
Perspective on CMP 4-Gun (and 3-Gun) Aggregate Competition
Since the CMP’s introduction of the 4-Gun Aggregate in 2017, combining three classic wood rifles with the modern AR15-platform guns, Brian has lead the field, winning the 4-Gun at every National Match cycle held so far by the CMP at Camp Perry. Brian has also dominated in the 3-Gun Aggregate which includes the three older wood rifles.
Q. What’s the most fun/satisfying thing about shooting CMP 4-Gun Aggs?
Brian: The 4-Gun Agg takes place over several days, and is usually decided by a very thin margin of victory. Making sure that you are prepared for all four rifles and keeping focus through several days of competition is very difficult. There is a great sense of accomplishment when you are able to perform well for the entire aggregate.
Q. Do you like shooting the wood rifles more or the AR in Modern Military?
Brian: No question that the wood rifles are my favorite. A steel rifle, with a beautiful wood stock (see above), firing the .30-06 Springfield, is “where it is all at” in my opinion.
Q. What is the best approach to shooting these older Wood Guns?
Brian: One of the things that I struggled with shooting the “wood guns” is that it is so easy to tell yourself that its the rifle and not your bad habits or poor position. “The rifle is far older than I am it must just not be a shooter”. In order to be successful with these rifles you have to be honest with yourself. Only then will you improve.
Q. If you could change any CMP 4-Gun course of fire, or revise aspects of the CMP 4-Gun discipline, what would you modify/alter?
Brian: There is always conversation around changing the course of fire, target dimensions, or putting certain rifles into different classes. I like the fact that I have to adapt myself to fit the current discipline. I would surely not want to make it any easier. I feel like that would decrease some of the satisfaction that I get from competing well.
Q: What are your key gear items and shooting accessories?
Brian: A good shooting coat has been very important for me. I currently use a Creedmoor Hardback Cordura Leather Coat. I also think that a good rifle sling is very important. For the last couple of years I have been using a Eric Hollis National Match leather sling and love it. I own a ShotMarker e-Target system and I think it’s one of the best training tools that I own. It just makes it so easy to shoot, capture information, and then be able to recall that information later and use it to improve.
The Mental Game — How to Become a Better Marksman
Q. What is your pre-match routine (mental/physical match prep)?
Brian: I try not to do anything different on match day that I would do any other day. I am a coffee drinker and drink just as much on match day as I do on any work day. This game is very mental, and I find that treating match day just like any other day helps me to control stress and anxiety.
Q. If you could do it all over from the beginning, how would you change your training/practicing processes?
Brian: I have learned that practice makes me better, but just sending rounds down range is not that beneficial to me. Some of the biggest improvements I have made have come from practice sessions where I did not fire very many rounds. Working through the shot process, being honest with myself, and evaluating what needs to happen to get the desired outcome.
Q. Most guys will never achieve what you’ve done in Marksmanship, i.e. win multiple multi-gun titles. What are the other positive things people can get from the sport, beyond trophies and glory?
Brian: This is an easy one — this sport is full of the most genuine, thoughtful, and helpful people out there. I have friendships with people that I only see a couple times per year… yet when we see each other it’s like we had just gotten together last week. This does not just apply to fellow competitors, but also to the folks who run matches, to those who supply gear, even to spouses of competitors who’ve fed me more times than I can remember.
Brian “Carbine” Williams, King of Wood Guns
— Commentary by Dennis Santiago
When it comes to CMP Games competition, Brian Williams presently dominates the multi-gun field. I first met Brian at the so-called Michigan Embassy at Camp Perry, a makeshift compound of tables, pop ups and lawn chairs where competitors gather at the end of the shooting day to exchange stories. It’s a “who’s who” gathering of High Power personalities exchanging tall tales. In this prestigious crowd, Brian Williams is “King of Wood Guns”, his mastery of the GSMM (Garand, Springfield, Modern Military) Four-Gun Aggregate renown to all. Yet he is as humble a champion you can ever hope to spend time with.
I discovered that Brian and I share a mutual love of the U.S. .30 Caliber M1 Carbine, a rifle many other shooters don’t give a second thought. But we believe in the potential of the little gun. We know that when driven right, the joy of collecting gold achievement pins with it. I’ve enjoyed trading notes with Brian about how to make it shoot better to turn in scores in the high 360s to mid-370s out of a possible 400. In this regard, I assure you Brian is again the guy who will shoot the 400 possible on any given day. He truly deserves the moniker “Carbine” Williams.
BONUS: Rimfire Sporter — Brian’s Fifth Gun
Along with his centerfire rifles, Brian Williams likes to shoot in CMP Rimfire Sporter matches. In fact, he won the Rimfire Sporter Match “O” Class (Iron Sights) at the 2021 CMP Eastern Games. Shown below is his Czech-made .22 LR CZ 452 Ultra Lux bolt-action rifle.
Q: How do you like Rimfire Sporter? Do you have to adjust your technique for rimfire vs. centerfire?
Brian: Most of the fundamentals will transfer from centerfire guns to the rim fire guns, the biggest difference is in the course of fire for the match. The Rimfire course of fire includes a slow-fire seated stage, and a rapid-fire standing stage, both of these stages are unique to the Rimfire Sporter game. I enjoy this discipline, but due to the scheduling of the Rimfire Sporter match at Nationals I have not yet shot this event at Camp Perry. I did do well in this event at both the Eastern CMP Games and New England CMP Games.
Readers who have just recently discovered the Daily Bulletin may not realize that AccurateShooter.com has hundreds of reference articles in our archives. These authoritative articles are divided into multiple categories, so you can easily view stories by topic (such as competition, tactical, rimfire, optics, shooting skills etc.). One of the most popular categories is our Technical Articles Collection. On a handy index page (with thumbnails for every story), you’ll find over 120 articles covering technical and gunsmithing topics. These articles can help you with major projects (such as stock painting), and they can also help you build more accurate ammo. Here are six popular selections from our Technical Articles archive.
Stress-Free Pillar Bedding. Richard Franklin explains how to do a top-quality bedding job, start to finish.
Gun Safe Buyers Guide. Our comprehensive Safe Buyers Guide examines the key features to consider in a safe — Wall Thickness, Volume, Shelving, Fire Rating, Lighting, Weight and more. We also explain the Pros/Cons of Dial vs. Digital (Keypad) locking systems.
Savage Action Tuning. Top F-TR shooter Stan Pate explains how to enhance the performance of your Savage rifle by optimizing the torque settings of the action screws.
Complete Precision Case Prep. Jake Gottfredson covers the complete case prep process, including brass weight sorting, case trimming, primer pocket uniforming, neck-sizing, and, case-neck turning.
Stock Painting Instructions. Step-by-step guide for stock painting by expert Mike Ricklefs. Mike shows both simple coverage and fancy effects.
Ultrasonic Case Cleaning. This article reviews the recommended process for cleaning cartridge brass with ultrasonic cleaning machine. We cover the right liquid solutions, processing times, and case drying options.
The anvil is the tripod-shaped thin metal piece protruding above the bottom of the primer cup. Getting the primer sitting fully flush on the bottom of the case primer pocket, without crunching it too much, requires some keen feel for the progress of primer seating.
Sadly, Glen Zediker passed away in October 2020. However, his insights live on through his written works. This feature is based on Glen’s popular reloading books and his articles for the Midsouth Blog.
In two informative Midsouth Blog articles, Glen Zediker offered helpful advice on priming. First he examines what happens to the primer itself as it is seated in the cup. Glen explains why some “crush” is important, and why you never want to leave a high primer. Glen also reviews a variety of priming tools, including his favorite — the Forster Co-Ax Bench Primer Seater. Then he offers some key safety tips. Glen provides some “rock-solid” advice about the priming operation. These reloading tips came from Glen Zediker’s popular book, Top-Grade Ammo.
Priming Precision vs. Speed
Glen writes: “The better priming tools have less leverage. That is so we can feel the progress of that relatively very small span of depth between start and finish. There is also a balance between precision and speed in tool choices, as there so often is.”
Benchtop Priming Tools — The Forster Co-Ax
Glen thinks that the best choice among priming options, considering both “feel” and productivity, may be the benchtop stand-alone priming stations: “They are faster than hand tools, and can be had with more or less leverage engineered into them. I like the one shown below the best because its feeding is reliable and its feel is more than good enough to do a ‘perfect’ primer seat. It’s the best balance I’ve found between speed and precision.”
Load Tuning and Primers
Glen cautions that you should always reduce your load when you switch to a new, not-yet-tested primer type: “The primer is, in my experience, the greatest variable that can change the performance of a load combination, which is mostly to say ‘pressure’. Never (never ever) switch primer brands without backing off the propellant charge and proving to yourself how far to take it back up, or to even back it off more. I back off one full grain of propellant [when I] try a different primer brand.”
Priming Safety Tips by Zediker
1. Get a good primer “flip” tray for use in filling the feeding magazine tubes associated with some systems. Make double-damn sure each primer is fed right side up (or down, depending on your perspective). A common cause of unintentional detonation is attempting to overfill a stuffed feeding tube magazine, so count and watch your progress.
2. Don’t attempt to seat a high primer more deeply on a finished round. The pressure needed to overcome the inertia to re-initiate movement may be enough to detonate it.
3. Don’t punch out a live primer! That can result in an impressive fright. To kill a primer, squirt or spray a little light oil into its open end. That renders the compound inert.
4. Keep the priming tool cup clean. That’s the little piece that the primer sits down into. Any little shard of brass can become a firing pin! It’s happened!


 Setting Magnification Levels
 Some say that a higher fill ratio is good because it prevents the powder from settling differently in the case (which could lead to inconsistent ignition and greater MV SD). This explanation sounds good, and went unchallenged for a long time. However, Applied Ballistics has done some interesting testing that sheds new light on the density issue.


 All shooters, even rimfire enthusiasts, should always wear ear protection when at the range. A typical rifle gunshot is very loud — in the region of 140 to 170 decibels (the pain threshold is 130-140 db). Without ear protection, you can permanently damage your hearing during a single shooting session. We all know older shooters who are partially deaf, or who suffer from


 Bullet Selection — With the .30-06 for my Garands and Springfields I stick mostly with 168gr bullets plus some 155-grainers. These bullet weights have just worked for me in the past.
  Power Charge and Dispensing — I have always had good success with Hodgdon H4895 powder. My load has always been right around 47.0 grains, with both the 168gr and 155gr bullets. I also use the Auto-Trickler to drop all of my powder charges. This is a fantastic piece of equipment that not only gives super-consistent powder charges quickly, but it also makes one less thing that you have to worry about while on the firing line. With the Auto-Trickler, there is never a question about the powder charge in your ammo. As for primers, I have been shooting CCI 200 Large Rifle primers for many years and have never had an issue.

 Brian: I have learned that practice makes me better, but just sending rounds down range is not that beneficial to me. Some of the biggest improvements I have made have come from practice sessions where I did not fire very many rounds. Working through the shot process, being honest with myself, and evaluating what needs to happen to get the desired outcome.


