Here is the impressive T-Rex front rest from Rodzilla. In the world of front rests there have been many innovations over the past decade, but this front rest from Rodzilla really represents significant innovation. The T-Rex offers impressive capabilities that can truly take your shooting experience to the next level. Along with the T-Rex, Rodzilla also offers a lighter unit, the Raptor Front Rest, which is smaller and lighter for easier travel. The Raptor shares many of the advanced features of the T-Rex.
Review byF-Class John
At first glance the T-Rex may resemble some other coaxial front rests. The T-Rex has a joystick, three points of ground contact, and a platform for the rifle. But look closer and you’ll see this isn’t your typical rest. Designer/builder Rod Brakhage (the Rod in Rodzilla) has started from the ground up to create the most user-friendly, match-ready, modular front rest on the market. T-Rex MSRP ranges from $1995.00 to $2305.00 depending on options.
The T-Rex weighs just over 21 pounds — about the same as many mid-sized rests. However the T-Rex has a large footprint, rivaling the largest rests on the market. Rod tells us: “The T-Rex has a similar footprint to the SEB MAX… 12.5″ wide X 11.25″ front to back. However, at just over 21 lbs. my rest weighs less than a SEB NEO.” This combination (wide base with moderate weight) allows for an incredibly stable platform that is still quite portable.
Rugged Carry Case Makes Transport Easy
Rodzilla delivers the T-Rex in a custom-designed hard carry case that fits it perfectly and still has room for additional feet and accessories. This sturdy case makes taking the T-Rex to matches easy. The case is strong enough that I can stack things on top of it in my truck. One side note, if you plan on storing your rest in the case between matches, it’s wise to put a desiccant pack in the case to absorb moisture.
The T-Rex boasts an adjustable joystick that extends from 15.5″ to 21″ in length. With this adjustability, no matter what your stock length or design, you can find a comfortable position without having to stretch uncomfortably. And you won’t have to shop for a joystick extension.
Using the T-Rex is a pure pleasure when shooting prone F-Class or from the bench. That’s because of its revolutionary ability to make large vertical adjustments without getting out of position. This is accomplished with a detachable arm/handle you can actuate while behind the gun. (This is the long T-handle on the right side of the rest).
The simplest way to show why this is a game changer is to consider when you’ve just left the 800-yard line during a match. You head up to the 900-yard line, get all set up, the range officer calls a hot line and suddenly realize you didn’t adjust your elevation for the new yardage. Normally you’d have to turn your scope dials then get up from your position to adjust your front rest, or at best stretch uncomfortably in hopes of reaching your rest adjustments. With the T-Rex, you simply turn the right-side gross elevation handle while still in position, move to your new hold point, and begin firing.
This same principal applies to other situations that require adjusting vertical without breaking your shooting position. All of this is accomplished in conjunction with an incredibly sensitive, yet easy-to-adjust counterbalance system. Once set, the counterbalance ensures that smooth and fluid motion occurs in any direction without any resistance or fear of backlash that might affect your shots.
Very Wide Horizontal Range is Useful in Matches
When it comes to looking downrange, the T-Rex can deliver nearly twice the range of horizontal motion as that of some other rests. (In high ratio mode, there is about 70 MOA of horizontal travel.) This means you can quickly scan a wide expanse of targets/flags without having to change magnification or go to your spotting scope. The huge field of view is a great help when shooting in a condition that is switching and you want to view targets on either side.
Rodzilla offers a number of options for the T-Rex. The first choice is the top. Select the Rodzilla 5-Axis roller top or the new 5-Axis IBS-legal sandbag top. Or, if your budget permits, you can order both — they are easily interchangeable in minutes. The video below shows the easy top-swap procedure:
This video explains how to exchange tops on the Rodzilla T-Rex
5-Axis Top Advantages
Rod Brakhage tells us: “This innovative new 5-Axis top rotates independently of the base plate so no matter how the rest is set on the line you only need to move your rear bag to pan across the row of targets with no binding of the rifle. Also, the sides of the rifle run against vertical Delrin rollers.”
Color Choices for Rodzilla T-Rex Base
In addition to the choice of tops, there are four (4) standard colors on the website, but for an additional fee you can have it made in just about any color you want, which is pretty cool.
Choose Standard Feet, Sand Feet, or Both
When you order a T-Rex, you can choose standard bench feet or large, gorgeous sand/dirt feet. Or order them both, as I did. I use the bench feet at my regular club where I shoot from wood and concrete platforms, but the sand feet are great for matches held on dirt, gravel, sand, or grass. These sand feet provide an incredibly stable platform on the ground.
Linear Bearings Allow Ultra-Smooth and Precise Adjustments
Rodzilla’s Rod Brakhage is a smart, innovative designer committed to improving the shooter’s experience. One of Rod’s key innovations in the T-Rex is the use of linear ball bearings for both X and Y axis: “The horizontal/vertical assembly, or X-Y block, moves on 6 double-sealed ball bearings that travel on hardened shafts for effortless movement”.* This system delivers a smooth, fluidity of movement that lets you aim quickly and efficiently. Gone are the days of having to move PAST your aim point and then come back (to get the aim right), or resetting your joystick position after every shot. With the T-Rex, you make one smooth, precise move and your aim is set. And it stays set after the shot.
The T-Rex allows you to position your crosshairs with pinpoint precision every time and if you need to move them just a hair, you can do it with ease. In F-Class, we often hold between the target’s scoring lines to correct for wind variations (without touching the scope’s windage knob). With the T-Rex, I could make those holds quickly and precisely without wasting time bouncing back and forth.
Overall, I’ve come to really enjoy the repeatable confidence the T-Rex has given me whether I’m doing load development, practicing at the range, or shooting a match. So, if you’re in the market for a superb front rest that just might give you an edge or, at minimum, make your life easier, head over to TheRodzilla.com and learn all about the impressive, T-Rex Front Rest.
* Rod Brakhage explains: “The bridge travels up and down on double-sealed ball bearings on 1” hardened shafts. My design utilizes a rack and pinion with an 18″-long drive shaft for adjusting the height of the bridge. This system allows you to stay in shooting position and looking through the scope while adjusting the vertical placement of your crosshairs. Precisely dial your vertical to the center of your target with the joy stick at the exact height you prefer. A 1/4 MOA movement is very easy to accomplish with this design. Also, there is no need to lock the bridge as there is an adjustable clutch to hold the vertical position. The long drive shaft utilizes a scalloped hand wheel on the shooters side and a quick coupling adapter on the rest side. Once adjusted you merely pull back on the drive shaft and remove it or just set it on your shooting mat out of the way. The geared rack and pinion can be placed on the right for right-handed shooters or on the left.”
On our main AccurateShooter.com site, you’ll find a good article by GS Arizona on the Basics of Neck Turning. If you’re new to the neck-turning game, or are just looking for good tips on improving your neck-turning procedures, you should read that article. Below we offer some highlights and photos from the article, but you’ll need to read the whole story to view all the illustrations and follow all the procedures step by step.
Why Should You Consider Neck Turning?
Let’s assume that your rifle doesn’t have a tight neck chamber that requires neck turning; if you have a tight neck chamber, of course, the answer to the question is “because you have to”. For the rest of us, and that includes the vast majority of Highpower shooters, neck turning isn’t a requirement, but it can be a useful way to bring your ammunition a small but meaningful step closer to that pot of gold at the end of the rainbow: perfection. I’m not talking about a theoretical improvement, but a real one, an improvement that lies in equalizing and optimizing the neck tension of your loaded rounds. Inconsistent neck tension is a real contributor to increased muzzle velocity variance which itself is a significant factor in increased elevation dispersion at long range. So there’s our basic reason for neck turning: to equalize and optimize neck tension in order to reduce elevation dispersion.
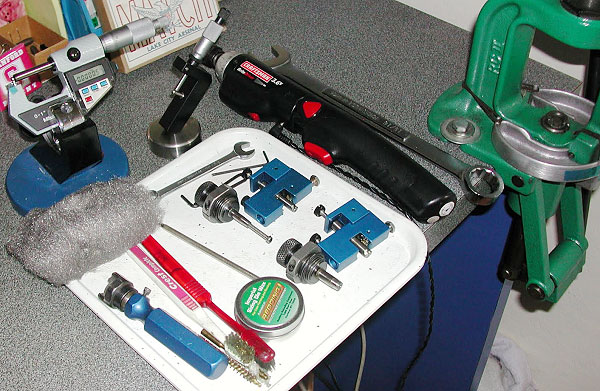
The Tools of the Trade
Here you see everything I use and a bit more. The press, a cordless screwdriver (always plugged in, turning is tough on the old battery), a couple of K&M neck turners (one set up for 6mm, the other for .30 caliber) an expander for each size, some Imperial lube, an old toothbrush or two to keep the cutter clean, a handle with a caseholder (for those emergencies when the screwdriver dies and there’s just one more case to go!), steel wool and a tubing micrometer finish the list of tools. Hey, I left the dial calipers out of the picture! They’re always handy, keep them around, but they are useless for measuring neck thickness, so don’t try. I usually use an Optivisor magnifier while I turn necks, very handy for a clear view of what’s happening on the neck.
Expanding the Neck
Put some lube on the inside of the case neck and run it into the expander. Really, this isn’t hard. I prefer to expand each case immediately before turning it as opposed to expanding all the cases and then turning them. Brass is somewhat springy and will tend to go back toward its original size; therefore, by expanding and turning immediately, you are more likely to have all cases fit the mandrel with the same degree of tightness and to get a more consistent depth of cut.
Cutter Adjustment for Cut Depth and Length
All the tools I’ve seen have pretty good adjustment instructions. The only thing they don’t tell you is that you should have five to ten spare cases to get it right initially. Anything of the right diameter will do while you learn, for instance, just use that cheap surplus .308 brass to do initial setup and save the precious .30-06 for when you know what you’re doing. Be patient and make your adjustments slowly; you’ll need to set the cutter for thickness as well as length of cut (just into the shoulder). The depth of cut (brass thickness) takes a bit of fiddling, the length of the cut is generally easy to set.
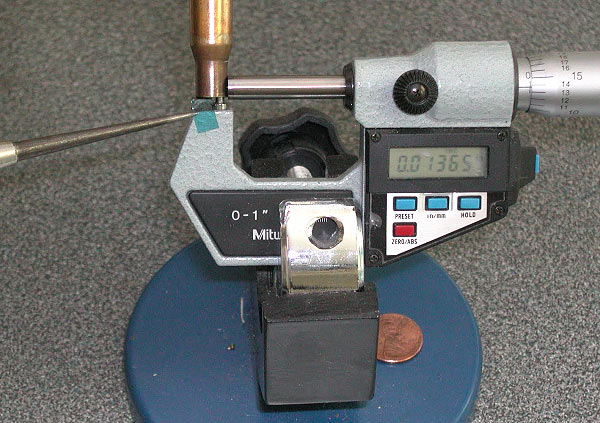
The Finished Product — A Perfectly Uniform Neck
If you read the whole article, and follow the procedures using quality tools, you should get very good results — with a little practice. To demonstrate, here’s an example of my finished, neck-turned brass. You’ll see there is a perfect, 0.0125″ thick neck. It’s very uniform around the circumference, usually I only see 1 or 2 ten-thousandths variance. Now, with the necks uniformed like this, we can select the bushing size that will give us our preferred neck tension and experiment with various levels of tension, secure in the knowledge that all of the cases will actually have the desired neck tension.
About the author — “GS Arizona” was the writing handle for German Salazar, a top-tier rifleman and gun writer. Sadly, German passed from a medical condition in 2022. German was instrumental in helping this website and our Forum get started, and we remember him as a very dear, valued friend.
German was a great individual, and a great asset to the sport. An attorney by trade, with an engineering background, German was one of the very best gun writers, who had high master shooting skills to match his writing abilities.
Need some interesting reading material? Check out the FREE digital editions of Shooting Industry Magazine. Along with reports on new products, Shooting Industry features reports on important trends in the shooting sports world. Below we’ve included quick links to the first two Shooting Industry editions for 2024. These monthly magazines can be read online for free. Also, as they are in PDF format you can easily print all or part of these monthly magazines.
If you want to review other monthly editions, CLICK HERE to access the Shooting Industry Digital Archives page with links for all 2022, 2023, and 2024 monthly issues.
The latest digital edition of Shooting Industry magazine features the third segment of SI’s comprehensive 2024 New Product Showcase. This 9-page article, starting on Page 36, showcases dozens of recently-introduced rifles, handguns, optics, and shooting accessories. There are quite a few very cool new hunting rifles including the Savage 110 UltraLite Elite, and the innovative 5.8-pound Bergara MgMicro Lite with carbon-wrapped barrel.
You can also see the 2024 NEW Product Showcase PARTS One and Two on the main Shooting Industry website with a mobile-friendly format. Click the links above.
Special Feature: New Trends in Self-Defense Handguns
The February 2024 issue of Shooting Industry has a good article on recent trends in self-defense handguns. Optics-Ready pistols are very popular, and SIG Sauer has had top-selling guns in 2023.
The Southwest Nationals (SWN) is right around the corner. Hosted by the Desert Sharpshooters Rifle Club at the Ben Avery Shooting Facility outside Phoenix, the 2024 SWN takes place February 14-18, 2024. One of the major F-Class matches of the year, the SWN will feature top F-Open and F-TR rifles. And many of those F-Open rigs will be running McMillan stocks. Today’s Sunday GunDay story is about the most sophisticated F-Open stock in McMillan’s line-up, the Kestros ZR.
Kestros ZR Stock — Impressive Design for Competition
Review by F-Class John
Walk the line at just about any rifle competition and you’ll see your share of McMillan stocks. Known for crafting high-quality fiberglass/composite stocks, McMillan has long been at top choice for competitive shooters, hunters, and tactical marksmen. McMillan’s latest top-of-the-line F-Open stock is the impressive Kestros ZR which features an extended front bag-riding Z-Rail. McMillan notes that the ZR’s “extended rail system, which extends the fore-end of the stock, provides all the benefits of the rails on the Kestros R stock while also lowering the center of gravity.” In addition, “the bottom of the buttstock is perfectly parallel to the rail with a 5/8″ flat for improved performance in a rear sandbag.”
The Kestros line features several models, but the ZR represents the pinnacle of craftmanship. Each one is finished off by a single craftsman and takes roughly four times longer to create than any other Kestros. So when McMillan offered me a chance to test one out, I jumped at the opportunity.
The aluminum Z-Rail extends nicely from the front of the stock and has a nice contrast of metal against the matte finish of the stock. I inspected the rails and noticed that they are very cleanly machined — all the corners and rails were precise and sharp. As a result, I grabbed some 1000-grit sandpaper and just lightly knocked the edges and corners down just to keep from accidentally scratching myself or my gear.
When I was ordering the ZR, lead time was about 6-9 months. I was like a kid on Christmas when mine arrived after seven months. Holding a Kestros ZR is definitely a unique experience compared to a traditional wood stock and you can’t help but feel like you’re holding something special. I chose three shades of blue that transitioned dark from the butt stock to lighter on the fore-end in a spectacular flame pattern. With McMillan, there are thousands of possible color and pattern combinations. These color/pattern options are outlined on McMillan’s Gallery Page.
The Kestros ZR comes fully inletted with pillars. I was able to bolt my Defiance action right into the stock “as is” without a bedding job. (McMillan states bedding is not required, though this is certainly something most Kestros owners will do). I threw in my action, fit a couple action screws and tightened it all down. I was amazed at how nicely it all fit together with even the little details like the port cutout being perfectly smooth with my action port. I loaded up some .284 Win rounds and headed to the range to test the new stock at 100 yards.
Here are examples of targets shot with the Kestros ZR at 100 yards.
During initial range testing (see above) I shot nine groups for vertical and all of them were under 0.40″ with the smallest being .08″ of vertical. I topped off the testing by shooting a 200-11X the next week at my club match. The thing that really stood out was how smoothly the stock tracked with its lower center of gravity while shooting free recoil and ultimately this translated to success on target.
Low-Rider — You may find that because of how low the Kestros rides as well as its additional length due to the Z rail, you may require an extension for your front rest.
CONCLUSION — Great Modern Low-Profile F-Class Stock
Overall the Kestros ZR exceeded my expectations. After a small learning curve, it was a joy to shoot and it performed great. As someone who believes in the power of muscle memory, I found each time I transitioned between the Kestros and my traditional wood stocks there was a slight adjustment period but not enough to impair accuracy in any way. Something to consider is that because every Kestros is made to the same dimensions, it makes owning multiples an easy process of switching between guns without any need for readjustment.
For those willing to put in the practice, your patience will be rewarded, and I think most shooters will find the Kestros ZR could become their new favorite stock. If you’re in the market for a new F-Open stock, the Kestros ZR is definitely one to consider.
McMillan Kestros — Proven National Championship-Winning Stock
Norm Harrold (above) won the 2018 USA F-Open National Championship shooting a .284 Shehane. Norm’s F-Open rig features a McMillan Kestros ZR stock and Bartlein barrel chambered for the .284 Shehane, which has a bit more case capacity than a standard .284 Winchester. Norm loaded Berger 184gr 7mm bullets in Lapua brass. Norm revealed his load in an Erik Cortina YouTube Video.
Tips for Ordering a Kestros ZR
You can order a Kestros ZR and other Kestros stock models via McMillan’s Competition Stocks Page. While there are a number of options available, McMillan has a helpful guide that walks you through each one to ensure you get exactly what you need. F-Class John notes: “While filling out my form I realized that because I have a custom-designed action, I needed some help, so I gave McMillan a call. The staffers were incredibly helpful and their knowledge of all the major actions out there made answering my questions a snap. I liked the fact that there is no set, fixed price on any of the stocks. The pricing system allows customers to get just what they want (within limits) and not have to pay for anything they do not want or need.”
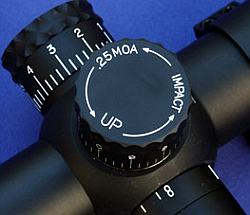
Let’s say you’ve purchased a new scope, and the spec-sheet indicates it is calibrated for quarter-MOA clicks. One MOA is 1.047″ inches at 100 yards, so you figure that’s how far your point of impact (POI) will move with four clicks. Well, unfortunately, you may be wrong. You can’t necessarily rely on what the manufacturer says. Production tolerances being what they are, you should test your scope to determine how much movement it actually delivers with each click of the turret. It may move a quarter-MOA, or maybe a quarter-inch, or maybe something else entirely. (Likewise scopes advertised as having 1/8-MOA clicks may deliver more or less than 1 actual MOA for 8 clicks.)
Reader Lindy explains how to check your clicks: “First, make sure the rifle is not loaded. Take a 40″ or longer carpenter’s ruler, and put a very visible mark (such as the center of an orange Shoot’N’C dot), at 37.7 inches. (On mine, I placed two dots side by side every 5 inches, so I could quickly count the dots.) Mount the ruler vertically (zero at top) exactly 100 yards away, carefully measured.
Place the rifle in a good hold on sandbags or other rest. With your hundred-yard zero on the rifle, using max magnification, carefully aim your center crosshairs at the top of the ruler (zero end-point). Have an assistant crank on 36 (indicated) MOA (i.e. 144 clicks), being careful not to move the rifle. (You really do need a helper, it’s very difficult to keep the rifle motionless if you crank the knobs yourself.) With each click, the reticle will move a bit down toward the bottom of the ruler. Note where the center crosshairs rest when your helper is done clicking. If the scope is accurately calibrated, it should be right at that 37.7 inch mark. If not, record where 144 clicks puts you on the ruler, to figure out what your actual click value is. (Repeat this several times as necessary, to get a “rock-solid”, repeatable value.) You now know, for that scope, how much each click actually moves the reticle at 100 yards–and, of course, that will scale proportionally at longer distances. This optical method is better than shooting, because you don’t have the uncertainly associated with determining a group center.
Using this method, I discovered that my Leupold 6.5-20X50 M1 has click values that are calibrated in what I called ‘Shooter’s MOA’, rather than true MOA. That is to say, 4 clicks moved POI 1.000″, rather than 1.047″ (true MOA). That’s about a 5% error.
I’ve tested bunches of scopes, and lots have click values which are significantly off what the manufacturer has advertised. You can’t rely on printed specifications–each scope is different. Until you check your particular scope, you can’t be sure how much it really moves with each click.
I’ve found the true click value varies not only by manufacturer, but by model and individual unit. My Leupold 3.5-10 M3LR was dead on. So was my U.S.O. SN-3 with an H25 reticle, but other SN-3s have been off, and so is my Leupold 6.5-20X50M1. So, check ‘em all, is my policy.”
From the Expert: “…Very good and important article, especially from a ballistics point of view. If a ballistics program predicts 30 MOA of drop at 1000 yards for example, and you dial 30 MOA on your scope and hit high or low, it’s easy to begin questioning BCs, MVs, and everything else under the sun. In my experience, more than 50% of the time error in trajectory prediction at long range is actually scope adjustment error. For serious long range shooting, the test described in this article is a MUST!” — Bryan Litz, Applied Ballistics LLC.
Bryan also uses a Tall Target Test to determine true click values. CLICK HERE to read a detailed, explanatory article about Litz’s Tall Target Test.
This article, as published in AccurateShooter.com, contains copyrighted content. It shall not be republished in whole or in part without advanced permission in writing. The act of republishing constitutes legal consent to licensing fees.
UPDATE: On 2/5/2024, the 9th Circuit granted a stay of Judge Benitez’s injunction ruling. So Californians may NOT purchase ammunition from out of state. CLICK Here for CRPA update and watch video below for details.
NOTE: The Benitez Ruling Explained Below Has Been Blocked by the 9th Circuit
Big news for California gun owners. You can now purchase ammunition online and have it shipped directly to your residence in California. And you can purchase ammo at California gun shops without paying for a background check. A Federal Judge has issued an injunction that blocks application of California laws requiring costly background checks for ammo purchases. NOTE: Right now, Californians can buy ammo without these restrictions, but it is possible that the Ninth Circuit could change things very soon. Act now while you can. Being able to mail-order ammunition from major vendors outside California makes ammo more affordable for Californians.
On January 30, 2024, in the case of Rhode v. Bonta, U.S. Federal District Court Judge Roger Benitez issued an order blocking the application of California laws which place severe limits on ammunition purchases by Californians. Benitez ruled that California’s laws requiring background checks on ammunition purchases were unconstitutional and invalid on multiple grounds. As noted by the San Diego Union-Tribune: “U.S. District Judge Roger Benitez ruled that such restrictions violate the Second Amendment. He also ruled that the portion of the law restricting out-of-state purchases violated the dormant Commerce Clause and is preempted by federal law regulating interstate transportation of firearms.”
Washington Gun Law Video Explains the Key Legal Points of Judge Benitez’s Order:
The Associated Press reports: “California residents don’t have to pay for and pass a background check every time they buy bullets, a federal judge has ruled. The Tuesday [1/30/2024] ruling by U.S. District Judge Roger Benitez took effect immediately. California Attorney General Rob Bonta [then] asked Benitez on Wednesday to delay the ruling[.]” Subsequently, Judge Benitez issued an order denying Bonta’s stay request. So, until the 9th Circuit acts, the injunction stands and Californians can buy ammo without a background check.
Four years ago, in April 2020, Judge Benitez had issued a preliminary injunction blocking California’s ammo background check laws. But days later the 9th U.S. Circuit Court of Appeals issued a stay of that injunction, effectively negating the Benitez ruling, and putting California’s unconstitutional laws back into effect. But there have been significant changes now based on recent U.S. Supreme Court decisions, in particular the Bruen case: “After the Supreme Court’s 2022 ruling in New York State Rifle & Pistol Association, Inc. v. Bruen, the 9th Circuit sent the case back to Benitez to be relitigated under that new framework, which holds that modern gun laws must be ‘consistent with the nation’s historical tradition of firearm regulation’.” (SD Union-Tribune).
If you want to ship handguns, as a private party (non-FFL), there are now very limited options. You cannot use the U.S. Postal Service, and, since September 2021, you cannot use FEDEX. Yes, that’s right, FEDEX no longer allows non-FFLs to ship handguns. And now UPS also requires firearms shippers to have a Federal license: “Shipments containing Firearm Products are accepted for transportation only from shippers who are federally licensed and have an approved UPS agreement for the transportation of Firearm Products.” (SEE UPS Rules).
So going through an FFL is the only option. There IS an alternative that can save you significant money. By ordering your shipping labels from ShipMyGun.com, you could save $50 or more on UPS handgun shipping. It is quick and easy.
ShipMyGun.com has a large FFL database, so you can verify the recipient’s address and FFL status. The ShipMyGun.com website has a simple to use label-printing process.
All handgun shipments are fulfilled via next day air. Long guns are shipped quickly via ground and typically arrive within 3-5 business days. (NOTE: For rifles and shotguns it is still possible to use U.S. Postal Service and FEDEX, following their rules.)
How ShipMyGun.com Works
Go to ShipMyGun.com. Click the Create Shipment/Get Started Link. The choose handgun or long gun (rifle, shotgun). Use the FFL Database to find the address for the FFL shop to which the gun will be shipped. All shipments must go to an FFL. Then you fill out the billing information. After confirming all the info, print the label. Then you attach the label to your shipment box and take it to a participating UPS facility. (NOTE: some private UPS stores will NOT handle ANY firearms).
Shipping Questions? Read the FAQ Page
ShipMyGun.com has a helpful Frequently Asked Questions (FAQ) Page. We suggest you read over this before your first shipment. GO TO FAQ PAGE.
Here are some notable Questions & Answers:
Q. Can I ship ammo with my gun?
A. NO, it is against the law to include ammo with your firearm shipment. Loose ammo or boxed ammo cannot be included. Also, inspect (clear) your firearm to ensure it is NOT LOADED prior to packaging.
Q. Should I include identification?
A. Yes, you MUST include a copy of your driver’s license. Dealers will not accept a private party transfer without it. Failing to include your drivers license could delay the recipient from being able to accept their transfer or result in the firearm being returned to you at an additional cost.
Q. Are there any restrictions on what I can and cannot ship?
A. Simply put, yes. You can find our restrictions on our State Restrictions Page. Please note: it is your responsibility to ensure that the firearm you are shipping is legal to own at its destination. If it is not, the dealer who receives the firearm will not transfer it to its intended recipient[.]
About ShipMyGun.com
ShipMyGun.com is a division of BudsGunShop.com. The business has now shipped over 1 million guns for over 250,000 customers. This allows ShipMyGun.com to pass on significant discounts for both private party shippers and FFL shippers.
John Weber, a 70-year-old from England, was given a metal mug by his grandfather in 1945. Though his grandfather had a “good eye” for antiques, John never thought the metal mug was worth much. He played with it as a child, and even used it as a target for his air rifle. The mug, assumed to be brass, has languished in a shoe box under Weber’s bed for decades.
Well, it turns out Weber’s old mug may be the world’s most expensive plinking target! The cup is actually made of solid gold, and is a rare, ancient artwork, crafted over 2300 years ago. The unusual mug, decorated with twin, opposite-facing female heads, was appraised with a value exceeding one-quarter million dollars ($250,000)!
According to news reports, Weber decided to have the old mug (thought to be brass) appraised when he moved from his house. He was shocked to learn that the mug is a Persian gold treasure, beaten out from a single sheet of gold before the time of Alexander the Great. Experts said the type of gold and the way the cup was hammered was “consistent with Achaemenid gold and gold smithing” dating back to the third or fourth century BC. The Achaemenid Empire ruled most of the Middle East and was conquered by Alexander the Great in 330 BC. Could this cup be one of Alexander’s war trophies? What stories could it tell from the past 2300 years?
Ancient Gold Cup Brings $99,000 at Auction
The rare cup was sold at auction by Duke’s Auction house in southwest England in June, 2008. Though the Cup was valued much higher by experts, it only fetched £50,000, or roughly $99,000 U.S. Dollars (at 2008 exchange rates). John Webber said he was still very pleased with that result.
Have you recently purchased a new scope? Then you should verify the actual click value of the turrets before you use the optic in competition (or on a long-range hunt). While a scope may have listed click values of 1/4-MOA, 1/8-MOA or 0.1 Mils, the reality may be slightly different. Many scopes have actual click values that are slightly higher or lower than the value claimed by the manufacturer. The small variance adds up when you click through a wide range of elevation.
In this video, Bryan Litz of Applied Ballistics shows how to verify your true click values using a “Tall Target Test”. The idea is to start at the bottom end of a vertical line, and then click up 30 MOA or so. Multiply the number of clicked MOA by 1.047 to get the claimed value in inches. For example, at 100 yards, 30 MOA is exactly 31.41 inches. Then measure the difference in your actual point of impact. If, for example, your point of impact is 33 inches, then you are getting more than the stated MOA with each click (assuming the target is positioned at exactly 100 yards).
How to Perform the Tall Target Test
The tall target test determines if your scope is giving you the proper amount of adjustment. For example, when you dial 30 MOA, are you really getting 30 MOA, or are you getting 28.5 or 31.2 MOA? The only way to be sure is to verify, don’t take it for granted! Knowing your scopes true click values insures that you can accurately apply a ballistic solution. In fact, many perceived inaccuracies of long range ballistics solutions are actually caused by the scopes not applying the intended adjustment. In order to verify your scope’s true movement and calculate a correction factor, follow the steps in the Tall Target Worksheet. This worksheet takes you thru the ‘calibration process’ including measuring true range to target and actual POI shift for a given scope adjustment.
NOTE: When doing this test, don’t go for the maximum possible elevation. Do NOT max out the elevation knob, running it to the top stop. Bryan Litz explains: “It’s good to avoid the extremes of adjustment when doing the tall target test. I don’t know how much different the clicks would be at the edges, but they are not the same.”
Tall Target Test For Milrad Scopes with B2B Target
This Precision Rifle Network video shows how to do a scope-tracking test using the pre-printed Sniper’s Hide Tall Target from Box to Bench Precision (B2B). With the primary line divisions in MILs, this printed target is perfect for Milliradian scopes. From bottom of the vertical line to the top there are 10 mils (36 inches) of travel. The markings are high contrast to make the testing easier.
In this video, there are some very helpful tips on setting up the target frame correctly and making sure the Tall Target is perfectly vertical. A plumb line can help. In this video the vertical tracking of a Burris XTR III 5.5-30x56mm scope is tested. Actual testing begins at 7:20 time-mark. The Precision Rifle Network has many other informative videos, with a new video released every week.
Should You Perform a WIDE Target Test Too?
What about testing your windage clicks the same way, with a WIDE target test? Bryan Litz says that’s not really necessary: “The wide target test isn’t as important for a couple reasons. First, you typically don’t dial nearly as much wind as you do elevation. Second, your dialed windage is a guess to begin with; a moving average that’s different for every shot. Whereas you stand to gain a lot by nailing vertical down to the click, the same is not true of windage. If there’s a 5% error in your scope’s windage tracking, you’d never know it.”
Verifying Scope Level With Tall Target Test
Bryan says: “While setting up your Tall Target Test, you should also verify that your scope level is mounted and aligned properly. This is critical to insuring that you’ll have a long range horizontal zero when you dial on a bunch of elevation for long range shots. This is a requirement for all kinds of long range shooting. Without a properly-mounted scope level (verified on a Tall Target), you really can’t guarantee your horizontal zero at long range.”
NOTE: For ‘known-distance’ competition, this is the only mandatory part of the tall target test, since slight variations in elevation click-values are not that important once you’re centered “on target” at a known distance.
Most folks would be very impressed with a centerfire rifle that can shoot a quarter-inch group at 100 yards. But to do that with a rimfire rifle, shooting little .22 LR cartridges, that’s quite an accomplishment. Today’s Sunday GunDay story spotlights a superbly accurate new .22 LR Benchrest gun belonging to Forum member Dave Way. This rimfire tack-driver was crafted by respected gunsmith Alex Wheeler of Wheeler Accuracy. Check out this five-shot group Dave shot once he had figured out his optimal tuner position. That is mighty impressive for a rimfire rifle!
A sub-quarter-MOA group at 100 yards is impressive for a centerfire rifle. But for a rimfire rifle, it is truly stunning. Check it out — this rifle hammers!
I tested three lots of Lapua Super Long Range today. This lot looked really good so I bought a case. It’s a blast shooting this rifle over wind flags. It’s amazing how little wind it takes to move the bullet at 100 yards. I was having to hold off today to finish up groups. That’s when it’s the most fun. — Dave Way
Dave posted in our Shooters’ Forum: “To say I was impressed with the quality of the action and the accuracy of the rifle would be an understatement. I shot five different lots of Lapua Midas, Lapua Long Range, and Lapua Super Long Range ammunition. At 50 yards all the groups were pretty tight. I was shooting in some wind, using flags. One lot seemed to stand out so I put a target at 100 yards and shot three rounds in it as aiming points. I shot three five shot groups with the last 15 rounds of that lot that I had with me. All three groups were under 1/2″ and they were getting tighter as I moved the tuner!”
Above are initial 100-yard, 5-shot groups Dave Way shot with his rifle, while experimenting with different tuner positions. The largest group (on left) was a 0.416″, while the smallest (on right) was 0.296″. The average of the three groups was a stellar 0.369″ (0.352 MOA).
Dave Way treasures this rifle and praised Alex Wheeler’s skills as a gunsmith: “I have never received a rifle from Alex that didn’t shoot incredibly well and this one is no exception. I’m just getting into the .22 world so I don’t know if this is good, great, or excellent accuracy but it seems pretty accurate to me.”
Lot Testing and Tuner Experimentation Pays Off
Here are some initial groups Dave Way shot during initial ammo testing. They are all under half-inch at 100 yards. That’s pretty impressive — but read on. When Dave optimized his tuner position and found a great lot of Lapua Super Long Range .22 LR ammo — his groups got even smaller. Dave notes: “They could have been better but I was just getting used to the trigger and everything.”
Here are a series of three-shot, 50-yard groups. You can see this rifle is quite consistent. This is with five different lots of Lapua .22 LR ammunition.
Lot Testing with Lapua Ammo — Three-Shot Groups at 50 Yards
Rifle Components
Holeshot 2500X Right Bolt, Left Port Action
Muller Works 1:16″-twist, 8-groove Barrel
Holeshot Barrel Tuner
Bix-N-Andy Trigger
Holeshot 2500X actions and Holeshot tuners are now produced and sold by Precision Quest Products.
Have questions about this ultra-accurate rig? You can discuss this Wheeler-built rimfire rifle in a current AccurateShooter Forum Thread.
Three 50-Yard Groups, All Under 0.180″ — That’s Consistency!
With the right ammo, this rig is wicked accurate. Here are three groups shot at 50 yards one after another. Dave shot these three 5-shot groups consecutively while optimizing his tuner: “Working with tuner the last two trips to the range. [It was] very consistent and pretty tight at tuner setting 162. Here are three consecutive 50-yard groups (5 shots each).” The biggest group (at bottom) measured 0.175″ (0.334 MOA), while the smallest group (middle) was a stellar 0.154″ (0.294 MOA) — that’s mighty impressive!
Alex Wheeler Crafted His Own Superb Rimfire Rifle First
Gunsmith Alex Wheeler of Wheeler Accuracy has, over the years, concentrated on ultra-accurate mid-range and long-range centerfire benchrest rifles, along with some stellar long-range hunting rifles. But Alex has started to venture into rimfire shooting. Prior to building the Dave Way rimfire rifle featured here, Alex built a “sister rifle” for himself with similar components. That gun turned out so well that Dave asked Alex to build another. And, as you can see, Dave’s new Wheeler-built rimfire rifle turned out to be a true tack-driver.
Alex credits Dave’s shooting skills: “I don’t think its possible for anyone to send a rifle to Dave that doesn’t shoot. He just has a knack for it. I’m glad I got into the rimfire stuff. I don’t have any interest in rimfire competition but it’s taught me a lot about bench manners and I get a lot more trigger time. It’s a great tool to learn wind flags with as well. It should make me a better centerfire shooter. That was really why I built mine. I normally sell every gun I build eventually and Dave was going to get mine but I said you should start gathering parts, I think I’m keeping this one!”
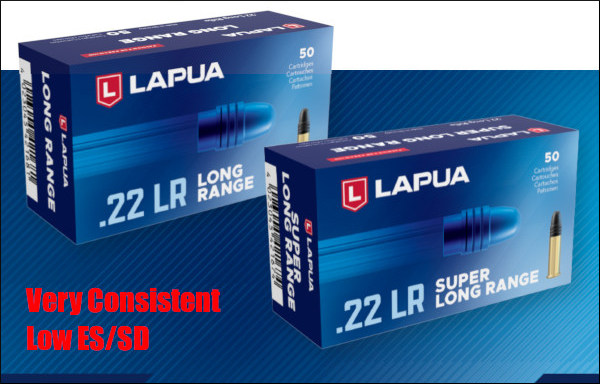
Lapua Long Range and Super Long Range .22 LR Ammunition
Dave Way had great results with his Lapua .22 LR ammo. Lapua Long Range and Super Long Range ammunition comes from Finland, and is designed for the growing long-range rimfire disciplines with targets at 100-300 yards. This ammo delivers very low ES and SD numbers. Our friend F-Class John tested this ammo and confirmed it performs very well (SEE Test Video).
Capstone’s Marketing Director, Geoff Esterline, explains: “Each production lot of Lapua’s [LR and Super LR] are test-fired in 50-round groups for dispersion. The results determine whether it makes Super Long Range or Long Range packaging.”


 Reader Lindy explains how to check your clicks: “First, make sure the rifle is not loaded. Take a 40″ or longer carpenter’s ruler, and put a very visible mark (such as the center of an orange Shoot’N’C dot), at 37.7 inches. (On mine, I placed two dots side by side every 5 inches, so I could quickly count the dots.) Mount the ruler vertically (zero at top) exactly 100 yards away, carefully measured.


 ShipMyGun.com has a large FFL database, so you can verify the recipient’s address and FFL status. The ShipMyGun.com website has a simple to use label-printing process.


 Verifying Scope Level With Tall Target Test