The Christmas holiday is just two weeks away. We know many of our readers will be driving to visit relatives in other states. If you plan to travel across state lines with your guns, this book can really help. With over 100 changes from last year, the 2023 edition of Traveler’s Guide to the Firearm Laws of the Fifty States is a must-read for anyone planning to travel around the country with firearms. In addition, the book also covers the firearms travel laws for Canada and Mexico.
For $15.95 you can purchase a state-by-state Traveler’s Guide to firearms laws. This book can help ensure you comply with all state laws during your trip. Highways Magazine states: “If you carry a weapon in your rig, you need this book.” This 68-page guide covers all firearms types and all 50 states. It even has info for Canada and Mexico. The Traveler’s Guide to the Firearm Laws of the Fifty States has sold more than 1,000,000 copies since it was first released in 1996.
This 27th edition of the Traveler’s Guide covers important topics such as carry of firearms in a motor vehicle, concealed carry reciprocity, which states preempt local gun regulation, tips on handling a traffic stop, concealed carry in state and National Parks, vehicle carry and possession on college campuses and much more. Best of all, the text is in plain, easy-to-read English.
Written and researched by J. Scott Kappas, an attorney and Class III Firearms Dealer, the 2022 Traveler’s Guide has a preface that defines many key terms important for anyone traveling with a firearm across state lines. The latest edition also has new formatting for easier reading.
Purchase from GunLawGuide.com for $15.95 with FREE shipping (3-4 weeks), or $19.95 with 1st Class Shipping (5-7 days). You can also purchase the book from Amazon direct for $17.98, or from 3rd Party Amazon sellers for a slightly lower price with $3.99 shipping.
The Traveler’s Guide is especially useful for shooters traveling in RVs and motorhomes. The American Rifleman Magazine declared: “This book is a must-have for truck drivers, motor home enthusiasts, campers and other travelers…easy to read and understand, well-organized and concise….” One reader from Texas adds: “I used to think that my RV was the same as my home when it came to gun carry….the Traveler’s Guide set me straight. Now I know my motorhome is subject to the same laws as any vehicle when it comes to guns.”
So you’re thinking of buying a suppressor (aka “moderator”, “silencer”). You can’t just get one off the shelf at Walmart. Acquiring a suppressor requires filling out paperwork and paying a Federal $200 Tax Stamp. Plus there is typically a pretty long wait. However, the good news is that suppressor ownership is now legal in 42 of the 50 American states — that’s 84%! For most American adults, getting a suppressor is legal, provided the buyer passes the required background checks (explained below). The 42 “suppressor-friendly” states are shown as RED in the illustration below.
States Where Suppressor Ownership is Allowed
These 42 states allow private ownership of suppressors: AL, AK, AZ, AR, CO, CT, FL, GA, ID, IN, IA, KS, KY, LA, ME, MD, MI, MN, MS, MO, MT, NE, NV, NH, NM, NC, ND, OH, OK, OR, PA, SC, SD, TN, TX, UT, VT, VA, WA, WV, WI, WY. Note: Even if you live in one of the states listed, you should still verify that owning a suppressor is legal in your area. Some states may have municipal- or county-based restrictions.
“Suppressor ownership [has] boomed in the 21st century. Thanks in part to companies like Silencer Central that streamline the purchasing process, the number of registered suppressors has grown from 285,000 in 2010 to over 2.6 million in 2020.” — GunsAmerica Digest
States Which Prohibit Suppressor Ownership
The eight states which prohibit suppressor ownership are: California, Delaware, Hawaii, Illinois, Massachusetts, New Jersey, New York, and Rhode Island. These states are shown in GRAY in the map.
Qualifications to Obtain a Suppressor
To legally obtain a suppressor, you must fill out Federal Forms and pay a $200 fee to the ATF. You must also pass BATFE background checks and otherwise comply with Federal and state laws. States can regulate suppressor ownership or use, so be sure to check the laws in your area. On the federal level, the process to acquire a suppressor is regulated under the National Firearms Act of 1934. According to the American Suppressor Association, to own a suppressor in the United States you must:
1. Be at least 21 years of age to purchase a suppressor from a dealer.
2. Be at least 18 years of age to purchase a suppressor from an individual on a Form 4 to Form 4 transfer (contingent on state laws).
3. Be at least 18 years of age to possess a suppressor as a beneficiary of a trust or as a member of a corporation (contingent on state laws).
4. Be a resident of the United States.
5. Be legally eligible to purchase a firearm.
6. Pass a BATFE background check with a typical process time of 8 to 10 months.
7. Pay a one time $200 Transfer Tax.
That fifth requirement, “be legally eligible to purchase a firearm”, involves a list of factors. The prohibitions are set forth in the “prohibited person” list found on ATF Form 4473.*
Shown is the Smith & Wesson M&P 9mm model. The M&P 45 is the same except for chambering.
You’ll hear some shooters complain loudly about the (perceived) lack of accuracy of their handguns. Well, sometimes the problem IS the gun, but other times the problem is “driver error”. At the range, we often hear guys blame their gun for poor accuracy, when in fact the real problem is lack of operator skill. This saga, posted a while back on Facebook, is a case in point.
Here’s the story. A gentleman attending an armorer’s course at Smith & Wesson was loudly dissing a S&W M&P 45, claiming it could not shoot. Very loudly he tells the instructor, “the M&P 45 one of our officers is carrying is sh*t”. He then trash-talks the gun, saying that both he and his officer couldn’t get the gun to shoot decent groups, either with FMJ or duty ammo.
Well it seems that Gregory Grutter, S&W’s Chief Firearms Instructor, happened to overhear these vociferous complaints, so Grutter asked to test-fire the M&P 45 pistol. Grutter put a couple of his business cards up at 15 yards, then shot one with Winchester Ranger SXT and the other with Winchester White Box ammo. Grutter’s best group was about half an inch, measured with OnTarget. Check it out:
We’re told that, after hearing the litany of complaints, Grutter walked over to the loud-mouthed grumbler and asked: “Hey Sir, can I shoot it?
“Have at it, I don’t want that POS back!” said Mr. Negative.
Kharma time baby… In Grutter’s hands the M&P performed superbly. Here are Grutter’s two 5-shot groups, each shot at 15 yards with the .45 ACP Smith & Wesson pistol. Pretty darn impressive:
After seeing this, the complainer asked: “Why did you shoot your cards — Ain’t got no targets?”
Grutter smiled and replied: “Nah… in case you or your officer want to learn how to shoot [this way] you will have the numbers to call.” Badda Bing!
Do you know which one of your eyes is dominant? It’s easy to determine eye dominance with a simple exercise. Pick an object about 6-10 feet away (a light switch or door knob works well). Make an “OK” sign with your right hand (see photo) and hold that about 18″ from your face. Now, with both eyes open, look through the circle formed by your thumb and index finger. Center the circle on the object, so you can see the object in the middle.
Now, here’s the important part — while still holding your hand up, centered on the object, first close your right eye. If you don’t see the object anymore, then your right eye is dominant. If you still see the object, then repeat the procedure with the left eye shut and right eye open. If you don’t see the object when your left eye (only) is closed, then you are left-eye dominant.
The digital archives of Shooting Sports USA contain many interesting articles. A while back, Shooting Sports USA featured a “must-read” expert Symposium on Eye Dominance, as it affects both rifle and pistol shooting. No matter whether you have normal dominance (i.e. your dominant eye is on the same side as your dominant hand), or if you have cross-dominance, you’ll benefit by reading this excellent article. The physiology and science of eye dominance is explained by Dr. Norman Wong, a noted optometrist. In addition, expert advice is provided by champion shooters such as David Tubb, Lones Wigger, Dennis DeMille, Julie Golob, Jessie Harrison, and Phil Hemphill. NOTE: If the story doesn’t open at the links, go to the ssusa.org home page first, indicate you are over 18, and then CLICK HERE.
Top Rifle Champions Talk About Eye Dominance:
David Tubb — 11-Time National High Power Champion
I keep both eyes open, always. Some use an opaque blinder in rifle or shotgun shooting. If you close your non-dominant eye, you will not get as good a sight picture. If your aiming eye is not your dominant eye, you have even more of a problem to overcome.
Lones Wigger — World, National and Olympic Champion Rifleman
Shooters should try to use the dominant eye unless the vision is impaired and the non-dominant eye has better vision. You should always shoot with both eyes open since this will allow the shooting eye to function properly.
Dennis DeMille — National Service Rifle Champion
I close my non-shooting eye initially. Once I pick up my sight picture, it’s not something I focus on. For those that use a patch, I recommend that they use something white to block their view, rather than cover the eye.
Bruce Piatt — 2015 World Shooting Championship Winner
Some shooters, especially those with nearly equal or cross-dominance, will naturally find themselves squinting one eye. When anyone does this, you are also closing your dominant eye to some extent and adding stress to your face.
Many guys getting started in long range shooting are confused about what kind of scope they should buy — specifically whether it should have MIL-based clicks or MOA-based clicks. Before you can make that decision, you need to understand the terminology. This article, with a video by Bryan Litz, explains MILS and MOA so you can choose the right type of scope for your intended application.
You probably know that MOA stands for “Minute of Angle” (or more precisely “minute of arc”), but could you define the terms “Milrad” or “MIL”? In a helpful video, Bryan Litz of Applied Ballitics explains MOA and MILs (short for “milliradians”). Bryan defines those terms and explains how they are used. One MOA is an angular measurement (1/60th of one degree) that subtends 1.047″ at 100 yards. One MIL (i.e. one milliradian) subtends 1/10th meter at 100 meters; that means that 0.1 Mil is one centimeter (1 cm) at 100 meters. Is one angular measurement system better than another? Not necessarily… Bryan explains that Mildot scopes may be handy for ranging, but scopes with MOA-based clicks work just fine for precision work at known distances. Also because one MOA is almost exactly one inch at 100 yards, the MOA system is convenient for expressing a rifle’s accuracy. By common parlance, a “half-MOA” rifle can shoot groups that are 1/2-inch (or smaller) at 100 yards.
What is a “Minute” of Angle?
When talking about angular degrees, a “minute” is simply 1/60th. So a “Minute of Angle” is simply 1/60th of one degree of a central angle, measured either up and down (for elevation) or side to side (for windage). At 100 yards, 1 MOA equals 1.047″ on the target. This is often rounded to one inch for simplicity. Say, for example, you click up 1 MOA (four clicks on a 1/4-MOA scope). That is roughly 1 inch at 100 yards, or roughly 4 inches at 400 yards, since the target area measured by an MOA subtension increases with the distance.
MIL vs. MOA for Target Ranging
MIL or MOA — which angular measuring system is better for target ranging (and hold-offs)? In a recent article on his PrecisionRifleBlog.com website, Cal Zant tackles that question. Analyzing the pros and cons of each, Zant concludes that both systems work well, provided you have compatible click values on your scope. Zant does note that a 1/4 MOA division is “slightly more precise” than 1/10th mil, but that’s really not a big deal: “Technically, 1/4 MOA clicks provide a little finer adjustments than 1/10 MIL. This difference is very slight… it only equates to 0.1″ difference in adjustments at 100 yards or 1″ at 1,000 yards[.]” Zant adds that, in practical terms, both 1/4-MOA clicks and 1/10th-MIL clicks work well in the field: “Most shooters agree that 1/4 MOA or 1/10 MIL are both right around that sweet spot.”
We have all been there — you place a piece of tumbled brass in the shell-holder of your press, raise it into the die, and suddenly it is like somebody hit the brakes. The case is stuck in the die. Your first instinct is to reverse it out. You crank on the handle, and BANG! The rim rips off the case head and you are looking at a piece of brass stuck in the die.
A stuck case is one of the boo-boos that all of us reloaders have faced from time to time. If proper lubrication is applied, then it should not be a problem. No matter if you are a seasoned reloader or new to it, this situation can happen. Take your time, use the proper procedures, and you will be back in business in no time! This article explains how to avoid stuck cases (through proper lubrication) and how to use a stuck case removal system.
What Causes Stuck Cases
One of the first common mistakes reloaders face is the stuck case. It can be caused by too much or too little lube. Too much and a vacuum can be formed causing the case to become suctioned into the die. Too little lube and friction is the culprit. So what is the cure? There is no exact cure, but the best lube that we have found so far is just a dab of Imperial Sizing Die Wax on your fingers and applied in a thin coat on the body of the case, not the shoulder or neck. Too much of this wax can cause the vacuum effect, or can eventually load your die up with gobs of residue. If it is applied to the shoulder area, or the leftover wax moves up into the shoulder region of the die, you will see dents or dimples in the shoulder. [AccurateShooter.com Editor’s Note: For normal full-length sizing of small cases such as 220 Russian/PPC, 6mmBR, 6.5 Grendel, or 6.5×47 Lapua we recommend Ballistol (aerosol) lube. It is very slippery, goes on very thin, and does not gum up the die.]
A great way to ensure that your dies are clean is to use a simple chamber mop with a dab of your favorite solvent on it and clean out the die. Be sure all of the solvent is out after cleaning by spraying the die out with Quickscrub III or use a clean chamber mop. If you are storing your dies, you can apply a thin coat of a good oil to protect the steel such as TM oil or Starrett M1 Spray.
This video shows how to use an RCBS Stuck Case Removal Kit:
Using a Stuck Case Removal Kit
If you do stick a case in your die there are a few good stuck case removal kits available. Each one works in a similar fashion. I have found the Hornady kit very effective and easy to use. [Editor: Forster, Lyman, and RCBS also make good kits for removing a case stuck in a die.]
Basically what you do is remove the die from the press. Unscrew the decapping assembly and pull it out as far as you can. You then need to drill/tap threads into the stuck case head (this is why it is suggested to unscrew the decapping assembly as far as you can to get it clear of the drill bits). Once this is done screw the die back into the press. You then install the included shellholder attachment on the shellholder ram, and thread it into the case via a small wrench. With some elbow grease you can reverse the stuck case out of the die with the leverage of the press, and not damage the die.
However if the case is stuck… REALLY stuck, you may pull out the threads on the case and you are still left with a stuck case in the die without any way to pull it out. If the case is really difficult to remove even with the use of a stuck case removal kit, do not try to be Hercules with the press ram. Here is a trick that may work. Take the die with the stuck case and place it in your freezer for a couple of hours. Then repeat the removal with the cold die. The freezing temperatures may cause the brass to contract, and make removal easier. If this does not work it is recommended to send it to the die manufacturer. They will be able to remove the case without damaging the die.
Another fix if you can remove the decapping assembly completely is to use a tap hammer and a punch or small wooden dowel to knock the stuck case out. This isn’t the best way since it is very possible that you will damage the die internally or externally on the threads, or both. Send the die to the manufacturer to have this done properly. You will be happier in the long run.
This article appears courtesy Sinclair International. It first appeared in Sinclair’s Reloading Press Blog.
Do you use bushings to size your case-necks? Are you assuming that your bushings are actually round on the inside, with a hole that’s centered-up properly? Well you may be in for an unpleasant surprise, based on what our friend Jim de Kort recently discovered. Jim was concerned about the run-out on his brass. His cases went into his bushing-equipped FL die pretty straight, but came out of the die with up to .004″ run-out. “What gives?”, Jim wondered. “Could the problem be the bushings themselves?”
To answer that question, Jim decided to examine his bushings. Using an Accuracy One Wheel-drive concentricity gauge, Jim checked out some of his neck bushings. What he discovered may surprise you…
Neck Bushing Flaws Revealed
Trust no one… — Jim de Kort
Jim writes: “I measured the concentricity of my 6BR rounds today. I noticed they went into the neck-bushing equipped full-length sizing die with less than .001″ deviation but came out with .003-.004″. The culprit, it appears, was the bushing itself. Without it the cases stayed within .0005″ to .001″ deviation, so something was happening with the bushing.
One bushing had .00025″ deviation on the outside, yet almost .003″ on the inside, so it is crooked. But even when using a bushing that is within .001″ I still get .003″ runout after sizing. I repeated the same procedure for my 6×47 and got the same results. When using the bushing, concentricity suffers a lot.”
Before we bash the bushing-makers, we must acknowledge that many different things can contribute to excessive run-out and/or mis-alignment of case-necks. We don’t have all the answers here, and Jim would be the first to say that some mysteries remain. Still, these are interesting results that give all precision hand-loaders something to think about.
Jim Borden of Borden Accuracy also offers this tip: “Check the trueness of the face of the die cap. That has more to do with trueness than the bushing. Also check perpendicularity of hole in bushing to top surface. When I was making dies, the cap was made by threading and facing the threaded tenon in same setup.”
Editor’s Comment: Many people have great results with neck-bushing dies, but Jim isn’t the only fellow who has seen some very odd results. I personally employ honed, non-bushing dies for many of my chamberings. These non-bushing dies (with the necks honed for .002-.003″ neck tension) produce extremely straight ammo, with run-out consistently under .0015″.
In a helpful NSSF video, Ryan Cleckner explains why you normally should avoid canting your rifle — rotating it clockwise or counter-clockwise. Cleckner explains that canting the rifle in one direction or another will change the point of impact: “When you rotate the rifle, not only does the [POI move] in the direction that you’re rotated, [but] it also loses some of its elevation as it rolls down.” This, Cleckner explains, can make you miss on one side or the other:
Cant to the Left — You’re going to miss low and left.
Cant to the Right — You’re going to miss low and right.
In this video, starting at the one-minute mark, Cleckner shows the effect of rifle canting when engaging a 600-yard target. A few degrees of cant (either to the left or to the right), moves the shot POI completely off the steel silhouette target. The POI change occurs mainly because you are lowering (and laterally shifting) the scope sight-line relative to the bore axis, effectively changing your zero.
David Tubb has explained: “Every 1 degree you are off on a cant, is about six inches of difference laterally at 1000 yards”.
Position Shooting with Sling — Rifle Cant Considerations
Cleckner’s discussion assumes that the scope or sights are set to hit center with the rifle level and plumb. That works for most situations when shooting prone off bipod, front mechanical rest, or front sandbag. However, many sling shooters, including David Tubb and John Whidden, do tilt or cant their rifles slightly inward because this allows a more comfortable hold with sling, or allows better eye-to-sight alignment. Holding the rifle at an angle can work — but the angle of cant must be consistent for every shot. Canting the rifle is not a sin by itself. However, after you confirm your zero on your target, the degree of cant must be the same for EVERY shot. You must maintain that exact same degree of rotation on each shot or you will experience the shot POI movement Cleckner illustrates. Consistency is the key.
John Whidden, 5-time Nat’l Long Range Champion, holds a Palma rifle. John now shoots a match rifle with an Anschutz stock which he holds more upright, but still with some counter-clockwise cant. John also installed his iron sights at an angle so that the adjustments are correct (and plumb) even with his canted hold: “While it may not be obvious in the picture, the sights on my rifle are set up so that they’re straight vertical and horizontal while I hold the rifle canted. Making sure your adjustments (scope or sights) are vertical and horizontal is a critical piece of the pie.”
Inexpensive Dual-Diameter Scope-Mounted Bubble Level
The best way to avoid inconsistent rifle canting is to use a bubble level fitted to rail or scope. One very affordable and versatile product is the Jialitte Scope Bubble Level. This features a 30mm milled inside diameter, plus an inner insert ring so it will also fit 1″-diameter main tubes. The Jialitte unit is nicely radiused, and has a low profile in the middle. User reviews have been very positive. You could easily pay $35.00 or more for a 30mm scope level. This costs just $8.79 on Amazon (Cyber Monday special).
One side has MOA (Minute of Angle) grid for MOA-based scopes. Flip target over for MIL adjustment grid.
Here’s a clever product that can speed up the process of sighting-in your rifles, whether you have a scope with MOA-based clicks or an optic with MIL-based clicks. Sport Ridge offers a pair targets that are printed on BOTH sides with precise grids based on your scope’s click values. One side has an MOA-based grid while the other side of the target has 1/10th Milliradian grid.
Choose between two, double-sided printed targets: the 16″x16″ 100-yard Precision Rifle Target and the 10″x10″ 25/50-yard AR15 Sight-In Target. For both target types, side one has an MOA-based grid for scopes with 1/4-MOA or 1/8-MOA click values. Flip the target over to use the grid for MIL scopes with 1/10th Milliradian click values.
Sport Ridge’s Premium Precision Sight-In Targets allow you to adjust the point of impact quickly because the target’s grid boxes precisely match the click values of MOA and MIL measurement systems. Sport Ridge states: “No more guesswork at matching your optic’s adjustment value, saving your ammunition and time spent sighting-in firearms.” Get the 16″x16″ Precision Target 40-pack for $39.95, or the 10″x10″ AR Target 10-pack for $5.99.
Manufacturer Video Explains How to Sight-In with MOA/MIL Grid Target:
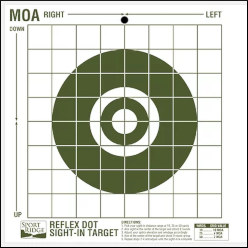
For MOA-type scopes, Sport Ridge also offers a single-sided Reflex Sight-In target with an MOA-based adjustment grid. This has a large center sighting bullseye so it can be used to confirm MOA-based click values at longer ranges (300+ yards) with rifles. Or use it at close range (for 10, 25, or 50 yards) for red-dot equipped pistols or shotguns. A 10-pack is $5.99, or get a 25-pack for $13.99.
REFLEX DOT SIGHT-IN TARGET
• Large Central Bull with MOA Grid
• Table of distance MOA optic click values
• Grid adjustment in direction Up/Down, Left/Right
This video explains general principles of sighting-in rifles, including dialing to Point of Impact:
If you are looking to acquire a reliable, accurate rifle for a late fall hunt, Howa can be a good choice. Howas feature smooth-running actions with fine two-stage HACT triggers. A Howa barreled action can also be a good basis for a DIY project. But some folks have heard that it may be difficult to find stocks, or to fit an after-market barrel. That’s not true. There are many stock options available, and in this article, Bill of RifleShooter.com shows that it is easy to remove the factory-installed barrel with the right tools. We think a Howa makes a fine basis for a varmint rig or field rifle. Or you can build a tactical rifle as Bill did. You can start with the factory barrel and when you want/need more accuracy, then have a gunsmith install a custom barrel from Krieger Barrels, Lilja Barrels or other quality brand.
The Carbon Stalker is an excellent ultralight factory option, weighing just 4.6 lbs. with Mini Action (before optics). All Howa Carbon Fiber Stalker rifles come with a Sub-MOA Guarantee and Lifetime Warranty.
What You Need to Know About Howa 1500-series Rifles
Tech Feature by Bill, editor of RifleShooter.com
Consider this article the “Howa 1500 Overview”. There has been a lot of interest in Howa rifles and barreled actions imported by Legacy Sports International. In addition to being able to buy a complete rifle from a dealer, Brownells sells barreled actions in a wide variety of calibers and configurations. In this post we are going to take a look at the Howa 1500 series.
Howa Rifles — General Background
Howa is a Japanese heavy machinery company. One of its product lines are firearms, which are imported into the United States of America by two different companies, Legacy Sports International and Weatherby. Legacy sells the 1500 under the manufacturers name while Weatherby re-brands the guns as the Weatherby Vanguard. In general, the finishes on the Weatherby rifles are more refined than the LSI-imported 1500s.
General Evaluation of Howa 1500 Rifles
I’ve found Howa 1500s to be solid, entry-level rifles that are capable of sub-MOA accuracy out of the box. I’ve actually purchased two Howa rifles I’ve tested because I like them so much. The gun below, a Howa Mini-Action in 7.62×39 Russian, is one of my favorite factory guns to shoot.
Check out this three-shot group I drilled at 100 yards with the rifle above and 125-grain Sierras. It took a lot of work and load development to get there, but when it did, it worked well.
Howa 1500 HACT 2-Stage Trigger
Howa 1500s feature the very nice Howa HACT trigger. This is an adjustable, two-stage trigger, set for about 3 pounds (combined stages). Crisp and repeatable, this is an excellent trigger for a factory gun. There is no annoying Glock-style safety lever in the middle of the trigger blade. The 2-stage design and pull weight range works well for a hunting rifle or a rig for PRS competition. Rifleshooter.com says the Howa trigger is “one of the best factory triggers, along with Tikka. I’ve found the Howa trigger superior to a Remington 700 — the Howas doesn’t need to be replaced.”
Writing for the Western Outdoor News, WONews.com, Steve Comus has field-tested the HACT Trigger. Steve writes: “I always liked two-stage triggers, because of the way I could take-up the slack and then actually know when the rifle was going to go off. The take-up on the [HACT] trigger was fast and easy. The crisp, positive release when pressure was put on during the second stage [reminded me] of some of the target rifles I shot through the years.”
Howa Actions — Three Options
Howa offers three action lengths: Mini, Short, and Long. You can see the bolts for the three action lengths in the image below. The Mini-Action has similar external dimensions to the Remington Model Seven, however, the Mini-Action’s bolt does not travel as far to the rear. This is a mixed bag. The upside is you have a quicker action (shorter bolt throw). The downside is you are limited to shorter rounds such as the .223 Remington, 7.62×39mm Russian, and 6.5 Grendel. But if you need a bigger cartridge, just choose the standard or long action Howa variant.
Howa 1500 vs. Remington 700 — Important Differences
Is the Howa 1500 a Remington 700 clone, or some kind of improved Remington 700? No, not really. While the top radius of the Howa 1500 does match the Model 700, and they can both use the same two-piece scope bases, there are a number of differences.
If you look at the Howa 1500 alongside the Remington 700 you’ll note the M700 is a round action, while the Howa is a flat-bottom action. In many ways the Howa’s bottom half reminds me of a push-feed Winchester. This means the chassis and stocks that support a Howa 1500 are not V-block based like you’ll find on a 700, instead they have a flat bottom. While the bolt of the Howa is similar in external appearance to the Model 700, it does offer some improvements, notably an M16-style extractor and a firing pin assembly that can be easily removed without tools.
Howa 1500 action screws are metric and are in a different location from the 700. The Howa 1500 has an integral recoil lug that accepts the front action screw, this means you have more of the front action screw engaging the action. WARNING: If you install it into a poorly-fitted stock or action you may bind it.
Can a Howa Action Be Used for a Custom Rifle Project?
Absolutely! You can either buy a barreled action from Brownells and throw it in a chassis system/stock of your choice or you can use a stripped action to build a custom rifle. If you are in the chassis market, MDT offers a wide variety of chassis in different price ranges. All have worked well for me.
How to Remove Howa Factory Barrel from Action
You may have heard internet grumblings about removing Howa barrels. Some keyboard commandos say they are extremely difficult to remove without a relief cut. Well Bill at Rifleshooter.com demonstrates that Howa barrels can be removed without trouble, provided you have the right tools. Watch this video:
Watch Howa Barrel Removal Video — Quick and Easy (Click Speaker Icon for Audio)
Q: Is it difficult to remove a barrel from a Howa 1500?
A: Not very. I’ve heard from some smiths that worked on Howas (years ago) that the factory barrels are difficult to remove. However of the half dozen or so Howa barrels that I’ve pulled, they’ve been very easy. I use a Brownells action wrench with the top piece for a Rem Model 700 and the flat bottom resting against the flat on the wrench.
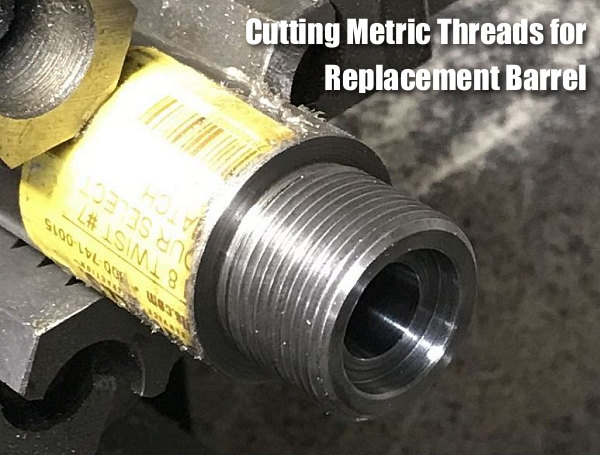
Howa Actions Require Metric Barrel Threads
It’s easy to thread a barrel for a Howa action. You just have to cut metric threads — most lathes out there can cut them. I cut the threads below on a manual lathe using change gears. [Editor: John Whidden cuts metric tenon threads with a CNC lathe. “It’s easy,” John tells us, “No issue whatsoever.”]
Using Howa Actions for Custom Rifles
I have built a few customs with Howa actions. Below is one of my favorite, a .308 Winchester. It consists of a Howa 1500 action, Shilen Select Match Rem Varmint contour barrel\, and Modular Driven Technologies (MDT) ESS chassis. Great rifle and it hammers!


 Written and researched by J. Scott Kappas, an attorney and Class III Firearms Dealer, the 2022 Traveler’s Guide has a preface that defines many key terms important for anyone traveling with a firearm across state lines. The latest edition also has new formatting for easier reading.


 Do you know which one of your eyes is dominant? It’s easy to determine eye dominance with a simple exercise. Pick an object about 6-10 feet away (a light switch or door knob works well). Make an “OK” sign with your right hand (see photo) and hold that about 18″ from your face. Now, with both eyes open, look through the circle formed by your thumb and index finger. Center the circle on the object, so you can see the object in the middle.


 A stuck case is one of the boo-boos that all of us reloaders have faced from time to time. If proper lubrication is applied, then it should not be a problem. No matter if you are a seasoned reloader or new to it, this situation can happen. Take your time, use the proper procedures, and you will be back in business in no time! This article explains how to avoid stuck cases (through proper lubrication) and how to use a stuck case removal system.


 For MOA-type scopes, Sport Ridge also offers a single-sided


 Howa 1500 HACT 2-Stage Trigger