Report by Craig Arnzen, Area 419
As the PRS and other tactical/practical competitions continue to grow, a guy tends to wonder, just how good are the top competitors? And what are they actually doing (and viewing) as they complete a stage? Well, a great video from the Long Range Precision Shooters YouTube Channel let us see what the best in the sport see through their scopes when they shoot.
This video features Dave Preston, 2015 National Champion and consistent top performer, shooting the PRS Skills barricade. Dave Preston has been considered among the very best in the nation running this PRS stage. Dave nearly always shoots 100% with the fastest recorded time. In this video you’ll see him successfully engage all eight shots in under 43 seconds — that’s crazy fast. This includes a POV sequence (4:35 time-mark) showing the actual view through Dave’s scope as he completes the stage.
Watch this video! Dave offers excellent advice on gun-handling and body positioning for barricades. Listen to what he says and you WILL shoot better.
This video features the PRS Skills Barricade, an 8-round, 4-position stage featured at the majority of PRS matches throughout country. It’s called a “Skills Stage” as it is run the same way at every national match and gives shooters the ability to compare skill levels based on hit percentage and speed.
The target is a 10″ plate at 400 yards. There are four different positions, with two shots each. Most people run this stage in about 70 seconds, some in the mid-60s, the greats in the high 50s, and Dave does it in the low 40s… mighty impressive!
The Right Gear Aids Stability and Lets You Shoot Faster
Let’s also take a look at two pieces of gear that really helped Dave Preston get stable and shoot fast.
1. BARRICADE BAG — To Get Stable, Really Stable
In the video Dave is using a Solo Sac from Short Action Precision This bag was designed by USMC Solomon Mansalala. It’s a very soft/dense bag and is popular at matches.
The other bag that sees a LOT of use, and is far and away the most used, is the patented Gamechanger Bag from Reasor Precision Solutions and Armageddon Gear.
2. MUZZLE BRAKE — To Make Your Follow-Up Faster
You’ll notice that in the video the rifle is very steady through firing, even though he is not applying a lot of pressure to the rifle. Dave is using a Hellfire Muzzle Brake from Area 419. Combined with the soft-recoiling 6mmBR cartridge he is able to spot his impacts and make adjustments, and can also make very fast follow-up shots as his rifle hasn’t bounced way off target.
Savage Arms offers a series of Shooting Tips in the Savage Blog. Here is a helpful article from Team Savage Shooter Stan Pate. This covers how to ship your rifle safely, and then re-establish zero properly when the gun is reassembled after transport.
Traveling with Firearms — Important Advice
Traveling with firearms can be stressful. You must comply with multiple regulations and then trust your expensive guns to airline baggage handlers. And after arrival you’ll need to put your rifles back together and confirm the zeros. This article offers helpful travel advice from Team Savage shooter Stan Pate. Pate has traveled the globe competing with match rifles. Here he shares his tips for making trips easier on you and your firearms.
Easier Air Travel With Firearms
TSA isn’t nearly as careful with your rifles as you are. Proper storage before sending your firearm up a conveyer belt and into the belly of a plane is critical. Stan Pate spends lots of time each year traveling the skies and has devised a system for keeping his rifle safe when going to and from.
“Never travel with your firearm completely assembled,” Pate cautions. “A fully assembled firearm is much heavier [as a total unit] than one that has been broken-down and stored [in separate sections]. More weight creates more in-the-case movement, which can result in damage. I learned this the hard way years ago. My rifle was actually broken in half when traveling to an international competition. Record your torque settings, use those settings during reassembly and your return to zero should be no problem.”
“Be sure to check on current TSA rules and regulations before travel to be aware of any changes that may effect how you pack your rifles,” says Pate.
Rifle Reassembly and Resetting Zero
The quicker you can reestablish your zero, the quicker you can relax and stop worrying about if your rounds are going to hit their mark during competition. Pate, over the years, has developed a system for rifle reassembly and getting back to zero as quickly as possible. While his torque settings may not be the same as yours, the process can still be used.
“The barreled-action goes back on the stock, and then I tighten all three receiver screws finger tight,” says Pate. “Next, I tighten the front two receiver screws down to 35-inch pounds. The rear receiver screws on this particular rifle likes 15-inch pounds. [Note: Proper torque settings will vary with your action and stock type. Most actions have TWO screws, not three.] Scope attachment comes next, and I follow manufacturer settings when tightening it down. All that’s left to do now is go zero your rifle.”
This video explains an efficient method to Re-Zero your rifles
Here is the original Sierra manufacturing facility in Whittier, CA.
In August 22, 2017 Sierra Bullets was acquired by Clarus Corporation (NASDAQ: CLAR), a Utah-based holding company that also owns Black Diamond Equipment Ltd., makers of ski and mountain gear/apparel. Sierra remains one of America’s leading producers of bullets and loaded ammunition. This article covers Sierra’s notable history, and also reviews Sierra’s processes for crafting and testing bullets.
Sierra Bullets — How It Got Started
Report Based on Story by Carroll Pilant, Sierra Bullets Media Relations Manager
What became Sierra Bullets started in the late 1940s in a Quonset hut in California. In 1947, three aircraft machinists, Frank Snow, Jim Spivey, and Loren Harbor, rented machine space to produce rivets for aircraft along with fishing rod guides and rifle front sight ramps. In the post-WWII years, sport shooting was becoming hugely popular, but quality ammunition was in short supply. For shooting enthusiasts, reloading was the solution to the ammo supply shortage. Snow, Spivey, and Harbor recognized this, creating Sierra Bullets to help fill the void. Before long, they were selling a 53-grain match bullet to the Hollywood Gun Shop. These bullets are still in production today as the Sierra #1400 53-grain MatchKing.
A few years later, an accomplished competitive shooter named Martin Hull joined Sierra. Hull helped develop new bullet types and served as manager of Sierra’s ballistics laboratory for nearly 20 years. With Hull’s help, Sierra’s output grew rapidly. The California company outgrew several locations before it moved to a large facility in Santa Fe Springs, CA, in 1963.
New Owners and New President in the Late Sixties
In 1968, the Leisure Group bought Sierra Bullets. Other Leisure Group companies included Lyman Reloading, High Standard Manufacturing Company, Yard Man, Thompson Sprinkler Systems, Flexible Flyer Sleds, and Dodge Trophies (Which made the Oscar and Rose Bowl Game trophies).
Soon after purchasing Sierra, the Leisure Group hired Robert Hayden as President and General Manager. Hayden was a mechanical engineer who had worked for Remington Arms. Hayden remained the president of Sierra for 42 years, retiring in 2012 when Pat Daly became president.
Sierra Moves to Missouri
In 1990, Sierra relocated to Sedalia, Missouri, where the company remains today. Sierra Bullets now employs over 100 people including five full-time ballistic technicians who answer daily reloading and firearms questions by both phone and e-mail.
The Making of MatchKings — How Sierra Produces SMKs
All Sierra bullets begin life as a strip of gilding metal, an alloy consisting of 95% copper and 5% zinc. To meet Sierra’s strict quality requirements, the gilding metal requires three times more dimensional and quality control standards than is considered standard in the copper manufacturing industry.
A blanking press stamps out a uniform disc and forms the cup that will be drawn into the MatchKing jacket. The cup is then polished and sent to a draw press to be drawn into a jacket that is longer than needed for the future MatchKing, thus allowing for the trim process. Press operators constantly check concentricity to make sure we have only quality jackets. The jackets then go to a trimmer where they are visually inspected again.
After being polished a second time, the jacket travels to the bullet press. In the meantime, 80-pound lead billets are being extruded into lead wire for the cores where great care is taken so that the core wire is not stretched. The core wire is lightly oiled before continuing to the bullet press to be swaged.
The lead core wire and trimmed jacket meet at the bullet press where the first stage forms a boattail on the jacket. The lead core is then formed on top of the bullet press and fed down into the jacket. In one stroke of the press, the MatchKing is formed.
Quality control technicians pull samples from each lot of MatchKings to make sure they meet Sierra’s stringent standards. Samples are then sent to Sierra’s 300-meter underground test range (shown below) to be shot for accuracy on mechanical mounts referred to as “unrestricted return to battery rests” that Sierra designed and built in-house.
After inspection, the bullets are placed in the familiar green box along with reloading labels. They are then shrink-wrapped and shipped all over the world.
Sierra Factory Ammunition with Modern Tipped Bullets
Sierra also produces popular competition and hunting factory ammunition. Sierra’s modern GameChanger hunting ammunition has shown very good performance and consistency. For the GameChanger line, Sierra re-engineered its MatchKing bullet into a hollow point design for quick expansion and fitted it with a green tip for ballistic uniformity. The lead-core GameChanger bullets deliver excellent penetration and expansion at a variety of ranges.
There is an excellent article about primers on the Shooting Times website. We strongly recommend you read Mysteries And Misconceptions Of The All-Important Primer, written by Allan Jones. Mr. Jones is a bona fide expert — he served as the manager of technical publications for CCI Ammunition and Speer Bullets and Jones authored three editions of the Speer Reloading Manual.
This authoritative Shooting Times article explains the fine points of primer design and construction. Jones also reveals some little-known facts about primers and he corrects common misconceptions. Here are some highlights from the article:
Size Matters
Useful Trivia — even though Small Rifle and Small Pistol primer pockets share the same depth specification, Large Rifle and Large Pistol primers do not. The standard pocket for a Large Pistol primer is somewhat shallower than its Large Rifle counterpart, specifically, 0.008 to 0.009 inch less.
Magnum Primers
There are two ways to make a Magnum primer — either use more of the standard chemical mix to provide a longer-burning flame or change the mix to one with more aggressive burn characteristics. Prior to 1989, CCI used the first option in Magnum Rifle primers. After that, we switched to a mix optimized for spherical propellants that produced a 24% increase in flame temperature and a 16% boost in gas volume.
Foiled Again
Most component primers have a little disk of paper between the anvil and the priming mix. It is called “foil paper” not because it’s made of foil but because it replaces the true metal foil used to seal early percussion caps. The reason this little disk exists is strictly a manufacturing convenience. Wet primer pellets are smaller than the inside diameter of the cup when inserted and must be compacted to achieve their proper diameter and height. Without the foil paper, the wet mix would stick to the compaction pins and jam up the assembly process.
Primer Functionality and Primer Types Compared
This video looks at a variety of primer types from multiple manufacturers, foreign and domestic. The video explains the basics of how primers function, and then explains the key characteristics of standard primers, magnum primers, and mil-spec primers (designed for semi-auto rifles).
Many novice hand-loaders believe that neck bushing Inside Diameter (ID) size is the only important factor in neck tension. In fact, many different things will influence the grip on your bullet and its ability to release from the case neck. To learn more about neck tension and “case grip”, take the time to read this article carefully. We bet you’ll gain knowledge that will let you load more accurate ammo, with better ES/SD.
Editor: Guys, this is a VERY important article. You really should read it over carefully, twice. Variations in the force required to release a bullet can significantly affect accuracy and ES/SD. You really need to know how the grip on bullet can be altered by many different factors.
Neck Tension (i.e. Grip on Bullets) Is a Complex Phenomenon
While we certainly have considerable control over neck tension by using tighter or looser bushings (with smaller or bigger Inside Diameters), bushing size is only one factor at work. It’s important to understand the multiple factors that can increase or decrease the resistance to bullet release. Think in terms of overall brass-on-bullet “grip” instead of just bushing size (or the internal neck diameter in non-bushing full-length sizing dies).
Bullet grip is affected by many things, such as:
1. Neck-wall thickness.
2. Amount of bullet bearing surface (shank) in the neck.
3. Surface condition inside of neck (residual carbon can act as a lubricant; ultrasonic cleaning makes necks “grabby”).
4. Length of neck (e.g. 6mmBR neck vs. 6mm Dasher).
5. Whether or not the bullets have an anti-friction coating.
6. The springiness of the brass (which is related to degree of work-hardening; number of firings etc.)
7. The bullet jacket material.
8. The outside diameter of the bullet and whether it has a pressure ridge.
9. Time duration between bullet seating and firing (necks can stiffen with time).
10. How often the brass is annealed.
11. Amount (length) of neck sized (e.g. you can size only half the neck).
12. Interior diameter of bushing, or neck section of non-bushing die. – and there are others…
One needs to understand that bushing size isn’t the beginning and end of neck tension questions, because, even if bushing size is held constant, the amount of bullet “grip” can change dramatically as the condition of your brass changes. Bullet “grip” can also change if you alter your seating depth, and it can even change if you ultrasonically clean your cases.
6-time U.S. National Long-Range Champion John Whidden adds: “Our tests show us that the condition of the necks in regards to lubed or not, carbon inside or not, squeaky clean or not, etc., matter even more than the size of the bushing used. An ultrasonically cleaned or brand new dry case neck make for some quite high seating force.”
In our Shooters’ Forum a reader asked: “How much neck tension should I use?” This prompted a lengthy Forum discussion in which other Forum members recommended a specific number based on their experience, such as .001″, .002″, or .003″. These numbers, as commonly used, correspond to the difference between case-neck OD after sizing and the neck OD of a loaded round, with bullet in place. In other words, the numbers refer to the nominal amount of interference fit (after sizing).
While these commonly-used “tension numbers” (of .001″, .002″ etc.) can be useful as starting points, neck tension is actually a fairly complex subject. The actual amount of “grip” on the bullet is a function of many factors, of which neck-OD reduction during sizing is just one. Understanding these many factors will help you maintain consistent neck tension as your brass “evolves” over the course of multiple reloadings.
Seating Depth Changes Can Increase or Decrease Grip on Bullet
You can do this simple experiment. Seat a boat-tail bullet in your sized neck with .150″ of bearing surface (shank) in the neck. Now remove the bullet with an impact hammer. Next, take another identical bullet and seat it with .300″ of bearing surface in another sized case (same bushing size/same nominal tension). You’ll find the deeper-seated bullet is gripped much harder.
Neck-Wall Thickness is Important Too
I have also found that thinner necks, particularly the very thin necks used by many 6mm PPC benchrest shooters, require more sizing to give equivalent “grip”. Again, do your own experiment. Seat a bullet in a case turned to .008″ neckwall thickness and sized down .003″. Now compare that to a case with .014″ neckwall thickness and sized down .0015″. You may find that the bullet in the thin necks actually pulls out easier, though it supposedly has more “neck tension”, if one were to consider bushing size alone.
In practical terms, because thick necks are less elastic than very thin necks, when you turn necks you may need to run tighter bushings to maintain the same amount of actual grip on the bullets (as compared to no-turn brass). Consequently, I suspect the guys using .0015″ “tension” on no-turn brass may be a lot closer to the guys using .003″ “tension” on turned necks than either group may realize.
Toward a Better Definition of Neck Tension
As a convenient short-cut, we tend to describe neck tension by bushing size alone. When a guy says, “I run .002 neck tension”, that normally means he is using a die/bushing that sizes the necks .002″ smaller than a loaded round. Well we know something about his post-sizing neck OD, but do we really have a reliable idea about how much force is required to release his bullets? Maybe not… This use of the term “neck tension” when we are really only describing the amount of neck diameter reduction with a die/bushing is really kind of incomplete.
My point here is that it is overly simplistic to ask, “should I load with .001 tension or .003?” In reality, an .001″ reduction (after springback) on a thick neck might provide MORE “grip” on a deep-seated bullet than an .003″ reduction on a very thin-walled neck holding a bullet with minimal bearing surface in the neck. Bushing ID is something we can easily measure and verify. We use bushing size as a descriptor of neck tension because it is convenient and because the other important factors are hard to quantify. But those factors shouldn’t be ignored if you want to maintain consistent neck tension for optimal accuracy.
Consistency and accuracy — that’s really what this all about isn’t it? We want to find the best neck tension for accuracy, and then maintain that amount of grip-on-bullet over time. To do that you need to look not only at your bushing size, but also at how your brass has changed (work-hardened) with time, and whether other variables (such as the amount of carbon in the neck) have changed. Ultimately, optimal neck tension must be ascertained experimentally. You have to go out and test empirically to see what works, in YOUR rifle, with YOUR bullets and YOUR brass. And you may have to change the nominal tension setting (i.e. bushing size) as your brass work-hardens or IF YOU CHANGE SEATING DEPTHS.
Remember that bushing size alone does not tell us all we need to know about the neck’s true “holding power” on a bullet, or the energy required for bullet release. True bullet grip is a more complicated phenomenon, one that is affected by numerous factors, some of which are very hard to quantify.
Howa Rifles — General Background
Howa is a Japanese heavy machinery company. One of its product lines are firearms, which are imported into the United States of America by two different companies, Legacy Sports International and Weatherby. Legacy sells the 1500 under the manufacturers name while Weatherby re-brands the guns as the Weatherby Vanguard. In general, the finishes on the Weatherby rifles are more refined than the LSI-imported 1500s.
Howa Centerfire Rifles In Review
Howa Rifles Come with Excellent HACT Two-Stage Triggers
Howa 1500 HACT 2-Stage Trigger
Howa 1500s feature the very nice Howa HACT trigger. This is an adjustable, two-stage trigger, set for about 3 pounds (combined stages). Crisp and repeatable, this is an excellent trigger for a factory gun. There is no annoying Glock-style safety lever in the middle of the trigger blade. The 2-stage design and pull weight range works well for a hunting rifle or a rig for PRS competition. Rifleshooter.com says the Howa trigger is “one of the best factory triggers, along with Tikka. I’ve found the Howa trigger superior to a Remington 700 — the Howas doesn’t need to be replaced.”
Writing for the Western Outdoor News, WONews.com, Steve Comus has field-tested the HACT Trigger. Steve writes: “I always liked two-stage triggers, because of the way I could take-up the slack and then actually know when the rifle was going to go off. The take-up on the [HACT] trigger was fast and easy. The crisp, positive release when pressure was put on during the second stage [reminded me] of some of the target rifles I shot through the years.”
Howa Barreled Actions Are Available Now at Brownells
A wide variety of Howa barreled actions are ON SALE now at Brownells.com starting at $409.99. That’s a good deal considering these include action, barrel, AND excellent HACT 2-stage trigger. These Howa barreled actions are offered in three sizes (Mini, Short, Long/Magnum) and with standard, heavy, and carbon-wrapped barrel types. Various barrel lengths are also offered for popular chamberings such as 6.5 Creedmoor and .308 Winchester. All these M1500 barreled actions come fully assembled with the barrel chambered, installed, and properly headspaced.
RifleShooter.com has articles showing how to build rifles with Howa barreled actions. Despite popular beliefs, Howa barrels are NOT that hard to remove. We asked Bill at RifleShooter.com about the process:
Q: Is it difficult to remove a barrel from a Howa 1500?
A: Not very. I’ve heard from some smiths that worked on Howas (years ago) that the factory barrels are difficult to remove. However of the half dozen or so Howa barrels that I’ve pulled, they’ve been very easy. I use a Brownells action wrench with the top piece for a Rem Model 700 and the flat bottom resting against the flat on the wrench.
You may have heard internet grumblings about removing Howa barrels. Some folks say they are extremely difficult to remove without a relief cut. Well Bill at Rifleshooter.com demonstrates that Howa barrels can be removed without trouble, provided you have the right tools. Watch this video:
Watch Howa Barrel Removal Video — Quick and Easy (Click Speaker Icon for Audio)
Howa Actions — Three Options
Howa offers three action lengths: Mini, Short, and Long. You can see the bolts for the three action lengths in the image below. The Mini-Action has similar external dimensions to the Remington Model Seven, however, the Mini-Action’s bolt does not travel as far to the rear. This is a mixed bag. The upside is you have a quicker action (shorter bolt throw). The downside is you are limited to shorter rounds such as the .223 Remington, 7.62×39mm Russian, and 6.5 Grendel. But if you need a bigger cartridge, just choose the standard or long action Howa variant.
Howa 1500 vs. Remington 700 — Important Differences
Is the Howa 1500 a Remington 700 clone, or some kind of improved Remington 700? No, not really. While the top radius of the Howa 1500 does match the Model 700, and they can both use the same two-piece scope bases, there are a number of differences.
If you look at the Howa 1500 alongside the Remington 700 you’ll note the M700 is a round action, while the Howa is a flat-bottom action. In many ways the Howa’s bottom half reminds me of a push-feed Winchester. This means the chassis and stocks that support a Howa 1500 are not V-block based like you’ll find on a 700, instead they have a flat bottom. While the bolt of the Howa is similar in external appearance to the Model 700, it does offer some improvements, notably an M16-style extractor and a firing pin assembly that can be easily removed without tools.
Howa 1500 action screws are metric and are in a different location from the 700. The Howa 1500 has an integral recoil lug that accepts the front action screw, this means you have more of the front action screw engaging the action. WARNING: If you install it into a poorly-fitted stock or action you may bind it.
A while back, our friend Bill Marr of Rifleshooter.com conducted a fascinating 6mm Creedmoor barrel cut-down test that reveals how velocity changes with barrel length. This time Bill started with a 24″ Proof Research stainless steel barrel on a Howa action. Bill says this was a well-used barrel, with over 1800 rounds through it. So, the velocities might be a bit different than a new barrel of similar length. Bill cut the barrel down in one-inch increments. Here are some results from the test:
For this latest test, Rifleshooter cut the barrel in one-inch increments from 24″ to 16.1″ (just over legal minimum). Velocities were measured with a MagnetoSpeed V3 chronograph mounted on arm attached to the stock. This allowed the chrono to be adjusted inwards as the barrel was cut shorter, inch by inch.
For the 6mm Creedmoor cartridge, Bill loaded Hornady 108gr ELD Match bullets over 41.5 grains of Hodgdon H4350 with CCI 200 primers in new Starline brass.
The results were interesting to say the least. Bill reports: “Muzzle velocities ranged from 2,893 ft/sec at 24″ to 2,598 ft/sec at 16″ for a decrease in muzzle velocity of 295 ft/sec. Muzzle velocity changes per inch of barrel length ranged from 6 ft/sec per inch between 20 and 19 inches to 63 ft/sec per inch between 19 and 18 inches. Average velocity change per inch of barrel length was 37.9 ft/sec.”
Bill concludes: “An average drop of 37.9 ft/sec/inch of barrel is fairly significant and is what would be expected with a fast moving 6mm cartridge like the 6mm Creedmoor. While I’m used to seeing 6mm Creedmoors with slightly longer barrel lengths than 24″, when coupled with a sound suppressor the additional length can make moving the rifle quickly more difficult.
I’d suggest staying with longer barrel lengths wherever possible with this cartridge. At shorter lengths, it does give up more performance than its big brother the 6.5 Creedmoor.”
More 6mm Creedmoor Velocity Data from 2017 Cut-Down Test
If you’re curious about 6mm Creedmoor velocities at longer barrel lengths, back in 2017 Rifleshooter completed a 6mm Creedmoor barrel cut-down test from 31 inches all the way down to 17 inches. The test included four bullet types from 95 grains to 110 grains. With the 110gr Sierra MK, velocity at 31″ was an impressive 3110 fps. Surprisingly the velocity didn’t decrease that much for the first few inches. Even at 26″ (a five-inch reduction), measured velocity with the 110s was 3073 fps, a loss of 7.4 fps per inch on average. With a barrel shortened all the way to 20″ however, velocity had dropped down to 2949 fps, a significant (161 fps) loss. CLICK HERE for complete results from that 31″-17″ Barrel Cut-Down Test.
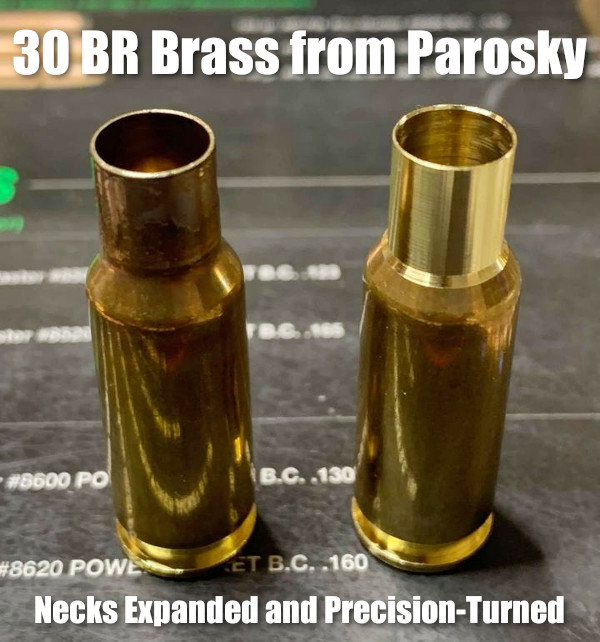
Here’s good news for 30BR shooters. Paul Parosky, maker of the excellent PRP Custom Bullets, is now offering 30BR neck-turned brass. This can save you considerable time and effort forming 30BR cases from Lapua 6mmBR brass. And the neck-turning is superb, again representing time savings (and no tools to buy). You can order this 30BR brass from PRPbullets.com. If you communicate with the PRP team, Paul may be able to neck-turn to your specific thickness. Paul notes: “Here are necks turned for a 0.330 neck. I’ll try my best to accommodate anyone’s neck dimensions as they wish. Just contact us through our website PRPBullets.com.”
About this Neck-Turning set-up — Paul Parosky notes: “For neck-turning I’m using an old drill press that has been re-worked. The cutter and spindle are all indicated before neck turning to ensure no runout. The RPM is around 520. The lube I use is a mixture of royal and mystery oil.”
Why the 30 BR Dominates 100/200 Benchrest for Score Competition
The 30BR, along with some wildcat variants, remains the dominant cartridge in short-range (100/200) benchrest-for-score competition. The 30BR’s .308″-diameter bullets are larger than the 6mm bullets used by the 6PPC (which rules group BR competition). The bigger 30-Cal diameter has an advantage in touching scoring rings. In addition, the 30BR is also relatively easy to tune, and barrel life is considerably better than with smaller-caliber benchrest cartridges. For more information, see our AccurateShooter 30BR Cartridge Guide.
Cases are Expanded, Then Neck-Turned
To produce his 30BR brass, Parosky first uses a series of expander mandrels. Then he neck-turns with power using a converted drill press. Paul tells us: “This is done the old school way, I use three different tapered expander mandrels, then neck-turn it to the proper neck chamber, then run them up through a FL expander mandrel to ensure necks are straight. Then I clean all the cases.”
Paul Parosky Can Also Neck-Turn 6PPC Brass
Paul Parosky also expands and neck-turns 6PPC cases that are made from parent Lapua .220 Russian cartridge brass. Here, illustrating his 6PPC neck-turning operation, is a Paul Parosky post on the USA Benchrest & Extreme Precision Shooters Facebook page.
Plan Your Visit: Top 5 Areas to Explore Near Camp Perry Feature based on article by Ashley Dugan, CMP Writer
This summer, many of our readers will visit Camp Perry, Ohio to participate in the historic CMP annual National Matches. There will be smallbore and centerfire rifle matches, along with pistol matches. And this year there will be a number of new mid-range (600-yard) rifle matches. For those competing at Camp Perry this summer, there are many interesting nearby places to visit along the shores of Lake Erie. This article covers some tourism highlights in the area — the Top 5 areas visitors can explore outside of Camp Perry this summer. Many of these tourism attractions are featured in Ohio’s useful Shores and Islands website.
Marblehead and East Harbor State Park
Marblehead is a small village about 18 miles east of Camp Perry. The downtown area offers a strip of quaint shops and restaurants along with an eclectic array of artist galleries and events. Here, catch the Kelleys Island ferry or drive slowly down the picturesque coastline of the peninsula to reach the Marblehead Lighthouse – a state park with the oldest continuously operating lighthouse on the Great Lakes (since 1822). The spot has a good nautical museum on the grounds. Fish off the rocks, have a picnic or take in views of the world-famous amusement park, Cedar Point, located just across the bay. For more outdoor activities, Marblehead offers East Harbor State Park, with a public beach, a marsh pond, camping and breathtaking views.
Port Clinton, Put-In-Bay, Liberty Aviation Museum
Port Clinton is the city where Camp Perry is located. Nestled along the shore of Lake Erie, Port Clinton offers beaches, restaurants, festivals. and live outdoor music during the summer months. Ride the fast, Jet Express catamaran ferry to Put-In-Bay, visit the old Port Clinton Lighthouse, reserve your spot on one of the many charter fishing boats or grab a basket of fried Lake Erie perch.
Visitors may also visit the Liberty Aviation Museum, which showcases several authentic World War II aircraft and a fully operational Ford Tri-motor “Tin Goose” — one of only a few still flying. Learn more about Port Clinton at PortClinton.com.
Catawba Island
No more than a 10-minute drive from downtown Port Clinton is Catawba Island, which offers several fun options. The Gideon Owen Wine Company serves up local wines, with roots dating back to the 1870s. Just down the road, The Orchard restaurant offers farm-to-table options in an upscale atmosphere. Try fresh seafood or Wagyu beef, and listen to the live entertainment. Visit the farm stand next door for a salad or hot honey & whipped feta dip, or simply sip on some wine in the garden area. Later you can watch the sunset over the lake at Catawba Island State Park, find yet another ferry to Put-In-Bay, play putt-putt or maybe even take a tour of African Safari Wildlife Park, a member of the Zoological Association of America and home to many exotic animals and drive-through encounters.
Sandusky and Cedar Point
Just a short drive across the bay, you’ll find Sandusky, which is home to Cedar Point, a large amusement park opened in 1870 that now has over 70 thrill rides, including 18 roller coasters. The park is built within its own peninsula and holds a mile-long sandy beach and water park. Kalahari Resort & Convention Center, located in Sandusky, is Ohio’s largest indoor water park. Buy a day pass to the many pools and water slides. This is the USA’s #1 indoor water park according to USA Today. Other Sandusky amenities include the Sandusky Mall, a Merry-Go-Round Museum, a speakeasy bar, and the Jackson Street Pier with a variety of restaurants to enjoy. Learn more about Sandusky at CityofSandusky.com.
Lake Erie Islands
The Western Basin of Lake Erie, where Camp Perry is located, is home to several unique islands. Just a short ferry ride away, guests may rent golf carts, bikes, or take their own transportation. Such islands include South Bass, home to Put-In-Bay. The island is also home to Heineman Winery, founded in 1888. While at the winery, explore Crystal Cave, one of the largest geodes in the world, and Perry’s Cave, a limestone cavern discovered in 1813. Families may also visit the Perry’s Victory & International Peace Memorial, at 352 feet, one of the tallest monuments in the USA.
Viewable from South Bass is Kelleys Island, another fun destination in Lake Erie. The island offers historic homes, bed & breakfasts, and a State Park where you can camp, sunbathe, swim, or rent kayaks. Next to the beach is the Glacial Grooves, a natural phenomenon created when a massive glacier moved through the area millions of years ago, forming the Great Lakes.
Tech Report by B. Walker, owner of The Urban Rifleman LLC
I have been moly coating since I started shooting rifles nearly 26 years ago. I have always moly-coated my bullets. I figured if it was good enough for Walt Berger, it was good enough for me (Walt still moly coats his bullets to this day, if recent match pictures are any indication). I had always used the typical dry method (without the wax) and I had the same jar of moly (molybdenum disulfide) for many years.
I had tried all kinds of methods over the years. But then AccurateShooter Forum member “Bowfisher” sent me a message about moly-coating bullets using water. After his suggestion, I did several batches using the moly-in-the-water method. I was stunned with the great results. This Wet Moly method is the cleanest, easiest, and best coating method I have ever tried. I strongly believe Wet Moly should be the recommended method.
Traditional Dry Moly Coating Process is Dusty and Messy
Before I started the Wet Moly process, I always coated my bullets in small containers in my big Dillon tumbler. I would put the bullets in old EMPTY 1-lb powder containers and add the moly. I would place the powder containers in my big Dillon tumbler and tumble for at least three hours. I would then throw rice in with the bullets to soak up any excess moly dust and shine the bullets. Then I would shake out the rice using a lid with holes drilled in it. My coated stuff came out beautiful if I do say so myself even dry. However, there was always dust and moly mess (there was always some on my fingers when I would handle the bullets after). I only liked to doing coating in big batches to get it over with because it was a chore (by all means don’t get moly on the bottom of your shoes and track the carpet)!
Wet Moly Method — Tumbling in Bottles with Moly and Water
The new wet method entails adding water to the bullets during the tumble in the bottle, and it is way easier and cleaner. The final product is totally dust free and will not come off on your fingers as there is no dust or residue. I think they shoot better too, and the moly works as it is supposed to. I won’t get into the debates over the merits of moly. Some folks believe it works for them. This article is intended for those guys — it is not intended to convert handloaders who are happy with shooting uncoated bullets.
Editor: None other than John Whidden, Multi-Time National Long Range Champion, moly-coats his bullets. Whidden also uses a Wet Moly application method. He agrees that applying moly in a water solution delivers the best results, and doesn’t leave dusty residues.
Here is the basic outline of the Wet Moly application method. In addition to this outline, I created an instructional video that shows my entire process. [Editor: Definitely WATCH the video. It is important to see the post-tumbling rinsing and buffing processses.]
1. Use old 1-lb powder containers. Work over a sink. Add the bullets in reasonable batches to the containers (lets say 2-3 inches of bullets). I try to use use only enough water to cover the bullets and I use a little more moly than I used to with a dry application. I suggest using half a teaspoon of moly per two inches depth of bullets.
2. Tumble for four hours (at least). I tape the container lids shut before placing them in the tumbler. Then, simply place the powder container in your vibratory tumbler.
3. After the elapsed time, take the bottle to the sink and, dump contents into a plastic strainer. I use an old spaghetti strainer that I save just for moly. IMPORTANT: BE SURE you have a strainer that won’t let the bullets fall out! Stream water (from faucet) gently over the bullets to thoroughly clean excess residues off the bullets. Shake strainer to get all the water out. See video time 6:00-10:00.
4. Sift out the bullets onto a paper towel inside an old baking pan and shake to buff. Repeat until the bullets are completely dry and buffed to a high shine. The bullets are clean, dust-free and the moly is gorgeous! Leave for several days before storing or put them in your oven at about 130 degrees for 30 minutes to remove the last bit of any moisture. (WARNING: DO NOT use excessive oven heat or cook too long — set a timer!).
If you follow these instructions, the result should be the best moly coating you have ever seen!
Before and AFTER Wet Moly. Note how uniform the moly coating is on the bullets. The Wet Moly process also leaves a perfect glossy finish after rinsing and drying. And the bullets are totally dust-free! These are Sierra #1380 .224 69gr HPBT MatchKings.
Be sure to visit our online store at TheUrbanriflemanstore.com. We have a full compliment of front and rear bag riders for various rifles that we designed and produce in-house. We also stock Revolution laminated benchrest stocks, and we sell stainless steel Remington prefit barrels (which are getting rave reviews from customers). Also available are Wilson dies, Timney and Triggertech triggers, Berger and Sierra bullets, Magpul and Accuracy International chassis, and lots more.


 In our
  Neck-Wall Thickness is Important Too
 Howa 1500 HACT 2-Stage Trigger


 For this latest test, Rifleshooter cut the barrel in one-inch increments from 24″ to 16.1″ (just over legal minimum). Velocities were measured with a


 Be sure to visit our online store at


