This shocking photo of destroyed AR-15 bits and pieces was posted on Facebook by William Walter, a firearms instructor. William said this was “The worst AR-15 blow-up I have ever seen. The case head literally atomized …you can see the brass residue on the parts. The bolt was split in two also.”
There’s nothing inherently wrong with AR-platform rifles (well, except that they run dirty). Over the past six decades Eugene Stoner’s semi-automatic design has proven its merits in military and civilian applications. You may not know, but the original AR from 1955 was a .30-caliber. The Armalite AR-10 shot the 7.62×51 cartridge. Later, at the request of the U.S. Military, Armalite created a smaller version that became the M16/AR15. The rest was history. Now there are millions of AR “black rifles” in the hands of soldiers and sportsmen.
With so many ARs in circulation, it’s no surprise that some get used by folks who don’t know how to hand-load or otherwise fail to follow safe gun practices. The AR is actually a pretty sturdy rifle, but when it’s fed bad ammo, or abused, bad things can happen. Very bad things… commonly known as Kabooms.
The American Shooting Journal (ASJ) has compiled a set of particularly extreme AR Kabooms. Compiling the “evidence” from various web sites, ASJ has published nine (9) of the most Unbelievable AR-15 Fails. Here are two of the worst “AR-15 Fails”. CLICK HERE to see them all.
Nothing but busted parts after this catastrophic Kaboom…
Notice the bolt is still stuck in the barrel extension … with the rest of the gun in pieces.
Another view of this sad blow-up…
These catastrophic AR failures are eye-openers, that’s for sure. ASJ cautions: “Any weapon can fail if given the wrong ammunition, faulty reloads or a plugged barrel. Always be aware of what can happen at anytime if you fail to follow common sense and gun safety rules.”
ASJ Sources: Photobucket, Armory Blog, Pinterest, Northeastern Arms, Eric Nestor
At the request of our readers, we provide select “Deals of the Week”. Every Sunday afternoon or Monday morning we offer our Best Bargain selections. Here are some of the best deals on firearms, hardware, reloading components, optics, and shooting accessories. Be aware that sale prices are subject to change, and once clearance inventory is sold, it’s gone for good. You snooze you lose.
1. EuroOptic — Free Kestrel 5700 with Leupold Mark 5HD Scope
If you don’t own a Kestrel yet, this is a fantastic deal. Right now at EuroOptic, if you purchase a Leupold Mark 5 HD scope, you get a FREE Kestrel 5700 with Hornady 4DOF, a $499.00 value. Choose from a variety of Leupold Mark 5HD models, MOA or MRAD: 7-35x56mm, 5-25x56mm, and 3.6-18x44mm. That Kestrel 5700 includes an advanced Ballistics App.
2. Cabela’s — Savage 12 FV and Ruger American Rifles on Sale
Looking for a great deal on a basic hunting rifle? Cabela’s is offering big discounts on Savage 12FV and Ruger American rifles now through 11:59 pm on January 22, 2020. The Savage 12FV is marked down to just $369.97 while the Rugers are 10% Off. Along with rifle bargains, Cabela’s Cabin Fever Sale includes great deals on hunting clothing, camping gear, and ammo.
3. Brownells — CCI .22 LR Ammo, $22.99 for 500 rounds
Here’s a great deal on big-name, rimfire ammo. Right now you can get a 500-round pack of CCI Standard Velocity 40gr LRN ammo for just $22.99. That works out to just four-and-a-half cents per round. That’s a great deal on reliable CCI ammo. But it gets even better. If you purchase at least four 500-rd packs (2000 rounds total), and add a small item to get the order over $99.00, you also get $10.00 Off and FREE shipping and with Discounnt CODE MDX. There is also a CCI Ammo Rebate if you buy a new rimfire firearm in 2020.
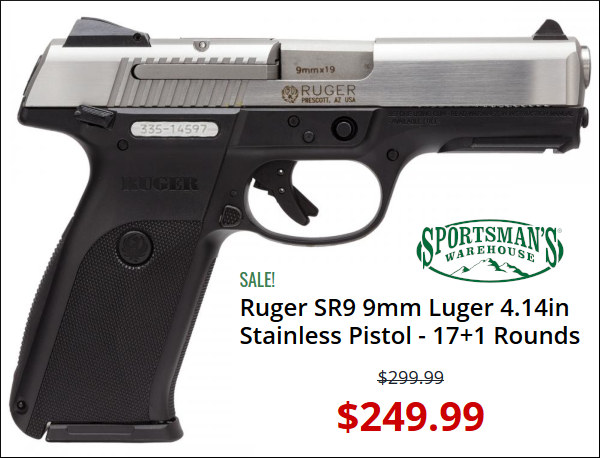
We’ve shot the Ruger SR9 9mm pistol and we like the ergonomics MUCH better than a Glock. The SR9 is comfortable with a slim, ergonomic grip, reversible backstrap, and narrow stainless slide. The Ruger SR9 also includes ambidextrous manual safety and magazine release, built-in Picatinny rail, and adjustable high-viz 3-dot sight system. If you are looking for a standard 9x19mm pistol (4.14″ barrel), this is a great value — $249.95 at Sportsman’s Warehouse
5. Amazon — ADDTOP Power Bank with Solar Panels, $39.99
Power — modern shooters need mobile battery power to run a LabRadar, charge a Tablet monitoring a Target Camera, or charge you smartphone running a Ballistics App. Here’s one of the best compact USB-port batteries you can buy. This offers 25000 mAh of energy, PLUS it has four solar panels (one built-in, three external). This ADDTOP Power Bank is on sale now for $39.99 on Amazon, a good deal.
6. Walmart — EZShoot Rifle Case with Shoulder Straps, $38.59
We like this versatile bag for hunting and varmint trips. The 47.2″ EZshoot gun case provides good protection for scoped rifles with up to about 27″ barrels. The large pockets will hold binoculars, laser rangefinder, windmeter, ammunition, and other gear. The big bonus is this inexpensive carry case includes comfortable, adjustable shoulder straps. That makes it easy to carry everything from your vehicle to your shooting area. You get all this functionality for under twenty-five bucks. Walmart currently offers this 47.2″ case for just $38.59 with FREE shipping to your residence.
7. Amazon — Padded Shooting Mat, $37.99
Are you new to prone shooting or tired of using an old worn out mat? Grab one of these Redneck Convent padded shooting mats and you shoot in style and comfort all day long. These pads are weather, chemical and water resistant and the durable PVC material is easy to clean and maintain. Best of all it rolls up for easy storage and transport.
8. Field Supply — Huge Discounts on Gerber and Other Knives
Gerber makes excellent fixed- and folding-blade knives. Right now at Field Supply you can save up to 72% on Gerber and other popular knife brands. The multi-function Gerber Bear Grylls Grandfather is just $9.68, while the Gerber 3-Knife Pursuit Hunting Kit (Kukri Machete, Saw, Fixed Blade) is now $37.13, marked down from $92.00. That’s a superb blade trio for hunters. There are also great deals on Winchester knives. For example, Winchester Fine Edge Folders are just $9.66.
9. Amazon — Bore-Snake Two-Pack, $7.99
While bore cleaning should be done with a good cleaning rod and fitted bore guide, there are times when Bore-Snakes can be handy, such as when cleaning pistols and 10/22s. Now on Amazon you can get two (2) convenient GogoKu Bore-Snakes for just $7.99. Get two of the same diameter (.22 up to 12ga), or choose a Kit with both .223 and .308 sizes. Handy item for your range bag. For a limited time you may be able to get 20% OFF by using code 20ZFXQ3W at checkout.
Many shooters these days clean their cartridge brass ultrasonically, or wet-tumble their cases with stainless media (above). Both methods get brass clean and shiny, inside and out. However, when those wet-cleaning processes are completed, you’re left with a pile of soaking wet brass. How do you dry your brass quickly and efficiently, without unsightly water spots? Read on for some great answers…
In our Shooters’ Forum, Forum Gold Member Terry asked: “How do you dry your brass after Ultrasonic cleaning?” In an interesting Reloading Forum Thread, many smart suggestions were posted. A dozen fellow members outlined a variety of effective case-drying procedures, which work equally well for both wet-tumbled brass and ultrasonically-cleaned cases. Here are the Top 10 brass-drying suggestions from our Forum members.
TOP TEN Ways to Dry Cartridge Brass After Wet Cleaning
1. Food Dehydrator — Shake the brass in towel to get the bulk of water off. Next leave in the food dehydrator for 45 minutes or until there are no signs of moisture inside the cases. — Lawrence97
2. Lyman 5-Level Case Dryer — Rinse off cleaning solution(s), then load brass by type into racks in Lyman Cyclone Case Dryer. This is easier to load/unload than food dehydrators and holds more cases.
3. Hot Water + Compressed Air — Rinse all your cases as a batch using scalding hot water from the kitchen sink. Hot water evaporates off of brass very very quickly. Then hit them with compressed air. Takes 10 minutes. Simple. — SG4247
4. Oven Dry in Pre-Heated Oven — After pre-heating to 200° or so, turn off oven and put brass inside on a tray. Most important! Tell your wife what you are doing so she doesn’t crank it up to 425 to heat pizza! — MClark
NOTE: Many other members suggested oven drying at 150-200°. We recommend turning OFF the oven so you don’t cook your brass if you forget to remove the cases.
5. Towel Dry then Warm with Heat Gun — Roll brass in a towel until no more water shakes out. Lay out on cardboard box top and blow off with Harbor Freight heat gun. $9.99 on coupon. Two minutes of heated air and about half hour of wait and they are good to go. This is with primers removed. — Shaggy357
6. Compressed Air, then Sun Dry Outside – I rinse the brass, then blow them out with compressed air. Then, dependent on the time of year, lay them on a towel in the sun. — HogPatrol
7. Dishwasher on Dry Cycle – In the winter, I drop my wet brass cases neck-down on the rack pegs in the dishwasher, then turn on the dry cycle. In the summer…well, I’m in Texas. They go to the porch for a bit. — Toolbreaker
8. Alcohol Rinse then Air or Oven Dry — Rinse in 90% Isopropyl alcohol and either let air dry or stick in 175° oven for half an hour. Alternatively, use a dehydrator. — Zipollini
9. Slow Air-Dry in Loading Blocks — I have a reloading block with holes drilled in it. I simply load the block up and let it air-dry in the cupboard for a couple of days. — JCS
10. Wipe with Towel Then Anneal Normally — This thread is stirring my OCD side. Seems complicated for just drying — my brass dries just fine when I anneal it. This entire process can’t take an hour per batch. When finished, the brass is cleaned, annealed, and ready to size. — CHLuke
Deprime, then tumble brass with stainless media, water, Lemishine, and dish detergent.
Shake them easily in a strainer to knock out most media then grab 4-5 pieces, shake them over the bucket for the last of the media then inside a towel.
Finally blow out the primer pockets and wipe with a towel, load in the Annealeez.
This article is part of Sinclair Int’l Step-By-Step Reloading Series. Most of the products mentioned in this article are sold through Brownells.com.
by Roy Hill, Brownells/Sinclair Copywriter
Making your own precision handloads is a meticulous journey with many steps, many important matters to consider, and many sets of measurements to calculate. For those who pursue the perfect group, the highest score, the really long accurate shot, the rewards more than outweigh the effort. Choosing the right cases, deburring the flash holes, making the primer pockets uniform, trimming the cases, and lubricating them are all familiar – and critical – steps along the journey. And now that your brass preparation is complete, you are at last ready to start running the cases through your press and fill them with primers, powder, and bullets. The very first die the brass encounters is the sizing die. You insert the case, work the press’s lever to return the case to its correct pre-fired dimensions – and the journey continues.
There are three types of sizing dies to think about: neck, full-length, and small base. All three have specific benefits and potential drawbacks, and you should choose the type of die you use by thinking very carefully about what kind of shooting you plan to do with your handloads. No matter which type you select, most sizing dies will also punch out the old spent primer with some sort of decapper assembly that uses a hardened steel rod. Many types of sizing dies use an expander ball inside the die to make sure the neck of the case will accommodate a bullet after being sized. With some size dies, the expanders are easily removable and interchangeable, letting you get exactly the neck tension you want. If you are reloading for pistol cartridges, carbide sizing dies allow you to quickly resize without applying any lube to the case. But rifle cases always need lube.
Neck-Sizing Dies Neck-sizing dies resize only the neck of the case. The benefit of sizing only the neck is that the brass is “worked” very little, letting you reuse the same cases many times over. Also, cases that have already been fired in your rifle are perfectly fireformed to fit that rifle’s chamber, which can help accuracy. However, neck-sized cases will fit only the specific rifle they were originally fired in, and may still require a little extra force to chamber or extract.
Sinclair recommends that neck-sized-only cartridges should not be used any in other rifle besides the one they were originally fired from [unless they are also FL-sized], or in any action other than a bolt-action. Neck-sized-only rounds are great for the target range or the benchrest but should not be used in critical situations like military or police operations, or hunting. And if you fire them enough times, neck-sized cases will still need to be full-length sized periodically for you to keep using them.
Full-Length Sizing Dies Full-length sizing dies do exactly what their name says: resize the full length of the case, not just the neck. Full-length sizing helps create handloads that will function in any rifle, not just the one from which the cases were originally fired. The potential downside of full-length sizing is that it may shorten case life because it works the brass more than neck sizing. But it’s possible to “tune” today’s full-length sizing dies so they barely work the brass at all, as this article by Sinclair Reloading Tech Ron Dague shows.
Illustration Shows How a Full-Length Sizing Die Works
Another way to reap the benefits of full-length sizing is to use Redding’s full-length bushing dies, which size the full length of the case but use a system of interchangeable bushings that enable you give the case neck the bare minimum of resizing needed. To see how finely adjustable bushing dies are, and how they resize the case while fully supported, CLICK HERE for Video. The neck bushing helps you precisely control the neck tension to help increase the consistency and accuracy of your handloads.
Small Base Dies
A Small Base Die is just another type of full-length sizing die, but one that is typically used when reloading for semi-automatic rifles, like the AR-15, M14, or AR-style .308 rifles. (It may also work well for bolt guns that need extra sizing on the lower section of the case.) A small base die works exactly like a full-length sizing die, only it compresses the brass just a bit more, usually about .001″ more, and may even push the case shoulder back just a hair. Small base dies give that extra bit of compression to the brass to help make sure the case will properly extract from a semi-automatic firearm. The upside is that you get precision handloads that should work flawlessly in your semi-automatic. The downside is case life is really shortened, especially compared to brass used only in one bolt-action rifle, because the brass is worked more.
Shoulder Bump Gauges
A handy tool for setting up your full-length sizing dies as close as possible to your rifle’s chamber is the Sinclair bump gauge. The bump gauge lets you resize the case as little as possible, to extend case life and help your handloads fit your rifle almost like a neck-sized only die. You use deprimed cases fired in your rifle and bump gauge inserts to help you set up the die so it resizes the case only about .001″ to .004″, depending on what type of rifle you’re shooting.
Video shows how to use a shoulder bump gauge to set up your full-length dies
Article Find by EdLongrange. We welcome reader submissions
Scary stuff — AK-74 after firing corrosive ammo and not being cleaned for a week.
Image courtesy ADCOFirearms.com.
No doubt you’ve heard the term “corrosive” used with respect to ammunition. But what exactly is “corrosive ammunition” (and how does it different from non-corrosive ammo)? What is the chemistry that leads to corrosion, and what cleaning procedures should you follow if you shoot corrosive ammunition? Brownells has come up with answers to these and other questions in a helpful TECH TIP video about corrosive ammo.
In this informative video, Brownells gun tech Steve Ostrem explains the primer-related chemistry that makes some ammo corrosive. The video then reviews suggested cleaning procedures you should follow after you have fired corrosive ammo through any firearms.
What Is “Corrosive” Ammunition?
What makes ammo “corrosive”? Generally speaking, primers are the problem. When corrosive ammunition is fired, the ignited primers leave a residue of corrosive salts. Typically these primers contain potassium chlorate, or sodium petrochlorate which, when burned, change into potassium chloride or sodium chloride. Sodium chloride is also known as common table salt.
Potassium chloride and sodium chloride are both very hygroscopic (i.e. they attract water). Because of that, these alkalis are rust generators. When exposed to the hydrogen and oxygen in the air (and moisture) potassium chloride and sodium chloride can form an acid that quickly causes metal rifle parts to rust and pit.
Given a choice, you may wish to avoid corrosive ammo altogether. However, for some types of fire-arms, particularly older military-style rifles, the most affordable ammunition may be corrosive. If you choose to use corrosive ammo, it is important to clean the gun thoroughly after use. After firing, you want to use an element that will neutralize the primer salts. Brownells suggests a water soak (see video above). Alternatively, Windex with ammonia can help neutralize the salts, but that doesn’t finish the job. After the salts have been neutralized and flushed away, basic anti-corrosion protectant (such as Eezox or other gun oil) should be applied to all metal parts.
This video ahows the effects of Corrosive Ammo after one month without cleaning:
To learn more about the proper procedures for cleaning rifles exposed to corrosive ammo, we suggest an article by Paul Markel on Ammoland.com. Markel, host of the popular Student of the Gun TV series, states that: “Windex (with ammonia) is the Corrosive Ammo shooter’s best friend. After you are done shooting your corrosive ammunition for the day, squirt the window cleaner liberally from the chamber down the barrel. Pull the bolt / bolt carrier / op rod if there is one and douse them as well. A couple of old cotton t-shirts will come in handy. A cotton barrel swab is a nice accessory but you can make do with patches. Some folks will rinse all of the ammonia and loosened corrosive salts off with hot water. Others prefer to wipe it all down and let the ammonia evaporate. Either way, once the corrosive salts have been tackled with the window cleaner, it is time for an all-purpose brush (old toothbrush) and some gun oil.” READ Full Article by Paul Markel.
Video Tip from EdLongrange. We welcome reader submissions.
At the request of our readers, we provide select “Deals of the Week”. Every Sunday afternoon or Monday morning we offer our Best Bargain selections. Here are some of the best deals on firearms, hardware, reloading components, optics, and shooting accessories. Be aware that sale prices are subject to change, and once clearance inventory is sold, it’s gone for good. You snooze you lose.
1. Bruno Shooters Supply — Seb NEO Rests in Stock
The Seb NEO Coaxial front rest is often considered the finest rest available for F-Class and benchrest shooting but there can be a long wait to get one. Head over to Bruno Shooters Supply which has the standard NEO and Ratigan NEO in stock and ready to ship. If you’re looking to upgrade your gear before the match season starts, this is one of the best ways to do it.
2. Stocky’s — Rem 700 Composite Stock with Accublock, $99.99
These stocks were the first run of Stocky’s Long Range Composite Sporters. There is nothing wrong with these “factory seconds” except the barrel channels are narrower than current versions, so you may have to open up the barrel channels a bit (simple task). On Sale for $99.99, these are an Amazing Bargain. Designed for Rem 700 and Rem clone actions, these LRC Sporter Stocks are constructed from a high-fiber composite with precision aluminum Accublock® chassis molded into the stock.
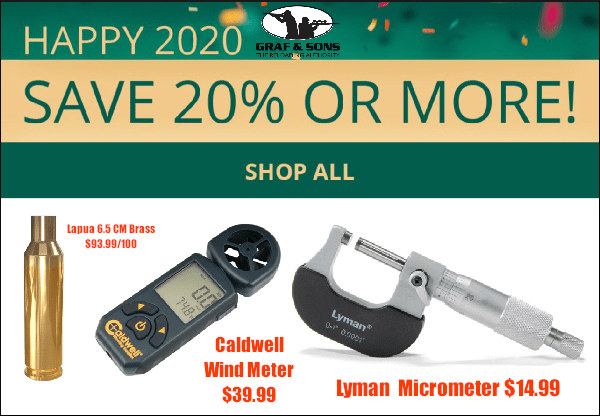
3. Grafs.com – Happy 2020 Sale — Save 20% or more
We saw plenty of large-scale sales before the holidays but here’s the first multi-category sale of 2020. Grafs is running a Happy 2020 Sale featuring products from Lapua, Lyman, Caldwell, Hornady and more. Some of the hot deals we found are: Lapua brass (6mm and 6.5 Creedmoor, .260 Rem, 7.62×39), a Lyman Micrometer for just $14.99, and a Caldwell wind meter for $39.99. In addition, Aguila .22 LR rimfire ammo is on sale for $2.99 per 50rd box. That works out to just 6 cents per round!
4. Amazon — Griffin Portable Range Stool, $34.95
Too many ranges seem to have hard, uncomfortable seating options that never seem to be the right height for the benches. One of the best solutions is to bring your own adjustable drummer stool. This Griffin “Drum Throne” features a comfortable padded seat. The Griffin seat adjusts easily for various heights and the tripod legs fold for transport. Next time you’re shooting from a bench, do it in style and comfort.
5. Cabela’s — Ruger 10/22 Carbine, $179.97
Shooting .22 LR is more popular than ever. With its low cost and wealth of aftermarket accessories, the Ruger 10/22 still dominates the .22 LR entry-level rifle market. Right now, Cabela’s offers the Ruger 10/22 Carbine (blued barrel, gray stock, no sights) for a super-low $179.97 price. A basic 10/22 rifle is $249.99 at MidwayUSA so you can see Cabela’s is offering a great deal.
6. EuroOptic — Nikon BLACK Riflescope Closeout Sale
Nikon’s decision to stop selling riflescopes shocked many in the industry. However, Nikon’s exit from the scope marketplace has created an amazing opportunity. If you’re in the market for a tactical scope, check out EuroOptic’s Nikon BLACK riflescope sale. EuroOptic has a big selection at prices up to 47% off. Choose MOA or MRAD versions with a variety of reticle options. NOTE: These BLACK Nikons are quality scopes that have performed well in the field. You’d have to pay hundreds more to do much better.
7. Natchez — Leupold BX-2 Binoculars, $174.49
For hunting and general outdoor use, a good pair of binoculars is invaluable. While we appreciate binoculars that cost $1000 or more, for many purposes a basic, affordable set of binoculars will get the job done. Natchez now has the Leupold BX-2 8×42 Cascades binoculars for $174.49. That is a great deal — a savings of $80 or more over the original price.
NOTE: These 8×42 Leupold binoculars have been very highly rated for the price, when compared to other budget-priced binoculars. See Video Review above.
8. Midsouth — Lyman Hearing Pro Earmuffs, $34.99
Quality hearing protection is vital for shooters. If you have old or worn-out muffs, upgrading your earmuffs can help protect your hearing for years to come. Right now you can purchase these Lyman Electronic Hearing Pro Earmuffs for only $34.99. That’s a great price for electronic muffs that let you hear range commands and talk to fellow shooters. At this price you can pick up an extra set as a spare. Choose either Flat Dark Earth or Matte Black colors for $34.99.
9. Amazon — Two Pairs Safety Eyewear, Cords, Covers, $13.50
Eye protection is important! All you need is one case separation or blown primer to cause serious eye injury. Don’t take that risk. Plus the CMP has made Eye Protection mandatory for all CMP Pistol and Centerfire Rifle events. Here’s a great kit with TWO Sets of safety eyewear, each with a neck strap and carry bag. These feature ANSI Z87.1-rated lenses that are anti-fog and scratch-resistant. The lenses also block harmful UV rays. Get the full SuperLite and SuperClear Lens Technology Kit for just $13.50.
Just in time for the Berger SW Nationals, Berger has released a class-leading new 7mm bullet — the 190 Grain Long Range Hybrid Target (LRHT). The new 190-grainer boasts a “jump-tolerant” hybrid ogive profile along with formed meplat (bullet tip) for more consistent Ballistic Coefficient (BC). In fact, with its new MRT (Meplat Reduction Technology) nose, Doppler Radar testing confirms less than 1% BC variation from bullet to bullet. While a high BC is of course desirable for competitive shooting, shot-to-shot BC consistency is most critical when engaging targets to 600 yards and beyond. The new 7mm 190gr LRHT’s BC numbers are very impressive: 0.751 G1 and 0.384 G7.
Designed for F-Open competition, the 7mm 190gr LRHTs are optimized for cartridges such as .284 Winchester, 7mm WSM, 7mm SAUM, and 7mm Remington Magnum among others.
No you don’t need a new barrel to shoot the 190s. If you are running Berger 184s in a 1:9″ or faster twist you should be fine. Berger states: “The 190gr LRHT is complementary to the industry-leading Berger 184gr F-Open Target bullet with an identical stability factor and improved ballistics when launched from 1:9″-twist barrels.”
Meplat Reduction Technology for More Consistent BCs
Utilizing advanced and proprietary manufacturing processes, Berger’s innovative Meplat Reduction Technology (MRT) applies controlled pressure along the nose of each LRHT bullet. Berger states this delivers ” a homogeneous and repeatable profile for the industry’s most consistent Ballistic Coefficients”.
“With improved MRT consistency contributing to its superior ballistic coefficient and form factor, the 190 is one of our highest performance projectiles to date. They provide minimal dispersion and more hits on target for F-Open competitors, long range shooters and larger capacity 7mm enthusiasts.” said Garett Stoddard, Berger’s Lead Production Engineer.
The new Berger 7mm 190 Grain Long Range Hybrid Target Bullets are shipping now to Berger authorized retailers.
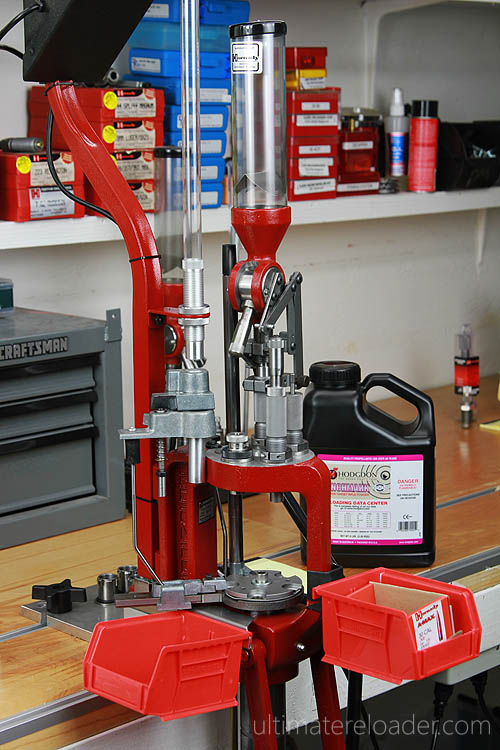
Blue, Red, Green — There are many Progressive Press options on the market…
When you need ammo fast — lots of ammo, it’s hard to beat a progressive reloading press for output. We use progressive presses to load handgun ammo and .223 Rem cartridges for varmint safaris. With good dies, and proper press set-up, today’s progressive presses can produce surprisingly uniform and accurate ammo. No, you won’t see Benchrest Hall-of-Famers loading PPC cartridges on progressives. However, if you need 1000 rounds for your next prairie dog adventure, you should consider getting a progressive. Below you can see a Hornady Lock-N-Load AP configured to load .308 Winchester in bulk.
UltimateReloader.com has published helpful Tips to Optimize Progressive Rifle Loading. No matter whether you have a Red (Hornady), Green (RCBS), or Blue (Dillon) progressive, this article can help you load more efficiently and produce better results. Here are some highlights:
Proper Brass Prep
Just like a good paint job requires good prep work, great rifle ammo requires good brass prep. In order to make sure your rifle loading goes smoothly, make sure to perform the following brass prep steps:
Clean the brass (tumble, ultrasonic, etc.)
Inspect brass for cracks, deep dents, etc.
For military brass: de-prime, ream/swage primer pockets, size with small-base sizer die (small base usually optional).
Measure brass length — if too long, size and then trim.
Final inspection before loading.
Cleaning primer pockets may be something you’ll consider (I don’t clean primer pockets except for rare cases or match ammo).
Smooth and Steady Pace
Since you’re loading rifle ammunition on a progressive, you’re already saving a load of time, so there’s no need to rush things! Attention to detail is super-important for safety and for good results. Always keep an eye on powder level (goes down FAST) and what’s happening at each station.
The Right Press and Press Setup
Look for a heavy-duty, well-built press that will stand up to rifle loading. You’ll also want to make sure your powder measure will have the proper capacity (~25 grains for .223, ~50 grains for 308). If you are bulk reloading, ensure you have enough stations for sizing, charging, powder check, bullet feed, bullet seating, and (optional) bullet crimp. Compare the powder measuring systems, and give careful consideration to the priming process. You want case priming to be 100% reliable. This video reviews the differences between the Dillon XL-650 and the new XL-750 Progressive presses.
More Ultimate Reloader Resources for Users of Progressive Presses:
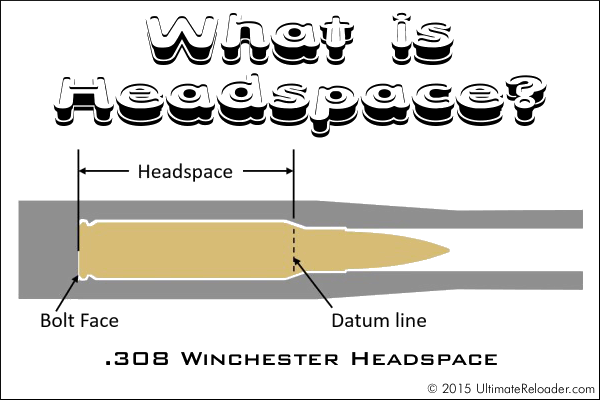
This illustration shows headspace measurement for the popular .308 Winchester cartridge, which headspaces on the shoulder. Image copyright 2015 Ultimate Reloader.
In this Brownells Tech Tip, Brownells gun tech Steve Ostrem explains what headspace is and why it’s one of the most critical measurements for nearly all firearms. Even if you’re an experienced rifle shooter, it’s worth watching this video to refresh your understanding of headspace measurements, and the correct use of “GO” and “NO-GO” gauges.
Headspace Definition
In firearms, headspace is the distance measured from the part of the chamber that stops forward motion of the cartridge (the datum reference) to the face of the bolt. Used as a verb, headspace refers to the interference created between this part of the chamber and the feature of the cartridge that achieves the correct positioning. Different cartridges have their datum lines in different positions in relation to the cartridge. For example, 5.56x45mm NATO ammunition headspaces off the shoulder of the cartridge, whereas .303 British headspaces off the forward rim of the cartridge.
If the headspace is too short, ammunition that is in specification may not chamber correctly. If headspace is too large, the ammunition may not fit as intended or designed and the cartridge case may rupture, possibly damaging the firearm and injuring the shooter. (Source: Wikipedia)
Headspace Gauges
Headspace is measured with a set of two headspace gauges: a “Go” gauge, and a “No-Go” gauge. Headspace gauges resemble the cartridges for the chambers they are designed to headspace, and are typically made of heat-treated tool steel. Both a “Go” and a “No-Go” gauge are required for a gunsmith to headspace a firearm properly. A third gauge, the “Field” gauge, is used (as the name implies) in the field to indicate the absolute maximum safe headspace. This gauge is used because, over time, the bolt and receiver will wear, the bolt and lugs compress, and the receiver may stretch, all causing the headspace to gradually increase from the “factory specs” measured by the “Go” and “No-Go” gauges. A bolt that closes on “No-Go” but not on “Field” is close to being unsafe to fire, and may malfunction on cartridges that are slightly out of spec. (Source: Wikipedia)
To learn more, read Brownell’s longer article Headspace Gauges and How to Use Them. Among other things, this explains the relative lengths of “Go”, “No-Go”, and “Field” gauges. The “Field” is actually the longest: “The GO gauge corresponds to the SAAMI (Sporting Arms & Ammunition Manufacturer’s Institute) minimum chamber length, while the FIELD gauge usually matches the maximum chamber depth, or slightly less. NO-GO gauges are an intermediate length between minimum and maximum, that, technically, is a voluntary dimension. A firearm that closes on a NO-GO gauge and does not close on a FIELD gauge may not give good accuracy and may have very short cartridge case life from the ammunition re-loader’s standpoint.”
A few years back, Our friend Grant Guess had a “close encounter” with a bad primer. An apparently defective primer caused part of the casehead on one of his rounds to blow out. This, in turn, allowed high pressure gas to vent through the damaged primer pocket. Take a good look, boys and girls. This is yet another very good reason to wear safety glasses. The cartridge was a 6.5-06, handloaded in necked-down Winchester-headstamp .270 Win brass. Grant reports:
“I had a blow through between the primer and the primer pocket today. The action was really smoking and I got a face full of gas. This was a reasonably light charge. Thank God for safety glasses.
I should also mention that it appears there is a 3/64 hole that is halfway between the primer and the primer pocket. Like it burned a small jet hole through both of them.”
Could this happen to you? It just might. On seeing this damaged case, one of Grant’s Facebook friends, Chris D., observed: “Search the internet, you will see a lot of these pin hole ‘in the corner’ failures. Obviously Winchester has some issues with the LR primers.”
Careful Examination Reveals Apparent Primer Defect
After this incident, Grant examined the damaged case: “I pinned the flash hole and it is not over-sized or under-sized. The primer clearly has an area where it had a defect. At [50,000 CUP], it doesn’t take much of a defect to cause issues. There was a slight bit of pucker-factor on the next shot….”


 5. Towel Dry then Warm with Heat Gun — Roll brass in a towel until no more water shakes out. Lay out on cardboard box top and blow off with Harbor Freight heat gun. $9.99 on coupon. Two minutes of heated air and about half hour of wait and they are good to go. This is with primers removed. — Shaggy357


 No doubt you’ve heard the term “corrosive” used with respect to ammunition. But what exactly is “corrosive ammunition” (and how does it different from non-corrosive ammo)? What is the chemistry that leads to corrosion, and what cleaning procedures should you follow if you shoot corrosive ammunition? Brownells has come up with answers to these and other questions in a helpful TECH TIP video about corrosive ammo.


 Headspace Gauges


