Just last week hundreds of F-Class shooters competed at the 2026 Southwest Nationals in Phoenix, Arizona. The vast majority of F-TR shooters had rifles chambered for the .308 Winchester cartridge (7.62×51), but F-TR rules also allow the .223 Rem (5.56×45). There are some advantages to the smaller .223 Rem round — there’s notably less recoil, bullets and brass are significantly cheaper, and a lot less powder is required. For those who are considering campaigning a .223 Rem F-TR rifle, this story explains how an accurate .223 Rem load was developed. This load development was done by a father for his daughter who was getting started in F-Class competition.
Dad builds an F-TR Rifle for his Daughter and Develops Load
Jeremy Rowland decided to put together an F-TR rifle for his eldest daughter, who enjoys competitive shooting. For his daughter, Rowland chose the .223 Rem option because it has less recoil and components are less costly than the .308 Win. Here is Rowland’s account of how he developed a .223 Rem load. For more details (with data charts), read Jeremy’s FULL STORY on Sierra Bullets Blog.
Journey to Find a .223 Rem F-Class Load
by Jeremy Rowland, Reloading Podcast
My oldest daughter has been to several matches with me, and has even competed in several, using her .243. [A few seasons back] I decided, she would compete with a .223 Rem in F-TR. Looking for a good starter rifle, I settled on the Savage Axis Heavy Barrel since it has a 1:9″ twist. This would be a great little rifle for her to learn on. The rifle was shot unmodified, as it came from the factory. A Sinclair F-Class Bipod w/micro elevation adjustment was fitted to the front.
Next came finding the components I wanted to use for her match loads. After spending hours and hours running numbers on JBM stability calculator as well as in my iPhone Ballistic AE app, the 69 gr Sierra Tipped MatchKing® (TMK) looked really good. So that’s what I decided to go with. I jumped in head first and ordered a bulk pack of the Sierra 69 gr TMKs. I had settled on Hodgdon CFE 223 powder since it shows good velocity. I decided to go with once-fired Lake City brass with CCI BR4 primers.
Next came the testing. I decided to run a ladder test (one shot per charge from min to max looking for the accuracy node). The ladder test ranged from 23.5 grains to 25.6 grains, in 0.3 grain increments.
Bullet: 69 gr Sierra Tipped MatchKing®
Case: Lake City (mixed years, sorted by case capacity)
Primer:CCI BR4
Powder: Hodgdon CFE 223 (one round each from 23.5 to 25.6 grains)
Cartridge OAL: 2.378″
Base to Ogive: 1.933″ (.020″ off lands)
After his ladder test, Rowland settled on a load of 25.2 grains of Hodgdon CFE 223. He then fine-tuned his load with different seating depths: “I loaded up 5 rounds each at .020″ off lands, .015″ off lands, .010″ off lands, and .005″ off the lands. Here are the results from the best group for OAL/Ogive fine tuning. As you can see, I think I’ve found a winner in these 69 gr Sierra Tipped MatchKings.”
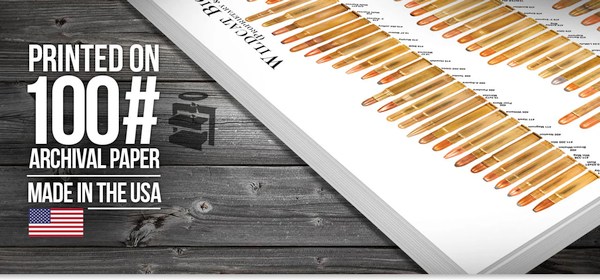
Need something for the walls of your “man cave” or reloading room? Looking for a great birthday gift for one of your shooting buddies? The creators of the Cartridge Comparison Guide offer a collection of wall posters showing ammunition types from 17 caliber rimfire cartridges all the way up to giant 35mm military rounds. ChamberIt.com currently offers 15 different large wall posters that display a huge variety of cartridge types. For example, the American Standard Poster (shown above) contains every standardized cartridge mass produced in the USA as of 2021. The cartridges are 100% to scale (life size). These posters feature full color images on high gloss / high quality 100-lb poster paper.
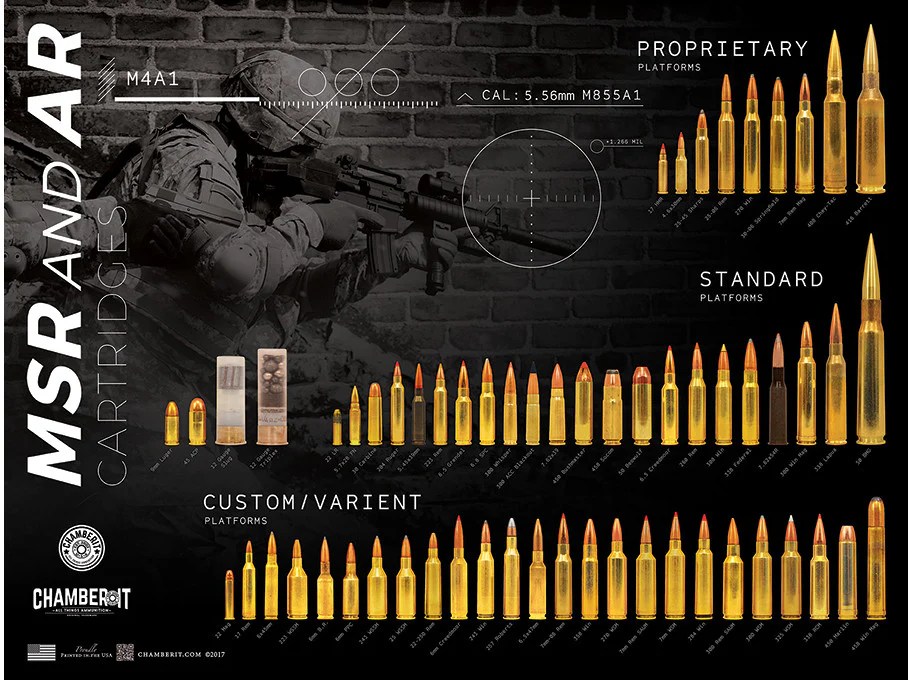
For example, the new MSR & AR Cartridges poster contains 60 cartridges that are commonly available in either a standard, customized, or proprietary MSR or AR platform with calibers from .17 Cal up to .500 Cal. This $14.92 poster displays 60 rifle cartridge types at true size (within 4/1000 of an inch).
MSR & AR Cartridges Poster Click to view large size poster.
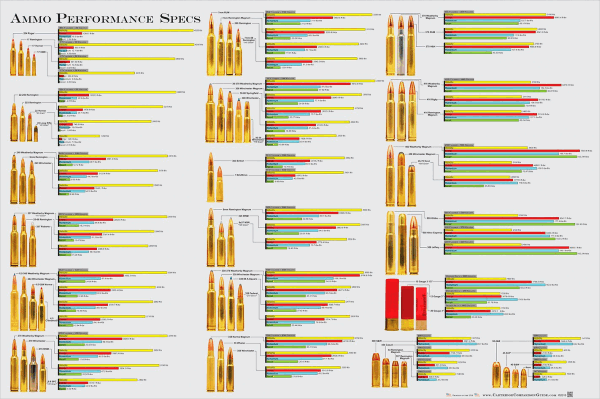
Ammunition Performance Specifications Poster
There is also an interesting Ammo Performance Specs poster. This shows dozens of popular hunting cartridges with the velocity, energy, momentum and recoil for each cartridge displayed in a bar graph.
This shows the actual size of the Ammo Performance Poster as displayed on a wall.
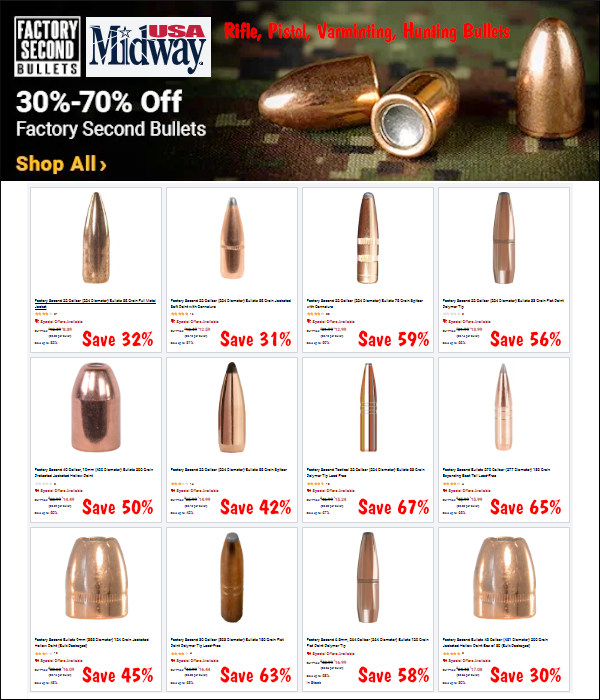
MidwayUSA is running a major sale right now on Factory Second Bullets. These may have some color variations and slight jacket appearance issues, but, for the most part, they will shoot fine. If you need bullets for action pistol matches, 3-gun (rapid-fire) competition, varmint hunting, deer hunting, or fun plinking, these bullets can do the job, while saving you 30-70%.
We have used factory second bullets in .223-cal and 6mm varmint rifles with great success — saving over 40% off the regular bullet price. And the 9mm and .40 Cal pistol bullets shoot fine. If you’re shooting a high volume of rounds that savings adds up quickly — put the money saved into powder and primers. Here are some of the factory second bullet types you should check out now at MidwayUSA:
At the request of our readers, we provide select “Deals of the Week”. Every Sunday afternoon or Monday morning we offer our Best Bargain selections. Here are some of the best deals on firearms, hardware, reloading components, optics, and shooting accessories. Be aware that sale prices are subject to change, and once clearance inventory is sold, it’s gone for good. You snooze you lose.
NOTE: All listed products are for sale to persons 18 years of age or older. No products are intended for use by minors.
Palmetto SA — President’s Day Sale: Guns, Optics, Ammo & More
⏺️ » Amazing deals on pistols, rifles, shotguns and scopes — save hundreds
Today, February 16, is President’s Day — so Palmetto State Armory is running a major President’s Day Sale. You’ll find great savings on rifles, uppers/lowers, handguns, optics, red dots, ammunition, carry cases, and hundreds of other items. Discounts are substantial, with some items discounted over 40%.
Midsouth — Major Timney Trigger Sale, Many Types
⏺️ » Huge selection of quality Timney triggers at major discounts
Need a good trigger for your match, hunting, tactical or classic rifle? Then head over to Midsouth, which is running a huge Timney Trigger Sale. There are over a dozen trigger variants for Rem 700s, plus a wide variety of AR Triggers, and Winchester Model 70s. Plus you’ll find triggers for CZ 452/455/457, Howa 1500, SAKO, Tikka, Ruger 10/22 and M77, Browning X-Bolt, Mauser M98, Springfield M1903, Weatherby Vanguard and more.
As an Amazon affiliate, this site can earn revenues through sales commissions.
Some custom barrel makers are now honing barrels (after drilling) to improve bore diameter uniformity, smooth the interior finish, and reduce barrel lapping times. For years, large-scale manufacturers of hammer-forged barrels have employed honing. Now the process is being used by smaller, “boutique” barrel-makers. This article explains how and why barrel honing is done. Take the time to watch the video. For anyone with an interest in barrel-making, this video from Sunnen Products Co. is an eye-opener.
Barrel Honing Process Demonstrated (Worth Watching!):
For custom barrel makers, honing is a time-saver and cost cutter. A few minutes on a honing machine can cut lapping times in half, leaving a cross-hatched surface finish in single or low double-digit Ra. Honing is the same process used to make diesel fuel injectors with bore roundness and straightness controlled to fractions of a micron (<0.000040"), with surface finish Ra ≤0.15 µm (6 µin).
A key manufacturing process used for hammer-forged barrels is now getting attention from the makers of custom button-rifled barrels. This process is precision bore-honing. Honing produces a high-quality bore surface fast, which is critical to hammer forging. (Why is honing so important with hammer forging? Surface finish is the one feature of the barrel that cannot be controlled in hammer forging. Surface imperfections in a barrel blank tend to be amplified as the blank is formed on the rifling mandrel. And if the bore is chromed afterwards, imperfections in the surface finish become even more obvious.)
Honing dramatically improves bore diameter size uniformity and accuracy, surface finish and roundness throughout the length of the barrel. It can certainly be used in place of a pre-rifling lap. The chief difference between a lapped and honed bore is the direction of the finish lines in the bore. Honing leaves fine spiraling crosshatch lines, while a lap leaves lines going longitudinally in the bore. After rifling the manufacturer can remove the crosshatch finish with a quick lap if desired. Honing is fast, accurate, and can be automated. Its surface quality and geometry can duplicate lapping, except for the longitudinal lines of the lapped finish.
In 2015 Frank Green of Bartlein Barrels told us: “We worked with Sunnen and we did all the initial testing on the prototype machine for them. The machine works great! We ordered and received … a new manufactured machine with the changes we wanted on it and [subsequently] ordered a second one.”
The Sunnen hone secures the barrel blank in a 3-jaw chuck, with honing oil pumped into one end while the tool works from the opposite end. Sunnen’s specialized Long Bore Tool uses metal-bond diamond or CBN superabrasives to quickly remove reamer marks, waviness, tight spots and other imperfections left by upstream processes.
Sunnen states that: “Honing is an ideal replacement for hand-lapping barrel blanks before rifling. It quickly removes reamer scratches and surface waviness without labor-intensive hand lapping. By producing a consistent bore diameter (±0.0001″ or less), parallelism, roundness and surface finish end to end, honing yields more consistent performance from rifling buttons and cutters, resulting in a constant groove depth. The ideal bore geometry reduces distortion of the bullet shape.”
Computer-Controlled Bore-Honing
Honing can be done with great precision through the use of advanced, computer-controlled honing machines. Sunnen Products Company offers an advanced machine for .17 to .50-caliber barrels (see control panel below). The spindles on this machine can correct bore size imperfections so small only an air gauge can measure them. The consistency this allows improves bore uniformity, which, in turn, produces more accurate barrels for the precision market.
Sunnen Products Company is the world’s largest vertically-integrated manufacturer of honing systems, tooling, abrasives, coolants, and gauging for precision bore-sizing and finishing. Sunnen’s customers include manufacturers of diesel and gas engines, aerospace components, hydraulic components, oil field equipment, and gun/cannon barrels. Sunnen employs more than 600 people worldwide.
Do you have some ammo that got loaded incorrectly, perhaps with the wrong powder? Then you’ll want to disassemble the ammo for safety’s sake. You can use an impact puller to do this task, but if you have more than a dozen rounds or so, you may prefer to use a collet-style bullet puller. These work very quickly and positively, making quick work of big jobs. The efficiency of the collet-style puller is worth the investment if you frequently disassemble ammo. These devices retail for under $35.00 (collets sold separately). Normally, you’ll need a specific collet for each bullet diameter. But collets are not that costly, so this isn’t a big deal, particularly if you only load a few calibers, such as .223, 6mm, and .308.
Hornady and RCBS use different mechanisms to tighten the collet around the bullet. On the red lever Hornady Cam-Lock Bullet Puller, a lever-arm on the top of the bullet puller serves to tighten the collet around the bullet. Simply rotate the lever from the vertical to the horizontal position to grab the bullet. Lower the ram to remove the case. The bullet will drop out when you return the lever arm to the vertical position. This is demonstrated in the video below:
Hornady Cam-Lock Bullet Puller Demonstrated
Collet bullet-pullers resemble a loading die with a lever or handle on the top. They screw into a standard reloading press. Hornady and RCBS both make collet-style bullet pullers. They use the same basic principle — the device tightens a collet around the bullet, and then the bullet is separated from the case by lowering the press ram. NOTE: Collet pullers may leave small marks on your bullets, unlike impact (kinetic) pullers.*
Like the Hornady tool, the RCBS Bullet Puller employs a collet to grab the bullet. However, the RCBS tool tightens the collet in a different way. The head of the RCBS tool is threaded internally. By rotating the lever arm clockwise in a horizontal circle you squeeze the collet around the bullet. To remove the bullet, after lowering the press ram, simply spin the lever arm back in the opposite direction. The use of the RCBS tool is demonstrated in these two videos:
RCBS Collet Bullet Puller Demonstrated:
WARNING: When removing bullets from loaded cartridges, always make sure there are no obstructions or debris in your shell-holder or under the loaded round. NEVER engage a primer seating accessory on your press when working with loaded rounds. You can cause a round to discharge by contacting the primer! Also, we recommend you keep your head and torso away from the bullet puller tool at all times.
*By contrast, impact pullers rarely mark bullets, particularly if you put a little bit of foam or paper wadding in the closed end of your impact puller. When dismantling loaded rounds, powder kernels can get trapped in the wadding, so you should remove and replace the wadding before changing to cartridges loaded with a different powder type (assuming you intend to save the powder).
It’s October, the fall season, and that means rainy, wet weather is on the way in many areas of the country. With rain comes increased moisture in the air, i.e. increased humidity. And that, in turn, can affect how your powders perform by altering their burn rates.
Most shooters realize that significant changes in temperature will alter how powders perform. That’s why you want to keep your loaded ammo out of the hot sun, and keep rounds out of a hot chamber until you’re ready to fire. But there are other factors to be considered — HUMIDITY for one. This article explains why and how humidity can affect powder burn rates and performance.
We’ve all heard the old adage: “Keep your powder dry”. Well, tests by Norma have demonstrated that even normal environmental differences in humidity can affect the way powders burn, at least over the long term. In the Norma Reloading Manual, Sven-Eric Johansson, head of ballistics at Nexplo/Bofors, presents a very important discussion of water vapor absorption by powder. Johansson demonstrates that the same powder will burn at different rates depending on water content.
Powders Leave the Factory with 0.5 to 1.0% Water Content
Johansson explains that, as manufactured, most powders contain 0.5 to 1% of water by weight. (The relative humidity is “equilibrated” at 40-50% during the manufacturing process to maintain this 0.5-1% moisture content). Importantly, Johansson notes that powder exposed to moist air for a long time will absorb water, causing it to burn at a slower rate. On the other hand, long-term storage in a very dry environment reduces powder moisture content, so the powder burns at a faster rate. In addition, Johansson found that single-base powders are MORE sensitive to relative humidity than are double-base powders (which contain nitroglycerine).
Tests Show Burn Rates Vary with Water Content
In his review of the Norma Manual, Fred Barker notes: “Johansson gives twelve (eye-opening) plots of the velocities and pressures obtained on firing several popular cartridges with dehydrated, normal and hydrated Norma powders (from #200 to MRP). He also gives results on loaded .30-06 and .38 Special cartridges stored for 663 to 683 days in relative humidities of 20% and 86%. So Johansson’s advice is to keep powders tightly capped in their factory containers, and to minimize their exposure to dry or humid air.”
Confirming Johansson’s findings that storage conditions can alter burn rates, Barker observes: “I have about 10 pounds of WWII 4831 powder that has been stored in dry (about 20% RH) Colorado air for more than 60 years. It now burns about like IMR 3031.”
What does this teach us? First, all powders start out with a small, but chemically important, amount of water content. Second, a powder’s water content can change over time, depending on where and how the powder is stored. Third, the water content of your powder DOES make a difference in how it burns, particularly for single-base powders. For example, over a period of time, a powder used (and then recapped) in the hot, dry Southwest will probably behave differently than the same powder used in the humid Southeast.
Reloaders are advised to keep these things in mind. If you want to maintain your powders’ “as manufactured” burn rate, it is wise to head Johannson’s recommendation to keep your powders tightly capped when you’re not actually dispensing charges and avoid exposing your powder to very dry or very humid conditions.
Real-World Example — “Dry” H4831sc Runs Hotter
Robert Whitley agrees that the burn rate of the powder varies with the humidity it absorbs. Robert writes: “I had an 8-lb. jug of H4831SC I kept in my detached garage (it can be humid there). 43.5-44.0 gr of this was superbly accurate with the 115 Bergers out of my 6mm Super X. I got tired of bringing it in and out of the garage to my house for reloading so I brought and kept the jug in my reloading room (a dehumidified room in my house) and after a few weeks I loaded up 43.5 gr, went to a match and it shot awful. I could not figure out what was going on until I put that load back over the chronograph and figured out it was going a good bit faster than before and the load was out of the “sweet spot” (42.5 – 43.0 gr was the max I could load and keep it accurate when it was stored in less humid air). I put the jug back in the garage for a few weeks and I now am back to loading 43.5 – 44.0 gr and it shoots great again. I have seen this with other powders too.”
If you have two jugs of the same powder, one kept in a room in your house and one somewhere else where it is drier or more humid, don’t expect the two jugs of the same lot of powder to chrono the same with the same charge weights unless and until they are both stored long enough in the same place to equalize again.
Even with high-quality brass from Lapua, Peterson, Norma, Alpha and RWS, occasionally you may find one or two cases per box which have a small flake or obstruction in the flash-hole. This will appear like a thin crescent on one side of the flash hole (see photo). You should inspect ALL new brass before loading to identify any pieces with a partially-obstructed flash hole. It’s a good idea to remove any flake or thin crescent left as an artifact of the flash-hole forming process. Because the flash-hole itself is normally centered and of the correct diameter, it is not necessary to ream the flash-hole to a larger diameter. All you really need to do is remove the small obstruction(s). This can be done quickly with inexpensive tools.
Use a Small Pin Vise to Remove Flash-Hole Obstructions
Folks have asked if there is a tool that can remove obstructions from a Lapua small, BR-sized flash hole without opening the hole size. The Lapua PPC/BR flash hole is spec’d at 1.5mm, which works out to 0.059055″. Most of the PPC/BR flash-hole uniforming tools on the market use a 1/16″ bit which is nominally 0.0625″, but these often run oversize — up to 0.066″.
If you want to just clear out any obstructions in the flash hole, without increasing the flash hole diameter, you can use an inexpensive “pin vise” with an appropriate drill bit. For $5.39, Amazon sells a 10-piece set of cobalt steel 1.5mm drill bits that match the Lapua flash hole exactly. Other vendors such as Ace Hardware offer a #53 pin vise drill bit that measures .0595″ or .060″ (depending or source). An 0.0595″ (1.51 mm) bit is close enough. You can find pin vises and these small-diameter drill bits at hobby stores.
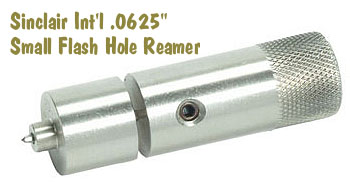
For quite some time, Sinclair Int’l has sold a similar device for small (PPC and BR-size) flash holes. Like the 749008617 unit for large flash holes, the 749005418 Reamer for small flash holes works from the outside, so it can index off the primer pocket. It reams to .0625″, and also costs $29.99. The standard dimension for Lapua 220 Russian and 6mmBR flash holes is 1.5mm or .0590″. This tool will permit standard-size decapping rods with .0625″ tips to work without binding. However, note that both Forster and Redding normally supply .057″ decapping pins with their PPC and BR dies. So, it is NOT necessary to ream your Lapua BR/PPC flashholes, unless you prefer to do so for uniformity. It IS, however, a good idea to check BR/PPC flash holes for burrs before loading the first time.
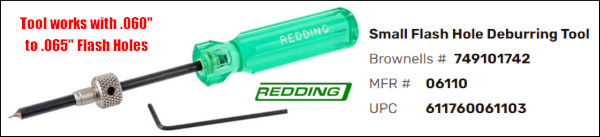
Redding also makes a handy tool that deburs and uniforms small flashholes, but works from the inside of the cases. This Redding tool has a bushing that fits in the case neck for proper alignment.
NOTE: If you purchase the Sinclair Flash Hole Reamer tools, we recommend you mic the cutter tip before you process a bunch of cases. Sometimes a tip comes through that is oversize. This will ream the flash holes larger than you may intend.
With the skyrocketing prices of ammo, more shooters than ever are hand-loading pistol and rifle ammunition. But many novice reloaders tell us that it’s a bit overwhelming in the beginning. Just learning all the technical terms (e.g. ogive, meplat, ballistic coefficient, load density etc.) is difficult, and the task of selecting the right tools and gear can be daunting.
The first thing a new reloader should do is find an experienced reloading mentor. One can learn the basics much more quickly under the guidance of an experienced hand-loader who “knows the ropes”. We also recommend that newbies acquire a good basic reloading handbook — not just a list of load recipes, but a book that explains the processes.
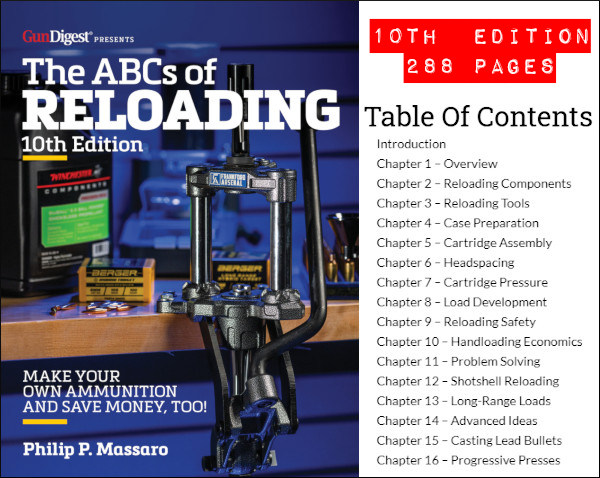
One of the best handbooks available is The ABCs of Reloading (10th Edition, 2021) by Philip Massaro. Released in March 2021, this reference contains 288 pages with hundreds of BW photos. The latest 10th Edition is available from Gun Digest Store for $29.99 (or $29.99 for Printable PDF Digital Book). You can also purchase from Walmart for $19.54 with possible Free Shipping.
Since the first edition was published in the 1970s, the ABCs of Reloading series has taught countless firearms owners safe/reliable methods for creating their own ammunition. ABCs of Reloading provides beginners what they need to know to get started in reloading. From basic topics such as “How does a cartridge work?” and “What components do I need?” to more advanced discussions of cartridge pressure, headspace, and chrono testing, this is a great resource for new handloaders.
In addition, the sections on advanced reloading and new powders make the new edition valuable for experienced handloaders. And long-range shooters will benefit from the sections on making ultra-consistent ammo and fine-tuning for precision accuracy. Massaro’s coverage of new reloading gear and components is another bonus (shown below is the impressive RCBS MatchMaster powder dispenser).
Review from purchaser of “The ABCs of Reloading”, 8th Edition:
“When I first got the itch to load my own ammunition, I was overwhelmed by the amount of information and terminology involved in this fascinating field/hobby. It was very difficult to take all the individual pieces of information that I had and form it into an understandable process. I was snowed in under a blizzard of data that I was piecing together through chat rooms and web sites. Phrases like ‘roll crimp’ and ‘headspace’ came at me in a blizzard. I could look up each phrase, understand each one as a piece, but still the whole picture was fuzzy. In essence, that is what this book will do for you — turn it all into a coherent, linear whole. The writing is very solid and clear, the illustrations are well-done and helpful, and the information is very complete. After reading this book, the entire process made sense to me, and more importantly, I was fully warned about the dos and don’ts of the reloading world. The coverage is very complete. Primers, powders, bullets, and … all necessary tools and accessories are discussed and explained. This is just a great book. It won’t make you an expert … but it will put you on the right road if you wish to become one.” — Mykal Banta
At the request of our readers, we provide select “Deals of the Week”. Every Sunday afternoon or Monday morning we offer our Best Bargain selections. Here are some of the best deals on firearms, hardware, reloading components, optics, and shooting accessories. Be aware that sale prices are subject to change, and once clearance inventory is sold, it’s gone for good. You snooze you lose.
NOTE: All listed products are for sale to persons 18 years of age or older. No products are intended for use by minors.
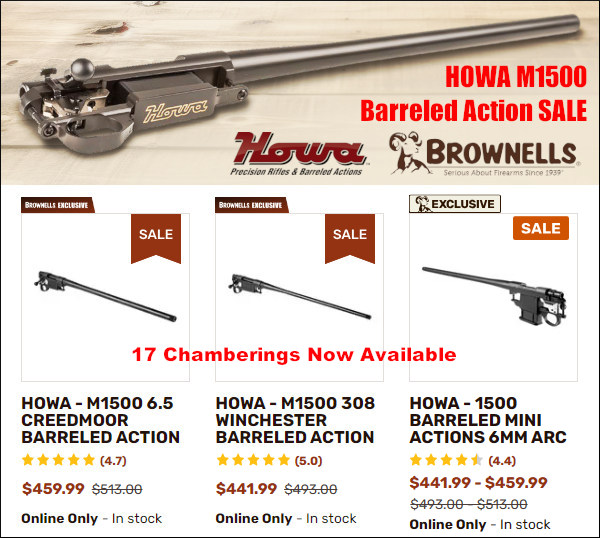
Brownells — Howa 1500 Barreled Actions with HACT Triggers
⏺️ » Great barreled actions with nice trigger starting under $430.00
Howa M1500 barreled actions are great for hunting and varmint rifle projects. The actions run smoothly and boast a very good 2-stage trigger. And now you can get a complete barreled action (with trigger!) starting at $429.12. Many chamberings are offered, with a variety of barrel profiles: .223 Rem, 22 ARC, .22-250, 6mm ARC, .243 Win, 6.5 Grendel, 6.5 Creedmoor, 6.5 PRC, 7.62×39, 7mm-08, 7mm PRC, 7mm Rem Mag, .308 Win, 300 AAC, 300 PRC, .300 Win Mag and 350 Legend. These Japanese-made Howa actions are smooth running and the 2-stage HACT trigger is way better than most factory triggers. CLICK HERE to learn more about Howa M1500 barreled actions.
EuroOptic — February Deals on Vortex Scopes, Rifles, Gear
⏺️ » Big savings on Vortex Scopes, Bolt Guns, and Outdoor Gear
EuroOptic.com is running multiple major sales this week. Check out these major specials with savings up to 80% on Outdoor Gear. If you need scopes, spotter, binoculars, and/or rangefinders, check out the Vortex Promo — save 12% with Code VTX12. Next you can save hundreds on bolt-action rifles. There are huge discounts on major brands including SAKO, Tikka, Bergara, Christensen, SAUER, and more. Last but not least, EuroOptic is running a major sale on a wide variety of outdoor gear (clothing, accessories, packs etc.) with discounts up to 80%.
As an Amazon affiliate, this site can earn revenues through sales commissions.


 Like the Hornady tool, the
 Tests Show Burn Rates Vary with Water Content