Many shooters are familiar with ballistics tables, weather programs, and even wind meters for smart devices, but few may know about a very handy Leveling Tool that comes factory-installed on Apple iPhones. The leveling function is a little-known option in Apple’s Compass App. It works well for a multitude of tasks.
There are a numerous reasons that a leveling tool should be in every rifleman’s range bag. From leveling optics during mounting to figuring out how much extra compensation is going to be required for a tricky angled shot, knowing just how far off things are from plumb can go a long way towards realizing success in the field.
This writer has used the leveling app on his iPhone to level a rifle on a rest while at the range. It definitely worked for “field expedient” leveling duties. That’s especially important for long-range applications. Just one degree of cant (tilt) can move your point of impact 7 inches at 1000 yards.
Of course, the iPhone level doesn’t use an actual bubble to find angles. Rather, it relies on the device’s sophisticated accelerometer to do so, and with a great degree of accuracy. Navigating to the level is done by first selecting the Compass App, at which point the device will need to be calibrated by rotating it a full 360 degrees. Once the compass is fully calibrated, simply make right swipe gesture to bring up the level — it will start operating immediately.
From there, use is intuitive and easy, like most iPhone Apps. Switching from horizontal plane to vertical is done by simply changing the physical axis of the phone. How do you know when you’ve got things just right — well the entire lower half of the screen turns green when everything is perfectly level. You’ll also see a zero° read-out, like this:
Bottom Line: If you already own an iPhone, you should definitely give this App a try. The price is right (free), and for a wide variety of tasks the iPhone Level App is actually pretty handy.
Need a new barrel for your Rem-actioned hunting or tactical rifle? Here’s a great DIY option for riflemen. McRee’s Precision offers complete, no-gunsmithing re-barreling kits for Remington and Rem-clone actions. These feature a high-quality, pre-chambered “PRE-FIT” stainless barrel from Criterion, a Savage-style barrel nut, a recoil lug, and a special barrel-nut wrench. With this system you can easily re-barrel your favorite Remington rifle yourself in less than an hour. You don’t need to pay gunsmithing fees, or wait weeks (or months) for a busy smith to do the job. And the price is under $500.00. McRee’s Precision even offers a Half-MOA Accuracy Guarantee with its pre-fitted barrel kits. NOTE: Check MrReesPrecision.net on Thanksgiving for a Holiday Special Price (probably 10% Off).
McRee’s Precision Remington DIY Barrel Kit includes Criterion Pre-Fit Stainless Barrel, Barrel Nut, Recoil Lug, Thread Protector, and Barrel Nut Wrench: The stainless steel Barrel Nut is set up for 1 1/16 x 16 barrel threads, while the stainless steel recoil lug has a 1/8 inch removable locator pin and is set up for 1.0625 dia barrel threads.Barrel Kit Specifications.
McRee’s Precision sells Rem-action Pre-Fit barrel packages (complete with barrel nut, recoil lug, and wrench) starting at $499.52 (get a Holiday Discount on that price commencing 11/24/2016). Choose from five chamberings: .243 Win, 6.5 Creedmoor, .260 Rem, .308 Win, and .300 Win Mag. These Pre-Fit barrel kits are “100% complete and ready-to-install”. All you need to do is remove your current barrel, place the recoil lug, spin on the new tube, follow the instructions for setting head-space, then torque the barrel nut against the lug. NOTE: You may require a barrel vise and action wrench to remove the original barrel. Minor inletting changes may be needed forward of the action.
The folks at McRee’s Precision say their Pre-Fit system offers many advantages: “Remington Pre-Fitted Barrel Kits have become popular over the years. If Savage can do it, why not for our Remingtons? Our [Criterion-supplied] barrels are spec’d to the McRee standard of performance. There are several places to get the tools required to remove your factory barrel correctly. Once you have your barrel removed all you have to do is follow the normal Savage procedure to install your new barrel. We recommend that you contact your local gunsmith for the install. Feel free to call us with any questions.”
Product Tip from Ed LongRange. We welcome readers’ submissions.
Trimming and chamfering brass are tasks hand-loaders grow to hate. Those chores are time-consuming and tiresome. Thankfully there are faster, better alternatives to manual trimming/chamfering. In this article, Forum member Erik Cortina shows how to use the Giraud tool which trims and chamfers in one operation. Erik has his own YouTube Channel dedicated to precision reloading and accurizing. Here we feature Erik’s video about the “mother of all brass trimmers”, the Giraud powered case trimmer. Erik says: “If you do volume reloading… this is the only trimmer to get. It not only trims to length but it also chamfers your case mouth inside and out.” In his video, Erik offers some very clever and useful tips that will help you get the most from your Giraud.
This is a manufacturer’s photo showing an older model.
The Giraud trimmer is very precise. When set up correctly, it can trim brass with amazing consistency. In the video, Erik trims five pieces of brass in 15 seconds (6:32 mark). He then measures all five with precision calipers (7:00-8:08). All lengths are exact within .0005 (half a thousandth). Erik notes that the Giraud trimmer indexes off the case shoulder. As long as you have fire-formed brass with consistent base-to-shoulder dimensions, you should get very consistent trim lengths.
The secret to the system is a 3-way cutting head. This cutter can be swapped in and out in a couple minutes with wrenches provided with the kit. Erik has three different heads; one each for 6.5mm, 7mm, and .30 caliber. The video shows how to adjust the cutting heads to match caliber diameter (and to get the desired amount of inside/outside chamfer).
To trim and chamfer cases, you simply insert them nose-first into the cartridge-specific case-holder. Erik offers a smart tip — He uses a die locking ring to position the cartridge holder (3:15). This can be locked in place. Erik says die locking rings work much better than the hex-nuts provided by Giraud (with the hex-nut, one must re-set cut length each time you change case-holders.)
The Giraud can be used in either horizontal or vertical modes. Erik prefers to have the trimmer aligned vertically, allowing him to push cases down on the trimmer head. But the trimming unit has twin sets of rubber feet, allowing horizontal or vertical orientation.
Improved Case-Holder Made with Chamber Reamer:
For his .284 Shehane, Erik had to create his own case-holder (Giraud does not make one for that wildcat cartridge). Erik used his chamber reamer. To his surprise, Erik found that the brass was easier to trim in the custom case holder (compared to the Giraud-made spring-loaded holders). With a perfect fit, trimming and case extraction went more smoothly and the process was easier on his hands. (See 9:00-10:00). Based on Erik’s experience, you may want to create your own custom case-holder.
Trim Bullet Meplats Also
With a special bullet-holder fitting and meplat cutter head, the Giraud power trimmer can be used to trim bullet meplats. Trimming meplats can help make the Ballistic Coefficents of a batch of bullets more consistent. Uniforming meplats is also often done as a first step in the process of “tipping” bullets to improve BC.
Do you use bushings to size your case-necks? Are you assuming that your bushings are actually round on the inside, with a hole that’s centered-up properly? Well you may be in for an unpleasant surprise, based on what our friend Jim de Kort recently discovered. Jim was concerned about the run-out on his brass. His cases went into his bushing-equipped FL die pretty straight, but came out of the die with up to .004″ run-out. “What gives?”, Jim wondered. “Could the problem be the bushings themselves?”
To answer that question, Jim decided to examine his bushings. Using an Accuracy One Wheel-drive concentricity gauge, Jim checked out some of his neck bushings. What he discovered may surprise you…
Neck Bushing Flaws Revealed
Trust no one… — Jim de Kort
Jim writes: “I measured the concentricity of my 6BR rounds today. I noticed they went into the neck-bushing equipped full-length sizing die with less than .001″ deviation but came out with .003-.004″. The culprit, it appears, was the bushing itself. Without it the cases stayed within .0005″ to .001″ deviation, so something was happening with the bushing.
One bushing had .00025″ deviation on the outside, yet almost .003″ on the inside, so it is crooked. But even when using a bushing that is within .001″ I still get .003″ runout after sizing. I repeated the same procedure for my 6×47 and got the same results. When using the bushing, concentricity suffers a lot.”
Before we bash the bushing-makers, we must acknowledge that many different things can contribute to excessive run-out and/or mis-alignment of case-necks. We don’t have all the answers here, and Jim would be the first to say that some mysteries remain. Still, these are interesting results that give all precision hand-loaders something to think about.
Jim Borden of Borden Accuracy also offers this tip: “Check the trueness of the face of the die cap. That has more to do with trueness than the bushing. Also check perpendicularity of hole in bushing to top surface. When I was making dies, the cap was made by threading and facing the threaded tenon in same setup.”
Editor’s Comment: Many people have great results with neck-bushing dies, but Jim isn’t the only fellow who has seen some very odd results. I personally employ honed, non-bushing dies for many of my chamberings. These non-bushing dies (with the necks honed for .002-.003″ neck tension) produce extremely straight ammo, with run-out consistently under .0015″.
One of our Forum members asked us the question: “Does anybody make a good range box with cradles for cleaning at the bench?” The answer is yes — the MTM model RBMC Range Box offers slide-in plastic cradles that provide a reasonably sturdy platform for a quick clean when you’re done shooting. The RBMC box also offers plenty of storage for jags, brushes, solvents, ammo boxes and other miscellaneous gear you need for the range.
Among the many range boxes available, the MTM model RBMC Range Box leads the pack in terms of versatility. It is rugged, it has plenty of storage space, and it doubles as a handy cleaning station. This Editor has used the MTM Range Box to clean rifles and as a “range expedient” rifle holder when adjusting scopes and tensioning action screws. It’s a good product that does the job and stands up to rough handling.
Fitted Cleaning Cradles
The key feature setting MTM’s RBMC apart from most range boxes is the rubber-coated cradle system. Wide enough to fit a 3″-wide fore-arm, the cradles slide into vertical slots on either end of the box. This allows your range box to serve as a maintenance station. The RBMC is really pretty stable in this role, and the cradles won’t mark your stock. The cradles even feature slots on each side to hold your cleaning rods. The MTM Range Box is secure enough to stay in place when you’re brushing the barrel. However, if you’re working on a carpeted bench top, keep one hand on the box when running a cleaning rod through the bore, just to ensure the box doesn’t slide.
Versatile Upper Tray with Dividers
The MTM Range Box has two major components — the box base (with cradles), and a large upper tray with hinged top and carry handle. This large upper tray clamps securely to the bottom unit for transport. The top tray has a long section that holds cleaning rod guides, long brushes, grease syringes and the like. There are two, clear-plastic fitted divider trays. These will hold your patches and jags, plus comparators, ring wrenches, and other small tools.
What Might Be Improved
Though we really like the MTM Range Box, it’s not perfect. First, we wish the box was a bit deeper, to have added carrying capacity. The dimensions of the MTM Range Box are: 25″ long x 11.5″ wide x 8.75″ high. We’d like to see it 12″ high/deep to allow larger solvent bottles to stand upright and to provide more space to carry tools and shooting muffs. However, it is deep enough to hold the large 100-round MTM cartridge boxes that are popular with many shooters (see photo at right).
While we like the twin clear plastic dividers that fit into the removable top-tray, but we wish the dividers had individual hinged tops. This would keep small items more secure.
The MTM Shooting Range Box RBMC-11 (green version) is on sale now for $39.03 at Amazon.com, with FREE shipping. MTM also offers a black “tactical” version of this product for a bit more money ($43.93 at Amazon). This Tactical Range Box includes a special bracket that supports AR-type rifles through the magazine well.
Creedmoor Sports has launched a completely redesigned, “new and improved” website. You’ll find it easier to navigate, with improved search funchtionality, and a more mobile-friendly interface. Check out the updated site at: www.CreedmoorSports.com.
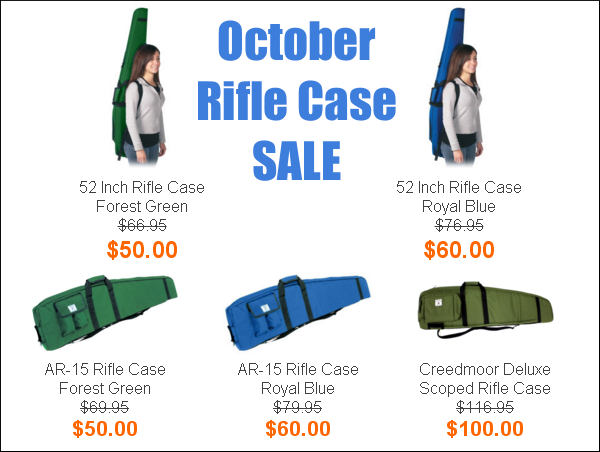
To help celebrate the launch of its updated website, Creedmoor Sports is running a big SALE this weekend on premium rifle cases. Creedmoor makes some of the best soft rifle cases you can buy. They are constructed with premium materials and can be ordered in sizes big enough for long match rifles.
Do you have some old, tired brass that needs a thorough cleaning — inside and out? Consider using an ultrasonic cleaning machine. When used with the proper solution, a good ultrasonic cleaning machine can quickly remove remove dust, carbon, oil, and powder residue from your cartridge brass. The ultrasonic process will clean the inside of the cases, and even the primer pockets. Tumbling works well too, but for really dirty brass, ultrasonic cleaning may be a wise choice.
Our friend Gavin Gear recently put an RCBS Ultrasonic cleaning machine through its paces using RCBS Ultrasonic Case Cleaning Solution (RCBS #87058). To provide a real challenge, Gavin used some very dull and greasy milsurp brass: “I bought a huge lot of military once-fired 7.52x51mm brass (fired in a machine gun) that I’ve been slowly prepping for my DPMS LR-308B AR-10 style rifle. Some of this brass was fully prepped (sized/de-primed, trimmed, case mouths chamfered, primer pockets reamed) but it was gunked up with lube and looking dingy.”
UltimateReloader.com Case Cleaning Video (7.5 minutes):
Gavin describes the cleaning exercise step-by-step on UltimateReloader.com. Read Gavin’s Cartridge Cleaning Article to learn how he mixed the solution, activated the heater, and cycled the machine for 30 minutes. As you can see in the video above, the results were impressive. If you have never cleaned brass with ultrasound before, you should definitely watch Gavin’s 7.5-minute video — it provides many useful tips and shows the cleaning operation in progress from start to finish.
Ultra Dry Necks After Ultrasonic Cleaning — Some Suggestions
The Ultrasonic cleaning process gets cartridge brass so “squeaky clean” that increased force may be required to seat your bullets, or they may “grab” as they go in the necks. To reduce bullet-seating effort, you may benefit from adding a little dry case lube inside the case-neck before loading (use a nylon brush). Another trick is adding a teaspoon of Ballistol lube to the cleaning solution. That provides a trace lubricant inside the necks, but does not interfere with powder ignition in any way.
The RCBS ultrasonic cleaning machine features a large 3-liter capacity, 60 watt transducer, and 100 watt ceramic heater. The RCBS ultrasonic machine can be found under $140.00, and this unit qualifies for RCBS Rebates ($10 off $50 purchase or $50 off $300.00 purchase). RCBS also sells 32 oz. bottles of cleaning concentrate that will make up to 10 gallons of Ultrasonic Solution.
This is one amazing .50-caliber rifle. Along with the lever-actuated falling block, it has a massive swing-out breech block like you’d find on a field artillery piece. The action is so wide that the sights and scope are offset. You’ve heard of the “Beauty and the Beast”? Well here the Beast IS a Beauty….
View looking down at the action from above. Note the hinged Breech-Block.
Jeffrey Block has created a great FREE software program, OnTarget, that measures shot groups quickly and precisely. All you need is a photo or scan of your target. The program allows you to set your target distance, and provides caliber-specific tools to precisely mark the center of each shot. Once you’ve marked each bullet hole, Jeff’s OnTarget program automatically calculates group center, maximum group spread (CTC), average distance to center, group width and height, and group offset from point of aim. The program will even measure multiple groups on the same target.
Video Tutorial Shows How OnTarget Software Works
Jeff created an excellent Animated Tutorial demonstrating OnTarget’s functions. It shows how to import a target image or scan, how to set target distance and scale, how to set bullet size, how to circle each bullet hole, and how to save the marked and measured target. VIEW OnTarget TUTORIAL.
After just a few minutes spent learning the program’s tool buttons, we were able to plot shot groups on a variety of targets with ease. Once you select the target distance and bullet diameter, figuring group size is a simple matter of centering a circle tool over each bullet hole. Then the program “connects the dots” and provides all the info you could want automatically.
The program worked with bullet holes as small as 17 caliber and as large as 50 caliber. It is very precise, but remember that if your target photo was taken at an angle, distorted perspective can cause slight errors in measurement. Therefore, for the ultimate precision, you want to start with a flat scan of the target.
OnTarget Compared to Measuring Manually
We found OnTarget to be especially useful for groups with widely dispersed bullet holes, or very small bullet holes, such as 17 caliber holes. We’ve found that it’s difficult to measure 17-cal group sizes with a standard caliper, because the tool itself obscures the tiny holes. With OnTarget, the program can zoom up your target view, making it much easier to plot the center of each shot. And with a widely dispersed group of shots, the program automatically finds the two most distant shots. You can’t mistakenly pick the wrong pair of shots to measure.
MEASURING REAL TARGETS — Actual Examples
Here are examples we created with OnTarget. The first photo shows a 17 Mach 2 target. These tiny 17-cal holes are notoriously hard to measure. With OnTarget, it’s a snap. You just load the target image into the program, zoom in with the controls, and then click on the center of the holes. The program automatically calculates group size, displaying measurements in both inches and minutes of angle (MOA)
Original Target (with ruler for scale)
Target Captured and Displayed in Program
Detail of Group, Enlarged by Program
10-shot Groups? — No Problem
Here’s another target, showing 6mm bullet holes at 600 yards. The first image shows the target image loaded into the program with the ten holes circled in red.
Target Displayed in Program
For this target we have used the Aiming Point option. The Aim Point was set at the center of the “X” and the program calculates average distance from the Aim Point. Very cool.
Detail of 10-Shot Group, Enlarged by Program
No Scanner Needed
The OnTarget program grabs target scans directly from a flatbed scanner using Microsoft’s Windows Image Acquisition system. But don’t worry if you don’t have a scanner. You can just take a digital photo of your target and OnTarget will import it quickly and easily. To set target scale, a simple tool allows you to mark a known length on the target (such as the diameter of the “X” Ring), and the program will then size the target accordingly. Is OnTarget precise and accurate? Here’s what Forum Member Steve W. says: “I used the extreme spread measurement of a group on one of my 600-yard match targets… as it was officially scored at the match. By clicking the +—+ icon, then clicked the cursor in the centers of the two extreme spread holes, I then entered that value in the reference window. After that it was simple because the bullet placement cursor’s circle was the same size as the black outline of the actual bullet holes on the picture of the target. OnTarget’s measurement came up within .006″ of the official 2.772 inch measurement of the group. That’s pretty darned close; well inside the human judgment of aligning the tips of a micrometer on the bullet holes.”
Bottom Line — Great Program — Download It Today
Jeffrey Block has done a great service for shooters by creating the FREE OnTarget program. It is easy to learn, it functions great, and it can save you time and effort measuring targets. It also lets you easily archive and compare multiple targets produced during load development or rifle testing. You can record ammo type, date, location, weather etc. in note fields accessed by “Group Info” and “Target Info” tabs.
Keep in mind that OnTarget was NOT created to replace existing methods for scoring competition targets. But for all other target measuring purposes it does a great job. Visit Jeff’s website, OnTargetShooting.com, view the tutorial, and check out OnTarget for yourselves.
To learn more about OnTarget, see more measuring samples, and read advanced Power-User Tips, visit our full OnTarget Product Review.
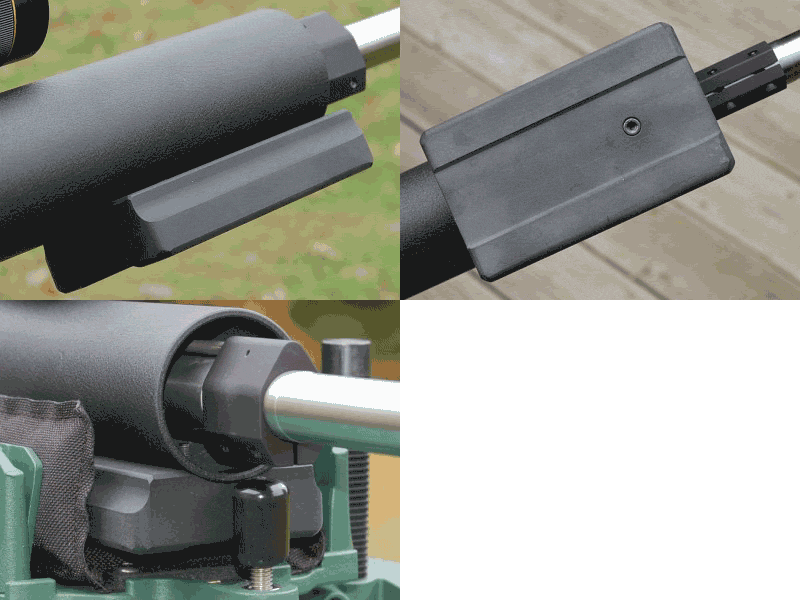
When doing load development for any rifle, it’s nice to be able to shoot from the bench with a stable front pedestal rest. Unfortunately, rifles with narrow fore-ends and ARs with tubular handguards can be somewhat wobbly on front bags. The solution is to attach a forward bag-rider to your rifle. This provides a nice, wide and flat base that sits securely in a benchrest-style front sandbag. A wide bag-rider helps prevent the gun from rocking, steadies your aim, and improves tracking. If you’re handy with tools, you can craft your own bag-rider from metal, wood, or Delrin, but there’s an easier option. Whidden Gunworks offers a nicely-engineered “bolt-on” front plate that will enhance the bench-rested accuracy of any rifle with an accessory rail on the forearm.
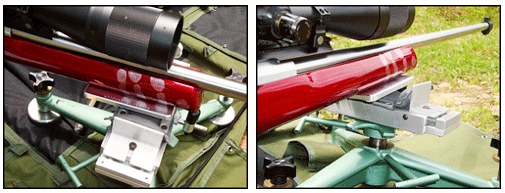
The Whidden Track Plate fits securely in the forearm accessory rail on prone, cross-the-course, and Palma rifles. These guns typically have a narrow and/or rounded fore-end so they rock and wobble when used with a front pedestal rest. The TrackPlate cures that. Once installed it provides a rock-solid, 2.9″-wide platform that mates perfectly with a benchrest-type front sandbag. This gives sling-shooters maximum stability when testing loads or zeroing their sights or scope. Plus you can now shoot F-Class competitively with a prone gun.
The Track Plate is light-weight, has catamaran-style runners to aid tracking and prevent rocking, and can be easily stowed in a range bag. The machined aluminum Track Plate fits BOTH Anschutz-style and American-style recessed forearm rails.
The Track Plate is available from Whidden Gunworks for $40.99 or from Champion’s Choice for $40.00 (item W29P). Plate designer (and National LR Rifle Champion) John Whidden says: “The Plate is great for any rifle with a rail whether it ís smallbore, centerfire, or an air gun. Now you can try F-Class with your favorite prone rifle: the Plate has a perfect low-drag finish for riding a rest or sandbags and is competition legal in all dimensions.”
Front Bag-Rider for AR-15s from EGW
Similar to the Whidden Track Plate is a 3″-wide Delrin bag-rider from Evolution Gun Works (EGW). This was developed expressly to fit the fore-ends of AR15-type rifles with round float tubes. The EGW front bag-rider attaches to a front sling swivel stud anchor. That allows it to mount as easily as a Harris bipod — no rail needed! Just unscrew the swivel stud, put the front bag-rider in place and attach one hex-head machine screw. The front bag-rider is contoured to match the handguard profile so it fits securely with no wobble. Overall, it is a slick system. Front and rear bag-riders can be attached in a couple of minutes. The Delrin blocks slide easily in the bags and make the gun ultra-stable. The gun tracks straight back. The front bag-rider comes in two (2) variants, a $39.99 radiused version (item 32141) that attaches via swivel stud, and a $49.99 version (item 32143) that mounts via a Picatinny-style rail.
EGW AR Front Bag-Rider System
EGW Picatinny Rail-Attached Front Bag-Rider
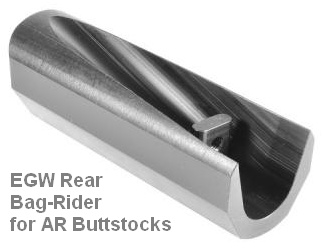
EGW Rear Bag-Rider for AR Buttstocks
EGW also offers a REAR bag-rider that attaches via the sling swivel anchor. The EGW AR Rear Bag-Rider accessory (item 32142), designed to work with A2-style buttstocks, sells separately for $39.99. This rear bag-rider provides a longer, straight “keel” that works very well in rear sandbags, giving the rifle more stability, and improving the tracking.


 Many shooters are familiar with ballistics tables, weather programs, and even wind meters for smart devices, but few may know about a very handy Leveling Tool that comes factory-installed on Apple iPhones. The leveling function is a little-known option in Apple’s Compass App. It works well for a multitude of tasks.


 What Might Be Improved



 After just a few minutes spent learning the program’s tool buttons, we were able to plot shot groups on a variety of targets with ease. Once you select the target distance and bullet diameter, figuring group size is a simple matter of centering a circle tool over each bullet hole. Then the program “connects the dots” and provides all the info you could want automatically.


 The Whidden