The BarrelCool is an innovative, compact barrel-cooling device that also serves as an empty-chamber safety flag. A small, battery-powered fan drives cooling air through the barrel’s bore. Yes it really works — manufacturer-provided data shows that BarrelCool significantly reduces the time it takes to cool down a hot barrel. Look at the chart above to see what to expect.
In the past, folks have tried various methods to cool barrels: water flushed through the bore, CO2 tanks, even battery-operated fish pumps. BarrelCool is a simpler, less costly, and much handier solution. Priced at $34.99, this small device can definitely save you time at the range. Potentially it can save you money by extending barrel life. To see how Barrelcool works, visit BarrelCool.com. There you’ll find video demos of BarrelCool units in both bolt-action and AR-type rifles.
BarrelCool Range Reports from Forum Members
“Early adopters” of BarrelCool have been impressed so far. Forum member Comrade Terry said: “At the range, I spend a good bit of time waiting for the barrel to cool between shot strings. I fired my usual 50 rounds today, and (though it was 85° today) I was able to leave the range 30-40 minutes earlier than usual thanks to the BarrelCool. I like it!” Another Forum member, J-Rod, reports “Did some load development on my new rifle Friday. This used to take forever due to the barrel heating up outside in full sun (90° ambient). I’d say this little gem cut about two hours off my normal shooting time. I got home early and the wife was happy — what’s that worth?”
How and Why BarrelCool Was Invented
BarrelCool originated from the idea that cease-fire periods would be a great time to cool a barrel. During cease-fires, most ranges and matches require empty chamber flags in the gun so that the range officer and everyone on the firing line can see visually that the gun is in a safe condition.
BarrelCool inventor Bryan Sumoba explains the advantage of Barrelcool: “The challenge with the previous barrel-cooling methods is one would have to be present to run the device, it required additional steps such as running patches down the bore, or it gets in the way of a required empty-chamber flag. BarrelCool now allows the shooter to cool the barrel down simply and easily while having the empty-chamber flag in the firearm.”
Sumoba says BarrelCool significantly shortens the time needed to cool down a hot barrel: “In controlled testing, it took about half the time to cool the barrel from 140 degrees F to 100 degrees F (more in some cases depending on the barrel contour/length and ambient temperatures). Our customers also report significant reductions in the time it takes to cool down a hot barrel. At a recent 3×1000 F-Class match in Sacramento, one shooter fired 25 shots out of his 7mm RSAUM and got the barrel to the point where it was too hot to touch. In most cases, the barrel would still be very warm/hot by the time the next relay started. We placed BarrelCool in his firearm and within 30 minutes, the barrel was back to near-ambient temperature. Other observers mentioned that the air coming out of the muzzle with BarrelCool in the firearm felt like a mini blow dryer.”
Using three (3) CR123A batteries, a BarrelCool unit can operate for 7-10+ hours. BarrelCool fits both AR-style rifles as well as most bolt action rifles. The Hi-Viz yellow color stands out on the firing line and BarrelCool is small enough to fit in most range or gun bags. Manufactured in the USA, Barrelcool can benefit competition, precision, or recreational shooters who need to cool down their barrels more rapidly, while displaying “safe condition” on the firing line. For more information, or to order for $34.99, visit www.barrelcool.com.
Nightforce’s 42x44mm fixed-power Benchrest scope mounted on James Mock’s 6mm Dasher.
Nightforce 42x44mm Comp Scope for Benchrest Shooters, by James Mock
Among long range shooters the name Nightforce has long commanded respect because of NF’s great optics and durability. However, the Benchrest disciplines that require either a 10-lb or 10.5-lb rifle had to forego the use of the Nightforce scopes because of their two+ pounds of weight. Some used the Benchrest model in the Heavy Varmint category (13.5-lb max weight) but not many in the Light Varmint, Sporter, or Hunter categories. That may change thanks to a new scope from Nightforce.
The folks at Nightforce Optics listened to benchrest shooters in the lighter classes and developed a new, light weight 42x44mm Competition Scope that weighs just 20.7 ounces. This scope comes as a fixed-power 42X and is without some of the “bells and whistles” of its larger cousins.
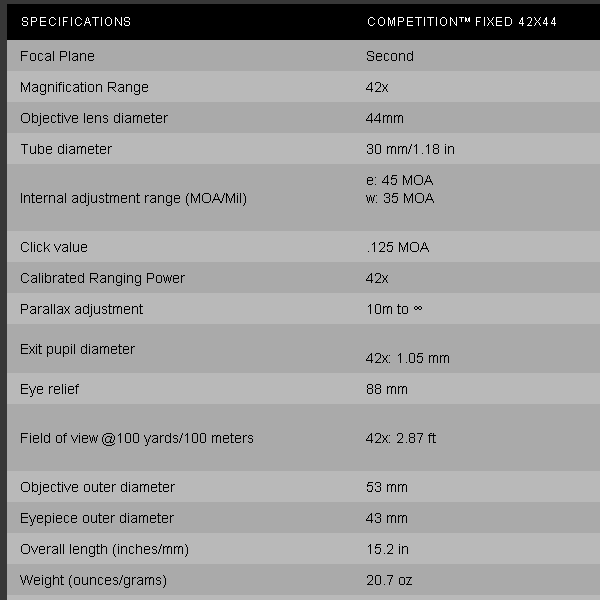
Key features of this scope important to Benchrest shooters are: ED glass, 42X power, 44mm objective lens, 88mm eye relief (~3.5 inches), 45 MOA elevation adjustment, 35 MOA windage, 10 MOA per revolution, 2.87-foot field of view at 100 yards, quick focus, click value of .125 inch, parallax adjustment from 10 meters (~33 ft.) to infinity, and an overall length of 15.2 inches. Also, you can set a “zero” easily. After obtaining conventional zero simply loosen one set screw per turret and set the dial at zero.
I received this scope on Monday, February 15th and mounted it on my BAT-action 6mm Dasher and zeroed it for a 600-yard match on Saturday, February 20th. My first impression of this scope was the amazing image produced by the ED glass. Although it is made with a 44mm objective lens (to save weight), one cannot say that the image is not clear. The image is outstanding from edge to edge and the image color is true. Nightforce offers two reticle options: the CTR-2 and CTR-3. Both reticles feature .016″ MOA vertical and horizontal lines, but the CTR-2 includes a .095 MOA center dot.
It took a small amount of faith to shoot the scope in a 600-yard match a few days after receiving it. Although I had shot only a few rounds with the scope mounted on my BAT Dasher, I knew that the Nightforce reputation was solid and my results would depend on the “nut” at the end of the rifle.
At the match, I fired a few shots to confirm zero and really appreciated the scope’s crisp 1/8th-MOA clicks. The adjustments were spot on at the 600-yard range and there was no problem getting my zero at the 600-yard distance. Remember, I had not shot at 600 yards with this scope, but I dialed in 11.5 MOA from my 100 yard zero and the resulting impact was correct. Each eight clicks delivered a precise one-MOA movement (about 6 inches) on the 600-yard target. The picture below is at the range as I was preparing for the first relay.
Our 600-yard match (non-registered) features 20 record rounds fired on the IBS target with steel gongs for sighters. The winter mirage can be brutal in this part of the country, but the Nightforce handled it without problems. Before the match was over, the left to right wind caused me to dial in two minutes (~12 inches) of windage and the scope was precise and I posted my 3rd best score with 191/200. The very fine .095″ dot allows for great precision in aiming.
Actual target shot by James Mock at 300 yards using Nightforce 42x44mm scope. James won the match.
My next match to use the scope was a 300-yard score match on March 5th. I had one chance to zero my rifle for this match and again I had no trouble changing the zero with the crisp, repeatable adjustments of this fine scope. The day was cool with bright sunshine and switchy tail winds. The new Nightforce handled the conditions very well, even with the horrible mirage. We shot two, 10-shot targets on the IBS 300-yard target. I shot 99-3X on the first and 99-3X on the second to win the match by one point over Mitch Young. Above is my second target, and the new scope let me see every shot through the mirage. There were many others who said that they could not see their bullet holes.
Summary of Nightforce 42x44mm Review
This 42x44mm optic is everything that I want in a scope. The 1/8th-MOA adjustments are crisp and repeatable. The center dot is small (.095 MOA). The image is sharp and clear all the way to the edges, and the ED glass provides a sensational image. The turret markings are distinct and there are 10 MOA per revolution. And you get all this in a scope that weighs 20.7 ounces with a 44mm objective lens. The low weight makes this scope viable for all benchrest classes. I believe the short range Benchrest shooters will welcome this scope and pay the sales price of $1742.00 (MSRP is $1795.00). Good shooting — James Mock
The Savage Arms A17 rifle has been named the 2016 Rifle of the Year by American Hunter Magazine, which awarded Savage Arms a Golden Bullseye Award. “Savage Arms has created a modern rimfire rifle deserving of a 2016 Golden Bullseye Award” said Doug Hamlin of NRA Publications. Savage Arms President Al Kasper declared: “We’re incredibly proud to receive the American Hunter Golden Bullseye Award, and with this recognition, we’re confident we have produced a category-leading firearm.”
The A17 is a 17 HMR semi-automatic with delayed-blowback action. Previous semi-auto 17 HMR designs struggled to cope with the extra power of the 17 HMR cartridge compared with a .22 LR. Savage solved that problem using a delayed blowback mechanism with retracting locking lug. You can see how that works in the video below.
Watch this Video — You’ll Learn Something about Semi-Auto Rimfires
This Savage-produced video demonstrates how the 17 HMR Savage A17 rifle works. The video includes nicely-done 3D Graphics that illustrate the function of the A17’s delayed-blowback action with “interrupter lug”. Using “X-Ray View” animation, the video shows what happens INSIDE the chamber as rounds are fired. The video also explains how the 17 HMR presents a tougher engineering challenge than the lower-pressure .22 LR cartridge.
Varminter.com Savage A17 Field Test and Hunt Report
Ammo Accuracy Results from Varminter.com Field Test:
NOTE: This entire test was performed without cleaning the barrel. For each ammo type, ten (10) 5-shot groups were done. That’s seven times 50, for a total of 350 rounds. The gun used Savage’s original, first-generation polymer A17 stock. Some folks have reported better accuracy with the late-model A17s in the laminated wood thumbhole stock or the laminated wood Sporter Stock (shown below).
When developing loads, it is important to know the true internal capacity of your cases, both fired and “as FL-sized”. In particular, when using the QuickLOAD program, it is vital to determine true case capacity. The default case capacity values listed by QuickLOAD may be off half a grain (or more) because brass from different manufacturers can vary considerably in capacity. Case capacity is a very important variable that will affect the pressure of a load and the velocity of your bullets.
To determine the true internal capacity of your cases, first weigh an empty cartridge case, then fill the case with water (all the way to the top of the neck) and weigh the case again. The difference in weight is your H20 capacity in grains. But how do you keep the H20 from flowing out the bottom? When measuring fired, unsized cases, you can simply leave the spent primer in the pocket. However, if you want to measure new brass or “as-FL sized” cases that have been deprimed, you’d have to insert a spent primer to “stem the tide”. Until now that is… 21st Century Shooting sells a great little $5.50 tool that plugs the bottom of the case so you can measure H20 capacity with ease.
When we saw 21st Century’s Primer Pocket Plug we thought “That’s smart — why didn’t someone think about that a long time ago?”. This handy “end-cap” lets you quickly measure multiple new brass cases or deprimed FL-sized cases so you can get an average H20 capacity. The primer pocket plugs are NOT case-specific (they feature an O-ring that fits the pocket). One version will work with all small-primer-pocket cases, while another works with all large-primer-pocket cartridge types. Price is $11.99 for either small-pocket or large-pocket version.
NOTE: If you want to measure H20 capacity on fired, sized brass, but don’t want to shell out the money for the tool (or re-insert a spent primer), here’s a simple suggestion. When you size your case, first remove the decapping rod from the die. Then you can FL-size the case without removing the primer. Of course, you will eventually have to knock the primer out, and that requires putting the decapping rod back in the die and running the case through a second time. To avoid that hassle, the Primer Pocket Plug may be worth the twelve bucks over the long haul.
Product Find by EdLongrange. We welcome reader submissions.
What was old, is new again… RCBS has just introduced an all-new balance beam scale, the RCBS M1000 Scale. RCBS claims this magnetic-dampened scale will weigh up to 1,000 Grains with +/- 0.1-grain accuracy (one-tenth of a grain is about three kernels of Varget). The new M1000 mechanical scale features a magnetic damping system for fast readings, and maintenance-free movement. A newly-designed “tip-proof” pan should ease powder loading. Notably, the M1000 scale was designed to work in both right-handed and left-handed configurations. Curtis Smith, RCBS Product Director, explains: “For those who choose mechanical scales, accuracy and reliability are top priorities. The new M1000 scale provides exactly that for both left- and right-handed users.” The scale is quite affordable — it is available now at Amazon.com for $129.59. (MSRP is $159.45.) For more information, visit www.RCBS.com.
Triple Poise Operation with 1000-Grain Capacity
The scale has some interesting features, including three poises (weight index adjusters). The main poise goes to 1000 grains, while the medium poise runs up to 20 grains. The most precise small poise spans one grain in tenth of a grain increments. The rated capacity of the RCBS M1000 scale is 1000 grains.
Multiple Reference Pointers for Target Weights
The M1000 also features multiple pointers which can be used to set target weight ranges. This speeds up operations. According to the M1000 Users Manual: “[There are] three separate pointers for easy reading of over and under loads. The center Pointer is what is used when balancing the scale and establishes a ZERO Balance. The top and bottom Pointers represent approximately 1.5 grain above and below target load. The top and bottom pointers allow the user to quickly weigh loads knowing that if the beam pointer is oscillating between the top and bottom pointers the load is within +/- 1.5 grains. Having top and bottom pointers also eliminates the need to move the small poise to check powder charge variations.”
Recently the CMP adopted new rules that allow the use of magnified optics, up to 4.5X power, in Service Rifle competition. The Nightforce NXS 1-4x24mm Compact Riflescope, while not designed specifically for Service Rifle competition, complies fully with the new Service Rifle optics rules and works very well. In fact, our correspondent Johnny Fisher used this scope to take third place in the recent California State Service Rifle Championship. Here’s a run down of the scope’s features and performance. Johnny says this is a “great scope” and “results are extremely promising” so far.
Gear Review: Nightforce NXS 1-4x24mm as Considered for Service Rifles by Johnny Fisher
2016 has brought with it a long anticipated rule change that allows for the use of optics in Service Rifle competition. The rule allows scopes (fixed or variable) up to 4.5 power with an objective lens no greater than 34mm. Given the strict limits on max magnification and objective size for Service Rifle optics, there are somewhat limited options on the market at this time. Service Rifle competitors are now challenged with selecting an optic that fits the rules while offering high-end performance. Thus far, it seems the biggest concerns that Service Rifle shooters have when considering an optic are: quality, repeatability, parallax, reticle choices, and durability.
Click Image for Full-screen Version.
PARALLAX Considerations
The vast majority of Service Rifle Rule-compliant scopes currently on the market have a fixed parallax. That means there is no separate focus knob to adjust parallax to target distance. Accordingly, there has been much concern about the potential for parallax error over the three different distances in Across-The-Course competition. It is possible that the repeatably-indexed head position maintained while shooting a Service Rifle, along with a little extra emphasis on sight alignment to ensure that the shooter’s eye is directly behind the scope, can greatly mitigate the potential effects of parallax error.
The Nightforce NXS 1-4x24mm comes with the parallax factory-set at 75 yards. Combined with the right amount of eye-relief and low-enough rings to ensure an easy-to-maintain and clear/full sight picture, it seems like the fixed parallax is not really the problem some folks think it may be. Below are two, 10-round test strings shot at 300 yards (each with a magazine change). Note that I didn’t drop a point, even with the non-adjustable parallax.
The Fixed Parallax is not a “deal-breaker”. Witness 20 shots at 300 yards — all 10s or Xs.
RETICLE Options
For the NXS 1-4x24mm scope, Nightforce offers two reticle types: the International Hunting Reticle (IHR) and the FC-3G (with 5.56 NATO or .308 NATO BDC hold-over features). My scope has the IHR Reticle, which provides a very clear, unobstructed and simple sight picture. The IHR reticle for the NXS 1-4x24mm boasts an illuminated center cross-hair. Unfortunately, the red-color illumination is really only intended for low-light situations and is not bright enough to offer any aid to National Match shooters competing in broad daylight at stationary targets.
ZERO-STOP (Optional)
For Service Rifle shooters accustomed to keeping track of their sight settings as “clicks from bottom”, the optional Zero-Stop might be welcome. After loosening the turret and establishing the desired Zero-stop location, tightening the set screw blocks rotation below this point. NOTE: Once set, the Zero-Stop turret only allows for one full revolution of elevation adjustment. However, the Nightforce NXS 1-4x24mm offers 20 minutes of elevation adjustment per revolution. That should be more than enough elevation adjustment for come-ups to 600 yards (even with a 100-yard zero established near bottom).
PRICE and DURABILITY
The Nightforce NXS 1-4x24mm carries a price tag of just over $1500.00. The scope just feels solid –nothing plastic — especially when compared to some of the other consumer- or recreational-grade options on the market. All touchable tolerances feel extremely tight. There was quite an amount of attention given to every little detail, as you would expect from an optic at this price point. It is hoped that the scope’s mil-spec robustness will assure continued excellent performance — even after seasons of the kind of abuse that High Power shooters put on their equipment. More will be revealed as I use the scope at future competitions, but initial results are very good. This is a quality optic. I have high hopes that it will prove a good investment.
Edgewood makes some of the best front and rear shooting bags you can buy. And the latest Edgewood rear bag is better than ever, with a new hybrid “slick material overlay”. This combines the shape retention and stability of leather ears, with slick, low-friction material where the stock rides. This “best of both worlds” solution delivers both bag stability and improved tracking. Derek Rodgers, the only man who has won BOTH the F-Open and F-TR National Championships, is using this new rear bag, and he says it’s excellent. He says his gun tracks great with the slick material on top of leather-based ears.
You’re probably familiar with Edgewood for its high-quality shooting accessories. You may not know that Edgewood also offers a full line of quality leather OWB holsters and IWB holsters. And we bet you didn’t know that Edgewood got its start making tack and bridles for horse riders. Here’s a short history of Edgewood Leather, a family-run business based in Albuquerque, New Mexico.
The History of Edgewood Leather
by Jack Snyder
I’ve always enjoyed working with leather and still do to this day. Something about starting with an idea and building a useful and hopefully, beautiful piece does it for me. There’s nothing like leather to stimulate my imagination. It brings out my creativity and makes me happy.
I began doing leatherwork as a kid, 12 or 13, and the first piece I made was a pair of shoes. Got a job in a leather shop in the late ’60s and made purses and belts, wallets and sandals — many pairs of sandals. I opened a small retail shop in Estes Park, CO and made even more of the same, adding vests, halter tops, hats, mountain man gear of all sorts from skunk hats to goat fur high-top moccasins.
After a decade or so, I became restless for something new and taught myself bridle work. I discovered a niche market with English riders who were always looking for beautiful, well-fitting show bridles and over a period of about twenty years developed and produced many products for these riders — numerous types of nosebands, breastplates, martingales, girths and many different varieties of reins. At the same time I observed that for every horse and rider there were at least two dogs trotting along beside. I began making dog products which closely resembled their horse buddies bridle work. Sales were good. Leashes, leads, halters and collars showed up at dog shows around the country. My bridles were worn by many champions in every horse discipline — dressage, show ring, hunter-jumpers, and my polo gear became popular among the players. All of that was fun and I’m still proud of those products (still being made today), but it was time for a change. I sold my interest to my partner and tried to retire. Didn’t work, though.
My plan was to shoot benchrest matches, as many as I could. And I did for some time and loved every minute. I’ve made many friends among the shooters, discovering early on that these people are the most interesting, smart folks a guy could ever associate with. To the man, they’ll share what they know with you and even hand you their gun when yours malfunctions during a match, and grin and slap you on the back when you beat ‘em with it!
When I was getting started in benchrest, one aspect of the game was somewhat disappointing to me-the quality and stability of the shooting bags. It was natural with my past leather experience to make what I thought would be a better product. I cobbled up a couple of bags and went to a match in Oklahoma. All hell broke loose. Most of the shooters had to have one. By the end of the summer, I had so many orders for shooting bags, I couldn’t keep up the pace. I was improving the designs, based on the shooters telling me what worked and didn’t work. I was adding new products, experimenting with materials, processes and configurations and having a great time. Completely by accident, Edgewood Shooting Bags was born. My wife Cindy and my two kids Jackie and Aaron jumped in and we became a bag-making machine — always looking to improve and expand upon the products. Jackie’s husband Ryan joined us several years ago and together, we’ve made a pretty awesome team.
Edgewood’s New Line of Leather Holsters
Since we’re all avid shooters with many handguns among us, the next logical product to add to our catalog would be a line of high-quality leather holsters. For the last year or so, we’ve come up with what we believe to be the most comfortable, elegant holster out there. Affordably priced, these holsters are are available in many different styles and configurations, for both outside carry and concealed carry.
Latest Rear Bag Design — Leather Ears with ‘Slick Material Overlay’
Edgewood constantly strives to improve its products. Witness the new “slick material overlay” bag ears. This is a major design improvement over our regular “slick ears”. The development of the overall design all started when we noticed some shooters applying household products like talcum powder or dryer sheets to the ears of their bag in an effort to reduce friction and speed up their rifle’s return to battery. We found a material that would achieve this function without the need to raid their wife’s pantry for powders or laundry accessories and began sewing the ears up using this “microscopic glass bead impregnated” fabric. We were happy with the results. However, we soon began to realize that the slick material could have the longevity of our nylon as well as its slick properties, if we found a way to increase its thickness without causing wrinkles or inconsistencies.
First, we ended up hunting down some similar fabric with a much higher strength and thickness. It even has a fireproof backing that makes it far more durable — even if shooters aren’t planning on exposing it to temperatures higher than the Arizona desert can offer. This material was definitely superior and even more representative of the quality and durability that shooters have come to expect from products wearing the Edgewood logo. We didn’t stop there, either.
We started experimenting with a way to combine our toughest ear design, which is made from soft leather, with the slick material to create the best of both worlds. We deemed it the “slick overlay” option and many of the world’s top shooters now swear by it. There is no compromise with this ear set — shooters gain all of the advantages of the slick material, in addition to durability and consistency that exceeds even our tried and true nylon ears. Many of our original bags have been punished by shooters for over a decade and are still performing. We expect this design to last even longer.
Keeping ahead of the curve with innovations that create and help propel evolution in the sport is a signal of our commitment to retain our status into the future. Along with other new products like our second generation of concealed and open carry holsters, range bags for sighting in hunting rifles, radius front bags for AR-style rifles, camouflage color options and more — we even have a new logo for 2016. Check us out online or give us a call. We’re ready to meet the demands of shooters — from Benchrest and F-Class to concealed carry and IDPA.
Jack Snyder
President – Edgewood Shooting Bags and Gun Leather
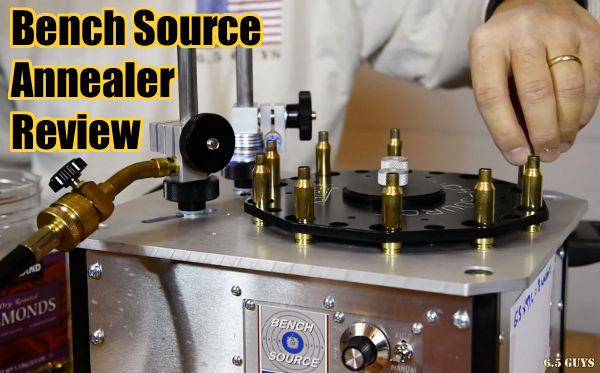
The 6.5 Guys, a dedicated duo of Pacific NW rifle shooters, have created an interesting series of shooting-related videos on their 6.5 Guys YouTube Channel. In a pair of YouTube videos, The 6.5 Guys set up and demonstrate the Bench-Source cartridge brass annealing machine. The videos offer valuable tips on setting up the machine, attaching and adjusting the torches, and fine tuning the flame and dwell time to achieve best results.
To complement their videos, the 6.5 Guys (aka Ed and Steve) have published an Annealing Tech Talk article on 65guys.com. If you own an annealing machine, or are getting started with cartridge annealing, you should read that article. It covers basic annealing principles, and gives useful tips on temp control, dwell time, and frequency of annealing. After the video, we feature highlights from this article.
Temperature Control
We use 750° Tempilaq applied inside the case neck to indicate that the proper temperature has been achieved. If you turn off the lights, you will notice that the brass just barely starts to turn color. As you go beyond the 750° mark we observed that the case mouth will start to flare orange — you can see this with the lights on. From our research, we understand that this is the result of zinc burning off. We adjust the time on our machine between the point that the Tempilaq turns liquid and the flame starts to turn orange. In other words, if the flame is starting to turn orange reduce the time. We let the cases air cool — we don’t quench them in water.
The case starts to flare orange here, during a set-up test. Dwell time was then reduced slightly.
Flame Orientation
We aim the flame at the neck-shoulder junction. Some folks like to aim it at the neck and others the shoulder. When you see how the two flames meet and spread out vertically, it probably doesn’t make that much of a difference.
Here you can see the flame points aimed at the neck-shoulder junction.
Case Coloration
Cases will turn color after annealing, but the degree of color change is not a reliable indicator. We have noticed that the appearance of cases will vary depending on brass manufacturer, brass lot, light source, and how long ago the case was annealed.
How Often Should You Anneal?
Some shooters anneal every time while others choose a specific interval. We noticed work hardening around five firings that resulted in inconsistency in shoulder setback and neck tension, so we choose to anneal every three firings. Your mileage will vary depending on how hot your loads are and how aggressively you resize.
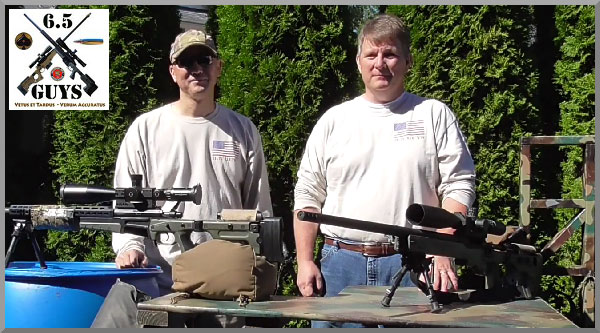
Who are the 6.5 Guys? They are Ed (right) and Steve (left), a pair of avid shooters based in the Pacific Northwest. They have released 22 Videos on the 6.5 Guys YouTube Channel.
Pac-Nor Production Manager Casey Dichter says the Sunnen hone produces a consistency in bore diameter that is much superior to hand-lapping. The Sunnen machine has all but eliminated the standard pre-rifling lap. “You can really tell the difference between a bore that was honed before rifling and one that was [only] lapped”, notes Dichter.
Gun Barrel Honing System Hits Target for Pac-Nor Barreling
Manufacturing precision rifle barrels has always been something of an art that involves hand lapping of the bore surface twice, before and after the rifling profile is cut or swaged in by a rifling button. In fact, a bright, hand-lapped bore is considered one of the hallmarks of a precision rifle barrel, despite the inherent variations from manual work done by people who get bored and tired from the monotonous chore. Pac-Nor Barreling, Inc. set its sights on this issue more than a year ago and hit the X-ring with the newly developed Sunnen HTE honing machine. The machine has all but eliminated Pac-Nor’s pre-rifling lap, which is the more difficult and time-consuming of the two laps. Pac-Nor is also producing as many custom barrels as ever, but with a slightly smaller staff. “Our objectives with the hone were to build a better product with less labor, and the honing machine has exceeded my expectations,” said Pac-Nor Production Manager Casey Dichter. “The hone produces a consistency in bore diameter that is head and shoulders above lapping, within two to three millionths of an inch end-to-end when it’s really dialed in,” he said. “This, in turn, improves the consistency of the rifling process by minimizing variation in the depth of the grooves. We still finish lap after rifling, but it’s easier because we just polish off the fine crosshatch finish that may be left after honing and rifling.”
The Sunnen hone secures the barrel blank in a 3-jaw chuck, with honing oil pumped into one end while the tool works from the opposite end. Sunnen’s specialized Long Bore Tool uses metal-bond diamond or CBN superabrasives to quickly remove reamer marks, waviness, tight spots and other imperfections left by upstream processes.
Honing is an ideal replacement for hand lapping barrel blanks before rifling. It quickly removes reamer scratches and surface waviness without labor-intensive hand lapping. A typical 600-grit abrasive can produce a 6-10 microinch Ra (0.15 to 0.25 µm) finish in a reamed barrel blank. By producing a consistent bore diameter (±0.0001″ or less), parallelism, roundness and surface finish end to end, honing yields more consistent performance from rifling buttons and cutters, resulting in a constant groove depth. The ideal bore geometry reduces distortion of the bullet shape.
Pac-Nor’s barrel-making process starts with cutting and facing premium bar stock, followed by gun drilling, done by four Pratt & Whitney twin-spindle machines and an Eldorado CNC twin spindle. After reaming, the barrels are gauged for size. Depending on the condition of the reamer, 0.0004″ to 0.0007″ of material is left in the bore. This must be manually lapped out or honed out to final size for rifling. “Everyone who works here has done hand-lapping,” said Dichter. “It’s an unpleasant job, particularly if the reamer is starting to get dull. Lapping may take 10 to 45 minutes, depending on the caliber of the barrel. We tried to shorten this, but when chatter marks get ‘ironed’ into the surface by the rifling button, the finish lap is even longer and more difficult, so there is no advantage. With lapping, too, there is potential for variation, simply because it’s a manual process. Lapping can also be a production limiter and in our region we have a very small labor force to draw on when we want to grow.”
Pac-Nor cuts and faces premium bar stock, then gun drills on one of five twin-spindle machines, followed by reaming of the blanks. This rack of barrel blanks awaits completion.
The company had explored honing in the nineties, but re-visited the idea when Sunnen introduced its HTE honing machine in 2014. The HTE is a horizontal machine that can hone small-bore rifle barrels, with a diameter range of 0.150″ to 0.790” (4-20 mm), and lengths up to 60″ (1,524 mm). Designed specifically for long small bores, the machine features an extremely sensitive drive and tool feed system that provide maximum protection against tool overload/breakage. Tool specific force limits and run settings are stored in the touch-screen PC control, allowing the system to sense tight sections in the bore and correct them automatically.
Sunnen also developed a new Long-Bore Tool (LBT) designed to take on industry’s most difficult honing challenges in small bores of .17 caliber rifle barrels. The tool quickly remove reamer marks, waviness, tight spots and other imperfections left by upstream processes. The LBT utilizes metal-bond diamond or CBN super-abrasives for high productivity, long life and fast cycle times. Precision-machined of through-hardened tool steel, the LBT can produce bore accuracies of 0.000027″ (0.0006 mm) for diameter, roundness, and taper – from first part to last.
“We are currently honing about 80 percent of what we make and will do more as we acquire the tools in different calibers,” said Dichter. “Although there is a trade-off in cycle time and abrasive cost for additional honing, we are still able to run our reamers two to three times longer than when we lapped alone. With a hand lap, the time and effort increase when the reamer is getting dull.”
After honing, each barrel is inspected again before rifling with a pull-button. Pac-Nor makes its own Accu-Twist carbide rifling buttons and can provide different rifling styles, including polygonal, per the customer’s choice. A button is attached to a rod and the rod is pulled through the barrel. The company’s hydraulic rifling machine utilizes a CNC-machined twist bar with a helix angle that matches the twist rate requested by the customer. The final twist rate is confirmed afterward using a Barrel-Scan electro-optical twist measurement system.
The barrel is then stress-relieved in a tempering furnace, followed by contouring of the outer shape and final, finish lapping of the bore. “During the finish lap, you can really tell the difference between a bore that was honed before rifling and one that was lapped,” said Dichter. “You can easily sense any remaining tight or loose spots in the bore. The diameter uniformity and roundness of the honed bore are superb. The lap also feels different in a honed bore.”
In competitive shooting where winning scores may be separated by thousandths of an inch, a few millionths of an inch improvement in the uniformity of a Pac-Nor barrel may make a big difference for a skilled shooter. For more information, visit www.sunnen.com or contact:
Sunnen Products Company
Mr. Bob Davis
Global Communications Mgr.
Sunnen Products Company
Tel: 314-781-2100
bdavis [at] sunnen.com
About Pac-Nor Barreling Inc.
Pac-Nor Barreling is a true custom manufacturer catering to bolt-action rifle shooters. The company’s principle markets are law enforcement, military, competitive shooters and hunters. Started in 1984 by avid shooter and company President Chris Dichter, Pac-Nor is now in its second generation under his son, Casey. In addition to barrel manufacturing, the shop will install the barrel on a customer’s action, or add features such as muzzle brakes or fluting on bolts and barrels etc.
The shop runs two shifts per day. A day shift of ten people produces 30-40 custom barrels of different calibers in 416R stainless or chrome-moly steel. A night shift of three people produces one type of barrel — about 50 AR-15 barrels per day for a rifle OEM.
by Tony Chow
In recent years, the use of electronic trainer systems has revolutionized training in all disciplines of position shooting. By capturing (and illustrating) key performance variables like the steadiness of a shooter’s hold, accuracy of aiming, and the timeliness of trigger release, these devices can offer tremendous insights into the strengths and weakness of a shooter’s position and technique, making high-level marksmanship training less voodoo and more of a science.
Until now, electronic trainers all suffered from one critical limitation: the inability to be used outdoors in live fire training. Now, however, SCATT has introduced the next-generation MX-02 electronic trainer, a product that can finally support outdoor live firing in broad daylight, as well as dry firing indoors. In addition, the MX-02 is the first electronic trainer to support centerfire rifles. It goes without saying that, when we at AccurateShooter.com were offered an MX-02 test unit to review, we jumped at the opportunity.
How the SCATT MX-02 Works
The SCATT sensor mounted on the end of the barrel has a digital camera that “sees” the black bullseye in the target, even in broad daylight outdoors. Using the bullseye as a reference, the SCATT software tracks the movement of the muzzle relative to the center of the target. The unit can plot these movements as a continuous trace, which appears on a monitor as a squiggly, colored line. Data points from the trace are also available in a tabular spreadsheet format. This allows the shooter to “crunch the numbers”, revealing strengths and weaknesses in his gun-handling and aiming technique.
In our testing, we confirmed that, like SCATT’s earlier indoor-only WS-01, the MX-02 offers excellent support for indoor dry-fire training, which will continue to be the primary means through which position shooters sharpen their fundamental skills. Since the new SCATT uses the same familiar Windows software for data capture and analysis as its predecessors, shooters and coaches upgrading to MX-02 will have no learning curve to overcome, and newcomers to the SCATT platform can tap into the wealth of institutional knowledge accumulated over the years by the shooting community on how to interpret shot data.
It’s in the support for outdoor live firing, however, that SCATT MX-02 distinguishes itself from its predecessors and the competition. Shot trace data captured by MX-02 during live firing turned out to be every bit as valuable (and revealing) as we had hoped. The ability to correlate SCATT tracing with real shots on target gave us a better understanding of the shooting process, and helped the reviewer, already a high-level smallbore prone shooter, uncover a significant problem in his shooting. SCATT MX-02’s outdoor capability is therefore an invaluable feature, particularly for experienced shooters aspiring to world-class performance.
In summary, SCATT MX-02 is an outstanding product that delivers on its promises. We heartily recommend it, both for first-time users of electronic training aids, and also for those shooters who may wish to upgrade their current electronic training system. The MSRP for SCATT MX-02 is $1,799, $500 more than its predecessor, the SCATT WS-01, which is still available. In my view, the $500 premium for the MX-02 is justified by the MX-02’s enhanced capabilities, making it a better long-term investment.
Our complete, 3600-word MX-02 review of the SCATT MX-02 can be accessed through the link below. This full review contains many more photos plus detailed field test results. For the time being, the review only covers our experience with the product in smallbore shooting. An upcoming addendum to the review will include test results from centerfire shooting. Those attending SHOT Show in Las Vegas next week can examine SCATT MX-02 in person. SCATT will have the MX-02 on display at Booth 111.




 I began doing leatherwork as a kid, 12 or 13, and the first piece I made was a pair of shoes. Got a job in a leather shop in the late ’60s and made purses and belts, wallets and sandals — many pairs of sandals. I opened a small retail shop in Estes Park, CO and made even more of the same, adding vests, halter tops, hats, mountain man gear of all sorts from skunk hats to goat fur high-top moccasins.