Generally you want the biggest, heaviest gunsafe you can afford. However, for many gun owners, a 1000+ pound behemoth is impractical. For those who relocate frequently for their jobs, or who live up many flights of stairs, it is more practical to have a safe that breaks down into separate pieces for storage. In our Guide to Gunsafes, we reviewed the Zanotti Safe, a quality modular safe that breaks down into smaller, lighter components. Now there is a new type of modular safe that is more affordable than the Zanotti. Snapsafe’s Titan safe ships in three (3) flat boxes. Simply unpack the components and assemble the 330-lb. Titan on-site in about 30 minutes without tools.
Watch video to see how the SnapSafe Titan clamps together with steel latches:
The SnapSafe™ Titan holds 10 rifles, weighs 330 lbs. assembled, and measures 60” H x 22” W x 17.5”. Side panels are 1/8″ steel and the door is 3/16”steel secured by eight 3/4″ live locking bolts. SnapSafe claims that its patented “Latch Wall Assembly” can be stronger than conventional welded construction. The safe does have some nice security features, including a Sargent & Greenleaf® digital lock, and spring-loaded relocker. We are pleased to see the safe comes with fire-sealing gaskets lining the door frame. These gaskets, combined with ceramic wool blankets in the walls provide a claimed one hour of fire protection against temperatures up to 2300ºF.
SnapSafe sells its Titan 10-Gun safe on SnapSafe.com for $899.00 (without shipping). The same safe is currently on sale at Midsouth Shooters Supply for $956.42 as a dropship item. Depending on your location, it may be less expensive to buy the SnapSafe from MidSouth.
Forum member RidgeRunner has devised a clever shooting support for field use. He calls it the “Pogo Stick”. It’s simply welded stainless rod with a two-pronged base, and a ‘U’-shaped cradle that adjusts for height along a vertical shaft. RidgeRunner tells us: “It is very solid and made from stainless steel so it won’t rust under sweaty hands. The rifle hook, or support, slides up and down the main stem and secures with the knob. It has two prongs you tramp into the ground and is VERY stable. It is shiny, but I have been using this one since about 1983, and I can’t say I have noticed it spooking any whistlers. Before I had an actual bench to shoot off of, I used it to sight-in rifles. I would lay down and use a sand bag under the butt stock. Worked just fine.”
While this “Pogo Stick” rest was created for varmint hunting, it would work well for hunters of larger game, in terrain where the prongs could be set in the ground. The whole unit is small enough to carry easily in a day-pack. It sets up in seconds, and it stays in position by itself, unlike shooting sticks, which normally require a firm hold with one hand.
Yep, that’s one big Pennsylvania groundhog in the photo below. RidgeRunner reports: “This old boy has been giving me the slip for a couple weeks. I finally got a 52gr A-Max in him before the hay got high enough to hide him again. This sucker weighed 15 pounds. My heaviest to date I believe. The rifle is a Tikka 22/250 with a 4-16X Weaver 1/8-MOA dot scope. Nice and light for carry, nice and accurate too.”
Forum member Kenneth Skorpen (aka “Sal”) from Norway sells a variety of shooting products through the www.Vertebrae.no website. Among the more interesting products offered by Skorpen are a series of muzzle brakes that can be installed on your barrel with no gunsmithing required — if the barrel tip has already been threaded. Crafted in Norway by Vektor Maskin, these muzzle brakes employ an internal inside/outside threaded bushing with a stop nut that fits on the barrel. With the threaded bushing in place, you simply screw the muzzle brake onto the bushing, align it so the ports are horizontal, then set the stop nut and set-screws. (Note, the set-screws touch only the bushing — they do not impinge on the barrel itself.) The video below shows how Vektor spin-on muzzle brakes are installed:
There are compact, standard, and large size Vektor muzzle brakes. Adjustment and installation is the same for all three sizes. The small, compact model, with two rows of opposed horizontal ports, is designed for .223-caliber rifles. The medium (standard) size, with either double or triple sets of opposed ports, is suited for 6.5mm or .308 calibers. The largest size, with three rows of large ports, is configured for the .338 magnum calibers. Skorpen claims that all three sizes of Vektor brakes can reduce felt recoil by 70% to 80% The brake itself is SIS1914-04 steel with an oiled zinc phosphate finish. The internal socket is AISI 303 (SUS 303) stainless steel.
If your barrel is already threaded at the muzzle, the Vektor brakes can be installed with no metal-work or gunsmithing required. Otherwise, you will need a gunsmith to thread the muzzle end of the barrel. The Vector bushings can be machined to a variety of thread types: 1/2″-20/UNF, 1/2″-28, 5/8″-18/UNF, 5/8″-24, m14x1, m14x1.5, m15x1, m16x1, m17x1, and m18x1. Just indicate the thread pitch you require when ordering.
How to Order Vektor Muzzle Brakes
Skorpen’s company, Vertebrae Sikkerhet & Teknikk, exports these Vektor brakes at reasonable prices. With one (1) supplied bushing, the compact brake is $131.43 USD, standard brake is $167.64 USD, and the large (magnum) brake costs $198.49 USD. Extra bushings are available for around $20.00. While the website lists .223, 6.5mm, .308, and .338 caliber brakes, Vetebrae can produce brakes in other calibers on request (add 5 days to delivery time).
You can also purchase Vektor muzzle brakes by emailing joachim [at] vertebrae.no. (It may be cheaper to order direct via email.) Just send an email stating your desired caliber and thread pitch. Normal delivery time to the USA is one to two weeks.
Harris swivel-model bipods allow you to adjust the cant of your rifle. This is useful if you are shooting on side-sloping ground. But what if you want to traverse from side to side, say to switch from one critter to another during a prairie dog safari? Well normally you would have to pick up the entire rifle and reposition it to the left or to the right. Now you have an option. The Upriser Arms Bipod Swivel Mount allows you to traverse your rifle left to right, without moving the bipod legs.
Video Shows How Traversing Bipod Mount Works, with Locking Plunger Knob:
This rugged, machined-aluminum bipod mount lets you swing your aim point from side to side without having to reposition the bipod. The rubber-padded Upriser Arms Bipod Mount accepts any bipod that attaches to a forward sling swivel stud. There is also a version that fits on tactical rails.
It is easy to engage or disengage traversing capability via the plunger knob on the front of the unit. When you pull down on the plunger (and twist to lock in “down” position), the rifle can swing smoothly on an internal, precision-bearing pivot. To go back to non-traverse mode, simply center the fore-arm and then twist and release the knob so the plunger pops up, securing the bipod in the “dead-center” position. Note: This unit adds approximately 1¼” to bipod height.
This $69.99 bipod mount comes with a 100% satisfaction guarantee when purchased through Brownells or Sinclair Int’l. User feedback has been positive. One purchaser wrote: “I take this [traversing bipod mount] on all my hunts and it has impressed me immensely. The part is built strong and has improved my shooting. It is really smooth, easy to use, and helps me stay on scope when my game is on the move instead of having a shaky swivel or having to move the whole bipod. I have recommended this product to all of my friends[.] — Adam, Missoula, MT
Shooters who reload at the range, during the course of benchrest matches, or during load development sessions, can benefit from having a portable scale to weigh charges. Even if you throw charges, using click values, a scale allows you to double-check the accuracy of your throws. In addition, having a scale handy lets you weigh and sort components during load development.
Many reloaders prefer “old-fashioned” balance beam scales for range use. They are relatively inexpensive and simple to use. With a beam scale, unlike electronic scales, you don’t have to worry about weak batteries or finding AC power. The problem when using any scale at an outdoor range is wind. Wind can cause powder to blow out of the pan and even a light breeze can actually cause a beam scale to perform erratically.
Beat the Breezes with a Wind Box for your Scale
Forum member Boyd Allen has come up with a smart solution for reloaders who use scales outdoors — a windproof scale enclosure, aka “Wind Box”. This is something that can easily be built at home with common tools. Boyd explains: “Many guys have good set-ups for loading at the range, with clamping mounts for powder measure and press. But they lack a good enclosure for a scale. This is vitally important with beam scales because they have a lot of surface area to catch the wind. With much wind at all, the beam can oscillate to the point that is not really very usable. While a low-profile electronic scale may be less wind-sensitive, breezes DO affect weight read-outs on digital scales. And of course you always have the issue of blowing powder particles.”
Boyd Allen has used his Wind Box successfully for many seasons. He explains: “Some time ago, I got this idea, and was fortunate enough to have a friend, Ed Hellam, who liked the idea well enough to build us both one. He did a fine job, but since this was the prototype there was at least one lesson to learn. The original viewing pane was Plexiglass, and I discovered that it would hold enough static charge to throw the scale off 0.1 grains, so another friend, Bob Smith, modified my Wind Box, replacing the Plexiglass with a tempered glass faceplate. Thank you Ed and Bob….
The essence of the idea is to have a scale set up in a box with a clear cover that can be opened and closed. On one side the trickler handle/control emerges through a ‘just big enough’ hole. You raise the cover, add a sub-target-weight thrown charge to the pan, and then close the cover. With the cover secure, the set-up is protected from the wind, and you can now trickle up to your desired charge. It works very well. The scale in the photo is an old Ohaus that I picked up. It is actually more sensitive than my RCBS 10-10 and works fine. You can adapt this Wind Box design to any beam scale, or portable electronic scale. Simply adjust the dimensions to fit your particular scale and trickler.”
A while back your Editor was in New Mexico, on a prairie dog expedition. While in the field, my companions and I used two pairs of Steiner 8x30mm Military/Marine binoculars to spot the critters. Finding the Prairie Dogs (PDs) could be challenging in the high grass. Often, a PD would reveal only its head — a small target at distances approaching 400 yards. We really needed sharp optics with high contrast to spot the dogs hiding behind tufts of grass or dry brush.
The Steiner Military/Marine binoculars performed superbly. I came away very impressed with these armored 8x30mm binoculars. The glass is bright and super-sharp. And the rubber-armored body is truly rugged. These binoculars offer both right and left diopters — important for me as my right eye requires more correction than the left eye. One great feature of the Steiners is the focusing system which keeps everything you can see in focus. This really is a big deal. You don’t have to constantly fiddle with focus — everything past about 20 yards is in sharp focus all the time. As one Steiner owner reports: “Focusing set-up is worth the price of admission. Set it and forget. Amazing. This single feature makes these worth owning.” And the sharpness is impressive. I compared the Steiners’ image with a 6.5-20×40 Leupold EFR riflescope set at 8X. Both 8×30 Steiners were brighter than the Leupold scope, and the Steiners resolved individual blades of grass and fine details better than the Leupold. Of course, comparing a binocular optic with a riflescope is like comparing apples and oranges. The advantages of binoculars (compared to a monocular scope) are well known — the brain combines the two images (left eye and right eye) to create a more vivid, 3D effect, with greater perceived contrast.
Good Binoculars are a “Must-Have” Item for Hunters
After three days in the prairie dog fields I came away convinced that a good set of binoculars is absolutely essential for any varmint hunter. As the PD population was fairly thin where we were shooting, we probably spent five minutes glassing for every minute actually behind the trigger. Over 90% of the dogs were first spotted with binos rather than riflescopes. We had a fixed (non-rotating) bench so it was difficult to swing the rifle more than about 30° from one side to another (60° total arc). With the binoculars, and their wide field of view, we could quickly scan a much wider arc.
Steiner 8×30 Military/Marine Binocs are Just $227.98
At the end of our hunt, I told my host that I planned to purchase a Steiner 8×30 Military/Marine Binocular just like the one we used during our hunt. When I arrived home I was amazed to see that the Steiner 8×30 Military/Marine is available for just $227.98 on Amazon.com, with free shipping for Prime members. That’s a great value, considering the ruggedness and optical quality of the unit.
The 10×50 Steiner Military/Marine is also offered on Amazon.com. It has more magnification and better low-light performance. However, it currently runs about $489.98, more than twice the price of the 8×30 Military/Marine! Unless you really need the 10×50’s extra low-light capability, the 8×30 M/M is the smart choice.
When we first saw this product in 2010 at Cabela’s we thought: “Great idea… it’s amazing nobody else has offered a covered loading tray before”. Being able to cover your loading tray makes sense. With the cover in place, you can’t inadvertently drop something into the tray, or knock over cases filled with powder. Plus the covered cased eliminates the risk of contaminating cases with overspray from lubes or solvents. You can also keep loaded rounds protected from the elements before they’re packed into ammo carriers.
Now Midsouth Shooters Supply offers covered loading trays for just $8.62 (that’s a lot less than Cabela’s price). You can purchase the 50-round loading tray from Cabelas.com for $14.99 (item IK-215760) with a green base, or get the same thing with a red base from Midsouth for $8.62 (item 038-502032). Order Midsouth’s 30-45 cal model (item 038-502032) for 6BR and .308-sized rims. For loading .223 rounds, get the 9mm-223 model (Midsouth item 038-502033).
Many styles of bipods were used by F-TR shooters at the F-Class U.S. Nationals and World Championships recently held in Raton, NM. Most featured angled arms — either left/right arms or parallel pairs of arms on either side. With such designs, vertical height is controlled by adjusting the angle of the arms (and hence the distance between the feet). Widen the track and the gun goes down; narrow the track and the gun goes up. One bipod design, Dan Pohlabel’s FLEX Bipod, was very different than the norm. On the FLEX, there are no angled arms — the main blade is a solid piece of metal. Each leg has independent control for height via adjustable “feet” on either ends of the main piece. A ratcheting locking lever controls the cant.
Click photo below for full-screen version
Monte Milanuk, who tested an early version of the FLEX Bipod, explains: “The FLEX bipod is a very simple design — no Mariner’s wheel for vertical adjustment, no joystick head, no changing width as it goes up and down. And the FLEX bipod is very light (as are most, these days), but also very durable. An added bonus is that it breaks down very flat for airline travel. Once I take the feet off, remove the ratchet lever (with screw), the whole bipod nestles very nicely in the bottom layer of foam in my gun case (with cuts for the head etc. in the foam). If someone bashes the case hard enough to damage what is essentially a plate of spring steel, then I’ve got bigger worries.”
Monte likes the FLEX Bipod, but notes that it works best if you lean into the gun when shooting: “Not everyone wants a bipod that slides around like a hog on ice. Some people manage to get things tracking straight back and forth, almost like it was constrained by a front rest. Personally, I have a hard time doing that in a repeatable fashion. While the FLEX Bipod shoots quite well with a [loose] hold, it was designed for those of us who like to ‘lean’ into the gun a bit. Quite literally, the idea is that you get the feet to dig in slightly, and push against the rifle butt with your shoulder and the bipod will ‘flex’ or bow forward slightly. It is one of those things that sounds wonky until you try it. It may take a few times to get a feel for it, but once you do, it is surprisingly repeatable.”
The FLEX bipod’s designer, Dan Pohlabel, offers these instructions:
The bipod feet are shipped loose. Note there is a left foot and a right foot. Determine the balance point of your rifle and mount the bipod approximately two inches forward of that point. You may want to move it further forward after shooting. Experiment with its placement to minimize movement of the bipod. When setting up, first grab each foot and ‘dig’ them in to the shooting surface, dirt, gravel, grass, carpet — it doesn’t matter. After making sure each foot has a hold, raise or lower the bipod to your target and use the cant adjustment to level your rifle. Loading the bipod with your shoulder is the preferred method of position. For more info, visit Kreativ-Solutions.com or email flex-bipods [at] kreativ-solutions.com .
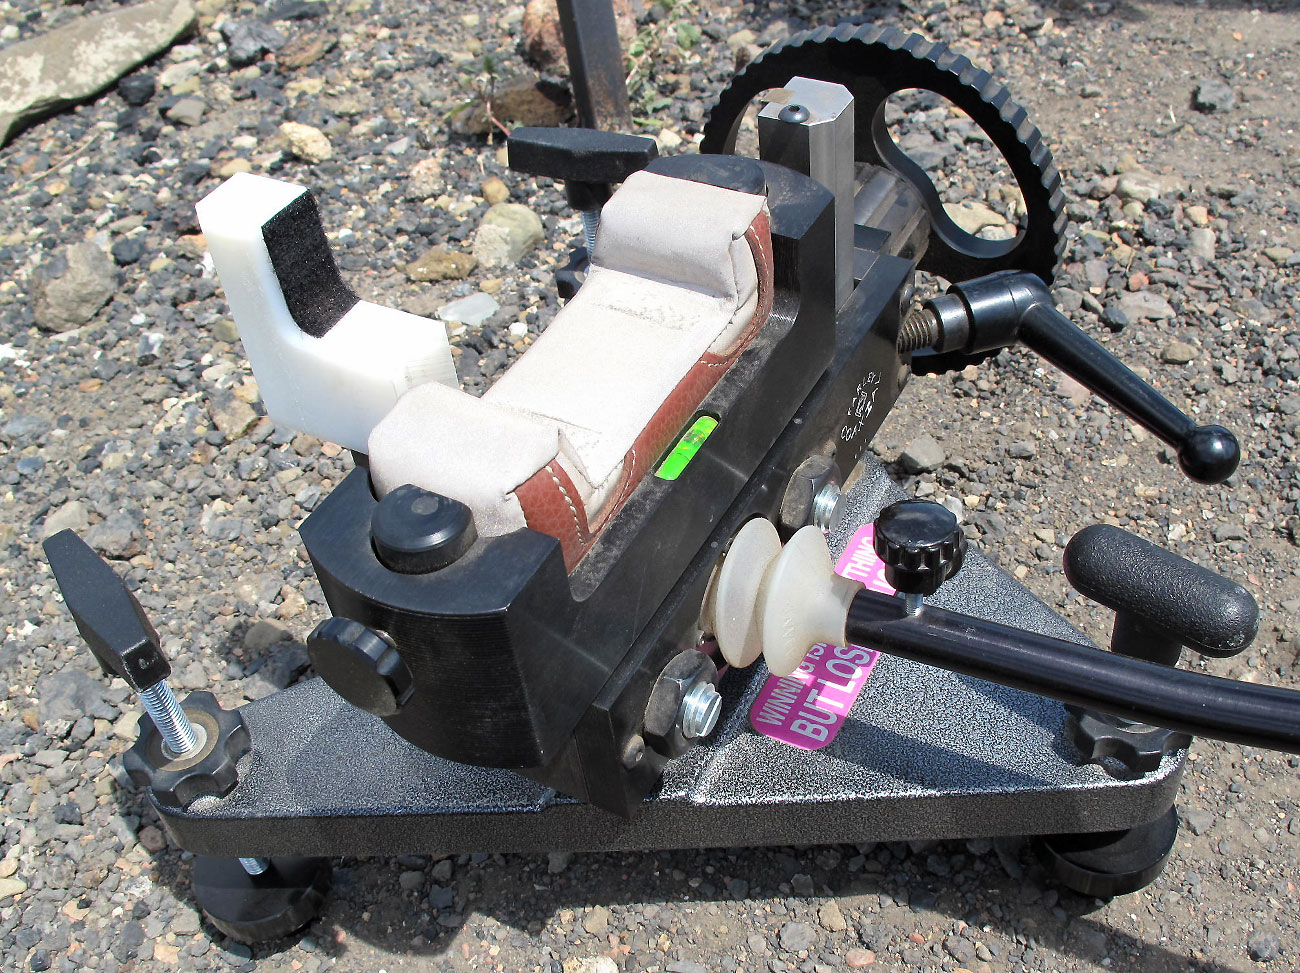
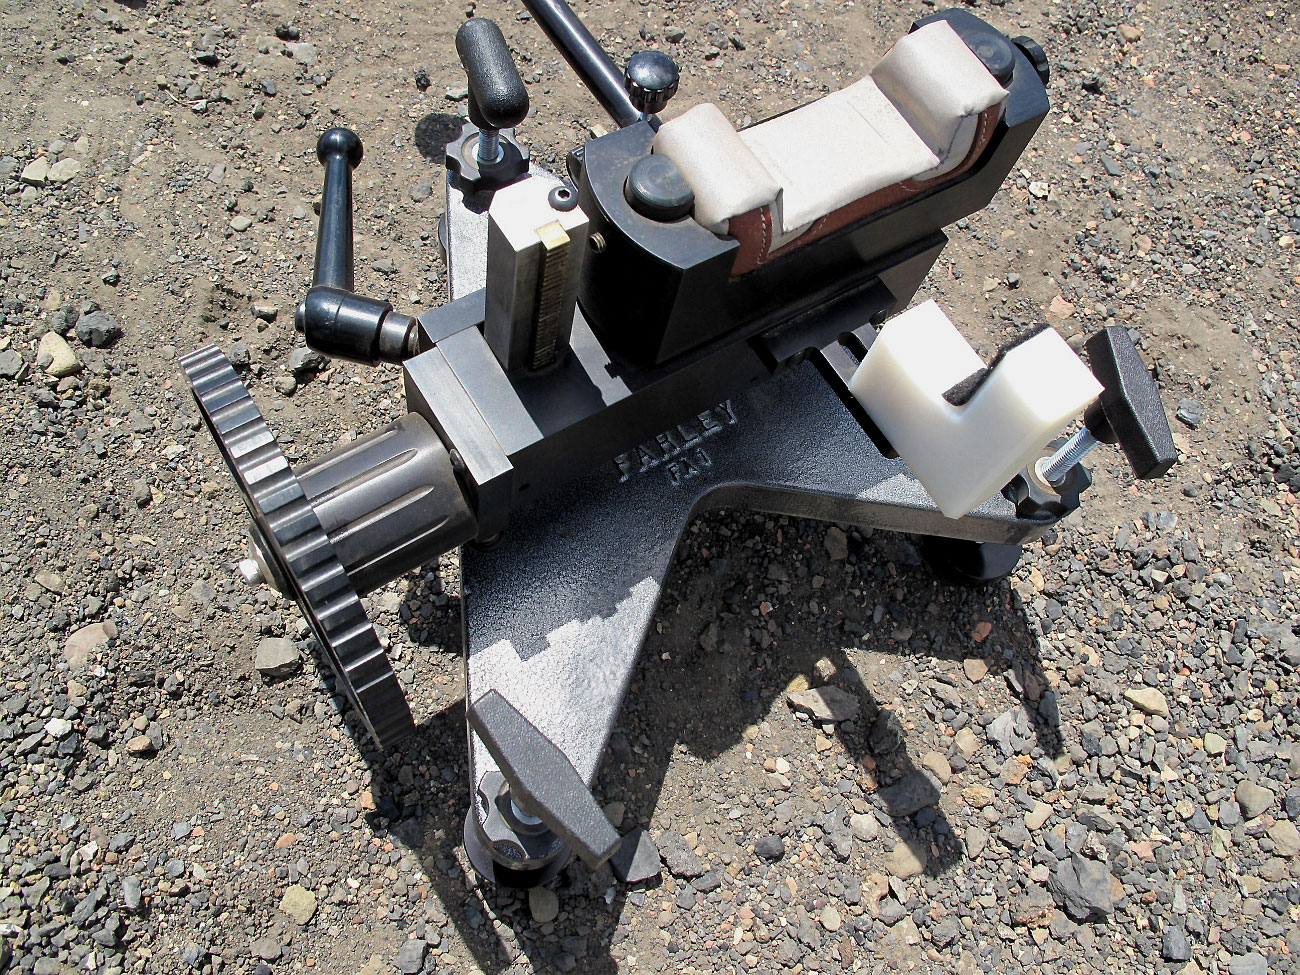
At the F-Class Nationals in Raton, we saw a wide variety of front rests being used by F-Open shooters. One that caught our eye was a new prototype Farley Coaxial rest brought to the match by our friend Speedy Gonzalez. This one-of-a-kind Farley features a big wheel on the side for gross elevation adjustment, plus an extended locking arm. These two upgrades make the rest easier to use from the prone position. Up front is a new L-shaped Delrin forearm stop (Speedy say this would be black in the production version). Special large-diameter feet with extended “anchor shafts” complete the package. (See bottom photo.) Speedy used this rest at the Nationals and did very well, finishing second in the Master division, and in the top 15 overall among all Open-class shooters.
CLICK Photos Below to See Full-Screen Version.
Speedy says the folks at Farley hope to market the Big Wheel Coaxial with these F-Class upgrades by the end of 2013. Some of the items should be available for purchase separately, as upgrades to current Farley rests. Sorry, no pricing is available at this time.
The rest also sported a new Edgewood front bag with the new light-colored, super-slick bag material. Along with the new bag fabric, Speedy explained that there are subtle changes to the bag design and construction so that it holds its shape better and doesn’t “plump up” in the middle.
Hunting season is here. That means many of you will be heading off into the woods. Along with your rifle and ammo, it’s wise to carry some basic survival gear on your hunt. The NRA has just introduced a cleverly-designed multi-function Survival Tube that fits in a pocket.
This new product combines a fire-starter with a knife sharpener. The NRA Survival Tube’s magnesium fire starter and steel striker can produce sparks in the wettest and windiest conditions. The easy-to-use, diamond-encrusted knife sharpener keeps hunting blades sharp. No one wants a dull knife on a hunting or camping trip. The Survival Tube is wrapped with six feet of 550 paracord, and the lanyard gives you another 31 inches of paracord. The NRA Survival Tube stows easily, or it can be hooked to a backpack loop. Price for this useful product is $19.95 at the NRA Store. That’s not bad, but remember that a $0.99 disposable lighter will start fires just fine in most conditions.


 Generally you want the biggest, heaviest gunsafe you can afford. However, for many gun owners, a 1000+ pound behemoth is impractical. For those who relocate frequently for their jobs, or who live up many flights of stairs, it is more practical to have a safe that breaks down into separate pieces for storage. In our Guide to Gunsafes, we reviewed the Zanotti Safe, a quality modular safe that breaks down into smaller, lighter components. Now there is a new type of modular safe that is more affordable than the Zanotti. Snapsafe’s Titan safe ships in three (3) flat boxes. Simply unpack the components and assemble the 330-lb. Titan on-site in about 30 minutes without tools.
 Forum member RidgeRunner has devised a clever shooting support for field use. He calls it the “Pogo Stick”. It’s simply welded stainless rod with a two-pronged base, and a ‘U’-shaped cradle that adjusts for height along a vertical shaft. RidgeRunner tells us: “It is very solid and made from stainless steel so it won’t rust under sweaty hands. The rifle hook, or support, slides up and down the main stem and secures with the knob. It has two prongs you tramp into the ground and is VERY stable. It is shiny, but I have been using this one since about 1983, and I can’t say I have noticed it spooking any whistlers. Before I had an actual bench to shoot off of, I used it to sight-in rifles. I would lay down and use a sand bag under the butt stock. Worked just fine.”
 There are compact, standard, and large size Vektor muzzle brakes. Adjustment and installation is the same for all three sizes. The small, compact model, with two rows of opposed horizontal ports, is designed for .223-caliber rifles. The medium (standard) size, with either double or triple sets of opposed ports, is suited for 6.5mm or .308 calibers. The largest size, with three rows of large ports, is configured for the .338 magnum calibers. Skorpen claims that all three sizes of Vektor brakes can reduce felt recoil by 70% to 80% The brake itself is SIS1914-04 steel with an oiled zinc phosphate finish. The internal socket is
 This rugged, machined-aluminum bipod mount lets you swing your aim point from side to side without having to reposition the bipod. The rubber-padded Upriser Arms Bipod Mount accepts any bipod that attaches to a forward sling swivel stud. There is also a version that fits on tactical rails.


 A while back your Editor was in New Mexico, on a prairie dog expedition. While in the field, my companions and I used two pairs of


 Steiner 8×30 Military/Marine Binocs are Just $227.98

 Many styles of bipods were used by F-TR shooters at the F-Class U.S. Nationals and World Championships recently held in Raton, NM. Most featured angled arms — either left/right arms or parallel pairs of arms on either side. With such designs, vertical height is controlled by adjusting the angle of the arms (and hence the distance between the feet). Widen the track and the gun goes down; narrow the track and the gun goes up. One bipod design, Dan Pohlabel’s


 At the F-Class Nationals in Raton, we saw a wide variety of front rests being used by F-Open shooters. One that caught our eye was a new prototype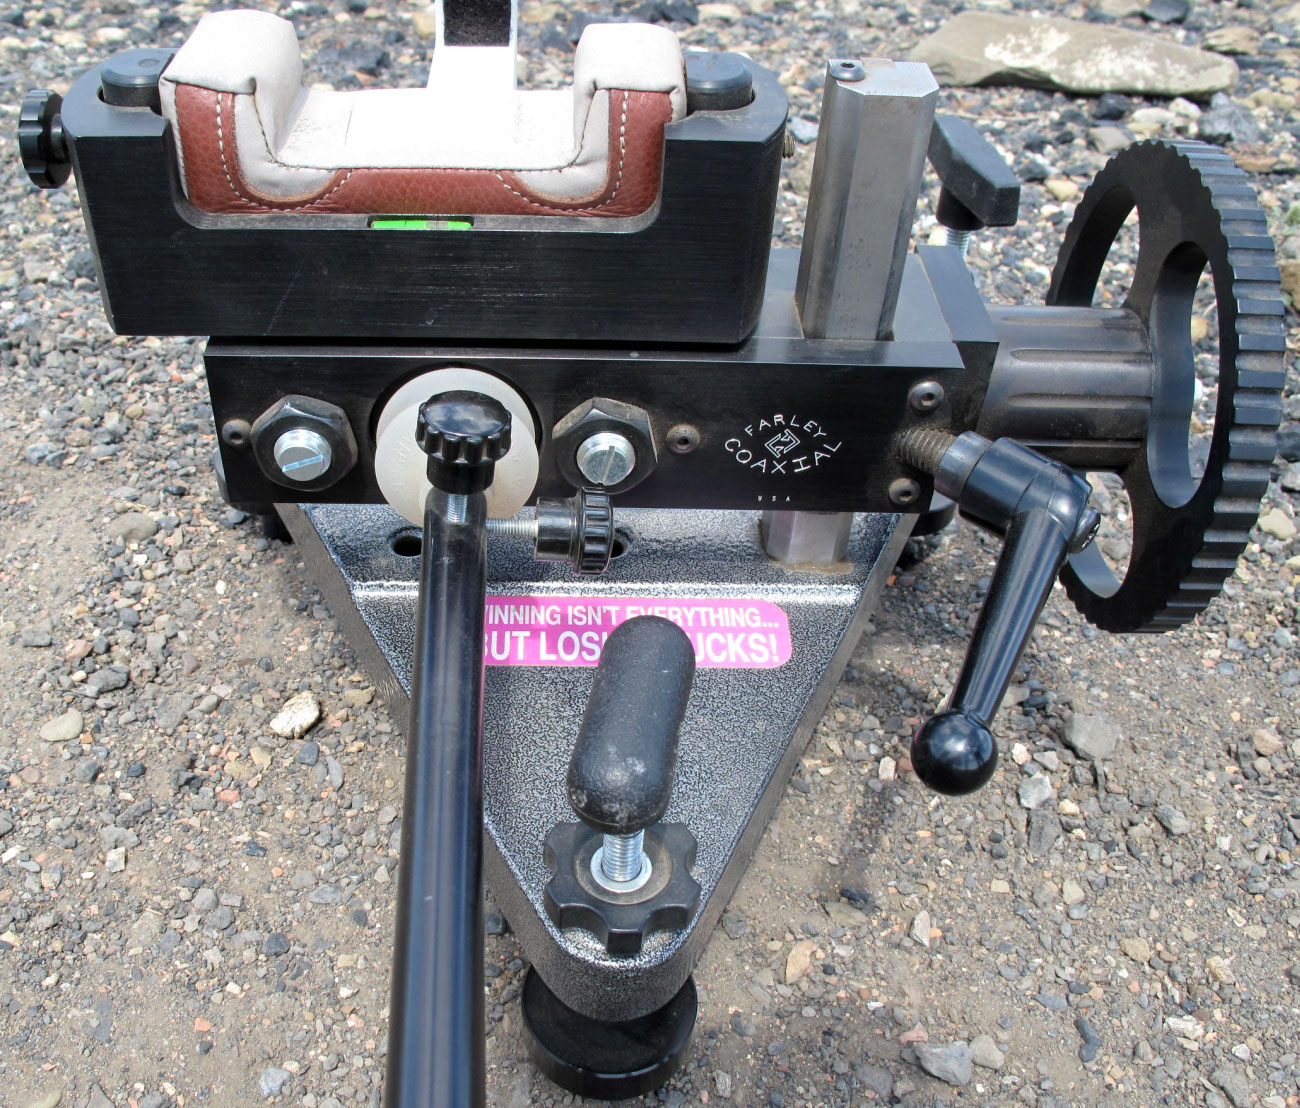

 Hunting season is here. That means many of you will be heading off into the woods. Along with your rifle and ammo, it’s wise to carry some basic survival gear on your hunt. The NRA has just introduced a cleverly-designed multi-function


