Father’s Day is Sunday, June 15, 2025, so now’s the time to get a great gift for the “Old Man”. If your father enjoys the shooting sports and hunting, here are some recommended items. These will all benefit “Pops” when he goes to the range or works with his guns at home. All selections cost less than $100.00. For the items sold by Amazon, If you have Amazon Prime, you can get free shipping in most areas of the country.
Ten Great Father’s Day Gifts for Dad Under $100.00
Protect Dad’s hearing — Howard Leight Impact Sport Electronic Muffs provide NRR 22 dB sound protection with the ability to still hear conversations and range commands. These muffs offer Headphone Functionality via external audio jack, so Dad can listen to music. These Impact Sport Muffs are currently $69.99 at MidwayUSA which also has free shipping for combined orders over $99.
We recommend using muffs over plugs for maximum hearing protection.
Teslong Digital Borescopes are “game-changers”, hugely popular with our Forum members. These Teslong borescopes display clear, sharp digital images on your mobile device. Shown here is the latest rigid version.
The versatile MTM Ultimate Range Box includes cradles so you can do gun maintenance while at the range. A lift-out tray holds small items such as patches and jags. This is a durable product that can hold ammo and other gear. It is now on sale for $57.24 on Amazon.
Here’s a good primary or secondary press for Dad. We’ve used this Lee Breech Lock Challenger press for many functions. It is sturdy and has a convenient primer ejection tube. This is just $83.99 at Midsouth, including a full 3-die set, plus Breech Lock quick change bushing. This is a great gift for a Dad who reloads — user reviews have been 97% Five-Star. Chose one of 5 die sets: 9mm Luger, .38 SPL/.357 Mag, .44 SPL/.44 Mag, .45 ACP, or .223 Rem.
This Columbia Bahama II guide shirt is durable and comfortable. More importantly it provides UPF 30 protection from the sun’s damaging rays. The added cape over the shoulder area provides extra protection. Made from breathable nylon, this guide shirt is offered in over 70 colors. This is popular for fishing, sailing, hiking and other outdoors sports. A huge variety of colors and sizes are offered on Amazon starting at $28.80, with most versions under $45.00. There are also older model Bahama II Shirts with yet more color choices.
This modern Billconch Biometric Safe will hold two handguns. Equipped with a high-rez fingerprint scanner, the safe can be opened instantly with the gun owner’s finger. There is also a digital keypad for opening plus a key lock.
This the #1-Selling compact biometric gun safe on Amazon and costs just $69.98. User reviews are very positive. This safe features a rechargeable battery that can be charged with a USB cable. This safe is small enough to be placed inside a drawer for extra security.
The latest 2020 Edition of The Wind Book, is the best wind resource in print for competitive shooters. The Wind Book analyzes key aspects of wind reading — vectors, cycles, vertical elements, and mirage. This excellent resource is now $22.99 on Amazon for hardcover, and $14.99 on Amazon for Kindle version.
The Tipton Best Gun Vise is a popular design that works with a huge selection of rifles and shotgun. The rear section has two adjustable clamps for a secure grip on the buttstock. The front can fit a variety of forearms and adjusts for height. There is also a movable center support. The solvent-resistant frame contains storage spaces for jags, brushes and tools. Wheeler center supports for ARs will also fit the center rail on the Tipton Best Gun Vise. This impressive product is on sale now for $87.99 at MidwayUSA, a 27% discount.
Walkie-Talkies are “must-have” items for long-range shooting. The MOICO 22-CH Long-Range Walkie-Talkie Set is an Amazon Favorite in FRS Handheld Radios. These MOICO units offer VOX hands-free functionality plus a handy built-in LED flashlight.
This MOICO 2-Radio set is now just $19.94 on Amazon with orange or black top section. Models with other colors (Day-glo Green, Silver, Blue) are $20.99 or $25.99.
This cleverly-designed Shotshell thermos will make Dad smile. Styled just like a 12ga shotgun shell, the Stansport Thermo Bottle holds 25 oz. of hot or cold liquids.
Current Amazon prices are $27.10 for green, $32.99 for red, and $34.99 for black.
The model 1911 pistol, designed by John Moses Browning, is an American classic. Originally manufactured as .45 ACP military pistols, modern 1911s have evolved to be superb competition pistols, and carry pistols. With a Single-Action-Only (SAO) configuration, the 1911 design is different than most modern pistols. You must have the hammer cocked to fire a 1911 — like a single-action revolver. But the positive side of the Single-Action design is than modern 1911 pistols enjoy superb triggers with very positive release and fast reset. There is a reason the 1911 design is the basis for so many modern competition pistols.
In today’s Saturday at the Movies feature, we showcase videos that cover the history, design, and function of 1911-type pistols. We also include videos that explain how to field-strip a 1911 and how to accessorize/upgrade 1911 pistols.
Operation of 1911 Pistol with 3D Animations
Here are two excellent videos that show how a classic 1911-type pistol functions. 3D computer graphics animation offers a X-Ray view inside the pistol, showing how cartridges feed and how the slide cycles during the firing process.
How to Field-Strip and Re-Assemble a 1911 Pistol
There are a few tricks to field-stripping a 1911-type pistols, and it helps to have a couple specialized tools. This helpful TFB-TV (The Firearm Blog) video shows the process of disassembling a 1911 pistol from start to finish, and notes components that require lubrication or special attention.
History of the Classic Model 1911 Pistol
The model of 1911 pistol is an American classic with a long and illustrious history. These two videos cover the interesting origins of the 1911 pistol, and explain how J.M. Browning designed the remarkable 1911 pistol which became the iconic American sidearm of the U.S. Military, the longest-serving pistol in American military history.
A fascinating article by Rock Island Armory covers the complete evolution of the 1911 pistol, including its earlier prototype variants, starting with the model of 1905. SEE: Road to the 1911 Article (with Model 1905, 1907, 1909, and 1910 prototypes).
Over time the 1911 design has evolved into many variants, including the modern “race gun” used in rapid-fire pistol competitions. Here is an STI DVC Open model fitted with a C-More sight, and front compensator.
Pistol Shooting Skills Demonstrated with 1911
How to Grip a 1911 Handgun Properly
World Champion pistol ace (and 18-time Bianchi Cup winner) Doug Koenig demonstrates how to grip a handgun. While the fundamentals are demonstrated on a 1911 pistol they are effective for establishing a proper grip on any handgun.
Trigger Press and Trigger Control
In this video Champion shooter Doug Koenig talks about key techniques that apply to all pistol marksmanship — not just speed shooting “on the clock”. With any handgun, Doug explains, you should focus on consistent trigger control. You want to avoid yanking the trigger or anticipating recoil.
How to Accessorize Your 1911
The Brownells YouTube Channel has a series of videos showing how to accessorize a 1911. The videos show procedures for upgrading the magazine release, slide release, hammer, guide rod, mainspring housing, and grips. There are also good videos on barrel replacement and drop-in trigger group installation. If you want to upgrade your 1911, these videos are worth watching. Below are links to three of these 1911 videos.
Here’s a cool tool for your hand-loaders, particularly if you load large quantities of bulk ammo for a variety of firearms. Lyman’s handy Ammo Checkers check the diameters of reloaded rounds and factory ammo, so you can quickly confirm that your ammo fits a standard chamber. Just drop your loaded rounds in the Ammo Checker, and if the round fits into the gauge, it will fit in the gun’s chamber.
Lyman Ammo Checkers are multi-caliber — each orange block checks six or eight different cartridge types, with each caliber/cartridge name engraved on the gauge. Ammo Checkers are machined to SAAMI minimum chamber dimensions from solid blocks of 6061 T6 aluminum. Ammo Checkers are available in three versions covering most common handgun and rifle calibers:
Handgun Ammo Checker (#7833000) $32.99 on Amazon
Fits: 380 Auto, 9mm Luger, 38 Super, 40 S&W, 45 ACP, 38/357, 44 Spl/Mag, and 45 Colt
Why Use a Case Gauge?
We find that case gauges like the Lyman Ammo Checker are particularly useful for handgun reloaders using progressive presses. The chambers of many popular semi-auto pistols are partly unsupported. This allows the case to swell in the bottom quarter. The case may not be sized adequately by your sizing die, which can lead to misfeeds or malfunctions.
Additionally, if you have loaded a large quantity of ammo for a semi-auto rifle such as an AR15, it’s not a bad idea to check your cartridges before you load them into your magazines. All you need is one mis-sized round to cause a stoppage. That will ruin your day if you are competing in a Service Rifle match or 3-Gun event.
Next week a major Airgun event kicks off in Springville, Utah — the Rocky Mountain Airgun Challenge (RMAC). Running June 18-22, 2025, this is a fun and challenging, multi-class tactical-style airgun competition. The RMAC event, hosted by Utah Airguns, is one of the largest outdoor air rifle matches in the country. It combines the low-cost of air rifle shooting with the fun of PRS/NRL-type multi-stage shooting.
RMAC 2025 features 100-yard benchrest, precision-rifle courses, and speed silhouette competitions—all designed to test both shooter skill and equipment durability. Competitors will engage in steel-plate challenges, long-range accuracy tests, and time-trials, pushing rifles and shooters to their limits. RMAC 2025 will be held at the Garth Killpack Shooting Range in Springville, Utah.
The Rocky Mountain Airgun Challenge
Last year’s 2024 Rocky Mountain Airgun Challenge in Utah attracted top shooters with over $100,000 worth of prizes. The stages look like what you’d see at PRS/NRL events, but the targets are smaller, the range is shorter, and the power behind each shot is air. Practical Air-Gun competition has a well-established community that spans the globe, and recently competitors from other shooting disciplines, the powder burners, beginning to take notice. Air-Gun practical competition is fun and inexpensive — you are paying pennies a round vs. a $1.30 or more per round for premium centerfire ammo. The Rocky Mountain Airgun Challenge is leading the way in this interesting air-powered shooting discipline. This multi-day event featured a variety of events on multiple stages.
Modern Tactical-Style Air Rifles
Here are two state-of-the-art tactical air rifles, the BinTac MCAR ($2790.00 from Airgun Tactical) and the FX IMPACT M4 ($2099.99 from Utah Airguns). The BinTac MCAR almost looks like a centerfire rifle at first glance but the air chambers on the buttstock tell the real story.
The 18-lb BinTac M4 features a 38″ barrel which can be easily swapped out to shoot multiple calibers including .457, .50, .51, and .58. There is also a 14-lb hunting version with a 30″ barrel. Max fill pressure is 4500 psi, but there is a 7000-psi upgrade with regulator available.
First introduced in 2015, the original FX IMPACT air rifle represented a major upgrade in field air rifles. The modern IMPACT M4 version offers enhanced performance with a variety of barrel and chassis options.
At the request of our readers, we provide select “Deals of the Week”. Every Sunday afternoon or Monday morning we offer our Best Bargain selections. Here are some of the best deals on firearms, hardware, reloading components, optics, and shooting accessories. Be aware that sale prices are subject to change, and once clearance inventory is sold, it’s gone for good. You snooze you lose.
NOTE: All listed products are for sale to persons 18 years of age or older. No products are intended for use by minors.
1. Natchez — Weaver Optics Sale
⏺️ » Major savings on Weaver scopes, spotting scopes, binocs and more
Are you putting together a new build and need optics that won’t break the bank? Then check out the Weaver Optics Sale at Natchez. You’ll find competition scopes, hunting scopes, red dots, and binoculars at prices up to 60% off. A 3-9x40mm hunting scope is now just $89.99, and a 6-24x50mm SFP Weaver Classic scope is just $199.99. If you need a new optic, you can save big bucks this week at Natchez.
2. Midsouth — Federal Gold Medal Primers on Sale
⏺️ » Great prices on top-quality primers including 205M.
For quite some time, top-quality American-made primers have been in short supply, or have been extremely expensive. Take heart, you can get great primers at good prices with Midsouth’s Federal Gold Medal Match Primer Sale. Offering optimum ignition and great consistency, Federal Premium Gold Medal primers are the choice of match shooters everywhere. These are some of the best primers on the market at prices lower than we’ve seen in years.
3. Creedmoor Sports — TriggerTech Trigger Sale
⏺️ » Good prices on triggers for bolt-actions and ARs.
If you need to replace a factory trigger in your AR or Rem 700 action-type rifles, TriggerTech Triggers are tough to beat for the price. With a very crisp break and adjustable pull weight, these easy-to-install triggers are an affordable upgrade that can improve your on-target results.
4. Graf & Sons — Shooter’s World Powders In Stock, Good Value
⏺️ » Positive field reports on these powders — good value, good ES/SD
If you need very good propellants at reasonable prices consider Shooters World Powders. Customers report these powders rival top Hodgdon and Alliant brands delivering good accuracy, temp stability, and low ES/SD. With its wide range of powders, Shooters World offers good choices for most popular cartridge types — small to magnum. Best of all, these Shooters World Powders are IN STOCK now at great prices.
5. Palmetto State Armory — Walther PPQ .22 LR, $269.99
⏺️ » Affordable .22 LR pistol with good trigger, great ergonomics.
When developing handgun skills, we recommend starting with a .22 LR pistol. The mild recoil helps with follow-up shots, and ammo is inexpensive. It’s also fun to shoot a .22 LR at reactive targets. If you’re shopping for a rimfire pistol, check out the Walther PPQ .22 LR 4″ PISTOL on sale now for just $269.99. The PPQ .22 delivers advanced design and ergonomics with the cost savings of .22 rimfire. The sculpted grip is comfortable and the trigger is very good — crisp and reasonably light.
6. Amazon — RCBS Auto Priming Tool, $129.99
⏺️ » Excellent benchmounted tool with primer dispensing tube
Are your hands tired of hand priming and you’d like an alternative? Consider the RCBS Automatic Priming Tool. This bench-mounted Automatic Priming Tool is fast, accurate and highly sensitive due to its single-stage lever system. Primers feed through the auto primer feed tube one by one, preventing potential contamination by oily fingers. Two primer rod assemblies and two primer feed tubes are included.
7. Amazon — Caldwell Wind Wizard II, $35.99
⏺️ » Good, reliable and affordable wind gauge
To calculate precision ballistics you need the current wind speed and ambient temperature. The Caldwell Wind Wizard II can provide that key information (wind speed and temp) at a very modest $35.99 price. The Caldwell Wind Wizard II Wind Meter may well be the best value wind meter on the market. It reads wind speed quickly and accurately, with various unit options (e.g. Mph, km/hr). A easy-to-grip rubber sleeve helps protect the unit and ensure a firm grip.
8. Amazon — Lyman Case Prep Tool, $26.99
⏺️ » Handy double-ended tool with internal parts storage
Do you need a simple but effective tool to help with case prep? We like the Lyman Case Prep Multi-Tool which has essential case prep accessories in one compact, double-ended tool. This handy tool can perform key case prep tasks (e.g. neck chamfering/deburring) on rifle and pistol brass from .17-.45 caliber. Both handle ends of the handle are threaded so two tool heads can be used simultaneously. In addition the Case Prep multi-Tool can be used with any other standard case prep tools and brushes.
9. Amazon — Rifle Storage Rods, Assorted Packages
⏺️ » Handy rods help organize in-safe storage
Need to fit more long guns in your safe? Want them to be secure and not lean on each other? Gun Storage Solutions Rifle Rodscan help you store more long guns more securely. A 5-rod set is just $21.95 (orange) and $20.70 (black). There are also rod sets with 10, 20, 30, or 40 rods. These Rifle Rods utilize a hook & loop (Velcro-type) system to stabilize long guns in the upright position. These rod sets work great with a variety of gun safes and come complete with the nylon loop fabric placed on the underside of shelves.
As an Amazon affiliate, this site can earn revenues through sales commissions.
Shooting steel targets is fun. You get “instant gratification” when a a hit produces a “clang” and visible target movement. Birchwood Casey has introduced an expanded lineup of Rimfire and Centerfire steel targets with interesting new target shapes, including a large male elk, howling wolf, and a walking “Bigfoot”. There are centerfire targets with 3/8″ AR500 steel and thinner steel targets for rimfire guns and air rifles. Targets that can hang from racks and supports are offered in one-hole and three-hole versions. One-hole targets are available in these styles: turkey, Texas map, alien, boar’s head, rabbit, raccoon, crow, gopher, armadillo, skull, yeti, milk jug, and howling coyote. The heavier three-hole targets are available in the shapes of deer, elk, bison, bear, ram, boar, bobcat, and coyote.
Along with many animal profile targets, Birchwood cases offers multiple geometric targets — circles (gongs), squares, torso profiles, and various IPSC and other offical steel match targets. The heaviest steel targets can handle bullet types with up to 3000 ft/lbs of energy.
Rimfire and Centerfire Steel Target Products
Listed below are the steel targets currently offered by Birchwood Casey. Available in a wide array of rimfire and centerfire options, these target boas smooth, burr-free gongs, and silhouette-shaped targets, and bright white powder-coated finishes for improved visibility in any conditions.
1/4″ AR500 Rimfire Target Kit ideal for use with airguns and rimfire firearms, handles up to 400 FPE.
3/8″ AR500 Centerfire Gong Target Kit (6″ and 8″, 8″ and 10″) with two steel gongs that withstand bullets with up to 3000 foot-pounds of energy.
3/8″ AR500 Centerfire Silhouette Steel Target Kit with one-hole targets available in shapes of turkey, Texas, alien, boar’s head, rabbit, raccoon, crow, gopher, armadillo, skull, yeti, milk jug and howling coyote, and three-hole targets available in shapes of deer, elk, bison, bear, ram, boar, bobcat, coyote.
3/8″ AR500 Round Gong Centerfire Steel Targets available in 4″, 6″, 8″, 10″, 12″ and 15″, each with multiple mounting options and capable of handling bullets with up to 3000 foot-pounds of energy.
3/8″ AR500 Square Gong Centerfire Steel Targets available in 4″, 6″, 8″ and 10″, each with multiple mounting options and capable of handling bullets with up to 3000 foot-pounds of energy.
3/8″ AR500 Silhouette Centerfire Steel Targets (official competition targets used by the Int’l Practical Shooting Confederation, or IPSC), which come in full size, 66%, 33% options, have multiple mounting options and handle bullets with up to 3000 foot-pounds of energy.
For more information about Birchwood Casey’s new steel rimfire and centerfire target offerings visit BirchwoodCasey.com/new.
Today’s featured rifle comes from the land Down Under — Australia. This impressive .300 WSM F-Open rig has top-tier components/accessories from multiple countries. From the USA comes the Borden BRMXD action, Krieger barrel, McMillan Kestros ZR stock, and R.A.D. 2 recoil system. The 10-60x56mm March scope comes from Japan. The Lenzi rear bag is from Italy, and the SEB front rest is from Indonesia, with a Rodzilla top from America. This rifle proved very accurate from the get-go, winning its first match, emerging with the top 600m Aggregate. This .300 WSM F-Open beast is definitely a winner.
Impressive .300 WSM F-Open Rifle from Australia
This rifle belongs to Kris Wilson, aka “Willow” on our AccurateShooter Forum. Just last week Kris posted in the Pride and Joy Rifle thread: “Got my latest build up and running — a .300 WSM F-Open rifle. Never shot a .300 WSM (Winchester Short Magnum) before today and I have to say that, while the recoil is on the sharp side, it’s entirely manageable thanks to the stock design and front rest.” Kris resides in Sydney, New South Wales, Australia and shoots at the Hornsby RSL Rifle Club. He has been his club’s F-Open Champion, even with some very tough competition — his club boasts two Australian F-Open championship-winning club members. Kris loves the F-Class game: “I started rifle shooting in 2015 when I was introduced to the world of F-class through shopping for a riflescope. Once I saw what F-class was all about, I was hooked.”
Kris produced this video on December 5, 2020. He reports: “Here is my first real outing with my new .300 WSM. I had previously sighted in at 50 meters at an indoor range to establish a wind zero. Had a rough idea of velocity so I threw together two loads to run at 600 meters. Our Aussie targets have a max numerical ring value of 6 (equivalent to “10” on USA targets). On Stage One I shot a 60.8X (60.10X max possible), grouping about 3.7 inches. On Stage Two, shown in this video, I shot a a 66.9X (66.11X max possible) with a 3-inch grouping. I took first place in both stages and won the overall Aggregate for the day. That earned me a Christmas ham and turkey for my trouble!”
.300 WSM Rifle Hardware, Cartridge Choice, and Reloading
Report by Kris Wilson, NSW, Australia
Stock: McMillan Kestros ZR with R.A.D. 2 system. 70% black, 15% grey, 15% red.
Action: Borden Rimrock BRMXD, left bolt, right port, left eject. The action is fully DLC coated and fitted with a +20 MOA rail
Trigger: TriggerTech Diamond
Barrel: Krieger 1:10″-twist, 4 groove finished at 31″ and fitted with an Ezell tuner.
Scope: March High Master 10-60x56mm with MTR-1 reticle, illuminated
Rings: ARC M10 High Rings
Front Rest: SEB Mini Rest, with Rodzilla Rest Top system
Rest Feet: Bryan Blake (F-Class Products) adjustable stainless feet
Rear Support: Lenzi (Italy) LR Rear bag, with custom metal base plate
Cartridge Selection — Why the .300 WSM Was Chosen over a 7mm Cartridge
I set out with the goal of building my ultimate F-Open rifle. Now “ultimate” is of course subjective, but I did not want to leave any stone unturned when it came to building a .300 WSM. When researching the equipment for my new build I had a couple of ideas in mind. I was already shooting a 7mm, in the form of a 280AI which had served me well, but I already had plans to switch to a .284 Shehane with the introduction of Peterson .284 Win brass, coupled with the fact Norma stopped making 280AI brass (Note: Peterson now makes 280AI brass). While I was reasonably well-covered with my .284 Shehane, I wanted something with a bit more horsepower to hold up at long range in choppy conditions. A lot of the top guys here shoot 7mm SAUMs but I wasn’t keen on going down that path. Why? For every accurate SAUM I’ve seen, I’ve seen others struggle and given that the 7mm SAUM seems to be particularly hard on barrels, I wanted something that could match the 7mm SAUM ballistically, but have better barrel life.
After plenty of research on AccurateShooter.com, and speaking with some shooters, both locally and in the USA, I decided to give the .300 WSM a go. This cartridge is not particularly popular in Australia for F-Open, primarily because most states enforce muzzle energy restrictions, so pushing the .300 WSM to its potential simply isn’t viable for many shooters here. It IS viable in my home state however, along with the ACT, so I can at least use it in major competitions in two Australian states without having to run at lower nodes where it would otherwise be trumped by the 7 SAUM shooters. I was also attracted to the cartridge through its general design, having a 35-degree shoulder angle similar to the inherently accurate .284 Winchester. I also think the .300 WSM resembles a super-sized Dasher, another devastatingly accurate cartridge. Most .300 WSM shooters report ease of tuning, another key factor I considered.
Choice of Stock, Action, and Barrel
My gunsmith, Matt Paroz (aka MattP on the AccurateShooter Forum) is one of Australia’s top gunsmiths as well as one of Australia’s top F-Open shooters. He knows what it takes to build match-winning rifles. Matt is also an agent for McMillan stocks and I was sold on the Kestros ZR after seeing how it well it tracked — the lower center of gravity it offers cannot be underestimated once you start stepping up in caliber size. I had previously seen a couple of rifles that Matt built for an Australian F-Open team member and I was blown away not only by the quality of the builds, but how well the components worked with one another. I already own a Barnard action, a match-winning action in its own right, but I was desperate to get my hands on a Borden. I liked the fact that Jim Borden times his actions as they leave his factory, so I ordered a BRMXD, left bolt, right port, left eject. I ordered my BRMXD fully DLC-coated, for both longevity and aesthetics.
I opted for a TriggerTech Diamond trigger which has been timed to the action and offers a level of crispness the factory Barnard trigger cannot replicate. The synergy between action and trigger is just superb. I managed to get my hands on a 10-twist, 4-groove Krieger barrel that looks like a winner so far. Finished at 31″, this barrel has been super-easy to tune so far, with Berger 215gr hybrids showing very good promise. NOTE — Overall the rifle comes in 500 grams (1.1 lbs.) below F-Open max weight, so the next barrel will probably finish at 32″.
The barrel sports an Ezell tuner. I don’t touch the tuner until I’ve sorted my load and bullet seating depth. The tuner just affords me that extra flexibility in tightening up an already good grouping. At the end of the day, like any competitive shooter, I’m chasing tight vertical and horizontal, something which will run inside 1 MOA at 1000 yards. If I drop a shot, I want it to be my fault, not the rifle’s.
About my optics choice — when the chance to own a March High Master came up, I didn’t think twice. I have used March previously and got a sneak peek through an original High Master prototype which was doing the rounds in Australia. With superb image quality, it left a lasting impression. March has built up an excellent following and reputation in Australia, and so far I have to say it was money well spent. The March is held in place with a set of beefy ARC M10 rings.
The rest of my F-Open setup includes a modified SEB Mini up front, with a Rodzilla Rest top and Bryan Blake adjustable feet. I chose the SEB Mini because it has a wide, stable footprint but relatively light weight. That makes the Mini easier to transport. At the rear I use an extremely well-crafted Lenzi LR bag which sits on a custom rear plate. This heavy combination keeps things nice and planted. That aids in straight tracking.
Reloading for the .300 WSM — Process and Die Choice
When it comes to reloading, I keep it simple and don’t over-think things. I use Norma .300 WSM brass. I ensure case mouths are always deburred on the inside and out but I do not neck turn. I am set up to turn necks with a 21st Century unit, but after neck turning previously for a 6mm SLR, I just didn’t see a noticeable benefit in doing so. I always full length re-size after firing and prefer bushings, generally opting for .002″ of neck tension on anything I shoot. So far it seems to be working. With my .300 WSM I run a Redding Type-S full-length bushing die with a .335 bushing. A loaded round comes in at 0.337″ across the neck and I opted for a no-neck turn reamer which comes in at 0.343″, so there’s plenty of clearance. I use a Forster micrometer seating die. I prefer the feel of the Forster and I use Redding dry lube media to assist in smooth bullet seating.
Reloading room with MEC single-stage press on left and AutoTrickler with Force Restoration Scale on right. Note there are plenty of bullets — Kris got his supplies before the shortage.
I use an AMP Annealer and anneal after every firing. Powder charges are measured and dropped with a V3 AutoTrickler and A&D FZ500i scale. The 215gr Berger Hybrid seemed like a pretty good place to start as far as bullet selection. I point them with a Whidden bullet pointing die. Powder options can sometimes be a contentious choice and if you’re lucky you’ll get a couple of powders which will work well in any given barrel. For my .300 WSM I use Alliant Reloder 23. It is very temp-stable. My primer of choice is S&B Standard Large Rifle Primers. How does it all come together? The first nine shots through the barrel while zeroing the scope resulted in an ES of 17 and SD of 6 — promising signs for a light initial load of 63 grains.
Kris has been impressed with his .300 WSM beast: “Suffice to say I was very pleased with how things turned out! Despite the bigger bang this rifle makes, the Kestros ZR and R.A.D. 2 system made it remarkably compliant. The recoil is sharp but the R.A.D. system just takes all the sting out of it — it reminded me of shooting my old 280AI in terms of felt recoil. I was able to get back on target with a minimum of fuss and didn’t find the rifle fatiguing at all, so it gets a massive thumbs up from me.”
CONCLUSION — The .300 WSM is Very Effective for F-Open
With recent trends in F-Open equipment, such as rifle stock technology making a lower center of gravity possible, bigger F-Open options such as the .300 WSM are now quite manageable. That’s not to say this caliber is a pussy cat — it definitely kicks more than the .284s out there. But with my choice of components, the recoil is manageable and the R.A.D. 2 system takes the sting out, so I’m not left nursing a sore shoulder at the end of a stage. The rifle is off to a very positive start so far but I know it’s capable of more. The lead up to Christmas will keep me busy fine-tuning a load in time for the NSW State Title match to be held in late January 2021. With COVID-19 halting most competitive shooting in Australia in 2020, this 2021 NSW competition is sure to prove popular. I intend to have my .300 WSM rifle humming in time for it.
Kris Wilson (NSW, Australia) Talks About Competitive Shooting
When I was introduced to F-Class shooting, I was fascinated with the level of accuracy shooters were obtaining with their rifles and it was something that just drew me in. Since then it has been a gradual learning curve, not to mention the fact everyone I have met has been super friendly and willing to share their knowledge. The shooting fraternity is a great community to be part of…. Mixing it with Australia’s best is what drives me right now.
I’ve been working hard to maintain my skills and the new rifle is motivation. As reloading equipment and rifle components continue to improve, it’s a great sport which encourages learning and provides many opportunities to keep improving your shooting.
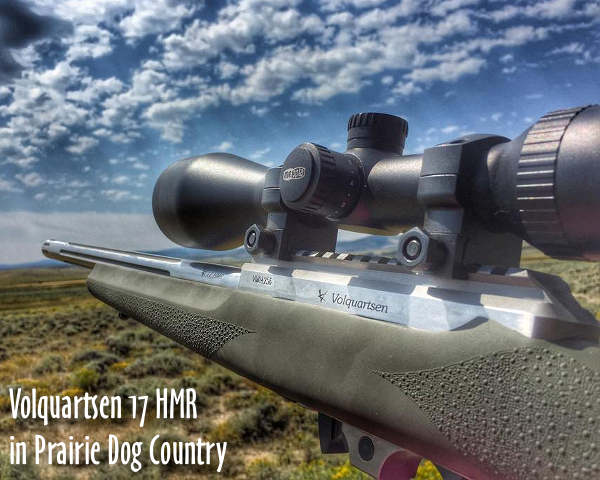
Planning a Prairie Dog hunting adventure this summer? Consider bringing a .17 HMR rimfire rifle. Of course, for long shots you’ll definitely want a centerfire. We like the 20 Practical in an AR and a 22 BR/BRA in a bolt-action. That will have you covered out to 700 yards. But for shorter shots on small critters — say inside 150 yards — it makes sense to have an accurate .17 HMR rimfire rig. Today’s 17 HMRs are capable of surprising accuracy, rivaling a good centerfire rig, but with less recoil and much lower cost per shot. And the .17 HMR offers more than double the velocity of a .22 LR — up to 2650 fps with a 17-grain bullet.
Top Shot former Champion Dustin Ellerman likes his Volquartsens, and we can see why. With one of his favorite .17 HMR rimfire varmint rigs, he’s seen some outstanding accuracy with CCI ammo. A few seasons back, on his Facebook page, Dustin reported: “Prepping for prairie dogs and I’m floored by this cold, sub-half-inch group shot with the Volquartsen Custom .17 HMR at 100 yards.” This thumbhole-stock rifle features a Bowers Group USS suppressor, and 3-12x56mm Meopta Scope. Dustin tried different types of CCI .17 HMR ammo. This small group was shot with CCI A17 ammo.
What’s the effective range of a .17 HMR on prairie dogs? You might be surprised. in 2015, Dustin took another Volquartsen .17 HMR on a Prairie Dog hunt in Wyoming. He was impressed with the rifle (shown below) and the little rimfire cartridge. Dustin says the effective range of the .17 HMR is farther than one might expect: “I made hits out to 300 yards. 200 yards was easy as long as the wind wasn’t too bad.”
Here’s the Volquartsen .17 HMR Dustin used in Wyoming in 2015:
After that 2015 P-Dog expedition, Dustin became a fan of the .17 HMR cartridge: “Never paid it much attention before now because the ammo is five times more expensive than .22 LR and I mostly target shoot. However, for prairie dogs, the .17 HMR is amazing!” Consider this — Hornady’s .17 HMR ammo pushes a 17gr V-Max bullet at 2550 fps, twice as fast as typical .22 LR rounds.
Prairie Dog Adventure with Savage A17
This video shows a successful Prairie Dog hunt. Watch and you’ll see hits out to 160 yards (00:50), proving the effective range of the .17 HMR cartridge. The host is shooting a Savage A17 semi-auto .17 HMR rifle in a Boyds laminated stock.
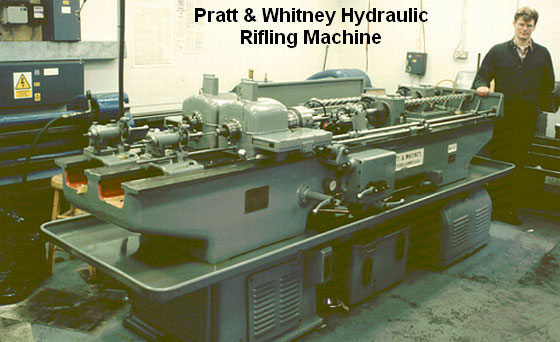
This video shows the process of cut-rifled barrel-making by Krieger Barrels, one of the world’s best barrel manufacturers. Krieger cut-rifled barrels have set numerous world records and are favored by many top shooters. The video show the huge, complex machines used — bore-drilling equipment and hydraulic riflers. You can also see how barrels are contoured, polished, and inspected.
For anyone interested in accurate rifles, this is absolutely a “must-watch” video. Watch blanks being cryogenically treated, then drilled and lathe-turned. Next comes the big stuff — the massive rifling machines that single-point-cut the rifling in a precise, time-consuming process. Following that you can see barrels being contoured, polished, and inspected (with air gauge and bore-scope). There is even a sequence showing chambers being cut.
Click Arrow to Watch Krieger Barrels Video:
Here is a time-line of the important barrel-making processes shown in the video. You may want to use the “Pause” button, or repeat some segments to get a better look at particular operations. The numbers on the left represent playback minutes and seconds.
Krieger Barrel-Making Processes Shown in Video:
00:24 – Cryogenic treatment of steel blanks
00:38 – Pre-contour Barrels on CNC lathe
01:14 – Drilling Barrels
01:28 – Finish Turning on CNC lathe
01:40 – Reaming
01:50 – Cut Rifling
02:12 – Hand Lapping
02:25 – Cut Rifling
“At the start of World War Two, Pratt & Whitney developed a new, ‘B’ series of hydraulically-powered rifling machines, which were in fact two machines on the same bed. They weighed in at three tons and required the concrete floors now generally seen in workshops by this time. Very few of these hydraulic machines subsequently became available on the surplus market and now it is these machines which are sought after and used by barrel makers like John Krieger and ‘Boots’ Obermeyer. In fact, there are probably less of the ‘B’ series hydraulic riflers around today than of the older ‘Sine Bar’ universal riflers.” — Geoffrey Kolbe, Border Barrels.
Brownells is a well-known retailer of guns, gun parts, tools, accessories, ammo, and pretty much everything gun-related. What you may not know is that Brownells has a very active video production department that releases new “how-to” and product information videos every week. These videos offer helpful advice on gun cleaning/maintenance, reloading, as well as selecting/assembling components for various kinds of rifles. And every week Brownells serves up a new products video. There now over 3000 videos on the Brownells YouTube Channel, which is truly a remarkable resource.
Here are seven of our favorite videos from Brownells. There’s a helpful guide to scope installation, a guide to using the OAL tool properly, and a good video on building a rifle with a Howa barreled action. There’s a helpful video on air travel with rifles, and all gun owners should watch the video on ammunition storage.
Scope-Mounting — Common Mistakes to Avoid
Always be careful when mounting a rifle scope. This isn’t a super-complex or highly technical task, but there are ways you can mess it up. This video explains common pitfalls to avoid when mounting a scope.
1. Make sure the rings don’t touch ANY part of the turret housing, objective bell, or eyepiece.
2. Be certain the scope rings are tightly clamped to the scope base. Grasp the scope with one hand and the rifle with the other, then ensure there is no play.
3. Make sure there’s clearance between the objective bell and the rifle. No part of the scope should touch the rifle itself.
4. NEVER over-tighten the scope rings. You can actually crush the scope tube and damage the optic beyond repair. Stick to the torque specs!
Affordable Precision Rifle Build with Howa 1500 Barreled Action
In this video, Caleb from Brownells walks through a step-by-step build of an affordable precision rifle using a Howa 1500 barreled action, MDT stock, and Vortex optic — putting together a highly capable long-range setup for under $1,200. The video covers key components and shows the assembly tools needed (4:38). The video explains how to build a reliable, accurate bolt gun on a budget, with honest insight into gear selection and assembly techniques. From the stock and trigger to rings, base, and scope setup, this video is a very helpful guide for anyone looking to build an affordable precision rifle. Installation of the Howa 1500 barreled action into the MDT stock is shown in detail at 6:00 minute mark.
How to Use Hornady OAL Tool and Hornady Bullet Comparator
Gun Tech Steve Ostrem explains how to properly use Hornady’s Overall Length Gauge to determine length-to-land precisely. The OAL Gauge uses a “Modified Case” that threads onto the tool and holds a bullet. Push on the back of the gauge until you feel the bullet just touch the rifling. (We do this gently at first, tapping the rod a couple time to ensure the bullet is aligned correctly). Once you’ve got the length, then use the tool with a comparator on your calipers to get the length-to-lands. NOTE: We recommend taking the measurement 3-4 times in a row to get a reliable number. With a little practice your should be able to get repeatable measurements within .0015″.
How to Store Ammunition Safely and Securely
This is one of the most popular Brownells videos — with over 2.5 million views. Here’s the deal — ammunition WILL keep for a long time if you store it properly. DO store ammunition in a cool, dry place that doesn’t have wide temperature swings. Temperature cycling will also degrade primers and powder. Put it in airtight ammo cans to keep out the moisture. Tupperware containers will work too. Brownells also recommends putting moisture-absorbing silica packs in your ammo containers. DON’T just keep ammo in factory cardboard factory boxes stacked in the basement, attic, or garage (especially on the floor). Factory ammo boxes can absorb moisture which can degrade primers and corrode the brass cases. Yes, sealed military ammo will usually handle this kind of storage for quite a while, but it’s still not wise.
Air Travel with Firearms — Key Regulations You Must Follow
You can travel on commercial airlines with firearms. But you must follow the TSA regulations, and your particular airline’s rules. First, make sure your guns are UNLOADED before your leave home. Guns need to be carried in proper hard-sided cases that cannot be pried open. Be prepared to unlock the case if the TSA wants to inspect what’s inside. TSA agents can cut the locks if they need to open the case but can’t locate you. If you use special TSA-approved locks, TSA agents have master keys that let them open the case without destroying your locks. You CAN transport up to 11 pounds of ammunition — with restrictions explained in the video.
Cleaning Advice for .22 LR Rimfire Rifles
Gun Techs Steve Ostrem and Caleb Savant debunk some myths about cleaning .22 LR barrels. One myth is that cleaning will harm the accuracy of a .22 LR barrel. Caleb thinks this myth is the result of people cleaning a barrel from the muzzle and damaging the muzzle crown, which CAN diminish accuracy. If it’s done right, cleaning won’t damage the bore. However, you certainly do NOT have to clean your 22 LR’s bore every time you go to the range. But DO clean the action every time you shoot the rifle, especially on a semi-auto. What about shooting a lot of lead bullets? Won’t that lead up the bore? The guys give us the straight skinny on lead fouling, too. When you see your .22 LR rifle’s groups opening up, you may want to consider cleaning.
Must-Have Spare Parts for AR-Platform Rifles
In this video, two knowledgeable gun techs answer the question: “What spare parts should I keep on hand for my AR-15?” On the list are: Gas Rings, Buffer Spring, Extractor Spring and Pin. NOTE: You may want to try the one-piece spiral gas ring rather than the standard rings which require alignment. The cotter pin and cam pin can also easily get lost when the Bolt Carrier Group is disassembled for cleaning. On the lower receiver you’ll want spare springs and detents for the pivot/takedown pins. If you’re using lighter-power springs, keep standard-power spares on hand. If your rifle stops working, swap in the factory-spec springs to find out if the problem is the gun or your ammo. Also, if you have upgraded your trigger, always keep the original trigger as a backup.
This article is Copyright 2023 AccurateShooter.com. Reproduction on any other website gives rise to monetary damages.