In this 54-minute video interview, Ken Clemens, co-owner of Brux Barrels, is interviewed by F-Class ace Erik Cortina for the Cortina Precision YouTube Channel. A lot of ground is covered, with many fascinating insights into barrel-making revealed. Watch and learn:
Interview with Ken Clemens, Co-owner of Brux Barrels
If you are involved in competitive shooting, and especially if you compete in F-Class or long-range benchrest, we recommend you take the time to watch this interview, perhaps in a couple of sessions because it runs for a lengthy 54 minutes. Ken Clemens explains the important procedures that go into making match-grade, cut-rifled barrels. Ken also explains some factors to consider when choosing a barrel-maker and specifying length, contour, land/groove configuration, and twist rates.
About BRUX Barrel-Making Methods
Brux starts with 4150 chrome-moly or 416R stainless steel double-stress-relieved bar stock — the best available. Barrels are bored with the Barnes gun drill, and reamed with an industry-standard Pratt & Whitney reamer. Brux uses solid carbide cutter hooks and employs special methods to achieve best results.
After the bore-cutting process is complete, each barrel is hand-lapped to high-precision standards. Multi-point inspections and meticulous hand processes (not possible in mass production) ensure extremely high quality. The Brux website says: “If there is the slightest deviation in surface finish or tolerance, the barrel is discarded.”
BRUX Specializes in Cut-Rifled Gun Barrels
Brux produces custom cut-rifled barrels, precision-crafted by professionals with extensive experience in both machine tools and competitive shooting. While Brux earned its reputation building great barrels for F-Class, benchrest, and long range competition, Brux also crafts hunting barrels. Brux states: “Hunters, big game and varmint, can benefit from the accuracy and dependability of a custom barrel made to your specifications.”
BRUX Barrels’ Owners Are Competitive Shooters
Brux owners and machinists are shooters themselves. So they understand how important a truly top-quality barrel can be. Everything else about a rifle can be great, but you need a superb barrel to win at the highest level. Owners Ken Clemens (pictured above) and Norm Brux are both seasoned shooters with years of experience using their own products.
Made in the USA — About the Home of Brux Barrels
The Wisconsin River Valley near Lodi has a storied history of hunting and shooting. The glacier spared many granite escarpments, leaving secluded glens and a topography rich in soil and wildlife habitat, which attracted families with old-world values and skills. Many of their descendants turned raw steel and iron into the tools necessary for farming – and some evolved to precision tooling and making gun barrels.
Wisconsin River Valley near Ferry Bluff State Natural Area.
Cheaper Than Dirt (CTD), a Texas-based vendor of firearms, gun accessories, and ammo, has created a very complete web page on AR-15 assembly from start to finish. If you are thinking of building an AR, or upgrading your upper, trigger group, or buttstock, we recommend that you read CTD’s DIY ARs — Building Your Own AR-15 page. This illustrates all the components you will need for a complete AR build.
In addition, the page has a series of videos showing how to assemble each element of the AR-15. We’ve included five of those videos in today’s Saturday Movie Showcase. There a total of ten CTD AR-15 videos in the series. View them all on the CTD AR-15 Playlist on YouTube.
Then, as a closer, we offer another video — the Ten Mistakes to Avoid When Building an AR-15. Worth watching BEFORE you start an AR project, this useful video now has 2.1 million views!
Installing the Fire Control Group
Installing the Safety Selector and Pistol Grip
Installing the Take-Down Pin and Buffer Tube
Installing the Bolt Catch
Field-Stripping the Bolt-Carrier Group
Mistakes to Avoid When Assembling an AR-Platform Rifle
This popular Tactical Toolbox video (with 2.1 million views) is definitely worth watching BEFORE you start your own AR project. It explains the common mistakes that even careful builders can make when assembling an AR-type rifle.
Matchlocks, Wheellocks, Flintlocks, Breechloaders, Lever Actions — All these historically significant firearms designs (and more) are featured in a fascinating series of videos produced by Ruger.
Sturm, Ruger & Co. has created a series of 11 short videos that trace the history of firearms, from matchlocks to modern semi-autos. Ruger’s “History of the Gun” video series provides a fascinating look at firearms technology throughout the years. The host is Garry James, Senior Editor of Guns & Ammo magazine. Featured here is Segment 7 on Rifling. Other installments in the series are linked below. If you are interested in the history of gun design and manufacturing, this series is definitely worth watching.
One Shooters’ Forum member asked: “What makes an AR accurate? What parts on an AR can really affect accuracy — such as free-floating handguards, barrels, bolts, bolt carriers?” He wanted an honest, well-informed answer, not just sales pitches. Robert Whitley posted a very detailed answer to this question, based on his experience building/testing scores of AR-platform rifles. Robert runs AR-X Enterprises, which produces match-grade uppers for High Power competitors, tactical shooters, and varminters.
Building an Accurate AR — What is Most Important
by Robert Whitley
There are a lot of things that can be done to an AR to enhance consistent accuracy, and I use the words “consistent accuracy” because consistency is a part of it (i.e. plenty of guns will give a couple great 5-shot groups, but won’t do a very good 10- or 20-shot groups, and some guns will shoot great one day and not so good on others).
Here are 14 key things we think are important to accuracy.
1. Great Barrel: You’ll want a premium match-grade barrel, well-machined with a good crown and a match-type chambering, true to the bore and well cut. The extension threads must also be cut true to the bore, with everything true and in proper alignment.
2. Rigid Upper: A rigid, heavy-walled upper receiver aids accuracy. The typical AR upper receiver was made for a lightweight carry rifle and they stripped all the metal they could off it to make it light to carry (which is advantageous for the military). The net result are upper receivers that are so thin you can flex them with your bare hands. These flexible uppers are “strong enough” for general use, but they are not ideal for accuracy. Accuracy improves with a more rigid upper receiver.
3. True Receiver Face: We’ve found that truing the receiver face is valuable. Some may argue this point but it is always best to keep everything related to the barrel and the bore in complete alignment with the bore (i.e. barrel extension, bolt, upper receiver, carrier, etc.).
4. Barrel Extension: You should Loctite or glue the barrel extension into the upper receiver. This holds it in place all the way front to back in the upper receiver. Otherwise if there is any play (and there typically is) it just hangs on the face of the upper receiver completely dependent on the face of the upper receiver as the sole source of support for the barrel as opposed to being made more an integral part of the upper receiver by being glued-in.
5. Gas Block: You want a gas block that does not impose pointed stress on the barrel. Clamp-on types that grab all the way around the barrel are excellent. The blocks that are pinned on with tapered pins that wedge against the barrel or the slip on type of block with set screws that push up from underneath (or directly on the barrel) can deform the bore inside of the barrel and can wreck the accuracy of an otherwise great barrel.
6. Free-Float Handguard: A rigid, free-float handguard (and I emphasize the word rigid) really makes a difference. There are many types of free-float handguards and a free-float handguard is, in and of itself, a huge improvement over a non-free-float set up, but best is a rigid set-up. Some of the ones on the market are small diameter, thin and/or flexible and if you are shooting off any type of rest, bipod, front bag, etc., a rigid fore-end is best since ARs want to jump, bounce and twist when you let a shot go, as the carrier starts to begin its cycle before the bullet exits the bore.
7. Barrel Contour: You want some meat on the barrel. Between the upper receiver and the gas block don’t go real thin with a barrel (we like 1″ diameter if it’s workable weight-wise). When you touch off a round and the bullet passes the gas port, the gas system immediately starts pressuring up with a gas impulse that provides vibrations and stress on the barrel, especially between the gas block back to the receiver. A heavier barrel here dampens that. Staying a little heavier with barrel contour through the gas block area and out to the muzzle is good for the same reasons. ARs have a lot going on when you touch off a round and the gas system pressures up and the carrier starts moving (all before the bullet exits the bore) so the more things are made heavier and rigid to counteract that the better — within reason (I’m not advocating a 12-lb barrel).
8. Gas Tube Routing Clearance: You want a gas tube that runs freely through the barrel nut, through the front of the upper receiver, and through the gas key in the carrier. Ensure the gas tube is not impinged by any of them, so that it does not load the carrier in a stressed orientation. You don’t want the gas tube bound up so that when the gas tube pressures up it immediately wants to transmit more force and impulse to the barrel than would normally occur. We sometimes spend a lot of time moving the gas block with gas tube on and off new build uppers and tweaking gas tubes to get proper clearance and alignment. Most gas tubes do need a little “tweaking” to get them right — factory tubes may work OK but they typically do not function optimally without hand-fitting.
9. Gas Port Tuning: You want to avoid over-porting the gas port. Being over-gassed makes the gas system pressure up earlier and more aggressively. This causes more impulse, and increases forces and vibration affecting the top end and the barrel. Tune the gas port to give the amount of pressure needed to function properly and adequately but no more.
10. Front/Back Bolt Play: If accuracy is the game, don’t leave a lot of front/back bolt play (keep it .003″ but no more than .005″). We’ve seen factory rifles run .012″ to .015″ play, which is OK if you need to leave room for dirt and grime in a military application. However, that amount of play is not ideal for a high-accuracy AR build. A lot of front/back bolt play allows rounds to be hammered into the chamber and actually re-formed in a non-consistent way, as they are loaded into the chamber.
11. Component Quality: Use good parts from a reputable source and be wary of “gun show specials”. All parts are NOT the same. Some are good, some are not so good, and some aftermarket parts are simply bad. Don’t be afraid to use mil-spec-type carriers; by and large they are excellent for an accuracy build. Also, remember that just because a carrier says “National Match” or something else on it does not necessarily mean it’s any better. Be wary of chrome-plated parts as the chrome plating can change the parts dimensionally and can also make it hard to do hand-fitting for fit and function.
12. Upper to Lower Fit: A good upper/lower fit is helpful. For quick and dirty fit enhancement, an Accu-Wedge in the rear helps a lot. The ultimate solution is to bed the upper to a specific lower so that the upper and lower, when together, are more like one integral unit. For the upper receivers we produce, we try to get the specs as close as we can, but still fit the various lowers in the market place.
13. Muzzle Attachments: Don’t screw up the muzzle (literally). Leave as much metal on the barrel at the muzzle as you can. People like to thread the muzzle for a flash hider, suppressor, muzzle brake, or some other attachment, but if you really want accuracy, leave as much metal as you can there. And, if you have something that screws on, set it up so that it can be put on and have it stay there without putting a lot of torque and stress on it right where the bullet exits the bore. If you are going to thread the end of the barrel, make it concentric with the bore and make sure what you screw on there is as well. For all muzzle attachments, also ensure that the holes through which the bullet passes through are dead true to the bore. Many aftermarket screw-on things are not so good that way. Anything that vents gas should vent symmetrically (i.e. if it vents left, it should vent equally right, and likewise, if it vents up, it should vent down equally). Uneven venting of gas can wreck accuracy.
14. Quality Ammunition: Ammo is a whole story by itself, but loads that are too hot typically shoot poorly in an AR-15. If you want accuracy out of an AR-15, avoid overly hot loads. Shown below are test groups shot with four (4) different uppers, all with moderate loads. These four uppers all pretty much had the same features and things done to them as explained in this article, and they all shot great.
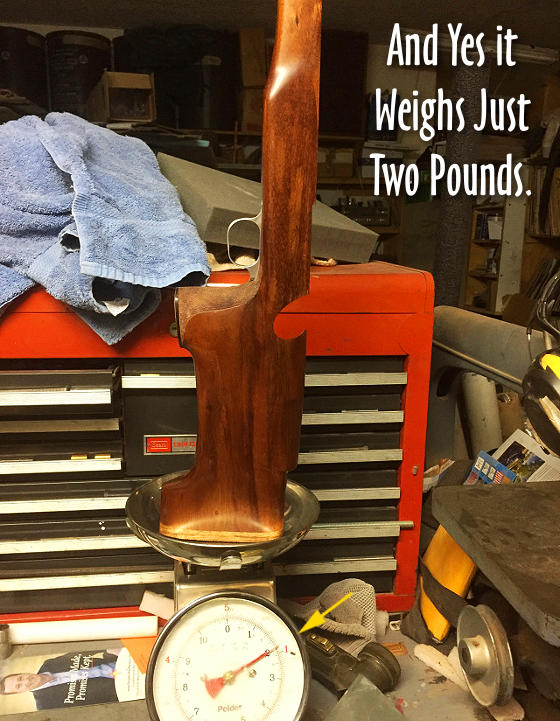
Gunsmith/stockmaker Doan Trevor created a lovely, one-of-a-kind silhouette stock for an Anschutz rimfire action. Built as a true custom design, this stock combines ideal standing position ergonomics with light weight — the entire stock weighs a mere two pounds. This project really showcases Doan’s remarkable skills with wood. Read the full story about this project (with more photos) at DoanTrever.com.
Doan explains his design process: “A customer came to me wanting to know if I could build a silhouette stock that was 2 pounds or less. I used the Koa wood because it is a lower specific gravity than Walnut (which makes it lighter) and stronger. I was still able to use pillar bedding and keep the weight down. The fore-end could be shortened to reduce the weight even more.
Since the drops on a silhouette rifle are different than a prone rifle, I kept the pistol grip from the prone rifle which is comfortable and tried to come up with a higher cheek piece and more drop to the buttplate. All of this required lots of hand carving.”
You’ve probably heard of cut-rifling, but did you know this process was invented in Germany nearly 500 years ago? Read on to learn more about how a cut-rifled barrel is made…
The cut-rifling process, used by leading barrel-makers such as Bartlein, Blake, Brux, and Krieger can yield a very high-quality barrel with a long useful life. Cut-rifled barrels have been at the top in short- and long-range benchrest competition in recent years, and cut-rifled barrels have long been popular with F-Class and High Power shooters.
You may be surprised to learn that cut-rifling is probably the oldest method of rifling a barrel. Invented in Nuremberg around 1520, the cut-rifling technique creates spiral grooves in the barrel by removing steel using some form of cutter. In its traditional form, cut rifling may be described as a single-point cutting system using a “hook” cutter. The cutter rests in the cutter box, a hardened steel cylinder made so it will just fit the reamed barrel blank and which also contains the cutter raising mechanism.
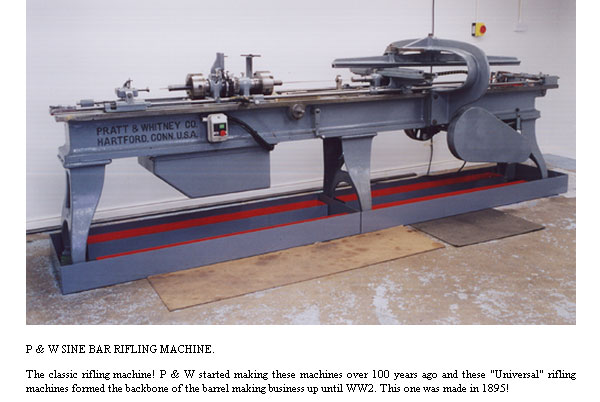
Above is a computer animation of an older style, sine-bar cut-rifling machine. Some machine features have been simplified for the purposes of illustration, but the basic operation is correctly shown. No, the cut-rifling machines at Krieger don’t use a hand-crank, but the mechanical process shown in this video is very similar to the way cut-rifling is done with more modern machines.
Read About Cut-Rifling Process at FirearmsID.com
To learn more about the barrel-making process, and cut-rifling in particular, visit FirearmsID.com. There you’ll find a “must-read” article by Dr. Geoffrey Kolbe: The Making of a Rifled Barrel. This article describes in detail how barrels are crafted, using both cut-rifling and button-rifling methods. Kolbe (past owner of Border Barrels) covers all the important processes: steel selection, hole drilling, hole reaming, and rifling (by various means). You’ll find a very extensive discussion of how rifling machines work. Here’s a short sample:
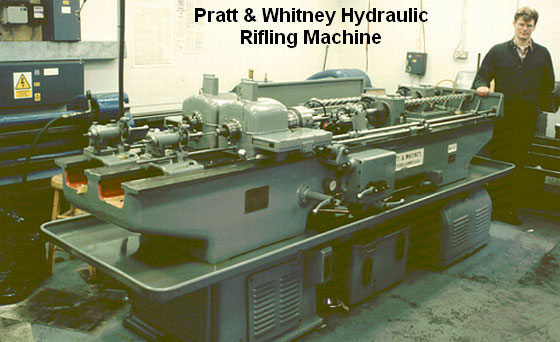
“At the start of World War Two, Pratt & Whitney developed a new, ‘B’ series of hydraulically-powered rifling machines, which were in fact two machines on the same bed. They weighed in at three tons and required the concrete floors now generally seen in workshops by this time. About two thousand were built to satisfy the new demand for rifle barrels, but many were broken up after the war or sold to emerging third world countries building up their own arms industry.
Very few of these hydraulic machines subsequently became available on the surplus market and now it is these machines which are sought after and used by barrel makers like John Krieger and ‘Boots’ Obermeyer. In fact, there are probably less of the ‘B’ series hydraulic riflers around today than of the older ‘Sine Bar’ universal riflers.
The techniques of cut rifling have not stood still since the end of the war though. Largely due to the efforts of Boots Obermeyer the design, manufacture and maintenance of the hook cutter and the cutter box have been refined and developed so that barrels of superb accuracy have come from his shop. Cut rifled barrel makers like John Krieger (Krieger Barrels), Mark Chanlyn (Rocky Mountain Rifle Works) and Cliff Labounty (Labounty Precision Reboring)… learned much of their art from Boots Obermeyer, as did I.” — Geoffrey Kolbe
Video find by Boyd Allen. Archive photos from Border Barrels. In June 2013, Birmingham Gunmakers Ltd. acquired Border Barrels. Dr. Geoffrey Kolbe has set up a new company called BBT Ltd. which produces chamber reamers and other gunsmithing tools and gauges. (Thanks to L. Holland for the Kolbe update).
It appears that, under pressure from Democratic politicians and anti-gun lobbying groups, FedEx and UPS are now providing confidential information to the ATF and other Federal government organizations. There are suggestions that FedEx and UPS are recording shipping data, and also may be monitoring the contents of shipping packages. UPS has adopted rules that require gun stores to provide customer data and even make invoices. Likewise FedEx is asking gun shops to retain customer/content descriptions. The result of the these policy changes could be to “create a database of American gun purchasers”. That is a de facto gun registry, something that is forbidden under Federal Law.
Watch this video for details of new FedEx and UPS gun shipping policies:
The anti-gun polices were, apparently adopted in responses to threatening letters from Democratic Party U.S. Senators including Edward Markey, Dick Blumenthal, Cory Booker, Dianne Feinstein, and Chris Murphy.
“UPS has since adopted new regulations that require gun companies to turn over customer data and allow UPS access to review and examine the shipper’s books and records and provide UPS with invoices for any firearms-related products. All coincidental, of course. This new policy gives UPS the unlimited power and discretion to examine and review any customer documents related to firearms sales.
FedEx now apparently demands that gun store owners retain documents about what specific items those shipments contain and make that information available to FedEx upon request. This would allow these companies to create a database of American gun purchasers and determine exactly what items they purchased.
Recently reported by AmmoLand News, UPS changed its policy surrounding unfinished frames and receivers and even told customers that if it found any packages containing the targeted items, or what the Biden Administration calls ‘ghost guns’, their accounts would be canceled, and the items destroyed.”
18 State Attorneys General Challenge New FedEx and UPS Policies
To counter these policy changes by FedEx, 18 state Attorneys General have sent letters to FedEx and UPS top executives. The letter from the Montana A.G. Austin Knudsen to FedEx asks whether information about gun owners is being provided to Federal agencies:
“FedEx now apparently demands that gun store owners retain documents about what specific items those shipments contain and make that information available to FedEx upon request. These demands, in tandem, allow FedEx to create a database of American gun purchasers and determine exactly what items they purchased.
Perhaps most concerning, your policies allegedly allow FedEx to ‘comply with …requests from applicable law enforcement or other governmental authorities’ even when those requests are ‘inconsistent or contrary to any applicable law, rule, regulation, or order’. In doing so you — perhaps inadvertently — give federal agencies a workaround to federal law, which has long prevented federal agencies from using gun sales to create gun registries.”
Jerry Miculek is the best action revolver shooter who has ever lived. Miculek is also a true master with rifle and shotgun. This guy shoots hundreds of thousands of rounds every year in all types of firearms. Through that process, he has discovered common mistakes many shooters make. Those mistakes can harm the guns, or threaten the safety of the operator. Here Jerry offers some vital gun handling and safety advice in his “Never Do This” video series.
Jerry Miculek has won multiple revolvers championships, and has set amazing records for revolver speed shooting (with reloads). Yes Jerry, “Mr. Revolver”, knows a thing or two about wheelguns. In this video, Jerry explains how you can damage your revolver by using the wrong methods to open and close the cylinder and extract ammo. Jerry shows what NOT to do, and then he very carefully explains the proper procedure to release the cylinder, and swing it out of the frame. In addition, Jerry shows how best to swing a loaded cyclinder back into place. If you own a revolver, ANY revolver, you should definitely watch this video.
In this second video, Jerry explains common mistakes people make when handling and shooting three classic, semi-auto firearm types — the M1 Garand, the SKS carbine, and the M1911 pistol. Jerry shows handling faults that can cause out-of-battery detonation or early primer strikes, or cause jams in the Garand and SKS. Then Jerry explains why you should never release the slide on a M1911 pistol with a round already in the chamber. This is a must-watch video for Garand owners.
Here Jerry demonstrates of the most common jams that can happen with AR-platform rifles. Miculek reveals the cause of the issue and then shows how to prevent it. Jerry notes: “This is one of those malfunctions that you won’t see coming! I’ve seen it … on the range and it can be devastating to your time in a match. All ammo used in the video were dummy rounds and intentionally loaded for training without powder or primers.”
Our friend Robert Whitley of ARX Enterprises LLC has learned, through careful measurement and testing, that some barrels threaded 5/8″ x 24 TPI at the muzzle may not deliver optimal accuracy. The reason is that the end of the barrel can bell out slightly, like a trombone, because too much steel has been removed. This is particularly true with .30-caliber barrels, but it can also be a problem with smaller caliber barrels (even 6mm). Robert demonstrates this phenomenon in the video below. All gunsmiths, and anyone considering threading a barrel, should watch the video. At 1:00 – 1:30 Robert gauges a 5/8″ x 24-threaded .30-Caliber barrel. You can see the belling effect clear as day.
“When setting up a commercial barrel in the lathe, we noticed that the maximum-sized bushing that would fit in the bore at the chamber end was almost .0015” smaller [than what would fit] at the muzzle. That precipitated my pin-gauging of a number of different commercial barrels that were threaded for 5/8” x 24 TPI. What I found is what’s shown on the video.” – R. Whitley
Solve Problem with a Larger Thread Diameter
If 5/8″ x 24 threading is potentially harmful to accuracy, is there a solution? Yes, you simply need to leave a little more steel on the barrel. (See Video starting at 02:40.) Frank Green of Bartlein barrels states: “We get these questions all the time. I say run the largest thread diameter that is possible.” Robert Whitley has found that a 3/4″ x 28 TPI threading does not cause the “belling effect”. Accordingly Robert recommends 3/4″ x 28 if you need to thread your barrel for a muzzle brake or suppressor. Robert explains: “We only make 3/4” x 28 TPI muzzle brakes and that’s what we recommend to customers.”
“See how much meatier the 3/4″ threading is vs. the 5/8″. The 3/4″ threading offers a lot more metal around the bore. There’s a lot less opportunity for the bore to become bell-mouthed…” – Robert Whitley
Barrel Threading Diameter — What’s Important to Know
By Robert Whitley
In truth, the 5/8″ x 24 TPI threading never came out of any accuracy-based think tank or set-up, it’s a military .30-Cal threading for barrels that someone has to carry around (they needed to keep the barrel weight down so it was smaller in diameter and the threading had to work with that situation). People have somehow assumed because the military uses that threading for certain things that it must mean that it’s also fine for a highly accurate rifle too, but that’s not really correct.
I don’t think there is any better and realistic option than the 3/4″ muzzle threading, and we also do it so there is no relief cut behind the threads on the barrel (i.e. put the relief cut on the brake or jam nut, don’t chop down on the muzzle of the barrel). For some reason many have a hard time grasping that the metal at the muzzle end of a rifle is “sacred” and you should not cut it down any more than absolutely necessary. A little threaded pencil diameter nub on the end of a barrel is not ideal for accuracy especially if it’s threaded and you need to torque on it. I cringe when I see a barrel with something like an MTU or Heavy Varmint contour, only to have an itty-bitty pencil thin threaded nub right at the muzzle so someone can “screw on a can” or a muzzle brake.
Lessons Learned Over the Years
A number of years ago I did a 30BR rifle project with Craig Kostyshyn who was big in the 30BR game and he made some of the best 30BR rifle barrels for benchrest competition. When I did the project I wanted a medium-heavy Palma type contour barrel I could use and also have a muzzle turndown for a front sight band. When he found out I was going to have the muzzle turned down he said “whoa, I need to provide for that when I make the barrel because if you turn the front down later you’ll be shooting a trombone” (i.e. the muzzle bore dimension would open up).
What he did was rough contour the barrel with the turndown (about .010” oversize) before he lapped the barrel, then when he lapped the barrel he took it easy in the muzzle area and worked the back of the barrel more. I thought he was a little bit excessive in his concerns but the barrel shot great and I wasn’t going to argue with him, after all he was shooting groups in the ones. I kind of just filed that away and never thought about it until recently when I went to have Fred from Sabreco do some chamber re-work on a commercial .30-caliber barrel I had. When setting up the barrel in the lathe and indicating things Fred noticed that the maximum-sized bushing that would fit in the bore at the chamber end was almost .0015″ smaller [than what would fit] at the muzzle and he mentioned it to me. That precipitated my pin-gauging of a number of different commercial barrels I had that were threaded for 5/8” x 24 TPI. What I found is what’s shown on the video.
NOTE: This is a copyrighted article. Do not reproduce or re-link more than 75 words without written permission from AccurateShooter.com.
Most competitive shooters are pretty good about bore cleaning (some may even clean their bores too aggressively). However, we’ve found that many shooters neglect the chamber area and the bolt lug recesses. It’s too easy to clean the bore, slip out the guide rod and say “I’m done.” Sinclair Int’l explains why it’s important to clean the action interior: “Shooters use a lot of grease and oil on their bolts to reduce friction and to prevent wear[.] Unfortunately, both of these compounds attract grit, powder and primer residues. Cleaning your receiver is especially critical [with] custom actions where the fit between the action and bolt is held to very tight tolerances. Routine cleaning of the action will prevent unnecessary wear on the bolt body, locking lugs, and the action raceways/guide rails. Frequent action cleaning is also essential to keeping the trigger area free of debris which can cause trigger hang-ups and failures.”
Your rifle deserves a clean action and lug recesses. For action cleaning, our friend Danny Reever favors the PMA Action Cleaning tool. This handy tool speeds up the cleaning process, letting you do a better job in less time. Danny reports: “I’ve been using the PMA Action Cleaning Tool Kit for quite some time. Previously, I used one of the old style (round knob) action-cleaning tools with cylindrical cotton rolls. I think the PMA Action Cleaning Tool Kit is easier to use, and possibly achieves better results. Read Full Tool Review.
Cleaning the Chamber
Combustion by-products, lubricants, and solvent residues can collect in your chamber. Severe build-up of grease and carbon can interfere with chambering. Also some solvents will promote corrosion. You need to keep your chambers clean.
1) Install a clean cotton mop of the correct size on the end of a chamber rod and insert the mop into the chamber. Rotate the mop several times to remove any brush bristles left behind and any excess solvent that was between the rod guide snout and the end of the chamber. Make sure the chamber is dry. Prior to storing a rifle you can oil the chamber but make sure the oil is removed prior to firing the rifle.
2) Alternatively, install an old bore brush on a chamber rod, overlap a couple of patches on the brush bristles, and wrap them around the brush completely. Then insert the patch-covered brush into the chamber while rotating it to remove the excess solvent and debris. Push it firmly into the neck area of the chamber. A similar method is to pierce a large patch on the end of the brush loop and insert it into the action, again rotating the brush as you push the patch up against the breech.
Cleaning the Lug Recess Area
The action lug recess area is one of the dirtiest places on a bolt-action rifle. To properly clean this area, always use a tool designed for the task, such as the $32.99 Sinclair Action Cleaning Tool (part # ACT1) which is part of the full Sinclair Action Cleaning Tool Kit ($54.99, part #ACT2).
1) Insert a cotton roll or cleaning felt into your lug recess cleaning tool and wet both ends and the face of the cotton roll/felt with solvent.
2) Insert the tool into the action and push it forward until it is positioned fully in the lug recess area and rotate the tool head several times. Then reverse the rotation for another few turns. While rotating the tool move it slightly in and out to cover the entire recess area and to also clean the breech face.
3) Remove the tool from the action and inspect the surface of the felt or cotton roll. If there is quite a bit of residue on both sides of the felt/roll, then repeat with another wet felt/roll.
4) When you feel the recess area is completely clean, insert a dry cotton roll into the tool and rotate the tool head to remove any remaining solvent and debris. If necessary, use a second dry cotton roll.
5) You can follow this step up with another pass of a mop or patches into the chamber to get any debris or solvent that pushed forward out of the lug recess area.


 About BRUX Barrel-Making Methods


 5. Gas Block: You want a gas block that does not impose pointed stress on the barrel. Clamp-on types that grab all the way around the barrel are excellent. The blocks that are pinned on with tapered pins that wedge against the barrel or the slip on type of block with set screws that push up from underneath (or directly on the barrel) can deform the bore inside of the barrel and can wreck the accuracy of an otherwise great barrel.