Brownells’ Do-It-Yourself (DIY) video series provides logical, step-by-step installation help for triggers, stocks, and springs. Nine separate videos cover Brownells various DIY Kits. Not sure if you’re up to the project? Just watch each video to see what’s involved. The nine DIY kits are:
This video shows Remington 700 after-market trigger installation:
In the Do-It-Yourself videos, Brownells’ Gun Techs proceed step-by-step, showing you exactly how to install the parts on your gun. Each kit also comes with complete, illustrated instructions you can take to the bench. To learn more, click the links above, or CLICK HERE to visit Brownells’ DIY Kit online page.
They say that a man can never have too much money or too much time. Darrell Jones would add that a man can never have too many BR-based rifles. Darrell had a fleet of BRs, in 22BR, 6mm BR, 6.5 BR, 7 BR, and 30 BR. But he was intrigued by the potential of a rifle in the .257 caliber. Could it shoot as well as a 6mm BR? Could it challenge the more popular calibers in the highly competitive 600-yard benchrest game? Through careful research and component selection, Darrell created a 25 BR rifle that proves the viability of the 25 BR as a competition round. Pushing 115gr high-BC Berger bullets at 2837 fps, Darrell’s 25 BR “Peppermint” won first place in its very first match.
The Barely Bigger BR — Exploring the .25 Caliber Option
Rifle Report by Darrell Jones
I decided to build a 25 BR after several weeks of deliberation and ruling out a .257 Ackley Improved. Part of my dilemma was that I wanted to shoot F-Class competition at 600 yards, and I was unsure about the accuracy potential of the 25 BR. However, I currently have several BRs chambered in 22 BR, 6BR, 6.5 BR, 7 BR, and 30 BR and they all shoot exceptionally well at 600 yards. This lead me to believe a 25 BR should deliver fine accuracy, just like its other BR siblings. Why wouldn’t a 25 BR shoot accurately provided that I built it with the right components? The feasibility saga began. I began searching diligently for custom 25-caliber bullets. Unfortunately, there are not many 25-caliber custom bullet makers. I actually found only two custom bulletsmiths who produce the 25s. I did look at Fowlers and then looked at Bergers. Both Jeff Fowler and Berger made 110-grain flat-base bullets when I was looking. [Editor — this 110gr bullet is no longer listed by Berger]. The Berger 110gr FB bullets (.414 ballistic coefficient) shot very well out of my 12-twist 25-06 Ackley. However, I wanted to shoot a heavier bullet if possible. Berger makes a 25-caliber 115gr VLD boat-tail with a high ballistic coefficient. This needs a 10-twist barrel.
Panda Action, McMillan Stock, Weaver T-36
As you can see, I went with a Panda polished action and a weighted McMillan BR stock painted metallic silver with red candy cane stripes thus the name “Peppermint”. This gun actually does double duty now as a 25 BR and 6 PPC switch barrel. When I want to run the gun as a 6 PPC for short range, I simply screw on the PPC barrel, then swap in a bolt (fitting the PPC bolt face) from another Panda action I own. That’s one advantage of owning custom Kelbly actions! Don’t even think about exchanging bolts between factory guns. Kelbly rings and a Weaver T-36 fixed-power scope handle the optical duties while a Jewell trigger set at one ounce takes care of the firing mechanism.
Chambering for the .25 Caliber BR Wildcat
I wanted a chamber that would let me shoot both the 110s and the 115s. I took some time surfing the net looking for rental reamers that had suitable throat dimensions. I found that Elk Ridge Reamer Rentals had a 25 BR pilot reamer available. I called and Elk Ridge faxed me a reamer diagram that indicated it was designed to tight SAMMI specs. I asked how often was the reamer used and was told “not very often”.
I did want a minimum no-turn neck optimized for Lapua brass. The drawing indicated that the reamer would cut a .281″ neck and a throat of 1.0315″. This was very close to ideal, though I did have to turn two thousandths off the necks of Lapua 6BR brass after I necked it up. I resized using a .277″ bushing and the loaded rounds came out to be .279″. Realizing that this was in the ball park, I decided to go with the Elk Ridge Reamer and build a 25 BR that could shoot 110gr or 115gr bullets. Now the question was where to get a match-grade 25-caliber barrel. I called quite a few of the custom barrel-makers, including BlackStar Barrels in Texas (no longer operating). I have had wonderful success with the BlackStar barrel on my 6BR “Chantilly” — it delivered great accuracy and impressive velocities. Since the 25 BR was so similar, I went with another BlackStar. I ordered a 10-twist, 6-groove, 1.250″-diameter straight-contour tube.
After chambering, the barrel finished at 1.245″ diameter and 27.5″ inches with an 11° crown. I actually had the throat lengthened to accept both Berger 110gr and 115gr bullets. The bases of the FB 110-grainers sit flush with the neck-shoulder junction, when they are seated .010″ into the lands. With the longer 115gr VLDs, the bottom of the bearing surface (i.e. start of boat-tail) is just about even with the neck-shoulder junction.
Accurate Load Development
The barrel broke in easily with just 10 shots, using a “shoot one and clean” process. The load I started with was 31.5 grains of Varget with CCI 450 primers. The Berger 110s and Berger 115s had the same Point of Impact (POI) at 100 yards. However, the 115s impacted two inches higher at 600 yards with the same load. That shows the benefits of a higher BC. Pushed by the CCI 450s and 31.5 grains of Varget, the 115-grainers were running about 2837 FPS. I boosted the load up to 32.0 grains but I noticed primer cratering, so I backed off, settling on 31.5 grains for the 115gr Berger VLD.
Peppermint Wins at 600 Yards
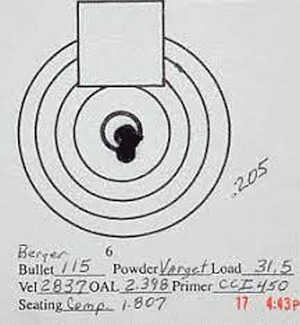
For her debut in competition, I took “Peppermint” to our local 600 yard F-class match. Shooting the Berger 115s with 31.5 grains Varget, she won with a perfect score of 200 with 14 Xs. At my club, we use a SR3 target. The X-Ring measures 3″ in diameter and the 10-Ring measures 7″. At the match there were some very good shooters with top-flight custom rifles in accurate calibers such as 6.5-284 and 22 Dasher. I was very fortunate to come out on top, but I give the credit to Peppermint’s good bench manners and outstanding accuracy.
As you can see from the target, “Peppermint” is a very accurate rifle that has proven herself in competition. It takes a good gun to finish “on top” in her very first match. So far, I’m very happy with the project, and more than satisfied with the accuracy of the 25 BR. This is definitely a worthy cartridge for Egg Shoots, 500m varmint matches, and the 600-yard F-Class game.
BR-Based Cartridge Comparison
CALIBER
22 BR
6mm BR
25 BR
6.5 BR
7 BR
30 BR
Bullet
80gr SMK
107gr SMK
115gr Berger
107gr SMK
130gr SMK
118gr BIB
BC
.420
.527
.522
.420
.391
na
Load Grains
31.0 H4350
30.0 Varget
31.5 Varget
32.0 Varget
34.0 AA2460
34.0 H4198
Barrel Length
27″
27″
27.5″
27.5″
28″
24″
Velocity
3100 fps
2880 fps
2837 fps
2851 fps
2719 fps
2970 fps
Comparing the BR-Based Variants
Now that I have several calibers in the BR cartridge family, (22 BR, 6mm BR, 6.5 BR, 7 BR, and a 30 BR), it is my humble opinion that they each have their own place. A varmint hunter’s dream, the 22 BR can push a bullet faster and more accurately than the 22-250. With an 8-Twist barrel, the 22 BR can send an 80gr SMK to 600 yards with extreme accuracy.
The 6 BR can do it all. The 6mm caliber offers a wide variety of quality bullets suitable for any shooting situation. All the major custom barrel makers produce outstanding 6mm barrels in a full range of twists. Moreover, since the 6 BR cartridge is so popular, there is a great store of knowledge about reloading for the 6 BR. It is easy to find a load that will shoot superbly in any bullet weight.
The 25 BR has proved to be easily tuneable, proficient and not fickle. You can obtain extreme accuracy without great effort in load development. The 115gr Berger offers a good high-BC projectile for this caliber, making the 25 BR a viable alternative to the 6 BR. As I’ve shown, it is competitive with a 6 BR in head to head competition.
Compared to the 25 BR, the 6.5 BR has a small edge in ballistics. However, there are not many light bullet choices available, especially from custom makers. The 123gr Lapua Scenar is an excellent bullet with a .547 stated BC, but it may be a bit heavy for the case capacity.
The 7 BR was designed for silhouette shooting, and it excels at that task. The 7 BR can push a 130 grain bullet fast enough to knock over the steel silhouettes at 500 meters with real consistency.
The 30 BR is nothing less than outstanding. The 30 BR is now the dominant cartridge on the benchrest Score-shooting circuit. It is also highly accurate for group shooting at 200 yards and very capable of winning a 600-yard F-Class match. Barrel life of over 6,000 rounds is realistic.
I like all the “flavors” of BR derived from the 6mm BR Norma case. However, if I could only have one BR in my safe, give me my 8-Twist, 6 BR “Chantilly” and I will be a happy camper. The final point I would make is if a cartridge is stamped BR on the case, it will shoot extremely accurately if you can.
We like Lyman’s Electronic Digital Trigger Pull Gauge, which is faster and more precise than the previous model. The latest Lyman Pull Gauge measures trigger pull weights from 1 ounce to 12 pounds with resolution of 0.1 ounces (2.8 grams). It features an adjustable, 4-position rod which retracts into the gauge body. We think that anyone running match triggers below 2.5 pounds pull weight should have a gauge like this. Among the pull gauges on the market, we think the Lyman unit offers great performance for the price. This gauge has a $67.95 MSRP, but it’s now under $52.00 on Amazon.
Features: More Precise Strain Gauge | Improved Grip Shape | Adjustable Rod Lengths
Lyman’s Digital Trigger Pull Gauge is designed to be the fastest and most accurate trigger pull gauge available. State-of-the-art strain gauge technology allows for repeatable accuracy of 1/10 ounce (2.8 grams). The gauge features a large, easy-to-read LCD display and you can switch from ounces to grams with the push of a button. The gauge can also deliver a pull weight average of the last 10 readings. That’s very helpful, particularly when working with factory triggers that may not be very consistent.
The Lyman Trigger Pull Gauge features a solid, collapsible rod with four locking positions. Being able to adjust length makes it easier to use the gauge with a wide variety of firearms — pistols, rifles, and shotguns. The locking feature prevents the rod from flexing when applying pressure to the trigger. When not in use, the rod conveniently collapses into the gauge body, making the whole unit more compact. The new Trigger Pull Gauge comes in an internally-padded plastic case that can be easily stored in a drawer or on your work bench.
Take a good look at this black-stocked, rimfire benchrest rifle. This just might be the most sophisticated (and accurate) Ruger 10/22 on the planet. This 10/22 was originally acquired as a used “donor gun” for just $98.00. Then its owner Les (aka “Scasa” in our Forum) completely upgraded the rifle from stem to stern. He added a rear lug to the receiver, threaded the receiver, installed a new barrel, and upgraded the trigger. Then he crafted the handsome benchrest stock from wood. He even designed and crafted the barrel tuner AND built the sophisticated shooting rest himself.
Overall, Les imagines he has over 1000 hours of design, fabrication, and fitting in this project. But the hard work paid off — this one-of-a-kind Ruger 10/22 shoots tiny groups. Is this the most accurate 10/22 on the planet? Possibly. But without question, it is the most sophisticated, do-it-yourself Ruger 10/22 project gun ever created.
$98 Ruger 10/22 Transformed into Tack-Driving Bench Gun
Report from Les E. (aka “Scasa” in our Forum)
I long thought I’d someday put an upgraded Ruger 10/22 together but the big hold-up was the receiver. I really wanted a threaded barrel/receiver and a rear lug for two-point mounting. They do make a rear lug that attaches to the rear of some aftermarket receivers but it’s just a little tab that attaches to the back, not what I would call really solid. So one day while hanging out at the local gun store I saw a Ruger 10/22 on the used gun rack for just $98.00. I latched onto it and I had my donor gun. This was an early gun that had the two guide rails for the bolt, walnut stock, and metal (not plastic) furniture.
Finished 10/22 rifle with rifle stock, tuner, and aluminum shooting rest all built by Les.
I then began a complete transformation of the rifle. Little did I know that, by the end of the project, I would put in about 1000 hours of labor. There were several things I wanted to make quite different than Ruger’s original design. First was to add the rear lug. Then get rid of the trigger pins. I also threaded the barrel hole in the receiver to get rid of the wedge. I also wanted to fix the bolt release. Of course that all required a new stock too.
In this video, Les explains the major upgrades he did to the Ruger 10/22:
Interested in this rifle build? Talk about it in our Shooter’s Forum. Rifle owner/builder Les can answer your questions about this Ruger 10/22 in this Forum Thread.
The Ruger 10/22 receiver was threaded to accept a more traditional barrel installation. Below is a conventional 10/22 drop-in barrel. Note that normal barrel is NOT threaded at receiver end, but slides in and then is held in place with a “wedge” locking block.
I made a rear lug that attaches to the back of the Ruger receiver with four, 6-32 screws and glued with JB Weld and filed to match the receiver contour.
Shown above is the completed gun before stock painting. The stock is made from nine pieces of Poplar 1x2s, with lots of sanding and black satin paint. Above is a photo of the stock before painting. As you can see, the laminations were stacked vertically. The rifle sits on a one-piece shooting rest I also built.
Editor: Les designed and crafted this sophisticated shooting rest himself. That’s right — this is a DIY rest! Les told us: “I built the rest from scrap aluminum. The design came from looking at rimfire rests online. Probably the Pappas Rest was the greatest influence. That Pappas rest cost about $1100.00 at the time for a polished one. I have less than a hundred dollars in mine now, but I’ve got a couple WEEKS of work in it. I’ve made two of them, one for my rifles and one for my benchrest pistol. It’s a lot of work to sand and polish, but in the end you have a solid shooting platform. Keep it waxed to preserve the shine.”
Watch Les shoot his fully-transformed and upgraded Ruger 10/22 with rest he built:
Editor: In the above video Les shoots his fully-upgraded Ruger 10/22 from a sophisticated one-piece rest he built himself. You can see how well the rest handles his upgraded Ruger 10/22. Below are the two 5-shot groups shot at 25 yards with this rig in the video. Very impressive! The ammo used was Wolf Match Extra.
More Upgrades — Trigger Pins, Bolt Release and More…
The trigger pins were replaced with 10-32 socket head screws which required threaded bushings to be put in the left side of the receiver and access holes in the right side of the stock. Now the trigger group and bolt can be removed without taking the action out of the stock. This also pulls the receiver sides together reducing bolt clearance. The trigger is shimmed with a piece of shim stock so it can’t be too tight.
There are several “How-Tos” which cover conversion of the manual bolt release to an auto bolt release, but it still requires a little fiddling with the darn thing. So instead of having it pivot on a slot, I welded up the slot and now it’s just a hole. I also welded on some more length and put a little knurled knob on it. With those modifications, it now works perfect.
The trigger housing is factory Ruger acquired at a gun show 25 years ago with Volquartsen hammer and sear. The barrel is a Green Mountain blank turned, threaded, and with a Bentz chamber. I made the barrel tuner. The rifle is fitted with a BSA 36-power scope I bought for $125.00 from the AccurateShooter Forum classifieds. There may be another $250.00 or so in parts and accessories I bought.
Editor’s Commentary — This project started with an old, used $98.00 Ruger 10/22 rifle. Now the transformation is complete. It took Les countless hours, and lots of effort, but he is deservedly proud of the end result. The excellence of the upgraded 10/22 is matched by the sophisticated, unitized aluminum shooting rest Les built. Very impressive design and execution.
So How Does it Shoot? Very Nicely Indeed!
Les reports: “Above is a target with some 3-shot groups while playing with the tuner. Those groups were shot at 25 yards. I figure at that distance I’m testing what the gun will do, not how well I can read the wind, not well and its been really windy. If I can get one clean hole 5 shots I’m pretty happy.”
Les electro-etched the caliber on the barrel. Les told us: “The machine was easy to make and works really well. It’s just a pain getting stencils.”
Do you own or shoot an AR-platform “black rifle”? Then you know these rifles run dirty, and have some unusual maintenance requirements. On the other hand, the AR “Modern Sporting Rifle” is fun and versatile with a vast range of options among buttstocks, barrels, handguards, and grips. You can assemble a simple 16″ barrel .223 Rem rig for home defense, or build a long-barreled 6mm ARC rifle with bag-rider buttstock and high-magnification optic for long range target work. The choice is up to you.
To help with your black rifle journey, here are eight helpful videos from Brownells. These will help ensure your AR rifle cycles reliably and runs longer, with reduced wear. Brownells also explains how to choose the optimal barrel twist rate. CLICK HERE to order AR parts, accessories, and ammo from Brownells.
AR Bolt/Bolt Carrier Lubrication — Smarter Methods
This video shows the proper way to lubricate an AR-15 bolt-carrier assembly. The video identifies the key metal-on-metal friction points where you actually need lubrication: the rails on the underside of the carrier, shiny wear points on top, and just a dab on the cam pin. How much oil/lubricant should you use? The AR-15 is pretty forgiving on that point. Some spots work best with grease, others work best with a lighter oil. Just keep it out of the combustion areas. Those little holes in the carrier are gas vent holes, NOT oil holes!
AR Maintenance — General Cleaning Procedures
Let’s face it, ARs with the original gas system tend to run dirty. You’ll need to regularly clean the bolt carrier and bolt. In addition you should regularly clean the chamber area and the inside of the upper. Also make sure to clean the lower (see video 3:15) and ensure the trigger assembly is properly maintained. This video covers general cleaning and maintenance of AR-platform rifles. We highly recommend that all new AR owners watch this video. NOTE: When cleaning the bolt, don’t forget the extractor recess and ejector recess. The majority of ARs we’ve seen that did not function properly had gunk (lube, carbon, brass shavings) clogging these areas.
AR Barrel Twist Rates — What You Need to Know
AR barrels can be ordered with a variety of twist rates from 1:12″ to 1:7″. Basically, the longer/heavier the bullet you plan to shoot, the faster the twist rate you need. For example, Sierra recommends a 1:7″ twist rate for the 90gr SMK. A 1:12″ could work with the small lightweight bullets up to 55 grains. The 1:9″ barrel will stabilize the light and mid-weight bullets up to about 77 grains. We recommend a 1:8″ or 1:7″ twist rate for the best versatility. You’ll find a detailed discussion of AR twist rates on PewPewTactical.com.
How to Install an AR15 Trigger Assembly
One of the most common AR upgrades done by black rifle owners is swapping out the trigger for a better unit (perhaps a two-stage). Trigger replacements on ARs can be done fairly easily with basic tools. But there are some recommended procedures to ensure the trigger group swap goes easily. You’ll want to have a proper mount to secure the lower, and tools that fit the pin diameters on your lower.
Must-Have Spare Parts for AR-Platform Rifle
With 350,000 views, this is one of the most-watched AR videos on the Brownells YouTube Channel. Brownells Gun Techs Steve and Caleb list key spare parts AR owners should have. Top of the list are bolt gas rings, which wear out through normal use. Also you’ll want a spare extractor spring and pin, because these both can fail. The cotter pin and cam pin can break, but more often they get lost when the Bolt Carrier Group is disassembled for cleaning. Additionally, the large buffer springs wear out with time, so have a spare. Downstairs on the lower receiver, keep spare springs and detents for the pivot and takedown pins. Finally, if you’ve upgraded your trigger, keep the original one as a backup spare.
Checking Headspace on ARs
In this Tech Tip, Brownells gun tech Steve Ostrem walks users step-by-step through the process of checking headspace on their AR-15 rifles, both new and used. It is very important to have proper headspace to ensure proper feeding and extraction, and to ensure good brass longevity (with less risk of dangerous case separation). Starting at 2:10, this video explains how to check headspace with go/no-go gauges and maximum headspace gauge. Ostrem notes: “If you have an AR that closes on a no-go gauge, we recommend taking it to a gunsmith before heading to the range.”
Excessive headspace in AR platform rifles can lead to dangerous case separation.
Setting Up Gas Tube Systems
This Tech Tip examines AR-platform gas systems, and shows how to select the proper length gas tube, and how to configure multiple tube systems if you change your barrel to different lengths. This is worth watching for anyone re-barreling an AR.
Barrel Gas Block Alignment — Key to Reliable Cycling
In this video, Brownells gun tech Steve Ostrem explains surefire methods to align your gas block. The most common problem with AR builds is poor cycling, commonly caused by misalignment between the gas block and the barrel’s gas port.
Good news for owners of 1903/1903A3 Springfields, M1917 Enfields, and M1 Carbines. The CMP eStore sells brand new chambered, Criterion chrome-moly barrels for these M1903/M1903AC rifles for under $200.00. In addition there are M1 Carbine barrels for $229.50. These authentic-profile barrels are made by Criterion Barrels in Richfield, WI, using the button-rifling process. They are “semi-finished” meaning they come chambered and headspaced within .010″ of finished size, with final fitting to be done by a competent gunsmith. The barrels are also externally Parkerized to match the finish of your vintage ’03, Garand, or M1 Carbine. To order, go to the CMP eStore and click the Barrels Link in the upper left.
NOTE: Final assembly and headspacing by a qualified gunsmith is required!
New 1903 barrels by Criterion Barrels, Inc., 4140 chrome moly steel, button rifled, contoured, and finish lapped after contouring. These comply with CMP competition rules and are legal for the 1903 Matches. Parkerized like the original 1903 and chambered .010″ from finish size to be fitted and headspaced when assembled to fit your receiver and bolt dimensions.
New 1903A3 barrels by Criterion Barrels, Inc., 4140 chrome moly steel, button rifled, contoured, and finish lapped after contouring. These comply with CMP competition rules and are legal for the 1903A3 Matches. Parkerized like the original 1903A3 and chambered .010″ from finish size to be fitted and headspaced when assembled to fit your receiver and bolt dimensions.
New M1917 barrels by Criterion Barrels, Inc., 4140 chrome moly steel, button rifled, contoured, and finish lapped after contouring. These comply with CMP competition rules and are legal for the 1903A3 Matches. Parkerized like the original M1917 Parkerized like the original M1917 and chambered .010″ from finish size to be fitted and headspaced when assembled to fit your receiver and bolt dimensions.
New Carbine barrels by Criterion Barrels, 4140 chrome moly Steel, button rifled, contoured, and finish lapped after contouring. Comply with CMP Competition Rules and are legal for the CMP M1 Carbine Matches. Parkerized like the original M1 Carbine and chambered .010 away from finish size to be fitted and head-spaced when assembled to fit your receiver and bolt dimensions. Barrel is .30 Carbine.
AR owners know that their black rifles require regular cleaning and maintenance. And this modular platform allows many options for stocks, fore-arms, and optics mounting. That ability to customize is one of the AR’s major attractions, but customization requires solid understanding of the AR’s design and components.
To help AR owners optimize their rifles and maintain their rifles properly, Gun Digest Media has just released a new, 320-page illustrated book: AR-15 Setup, Maintenance and Repair. Authored by Patrick Sweeney, this book is a “one-stop guide to repairing, maintaining and modifying America’s favorite rifle.” The MSRP for the book is $35.99 from Gun Digest, but it is available on Amazon for $30.11* in paperback. Digital editions are offered by GunDigest for $31.99.
If you need to disassemble and maintain your AR rifle, swap barrels or handguards, add optics, or customize the stock, Gun Digest’s AR-15 Setup, Maintenance and Repair book tells you what you need to know. From field-stripping to barrel mounting and trigger installations, the book covers a wide range of topics. The book provides step-by-step instructions for set-up and maintenance, with hundreds of detailed photos. The book also includes AR gunsmithing chapters with reviews of recommended tools.
Author Patrick Sweeney is a certified master gunsmith and armorer instructor for police departments. Sweeney has also authored the notable 4-volume Gunsmithing the AR-15 series (Vol. 1, Vol. 2, Vol. 3, and Vol. 4) and 20+ other titles for Gun Digest Books.
Whether you want to learn about disassembling your AR for regular maintenance, field-stripping, swapping out parts, adding optics or customizing a stock, AR-15 Setup, Maintenance and Repair guides you through everything you need to know to keep your AR-platform rifle running well. There are also tips on how to improve accuracy, and maintain your bolt carrier group properly.
Authored by Patrick Sweeney
Published by Gun Digest Books
ISBN-13: 978-1951115470
320 pages, softcover, 8 ¼ x 10 7/8 inches
Editor’s NOTE: The key to keeping an AR running reliably is proper lubrication (in the RIGHT places), and regular cleaning of the bolt carrier and bolt, including ejector recess and extractor recess. The majority of non-functioning ARs we’ve seen had gunk, lube, carbon, and brass shavings in those recesses.
Other AR Books by Patrick Sweeney
Bonus Video — AR15 Maintenance with Jerry Miculek
In this helpful video, legendary shooting Jerry Miculek explains how he cleans and maintains his AR-platform rifles. Miculek shoots ARs in three-gun competitions.
* There are other Amazon third-party sellers offering the book starting at $25.48 plus $3.99 shipping.
Ever wish you could look inside your rifle, to see how the trigger and fire-control system work? Well now that is possible with the magic of 3D computer graphics. Modern software allows detailed “cutaway” side-views (see below), as well as 3D views with 360° rotation. The software can also provide X-Ray-type views into the gun’s internals — as you can see above. And computer animation can show the complete firing process from trigger pull to chambering of the next round.
Rem 700 Cutaway View from Right Side
This article provides some very cool 3-D “Cutaway View” animations of the popular Remington 700 action, probably the most successful American bolt-action ever created.
READERS — Take the time to watch the video! The Rem 700 animation is really outstanding! EVERY bolt-action shooter should watch this video all the way through.
Cutaway 3D Animation of Rem 700 Action — Watch Video
The Model 700 series of bolt-action rifles have been manufactured by Remington Arms since 1962. All are based on basically the same centerfire bolt action. They are typically sold with an internal magazine depending on caliber, some of which have a floor-plate for quick-unloading, and some of which are “blind” (no floor-plate). The rifle can also be ordered with a detachable box magazine. The Model 700 is a development of the Remington 721 and 722 series of rifles, which were introduced in 1948.
The Remington 700 is a manually-operated bolt action with forward, dual opposed lugs. It features “Cock On Opening”, meaning the upward rotation of the bolt when the rifle is opened cocks the firing pin. A cam mechanism pushes the firing pin’s cocking piece backward. The bolt face is recessed, fully enclosing the base of the cartridge. The extractor is a C-clip sitting within the bolt face. The ejector is a plunger on the bolt face actuated by a coil spring. The bolt is of 3-piece construction, brazed together (head, body. and bolt handle). The receiver is milled from round cross-section steel.
This video was made with the help of the World of Guns: Gun Disassembly interactive encyclopedia with 3D rendering. This remarkable web-based software allows users to view the inner workings of hundreds of different rifles and pistols — everything from a .22 LR Ruger to a .55-caliber Boys Anti-Tank rifle. There are also 25,000+ parts diagrams. This is a remarkable technical resource. SEE MORE HERE.
Looking for a superb illustrated coffee table book about guns? Yes there is such a thing, a great book we highly recommend — The Illustrated History of Fireams (2nd Edition). This full-color 320-page hardcover book features more than 1,700 photos compiled by NRA Museums curators Jim Supica, Doug Wicklund, and Philip Schreier. This Second Edition includes 300 photos more than the original, plus dozens of new profiles of important persons who influenced firearms development.
This follow-up to the best-selling original NRA Museums book is loaded with great images, historical profiles, and technical data on old, new, and currently-manufactured firearms that have changed history. Covering the earliest matchlocks to modern match-grade superguns and everything in between, The Illustrated History of Firearms provides a fascinating education on how guns evolved, where they originated and how they worked.
The Illustrated History of Firearms, 2nd Edition
– Authored by the experts at the NRA Firearms Museums
– Published by Gun Digest Books
– 9 ½ x 11 1/2 inches, hardcover with dust jacket
– 1,700 full-color photos
– 320 Pages
– Price: $39.99 (MSRP); $29.12 on Amazon
The Illustrated History of Firearms, 2nd Edition is available from Amazon direct for $29.12. Amazon also lists the book starting at $25.12 from a variety of other book vendors. You’ll also find the book at major bookstores such as Barnes & Noble, but it’s probably easier to purchase online.
Historic American Arms — Teddy Roosevelt’s Lever Guns
These two lever action rifles, owned by President Theodore Roosevelt, are part of the NRA Museum collection. First is a Winchester 1886 rifle known as the tennis match gun because Roosevelt used winnings from a tennis match to buy it. Below that is a suppressed Winchester model 1894 rifle. Roosevelt liked to shoot varmints around Oyster Bay (Long Island, NY) with this gun so he wouldn’t disturb his neighbors — the Tiffany and Du Pont families.
About the NRA Museums
The NRA opened the original National Firearms Museum at its Washington DC Headquarters in 1935. In 2008 the Francis Brownell Museum of the South West opened at the NRA’s Whittington Center in Raton, NM. Then, in 2013, the National Sporting Arms Museum opened at the Bass Pro Shops store in Springfield, MO. Every year, at these three museum facilities, over 350,000 persons visit to see the impressive exhibits and many of America’s most famous firearms. For more information, visit www.NRAMuseum.org.
Are you seeing unpredictable changes in Point of Impact on your target? Think you may have a scope issue? Well maybe not — when was the last time you checked your BARREL?
Yes scopes do fail, and scope bases/rings do get loose. But sometimes problems with erratic POI shifts are caused by a LOOSE BARREL. This issue came up recently in our Shooter’s Forum. One member complained that his zero was shifting from day to day — by as much as two inches at 100 yards. He was convinced he had a scope problem, based on erratic POI:
“I think my scope loses 1 to 3 MOA per day. When I shot my rifle Monday it was dead on. On Tuesday it was 1″ low. Then on Wednesday it was 1 or 2″ lower. I don’t get it. — the elevation knob never touched. Scope will track and return to zero that day perfect. Yes EVERYTHING has been checked, nothing loose. What is the chance the erector tube spring has gone south? For the record this is a Vortex GE. Never had a bad scope, but this has me wondering”. — LB
On Forum member told LB to send the scope right back to the manufacturer. Two other members suggested mounting the scope on a different rifle to test. Good advice. That’s generally a smart strategy before you conclude a scope has gone bad…
Could Problem Be the Scope Base?
Two Forum members, ExPiper and Dickn52, suggested checking the scope base, recounting their past experiences with troublesome bases. This was intelligent — anyone with a POI problem should check all the optics attachments:
“Went crazy one day chasing my impacts on a 100-yard target. Shots would group fine for three then go nuts for 4-5. I cranked and un-cranked for about an hour. Then I reached up and the base wobbled on the rifle. Removed scope, tightened base screws and back in business.” — Dickn52
“Years ago I had a problem [where] shots were climbing with almost every shot. I was blaming the scope. However, when removing the scope I noticed that the 20 MOA base was cracked and getting wider with every shot. Needless to say I replaced the base and the problem was solved. — ExPiper
Eureka Moment — The problem was the BARREL, not the Scope
There were many helpful suggestions, but member PirateAmmo steered LB to the real problem — a loose BARREL: “We had a problem on a home-built AR-platform rifle once, barrel was loose a tad…”
Member Snert chimed in: “Yep — I had a PPC that suddenly went 19″ low. Picked up gun off bench by barrel and felt a wiggle. I tightened the barrel and the POI went 19 inches up”.
Problem Solved — Barrel Tightened up and POI Back to Normal
The gentleman with the POI problem took the advice of PirateAmmo and checked his barrel. BINGO! Low and behold, the barrel WAS loose.
LB posted: “Barrel loose by about 2%, checked it twice before and didn’t find it the first two times”.
After LB re-tightened his barrel, his rifle started shooting normally again. No more shooting low by 1-2 inches. Problem solved. The fix didn’t cost a penny and now LB doesn’t have to send a perfectly good optic back to the manufacturer.
Lesson learned? Check ALL the variables before you assume a scope has gone bad. Along with the barrel, also check your action screw tension, and of course the scope base and rings.


 I did want a minimum no-turn neck optimized for Lapua brass. The drawing indicated that the reamer would cut a .281″ neck and a throat of 1.0315″. This was very close to ideal, though I did have to turn two thousandths off the necks of Lapua 6BR brass after I necked it up. I resized using a .277″ bushing and the loaded rounds came out to be .279″. Realizing that this was in the ball park, I decided to go with the Elk Ridge Reamer and build a 25 BR that could shoot 110gr or 115gr bullets. Now the question was where to get a match-grade 25-caliber barrel. I called quite a few of the custom barrel-makers, including BlackStar Barrels in Texas (no longer operating). I have had wonderful success with the BlackStar barrel on my 6BR “Chantilly” — it delivered great accuracy and impressive velocities. Since the 25 BR was so similar, I went with another BlackStar. I ordered a 10-twist, 6-groove, 1.250″-diameter straight-contour tube.
 After chambering, the barrel finished at 1.245″ diameter and 27.5″ inches with an 11° crown. I actually had the throat lengthened to accept both Berger 110gr and 115gr bullets. The bases of the FB 110-grainers sit flush with the neck-shoulder junction, when they are seated .010″ into the lands. With the longer 115gr VLDs, the bottom of the bearing surface (i.e. start of boat-tail) is just about even with the neck-shoulder junction.
 For her debut in competition, I took “Peppermint” to our local 600 yard F-class match. Shooting the Berger 115s with 31.5 grains Varget, she won with a perfect score of 200 with 14 Xs. At my club, we use a SR3 target. The X-Ring measures 3″ in diameter and the 10-Ring measures 7″. At the match there were some very good shooters with top-flight custom rifles in accurate calibers such as 6.5-284 and 22 Dasher. I was very fortunate to come out on top, but I give the credit to Peppermint’s good bench manners and outstanding accuracy.
 Now that I have several calibers in the BR cartridge family, (22 BR, 6mm BR, 6.5 BR, 7 BR, and a 30 BR), it is my humble opinion that they each have their own place. A varmint hunter’s dream, the 22 BR can push a bullet faster and more accurately than the 22-250. With an 8-Twist barrel, the 22 BR can send an 80gr SMK to 600 yards with extreme accuracy.


 This video was made with the help of the


