If two barrels are better than one, then why not three? That’s the thinking behind the exotic Bockdriling BD14 from Blaser, unveiled at the 2014 IWA Show in Germany. This three-barrel Bockdrilling firearm works as a shotgun, large-caliber rifle, and small-caliber rifle all in one. Even with all those barrels, the BD14 is relatively light, at 3.3 kg (7.26 lbs) without optics. That makes this a nice, carry-around gun for stalking. As you’d expect from Blaser, the twin triggers are crisp and precise, with a pull weight of just 1.43 lbs (650 grams). The front trigger is for the large-caliber rifle barrel, while the rear trigger works both the shotgun and small-caliber barrels, via a tang-mounted selector. These firearms are rare in the USA — and quite expensive. The only Blaser BD 14 we could find on GunBroker had a $9099.95 asking price. That works out to over three grand per barrel.
Here’s what Blaser USA has to say about its unique three-barreled BD 14:
“The ‘Bockdrilling’ is, put simply, an over/under (O/U) rifle-shotgun combination with a smaller caliber rifle-barrel… on the side. The barrel arrangement [allows] for an extremely slender receiver, making the BD14 exceptionally huntable.
The [patent-pending] Vertical Block Lockup… combines an extremely compact and solid block lockup in a closed system within the monoblock with the comfortable handling of a classic break-action rifle.
The double lock permits, if needed, a rapid second shot, the front trigger always releasing the large rifle-caliber. The … barrel selector actives the shotgun barrel when in position ‘top’ and activates the smaller rifle caliber in position ‘bottom’.”
Why Does Anyone Need Three Barrels?
The Blaser website explains: “As hunters, we learn to expect the unexpected, whether in a blind or stalking, so it’s understandable that we dream of a firearm that will allow us to take advantage of any situation. With the Bockdrilling BD14, Blaser has developed the perfect blind and stalking firearm – compromises are finally a thing of the past.”
Design Features of the Bockdrilling BD 14 Tri-Barrel Gun
The BD14 has a double-lock system so that a second shot can be taken without having to recock the firearm. Blaser says: “Thanks to the free-floating barrels, point of impact remains constant even with a quick succession of shots, no matter which barrel was fired first. The extremely strong vertical block lock on the BD14 helps contribute to the high degree of precision.”
Story idea from EdLongrange. We welcome reader submissions.
If you are looking to acquire a reliable, accurate rifle for a late fall hunt, Howa can be a good choice. Howas feature smooth-running actions with fine two-stage HACT triggers. A Howa barreled action can also be a good basis for a DIY project. But some folks have heard that it may be difficult to find stocks, or to fit an after-market barrel. That’s not true. There are many stock options available, and in this article, Bill of RifleShooter.com shows that it is easy to remove the factory-installed barrel with the right tools. We think a Howa makes a fine basis for a varmint rig or field rifle. Or you can build a tactical rifle as Bill did. You can start with the factory barrel and when you want/need more accuracy, then have a gunsmith install a custom barrel from Krieger Barrels, Lilja Barrels or other quality brand.
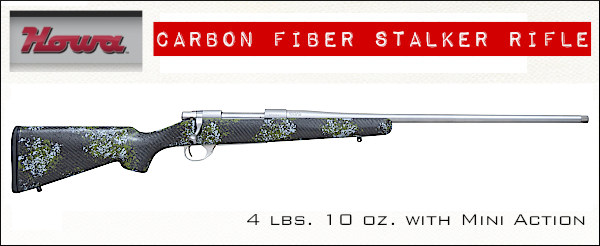
The Carbon Stalker is an excellent ultralight factory option, weighing just 4.6 lbs. with Mini Action (before optics). All Howa Carbon Fiber Stalker rifles come with a Sub-MOA Guarantee and Lifetime Warranty.
What You Need to Know About Howa 1500-series Rifles
Tech Feature by Bill, editor of RifleShooter.com
Consider this article the “Howa 1500 Overview”. There has been a lot of interest in Howa rifles and barreled actions imported by Legacy Sports International. In addition to being able to buy a complete rifle from a dealer, Brownells sells barreled actions in a wide variety of calibers and configurations. In this post we are going to take a look at the Howa 1500 series.
Howa Rifles — General Background
Howa is a Japanese heavy machinery company. One of its product lines are firearms, which are imported into the United States of America by two different companies, Legacy Sports International and Weatherby. Legacy sells the 1500 under the manufacturers name while Weatherby re-brands the guns as the Weatherby Vanguard. In general, the finishes on the Weatherby rifles are more refined than the LSI-imported 1500s.
General Evaluation of Howa 1500 Rifles
I’ve found Howa 1500s to be solid, entry-level rifles that are capable of sub-MOA accuracy out of the box. I’ve actually purchased two Howa rifles I’ve tested because I like them so much. The gun below, a Howa Mini-Action in 7.62×39 Russian, is one of my favorite factory guns to shoot.
Check out this three-shot group I drilled at 100 yards with the rifle above and 125-grain Sierras. It took a lot of work and load development to get there, but when it did, it worked well.
Howa 1500 HACT 2-Stage Trigger
Howa 1500s feature the very nice Howa HACT trigger. This is an adjustable, two-stage trigger, set for about 3 pounds (combined stages). Crisp and repeatable, this is an excellent trigger for a factory gun. There is no annoying Glock-style safety lever in the middle of the trigger blade. The 2-stage design and pull weight range works well for a hunting rifle or a rig for PRS competition. Rifleshooter.com says the Howa trigger is “one of the best factory triggers, along with Tikka. I’ve found the Howa trigger superior to a Remington 700 — the Howas doesn’t need to be replaced.”
Writing for the Western Outdoor News, WONews.com, Steve Comus has field-tested the HACT Trigger. Steve writes: “I always liked two-stage triggers, because of the way I could take-up the slack and then actually know when the rifle was going to go off. The take-up on the [HACT] trigger was fast and easy. The crisp, positive release when pressure was put on during the second stage [reminded me] of some of the target rifles I shot through the years.”
Howa Actions — Three Options
Howa offers three action lengths: Mini, Short, and Long. You can see the bolts for the three action lengths in the image below. The Mini-Action has similar external dimensions to the Remington Model Seven, however, the Mini-Action’s bolt does not travel as far to the rear. This is a mixed bag. The upside is you have a quicker action (shorter bolt throw). The downside is you are limited to shorter rounds such as the .223 Remington, 7.62×39mm Russian, and 6.5 Grendel. But if you need a bigger cartridge, just choose the standard or long action Howa variant.
Howa 1500 vs. Remington 700 — Important Differences
Is the Howa 1500 a Remington 700 clone, or some kind of improved Remington 700? No, not really. While the top radius of the Howa 1500 does match the Model 700, and they can both use the same two-piece scope bases, there are a number of differences.
If you look at the Howa 1500 alongside the Remington 700 you’ll note the M700 is a round action, while the Howa is a flat-bottom action. In many ways the Howa’s bottom half reminds me of a push-feed Winchester. This means the chassis and stocks that support a Howa 1500 are not V-block based like you’ll find on a 700, instead they have a flat bottom. While the bolt of the Howa is similar in external appearance to the Model 700, it does offer some improvements, notably an M16-style extractor and a firing pin assembly that can be easily removed without tools.
Howa 1500 action screws are metric and are in a different location from the 700. The Howa 1500 has an integral recoil lug that accepts the front action screw, this means you have more of the front action screw engaging the action. WARNING: If you install it into a poorly-fitted stock or action you may bind it.
Can a Howa Action Be Used for a Custom Rifle Project?
Absolutely! You can either buy a barreled action from Brownells and throw it in a chassis system/stock of your choice or you can use a stripped action to build a custom rifle. If you are in the chassis market, MDT offers a wide variety of chassis in different price ranges. All have worked well for me.
How to Remove Howa Factory Barrel from Action
You may have heard internet grumblings about removing Howa barrels. Some keyboard commandos say they are extremely difficult to remove without a relief cut. Well Bill at Rifleshooter.com demonstrates that Howa barrels can be removed without trouble, provided you have the right tools. Watch this video:
Watch Howa Barrel Removal Video — Quick and Easy (Click Speaker Icon for Audio)
Q: Is it difficult to remove a barrel from a Howa 1500?
A: Not very. I’ve heard from some smiths that worked on Howas (years ago) that the factory barrels are difficult to remove. However of the half dozen or so Howa barrels that I’ve pulled, they’ve been very easy. I use a Brownells action wrench with the top piece for a Rem Model 700 and the flat bottom resting against the flat on the wrench.
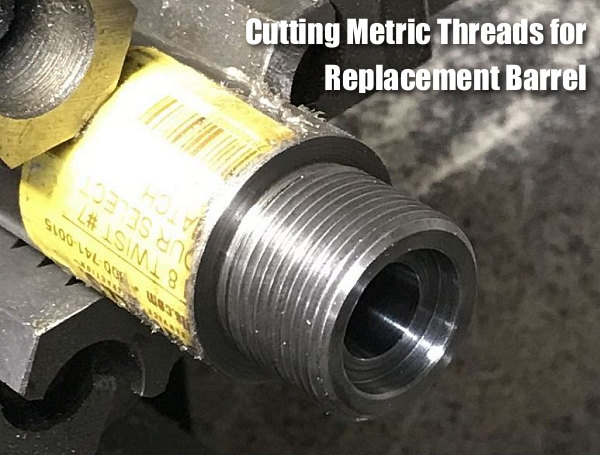
Howa Actions Require Metric Barrel Threads
It’s easy to thread a barrel for a Howa action. You just have to cut metric threads — most lathes out there can cut them. I cut the threads below on a manual lathe using change gears. [Editor: John Whidden cuts metric tenon threads with a CNC lathe. “It’s easy,” John tells us, “No issue whatsoever.”]
Using Howa Actions for Custom Rifles
I have built a few customs with Howa actions. Below is one of my favorite, a .308 Winchester. It consists of a Howa 1500 action, Shilen Select Match Rem Varmint contour barrel\, and Modular Driven Technologies (MDT) ESS chassis. Great rifle and it hammers!
Many barrel-makers mark the twist rate and bore dimensions on their barrel blanks.
Does muzzle velocity change with faster or slower barrel twist rates? Absolutely, but much less than you might think. Faster twist rates do slow down bullets somewhat, but the speed loss is NOT that significant. With Bartlein .308 Win barrels of identical length and contour, a 1:12″-twist barrel was only 8 fps faster than a 1:8″-twist barrel. That was the result of testing by Applied Ballistics.
The Applied Ballistics team tested six (6) same-length/same-contour Bartlein barrels to observe how twist rate might affect muzzle velocity. This unique, multi-barrel test is featured in the book Modern Advancements in Long Range Shooting, Vol. 1. That book includes other fascinating field tests, including a comprehensive chronograph comparison.
Barrel Twist Rate vs. Velocity — What Tests Reveal by Bryan Litz
When considering barrel twist rates, it’s a common belief that faster twist rates will reduce muzzle velocity. The thinking is that the faster twist rate will resist forward motion of the bullet and slow it down. There are anecdotal accounts of this, such as when someone replaces a barrel of one brand/twist with a different brand and twist and observes a different muzzle velocity. But how do you know the twist rate is what affected muzzle velocity and not the barrel finish, or bore/groove dimensions? Did you use the same chronograph to measure velocity from both barrels? Do you really trust your chronograph?
Summary of Test Results
After all the smoke cleared, we found that muzzle velocity correlates to twist rate at the average rate of approximately 1.33 FPS per inch of twist. In other words, your velocity is reduced by about 5 FPS if you go from a 1:12″ twist to a 1:8″ twist. — Bryan Litz
Savage Test Rifle with Six Bartlein Barrels
Most shooters don’t have access to the equipment required to fully explore questions like this. These are exactly the kinds of things we examine in the book Modern Advancements in Long Range Shooting, Vol. 1. In that book, we present experiments conducted in the Applied Ballistics lab. Some of those experiments took on a “Myth Buster” tone as we sought to confirm (or deny) popular pre-conceptions. For example, here’s how we approached the question of barrel twist and muzzle velocity.
Six .308 Win Barrels from Bartlein — All Shot from the Same Rifle
We acquired six (6) barrels from the same manufacturer (Bartlein), all the same length and contour, and all chambered with the same reamer (SAAMI spec .308 Winchester). All these barrels were fitted to the same Savage Precision Target action, and fired from the same stock, and bench set-up. Common ammo was fired from all six barrels having different twist rates and rifling configurations. In this way, we’re truly able to compare what effect the actual twist rate has on muzzle velocity with a reasonable degree of confidence.
Prior to live fire testing, we explored the theoretical basis of the project, doing the physics. In this case, an energy balance is presented which predicts how much velocity you should expect to lose for a bullet that’s got a little more rotational energy from the faster twist. In the case of the .30 caliber 175 grain bullets, the math predicts a loss of 1.25 fps per inch-unit of barrel twist (e.g. a 1:8″ twist is predicted to be 1.25 fps slower than a 1:9″ twist).
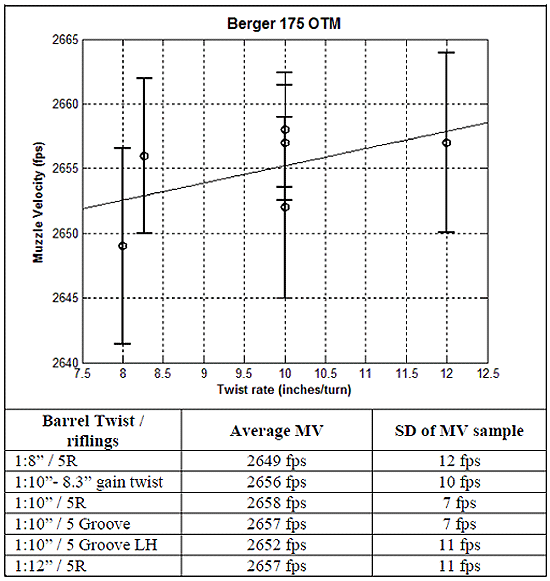
Above, data shows relationship between Twist Rate and Muzzle Velocity (MV) for various barrel twist rates and rifling types. From fast to slow, the three 1:10″ twist barrels are: 5R (canted land), 5 Groove, 5 Groove left-hand twist.
We proceeded with testing all 6 barrels, with twist rates from 1:8″ to 1:12″. After all the smoke cleared, we found that muzzle velocity correlates to twist rate at the average rate of approximately 1.33 fps per inch of twist. In other words, your velocity is reduced by about 5 fps if you go from a 1:12″ twist to a 1:8″ twist. [Editor: That’s an average for all the lengths tested. The actual variance between 1:12″ and 1:8″ here was 8 FPS.] In this case the math prediction was pretty close, and we have to remember that there’s always uncertainty in the live fire results. Uncertainty is always considered in terms of what conclusions the results can actually support with confidence.
This is just a brief synopsis of a single test case. The coverage of twist rates in Modern Advancements in Long-Range Shooting Vol. 1 is more detailed, with multiple live fire tests. Results are extrapolated for other calibers and bullet weights. Needless to say, the question of “how twist rate affects muzzle velocity” is fully answered.
Other chapters in the book’s twist rate section include: · Stability and Drag — Supersonic
· Stability and Drag — Transonic
· Spin Rate Decay
· Effect of Twist rate on Precision
Other sections of the book include: Modern Rifles, Scopes, and Bullets as well as Advancements in Predictive Modeling. This book is sold through the Applied Ballistics online store at thescienceofaccuracy.com. Modern Advancements in Long Range Shooting is also available as an eBook in Amazon Kindle format.
Most of us own a .223 Rem rifle. Now, thanks to our friends at Rifleshooter.com we can assess exactly how velocity changes with barrel length for this popular cartridge.
Rifleshooter.com performed an interesting test, cutting the barrel of a .223 Rem rifle from 26″ all the way down to 16.5″. The cuts were made in one-inch intervals with a rotary saw. At each cut length, velocity was measured with a Magnetospeed chronograph. To make the test even more interesting, four different types of .223 Rem/5.56 ammo were chron’d at each barrel length. The Rifleshooter.com team that conducts these tests has a full-service gun shop, 782 Custom Gunworks — visit 782guns.com.
Test Barrel Lost 25.34 FPS Per Inch (.223 Rem Chambering)
How much velocity do you think was lost, on average, for each 1″ reduction in barrel length? The answer may surprise you. The average speed loss of the four types of .223/5.56 ammo, with a 9.5″ shortening of barrel length, was 240.75 fps total (from start to finish). That works out to an average loss of 25.34 fps per inch.
5.56/.223 Barrel Cut-Down Speed Test 26″ to 16.5″
Start FPS at 26″
End FPS at 16.5″
Total Loss
Average Loss Per Inch
UMC .223 55gr
3182*
2968
214
22.5 FPS
Federal M193 55gr
3431
3187
244
25.7 FPS
Win m855 62gr
3280
2992
288
30.3 FPS
Blk Hills .223 68gr
2849
2632
217
22.8 FPS
*There may have been an error. The 25″ velocity was higher at 3221 fps.
Rifleshooter.com observed: “Cutting the barrel from 26″ to 16.5″ resulted in a velocity reduction of 214 ft/sec with the UMC 223 55-grain cartridge, 244 ft/sec with the Federal M-193 cartridge, 288 ft/sec with the Winchester M855 cartridge and 217 ft/sec with the Back Hills 223 68-grain match cartridge.”
How the Test Was Done
The testers described their procedure as follows: “Ballistic data was gathered using a Magnetospeed barrel-mounted ballistic chronograph. At each barrel length, the rifle was fired from a front rest with rear bags, with five rounds of each type of ammunition. Average velocity and standard deviation were logged for each round. Once data was gathered for each cartridge at a given barrel length, the rifle was cleared and the bolt was removed. The barrel was cut off using a cold saw. The test protocol was repeated for the next length. Temperature was 45.7° F.”
See More Barrel Cut-Down Tests on Rifleshooter.com
Rifleshooter.com has performed barrel cut-down tests for many other calibers/chamberings including 6mm Creedmoor, .308 Winchester, and .338 Lapua Magnum. See these test results at Rifleshooter.com.
Much Different Results with 6mmBR and a Longer Barrel
The results from Rifleshooter.com’s .223/5.56 test are quite different than the results we recorded some years ago with a barrel chambered for the 6mmBR cartridge. When we cut our 6mmBR barrel down from 33″ to 28″ we only lost about 8 FPS per inch. Obviously this is a different cartridge type, but also our 6mmBR barrel end length was longer than Rifleshooter.com’s .223 Rem start length. Velocity loss may be more extreme with shorter barrel lengths. And, of course, different cartridge types and powder/bullet combinations will yield different results.
Montana-based PROOF Research has released a revealing video showcasing carbon fiber firearms technology and the company’s barrel-making process. Viewers will find the 8-minute film an intriguing introduction to composite barrel-making, which employs aerospace carbon fiber wrapped around a steel barrel core. The video showcases the high-tech machines used at PROOF’s production facilities.
This video shows how PROOF Research employs aerospace-grade, high-temperature composite materials to build match-grade carbon fiber-wrapped barrels.
Dr. David Curliss, General Manager of PROOF Research’s Advanced Composite Division, and former head of the U.S. Air Force High Temperature Composites Laboratory, explains how aerospace expertise helps in the development of PROOF’s firearms-related products: “We are able to provide premier materials for PROOF Research for firearms barrels applications as well as the aerospace market. We’re probably the only firearms technology company that has composite materials in orbit around the earth.”
Barrel-maker Dan Lilja’s website, RifleBarrels.com has an excellent FAQ page that contains a wealth of useful information. On the Lilja FAQ Page you’ll find answers to many commonly-asked questions. For example, Dan’s FAQ addresses the question of barrel life. Dan looks at factors that affect barrel longevity, and provides some predictions for barrel life, based on caliber, chambering, and intended use.
NOTE: This article was very well-received when it was first published. We are reprising it for the benefit of readers who missed it the first time.
Dan cautions that “Predicting barrel life is a complicated, highly variable subject — there is not a simple answer. Signs of accurate barrel life on the wane are increased copper fouling, lengthened throat depth, and decreased accuracy.” Dan also notes that barrels can wear prematurely from heat: “Any fast varmint-type cartridge can burn out a barrel in just a few hundred rounds if those rounds are shot one after another without letting the barrel cool between groups.”
Q. What Barrel Life, in number of rounds fired, can I expect from my new barrel?
A: That is a good question, asked often by our customers. But again there is not a simple answer. In my opinion there are two distinct types of barrel life. Accurate barrel life is probably the type most of us are referencing when we ask the question. But there is also absolute barrel life too. That is the point where a barrel will no longer stabilize a bullet and accuracy is wild. The benchrest shooter and to a lesser extent other target shooters are looking at accurate barrel life only when asking this question. To a benchrest shooter firing in matches where group size is the only measure of precision, accuracy is everything. But to a score shooter firing at a target, or bull, that is larger than the potential group size of the rifle, it is less important. And to the varmint hunter shooting prairie dog-size animals, the difference between a .25 MOA rifle or one that has dropped in accuracy to .5 MOA may not be noticeable in the field.
The big enemy to barrel life is heat. A barrel looses most of its accuracy due to erosion of the throat area of the barrel. Although wear on the crown from cleaning can cause problems too. The throat erosion is accelerated by heat. Any fast varmint-type cartridge can burn out a barrel in just a few hundred rounds if those rounds are shot one after another without letting the barrel cool between groups. A cartridge burning less powder will last longer or increasing the bore size for a given powder volume helps too. For example a .243 Winchester and a .308 Winchester both are based on the same case but the .308 will last longer because it has a larger bore.
And stainless steel barrels will last longer than chrome-moly barrels. This is due to the ability of stainless steel to resist heat erosion better than the chrome-moly steel.
Barrel Life Guidelines by Caliber and Cartridge Type
As a very rough rule of thumb I would say that with cartridges of .222 Remington size you could expect an accurate barrel life of 3000-4000 rounds. And varmint-type accuracy should be quite a bit longer than this.
For medium-size cartridges, such as the .308 Winchester, 7×57 and even the 25-06, 2000-3000 rounds of accurate life is reasonable.
Hot .224 caliber-type cartridges will not do as well, and 1000-2500 rounds is to be expected.
Bigger magnum hunting-type rounds will shoot from 1500-3000 accurate rounds. But the bigger 30-378 Weatherby types won’t do as well, being closer to the 1500-round figure.
These numbers are based on the use of stainless steel barrels. For chrome-moly barrels I would reduce these by roughly 20%.
The .17 and .50 calibers are rules unto themselves and I’m pressed to predict a figure.
The best life can be expected from the 22 long rifle (.22 LR) barrels with 5000-10,000 accurate rounds to be expected. We have in our shop one our drop-in Anschutz barrels that has 200,000 rounds through it and the shooter, a competitive small-bore shooter reported that it had just quit shooting.
Remember that predicting barrel life is a complicated, highly variable subject. You are the best judge of this with your particular barrel. Signs of accurate barrel life on the wane are increased copper fouling, lengthened throat depth, and decreased accuracy.
Benchrest Barrel Life — You May Be Surprised
I thought it might be interesting to point out a few exceptional Aggregates that I’ve fired with 6PPC benchrest rifles with barrels that had thousands of rounds through them. I know benchrest shooters that would never fire barrels with over 1500 shots fired in them in registered benchrest matches.
I fired my smallest 100-yard 5-shot Aggregate ever in 1992 at a registered benchrest match in Lewiston, Idaho. It was a .1558″ aggregate fired in the Heavy Varmint class. And that barrel had about 2100 rounds through it at the time.
Another good aggregate was fired at the 1997 NBRSA Nationals in Phoenix, Arizona during the 200-yard Light Varmint event. I placed second at this yardage with a 6PPC barrel that had over 2700 rounds through it at the time. I retired this barrel after that match because it had started to copper-foul quite a bit. But accuracy was still good.
We talked with the experts at Bartlein Barrels. They confirmed that they have seen many, many more barrels harmed by crown damage caused by improper cleaning than by anything else. If you use a bronze brush, Bartlein recommends that you REMOVE the BRUSH after it passes through the muzzle. This is because the bristles take a set (pointing to the breech) during the out-stroke. In other words the bristles angle back as you push towards the muzzle from the breech. If you drag the brush backwards at the muzzle, you force these bristles to reverse direction abruptly right as they cross the delicate crown. In time, that can damage the crown. NOTE: John Krieger of Krieger Barrels also advises his customers not to pull a bronze brush backwards across the crown.
Response to Skeptics
Whenever we’ve published similar advice, given by guys who are producing some of the most accurate barrels in the world, some readers get extremely angry. They say, “You’re crazy! I’ve was pullin’ triggers when you were still in diapers. I’ve got Hall of Fame points and I say there’s no way a phosphor bronze brush can ever do anything to steel. You’re full of it.” Well, these guys are entitled to their opinion. But here’s our response. Number one, we’re just telling you what the barrel-makers are telling US. Don’t kill the messenger. Number two, many of the guys who say bronze brushes can’t affect the crown are the same guys who feel they need to recrown their barrels every 400-500 rounds (Do we see a connection?). Third, if you don’t think a softer material can affect steel, look at the steel ferrules of a well-used fishing rod — there the steel is worn away by plastic. (With time, water will wear away granite.) Lastly, this Editor can tell you I’ve seen the damage myself, first-hand, using a magnifying glass on much-brushed benchrest barrels. Right at the muzzle, the top edge of the lands had sharp, jagged edges that looked like little shark’s teeth, or the edge of a serrated knife. By contrast, a new barrel will have a nice, smooth straight edge along the top of the lands at the muzzle.
Also Be Careful with Jags
Bartlein’s experts also told us to be careful about the jags you use. Dewey-style jags in particular can cause problems. These have a long shaft with multiple rings with diamond-pattern “teeth”. The teeth are designed to grip a patch. The problem is that the lower rings may be exposed below the patch fabric, so the teeth can grind directly on the rifling and/or crown. Bartlein says Dewey-style metal jags can damage a crown very quickly if any of the toothed rings are exposed, metal-on-metal. Tim North of Broughton barrels also advises against using the Dewey-style jags with toothed rings. Interestingly, Dewey uses the same type of diamond-shaped teeth on the bottom of its “Crocogator” primer pocket tool, so you know those knurled teeth can scrape.
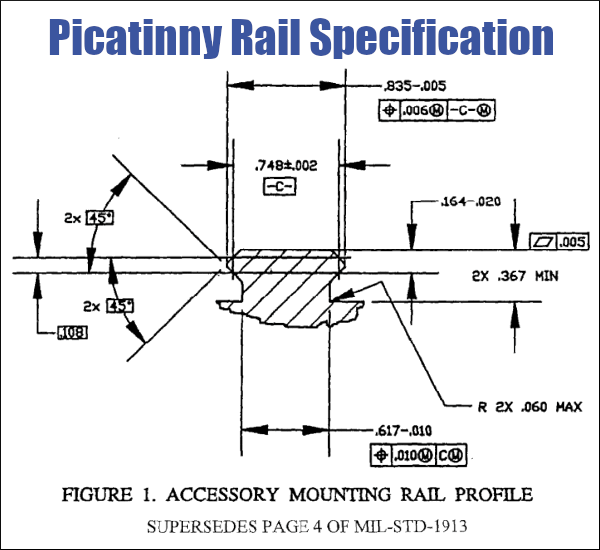
Readers often ask “What’s the difference between a Weaver scope rail and a Picatinny Rail?” The answer is not as simple as it seems. The dimensions of a Picatinny Rail should be consistent (from one rail-maker to another), since there IS a government spec. Conversely, there is some variance in “Weaver-style” rails. The width of the groove is the most important difference between Picatinny Rails and Weaver-type rails. “Mil-spec” Picatinny rails will have a grove width of 0.206″ while Weaver rails typically have a narrower, 0.180″ groove width.
Does your rifle have a Weaver Rail or Picatinny Rail? Check the dimensions to be sure.
A while back, Brownells had a helpful GunTech™ Article that discussed the Picatinny Rail vs. Weaver Rail. That article explained:
What are the differences between the ‘Picatinny’ and the ‘Weaver’ systems? The profile of the two systems is virtually identical. Depending on the quality of the machining done by the manufacturer, the two systems should be indistinguishable from the profile. The key difference lies in the placement of the recoil grooves and with width of the grooves. MIL-STD-1913 (Picatinny) grooves are .206″ wide and have a center-to-center width of .394”. The placement of these grooves has to be consistent in order for it to be a true Picatinny MIL-STD system. Weaver systems have a .180” width of recoil groove and are not necessarily consistent in a center-to-center measurement from one groove to the next.
In many instances, a Weaver system has a specific application that it is machined for, so interchangeability is not necessarily an issue. A MIL-STD-1913 system must adhere to the specifications listed above in order for it to be considered MIL-STD, since the military desires uniformity in the recoil grooves to allow for different systems to be mounted on the weapon with no concern for compatibility.
Now, what does this mean? Boiled down, it means that accessories designed for a Weaver system will, in most cases, fit on a Picatinny system. The reverse, however, is probably not the case. Due to the larger recoil groove, Picatinny accessories will not fit a Weaver system. There are, of course, exceptions to every rule, but for a good rule-of-thumb, [full-width] Picatinny won’t fit Weaver, but Weaver accessories WILL fit Picatinny.
This video shows the process of cut-rifled barrel-making by Krieger Barrels, one of the world’s best barrel manufacturers. Krieger cut-rifled barrels have set numerous world records and are favored by many top shooters. The video show the huge, complex machines used — bore-drilling equipment and hydraulic riflers. You can also see how barrels are contoured, polished, and inspected.
For anyone interested in accurate rifles, this is absolutely a “must-watch” video. Watch blanks being cryogenically treated, then drilled and lathe-turned. Next comes the big stuff — the massive rifling machines that single-point-cut the rifling in a precise, time-consuming process. Following that you can see barrels being contoured, polished, and inspected (with air gauge and bore-scope). There is even a sequence showing chambers being cut.
Click Arrow to Watch Krieger Barrels Video:
Here is a time-line of the important barrel-making processes shown in the video. You may want to use the “Pause” button, or repeat some segments to get a better look at particular operations. The numbers on the left represent playback minutes and seconds.
Krieger Barrel-Making Processes Shown in Video:
00:24 – Cryogenic treatment of steel blanks
00:38 – Pre-contour Barrels on CNC lathe
01:14 – Drilling Barrels
01:28 – Finish Turning on CNC lathe
01:40 – Reaming
01:50 – Cut Rifling
02:12 – Hand Lapping
02:25 – Cut Rifling
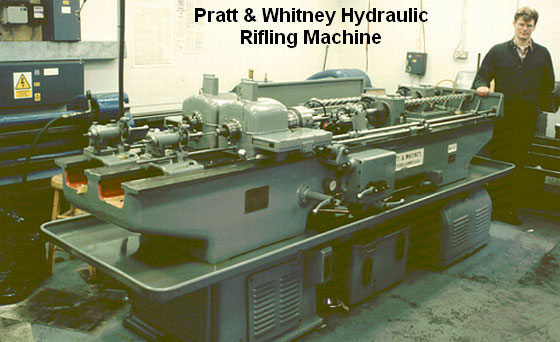
“At the start of World War Two, Pratt & Whitney developed a new, ‘B’ series of hydraulically-powered rifling machines, which were in fact two machines on the same bed. They weighed in at three tons and required the concrete floors now generally seen in workshops by this time. Very few of these hydraulic machines subsequently became available on the surplus market and now it is these machines which are sought after and used by barrel makers like John Krieger and ‘Boots’ Obermeyer. In fact, there are probably less of the ‘B’ series hydraulic riflers around today than of the older ‘Sine Bar’ universal riflers.” — Geoffrey Kolbe, Border Barrels.
Photos and Facebook post by Tactical Rifle Shooters
Yet another .300 Blackout disaster. Unfortunately, that .300 Blackout cartridge can fit in a .223 Rem chamber. Shooting a .308-caliber bullet in .223 bore is a recipe for disaster.
The .300 AAC Blackout aka “300 BLK”, is a compact 30-caliber cartridge designed to work in AR-15 rifles. It has a shorter cartridge case to accommodate the bigger 30-caliber bullet while still fitting in a standard AR-15 magazine. Unfortunately, that’s the danger. A careless shooter can toss a .300 Blackout cartridge in with .223 Rem rounds without noting. And because the case-head size is the same as the .223 Rem (5.56×45) the rifle’s bolt assembly will happily chamber and fire the .300 BLK round. Problem is, that forces a .308 diameter bullet down an undersized .223-caliber bore. Not good!
This images were provided by Tactical Rifle Shooters on Facebook. The message was clear: “Don’t try to run 300 Blackout in your .223/5.56mm. It won’t end well. The problem is identical rifles and identical magazines but different calibers.”
Image from Accurate Shooter Forum. Cutaway shows the jammed .30-Cal bullet:
For those who MUST have a .300 Blackout, here are some things you can do:
1. Use different colored magazines for .300 Blackout vs. .223 Rem.
2. Fit all your uppers with caliber-labeled ejection port covers.
3. Mark .223 Rem upper handguards with the caliber in bright paint.
4. Mark all .300 BLK Rounds with heavy black marker.
Comments by Folks Who Viewed these .300 Blackout Disaster Photos:
“The .300 Blackout is simply a badly-designed round. A properly-designed round would have had a feature in the shape that would have prevented cross loading in the first place.” — D. Santiago
“I almost made that mistake… I had a magazine of 300 BLK inserted in my .223/5.56 all night. Fortunately, I never pulled the trigger. Once I realized the mistake, I almost got ill. [After that incident] I no longer own a 300 BLK.” — B. Welch
“Happened to me hog hunting from a helo. Gun exploded in my face.” — B. Hood
“Fire-forming projectiles [is] so wrong in centerfire!” — M. Stres
“Had some dude come into the store the other day wanting .300 Blackout ammo to shoot in his 5.56 AR. It took 15 minutes of explaining for him to understand you got to have a .300 Blackout Upper!” — R. Williams


 Howa 1500 HACT 2-Stage Trigger


 The
The 


