This is one amazing .50-caliber rifle. Along with the lever-actuated falling block, it has a massive swing-out breech block like you’d find on a field artillery piece. The action is so wide that the sights and scope are offset. You’ve heard of the “Beauty and the Beast”? Well here the Beast IS a Beauty….
View looking down at the action from above. Note the hinged Breech-Block.
This extraordinary example of gunsmithing art was crafted by the late J.T. (Jack) Smith of Sudbury, Massachusetts. This unique .50-caliber rifle features an aircraft machine gun barrel cut down to 38-1/4″, and turned octagon to round (in the style of Schuetzen rifles). The round portion of the barrel is tapered with a heavy boss at the muzzle. The barrel is inlaid in gold on both left and right side top flats. Custom scope bases are fitted to the receiver and to the top of the barrel. These hold an externally adjusting Unertl 15X target scope in offset scope mounts.
Huge Falling Block Receiver
The massive receiver (8″ long x 2-3/4″ wide x 3″ deep) is remarkable in design and construction. Machined from solid steel, the action incorporates several unique features. Note the hinged Howitzer-style breech block which swings to the right and mortises into the back of the receiver in the loading slot, providing a back-up for the falling block. We’ve never seen anything like that on any rifle. The one-piece floorplate/lever incorporates a Ruger No. 1-style latch which locks into the bottom of the trigger guard. The entire floorplate and lever retract downward. Firing is accomplished by means of a striker mounted in the hinged (swing-out) breech block. This is manually cocked with another lever on top of the breech block. Dropping the falling block activates the extractor which removes the spent case.
Offset Sights
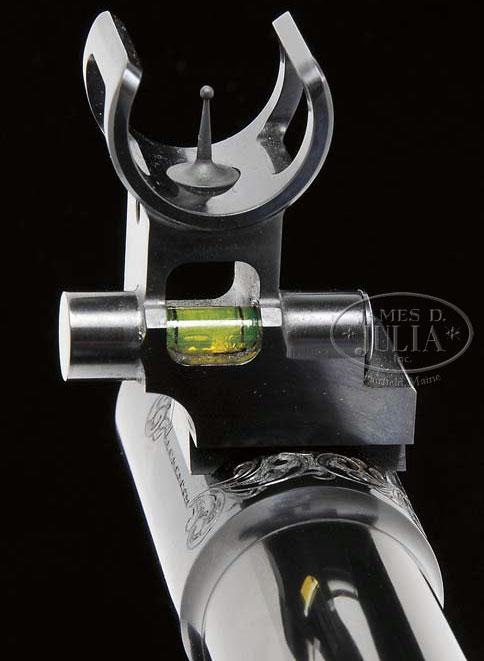
This rifle features a custom-built, windage-adjustable offset front sight plus a custom-built vernier tang sight with aperture offset to the left side. The sights are offset to the left for a right-handed shooter, to correct for the extreme width of the receiver, allowing a more comfortable head position.
This rifle started life as a factory Remington VSSF in .204 Ruger. With new stock, new barrel, and other upgrades it is now an ultra-accurate .223 Rem competition rifle.
Flames in the Snow…
Forum Member Brandon Schlund (aka “Bois Blanc Boy”), photographed this handsome flame-themed F-TR rifle against the snowy background of Michigan’s Bois Blanc Island. Brandon posted this to our long-running Pride and Joy Rifle Forum thread. He notes: “This is my first F-TR build, which started out as a stock Remington .204 Ruger. I had the action blue-printed, firing pin was bushed by Speedy, and I had a new bolt handle and knob installed by John Pierce.” This rifle is now fitted with a 3-groove Pac-Nor 1:6.5″-twist barrel chambered in .223 Remington to shoot the 90gr Bergers. Other components are: Kelbly KTS stock, Phoenix bipod, and Sightron 8-32x56mm SIII scope. Brandon says: “It took a long time to get this gun where it is now but I’m truly happy with it!” Here’s the “before” photo:
The Transformation — F-TR Comp Rig Made from Rem .204 Ruger Varminter
This rifle started out as a “plain Jane”, factory Remington VSSF II. I shot it on varmint hunts in factory configuration. Then I decided to transform the rifle into a .223 Rem F-TR gun. As the .204 has the same bolt face as a .223 made sense to go in that direction since I would be able to use the gun for varmint hunting as well as F-TR.
While I had shot some F-Class matches with my dad (Joe Schlund aka Bench on AccurateShooter) it wasnt much. When we did a PD hunt in Wyoming I primarily shot my .204 but I decided I wanted a cartridge that could reach out a little further and also do double duty — competition and varminting.
The first step in transforming this rifle was selecting a barrel. We ordered a Pac-Nor, 1:6.5″-twist, 3 groove, 30.5″ heavy Palma contour. This was then chambered with a PTG .223 ISSF reamer with 0.169″ freebore to run the .224 caliber heavies. I went with Pac-Nor because both my father and my brother Mark (aka Labrador2 on AccurateShooter) owned Kelbly-built F-TR rifles with the same barrels. Mark and my father couldn’t be happier with the results. Pac-Nor has great customer service along with a short wait time.
I sent the barrel and the factory Remington 700 action down to Kelbly’s where they did the chambering and cut the threads. While Kelbly’s had my action I had them blueprint it. A Kelbly KTS stock with the three-way buttplate and adjustable cheek piece came next. After getting behind Dad’s rifle and Mark’s gun there was no reason to look any further. With all its adjustments, the KTS stock fits very comfortably.
Loading for the .223 Rem with H4895 and 90gr Bergers
As a .223 Rem, this rifle has proven very accurate — it’s a bullet-hole cutter at 100 yards (low twos easy). Our best load is with Hodgdon H4895, 90gr Berger VLDs, CCI BR4 primers. This load is running at about 2835 FPS but YMMV (remember this is a LONG 30.5″ barrel). The Bergers are loaded .008″ into the lands with base-to-ogive of 2.035″.
Our loading technique may be tedious — with lots of sorting and measuring. But brother Mark, father Joe, and I all enjoy the steps. Our three .223 Rem match guns all love the same load which makes loading much easier. Believe it or not we use a Hornady Lock-N-Load progressive ammo plant, which is great when loading for three guns. Our consistency is fantastic with run-out a mere .001-.0015.
We also turn necks and weigh our primers. Does neck-turning and primer weighing really make a difference? Who knows but we try to eliminate more variables since we have to the time to do it, and we actually enjoy the procedures.
Pierce Engineering Installed Action and Modified Bolt
Being from Michigan, Pierce Engineering has done a lot of work for my family’s guns. For this project the Pierce team bedded the action and glued in a single-shot follower. The stock bolt handle/knob was too short for comfort in the KTS stock. Pierce added a longer handle and tactical knob to the bolt. I then installed a .223 Rem Lapua case base into the knob.
The complete .223 Rem rifle ready to shoot F-TR, as fitted with 8-32X56mm Sightron and Phoenix Bipod, weighs 17 pounds, 15 ounces.
Flame Graphics by Camo Creek Hydrographics
After the action was bedded by Pierce, the stock was sent to Camo Creek Hydrographics in Fenton, Michigan. I selected a flame-style design which Camo Creek applied through hydro-dipping. The stock went back to Pierce’s shop, which applied three coats of clear over the entire stock. The clear-coating really enhanced the flame graphics.
Firing Pin Bushed by Speedy
I sent the bolt to Thomas “Speedy” Gonzalez to have the firing pin hole bushed as otherwise the load could crater the primers pretty bad. Knowing I’d be shooting heavy-weight .22-Cal bullets with a stout load this was a good idea. Speedy also cut his trademark grooves into the bolt shroud which looks amazing. His work is top notch! There is zero cratering now, even with the hottest of loads.
Competition Components — 8-32x56mm Sightron and Phoenix Bipod
For an F-TR rig you need a quality high-magnification optic and a premium, wide-base bipod. I installed a 8-32x56mm SIII Sightron. This was another easy choice because of the attractive price and because my family has four other Sightrons that work great.
I installed a fore-end Picatinny rail to attach a Phoenix Bipod. I extended the Mariners wheel handles by adding short sections from an aluminum arrow shaft. This lets me adjust elevation without stretching forward. I also installed a Calvin Elite Timney Trigger set at 6 ounces.
How much did this all cost? Brandon tells us “I have roughly $2500 into the rebuild of the gun from a .204 Ruger to the .223 Rem.”
Bois Blanc Island in Michigan
Here on Bois Blanc Island we don’t have many amenities, but we do have the ability to shoot 550 yards at our local gravel pit on state land. It’s snow-bound right now as you can see. But later in the year this will be our close-to-home training center.
Winter at Bois Blanc Island, Michigan — Here’s the gravel pit where we can load test during warmer weather. When I took this photo, it was a “balmy” 10-degree day.
Rifle-maker Weatherby Inc. is finalizing its move to Wyoming, after leaving the politically hostile, high-taxation state of California. Weatherby’s directors are pleased with the move, which has many advantages for the company — not the least of which is getting away from the anti-gun policies of California’s corrupt, one-party-controlled state government.
Weatherby is nearing the final steps in the move to Sheridan, WY from Paso Robles, CA. Weatherby manufacturing has established residency in its new Sheridan, Wyoming facility effective March 1, 2019.
“When you see the words ‘Sheridan, WY’ stamped in the side of a Mark V action, it just looks right. We are excited to see the beginning of our manufacturing in Sheridan, Wyoming.”, says Adam Weatherby.
Weatherby Leaves Hostile Political Environment
Is Weatherby’s Wyoming move all about dollars and cents? Not entirely. California has become increasingly hostile to firearms manufacturers. TheFireamRack.com’s Dan Zimmerman observes: “[Weatherby] wanted to do business in a state that isn’t at war with the very products they make. A state that respects the Second Amendment and won’t try to claw back every single cent it can wring out of businesses located there. So Weatherby made the entirely rational choice to take their company to a place that values what they do.”
Gold and Silver Weatherby Commemorative Rifles
The first firearms built in the new facility in Sheridan will be two Wyoming Commemorative rifles, the Gold and the Silver (see photo at top). Both versions will be chambered in .300 Weatherby Mag and will feature the “Bucking Horse and Rider” engraved on the floor plate. The Gold version will feature highly-figured, exhibition-grade walnut while the Silver version will feature AAA walnut. Both Gold and Silver stocks will feature a mountain scene integrated into the fine line checkering. The receivers are highly decorated with beautiful engravings. The Gold version will also have gold and silver barrel bands and will include a custom leather case. The Gold Commemorative cost $10,000.00 MSRP with serial numbers starting at WY000001. The Silver Commemorative costs $6,500.00 MSRP with serial numbers starting at WY000501.
SEE Weatherby videos at Wby-TV.com. Here’s a video featuring Weatherby’s new home state of Wyoming.
Our friend Dennis Santiago was recently conducting training for a Southern California Police Department. During a training session one of the unit’s AR15s stopped functioning. The problem — the bolt in the AR rifle broke in half. Dennis states: “They ran the gun dry, broke for lunch, shot it again. They don’t like that. I personally like to flood the bolt wet with lube on training days. It prevents stuff like this. Given that, it’s a simple remove-and-replace fix.”
Here are some of the more interesting comments about this parts failure — an AR bolt that literally sheared in half:
“If I was a betting man [the steel] wasn’t made by Carpenter Steel. They are one of the few companies that use the correct [milspec-steel, C-158] called out on the drawing which they coincidentally developed. Most of the other companies that make [AR Bolts] use different steel with the same heat treat specification as what is called out which gives them the potential of being a little on the brittle side at the upper end of the tolerance. When it comes to the AR platform, bolts are probably the only part of the entire gun where I must admit to being a little bit of a brand snob.” David O’N.
[Editor’s Note: Actually Carpenter Steel does not make AR bolts. They are a steel supplier, and yes Carpenter did develop the original C-158 steel for AR bolts. Here is a contrary view, claiming that AISI 9310 Steel is actually stronger than milspec Carpenter C-158: 9310 Steel for AR Bolts.]
“Dry bolt and carrier shouldn’t cause that. Looks like a big pressure spike. What kind of ammo…?” Guy G.
Reply from Dennis: “55gr factory ammo.Piles of it.”
“Is that the new two-piece bolt everyone’s been talking about LOL?” — Darren R.
“Let me guess…the PD called you in cause they didn’t know why it stopped going ‘pew pew’?” — Jim O.
Reply from Dennis: “I was there today for qualifications. It broke during the rifle phase. Simple enough to fish the bolt parts out of the action. The training didn’t miss a beat. I have an armory full of the things.”
This rifle features a massive BAT “L” Round Action, McMillan Beast Stock, 38″ Bartlein 1:7″-twist Barrel, T5 Terminator Muzzle Brake, R.A.D. Recoil Reduction unit, and a customized Cheek Riser. The “Beast” stock name is appropriate — this rifle weighs a massive 38 pounds. Including the T5 brake, the finished barrel, chambered in .375 CheyTac, is 44″ long! All the work was done by Hall-of-Fame shooter and gunsmith Thomas “Speedy” Gonzales, of S.G. Precision LLC in San Antonio, Texas. If you want a rifle like this, Speedy says the lead time is 6-9 months. CONTACT SPEEDY, or call (210) 368-9010, or (972) 672-6630.
Speedy milled vents in the fore-end. He told us “when you’re burning 150+ grains of powder you need all the ventilation you can get to help reduce the barrel heat.”
There are many good brakes out there, then there’s the “TERMINATOR”! — Speedy
The Phoenix Bipod employs a lowering modification.
Krieger Barrels has some great news for Savage rifle owners. This fine cut-rifled barrel-maker, a long-term sponsor of AccurateShooter.com, now offers Pre-Fit (pre-chambered) rifle barrels for Savage actions. With a Krieger pre-chambered barrel, you save time and money — you don’t have to pay a gunsmith hundreds to cut the chamber, and wait weeks (or sometimes months). With the proper GO/NO-GO gauges and barrel nut wrench, most rifle-owners can install their own pre-fit barrel.
SAVAGE PRE-FITS NOW AVAILABLE
Choose from multiple calibers/chamberings and custom contours for large- and small-shank Savage actions. Call Krieger Barrels at (262) 628-8558 to start your order.
On February 26, Krieger announced: “We are happy to announce that we are now taking orders for Pre-Fit Savage barrels for their centerfire bolt action receivers! Many standard cartridges available for both large shank (1-1/8″) and small shank (1-1/6″) actions. You can order our standard contours or come up with a custom contour to fit your needs. Every detail is addressed to make these Pre-Fit Savage barrels the best they can be for your application.”
Pre-Fit Savage barrels start at $515.00 + S&H. Call today to discuss your needs and get a barrel order going! For more information visit KriegerBarrels.com or call Krieger at (262) 628-8558.
Company founder John Krieger hard at work at the Krieger Barrels production facility.
The Berger Southwest Nationals is taking place right now at the Ben Avery Range outside Phoenix, Arizona. At the SWN you’ll see prone rifles and tubeguns for sling shooters, F-TR rifles with fancy bipods, and high-tech F-Open rigs. You might also see a few TubeGuns converted to shoot F-Open off front rests. Yes this is an easy conversion thanks to Gary Eliseo’s clever PickleFork forearm attachment.
Forum Member Killick attached PickleForks to his handsome blue Eliseo R1 TubeGun now chambered in .284 Winchester, a top choice for the F-Open discipline. Killick explains: “Behold! An Eliseo R1 F-Classer. This started out as an R1 Long Range sling rifle (6XC) with a Borden TubeGun action. It is now rebarreled in .284 Win with Gary’s PickleFork fore-end adaptor. Props to Gary Eliseo at Competition Machine LLC.”
Killick adds: “I like how the original fore-end indexes off the back side of the front bag. No need for the front bumper attachment.” Check it out below:
PickleForks are rails that fit to the sides of the tubular fore-end/handguard on Eliseo Chassis systems. This allows you to use a pedestal-style front rest for F-Class competition. It also provides a much more stable platform for load testing, varmint hunting, or any kind of rest-assisted precision shooting. These new PickleForks transform a Tubegun into an ultra-stable, straight-tracking rig when used with a competition-style front rest.
Designer Gary Eliseo explains: “Now you can have the same super low-boreline, long wheelbase and vertical sides of our innovative F1 F-Class chassis system for your tube chassis. The PickleForks attach directly to the sides of the F-Class/Tactical fore-ends, no modifications are required. They are very rigid with no flex or twist and make the rifle track like it’s on rails.” The Eliseo Competition Machine PickleForks are offered for a very reasonable $70.00 per pair, with Cerakote finish. You get two metal units, one for each side of the fore-arm. For more info, visit GotXRing.com or call (928) 649-0742.
This week we return to our 6mmBR.com roots with an article on David Bergen’s slick 24″ Drop-Port Viper. This was one of the first 6BR rifles we featured. David, who hails from Belgium, developed this project over many months, and the gun proved to be a true tack-driver, with the ability to group in the Ones, even with the heavy boat-tail bullets. David talks about the build and his reloading methods while action designer Jerry Stiller provides technical insights into the design features of his Viper action.
It was a long journey looking for the perfect custom action to build my new rifle. I searched the internet and visited various forums. I even re-read all my old Precision Shooting magazines to find what I was looking for. One evening I conferred by telephone with Mr. Jerry Stiller of Stiller’s Actions in Texas. He patiently answered all my questions. That moment I decided that I wanted a Viper Drop-Port action. [Editor: Sadly, the Viper Drop-Port is no longer in production.]
Component Selection At the heart of this gun is a Viper action. This medium-sized action can handle cartridges from a small BR up to a 6.5-284. (Stiller’s smaller Cobra action is for PPC and BRs only.) The Viper is milled from aluminum. This keeps weight down while still allowing Vipers to have a large bedding surface like a Stolle Panda.
At first I was a bit sceptical about the aluminum’s toughness, but Mr. Stiller informed me that the action is the perfect marriage between steel and aluminum. The bolt is hard-chromed and the action body is hard-anodized. This gives it two surfaces that resist wear and make an already-slick action even slicker. Stainless steel is used for all the heavy-stress points including barrel threads, locking lugs, and the rear camming surface. The bolt is made of steel with a very light, small-diameter firing pin to prevent primer piercing with heavy loads. Everything is held very concentric to the bore axis. The Viper is a very smooth action mainly because the design and the precise machining of the camming surfaces. Combined with optimal bolt-lift timing, this gives a smooth action. Stiller also keeps the tolerances very tight on these actions, though they are as fast-handling as any you can buy. The trigger is of course a Jewell BR model.
The rifle is chambered in 6mmBR Norma, my favorite cartridge. I have two HV-contour Shilen match barrels, both with 1 in 8″ twists and finished lengths of 24 inches. The chamber has a .266″ neck so neck-turning is necessary. Freebore is .060″ but combined with a 1.5° throat angle this lets me seat a wide range of bullets from 58 grains up to 107 grains.
The stock is a McMillan Edge with moulded-in gray and black marble swirl. I specified 60% black and dark and light gray both at 20%. I went with the Edge stock because I was always pleased with McMillan products and because it had a very low center of gravity. I wanted the barrels very low in the stock because I think it makes the gun track better.
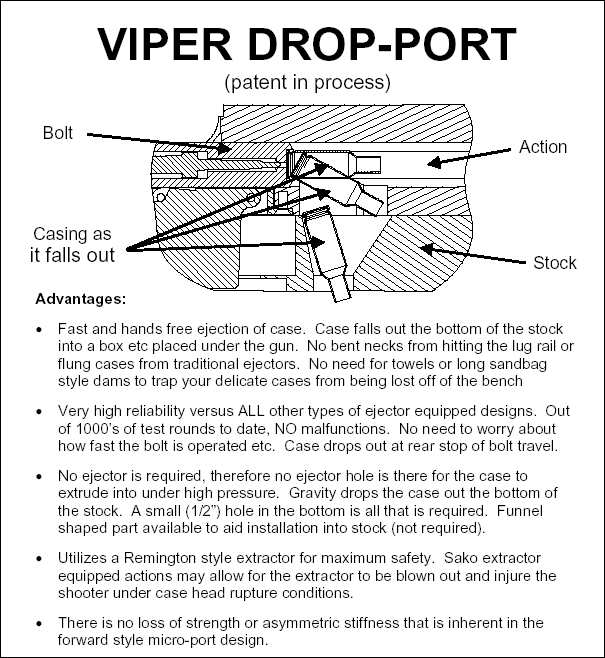
Details of the Drop-Port–with VIDEO! The visible part of the Drop-Port is a cartridge-sized cut-out in the floor of the action. This tapers into a funnel shape that lets the spent case fall nose-first through a single hole in the underside of the stock. The Drop-Port is carefully sized so that empty brass will fall through from gravity but a loaded round won’t. I’ve found that getting a BR case to eject 100% reliably in a standard action is not easy. The round is short and fat so it clears the chamber too early and the ejector pushes the cases out the extractor too fast. This can result in an empty case sitting in your action, no longer held by the extractor. Needless to say, this can slow you down during a stressful competition. When you get a Drop-Port you can forget all those problems.
Failure to eject is NOT going to happen with a Drop-Port. The system just works every time, and it’s FAST. Right-Click on the Media Player image and “Save As” to download a video (6.9 megs) showing me cycling the action during live fire.
One smart feature of the Drop-Port is the extractor location. A Remington extractor is located at the bottom of the bolt. This way the case is supported by the extractor until the front of the case lines up with the cut-out in the action. At that moment the front of the case tilts down and the rim slips out of the extractor. In the stock there is a funnel which collects the case. The case drops out of the rifle through a single small hole in front of the trigger guard.
Building an Accurate Load Tools and Recipes I start with new Lapua cases and after full-length sizing I trim them with a Wilson trimmer. Then I turn the necks for a .264″ neck diameter with a Lapua 105 seated in the brass. After fire-forming I use a “semi-custom” Harrell’s full-length sizing die with bushing. I use a .262 bushing with the moly-coated bullets. This Harrell’s die is the best I ever used — it gives very low run out. [Editor’s Note: Harrell’s stocks a number of dies with various internal dimensions. You send them three fire-formed cases and they’ll pick out a die that fits your brass the best. The cost is very reasonable.] Overall the excellent concentricity I’m seeing with my rounds is a combination of a superb chambering job, a neck-turned Lapua case and the Harrell’s sizing die. The die is supplied with a brass bushing that allows you to measure the amount of sizing you are doing.
For seating I use both a Wilson inline seater (hand die) and a Forster seating die that threads into a press. The latter gets the most use because I find it easier to use. Run out with both is around 0.001″ or better measured on the bullet.
Load development was very easy. I started with Varget and all loads … shot well. Vihtavuori N150 also shot very well with… moly-coated Lapua 105s. To my delight, the light bullets are also shooting very well in the 1:8″ twist. Nosler Ballistic Tips are giving very good results with a case full of N140. I’ve also tried N150, N540 and AA 2520. For all loads I’ve been using CCI BR4. Bullets are seated well into the lands with square marks showing. This gives an overall length around 59 mm (2.32″), depending on the bullet used.
Shooting the Rifle–How It Performs The rifle is very easy to shoot and it is very accurate, but it had some drawbacks in the beginning. First there is the stock. It is designed for bench shooting and on a table it does this very well. I use a Caldwell front rest and a Protektor rear bag. When shooting prone I’ll also use the rest but the cheek weld is not ideal (the Edge was optimized for free recoil shooting from the bench). The rings that are supplied with the action are rather high. I looked around and found some that were lower. This made shooting easier, but I still wasn’t satisfied. The gun was a bit nose-heavy. There is a weight system built into the stock, but it wasn’t enough to bring the gun in balance. I like the balance point to be just in front of the receiver ring. So I cut the rear off the stock and put in a larger tube and turned some weights to put in it. I also made up an aluminum butt plate. Then I installed a Harrell’s brake to cut recoil to a minimum. With these modifications, the rifle is now shooting the way I want. I think the Edge stock is a very good design for benchrest shooting but for prone shooting it has some shortcomings. I think the MBR is a better stock for shooting prone.
Muzzle Brake–Less Recoil, Same Excellent Accuracy After testing the barrel with different loads, I decided to put a brake on one barrel. Most of my guns are muzzle-braked and since I had two virtually identical barrels, I put a Harrell’s brake on one. The barrel had to be threaded to mount the brake and here I was a little concerned–I remembered the advice to “never mess with a winner”. The un-braked barrel was ultra-accurate and I was curious whether the process of fitting the brake might affect the accuracy.
Thankfully, my worries were unfounded. My targets showed no loss of accuracy — there was no evidence that the brake had caused any changes (except as to recoil). I have wondered though, perhaps the brake makes the gun more shootable and in that way compensates for some small accuracy loss that may be there? Whatever the case, the gun shoots just as tight as before, except now it’s a lot more user-friendly with less muzzle hop and less “push” on recoil.
This Rifle Literally Shoots Bug-Holes
And now I come to the end of the story. One day when testing the rifle at 100 meters (with brake installed), I spied a fly on the target. Well now, I thought, here is an interesting “precision shooting” challenge. I put the crosshair on the fly, squeezed the trigger, and the fly was history.
One shot, one kill. Now THAT is impressive precision. If you look closely you’ll see what’s left of Mr. Fly around the bullet hole. Or “bug-hole” as you Americans would say. This kind of performance is a real confidence-booster for the trigger-puller, let me tell you.
The Drop-Port — Simple Yet Advanced
Jerry Stiller tells us: “The drop-port ejects the case out the bottom of the action using only gravity. No ejector plunger is required so the system is as foolproof as anything can be. (A normal spring-loaded ejector creates an uneven load on one side of the case head.) Unlike other ejection systems, micro-ports etc., a Drop-Port doesn’t require tuning or adjusting, and just works. Many top shooters tell us they can cycle rounds faster with a Drop-Port action than with any other design.”
“The engineering of the Viper reflects some key design objectives. I wanted it to be able to fit standard commercially available stocks and have a barrel fit-up that was well known in the industry. I liked the idea of the larger bedding area and higher stiffness of the aluminum actions, so I chose the Panda footprint and barrel tenon for the Viper. I also made some changes to what was available at the time to make the product better. I used a smaller diameter firing pin to eliminate primer piercing, hard anodized all the aluminum parts for corrosion resistance and to make the surface hard and slick. The bolts are also coated for the same reasons.
We’re starting to see barrel tuners employed in more competitive disciplines than ever — from 100 yards to 1000 yards. And even some varmint hunters are employing tuners or tuner/brakes now. This allows them to dial in accuracy with different loads (when shooting hundreds of rounds in a weekend). Here’s a quick over-view of the potential benefits of tuners.
Commentary by Mark Walker, Sierra Bullets Product Development Manager This story originally appeared in the Sierra Bullets Blog. Visit SierraBullets.com.
Some people love tuners and others hate them. I use them on my rifles and I’ve had more than one person ask me why on earth I would put one of those things on my barrel. I’ve even had a national long range champion tell me to unscrew it and throw it into Lake Erie on my next trip to the pits at Camp Perry. However, there are other shooters that swear by them and have many match wins to back it up.
It’s an indisputable fact that tuners do have an effect on a rifle’s accuracy, however how much is somewhat open for debate. The large heavy target barrels that we use for benchrest or F-class may not be affected as much by a tuner as a lighter weight sporter type barrel. Each barrel that I’ve installed a tuner on not only showed improvement in accuracy but also displayed a wider load window. The increased accuracy is because of the ability to adjust the tuner to the load, however I believe the wider load window is due to the added weight of the tuner slowing down the barrel vibrations. These are both very important aspects of having a very accurate rifle.
While better accuracy and a wider load window are two areas of improvement, I believe the most important feature of a tuner is the ability to adjust the tune during the middle of a match. This is especially important during matches where you must load all your ammo earlier and cannot make adjustments to the load during the match. If you happen to miss the load, instead of having to deal with a gun that isn’t shooting you can make an adjustment to the tuner and hopefully improve the accuracy of the rifle.
While I’ve laid out several ways that a tuner can help, there are also a few ways that tuners can cause problems. They add weight so if you are shooting a discipline that has weight limits on the rifle, you may not be able to install a tuner and still make weight. Sometimes, a barrel just doesn’t show improvement with a tuner installed. These are few and far between, but it is something to consider. If you make an adjustment to the tuner in a match, you need to make sure you move it in the right direction. Adjusting a tuner in the wrong direction can cause very large groups. And finally, if they aren’t tightened properly, tuners can come loose during firing which will cause a lot of problems as well.
As you can see, tuners have both positive and negative aspects. In my personal experience, the positives far outweigh the negatives so I will continue to use them on all of my competitive rifles. If you’ve been thinking about installing a tuner, hopefully some of the information that I’ve presented will help you make an informed decision.
In the video below, Forum member (and F-Class ace) Erik Cortina shows how to install a Jewell Benchrest trigger into a Kelbly F-Class Panda action. You could follow the same simple procedure to install a Jewell in a standard Panda action. Kelbly’s sell both standard and long versions of the F-Class Panda action. Both versions feature integral recoil lugs in the front.
To see more detail in this “how-to” video, you can zoom it to full-screen size. Simply click the full-screen icon (4-cornered frame) just to the right of the YouTube logo in the lower right.




 Flame Graphics by Camo Creek Hydrographics


 Building an Accurate Load
 Shooting the Rifle–How It Performs

 This Rifle Literally Shoots Bug-Holes