|
|
August 24th, 2017

A while back, RifleShooter online magazine published a list of the purported Ten Best Bolt-Action Rifles of All Time. Ten classic rifle designs (including the Remington 700 and Winchester Model 70) were featured with a paragraph or two explaining their notable features.
“Best” Lists Stir Controversy…
These Top 10 lists are always controversial. While most readers might approve of half the entries, there are always some items on the Top 10 list that some readers would challenge. Here is RifleShooter’s Top 10 list. What do you think? Are there some other bolt-actions that are more deserving?
|
1. Springfield M1903
2. Mauser 98
3. Winchester Model 70
4. Remington Model 700
5. Weatherby V |
6. Sako L61/AV
7. Savage Model 110
8. Ruger M77
9. Tikka T3
10. Mannlicher-Schonauer |

August 22nd, 2017

A carpet is used up front for smoother tracking with the Joy-Pod’s flat, ski-style feet. The arms of the Joy-Pod were painted to match the stock. The rear bag features low-drag material on the ears.
The F-Class World Championships recently concluded in Canada. Our friend Derek Rodgers won the individual F-TR Championship using a rifle with a McMillan Xit stock and Kelbly F-Class Panda action. If you’re wondering what a modern F-TR competition rifle looks like, here is a new F-TR build from Forum member DM.Oakes.

Modern F-TR Rig with Borden Action, Krieger Barrel, and SEB Joy-Pod
This handsome .308 Win F-TR rig features a smooth-running Borden BRM action, 30-inch 1:10″-twist Krieger barrel, and an X-Ring Laminated Wood stock. Up front is a coaxial “Joy-Pod” joystick bipod. This is a state-of-the art, wide footprint bipod used by many competitors at the Worlds in Canada. The long joystick allows the “driver” to quickly adjust both elevation and windage in a smooth, continuous motion. The Joy-Pod can be adjusted so it will hold setting during the shot — you don’t have to “hard-hold” the joystick. Many shooters let the joystick slide through their fingers as the rifle moves back on recoil. With a little practice (and careful placement of the rear sand-bag), the tracking is excellent and you can slide the gun right back to point of aim after each shot.
Action: Borden BRM
Trigger: Blue-printed Jewell BR
Barrel: Krieger 30″ / 4-Grove / 1:10″ twist (.30 Cal)
Chamber: .308 Winchester with 0.170 Freebore
Stock: X-Ring Laminated F-Class
Scope: Nightforce 12-42x56mm Competition
Potential Name: Blue Thunder

This F-TR rifle is shown during load testing with a LabRadar chronograph.
August 19th, 2017
Brian, a gunsmith at GA Precision, built this rimfire rig with GAP colleague Anthony Soukup.
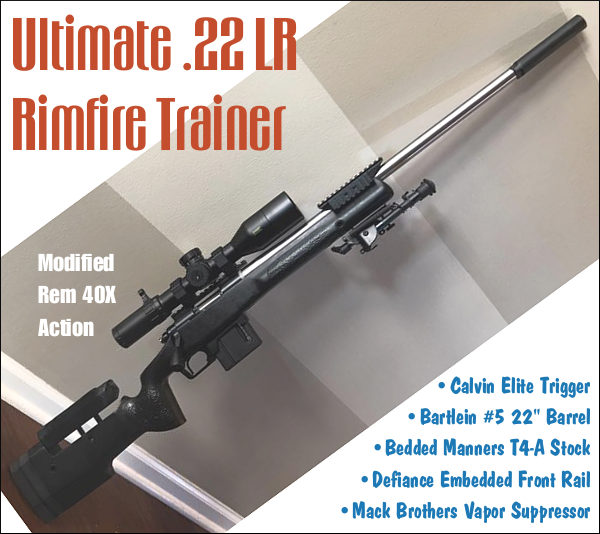
On his Facebook page, Tactical competitor Bryan Sikes posted a photo of a rimfire rig we really liked. Brian works at GA Precision. He and fellow GAP gunsmith Anthony Soukup built this rifle. With a modified Rem 40X action, Manners stock, Bartlein barrel, and Mack Brothers suppressor, this rig has top-quality components stem to stern. And Bryan tells us this rifle performs as good as it looks: “This is the baddest little .22 LR trainer ever. I’m stoked about it. With the barrel length and can, it’s the exact length of my regular comp rigs.” With length, balance, and ergonomics near identical to Bryan’s centerfire competition rifles, this 40X is a superb training tool.
|
• Modified Remington 40X Action
• Calvin Elite Trigger
• Bartlein #5 22″ Barrel
• Mack Brothers Vapor Suppressor |
• Bedded Manners T4-A Stock
• Defiance Embedded Front Rail (EFR)
• Harris Swivel Bipod with Handle
• Bushnell DMR2 Scope w/ G3 Reticle |
Many readers wanted to know about the bottom metal and the detachable box magazine. Bryan Sike reveals: “The magazine setup is designed specifically to replicate my actual competition rifles. The bottom metal is for use with AI magazines and uses a standard M5 type inlet just like any centerfire completion rifle. In this case with the .22LR, Mike Bush designed a high reliability rimfire magazine using the same outside dimensions as an AI magazine. This rifle was built no different from any other. The action was modified and trued, barreled, fully bedded, etc. using ALL components common to centerfire match rifles.” The Rem 40X action was modified by Modacam Custom Rifles to work as a repeater with box mags.

Bryan adds that a new rimfire action is in the works: “My preference is modified Remington 40X actions and the soon-to-be available, V-22 action from Mike Bush. Both of which are TRUE repeaters and don’t feed from a Savage magazine. This rifle feels nothing like a .22 LR and that was the whole point.”

Why You Need a .22 LR Tactical Cross-Trainer
Many guys who shoot long-range tactical matches practice with .22 LR rifles of similar configuration. Rimfire ammo is way more affordable than centerfire, you do not need a big range facility, and shooting rimfire saves wear and tear on your centerfire rifle. Further, for learning how to read the wind, there really is no better training tool than a .22 LR, even as close as 50 yards.
Our Friend “DesertFrog”, who shoots tactical matches in Southern California, explains: “I used to shoot an average of 200 rounds of .308 Match ammo a month for training (50 per weekend). These days I shoot maybe an average of 50 rounds of .308 Win per month and probably around 600 rounds of .22 LR. Using mainly the .22 LR for practice did NOT hurt my standings in actual competitions. I shot my .308 just as well in matches, but saved the cost of hundreds of rounds of .308. If I didn’t reload and was still buying boxes of Federal Gold Medal Match .308 Win [at $1.00/round], this would be a savings of [$150 per month on the centerfire ammo.]” Money saved is money earned.
Targets for Rimfire Cross-Training
| SPECIAL BONUS–Rimfire Tactical Precision Targets
These FREE targets by DesertFrog are offered in Adobe Acrobat format for easy printing.
CLICK HERE to download all six targets as a .ZIP archive.
|
August 16th, 2017

Wouldn’t it be great if you could have one match rifle that could do double-duty — shoot position matches (with sling), and then function as an F-Open gun with front rest? Now that’s possible with Gary Eliseo’s clever “PickleFork” accessory for his line of tubeguns. This accessory also works great for load testing and varmint hunting.
Competition Machine’s Gary Eliseo is a very smart designer as well as a talented shooter. The inventor/builder of the popular Competition Machine Tubegun chassis systems, Gary has come up with something new, which he calls the PickleForks. These are rails that fit to the sides of the tubular fore-end/handguard on his chassis systems. This allows you to use a pedestal-style front rest for F-Class competition. It also provides a much more stable platform for load testing, varmint hunting, or any kind of rest-assisted precision shooting.
These PickleForks transform a Tubegun into an ultra-stable, straight-tracking rig when used with a competition-style front rest.

Gary explains: “Now you can have the same super low-boreline, long ‘wheelbase’ and vertical sides of our innovative F1 F-Class chassis system for your tube chassis. The new PickleForks attach directly to the sides of the F-Class/Tactical fore-ends, no modifications are required. They are very rigid with no flex or twist and make the rifle track like it’s on rails.” The new Eliseo Competition Machine PickleForks are offered for a very reasonable $70.00 per pair, with Cerakote finish. (You get two metal units, one for each side of the fore-arm). For more information, visit www.GotXRing.com or call (928) 649-0742.

New Product Tip from EdLongrange. We welcome reader submissions.
August 11th, 2017

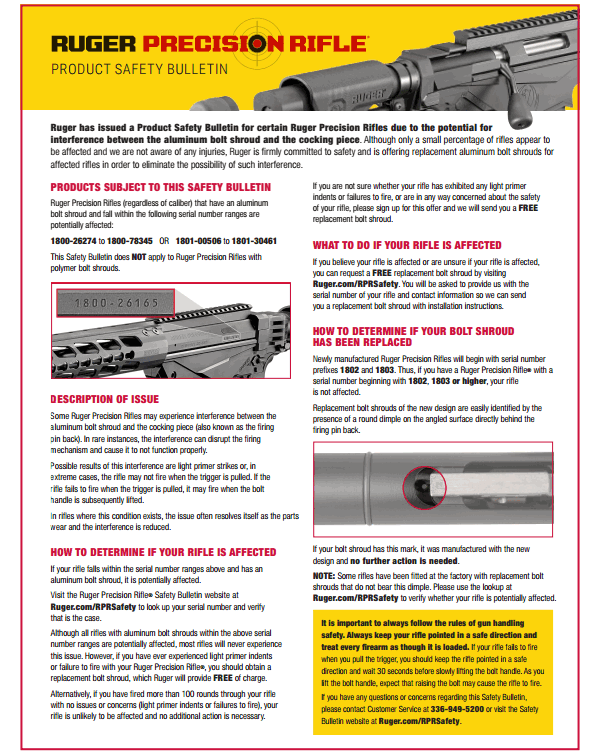
Ruger has issued a Product Safety Bulletin for certain Ruger Precision Rifles due to the potential for interference between the aluminum bolt shroud and the cocking piece (also known as the firing pin back). This can lead to light primer strikes. The real problem is that: “If the rifle fails to fire when the trigger is pulled, it may fire when the bolt handle is subsequently lifted”. NOTE: Ruger Precision Rifles with polymer bolt shrouds are NOT affected.
Although only a small percentage of rifles appear to be affected and there are no reported injuries, Ruger is offering replacement aluminum bolt shrouds for affected rifles in order to eliminate the possibility of bolt/shroud interference. View Safety Bulletin PDF
AFFECTED RIFLES: Ruger Precision Rifles (regardless of caliber) that have an aluminum bolt shroud and fall within the following serial number ranges are potentially affected:
SN 1800-26274 to 1800-78345 OR SN 1801-00506 to 1801-30461

If you believe your rifle is affected or are unsure if your rifle is affected, you can request a FREE replacement bolt shroud by visiting Ruger.com/RPRSafety.
DESCRIPTION OF ISSUE
Some Ruger Precision Rifles may experience interference between the aluminum bolt shroud and the cocking piece (aka the firing pin back). In rare instances, the interference can disrupt the firing mechanism and cause it to not function properly. Possible results of this interference are light primer strikes or, in extreme cases, the rifle may not fire when the trigger is pulled. If the rifle fails to fire when the trigger is pulled, it may fire when the bolt handle is subsequently lifted. In rifles where this condition exists, the issue often resolves itself as parts wear and interference is reduced.
CLICK IMAGE Below to Read Full RPR Safety Bulletin PDF
August 6th, 2017

Helpful “How-To” Maintenance Videos from BAT
BAT Machine’s website features an extensive Video Archive with a selection of helpful videos for custom action owners. Among BAT’s collection of videos, you’ll find informative clips covering about bolts, ejectors, action maintenance, and other technical matters. Here are two examples:
How to Grease and Maintain Your BAT Action and Bolt:
”
How to Remove (and Re-Install) Firing Pin Assembly:
More Helpful Information on the New BAT Website
One thing that people might easily miss is the large spreadsheet that details the specs of all BAT Machine actions. To download that .xlsx spreadsheet to your hard drive, Right Click (and “Save As”) this link: ACTION CONFIGURATION PART LIST. After opening the spreadsheet, on the “ACTION” worksheet, you’ll find action model, body shape, weight, bolt faces available, and tenon spec among several other items. Note that there are two worksheet tabs (look down at the bottom left). Use these spreadsheet tabs to switch between “Action” and “Accessories”.
Also, on the BAT website FAQ page, you’ll find prints for barrel tenon machining, firing pin sizes, torque specs, and tons of other very helpful info. This is well worth a look. — ELR Researcher.
Story Tip from Boyd Allen and EdLongrange. We welcome reader submissions.
July 31st, 2017
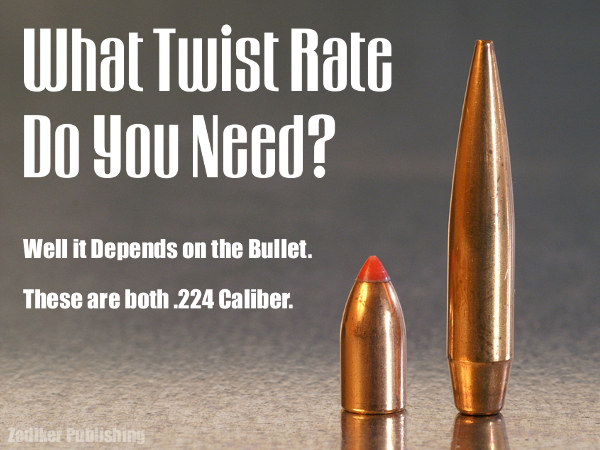
Here’s an extreme range of .224-Caliber bullets: 35gr varmint bullet and 90gr match bullet. Of course, along with bullet length/design, you need to consider MV when choosing twist rate.
Even with the same caliber (and same bullet weight), different bullet types may require different rates of spin to stabilize properly. The bullet’s initial spin rate (RPM) is a function of the bullet’s muzzle velocity and the spin imparted by the rifling in the barrel. You want to ensure your bullet is stable throughout flight. It is better to have too much spin than too little, according to many ballistics experts, including Bryan Litz of Applied Ballistics. Glen Zediker has some basic tips concerning barrel twist rates and bullet stability. These come from his latest book, Top Grade Ammo.
Choosing the Right Twist Rate
I’d always rather have a twist too fast than not fast enough. Generally… I recommend erring toward the faster side of a barrel twist decision. 1:8″ twist is becoming a “new standard” for .224 caliber, replacing 1:9″ in the process. The reason is that new bullets tend to be bigger rather than smaller. Don’t let a too-slow twist limit your capacity to [achieve] better long-range performance.
Base your next barrel twist rate decision on the longest, heaviest bullets you choose to use, and at the same time realize that the rate you choose will in turn limit your bullet choices. If the longest, heaviest bullet you’ll shoot (ever) is a 55-grain .224, then there’s honestly no reason not to use a 1:12″. Likewise true for .308-caliber: unless you’re going over 200-grain bullet weight, a 1:10″ will perform perfectly well.

Bullet Length is More Critical than Weight
Bullet length, not weight, [primarily] determines how much rotation is necessary for stability. Twist rate suggestions, though, are most usually given with respect to bullet weight, but that’s more of a generality for convenience’s sake, I think. The reason is that with the introduction of higher-ballistic-coefficient bullet designs, which are longer than conventional forms, it is easily possible to have two same-weight bullets that won’t both stabilize from the same twist rate.
Evidence of Instability
The tell-tale for an unstable (wobbling or tumbling) bullet is an oblong hole in the target paper, a “keyhole,” and that means the bullet contacted the target at some attitude other than nose-first.
 Increasing Barrel Length Can Deliver More Velocity, But That May Still Not Provide Enough Stability if the Twist Rate Is Too Slow Increasing Barrel Length Can Deliver More Velocity, But That May Still Not Provide Enough Stability if the Twist Rate Is Too Slow
Bullet speed and barrel length have an influence on bullet stability, and a higher muzzle velocity through a longer tube will bring on more effect from the twist, but it’s a little too edgy if a particular bullet stabilizes only when running maximum velocity.
My failed 90-grain .224 experiment is a good example of that: I could get them asleep in a 1:7″ twist, 25-inch barrel, which was chambered in .22 PPC, but could not get them stabilized in a 20-inch 1:7″ .223 Rem. The answer always is to get a twist that’s correct.
These tips were adapted from Glen’s newest book, Top-Grade Ammo, available at Midsouth. To learn more about this book and other Zediker titles, and read a host of downloadable articles, visit ZedikerPublishing.com.
July 30th, 2017

Our friend Doan Trevor is creating a new raffle rifle. This will be raffled off this fall to support the USA Palma Team. Doan is donating his labor and building the stock from a walnut blank. Pierce Engineering will supply the action and Brux Barrels will provide the barrel.
Doan tells us: “I have volunteered to build another raffle rifle for the U.S. Palma National Rifle Team. Work has begun. I am hoping to have this completed for the Spirit of America Match in Raton, NM this fall. The action has been donated by Pierce Engineering and the long Palma barrel has been donated by Brux Barrels. The one item we are lacking at this point is a Remington-style competition trigger.”
Doan says he will craft the stock from hand-selected American Walnut: “This is [my own] Doan Trevor prone design, modified to be used for F-TR. This can be shot either prone or F-TR (with bipod). This will be similar to the stock that I custom-designed for Derek Rodgers, which won several National Championships and other awards.” The photos below show Doan crafting the wood and starting the bedding on the 2017 U.S. Palma Team Raffle Rifle:


Another Doan Trevor Raffle Rifle — for the Veterans’ Team
What will the rifle look like when it’s complete? We can’t show you that yet, but here’s another custom Palma rifle Doan crafted for the 2011 U.S. Veterans’ Team. Doan says: “This is the finished rifle for the U.S. Veterans Palma Team raffle for 2011. It carries a unique serial number signifying the 2011 World Championships in Australia.”


July 26th, 2017
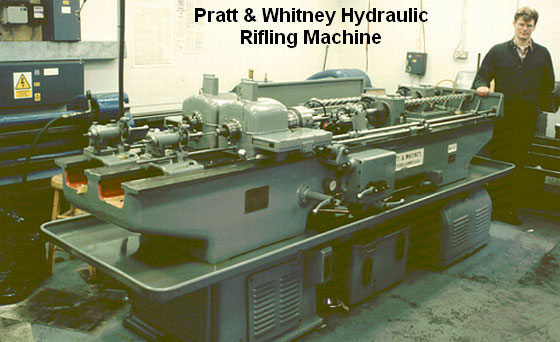
“At the start of World War Two, Pratt & Whitney developed a new, ‘B’ series of hydraulically-powered rifling machines, which were in fact two machines on the same bed. They weighed in at three tons and required the concrete floors now generally seen in workshops by this time. Very few of these hydraulic machines subsequently became available on the surplus market and now it is these machines which are sought after and used by barrel makers like John Krieger and ‘Boots’ Obermeyer. In fact, there are probably less of the ‘B’ series hydraulic riflers around today than of the older ‘Sine Bar’ universal riflers.” — Geoffrey Kolbe, Border Barrels.
How Krieger Builds Barrels
This video shows the process of cut-rifled barrel-making by Krieger Barrels, one of the world’s best barrel manufacturers. Krieger cut-rifled barrels have set numerous world records and are favored by many top shooters. The video show the huge, complex machines used — bore-drilling equipment and hydraulic riflers. You can also see how barrels are contoured, polished, and inspected.
Click Arrow to Watch Krieger Barrels Video:
For anyone interested in accurate rifles, this is absolutely a “must-watch” video. Watch blanks being cryogenically treated, then drilled and lathe-turned. Next comes the big stuff — the massive rifling machines that single-point-cut the rifling in a precise, time-consuming process. Following that you can see barrels being contoured, polished, and inspected (with air gauge and bore-scope). There is even a sequence showing chambers being cut.
Here is a time-line of the important barrel-making processes shown in the video. You may want to use the “Pause” button, or repeat some segments to get a better look at particular operations. The numbers on the left represent playback minutes and seconds.
Krieger Barrel-Making Processes Shown in Video:
00:24 – Cryogenic treatment of steel blanks
00:38 – Pre-contour Barrels on CNC lathe
01:14 – Drilling Barrels
01:28 – Finish Turning on CNC lathe
01:40 – Reaming
01:50 – Cut Rifling
02:12 – Hand Lapping
02:25 – Cut Rifling |
02:40 – Finish Lapping
02:55 – Outside Contour Inspection
03:10 – Engraving
03:22 – Polish
03:50 – Fluting
03:56 – Chambering
04:16 – Final Inspection |

July 25th, 2017

John Whidden of Whidden Gunworks has won his fifth Long Range National Championship, his second title in a row (he also won the LR Title in 2016). This year, competing at Camp Atterbury in Indiana, Whidden pulled together a gritty, come-from-behind victory. John won the title by shooting a perfect 450-28X (not dropping a point) in the final Palma match on the last day of the Long Range Championship. While Whidden, who finished at 1246-91X, edged runner-up Phillip Crowe (1245-68X) by just one point, John enjoyed a huge X-Count margin. Finishing third was past High Power and Long Range National Champion Nancy Tompkins (1244-65X). Here are the Top Ten finishers:

Whidden’s Perfect Palma Match
Whidden secured the 2017 LR Title by shooting “clean” (not dropping a point) in the tough Palma competition. In the NRA Palma match, rifles must be .223 Rem or .308 Winchester, with metallic sights (no scopes). The match is conducted at three yardages, 15 shots at each distance of 800/900/1000 yards, with unlimited sighters at 800 and two sighters at 900 and 1000.
John liked the Camp Atterbury facility and he credited his equipment for his 2017 victory: “With the change to the new Camp Atterbury venue, many shooters were a little unsure how things were going to shake out. But it all turned out really well. All of my equipment shot fantastic all week long — that certainly made shooting a big score easier.”
Whidden’s Championship-Winning Rifle
Since John captured his fifth Long Range crown with a superb performance in the Palma match, we thought we’d give readers a look at John’s very special Palma rifle. This unique .308 Win prone rifle features a Barnard “P” action in a converted aluminum Anschutz “Precise” smallbore (rimfire) stock. The combo of Barnard action and Anschutz ergonomics is hard to beat, says John, who told us: “this is easily the best Palma rifle I’ve ever had.” John told us this gun handles like no other: “After recoil, with this Anschutz stock, the sights fall right back on target — better than any other prone rifle I’ve shot”.
As a bonus, the Barnard “drop-in” required no modification of the Anschutz Precise stock. This means John can actually swap in his rimfire barreled action and shoot smallbore with the same stock.
Sling Rifle Evolved: The Ultra-Accurate Hybrid Palma Rifle
by John Whidden
The mental component of Long Range competitive shooting is always challenging but having tremendous confidence in the accuracy of your equipment is a huge benefit. There’s nothing to start your Palma match off well like knowing that you are shooting the most accurate Palma rifle you’ve ever owned.

Whidden Palma Rifle
Action: Barnard “P” (three lugs, 60° bolt lift)
Barrel: Bartlein 32″, Light Palma contour, cryo-treated by 300 Below.
Stock: Anschutz Precise aluminum smallbore stock, set up for centerfire barreled action.
Trigger: Barnard Two-Stage adjustable

Whidden’s Wonder-Gun: German Stock, New Zealand Action, American Barrel
John built this Palma rifle in early 2016. With it, John won back-to-back long-range Championships in 2016 (Camp Perry) and 2017 (Camp Atterbury). The major components are: Barnard ‘P’ action, Anschutz Precise smallbore stock, and Bartlein barrel. The caliber is .308 Win, as dictated by the Palma rules. Palma matches are fired from 800, 900, and 1000 yards utilizing iron sights only. No optical sights are allowed.
The Anchutz Precise stock is so well-designed that once I finished adjusting the details, I realized that my hold was about 1/3 smaller than with the stocks I shot previously. While in recoil the gun will track vertically and fall back down right on my own target just as it should. In the past, with my other Palma rifles, it was frankly sometimes a struggle to get them to settle back on target after a shot.
Whidden Gunworks has installed a variety of different actions in the Anschutz Precise stocks. Though the stocks are designed for the .22 LR caliber 2013 action rifles, we’ve successfully installed Barnard, Kelbly, Bat, Nesika, and Remington clone actions into them. The Barnard Model P makes a particularly simple installation because there is no modification necessary to the stock at all. A competitor can then shoot both his centerfire rifle as well as his smallbore gun in the exact same stock. The location of the trigger and bolt handle on the Barnard are positioned just right to make this work. Other actions do require at least some amount of modification to the stock, and we have found the Barnard works the best.
Barnard manufactures several models of actions as part of their lineup. All of the actions in the lineup use three lug bolts which give a shorter 60-degree bolt lift when opening and closing. All of the critical surfaces are machined after heat treating. This means that they are exceptionally true and square, more so than other actions. The Model P action is most familiar to Palma and F-Class shooters and are commonly seen on the firing line. The fact that Model P actions include an excellent two-stage trigger makes also the pricing very attractive.
Based on my previous excellent experiences, I selected Bartlein barrels for this rifle. When shooting internationally in the Palma matches we are restricted to 155 grain .308 bullets, but I made the unusual choice of a 1-10″ twist for these bullets. I’ve shot this fast twist for some years with the 155s with good success and it’s pleasing to know that Bryan Litz is finding benefits in some cartridges to shooting faster twist rates than we previously thought we needed. The load is Vihtavuori N140 Powder with Berger 155gr Hybrid bullets. The chamber is the 2011 Palma and the barrel is a Light Palma contour finished at 32” length. The barrel was cryo-treated by 300 Below. The point of impact isn’t changed at all by barrel heating and the accuracy is incredible regardless of the temperature of the barrel. This can’t be said of all the barrels I’ve owned.

Get Your Own Whidden Wonder-Gun for $4500.00
Like what you see — but wonder how much it will cost? Whidden Gunworks can build you a rig like this, fitting a centerfire barreled action in the Anschutz Precise stock. John tells us: “The price of a rifle like this one but without sights or mounts would be just under $4500.00. We attempt to keep all of the parts except the stock in inventory, so lead time should be under eight (8) weeks.”
Stock Offers Great Adjustability
 One thing that is quickly noticed about the Anschutz Precise stock is its adjustability. The engineers did a very good job of allowing many of these adjustments to be made while in the shooting position, most notably the cheekpiece adjustments. When a shooter picks up a Precise stock for the first time they also notice how narrow the fore-end is. This really contributes to reducing the pain in the forward hand in prone when shooting with a sling. This stock is, by far, the most comfortable sling stock I’ve ever handled. One thing that is quickly noticed about the Anschutz Precise stock is its adjustability. The engineers did a very good job of allowing many of these adjustments to be made while in the shooting position, most notably the cheekpiece adjustments. When a shooter picks up a Precise stock for the first time they also notice how narrow the fore-end is. This really contributes to reducing the pain in the forward hand in prone when shooting with a sling. This stock is, by far, the most comfortable sling stock I’ve ever handled.
This rifle was very accurate right away and very comfortable to shoot. I’ve built some really good shooting Palma rifles but this is easily the best Palma rifle I’ve ever had. The Barnard action with its superb quality and excellent two-stage trigger has been the best choice I could have made. When you can go to the firing line knowing that you have the very best, the foundation for success has been set.
|