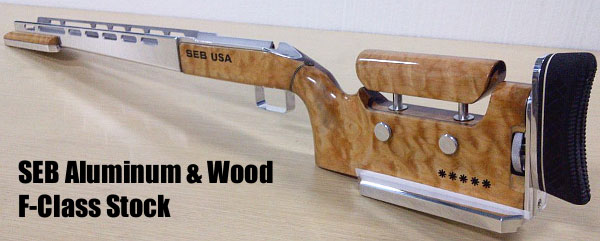
We first featured this amazing stock last year. We felt this creation was such a stunning piece of work that it deserved a second look. If you missed this masterpiece the first time around, feast your eyes…
Sebastian (“Seb”) Lambang, creator of the SEB Coaxial Rests and the Coaxial Joystick Bipod, has engineered an impressive new wood and aluminum F-Class stock. The stock features a long, box-section aluminum fore-end with a wood rear section and wood-trimmed “wings” on the front bag-rider. The aluminum fore-arm has “buick vents” for weight reduction. From the end of the action rearward, the stock is mostly wood, with light and dark fancy wood laminates on opposite sides (left and right).
The foot of the buttstock has a very wide aluminum rear bag-rider with rails. The rear wood section appears to be two solid pieces of wood — but that is deceiving. Seb explains: “To save weight, the buttstock is hollow (using thin-walled wood)”. To strengthen the construction, Seb added carbon fiber inside the buttstock. So what you see is a wood outer shell with carbon fiber layers on the inside. The stock sports vertically-adjustable cheek-piece and buttplate. The thick, rubber buttpad should diminish felt recoil even when shooting big cartridges with heavy bullets.
This is an interesting, innovative stock design. And as with everything Seb produces, the craftsmanship, fit and finish are superb. We may get a chance to see how well this new stock shoots at the F-Class World Championships later this month in Raton, New Mexico.
Seb also crafted a handsome set of angled scope rails with beautifully-machined scope rings. Imagine being able to custom-make one-off products of this quality in your own machine shop!
2014 and 2012 U.S. National F-TR Champion James Crofts is one of America’s top F-Class shooters. A member of the 2013 World Championship-winning F-TR Team USA squad, James knows a thing or two about long-range shooting, that’s for sure. But you may be surprised to learn how James sharpens his shooting skills at relatively short distances. You see, James often practices with a .22 LR rimfire rifle at distances from 50 to 200 yards. James tells us: “Shooting my F-Class rimfire trainer saves me money and improves my shot process and wind-reading abilities.”
Remington rimfire 40X barreled action in PR&T LowBoy stock with PT&G bolt.
Rimfire Training Teaches Wind-Reading Skillsby James Crofts
Training with the rimfire is extremely useful and can be done from 25 yards out to 200 yards. I am lucky and can shoot 50 yards right off my back deck. That is far enough that any miscue on rifle handling will show up on the target. I use a two dry-fire to one actual shot routine for my practices. This gives me much more positive reinforcement without any negative reinforcement.
Wind reading is extremely important with a .22 LR rifle. I use a set of smallbore flags to aid my wind calls. The smallbore flags are a must and force you to look at the flags and mirage on each and every shot. If you think the flags at Camp Butner move a lot, try smallbore flags around tall pine trees.
Rimfire Training Is Cost-Effective
Rimfire ammunition is much less costly than centerfire ammo. Though .22 LR prices have risen in recent years (and rimfire ammo is harder to find), even now I can get a 500-round brick of .22 LR ammo for less than $75.00. That works out to fifteen cents a round. That’s a fraction of the cost of handloading .308 Win match ammo. Heck, you can pay 40 cents a piece for match-grade .308-cal centerfire bullets. Then you have to figure in brass, primers, and powder.
My CMP 40X Rimfire F-TR LowBoy Clone
My quest into the .22 LLR rimfire field started with an email from the Civilian Marksmanship Program (CMP) announcing Rem 40X stripped barreled actions for sale. I thought, “Hmmm… Could one of those little 40X barreled actions be turned into a F-Class training rifle?” My gunsmith Ray Bowman of Precision Rifle & Tool was brought in at this point.
After conferring with Ray, it was decided that he could indeed turn this into a F-Class training rifle. Ray contacted Dave Kiff of PT&G and ordered a new bolt for the Remington 40X rimfire action. Next was the stock decision. I decided to go with a PR&T Low Boy F-Class stock — this is an exact clone of the stock for my .308 Win F-TR competition rifle. Then a Jewell trigger was acquired to complete the components. Ray built this just like he would any custom rifle, other than using the stock barrel. The project turned out awesome. The rifle was a hammer from the beginning even with the stock barrel.
About James Crofts
This spring, James Crofts was chosen as the new Vice Captain for the USA F-TR National Team. James comes from a military background, having served 20 years in the U.S. Navy aboard fast attack submarines. James has also been a shooting member of the 8-man F-TR Team USA, and he is always one of the top shooters in any F-TR competition. James told us: “Now the work begins, but with Ray Gross as Captain I think we can handle it. It will be a tough act to follow. Darrell Buell and Mike Miller set the bar extremely high with back-to-back world championship gold medals.”
Alex Sitman of Master Class Stocks in Pennsylvania is widely considered one of the finest rifle-stock craftsmen in the country, if not the world. Alex’s workmanship and dedication to excellence is top-of-the-line. Alex normally custom-fits each stock to his customer precisely. Many hours are dedicated to stock prep and inletting, and his bedding jobs are flawless. Each stock is exactingly hand-crafted with great attention to detail, and then the stock is “dressed” in the customer’s choice of finishes.
Doing all that takes time — a lot of time. That’s why Master Class Stocks has a long waiting list, and it can take months before a big job is completed. But when Alex is involved, you can count on the final product being a work of stock-making art. Here’s an example. Alex recently stocked an F-Class rifle using eye-popping, exhibition-grade Bastogne walnut. The wood was sourced from Cecil Fredi of GunstockBlanks.com. Alex says: “Cecil’s wood is some of the best I’ve ever used. This blank cost over $1000.00, but it was truly spectacular.” Since the blank was less than 3″ wide, Alex (with assistance from 8-time NRA High Power Champion Carl Bernosky) laminated on the 3″-wide forearm “wings” using spare wood left after the blank was cut. See how Alex and Carl carefully matched the grain of the wood on the forearm. And note how perfectly the adjustable cheek-piece is fitted. If you want a stock like this on your next rifle, contact Alex Sitman at Master Class Stocks, (814) 742-7868.
The Bastogne Beauty — More Construction Details
Eric Kennard tells us: “This rifle was built for Mike Dana in Florida. Kelbly’s did the metal work. [The action is a Stolle Panda F-Class.] Barrel by Brux. Chambering? 6mmBR of course! Mike added a March 10 x 60 scope. Let me tell you this is beyond a work of art! The fit is absolutely perfect! There is not one flaw in the wood-work. The pillar bedding is also perfect! Did you notice the ebony inserts? Or Alex’s custom trigger guard? Alex out did-himself this time. Most of us would not dare to shoot [this gun]!”
Today, AR-platform rifles are hugely popular. Dozens of manufacturers sell AR-type rifles, in a wide variety of configurations and calibers. But before there were M16s and AR-15s, ArmaLite produced a 7.62×51 caliber rifle, the AR-10. Invented by Eugene (‘Gene’) Stoner for the Armalite company, this is the father of all of today’s AR-platform rifles.
If you’re curious about the AR-10, in this video, Jerry Miculek puts an original 1957-vintage AR-10 through its paces on the range. This extremely rare, early-production rifle was provided by Mr. Reed Knight and the Institute of Military Technology. (The gun in the video was actually produced in the Netherlands under license, see video at 4:40.) This AR-10 is the direct ancestor of the AR-15, M16, and many of the modern sporting rifles that we use today.
The AR-10 was slim and light, weighing in at around 7 pounds. Some folks might argue that the original “old-school” AR10 is actually better that some of today’s heavy, gadget-laden ARs. The AR-10’s charging “lever” was under the carry handle — that made it easier to manipulate with the gun raised in a firing position.
You’ll notice there is no “forward assist”. Inventor Gene Stoner did not believe a separate “bolt-pusher” was necessary. The forward assist was added to solve problems encountered in Viet Nam. Some critics say the forward assist “only takes a small problem and makes it a big problem.” For today’s competition ARs (that are never dragged through the mud) the forward assist probably is superfluous. It is rarely if ever needed.
Note also that the handguards are fairly slim and tapered. Today, six decades after the first AR-10 prototypes, we are now seeing these kind of slim handguards (made from aluminum or lightweight composites) used on “full race” ARs campaigned in 3-gun competition.
History of the AR-10
The AR-10 is a 7.62 mm battle rifle developed by Eugene Stoner in the late 1950s at ArmaLite, then a division of the Fairchild Aircraft Corporation. When first introduced in 1956, the AR-10 used an innovative straight-line barrel/stock design with phenolic composite and forged alloy parts resulting in a small arm significantly easier to control in automatic fire and over one pound lighter than other infantry rifles of the day. Over its production life, the original AR-10 was built in relatively small numbers, with fewer than 9,900 rifles assembled.
In 1957, the basic AR-10 design was substantially modified by ArmaLite to accommodate the .223 Remington cartridge, and given the designation AR-15. ArmaLite licensed the AR-10 and AR-15 designs to Colt Firearms. The AR-15 eventually became the M16 rifle.
AR-10 photos from Arms Izarra, a Spanish company specializing in de-militarized, collectible firearms. Interestingly, this particular AR-10 was produced in the Netherlands under license.
Muzzle brakes are controversial. Some people swear by them, while others swear at them. Still, there’s no question that a good brake can reduce felt recoil up to 45%. And likewise, the best brakes, when installed properly, seem to have no negative effect on accuracy.
Roy Bertalotto has done considerable experimentation with muzzle brakes, testing dozens of brake designs on his own rifles over the past few years. Roy’s article, Adventures with Muzzle Brakes, discusses various aspects of muzzle brake design and performance. Roy doesn’t claim that his testing is definitive, but his article is definitely worth a read. Here are some of Roy’s interesting findings:
Exit Hole Diameter
“Best accuracy and effectiveness of the brake was obtained with a hole .020″ over bullet diameter. If the exit hole is too small, such as +.005″ over bullet diameter, accuracy suffers. If the depth of the exit hole is too shallow, the metal around the hole will erode very quickly.”
Hole Placement
“The most effective braking was with a brake 1″ in diameter with a 3/4″ exit hole on each side, just in front of the muzzle. The bullet passes through a cone of 35 degrees before it exits the brake. (Like the tank example), Incredible reduction of recoil. But loud and ugly. Very easy to make since you don’t need a spin fixture or a dividing head.”
Bottom Gas Venting Helps Accuracy
“In my tests, not having holes all around the brake effects accuracy a bit. I believe it does something to the bullet by the air pushed ahead of the bullet creating unequal turbulence in the bullet path. I’ve tried a few brakes where I drilled only holes on the top, test fired, and then completed holes on the bottom and in every case, accuracy improved.” Below are spiral-ported brakes crafted by Clay Spencer.
Brakes Work Best with High-Pressure Cartridges
“The higher the pressure of the particular round, the more effective the brake. I have over 20 rifles with brakes. The 220 Swift is the king of reduction. Followed very closely by the 25-06, 6mm Remington, any Weatherby small bore. With a proper brake and a hot handload under a 40 gr bullet, the Swift will move 1/2″ to the rear and 0 muzzle rise! Big boomers with low pressure like 45-70s and shot guns benefit the least.” [Editor’s Note: Roy is judging effectiveness by the percentage of recoil reduction rather than absolute levels of recoil. Obviously if you start with a heavier-recoiling round, the absolute amount of recoil energy reduction is greater. Roy is really talking about efficiency–brakes are most efficient when used with high-pressure cartridges.]
Installation is Key to Accuracy
Roy’s findings are fascinating and suggest that further study of muzzle brakes is warranted. But we can all agree that precision installation of the brake is essential for accuracy. A poorly-installed, mis-aligned brake will degrade accuracy, that is well-known.
Harrell’s Precision has made thousands of muzzle brakes, in many styles and port arrangements. The Harrell brothers offer some good advice for gunsmiths installing brakes: “Muzzle brakes aren’t magic, they reduce recoil by redirecting exiting gas. What’s important is that they are straight and the threads are perpendicular with the base. The only way to get the base and threads perpendicular is to thread, not tap, them on a lathe.”
Trigger Blue-Printing — Why It Can Be Important by Thomas “Speedy” Gonzalez
To Blueprint or Not? That is the Question.
I often get asked is it really necessary to blueprint a custom match trigger. “Abolutely” is my answer. Here is an example that demonstrates why. After I completed a recent rifle project, the gun’s owner and I took the rifle to the range to break-in the barrel. But we quickly noticed a problem. The owner Alex L’s first statement was: “This trigger sucks — better blueprint it when you get back.”
Not only did the trigger feel rough and scratchy, but it failed to hold the cocking piece 2 out of 10 times when cocking the rifle for the next shot. Not good.
No matter what we tried at the range, the problem persisted. As soon as we returned from the range, I had to take the trigger apart to solve the mystery.
As soon as I opened her up on the operating table it was evident to me where the problem was. I have only seen the inside of about 3000 of these rascals and the head of the Over-Travel Screw stuck out like a sore thumb. The head of the Over-Travel Screw was nearly twice as thick as its other brothers and sisters. This caused the relationship between travel adjustment and sear engagement to be nearly impossible to adjust. And that, in turn, created a serious safety issue.
To remedy the situation, I replaced the screw with [another screw with] standard head thickness and ALL PROBLEMS DISAPPEARED… Amazing! Had I blue-printed this trigger before going to shoot, this never would have happened.
So, should one blueprint a trigger? I say “Hell yeah” if you are serious about competiting and winning. Otherwise be prepared for the worst. — Speedy
Yet another important gun-related company has left California for a more business-friendly location. Gary Eliseo’s Competition Machine Inc., producer of rifle chassis systems, has moved operations to Northern Arizona. A large, new Arizona facility has been secured, and Gary’s team is busy putting the production machinery in place and organizing supplies and inventory.
Rifle Chassis Builder Moves to Arizona
Gary Eliseo announced: “It’s official, after 24 years of dealing with the difficult business environment in California, we’re relocating to Northern Arizona. To our friends and customers we ask for your patience during this monumental task. Our new shop will be larger and more efficient which will allow us to better serve your needs. We have some exciting new products planned in the future that we were simply not able to pursue in California.”
Gary is happy about his new digs in Arizona. His new Arizona facility is much bigger: “The new shop is over twice the size of the old one (3600 square feet vs. 1500 square feet). The added space which will let me open a new rifle division. We’ll update the Competition Machine website soon with the new contact information.” — Gary Eliseo
Here’s a photo of the new facility on “move-in” day. Gary says: “This is just an empty shell, but it’s soon to be a very busy place. There is so much more opportunity for us here than in California. Also, this Northern Arizona area is crazy beautiful, I think I’m gonna like it!”
Highway Photo by Wing-Chi Poon, Wiki Creative Commons License.
Commentary by Robert Whitley
In recent years several major firearms component suppliers have promoted the idea of the “do-it-yourself” AR-15 build up. In one sense this is a good thing because it promotes peoples’ education and understanding of firearms, but the down side of this is some folks are assembling and modifying AR-15s without an understanding of the rifle and without the necessary skills and tools to do things properly. The net result of this “do-it-yourself” work can be an AR-15 that is non-functional, problematic or dangerous. Here are two examples of common issues with “do-it-yourself” modifications.
Opening Up the Ejection Port
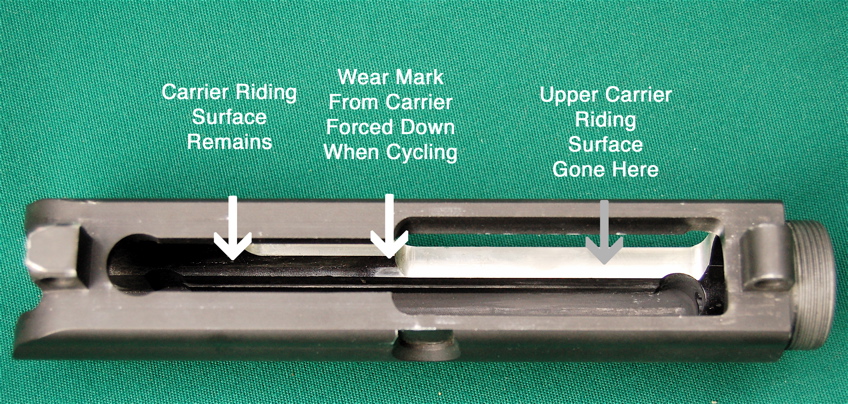
One common modification for AR-15’s is the opening up of the ejection port. This is typically done to permit more room for ejection or loading of the rifle, and it is also typically done in conjunction with a side charging handle modification.
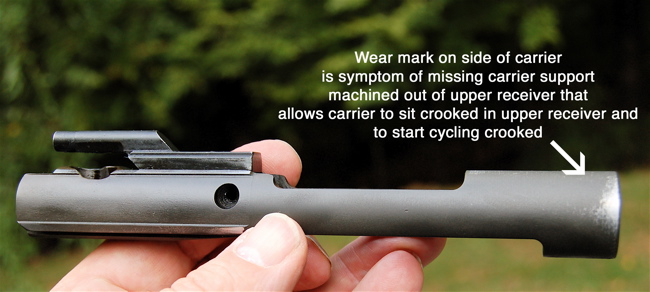
A common issue I have seen with this modification is that the person opening up the port removes the upper right hand carrier support and riding surface. The net result of this is that the carrier sits loose in the upper receiver when the bolt is in lock-up and this can have very detrimental effects on the function and accuracy of the AR-15. Below are more pictures of one that I saw recently.
Wrong Buffer Installed
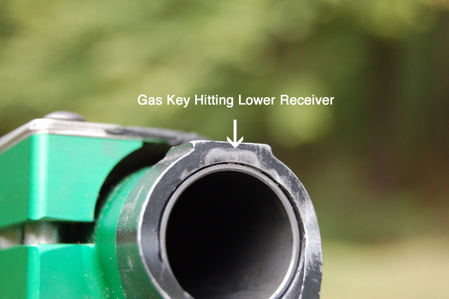
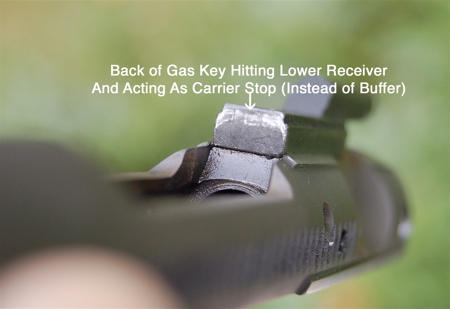
Another common mistake is the use of an improper buffer with the rifle (i.e. like using a carbine buffer in a standard rifle length buffer tube). There are many after market buffers being sold out there, but if the wrong buffer is used with the rifle, it can allow the bolt carrier to cycle too far back so that the rear of the carrier gas key becomes the stop for the carrier (i.e. when it smashes into the upper part of the lower receiver – OUCH!).
We have even seen situations where the gas key is snapped right off the carrier from this, and it completely disables the rifle and can also cause extensive damage to the firearm as well. Unfortunately we have seen this situation far too often and it is clear that a person needs to fully understand how the buffer assembly works if “do-it-yourself” work is going to be done to the buffer assembly, since everything done to the buffer assembly has an effect on the rifle, its function and accuracy.
While I applaud the person who is self-reliant and has a “can do” attitude, the other side of this is when it comes to a firearm, “do-it-yourself” work should only be done when and if one fully understands the rifle and how it functions and how the work will affect the rifle.
Robert Whitley
AR-X Enterprises, LLC
199 North Broad Street
Doylestown, PA 18901
(215) 348-8789 www.6mmAR.com
In the short-range benchrest game, most of the attention goes to the 10.5-lb Light Varmint Class, and the 13.5-lb Heavy Varmint Class. But there’s another class that is enjoying increased popularity — Hunter Benchrest. In some ways, Hunter BR is more challenging, because you shoot a 10-pounder with a narrower (2.25″ forearm) and a 6-power scope (both LV and HV allow 3″-wide forearms and high-magnification scopes). It takes skilled gun-handling and careful aim to get the most from a Hunter Benchrest rig.
The modern Hunter BR rifle is a far cry from a typical deer rifle, or even a walk-around varminter. Jackie Schmidt explains: “Do not be fooled by that title ‘Hunter Benchrest’, or HBR. The typical HBR Rifle has, like its cousin the Group Rifle, evolved into a very singular-purpose piece of equipment, suited to do one thing very well — namely to shoot Xs in the competitive arena, governed by rather strict sets of rules promulgated by the IBS or the NBRSA.
Hunter Benchrest Rifle Standards
The two defining factors in HBR are the minimum case capacity, and the 6-power scope. Everything else is just window dressing. Can one shoot a real factory gun in Hunter BR Class? YES — IF your factory rifle meets these qualifications:
■ Total gun weight no more than 10 pounds.
■ Stock forearm must be convex (at least slightly) on the bottom, and no more than 2.25″ wide.
■ Gun must have magazine capable of holding at least two cartridges. (Normally, however, Hunter BR shooters don’t feed from the magazine.)
■ Gun must shoot cartridge with at least 45 grains of H20 capacity (same as a 30-30).
■ Scope must be a 6-power or capable of being set and used at 6X magnification.
If you go to the IBS website, you will see that there are a couple of exceptions, but in the end, to compete for the prize, you must have a legal Hunter BR rifle. But even if you’re not completely within the rules, most match directors will let a newcomer shoot along, for the fun of it, and to see what the game is really all about.”
Top Hunter BR shooter Al Nyhus tells us: “As Jackie has pointed out, the Hunter class in Benchrest has mutated into full race BR rigs…much like NASCAR ‘stock cars’ or NHRA ‘Pro Stock’. The original intent of Hunter was for a class where the average person with an interest in accuracy could bring a good shooting hunting rifle and give BR a try. Still a darn good idea, to me.
Hunter Benchrest Rig Chambered for the .30 Wolfpup
Here are photos of my Hunter Benchrest rig, which is pretty typical of what’s being used at this point in time. My Hunter BR rig is pretty standard stuff except for the chambering. It features a Stolle R/L Kodiak action tweaked a bit by Stan Ware, Kostyshyn 1:17 four groove, chambered for Stan Ware’s 30 WolfPup (30BR .240″ long/.085″ neck length). The photo below shows a Leupold 6X scope but I’ve been using a Sightron 6X lately.
This stock is an old Speedy/McMillan pattern HBR stock. I had it dipped (externally coated) with a carbon fiber pattern. By the rules, Hunter rifles cannot be glue-ins, so pillar-bedding is the norm. I guess the forearm is about as ‘convex’ on the bottom as any other stock currently in use. This is another area where the guns have evolved and the rulebook(s) haven’t exactly kept pace with the current state of what’s being used.”
Bryan Litz shot his first F-TR match recently, and he came up a winner — a big winner. Competing at the Midwest Palma event, Bryan topped the F-TR field, winning by 15 points. In fact Bryan ended up finishing within 10 points of F-Open winner Alex Lipworth. In the 20-shot, 1000-yard matches, Bryan averaged an impressive 195-7X, with a stunning 196-11X score in one match. (Consider that the 1000-yard X-Ring is just five inches in diameter!) Not bad for Bryan’s first attempt at the F-TR game.
We all know Bryan has serious long-range shooting skills. But he also had a secret weapon — a wickedly accurate, wood/carbon-stocked, low-profile F-TR rifle built by John Pierce. With this Pierce rifle, Bryan had to abandon the hard-holding style he uses in sling-shooting competition. Instead he adopted a “less is more”, almost-free-recoil method — and it worked. Is this the future of F-TR? Read on and learn what Bryan has to say about F-TR shooting, “belly benchrest” style.
Sling Shooter Tries F-TR
by Bryan Litz
I’ve been coaching the Michigan F-TR team for a while and finally decided to participate in the competition. F-TR is more rifle-centric than Palma, meaning the precision demands are greater due to the smaller scoring rings. After seeing Eric Stecker’s results with his Pierce rifle at the 2014 Berger Southwest Nationals, I asked my good friend and Michigan team-mate John Pierce to “build me one like Eric’s”. This is the same basic set up as John’s own F-TR rifle as well. It’s a Pierce F-TR action with a 30″ long, 1:9″ twist Bartlein Barrel chambered for the Berger 215gr Hybrids. The barreled action is bedded into a light-weight, BR-style stock built by Bob Scoville. A Phoenix bipod underneath and a Nightforce 15-55X Competition scope complete the package.
Click Image to Zoom
Loading the .308 Winchester with Berger 215gr Hybrids
I received the rifle just one week before the Midwest Palma match. During that week prior to the match, I put over 700 rounds on the rifle. I did some load development but was mostly learning to shoot a new rifle in a new discipline. I settled on 215gr Berger Hybrids seated 0.015″ off the riflings over a stout charge of Varget in Lapua Palma (small primer) brass with CCI BR4 primers. The only brass prep was mandreling the necks of the new brass for consistent neck tension. Bullets were slightly pointed, but nothing was segregated by weight, base-to-ogive, or anything. All the ammo I shot in Lodi was loaded in brand-new Lapua brass.
Check Out Bryan’s Set-up with the Rifle (Click Photo to Zoom)
Learning the F-TR Game — Adapting to a New Shooting Style
Coming over from sling shooting, I knew there would be unique challenges to F-TR which I wanted to learn prior to (not during) a major tournament. I learned a new shooting position which doesn’t involve drawing the right knee up. For F-TR I get more straight behind the gun rather than at an angle. I found that the rifle shoots best with very light cheek, shoulder and grip pressure, approaching free recoil. This is how Eric Stecker shot his similar rifle into second place in the SW Nationals. I learned the rifle’s sensitivity to different bipod and rear bag supports, and found the best buttplate position to allow the rifle to track and stay on target after recoil. This set-up shot best with a mostly free-recoil approach, that means “hovering” over the comb, rather than resting your head on the stock. This took some “getting used to” in terms of neck and back muscle tone. These are the kind of details I think it’s important to focus on when entering a new dicipline.
“I love the way this Pierce F-TR rifle flings brass, and wins tournaments. None of my sling guns ever had an ejector. With this rig, it’s become one of my favorite things to eject the brass and just let it fly!”
I think many shooters consider themselves ‘ready for a match’ the first time the rifle shows them a couple 1/3 or 1/4 MOA 5-shot groups from a bench at 100 yards. While making the rifle shoot precisely is certainly a prerequisite for successful match shooting, it’s certainly not the whole story. So as soon as I got the load and rifle shooting 1/2 MOA from the bench, I proceeded to shoot many 10- and 20-shot strings from the ground at 300 and 1000 yards. I shot more than 500 rounds this way, studying the rifles character, and learning to shoot it. It’s amazing how much the precision (grouping) is affected by subtle variables in the set-up, especially when shooting heavy bullets. I truly believe that many F-TR rifles are hindered in their precision potential by something in the way they are set up and shot.
Advice on Shooting the Heavy Bullets in a .308 Win
I believe F-TR set-ups are way more forgiving with light- to medium-weight bullets (155 to 185 grains). By this I mean that it’s easier to shoot good groups with a variety of bipods, rear bags, etc. But as you get into the 200 – 215 grain bullet weights, the precision of the rifle (i.e. group size) becomes very sensitive to set-up and shot execution. I was able to find a good set-up which let the rifle shoot very well on a variety of surfaces (hard gravel, soft grass, sand, etc.). In Lodi, the rifle shot well all week.
Having done so much preparation and training with the rifle the week prior to the match, I felt very prepared and confident. The results were actually better than expected. There were no problems at all with equipment, and I just shot the rifle the way it liked to be shot. In the end, I won the F-TR Division. I can say there were many shooters interested in the Pierce rifle!
Impressive Performance
Bryan observes that this rifle held 1/2 MOA of vertical at 1000 yards for 17 out of 20 shots. That’s impressive accuracy. Bryan was in first place each day of the match, including the 3×1000 on Friday where he averaged over 195-7X. Remarkably, Bryan finished just 10 points behind the F-Open winner, with the next closest F-TR competitor 15 points behind Bryan. In fact, with his .308 Win, Bryan out-scored 75% of the F-Open shooters. CLICK for match results.
Bryan gave credit to his smiths and his team-mates: “I’d like to thank John Pierce for building a great F-TR rifle and thank my dad, Bill Litz, for loading the best ammo on the planet. Finally, I’d like to thank the Michigan F-TR team for helping me learn how to shoot F-TR.”
Bryan writes: “Here I am with ‘The Man’, John Pierce, and the epic F-TR rifle he built for me. This thing shoots ‘No S***’ 1/2 MOA Vertical at 1000 yards.”




 Alex Sitman of


 Trigger Blue-Printing — Why It Can Be Important


 Rifle Chassis Builder Moves to Arizona



 In the short-range benchrest game, most of the attention goes to the 10.5-lb Light Varmint Class, and the 13.5-lb Heavy Varmint Class. But there’s another class that is enjoying increased popularity — Hunter Benchrest. In some ways, Hunter BR is more challenging, because you shoot a 10-pounder with a narrower (2.25″ forearm) and a 6-power scope (both LV and HV allow 3″-wide forearms and high-magnification scopes). It takes skilled gun-handling and careful aim to get the most from a Hunter Benchrest rig.
 The modern Hunter BR rifle is a far cry from a typical deer rifle, or even a walk-around varminter. Jackie Schmidt explains: “Do not be fooled by that title ‘Hunter Benchrest’, or HBR. The typical HBR Rifle has, like its cousin the Group Rifle, evolved into a very singular-purpose piece of equipment, suited to do one thing very well — namely to shoot Xs in the competitive arena, governed by rather strict sets of rules promulgated by the IBS or the NBRSA.


