|
|
January 15th, 2015

Is that target good enough? Yes that’s really five (5) shots. This amazing group was shot, in competition, with 6 PPC cartridges loaded with Accurate LT-32 powder. If you’d like to try out this powder in your rifle, Western Powders has released loading data for the LT series of powders. LT-32 is a good choice if you’re currently using propellants with burn rates similar to Vihtavuori N133 or Hodgdon Benchmark powders. (Caution: NEVER simply substitute loads powder for powder. Always start low and work up when trying a new powder). The other powder in Accurate’s LT series, LT-30, has a burn rate similar to Hodgdon H4198. LT-30 is a superb performer in the 30 BR cartridge. LT-30 also is a good choice for small varmint cartridges such as the 17 Rem Fireball.


Download FREE Reloading Guide for Accurate and Ramshot Powders
You can also download the complete Western Powders Reloading Guide in PDF format. This covers Accurate and Ramshot propellants.

January 13th, 2015
Forum member Erik Cortina recently launched his own YouTube Channel dedicated to precision reloading and accurizing. Erik’s videos demonstrate the proper use of specialized reloading tools and provide helpful hints. Erik’s latest video is about the “mother of all brass trimmers”, the Giraud powered case trimmer. Erik says: “It you do volume reloading… this is the only trimmer to get. It not only trims to length but it also chamfers your case mouth inside and out.” In his video, Erik offers some very clever and useful tips that will help you get the most from your Giraud.
The Giraud trimmer is very precise. When set up correctly, it can trim brass with amazing consistency. In the video, Erik trims 5 pieces of brass in 15 seconds (6:32 mark). He then measures all five with precision calipers (7:00-8:08). All lengths are exact within .0005 (half a thousandth). Erik notes that the Giraud trimmer indexes off the case shoulder. As long as you have fire-formed brass with consistent base-to-shoulder dimensions, you should get very consistent trim lengths.
The secret to the system is a 3-way cutting head. This cutter can be swapped in and out in a couple minutes with wrenches provided with the kit. Erik has three different heads; one each for 6.5mm, 7mm, and .30 caliber. The video shows how to adjust the cutting heads to match caliber diameter (and to get the desired amount of inside/outside chamfer).
This is a manufacturer’s photo showing an older model.

To trim and chamfer cases, you simply insert them nose-first into the cartridge-specific case-holder. Erick offers a smart tip — He uses a die locking ring to position the cartridge holder (3:15). This can be locked in place. Erik says die locking rings work much better than the hex-nuts provided by Giraud (with the hex-nut, one must re-set cut length each time you change case-holders.)

The Giraud can be used in either horizontal or vertical modes. Erik prefers to have the trimmer aligned vertically, allowing him to push cases down on the trimmer head. But the trimming unit has twin sets of rubber feet, allowing horizontal or vertical orientation.

Improved Case-Holder Made with Chamber Reamer:
For his .284 Shehane, Erik had to create his own case-holder (Giraud does not make one for that wildcat cartridge). Erik used his chamber reamer. To his surprise, Erik found that the brass was easier to trim in the custom case holder (compared to the Giraud-made spring-loaded holders). With a perfect fit, trimming and case extraction went more smoothly and the process was easier on his hands. (See 9:00-10:00). Based on Erik’s experience, you may want to create your own custom case-holder.
Trim Bullet Meplats Also
With a special bullet-holder fitting and meplat cutter head, the Giraud power trimmer can be used to trim bullet meplats. Trimming meplats can help make the Ballistic Coefficents of a batch of bullets more consistent. Uniforming meplats is also often done as a first step in the process of “tipping” bullets to improve BC.


January 12th, 2015
Sierra Bullets Ballistic Technician Gary Prisendorf has written a nice essay about how reloading can become a life-time hobby, a rewarding pastime that can bring together a father and son…
by Gary Prisendorf
For as long as I can remember I have been around reloading. I have tons of childhood memories of my father reloading and shooting. I remember how he would let me help him load his ammunition, by letting me clean primer pockets or wipe the sizing lube off of his cases. I really thought I was doing something. Well, I guess I was, I was spending quality time with my father doing something that would become a great hobby and eventually land me a great job working for Sierra Bullets.

I remember watching my father sizing cases on his Herters press, dropping his powder charges with a Belding & Mull powder measure and weighing powder charges with his Texan scales. Heck, I can even remember when he would buy powder at a local pawn shop, and they would weigh it out and put it in a paper sack. He would save his empty powder cans, wrap them with masking tape and write what the powder was on them with a black magic marker.

When I was in Junior High, I got my first shotgun, a 20 gauge Mossberg 500 and within a couple of weeks my father came home with a 20 gauge Lee Load-All and a pound of Blue Dot. He gave me a crash course on how to use it, and got me up and running with a couple of safe loads. I put a lot of shells through that old 20 gauge.
From that day forward I was hooked. If I got a new gun, I was loading ammunition for it. I don’t buy factory ammunition unless I just want to shoot it up so I can get some once fired brass. I reload everything that I shoot, except for rimfire stuff, and if I could figure out how to do that safely, I would probably load that too.
Through the years I have learned to appreciate things — such as once-fired military .30-06 cases that can be converted to obscure cartridge types. And I know the value of a five-gallon bucket of lead wheel weights that will be melted down and cast into bullets.
I remember finding 19 once-fired Norma 7.7×58 Arisaka cases laying on the ground at a public shooting range, and it was like Christmas came early. I must have looked for that 20th case for about thirty minutes, but I never did find it.
I can’t thank my father enough for getting me started in reloading, he gave me a great hobby, many wonderful memories and taught me the skills that gave me a career doing something that I love.
If you are a reloader, teach someone. You may just give them a hobby for the rest of their life and who knows, you could help them find an enjoyable career, doing something that they love. — Gary Prisendorf

January 9th, 2015
This is a grim tale. A man almost lost the use of his right hand, and did suffer terrible injuries to his fingers. All because he picked the wrong bottle of powder off the shelf.

Similar Labels, Disasterous Consequences
The shooter, Denny K., was assembling some rounds for his brand new 7mm-08 Savage hunting rifle. He thought he was loading with Hodgdon Varget. Instead he had filled his powder measure with Hodgdon TiteGroup, a fast-burning pistol powder. The labels are similar, so the mistake is understandable. But the results were devastating. Here’s what 41 grains of TiteGroup can do in a 7mm-08:

Posting on the Firing Line, in a thread entitled “Lucky to Be Alive”, Denny writes:
“This is the hardest post to post. I know if I had read it a week ago my comment would have been: ‘You have no business reloading’. I had everything perfect, except pouring the wrong powder in the powder measure. I type this slowly with my left hand, embarrassed but … possibly saving someone else a tragedy or, like me, a long drive to the Emergency Room and surgery to save my finger.”
CLICK HERE for bigger, more graphic photo of injury.

The Still-Sealed Bottle of Varget
Denny did not initially comprehend exactly why the kaboom happened. He thought maybe his new Savage rifle was at fault. Then, on his return home, he discovered something…
Denny wrote: “The seven-hour period it took to go to ER, transport to Trauma Center and surgery made me think it was a Savage rifle issue. Brand new rifle, new brass, triple-checked loading data. The next day I was humbled when I realized the Varget powder was still sealed.
I knew what powder to use. I thought [Varget] was what I used. Not until the following day did I realize the Varget was still sealed.”
At that point, Denny realized what caused the accident — “operator error”. He knew he had to warn others about using the wrong powder: “I knew I needed to share my mistake, even though it is embarrassing, just to remind people. I’ve been reloading for 30 years…”
Editor’s Comment: Denny was not a novice reloader. His experience demonstrates that this kind of mistake can be made by any hand-loader, even one with decades of experience. Be safe guys, take your time when you load your ammo. Remove powders from measures after your loading sessions (pistol powders can look very similar to rifle powders). And by all means CHECK the LABEL on the jug. As the TiteGroup label says: “A little goes a long way.”
It’s not a bad idea to separate your pistol powders from your rifle powders, or perhaps even load for pistol in a separate part of your workshop.
January 6th, 2015
What can happen when the bottom-most primer in a primer feed tube goes off? A big bang, that’s what. Some or all of the primers in the vertical feeding tube can go off in a chain detonation. That’s exactly what happened to Dustin Ellermann, Top Shot Season 3 Champion. Scary experience, but thankfully Dustin was not injured. He writes: “Super thankful that I was wearing my Wiley X eye protection this weekend when I was reloading some .223 rounds. My press detonated nearly 100 small rifle primers. Shown here is the magazine feed tube. Not fun but it could have been much worse. Stay safe!”

When working with progressive reloading presses, you should definitely wear eye protection. Dustin’s chain detonation experience proves that — without a doubt. Remember you only have one set of eyes!
APS Strips — Alternative to Primer Tubes
 When you stack a column of primers in a single metal tube, you’re asking for trouble. As Dustin Ellermann learned, when one primer fires, the entire column can follow suit in a chain detonation. Thankfully, you do have options when it comes to primer feeding on a progressive press. RCBS developed an innovative primer system for its Pro-2000 progressive press. Instead of being stored in a vertical tube, primers are placed in flat, plastic “APS” strips, with a ring of plastic separating each primer. Moving horizontally, primers are never stacked, so the chance of a chain detonation is reduced dramatically. The re-usable APS strips are color-coded for different primer types. You can buy CCI “pre-loaded” primer strips, or you can insert any brand of primers into strips using an RCBS strip-loader tool. When you stack a column of primers in a single metal tube, you’re asking for trouble. As Dustin Ellermann learned, when one primer fires, the entire column can follow suit in a chain detonation. Thankfully, you do have options when it comes to primer feeding on a progressive press. RCBS developed an innovative primer system for its Pro-2000 progressive press. Instead of being stored in a vertical tube, primers are placed in flat, plastic “APS” strips, with a ring of plastic separating each primer. Moving horizontally, primers are never stacked, so the chance of a chain detonation is reduced dramatically. The re-usable APS strips are color-coded for different primer types. You can buy CCI “pre-loaded” primer strips, or you can insert any brand of primers into strips using an RCBS strip-loader tool.
RCBS Pro-2000 with APS Strip Priming System
AccurateShooter.com Editor Uses Strip Primers
This Editor owns an RCBS Pro-2000 progressive press (manual-indexing version). The RCBS strip-priming system was one key reason I selected the RCBS Pro-2000 over similar-priced progressives from Dillon and Hornady. I believe the strip primer system is safer, more positive, and easier to use. Before I purchased my RCBS progressive, I “road-tested” the competition. I loaded hundreds of rounds on each of four different progressives: Dillon 550B, Dillon 650, Hornady Lock-N-Load, and RCBS 2000. I was concerned about the primer feed tubes on the Dillons, and I found the RCBS rotary powder measure was much more precise (and easier to adjust) than the sliding bar system on the Dillon machines. The RCBS priming system was definitely more fool-proof than the system on the Hornady press (a first-generation L-N-L that had issues with primer feeding). After “test-driving” blue, red, and green brand progressives extensively, I settled on the RCBS Pro-2000. A decade later, I still think I made the right choice. I like the APS strips for big jobs, and I can also use them in the RCBS hand-priming tool (shown below). With the strips, its easy to prime 20 or 40 cases at a time, and then switch to another type of primer for comparison testing.

January 4th, 2015
You’ve probably heard of Allliant Reloder 22 powder, but how about Reloder 23? Or Reloder 26? These two new European-produced Reloder propellants were introduced in 2014. Most folks haven’t seen these Reloder powders because it took quite a while for the first shipments of RL 23 and RL 26 to arrive in the USA. We’re pleased to announce that these two new propellants are now in the stateside distribution chain. You should start to see these propellants on dealers’ shelves soon. ATK tells us: “We introduced [Reloder 23 and Reloder 26] last spring at the NRA convention, but… we were unable to ship them into distribution due to delays obtaining the required DOT classifications. We have finally received them (after 7 1/2 months) so we began shipping late fall.”
What are the characteristics of RL 23 and RL 26? That question was answered recently by Paul Furrier who works for ATK, the parent company of Alliant Powders. Posting in our Shooters’ Forum, Paul writes:
“Let me provide some factual info about these products. Some of the stuff that gets propagated is not correct. Reloder 23 is produced by our Swedish partner Bofors, and Reloder 26 is produced in Switzerland by our extremely capable partner Nitrochemie. I have seen it stated that they are both made by Bofors, so that is incorrect.
I have also noticed people are equating Reloder 23 to Reloder 22, and Reloder 26 to Reloder 25. Both of those statements are definitely incorrect. We do state that the performance of Reloder 23 is similar to Reloder 22, and it is, in general burn speed terms, but they are most certainly not the same. We have worked quite a lot of recipes for Reloder 23, and they are not the same as Reloder 22. Reloder 26 is definitely slower burning than Reloder 25, so there shouldn’t be any confusion there either.”

Furrier says that RL 23 is NOT sensitive to temperature shifts: “Reloder 23 was developed to bring a truly temp-stable powder to the Reloder 22 burn-speed range using Bofors new process technology. This is the second product developed for us with this TZ® process, the first being AR-Comp™. We see terrific efficiencies, SDs, accuracy and flat temp response from these powders. Please try them, I think you will be impressed.”
Speed and More Speed with RL 26
Think of Reloder 26 as a high-velocity powder for big cartridges. Furrier explains: “Reloder 26 is produced with Nitrochemie’s latest generation EI® process technology. This is the same impregnation coating process used to produce Reloder 17, Reloder 33, and Reloder 50 for us, and it is fantastic. The “so what” on Reloder 26 is great ballistic efficiency, high bulk density so you can get more of the slow powder into the case to harness the energy, and decent, predictable extreme temp response. Reloder 26 is not as flat at temps as the TZ or Australian materials, but it is very manageable, usually in the 0.5 fps/°F range (depending on the application). Just as important, the pressure increases at hot are very manageable. We are using quite a bit of this powder in our Federal factory ammo due to the fantastic ballistics and accuracy.
Both of these new Reloder powders contain decoppering agent to help reduce coppering up your barrels, but this is nothing new for us. Bofors began adding decoppering agent to our Reloder rifle powders in the 2002 timeframe, and all our Swiss Reloders except 17 contain their proprietary additive. (We may include it in 17 at some point also, but right now we like it just the way it is.) Sorry we didn’t have a snappy name figured for the decoppering agents, we just did it.
Both of these new Reloder powders are also produced to the current highest level of ‘green’ technology. Actually, all of our Alliant rifle, pistol and shotshell reloading powders meet the current (tough) European requirements for elimination of nasty ingredients. They do not contain any dinitrotoluene or dibutylphthalate, which are a couple of the nasties that are commonly used in smokeless powders.
Thank you for your interest in our new powders.” — Paul Furrier, ATK
Reloder 23
Like AR-Comp™, new Reloder 23 from Alliant Powder performs consistently across temperature extremes. Its sophisticated TZ® technology manipulates the response of the material and resists the natural tendency to generate more pressure at higher temperatures and less pressure at lower temperatures. Reloder 23 is perfect for long-range target shooters seeking performance similar to Reloder 22 with world-class temperature stability.
Features & Benefits:
TZ technology provides exceptionally consistent velocities across temp extremes
Contains proprietary de-coppering additive
Ideal for long-range target shooting
Excellent lot-to-lot consistency
Formulation contains no DNT or DPB
Made in Sweden for Alliant Powder |
Reloder 26
Reloder 26 offer high velocities in large magnum cases. Achieve awesome ballistics with new Reloder 26 from Alliant Powder. The propellant’s burn speed falls between that of Reloder 22 and Reloder 33, and it incorporates EI® technology to produce extremely high velocities in magnum cartridges. Reloder 26 has a high bulk density that allows larger powder charges, and it provides a consistent, controlled response to temperature changes.
Features & Benefits:
EI technology produces extremely high velocities in magnum cartridges
Contains proprietary de-coppering additive
Controlled temperature stability
Excellent lot-to-lot consistency
Formulation contains no DNT or DBP
Made in Switzerland for Alliant Powder |
December 30th, 2014
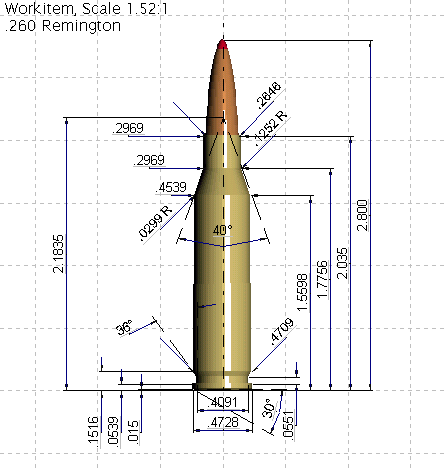
The AR-10 was designed to handle the 7.62×51/.308 Winchester and other .308 “family” cartridges such as the .243 Win and .260 Remington. Our friend Dennis Santiago recently put together an AR-10 to shoot the accurate .260 Rem cartridge. Here is his initial report:
AR-10 Platform Chambered for .260 Remington by Dennis Santiago
I was very curious to see how the .260 works in the AR-10 compared to a .308. I’ve always thought about chambering a bolt gun in .260 but before doing so I thought it’d be good to try it using a less expensive entry point. With an AR platform’s easy interchanging of barrels, it seem like the best way to test out the .260 Rem chambering. So far, it’s most impressive.
DPMS LR-308 in .260 Remington getting function cycle tuned and zeroed

I took the AR-10-type .260 Rem a step closer to being ready for matches yesterday. The first order of business was to confirm which buffer spring to use with both the 123 grain and 140 grain bullet loads. My .260 Rem loads, on average, are using 4-5 grains less powder than the .308 loads. In a semi-automatic action that means less gas/energy to work the mechanics. The solution in an AR-10 platform is to either cut coils in the .308 spring or use a weaker AR-15 buffer spring; yup they are not the same. In this case, a CS flat spring for the AR-15 did the trick.
I also put a very nice NightForce Benchrest 12-42x56mm scope that came via friend Mark Gravitt on it and got zeros. This scope’s 1/8th MOA clicks are nice. The AR-10 had previously mounted a NightForce F1, a more “field tactical” 3-15X system. This 12-42X scope now sets this gun up as more of a target cannon. Field of view is limited when your minimum magnification is twelve. Maybe I’ll put an auxiliary red dot on it just to find the target.
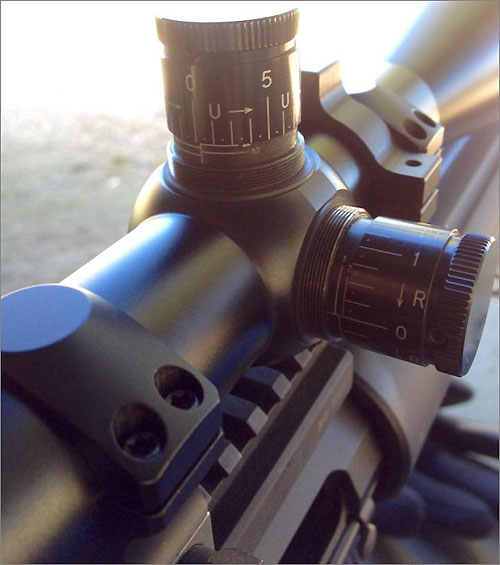
Pet Loads: H4350 and Lapua 123gr Scenars
Comment by Daily Bulletin Editor
Over a two-year period, this Editor put a lot of rounds through a .260 Remington. I did a ton of load testing with that Savage-actioned rifle (before it was rebarreled as a 6mmBR Norma). I tried two dozen load recipes with five different powders and bullets ranging from 100 grains to 142 grains. Hodgdon H4350 was my “go-to” powder. As many 260 Rem shooters have discovered, H4350 is a winner in the .260 Rem. This propellant delivered the lowest ES in my rifle and nothing beat H4350 for consistent accuracy with bullets in the 120-140 grain range. My most accurate load was with Lapua 123gr Scenars, pushed by H4350 and CCI 250 primers. The 123gr Scenars worked well jumped as well as seated into the lands. Best accuracy, in my 24″-barreled .260 Rem, was right about 2950 fps. Other powders work well, but H4350 is a very good choice for the .260 Remington (as well as the smaller 6.5×47 Lapua cartridge).
December 30th, 2014
 Midsouth Shooters Supply is having a huge End-of-Year Sale. Hundreds of clearance items are marked down 40% (or more) through the end of 2014. For the next couple of days there are amazing deals to be had on ammo, optics, scope rings, gun cases, reloading dies, muzzle-loader rifles, cleaning supplies and much more. Below are some of the top deals we found this morning. (NOTE: This is just a tiny fraction of the hundreds of 40% OFF clearance items.) Remember, these deeply-discounted deals expire soon — you snooze, you lose. Midsouth Shooters Supply is having a huge End-of-Year Sale. Hundreds of clearance items are marked down 40% (or more) through the end of 2014. For the next couple of days there are amazing deals to be had on ammo, optics, scope rings, gun cases, reloading dies, muzzle-loader rifles, cleaning supplies and much more. Below are some of the top deals we found this morning. (NOTE: This is just a tiny fraction of the hundreds of 40% OFF clearance items.) Remember, these deeply-discounted deals expire soon — you snooze, you lose.
Go to Midsouth End-of-Year Clearance Sale.
Sample Sale Items (hundreds more products are 40% off):


December 29th, 2014
 In our Shooters’ Forum a reader asked: “How much neck tension should I use?” This prompted a Forum discussion in which other Forum members recommended a specific number based on their experience, such as .001″, .002″, or .003″. These numbers, as commonly used, correspond to the difference between case-neck OD after sizing and the neck OD of a loaded round, with bullet in place. In other words, the numbers refer to the nominal amount of interference fit (after sizing). In our Shooters’ Forum a reader asked: “How much neck tension should I use?” This prompted a Forum discussion in which other Forum members recommended a specific number based on their experience, such as .001″, .002″, or .003″. These numbers, as commonly used, correspond to the difference between case-neck OD after sizing and the neck OD of a loaded round, with bullet in place. In other words, the numbers refer to the nominal amount of interference fit (after sizing).
While these commonly-used “tension numbers” (of .001″, .002″ etc.) can be useful as starting points, neck tension is actually a fairly complex subject. The actual amount of “grip” on the bullet is a function of many factors, of which neck-OD reduction during sizing is just one. Understanding these many factors will help you maintain consistent neck tension as your brass “evolves” over the course of multiple reloadings.
Neck Tension (i.e. Grip on Bullets) Is a Complex Phenomenon
While we certainly have considerable control over neck tension by using tighter or looser bushings (with smaller or bigger Inside Diameters), bushing size is only one factor at work. It’s important to understand the multiple factors that can increase or decrease the resistance to bullet release. Think in terms of overall brass-on-bullet “grip” instead of just bushing size.
One needs to understand that bushing size isn’t the beginning and end of neck tension questions, because, even if bushing size is held constant, the amount of bullet “grip” can change dramatically as the condition of your brass changes. Bullet “grip” can also change if you alter your seating depth significantly, and it can even change if you ultrasonically clean your cases.
Bullet grip is affected by many things, such as:
- 1. Neck-wall thickness.
- 2. Amount of bearing surface (shank) in the neck.
- 3. Surface condition inside of neck (residual carbon can act as a lubricant; ultrasonic cleaning makes necks “grabby”).
- 4. Length of neck (e.g. 6BR neck vs. 6BRX).
- 5. Whether or not the bullets have an anti-friction coating.
- 6. The springiness of the brass (which is related to degree of work-hardening; number of firings etc.)
- 7. The bullet jacket material.
- 8. The outside diameter of the bullet and whether it has a pressure ridge.
- 9. The time duration between bullet seating and actual firing (necks can stiffen with time).
- 10. How often the brass is annealed
— and there are others…
Seating Depth Changes Can Increase or Decrease Grip on Bullet
You can do this simple experiment. Seat a boat-tail bullet in your sized neck with .150″ of bearing surface (shank) in the neck. Now remove the bullet with an impact hammer. Next, take another identical bullet and seat it with .300″ of bearing surface in another sized case (same bushing size/same nominal tension). You’ll find the deeper-seated bullet is gripped much harder.
 Neck-Wall Thickness is Important Too Neck-Wall Thickness is Important Too
I have also found that thinner necks, particularly the very thin necks used by many PPC shooters, require more sizing to give equivalent “grip”. Again, do your own experiment. Seat a bullet in a case turned to .008″ neckwall thickness and sized down .003″. Now compare that to a case with .014″ neckwall thickness and sized down .0015″. You may find that the bullet in the thin necks actually pulls out easier, though it supposedly has more “neck tension”, if one were to consider bushing size alone.
In practical terms, because thick necks are less elastic than very thin necks, when you turn necks you may need to run tighter bushings to maintain the same amount of actual grip on the bullets (as compared to no-turn brass). Consequently, I suspect the guys using .0015″ “tension” on no-turn brass may be a lot closer to the guys using .003″ “tension” on turned necks than either group may realize.
Toward a Better Definition of Neck Tension
As a convenient short-cut, we tend to describe neck tension by bushing size alone. When a guy says, “I run .002 neck tension”, that normally means he is using a die/bushing that sizes the necks .002″ smaller than a loaded round. Well we know something about his post-sizing neck OD, but do we really have a reliable idea about how much force is required to release his bullets? Maybe not… This use of the term “neck tension” when we are really only describing the amount of neck diameter reduction with a die/bushing is really kind of incomplete.
My point here is that it is overly simplistic to ask, “should I load with .001 tension or .003?” In reality, an .001″ reduction (after springback) on a thick neck might provide MORE “grip” on a deep-seated bullet than an .003″ reduction on a very thin-walled neck holding a bullet with minimal bearing surface in the neck. Bushing ID is something we can easily measure and verify. We use bushing size as a descriptor of neck tension because it is convenient and because the other important factors are hard to quantify. But those factors shouldn’t be ignored if you want to maintain consistent neck tension for optimal accuracy.
Consistency and accuracy — that’s really what this all about isn’t it? We want to find the best neck tension for accuracy, and then maintain that amount of grip-on-bullet over time. To do that you need to look not only at your bushing size, but also at how your brass has changed (work-hardened) with time, and whether other variables (such as the amount of carbon in the neck) have changed. Ultimately, optimal neck tension must be ascertained experimentally. You have to go out and test empirically to see what works, in YOUR rifle, with YOUR bullets and YOUR brass. And you may have to change the nominal tension setting (i.e. bushing size) as your brass work-hardens or IF YOU CHANGE SEATING DEPTHS.
Remember that bushing size alone does not tell us all we need to know about the neck’s true “holding power” on a bullet, or the energy required for bullet release. True bullet grip is a more complicated phenomenon, one that is affected by numerous factors, some of which are very hard to quantify.
December 28th, 2014
This article originally appeared in Sinclair Intl’s Reloading Press Blog, which has been merged into the Gun Tech Section on Sinclair’s website, www.SinclairIntl.com
Steps to Minimize Bullet Run-Out
Poor bullet run-out can cause poor and inconsistent accuracy, and variations in bullet velocities. The truer the loaded round, the more consistent your results will be on paper and across the chronograph.
 Measuring Concentricity Measuring Concentricity
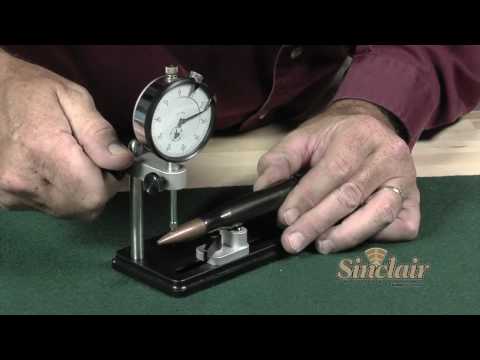
We all know that low run-out is the goal. But how can you tell if your run-out is high or low? Run-out is generally measured in thousandths of an inch with a concentricity gauge. There are many concentricity gauges to choose from that work well. Some work on loaded rounds only, some have a bullet straightening feature, and a few work on both loaded rounds and empty cases for checking case neck concentricity. The tool of choice for the Sinclair Reloading Tech Staff is the Sinclair Concentricity Gauge (Part # 09-175).
This tool is a mainstay on my bench, and it is used about as much as I use my reloading press! The tool uses two sets of bearings that are set on lateral, length-adjustable anodized aluminum blocks to accommodate cartridges from .221 Fireball-sized cases up to .50 BMG. The indicator is set on a height adjustable swiveling base on a stand that can be used for checking bullet or case neck run-out. The adjustable blocks ride aligned in a precision-milled slot. The entire set up is on an anodized base plate that gives excellent support during the process that is crucial to operation and accuracy. Basically the operation consists of placing a loaded round (for checking bullet run-out) or an empty case (for case run-out) on the bearings with the indicator end touching the chosen point to be measured. The case is easily spun with one finger as the indicator measures the amount of run-out. Once this process has been done a few times it is a fast and accurate means of measurement. In terms of indicator type being used, whether dial or digital, I actually prefer a standard dial indicator over the digital type. My reason for this choice is that you can see the needle jump when run-out is present. I believe this to be easier and faster than looking at digital numbers while measuring. In the video below, Sinclair’s Bill Gravatt shows how to use the Sinclair Concentricity Gauge correctly.
Sizing Steps to Minimize Run-Out
One of the most common steps in the reloading process that contributes to bullet run-out occurs is the sizing operation. If improper techniques are used or there are issues with the sizing die set up, a once perfectly concentric case can become out of whack. By using the proper dies for your application, properly setting up the die/shell holder or floating the de-capping/expander assembly, you can eliminate problems before they happen.
 Many of us on the technical staff choose the Redding Type-S series of dies. These are full-Length or neck sizing dies that utilize a removable/changeable neck bushing (sold separately) to size the neck according to your application. These dies are machined with true precision and quality in mind. The Type-S dies come with a standard de-capping assembly with a caliber-specific expander ball in place. In addition to this an undersized retainer to hold the de-capping pin is included with the die. In my experience with these dies I use the standard expander ball with new, unfired brass on the initial re-size. I will then use the undersized retainer in place of the expander ball with brass that has been fired. I have found this step crucial in my reloading regiment to minimize bullet run out. The use of the expander ball can cause a few thousandths of run-out when the case is being pulled back out of the sizing die. With the undersized retainer in place the only thing that touches the neck of the case in sizing is the bushing. If you prefer to use an expander ball, Redding offers caliber specific carbide floating expander balls that fit on the de-capping rod. This free floating expander ball will self center on the case neck, and reduce the amount of run-out that can be caused by a standard expander ball. Many of us on the technical staff choose the Redding Type-S series of dies. These are full-Length or neck sizing dies that utilize a removable/changeable neck bushing (sold separately) to size the neck according to your application. These dies are machined with true precision and quality in mind. The Type-S dies come with a standard de-capping assembly with a caliber-specific expander ball in place. In addition to this an undersized retainer to hold the de-capping pin is included with the die. In my experience with these dies I use the standard expander ball with new, unfired brass on the initial re-size. I will then use the undersized retainer in place of the expander ball with brass that has been fired. I have found this step crucial in my reloading regiment to minimize bullet run out. The use of the expander ball can cause a few thousandths of run-out when the case is being pulled back out of the sizing die. With the undersized retainer in place the only thing that touches the neck of the case in sizing is the bushing. If you prefer to use an expander ball, Redding offers caliber specific carbide floating expander balls that fit on the de-capping rod. This free floating expander ball will self center on the case neck, and reduce the amount of run-out that can be caused by a standard expander ball.
When setting up a Type-S sizing die, set the neck bushing into the die with the numbers facing down toward the body of the die. Tighten the de-capping assembly until it contacts the bushing and then back it off ¼ of a turn. This allows the bushing to free float in the die. You should be able to hear the bushing rattle if you shake the die. Having the bushing free floating self centers the neck, and again minimizes any run-out that can occur.
If you prefer other brands of sizing dies there are a few tricks that people use to minimize run-out as well. Many reloaders claim that the use of an O-ring at the base of the de-capping assembly lock nut will float the assembly and help self center during sizing. Another trick that has been used is to remove the retaining pin on the shell holder slot on the press ram, and use an O-ring in its place to hold the shell holder in place. This allows the shell holder to self center during sizing as well.
Seating Steps to Minimize Run-Out
Run-out issues can arise during the bullet seating process. To reduce run-out during seating, use a high-quality die with a sliding sleeve. The sliding sleeve perfectly aligns the case with the bullet to be seated. Good examples of these dies are the Redding Competition Micrometer bullet seating dies, Forster Ultra Seaters, or RCBS Competition Seating dies. All of these dies utilize a micrometer top to precisely set seating depth. They are all very high quality dies that have tight tolerances to maximize bullet straightness during seating.
We receive many questions about seating long pointed bullets such as the Berger VLD or Hornady A-Max. One problem that the reloader faces with longer bullets is that they are so long that the standard seating stem is not machined deep enough to contact these bullets properly. The point of the bullet “bottoms out” in the stem and the result is off-center seating and/or rings and dents on the bullet nose. If you plan on using such bullets, you should purchase a “VLD” style seating stem, which is cut to accommodate the longer bullets. The use of this stem results in truer seating of the bullet without leaving a ring or marring the tip of the bullet.
Besides using a traditional press and threaded seating die, another great way to get a true bullet seat is by using an arbor press and Wilson chamber-type seating die. These dies are cut to very tight tolerances and have proven themselves as the main choice for bench rest enthusiasts. The design of the die positively aligns the case with the bullet as they are both captured by the die before the bullet is pushed straight into the case by the stem. These seating dies are available with the standard seating cap and stem or an additional micrometer top can be added for precise adjustment. Wilson also offers a stainless seating die with an integral micrometer seating head.
Finally another trick used by many in the seating process is to turn the case while the bullet is being seated. Some people claim this will keep things straight. What they do is raise the ram in increments while seating and rotate the case in the shellholder in increments of 90 degrees from the original starting while the bullet is being seated. Personally I have tried this and have seen no significant difference at all. However you may be the judge of this one. It makes sense, and maybe I should try this a little more before I rule it out.
After the Rounds Are Loaded — Batch Sorting by Concentricity Levels
No matter how meticulous you are, and no matter how good your components and tools are, run-out will still show up. Reloaders can drive themselves crazy trying to make each and every loaded round a true “0” in run-out. You will still see some minimal amount no matter what you do. Set yourself a standard of maximum allowable run-out for your loads. For instance for my Long Range 600- and 1000-yard F-Class loads I like to see .002” or less. I average .0015” and see a few in the range up to .004”. I spin each loaded round on my Sinclair Concentricity Gauge and sort them by run-out. Those that run over .002” I use for sighters or practice. Though achieving zero run-out (on every round) isn’t possible, minimizing run-out can definitely help your performance. Not only will your loads shoot better but you will have one less thing to worry about when you are lining up the sights on the target.
|


