|
|
November 26th, 2014
|
One of our Forum members asked us the question: “Does anybody make a good range box with cradles for cleaning at the bench?” The answer is yes — the MTM model RBMC Range Box offers slide-in plastic cradles that provide a reasonably sturdy platform for a quick clean when you’re done shooting. The RBMC box also offers plenty of storage for jags, brushes, solvents, ammo boxes and other miscellaneous gear you need for the range.
Among the many range boxes available, the MTM model RBMC Range Box leads the pack in terms of versatility. It is rugged, it has plenty of storage space, plus it doubles as a handy cleaning station. This Editor has used the MTM Range Box to clean rifles and as a “range expedient” rifle holder when adjusting scopes and tensioning action screws. It’s a good product that does the job and stands up to rough handling. |
|

Fitted Cleaning Cradles
The key feature setting MTM’s RBMC apart from most range boxes is the rubber-coated cradle system. Wide enough to fit a 3″-wide fore-arm, the cradles slide into vertical slots on either end of the box. This allows your range box to serve as a stable maintenance station. The RBMC is really pretty stable in this role, and the cradles won’t mark your stock. The cradles even feature slots on each side to hold your cleaning rods when not in use. The MTM Range Box is secure enough to stay in place when you’re brushing the barrel. However, if you’re working on a carpeted bench top, you may want to keep one hand on the box when running a cleaning rod through the bore, just to ensure the box doesn’t slide.

Versatile Upper Tray with Dividers
The MTM Range Box has two major components — the box base (with cradles), and a large upper tray with hinged top and carry handle. This large upper tray clamps securely to the bottom unit for transport. The top tray has a long section that holds cleaning rod guides, long brushes, grease syringes and the like. There are two, clear-plastic fitted divider trays. These will hold your patches and jags, plus comparators, ring wrenches, and other small tools.
 What Might Be Improved What Might Be Improved
Though we really like the MTM Range Box, it’s not perfect. First, we wish the box was a bit deeper, to have added carrying capacity. The dimensions of the MTM Range Box are: 25″ long x 11.5″ wide x 8.75″ high. We’d like to see it 12″ high/deep to allow larger solvent bottles to stand upright and to provide more space to carry tools and shooting muffs. However, it is deep enough to hold the large 100-round MTM cartridge boxes that are popular with many shooters (see photo at left).
The cradles are very nicely designed, and will hold your rifle securely without marking the stock. However, we’ve found that sometimes the rear cradle grips the gun so well that the cradle slides out as you lift the gun up. This is not a big deal, but it does demand a little extra attention when you’ve finished cleaning. We really like the twin clear plastic dividers that fit into the large removable top-tray, but we wish the dividers had individual hinged tops. This would keep patches and small parts more secure.
|
The MTM Range Box costs about $46.00 at most vendors. The MTM Shooting Range Box RBMC-11 (green version) is on sale now for $35.68 at Amazon.com, with FREE shipping. The red RBMC-30 version (shown below) costs slightly more, and may currently be hard to find.

|
|
November 22nd, 2014
Lapua brass is so good that you’ll be tempted to just load and shoot, if you have a “no-turn” chamber. However, some minimal case prep will ensure more uniform neck tension. Keeping your neck tension very uniform allows more consistent bullet seating. That, in turn, usually yields better accuracy, and lower Extreme Spread and Standard Deviation (ES/SD). Lapua brass, particularly 6BR, 6.5×47, .243 Win and .308 Win comes from the factory with tighter-than-optimal necks. Before you seat bullets, at a minimum, you should inside chamfer the case mouths, after running an expander mandrel down the necks. The expander mandrels from both Sinclair Int’l and K&M will both leave the necks with enough neck tension (more than .001″) so you can then seat bullets without another operation. Put a bit of lube on the mandrel before running it down the necks — but remove any lube that gets inside the necks before seating bullets.

Both Sinclair and K&M Tools make a die body specifically to hold expander mandrels. The Sinclair version, is shown above. This $24.99 unit fits caliber-specific expander mandrels ($9.95) which measure approximately .001″ less than bullet diameter for each caliber. This is an updated “Gen II” design that completely captures the mandrel within the die so the mandrel cannot pull out. It also has an O-ring in the die cap that allows the mandrel to self-center within the case neck. Sinclair now offers three sizes of die bodies for expander mandrels: .17 -.310 Caliber (#849-011-715WS); .357 – .50 caliber (#749-008-843WS), and a special .50 Cal die body for large-diameter 50 BMG presses (#749-009-163WS, $49.99). All Generation II dies are machined from stainless steel and the standard diameter 7/8-14 dies include the Sinclair Stainless Steel Split Lock Ring.
Once you run the Sinclair expander mandrel down the necks of Lapua brass, after you account for brass spring-back, you’ll have about .002″ neck tension. This will make the process of seating bullets go much more smoothly, and you will also iron out any dents in the case mouths. Once the case mouths are all expanded, and uniformly round, then do your inside neck chamfering/deburring. The same expander mandrels can be used to “neck-up” smaller diameter brass, or prepare brass for neck-turning.
Forum member Mike Crawford adds: “These expanders can also reduce runout from offset seating. Prior to bullet seating, expand the sized necks to force thickness variance outward. With the Sinclair system, the necks will springback fine, and will not be pulled out of center. This leaves plenty of tension, and bullets seated more centered. I do this, even with turned necks, to get improved seating.”
Mandrels vs. Expander Balls on Decapping Rods
If you haven’t acquired an appropriate expander mandrel for your brass, but you DO have a full-length sizing die with an expander ball, this will also function to “iron out” the necks and reduce tension. However, using a die with an expander ball will work the necks more — since you first size them down, then the ball expands them up again. Typically (but not always), run-out is worse when using an expander ball vs. an expander mandrel.
November 19th, 2014
Many shooters, particular those who shoot vintage military rifle matches, reload once-fired military cartridge brass. This brass may be high-quality and stout, but you may encounter a primer crimp* that interferes with the seating of a new primer. There are a variety of dedicated, military-crimp tools on the market, such as Dillon’s excellent Super Swage 600 tool that “rolls the crimp away”. But the Dillon tool costs $100.95 and takes quite a bit of room on your reloading bench. If you don’t want to drop a C-note and give up valuable bench space — here’s another (much cheaper) solution.
If you already have a Wilson case trimmer set-up, you can ream away those military crimps using an affordable Wilson accessory — the Primer Pocket Reamer (large #PPR-210, small #PPR-175). This $32.99 accessory is used in conjunction with a Wilson case trimmer and case-holder as shown below.
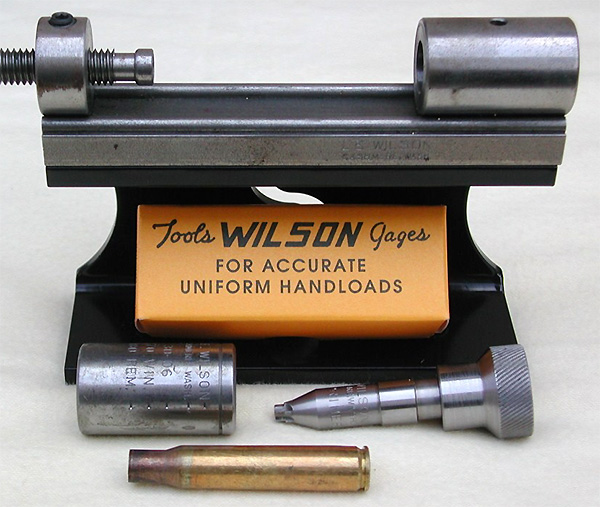
 In the older Riflemans Journal website, the Editor, “GS Arizona”, shows how to use the Wilson primer pocket reamer to remove military crimps on Lake City .30-06 cartridge brass. He explains: “The case goes into the Wilson case-holder, the same one used for case trimming, and the reamer replaces the trimmer head in the tool base. The threaded rod on the left side, which is normally used to regulate trim length has no use for this operation and it is simply backed out. Hold the case-holder as you turn the reamer into the primer pocket, it cuts easily and quickly. The reamer will stop cutting when the proper depth is reached.” In the older Riflemans Journal website, the Editor, “GS Arizona”, shows how to use the Wilson primer pocket reamer to remove military crimps on Lake City .30-06 cartridge brass. He explains: “The case goes into the Wilson case-holder, the same one used for case trimming, and the reamer replaces the trimmer head in the tool base. The threaded rod on the left side, which is normally used to regulate trim length has no use for this operation and it is simply backed out. Hold the case-holder as you turn the reamer into the primer pocket, it cuts easily and quickly. The reamer will stop cutting when the proper depth is reached.”
 
Do you really need to do this operation with military-crimped brass? Yes, and here’s why: “any attempt to prime the case without removing the crimp will simply result in a mangled primer that cannot be expected to fire and certainly won’t fire reliably.”
Read Full Article on Riflemans’ Journal Website (more photos and detailed write-up).
*Why does military brass has a primer crimp? GS Arizona answers: “The crimp is nothing more than an intentional deformation of the case around the primer pocket, the purpose of which is to retain the primer in the case despite high pressure situations in machine guns and other automatic weapons where a loose primer may cause a malfunction. As reloaders, our task is to get rid of the remnants of the crimp in order to allow re-priming the case.”
November 16th, 2014
Most of us assume that if we weigh our powder carefully (down to the tenth of a grain or less) we can achieve a uniform powder fill from case to case in our handloads. Weighing does ensure that the weight of the propellant in each case is the same, but is the column of powder the same by volume each time? “Not necessarily” is the answer. An interesting experiment by our friend Boyd Allen demonstrates that the manner in which you place kernels in the case can make a significant difference in the height of the powder column within the brass case.
Using a Gempro 250 scale, Boyd measured exactly 30.6 grains of Vihtavuori N-133 powder. He then inserted this powder in the same cartridge case multiple times. (The case has a fired primer in place.) But here is the key — Boyd used various filling techniques. He did a slow fill, and a fast fill, and he also experimented with tapping and drop tubes. What Boyd discovered was that you can start with the exact same weight of powder (in fact the very same set of kernels), yet end up with vary different fill heights, depending on how you drop the kernels into the case. Look at the photos. Despite variations in lighting, the photos show the same 30.6 grains of powder, placed in the same cartridge, with four different methods.
Boyd Explains the Procedure Used for his Experiment.
EDITOR’s NOTE: So there is no misunderstanding, Boyd started with a weighed 30.6 grain charge. This identical charge was used for ALL four fills. After a fill the powder was dumped from the case into a pan which was then used for the next fill technique to be tried. So, the powder weight was constant. Indeed the exact same kernels (of constant weight and number) were used for each fill.
Boyd writes: “I used the same powder for all fills, 30.6 gr. on a GemPro 250 checked more than once. All fills employed the same RCBS green transparent plastic funnel. The fast drop with the funnel only overflowed when it was removed from the case neck, and 15 granules of powder fell on the white paper that the case was sitting on. The fast-funnel-only drop with tapping, was done with the funnel in place and the case and funnel in one hand, while tapping the case body with the index finger hard, many times (about 20 fast double taps). My idea here was to “max out” the potential of this tapping technique.
The slow drop with the funnel and 10″-long .22 cal. Harrell’s Precision drop tube, was done by holding the scale pan over the funnel and tapping the spout of the pan repeatedly on the inside of the funnel about 1/3 down from the top, with the scale pan tilted just enough so that the powder will just flow. Many taps were involved, again, to max out the technique.
Again, to be clear, after each case filling, the powder was poured from the case back into the scale pan carefully. You may notice the similarity between the fast drop with the drop tube, and the funnel only with tapping. Although I did not photograph it, fast tube drop and tapping (combined) improved on tapping alone, but only to about half as far down the neck as the slow with drop tube. Due to the endless possible permutations, I picked four and left it at that.
I believe that I can make the rough judgment that the scale pan funnel and drop tube technique, which involved a longer drop period, and probably less velocity at the top of the tube, left more room in the top of the case neck than the slow drop from the measure with the same drop tube. You have both pictures, so you can make the comparison.” — Boyd
Does Powder Column Height Variance Make a Difference?
Boyd’s experiment proves pretty conclusively that the method of dropping a given weight of powder can affect the height of the powder column in the case and the degree of powder compression (when a bullet is seated). He showed this to be true even when the exact same set of kernels (of constant weight) was used in repetitive loadings. This raises some interesting questions:
1. Will subsequent cartridge transport and handling cause the powder to settle so the variances in powder column height are diminished?
2. If significant inconsistencies in powder column height remain at time of firing, will the difference in fill level hurt accuracy, or result in a higher extreme spread in velocity?
3. Is there any advantage (beyond increased effective case capacity) for a tight (low level) fill vs. a loose (high level) fill?
We don’t know the answer to these follow up questions. This Editor guesses that, if we tested low-fill-height rounds vs. high-fill-height rounds (all with same true fill quantity by weight), we might see meaningful differences in average velocity. I would also guess that if you fired 10 rounds that exhibited quite a difference in powder column heights, you might see a higher ES/SD than if you shot 10 rounds loaded with a very consistent powder column height (either high or low). But further testing is needed to determine if these predictions are true.
November 15th, 2014
How much can you save reloading your own ammo? Well that depends on the cost of components and how much you have invested in your reloading gear. UltimateReloader.com has created a handy online Reloading Costs Calculator that lets you quickly compare the cost of reloaded ammo vs. factory ammo. Just enter the costs of powder, primers, bullets, and brass, and the Calculator will tell you the cost per round, per 20-rd box, per 50-rd box, and cost per thousand. Note — when setting the price of the brass you need to divide the initial cost by the number of predicted reloads. For example if you have 500 pieces of brass that cost $40/100 to buy ($200 total), but you get 8 reloads per case, then you put $25.00 in the Calculator ($200 total brass cost divided by 8).

True Reloading Cost Should Include Amortized Tool Expenses
Ah… but there is a catch. To understand the true cost of reloading, you also need to consider the costs of your tools and accessories, amortized over the tools’ loading lifespan. Let’s say you have $1000.00 invested in presses, dies, tumblers, measuring tools and other accessories, with a residual value of $500.00 (upon resale). If you load 5,000 rounds with those tools over their lifespan, you need to add $0.10 per round for tooling costs (your investment minus residual value, divided by the number of rounds loaded). The UltimateReloader.com Calculator does not include amortized tooling costs, but that’s something you can easily figure out on your own.
Excellent Resource for Reloading Videos
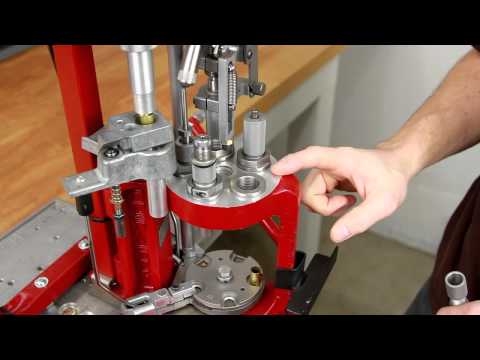
After you’ve tried out the Reloading Costs Calculator, check out the other content on UltimateReloader.com. This site features some of the best gun-related “how-to” videos on the internet. With sharp video and clear audio, the production quality is very high. If you use a progressive press (Dillon, Hornady, RCBS), you should definitely watch UltimateReloader.com’s videos — you’ll probably learn a new trick or two. In the sample video below, you can see how Hornady’s new Bullet Feeder works with its Lock-N-Load Progressive press.
November 14th, 2014
Gear Review by GS Arizona
This article originally appeared in the Rifleman’s Journal website.
Many of you have doubtlessly read Bryan Litz’s articles in our Daily Bulletin and on his Applied Ballistics website about various current long-range bullets. Bryan’s work carries a great deal of weight in the world of ballistics, so his comments (and mathematical proofs) regarding the benefits of bullet pointing certainly caught my attention. Bullet pointing, like meplat trimming, is an effort to reduce the ballistic inconsistency created by the somewhat jagged tip of the jacket where the bullet forming dies bring it to a point in the manufacturing process. Of course, we could eliminate this problem altogether by shooting closed-tip, open-base bullets like the Lapua D46, but that merely shifts the jacket problem to the other end of the bullet.

In any event, hollow point bullets rule the accuracy world today, so John Whidden, multi-time National Long Range Champion at Camp Perry and a talented gunsmith and designer to boot, came up with a very handy tool to let us make those hollow points pointier. Let’s have a look at John’s tool and see how it works.

The Whidden Bullet Pointing Die System uses a Forster bullet seating die body as its basic structure and that’s a good choice given the quality machining Forster does on these. The real heart of the tool comes in two parts: the caliber sleeve and the pointing die that fits inside the sleeve. In fact, to point up different caliber bullets, you only need to change the caliber sleeve, everything else remains the same. The last item is the bullet base that slips into a standard .308 shellholder and supports the bullet as it goes into the die body.
 It took me less than five minutes to get everything set up, including changing the caliber sleeve from 6mm to .30 caliber. John’s instruction sheets are well illustrated and clearly written; you should have no problem getting up and running. It took me less than five minutes to get everything set up, including changing the caliber sleeve from 6mm to .30 caliber. John’s instruction sheets are well illustrated and clearly written; you should have no problem getting up and running.
Pointing the bullets is as easy as sizing a piece of brass. You can see in the top photo the difference between a few pointed bullets and a few un-pointed ones. The innermost pointed bullet in the picture was my first attempt and I adjusted the die a little after that, you can see that the others are closed a little more. John even includes a couple of sample bullets so that you can see one done right and one done wrong. That is a nice addition that can help you achieve the desired results.
I think Bryan’s work supports the validity of this concept and John’s tool puts it into practice in a simple-to-use manner that makes it just about impossible to do any damage to the bullet. I have shot pointed bullets in various calibers at many matches now. Pointing is not a “miracle cure”, but I believe that pointing bullet tips can produce long-range accuracy gains, through reduced vertical dispersion, for many popular types of match bullets. The Whidden Bullet Pointing Die System retails for $220.00 (with one insert). Additional die inserts are $42.00 each. Extra caliber sleeves are also $42.00. You can purchase directly from Whidden Gunworks, or from Sinclair International.

November 12th, 2014
 Our friend (and ace benchrest shooter) Lou Murdica recently tested some prototype Accurate LT-30 powder from Western Powders. This is a new formulation similar to LT-32, but with a slightly faster burn rate. That makes LT-30 ideal for the 30 BR and other cartridges that presently work well with Hodgdon H4198. Lou tells us: “At a 100/200-yard group benchrest match in Phoenix this weekend, I shot the new LT-30 powder in a 30BR. I used Berger 115gr bullets in a rifle with a Shilen barrel. This powder is just like the LT-32 powder… just a little faster.” Our friend (and ace benchrest shooter) Lou Murdica recently tested some prototype Accurate LT-30 powder from Western Powders. This is a new formulation similar to LT-32, but with a slightly faster burn rate. That makes LT-30 ideal for the 30 BR and other cartridges that presently work well with Hodgdon H4198. Lou tells us: “At a 100/200-yard group benchrest match in Phoenix this weekend, I shot the new LT-30 powder in a 30BR. I used Berger 115gr bullets in a rifle with a Shilen barrel. This powder is just like the LT-32 powder… just a little faster.”
Lou added that, in the 30 BR, this powder delivers accuracy similar to Hodgdon H4198, but 30 BR loads with match bullets can be pushed up to 200 FPS faster without apparent pressure issues. That’s significant. Lou posted some targets which do indicate that LT-30 offers excellent accuracy. Here are 5-shot groups shot with Berger 115s and LT-30 powder:

Western Powders has not yet announced an “arrival date” for LT-30, so we can’t tell you when you will see LT-30 at retail powder vendors. It appears this new propellant will go into production in the near future, though LT-30 is not yet listed on the Accurate Powders website.
 Accurate’s New LT-30 Powder Is Like LT-32 but a Little Bit Faster… Accurate’s New LT-30 Powder Is Like LT-32 but a Little Bit Faster…
LT-32 is a fine-grained extruded powder that was developed for 6mm PPC benchrest competitors. Already a proven match winner, LT-32′s excellent shot-to-shot consistency and low standard deviation (SD) make this a very good choice for competitive benchrest shooting. Due to its small grain size, LT-32 flows like a spherical powder and allows for very precise hand-loading. It also offers impressive accuracy in varmint and tactical cartridges, including the .223 Rem, and 20 Tactical. If you haven’t tried LT-32 in your PPC or varmint cartridges yet, you should give it a try. LT-32 is one of the most accurate powders on the market, when used with appropriate bullet/cartridge combos.
November 7th, 2014
 Powder Valley Inc. (PVI) now has the new IMR 4166 powder. This is an all-new extruded powder with a burn rate similar to Hodgdon Varget. It is expected to perform well in the .308 Winchester and in 6mm cartridges running the heavier (95-107gr) projectiles. IMR’s press release states: “IMR 4166 [has] a perfect burn speed for cartridges like the 308 Win/7.62mm NATO, 22-250 Remington, 257 Roberts and dozens more.” Powder Valley Inc. (PVI) now has the new IMR 4166 powder. This is an all-new extruded powder with a burn rate similar to Hodgdon Varget. It is expected to perform well in the .308 Winchester and in 6mm cartridges running the heavier (95-107gr) projectiles. IMR’s press release states: “IMR 4166 [has] a perfect burn speed for cartridges like the 308 Win/7.62mm NATO, 22-250 Remington, 257 Roberts and dozens more.”
IMR 4166 is one of the new Enduron family of propellants. It is formulated to reduce fouling and to be stable across a wide temperature range. If you commonly use Varget, Alliant Reloder 15, Norma 203B, IMR 8208 XBR, or Vihtavuori N140, you might want to try IMR 4166. It is available right now at Powder Valley in both one-pound ($25.45) and 8-pound ($182.75) containers:
IMR4166-01: IMR 4166 – 1 LB. — $25.45
IMR4166-08: IMR 4166 – 8 LBS. — $182.75
For more information and IMR 4166 LOAD DATA visit imrpowder.com or check the 2015 Hodgdon Annual Manual. Load data should be forthcoming pretty soon.
October 26th, 2014
 Effects Of Cartridge Over All Length (COAL) And Cartridge Base To Ogive (CBTO) – Part 2 Effects Of Cartridge Over All Length (COAL) And Cartridge Base To Ogive (CBTO) – Part 2
by Bryan Litz for Berger Bullets.
Part One of this series focused on the importance of COAL in terms of SAAMI standards, magazine lengths, seating depths, and pressure levels. Another measure of length for loaded ammunition is highly important to precision, namely Cartridge Base to Bullet Ogive Length (CBTO).
Figure 2. Chamber throat geometry showing the bullet jump to the rifling or lands.

Look at Figure 2. Suppose the bullet was seated out of the case to the point where the base of the bullet’s nose (ogive) just contacted the beginning of the riflings (the lands) when the bolt was closed. This bullet seating configuration is referred to as touching the lands, or touching the riflings and is a very important measurement to understand for precision hand-loading. Due to the complex dynamics of internal ballistics which happen in the blink of an eye, the distance a bullet moves out of the case before it engages the riflings is highly critical to precision potential. Therefore, in order to systematically optimize the precision of his handloads, it’s critically important that the precision hand-loader understands how to alter bullet seating depth in relation to the barrel rifling. Part of the required knowledge is understanding how to accurately and repeatably measure the Cartridge Base To Ogive (CBTO) dimension. This is explained in the FULL ARTICLE.
Bryan Litz offers an extended discussion on how to measure CBTO using different tools and methods, including the Hornady OAL gauge. You can read this discussion in the full article found on the Berger Bullets website. CLICK HERE to Read Full Article.
Why Not Use CBTO as a SAAMI Standard?
If CBTO is so important to rifle accuracy, you might ask, “Why is it not listed as the SAAMI spec standard in addition to COAL?” There is one primary reason why it is not listed in the standard. This is the lack of uniformity in bullet nose shapes and measuring devices used to determine CBTO.
Figure 4. Two different bullet shapes, seated to the same CBTO length, but different COAL. Note the shiny scratches on the bullets made by the comparator tool which indicates a point on the bullet ogive near where the ogive will engage the riflings.

Benefits of Having a Uniform CBTO
There is another aspect to knowing your CBTO when checking your COAL as it pertains to performance. With good bullets, tooling, and carefully-prepared cases you can easily achieve a CBTO that varies less than +/- .001″ but your COAL can vary as much as .025″ extreme spread (or more with other brands). This is not necessarily bad and it is much better than the other way around. If you have a CBTO dimension that varies but your COAL dimension is tight (within +/- .002″) then it is most likely that your bullet is bottoming out inside the seater cone on the bullet tip. This is very bad and is to be avoided. It is normal for bullets to have precisely the same nose shape and it is also normal for these same bullets to have nose lengths that can vary as much as .025″.
|
Summary of Cartridge Base To Ogive (CBTO) Discussion
Here are four important considerations regarding bullet seating depth as it relates to CBTO:
1. CBTO is a critical measurement to understand for handloaders because it’s directly related to precision potential, and you control it by simply setting bullet seating depth.
2. Tools and methods for measuring CBTO vary. Most of the measurement techniques have pitfalls (which may give rise to inconsistent results) that you should understand before starting out.
3. A CBTO that produces the best precision in your rifle may not produce the best precision in someone else’s rifle. Even if you have the same rifle, same bullets, same model of comparator gauges, etc. It’s possible that the gauges are not actually the same, and measurements from one don’t translate to the same dimension for another.
4. Once you find the CBTO that produces the best precision in your rifle, it’s important to allow minimal variation in that dimension when producing quality handloads. This is achieved by using quality bullets, tooling, and properly preparing case mouths and necks for consistent seating.
CLICK HERE to Read Full Article with More Info |
Article sourced by EdLongrange. We welcome tips from readers.
October 21st, 2014
IMR is bringing out a new series of advanced-formulation extruded powders. In 2015, IMR will introduce three (3) new Enduron powders: IMR 4166, IMR 4451, and IMR 7977. The new line of IMR Enduron powders feature small kernels for easy metering, plus a built-in copper fouling eliminator. IMR claims that Enduron powders are not sensitive to temperature changes. If this is true, these powders should prove popular, particularly IMR 4166 which seems to be in the Varget/Reloder 15 burn-rate range. With Varget so hard to find, if IMR 4166 proves accurate (and available) we might see many .308 Win shooters make the switch. IMR states that IMR 4166 is a “versatile, match grade propellant”. We’ve been quite pleased with IMR 8208 XBR as a Varget alternative. IMR 8208 XBR is accurate, clean-burning, and offers good velocity. Perhaps the new IMR 4166 will be as good or better.
When will Enduron powders appear on dealers’ shelves? Hodgdon Powder Co., distributors of Hodgdon, IMR, and Winchester powders, says that: “The new IMR Enduron™ Technology powders will be available at dealers in early 2015 in 1-pound and 8-pound containers.” For more information and Enduron LOAD DATA visit imrpowder.com or check the 2015 Hodgdon Annual Manual.
IMR’s press release provides these descriptions of the new Enduron propellants:
IMR 4166 is the first in the series of Enduron™ propellants. It’s a perfect burn speed for cartridges like the 308 Win/7.62mm NATO, 22-250 Remington, 257 Roberts and dozens more.
IMR 4451 Another new Enduron powder that gives top performance in the venerable .30-06, 270 Winchester, and 300 Winchester Short Magnum, to name just a few. This propellant is ideally suited for many mid-range burn speed cartridges.
IMR 7977 is the slowest burn rate Enduron Technology powder. It is a true magnum cartridge propellant with outstanding performance in such cartridges as the .300 Winchester Magnum, 7mm Remington Magnum, .338 Lapua and more.

|


