|
|
November 23rd, 2012
 The RCBS ChargeMaster Combo Electronic Scale/Dispenser is very popular with reloaders. The units we use have dispensed loads faithfully (and accurately) for many seasons. We rarely, if ever, mess around with manual powder measures anymore. If you haven’t bought a ChargeMaster yet because the price (typically about $349.00) has been out of reach, now you’re in luck. Midsouth Shooters Supply has discounted the ChargeMaster to exactly $300.00. That qualifies for a $50 off rebate from RCBS. When you figure in the $50 Manufacturer’s Rebate, your final price (not including shipping) is just $250.00. That’s a good deal. But just to be clear — you still have to pay shipping! The RCBS ChargeMaster Combo Electronic Scale/Dispenser is very popular with reloaders. The units we use have dispensed loads faithfully (and accurately) for many seasons. We rarely, if ever, mess around with manual powder measures anymore. If you haven’t bought a ChargeMaster yet because the price (typically about $349.00) has been out of reach, now you’re in luck. Midsouth Shooters Supply has discounted the ChargeMaster to exactly $300.00. That qualifies for a $50 off rebate from RCBS. When you figure in the $50 Manufacturer’s Rebate, your final price (not including shipping) is just $250.00. That’s a good deal. But just to be clear — you still have to pay shipping!
How to Claim Your $50.00 Mail-In Rebate
You can get $50.00 cash back from RCBS. You need to have purchased at least $300.00 in 2012 RCBS “Product” to qualify for the RCBS $50.00 mail-in rebate. With the rebate you get $50.00 back directly from RCBS. This lowers the effective price of a new ChargeMaster to $250.00 (before shipping and after rebate). Purchases must be made between 1/1/2012 and 12/31/2012 and the rebate form and supporting materials must be received no later than 1/31/2013.

November 20th, 2012
 How much does it cost you to send a round downrange? Ask most shooters this question and they’ll start adding up the cost of components: bullets, powder, and primers. Then they’ll figure in the cost of brass, divided by the number of times the cases are reloaded. How much does it cost you to send a round downrange? Ask most shooters this question and they’ll start adding up the cost of components: bullets, powder, and primers. Then they’ll figure in the cost of brass, divided by the number of times the cases are reloaded.
For a 6BR shooting match bullets, match-grade primers, and 30 grains of powder, in brass reloaded ten times, this basic calculation gives us a cost per shot of $0.51 (fifty-one cents):
Bullet $0.33 (Berger 105 VLD) Grafs.com
Primer $0.02 (Tula/Wolf SmR magnum) PVI
Powder $0.08 (Reloder 15 @ $19.15/lb) PVI
Brass $0.08 (Lapua @ $82.30/100, 10 reloads)
Total = $0.51 per round
NOTE: If you shoot a larger caliber that burns more powder, and uses more expensive bullets and/or brass, your total cost per round will be higher than $0.51.
$1.00 Per Shot True Cost? Yikes!
OK, we’ve seen that it costs about $0.51 per round to shoot a 6BR. Right?
Wrong! — What if we told you that your ACTUAL cost per round might be closer to double that number? How can that be? Well… you haven’t accounted for the cost of your barrel. Every round you fire down that tube expends some of the barrel’s finite life. If, like some short-range PPC shooters, you replace barrels every 700 or 800 rounds, you need to add $0.60 to $0.70 per round for “barrel cost.” That can effectively double your cost per round, taking it well past the dollar per shot mark.
Calculating Barrel Cost Per Shot
In the table below, we calculate your barrel cost per shot, based on various expected barrel lifespans.
 As noted above, a PPC barrel is typically replaced at 700-800 rounds. A 6.5-284 barrel can last 1200+ rounds, but it might need replacement after 1000 rounds or less. A 6BR barrel should give 2000-2600 rounds of accurate life, and a .308 Win barrel could remain competitive for 4,000 rounds or more. As noted above, a PPC barrel is typically replaced at 700-800 rounds. A 6.5-284 barrel can last 1200+ rounds, but it might need replacement after 1000 rounds or less. A 6BR barrel should give 2000-2600 rounds of accurate life, and a .308 Win barrel could remain competitive for 4,000 rounds or more.
The table below shows your barrel cost per shot, based on various “useful lives.” We assume that a custom barrel costs $540.00 total to replace. This includes $300.00 for the barrel itself, $200.00 for chambering/fitting (conservative number), and $40.00 in 2-way shipping costs. These are typical costs shooters will encounter when ordering a rebarreling job.

The numbers are interesting. If you get 2000 rounds on your barrel instead of 1000, you save $0.27 per shot. However, extending barrel life from 2000 to 3000 rounds only saves you $0.09 per round. The longer you keep your barrel the more you save, but the savings per shot decreases as the round count increases.

How to Reduce Your TRUE Cost per Round
What does this tell us? First, in figuring your annual shooting budget, you need to consider the true cost per round, including barrel cost. Second, if you want to keep your true costs under control, you need to extend your barrel life. This can be accomplished in many ways. First, you may find that switching to a different powder reduces throat erosion. Second, if you’re able to slow down your shooting pace, this can reduce barrel heat, which can extend barrel life. (A varminter in the field is well-advised to switch rifles, or switch barrels, when the barrel gets very hot from extended shot strings.) Third, modifying your cleaning methods can also extend the life of your barrel. Use solvents that reduce the need for aggressive brushing, and try to minimize the use of abrasives. Also, always use a properly fitting bore guide. Many barrels have been prematurely worn out from improper cleaning techniques.
November 20th, 2012
Pyrodex certainly sounds cool, but does anyone know where the name came from? In 1972, chemist Dan Pawlak developed a mixture that performed like black powder but was much safer to handle. This black powder substitute was able to win a Flammable Solid designation from the Department of Transportation, which meant it could be shipped like regular smokeless powder.
Dan called this mixture a pyrotechnic deflagrating explosive…or Pyrodex for short.
November 15th, 2012
 We were recently asked: “What size neck bushing is best for Lapua 6mmBR brass in a ‘no-turn’ chamber?” The questioner planned to purchase a Redding Type ‘S’ full-length sizing die with neck bushings. The quick answer is that one should probably get 0.265, 0.266, and 0.267 bushings and see what works best. We were recently asked: “What size neck bushing is best for Lapua 6mmBR brass in a ‘no-turn’ chamber?” The questioner planned to purchase a Redding Type ‘S’ full-length sizing die with neck bushings. The quick answer is that one should probably get 0.265, 0.266, and 0.267 bushings and see what works best.
Using current “Blue Box” Lapua brass, a loaded 6BR round with an unturned neck will typically run about 0.2680-0.2685 (depending on the bullet). A 0.266 neck bushing, after springback, will give about 0.0015 tension which can work well in a bolt gun. NOTE: With the older “Brown Box” Lapua Brass, the neckwalls are slightly thicker, so you may want to start with a .267 bushing. Remember, however, that with either older or newer Lapua brass you may want to experiment. Some bullets prefer more tension than others. And, you may find that it is useful to tweak neck tension slightly if you make major changes in seating depth during load development. In a gas gun, such as an AR15, you probably want .003 or more tension.
Alternative to Bushings — Honed Full-Length dies
Conventional, non-bushing full-length sizing dies can create ultra-accurate ammo with very low run-out. For some applications, we prefer a non-bushing FL die over a bushing die — so long as the neck tension is correct. But many FL dies have an undersized neck diameter so you end up with excess neck tension, and you work the brass excessively. Forster offers a simple, inexpensive solution — honing the neck diameter to whatever size you want.
If you purchase a Forster non-bushing, full-length sizing die, Forster will hone the neck dimension to your specs for $12.00 extra (plus shipping). This way you can have a FL die that provides the right amount of tension for your particular load. (The max amount of diameter change Forster can do is about .008″) Forster dies are relatively inexpensive so you can afford to have a couple of FL dies with necks honed to different diameters — such as 0.266″ and 0.267″ for a no-turn 6mmBR. The die itself is fairly inexpensive — currently Sinclair Int’l charges $33.99 for a Forster 6mmBR full-length sizing die (Forster Part # 018121).
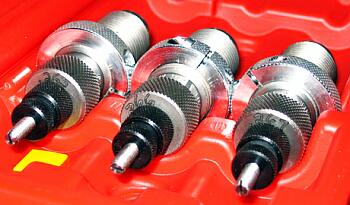
Forster FL dies, necks honed to .265″, .266″, and .267″.
Steve Rasmussen of IowaHighPower.com gave this a try. In fact, he had three dies made — each with a different neck dimension. Here’s his report: “My original Forster 6BR FL die sized the necks down a lot [to about 0.260″]. I sent my die in and asked if they could supply two more FL dies (for three total) to have the necks honed to 0.265″, 0.266″, and 0.267″.” In addition to the purchase cost of two more FL-sizing dies, Steve paid $36 ($12 per die) for the three dies to be honed, plus about $12 for return shipping.
The table below shows the neck diameter range of 10 sized cases using each die. [NOTE: This is with older “Brown Box” Lapua brass!] Brass springback after sizing is running 1 to 1.3 thousandths. My loaded rounds are running 0.2697-0.2699 using Lapua I bought last year. So far the dies are working well. I sized 80 cases with the 0.266″ necked die. The shoulder is running 0.4582″ and 0.300″ up from the base is 0.4684". I spun 20 of ‘em and 16 had a runout of one thousandth (0.001) and the other 4 at 1.5 thousandths (0.0015).”
| Die Diameter |
Sized Brass |
Springback |
Neck Tension |
| 0.267 Die |
0.2683-0.2684 |
0.0013 |
0.0014 |
| 0.266 Die |
0.2672-0.2674 |
0.0013 |
0.0025 |
| 0.265 Die |
0.2659-0.2660 |
0.0010 |
0.0039 |
November 13th, 2012
 21st Century Shooting crafts some of the best precision handloading tools you can buy. This company’s neck-turning tools, priming tools, funnels, flash-hole tools, and other specialty tools are truly excellent pieces of kit. The 21st Century neck-turner, fitted in the company’s innovative neck-turning lathe, is an outstanding system for turning case-necks. Now holiday shoppers can save money on 21st Century’s entire product line. 21st Century is offering 10% off all products ordered through its website, www.21stCenturyShooting.com. 21st Century Shooting crafts some of the best precision handloading tools you can buy. This company’s neck-turning tools, priming tools, funnels, flash-hole tools, and other specialty tools are truly excellent pieces of kit. The 21st Century neck-turner, fitted in the company’s innovative neck-turning lathe, is an outstanding system for turning case-necks. Now holiday shoppers can save money on 21st Century’s entire product line. 21st Century is offering 10% off all products ordered through its website, www.21stCenturyShooting.com.
To get 10% off your online order, simply use the Discount Code 1210holiday25 during check-out, placing “1210holiday25″ in the box marked “REDEEM CODE”. With the money you save you can buy more cool tools, or set aside your savings for bullets, brass, and powder.

Discount Tip from EdLongrange. We welcome reader submissions.
October 30th, 2012
A few times each year, MidwayUSA puts its Frankford Arsenal Digital Calipers (product #604242) on sale, and we try to let our readers know. Marked down from $22.49, these are just $12.99 through November 30, 2012. We have a set of these calipers and they have performed basic measuring functions in the loading room reliably for many years. But there have been complaints about the long-term reliability of recently-made versions. Still, at this price, you can afford to buy a spare set for your range kit. Measuring resolution is ± .001″ and values can be switched from English to Metric. The calipers come in a handy, protective plastic case, with battery.

October 22nd, 2012
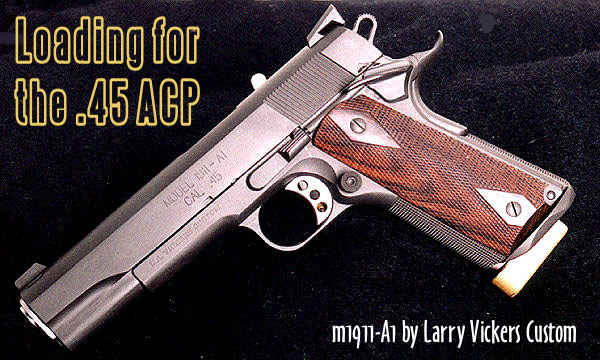
 Man does not live by long-guns alone. We know that many of our readers own .45 ACP handguns and load for this extremely accurate “classic” cartridge. When selecting a powder for the .45 ACP, there are many good options. All the major powder manufacturers make propellants with appropriate density and burn rate characteristics for the .45 ACP. Popular choices include: AA #5 (Accurate Powder); Bullseye (Alliant); Clays, HP-38, and Titegroup (Hodgdon); VV N310 and N320 (Vihtavuori); and WW 231 and WST (Winchester). We’ve tried all those powders in a variety of .45 ACP handguns. When we consider all the factors that make for a good pistol powder, we think N320 is one of the best available propellants for the .45 ACP. Vihtavuori N320 is very accurate, it meters well, and it burns clean, with minimal smoke and flash. If you haven’t tried VV N320 yet, you should. Man does not live by long-guns alone. We know that many of our readers own .45 ACP handguns and load for this extremely accurate “classic” cartridge. When selecting a powder for the .45 ACP, there are many good options. All the major powder manufacturers make propellants with appropriate density and burn rate characteristics for the .45 ACP. Popular choices include: AA #5 (Accurate Powder); Bullseye (Alliant); Clays, HP-38, and Titegroup (Hodgdon); VV N310 and N320 (Vihtavuori); and WW 231 and WST (Winchester). We’ve tried all those powders in a variety of .45 ACP handguns. When we consider all the factors that make for a good pistol powder, we think N320 is one of the best available propellants for the .45 ACP. Vihtavuori N320 is very accurate, it meters well, and it burns clean, with minimal smoke and flash. If you haven’t tried VV N320 yet, you should.
Pros and Cons of Different Powders for the .45 ACP
This Editor has personally tried out eight or more different powders for the .45 ACP. Bullseye works but it is very dirty (both smoke out the barrel and sooty powder fouling on case). Though it otherwise burns clean, Titegroup leaves a singular (and nasty) high-temp flame streak on your brass that is hard to remove. AA #5 is a good choice for progressive press newbies as you use more powder so a double charge will (usually) be obvious. I like AA #5 but N320 was more accurate. Clays burns clean but some powder measures struggle with flake powders like this. WW 231 offered excellent accuracy and metered well, but it kicked out sparks with little pieces of debris that would hit me in the face. Who wants that?
I personally tried all the powders listed above with lead, plated, and jacketed bullets. After testing for accuracy, consistency, and ease of metering, I selected VV N320 as the best overall performer.
Vihtavuori N320
- No powder tested was more accurate (WW 231 was equally accurate).
- Meters very well in all kinds of powder measures.
- Produces very little smoke from muzzle.
- Does not put nasty burn streak on brass like Tite-Group does.
- Low Flash — you don’t get particles and sparks flying out like WW 231.
- Cases come out from gun very clean — so you can tumble less often.
Forum member and gunsmith Michael Ezell agrees that N320 is a good choice for the .45 ACP. Mike has also found that WW 231, while accurate, produces sparks and a large flash. Mike writes: “I first started using N320 after my first night shoot, while shooting IDPA/IPSC matches. It was astonishing how much of a fireball the WW 231 created. I was literally blinded by the flash while trying to shoot a match. As you can imagine, that didn’t work out very well. I went from WW 231 to N320 and never looked back…and the flash from it was a fraction of what a kid’s sparkler would give off. I have nothing but good things to say about [N320] after using both. Night shoots are a real eye-opener! When it comes to a personal protection… there is, statistically, a very high chance that if you ever have to use a gun to protect yourself or your family, it’ll be in the darkness[.] Being blinded by muzzle flash (and deafened by the noise) are things that should be considered, IMO.”
 This Editor owns a full-size, all-stainless S&W 1911. After trying numerous powders, I found VV N320 delivered the best combination of accuracy, easy metering, consistency, clean burning qualities, and low muzzle flash. My gun has proven exceptionally accurate using N320 with bullets from 180 grains to 230 grains — it will shoot as accurately as some expensive customs I’ve tried. At right is 5-round group I shot offhand at 10 yards with my 5″ S&W 1911. The bullet hole edges are sharp because I was using semi-wad-cutters. Rounds were loaded with Vihtavuori N320 and 200-grain SWCs from Precision Bullets in Texas. This Editor owns a full-size, all-stainless S&W 1911. After trying numerous powders, I found VV N320 delivered the best combination of accuracy, easy metering, consistency, clean burning qualities, and low muzzle flash. My gun has proven exceptionally accurate using N320 with bullets from 180 grains to 230 grains — it will shoot as accurately as some expensive customs I’ve tried. At right is 5-round group I shot offhand at 10 yards with my 5″ S&W 1911. The bullet hole edges are sharp because I was using semi-wad-cutters. Rounds were loaded with Vihtavuori N320 and 200-grain SWCs from Precision Bullets in Texas.
October 22nd, 2012
 The Hornady Handbook of Cartridge Reloading (9th Edition) will be available December 1st, 2012. The latest edition of this popular resource offers over 900 pages worth of reloading data covering 233 different cartridge types, 146 powders, and 304 bullet designs. Each cartridge write-up includes applicable Hornady bullets along with velocity and powder charts. The Hornady Handbook of Cartridge Reloading (9th Edition) will be available December 1st, 2012. The latest edition of this popular resource offers over 900 pages worth of reloading data covering 233 different cartridge types, 146 powders, and 304 bullet designs. Each cartridge write-up includes applicable Hornady bullets along with velocity and powder charts.
What’s New in 9th Edition
New Cartridge Types — Cartridge additions include the 17 Hornet, 327 Federal Mag, 356 Winchester, 5.56 NATO, 416 Barrett, and 505 Gibbs. There is also expanded data on over 20 favorites like the 223 Rem, 300 Whisper/AAC Blackout, 308 Win, 25-06 Rem, 257 Wby Mag and many more.
New Powders — A variety of propellants such as Power Pro Varmint, AR-Comp, CFE-223, among others have been added to many popular cartridges.
New Bullets — The Handbook includes data on newer Hornady bullets like the MonoFlex, NTX, GMX and FTX, plus longtime favorites like the V-MAX™, SST, InterBond, InterLock, A-MAX, XTP.
The 9th Edition Hornady Handbook of Cartridge Reloading is worth adding to your library of reloading resources. In addition to comprehensive reloading charts, the Handbook provides in-depth, easy-to-understand explanations of internal, external and terminal ballistics. For further information regarding Hornady® products, visit the company web site at http://hornady.com.
October 16th, 2012
This article originally appeared in Sinclair International’s Blog, The Reloading Press.
In the August 2012 Reloading Press, Bill Gravatt, President of Sinclair International, shared his experience using the Thumler’s Tumbler and stainless steel pin media to clean some .308 brass just before the National Matches. He discovered that combo is really great for cleaning brass.
This month, I want to share the results of a test I performed with stainless steel pin media, and give you some tips on how to best use this media to get cases as clean as you can. I’ve been using tumblers of some sort for more than 30 years. I got started with a sealed rotary tumber that my father and I made out of an old rock polisher we hooked up to a washing machine motor. While not as nice as a new Thumler’s Tumbler, the one-gallon capacity on that old tumbler means it’s still good for cleaning brass.
The Brass: Good, Bad and Downright Ugly
 To really test the stainless steel media’s cleaning power, I mixed three kinds of pistol brass that offered different challenges. First was some very old Amron headstamped .357 Magnum brass. The late Ken Lomont of Lomont Precision Bullets gave me the Amron brass as partial payment back when I was still in high school and working for him. I’ve been shooting it for years, so it’s obviously very durable. But it’s also very hard to clean, which made it great for the test. To really test the stainless steel media’s cleaning power, I mixed three kinds of pistol brass that offered different challenges. First was some very old Amron headstamped .357 Magnum brass. The late Ken Lomont of Lomont Precision Bullets gave me the Amron brass as partial payment back when I was still in high school and working for him. I’ve been shooting it for years, so it’s obviously very durable. But it’s also very hard to clean, which made it great for the test.
I threw in some once-fired nickel-plated .357 SIG brass from Federal that had a lot of soot inside. I wanted to see just how well the stainless steel media could handle really grimy jobs. Finally, I added in the worst brass — some very corroded 9mm range pick-up brass with spots of verdigris all over them and dirt down inside them. They were terrible, which made them perfect for the test.
Case Prep For Cleaning
 Before I ran the cases through the tumbler, I knocked out all of the fired primers so that the stainless steel media would be able to get into the primer pockets and run through the flash holes. The media that we have at Sinclair is only .040″ in diameter, so it will easily go through the .080″ diameter flash hole on most domestic-produced brass, as well as the smaller .060″ flash holes found on some other cases. Once I knocked out the primers, I poured the brass and the media into the tumbler drum together. Before I ran the cases through the tumbler, I knocked out all of the fired primers so that the stainless steel media would be able to get into the primer pockets and run through the flash holes. The media that we have at Sinclair is only .040″ in diameter, so it will easily go through the .080″ diameter flash hole on most domestic-produced brass, as well as the smaller .060″ flash holes found on some other cases. Once I knocked out the primers, I poured the brass and the media into the tumbler drum together.
Mixing The Solution
 Then I mixed up the cleaning solution. I poured ¾ of a gallon of water into the unit, and then put in four tablespoons of Dawn dishwashing detergent. I also added one teaspoon of lemon juice to keep the brass from spotting when it dried. Then I mixed up the cleaning solution. I poured ¾ of a gallon of water into the unit, and then put in four tablespoons of Dawn dishwashing detergent. I also added one teaspoon of lemon juice to keep the brass from spotting when it dried.
With everything ready, I sealed up the drum and started the unit and let it run for three or four hours. When I opened the drum, I could tell the media had done a very good job of removing all of the crud from the brass. The water was black, as you would expect from all the carbon inside the cases. After pouring off the solution, I separated the brass from the stainless media and rinsed it off. It took three rinses in clear water to make sure the brass was free of all the carbon the media scrubbed off.
 Then I rinsed the media, too. Rinsing the media is important: if you don’t do it, the media will be dirty when you use it next time. The media is easier to rinse while it’s still damp, and it cleans easily with clear water. As you can see, the brass cleaned up very well and showed no evidence of water spotting because of the lemon juice. The range pick-up brass came out fully usable, showing no signs of corrosion. The nickel brass looked as if it were brand new and unfired. The Amron cases looked the best that I can ever remember seeing them. Some of them still had a light amount of carbon just behind the case mouth, but a quick twist with 0000 steel wool took care of this easily during inspection of these cases before loading. All of the primer pockets were clean and clear of carbon. Impressive! Then I rinsed the media, too. Rinsing the media is important: if you don’t do it, the media will be dirty when you use it next time. The media is easier to rinse while it’s still damp, and it cleans easily with clear water. As you can see, the brass cleaned up very well and showed no evidence of water spotting because of the lemon juice. The range pick-up brass came out fully usable, showing no signs of corrosion. The nickel brass looked as if it were brand new and unfired. The Amron cases looked the best that I can ever remember seeing them. Some of them still had a light amount of carbon just behind the case mouth, but a quick twist with 0000 steel wool took care of this easily during inspection of these cases before loading. All of the primer pockets were clean and clear of carbon. Impressive!
 Based on what I have seen, I will definitely use stainless steel media a whole lot in the future, even though I will still keep some of the treated organic media around for when I want a very bright shine on the brass. Several of the other Sinclair International Reloading Techs plan on trying the stainless media as well, so they might come up with some other tips for you in the future. Based on what I have seen, I will definitely use stainless steel media a whole lot in the future, even though I will still keep some of the treated organic media around for when I want a very bright shine on the brass. Several of the other Sinclair International Reloading Techs plan on trying the stainless media as well, so they might come up with some other tips for you in the future.
As always, if you have questions, please do not hesitate to call on any of us on the Sinclair Tech staff to assist you.
Bob Blaine, Sinclair International Tech
NRA Certified Reloading Instructor and RSO
TECH TIPS — Avoiding Problems with Stainless Media
Do Not Use Stainless Media Dry — I have had customers call and ask if stainless steel media can be used dry. The answer is that you will not like the results. Everything will go to the media, but it will still leave the brass dirty. If you use stainless steel media dry, you have to run it through a cleaning solution to clean the media. Then, it’s good to go again.
Do NOT Use Stainless Media in a Vibratory Tumbler — When using stainless media, you need a rotary-style, liquid-containing tumbler. You want to use stainless steel media ONLY in a rotary tumbler. Do not use stainless steel media in a vibratory type cleaner.
October 15th, 2012
One of our readers has been shooting his 6BR with considerable success in tactical/practical matches. Thus far he’s been using Lapua factory-loaded 105gr ammo. The factory ammo has delivered superb accuracy for him — under 1/4 MOA at 100 yards. Now, he is making the jump into reloading. He asked for some tips on working up a good load for an 8-twist 6BR with a no-turn neck, and selecting reloading tools. Since other readers may be 6BR novices as well, here are some helpful hints…
Accurate Reloading Tips for the 6mmBR Cartridge
 ▪ Brass Prep — You need to look at the flash-holes to make sure they’re not occluded. A few lots of Lapua brass came with a little sliver/flake of brass in the hole, sort of like a quarter moon. You can clean that up with an inexpensive pin vise. Otherwise, there is no need to ream flash holes or uniform primer pockets. ▪ Brass Prep — You need to look at the flash-holes to make sure they’re not occluded. A few lots of Lapua brass came with a little sliver/flake of brass in the hole, sort of like a quarter moon. You can clean that up with an inexpensive pin vise. Otherwise, there is no need to ream flash holes or uniform primer pockets.
▪ Neck Chamfering — You want to develop a good feel for neck chamfering. You don’t want/need to remove a lot of brass — just knock off the sharp edge. I use a Forster 45 deg “rocket” tool. It works fine. After a couple light turns, spin backwards to smooth the cut and then finish with a twist with a green scotch pad. If you use a deep-angle chamferer, be very careful not to overcut and remove too much brass.
▪ Neck Tension — On brand new, unfired Lapua 6BR brass, neck tension is excessive. You should run an expander mandrel down the case necks before the first firing. This will reduce the neck tension while it fixes necks that may be dented or out of round. After the first firing, we suggest sizing the necks so that, after they come out of your sizing die, the neck outside diameter (OD) is .002″ less than the neck diameter of a loaded round with bullet seated. If that doesn’t work, try the next size up bushing for .001″ tension. Many top shooters like low neck tension, but we’ve also seen heavy tension work. The .002″ under loaded OD is a good starting point with the 6BR. (But note — if you have thin-walled turned necks, you may need to use a smaller bushing, running your sized necks .003 or .0035 under the OD of a loaded round.)
▪ Primers — A lot of guys like the CCI 450 primers. They’re a lot cheaper than the Federal and CCI BR primers and may give a little more velocity. The cups are also hard, which lets you run faster loads with less concern about cratering. Wolf/Tula primers also have hard cups, but you must make sure to seat them deep enough.
▪ Load Development and Bullet Choice — With the 6BR and 100-108gr bullets, load development should be relatively easy. With Varget, Reloder 15, Norma 203B, or VV N150, between 30.0 and 30.7 grains should work as your final load. My match load is 30.3 Varget and that has shot under 2.0″ at 600 yards. Start at 29.0 grains and and work up in 0.2 grain increments, checking for pressure. DO weigh every load… twice. If possible, use a chronograph during your load work-up. 2880-2920 fps is a nice “sweet spot” for the 6BR, but slower can be very accurate too. (With custom actions, tight chambers, and long barrels, some guys are going even faster — but that’s hard on brass.)
If you have a barrel on the slow side, consider shooting the Berger 100gr ‘Match Target’ BTs. These bullets are very accurate, and we’ve found that you can drive them 75-100 fps faster than the Berger 108s or Sierra 107s at similar pressure levels. With the 100-grainers, you may find that you can hit a superior velocity/accuracy node, so they may shoot better overall than the 105-108 class bullets. Varget, RL15, and IMR 8208 all work great with this 100gr bullet.
For shooting from 300-500 yards, you should consider the lighter-weight bullets: Sierra 95gr MK, Lapua 90gr Scenar, Berger 95gr and 87gr VLD. The Sierra and Lapua bullets are very accurate and not sensitive to seating depth. In addition to the powders mentioned above, H4895 and IMR 8208 XBR work very well with the 90-grain-class bullets. One note about the smaller Berger VLDs — the Berger 95gr VLD and 87gr VLD both have very short bearing surfaces, so they work best in a chamber with a short-to-moderate Freebore. We had the best luck with the 95gr VLD about .010″ into the lands. We could achieve that with an 0.075″ Freebore chamber. But you won’t be able to hit the rifling with the 95s in a long-throated chamber. With this bullet we recommend sorting bullets by base to ogive.
 For guys with 10-twist barrels, try out the new Berger 87gr VLD. It was expressly designed to work great in the 1:10″ twist barrels. Forum member Mark Schronce reports that this bullet is extremely accurate and can be driven fast. It has an 0.412 G1 BC. Note: The new 87gr VLD, product #24524, is hard to find on the Berger website, but it IS available. Berger calls it a “hunting bullet”, but it works great on paper also. MidwayUSA has the 87-grainers in stock as item #77854. For guys with 10-twist barrels, try out the new Berger 87gr VLD. It was expressly designed to work great in the 1:10″ twist barrels. Forum member Mark Schronce reports that this bullet is extremely accurate and can be driven fast. It has an 0.412 G1 BC. Note: The new 87gr VLD, product #24524, is hard to find on the Berger website, but it IS available. Berger calls it a “hunting bullet”, but it works great on paper also. MidwayUSA has the 87-grainers in stock as item #77854.

▪ Pure Accuracy — If you are looking for bughole accuracy out of your 6BR, try the Berger 80gr FBHP ‘Match Varmint’ bullets (item #24321). Many folks have reported these bullets will shoot in the ones and low twos, even in 8-twist barrels. For 100- to 200-yard distances, these bullets are hard to beat for pure accuracy. Beyond those distances, you’ll want something with a higher BC. We’ve had good luck with the Berger 80s pushed by Vihtavuori N135, and IMR 8208 XBR.
▪ C.O.A.L. — Bullet seating depth is very important. You should get the Hornady (Stoney Point) O.A.L. Gauge (shown below). This will let you discern the OAL at which the bullets just contact the rifling. The trick is tapping gently on the stick. (Get a wood dowel as the bullet can get stuck if you tap a little too aggressively.) With some practice, measuring is quick and you can get repeatable measurements of your distance to lands within .001-.002″.

A good starting point for the Berger and Lapua 105s is about .010-.015 IN the lands and then work back. Each barrel is different, but about .010″ in the lands works for many folks. One guy I know started at .012″ in the lands with Berger 105s, adjusted his load up from 30.0 to 30.4 Varget, and within an hour he was done with load dev — the gun was shooting in the low 2s. He went out and won his first match with that load the next day! With the Sierra 107s you might want to start .020″ out of the lands.
▪ Seating Die — We recommend the Wilson Micrometer Seating Die. The adjustable top makes it really easy to play with seating depths. Keep in mind, however, that moving 5 hash marks on the die may not give you exactly .005″ seating depth change — it will be close, but you should measure and write down the actual base to ogive length. FYI, I measure base to ogive of every loaded round. Occasionally you’ll find a bullet that ends up seated a little long or short.
NOTE: The fit of the 6BR Wilson seating die is very tight. You may have difficulty getting a fired case into the die if you do not full-length size the case first. Even with FL-sized cases, there may be a vacuum fit that makes the loaded round a little hard to remove. If you can’t easily extract your loaded round, try lifting the entire micrometer head and attached stem. This can release the vacuum so the case can slide out easily (unless there is a really tight fit). If that doesn’t work, here’s another trick — use the end of a Popsicle stick placed under the cartridge rim to lever the case out. I’ve found that the “working” end of a metal spoon works well too, but be careful not to nick the bottom of the die.
|


