Figure 1. When the bullet is seated farther out of the case, there is more volume available for powder. This enables the cartridge to generate higher muzzle velocity with the same pressure.
Effects Of Cartridge Over All Length (COAL) And Cartridge Base To Ogive (CBTO) – Part 1 by Bryan Litz forBerger Bullets.
Many shooters are not aware of the dramatic effects that bullet seating depth can have on the pressure and velocity generated by a rifle cartridge. Cartridge Overall Length (COAL) is also a variable that can be used to fine-tune accuracy. It’s also an important consideration for rifles that need to feed rounds through a magazine. In this article, we’ll explore the various effects of COAL, and what choices a shooter can make to maximize the effectiveness of their hand loads.
Sporting Arms and Ammunition Manufacturers’ Institute (SAAMI)
Most loading manuals (including the Berger Manual), present loading data according to SAAMI (Sporting Arms and Ammunition Manufacturers’ Institute) standards. SAAMI provides max pressure, COAL and many other specifications for commercial cartridges so that rifle makers, ammo makers, and hand loaders can standardize their products so they all work together. As we’ll see later in this article, these SAAMI standards are in many cases outdated and can dramatically restrict the performance potential of a cartridge.
Bullet seating depth is an important variable in the accuracy equation. In many cases, the SAAMI-specified COAL is shorter than what a hand loader wants to load their rounds to for accuracy purposes. In the case where a hand loader seats the bullets longer than SAAMI specified COAL, there are some internal ballistic effects that take place which are important to understand.
Effects of Seating Depth / COAL on Pressure and Velocity
The primary effect of loading a cartridge long is that it leaves more internal volume inside the cartridge. This extra internal volume has a well known effect; for a given powder charge, there will be less pressure and less velocity produced because of the extra empty space. Another way to look at this is you have to use more powder to achieve the same pressure and velocity when the bullet is seated out long. In fact, the extra powder you can add to a cartridge with the bullet seated long will allow you to achieve greater velocity at the same pressure than a cartridge with a bullet seated short.
When you think about it, it makes good sense. After all, when you seat the bullet out longer and leave more internal case volume for powder, you’re effectively making the cartridge into a bigger cartridge by increasing the size of the combustion chamber. Figure 1 illustrates the extra volume that’s available for powder when the bullet is seated out long.
Before concluding that it’s a good idea to start seating your bullets longer than SAAMI spec length, there are a few things to consider.
Geometry of a Chamber Throat
The chamber in a rifle will have a certain throat length which will dictate how long a bullet can be loaded. The throat is the forward portion of the chamber that has no rifling. The portion of the bullet’s bearing surface that projects out of the case occupies the throat (see Figure 2).
The length of the throat determines how much of the bullet can stick out of the case. When a cartridge is chambered and the bullet encounters the beginning of the rifling, known as the lands, it’s met with hard resistance. This COAL marks the maximum length that a bullet can be seated. When a bullet is seated out to contact the lands, its initial forward motion during ignition is immediately resisted by an engraving force.
Seating a bullet against the lands causes pressures to be elevated noticeably higher than if the bullet were seated just a few thousandths of an inch off the lands.
A very common practice in precision reloading is to establish the COAL for a bullet that’s seated to touch the lands. This is a reference length that the hand loader works from when searching for the optimal seating depth for precision. Many times, the best seating depth is with the bullet touching or very near the lands. However, in some rifles, the best seating depth might be 0.100″ or more off the lands. This is simply a variable the hand loader uses to tune the precision of a rifle.
Here’s something you don’t see every day — a reloading press that has loaded over 1,000,000 rounds of ammo. At the NRA Convention in Dallas in 2018, Redding showcased an old Redding T-7 Turret Press delivered to Sierra Bullets decades ago. 0ne of the very first T-7s made by Redding, this “old warrior” was used by Sierra Bullets to load over 1,000,000 rounds of ammunition in Sierra’s ballistics lab.
Redding T-7 Still Within Spec
After all that loading, Redding tested the press and, remarkably, found that it still remained “within spec”. Redding notes: “This press was subjected to real world reloading wear and stress yet remains within ‘new’ spec after this historic test”. When showcased in Dallas, this Redding turret press was fitted with indicators to show “just how good American steel and craftsmanship remains after what, in a normal situation, would represent numerous lifetimes of use.”
About Redding Reloading
Redding Reloading Equipment has crafted quality, American-made products for the precision handloading market since 1946. Along with single-stage and turret presses, Redding makes great dies. And Redding’s line of tools/accessories includes concentricity gauges, scales, trimmers, powder measures, powder tricklers, cleaning tools, deburring tools, bushings, and many other quality items.
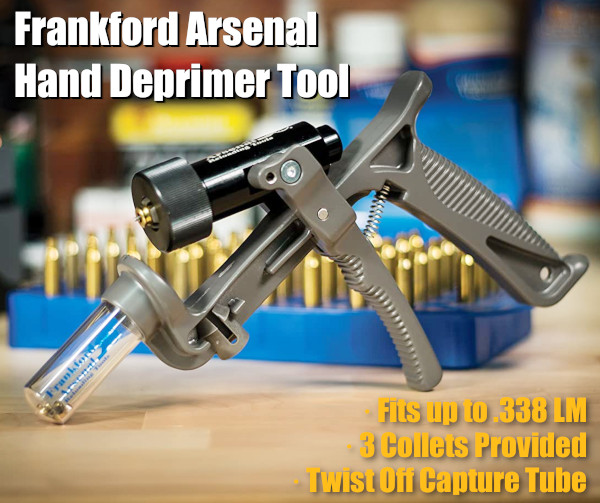
Many shooters prefer to deprime their brass before resizing. That way they can tumble cases or keep primer debris off their main press. To deprime cases before sizing or cleaning you can use a Depriming Die (aka “decapping die”). This pushes out the spent primer without changing the neck or body of a case. Such decapping dies work fine, but they do require the use of a press. Here is a handy alternative — a cool tool that allows you to deprime brass anywhere — no press needed.
Handheld Primer Removal Tool From Frankford Arsenal
This cleverly-designed Hand Deprimer Tool allows you to deprime cartridge cases without a press. This hand-tool from Frankford Arsenal will deprime brass and capture primers conveniently. You can deprime your cases while watching TV or relaxing in your favorite chair.
This device lets you remove spent primers anywhere — no press needed and all the mess (cups/anvils/residue) stays in the capture chamber. This tool comes works with nearly all common case types up to .338 Lapua Magnum. With good leverage, this tool does the job quicklyi and efficiently. Forum members have praised this handy tool, but recommend wearing a thick glove if doing more than 100 cases in a sesssion.
This handy depriming tool is very versatile. With a universal, cylinder-style cartridge-holder, the tool can deprime a wide variety of cartridge types from .20 caliber up to .338 caliber. Three different plastic collets are provided to handle for different diameter cases. Spent primers are captured in a removable spent primer catch tube. Simply twist off the clear catch tube to dump the spent primers. With die-cast metal construction, this tool should last through many thousands of depriming cycles. MSRP is $54.99. Right now it is $44.99 on Amazon with 82% 5-star ratings.
User Modifications — Grip Padding and High-Volume Capture
Many users recommended putting some kind of padding on the grip and front lever to reduce pressure on the fingers. This can be done with a wrap or a rubber covering. In addition, users have adapted the unit with an attached hose and large primer capture jug. If you depriming hundreds of cases at a time, this hose conversion may make sense.
Review from actual owner: “I have owned one of these for about eight years and deprimed over 10,000 cases with this tool. I have never had to replace a single part on it. You will have to adjust the return spring every so often, but that is a very easy task. If you are depriming a LOT of brass, the handle can tear up your hand a bit. Solution: Wear a Mechanics Glove. Easy Peasy! You will NOT regret this purchase.”
How to Adapt Tool for Small Flash Hole Brass
The Frankford Arsenal Deprimer Tool was designed for LARGE flash-hole brass. To deprime brass with small (1.5mm/0.59″) small flash-holes, as found on Lapua .220 Russian and 6mmBR cases, you will need to reduce the pin diameter. A smaller pin is “in development” according to the manufacturer. Frankford Arsenal currently recommends purchasing a replacement pin and “sanding it down” to the smaller diameter. NOTE: This is NOT difficult — simply spin the stock pin in some sandpaper.
Gear Review by Mark LaFevers With its innovative “moving die/static cartridge” design, the RCBS Summit Press definitely demonstrates “out of the box” thinking. Unlike other presses, the case does not move. Rather, the reloading die comes down to the case. We are happy to report that this unique “upside-down” reloading press works great.
We have tested the RCBS Summit Press in the workshop and in the field. We’ve now loaded hundreds of rounds with the press. It is smooth, solid, and easy to use. The spent primer ejection/capture system works great (our testers preferred the Summit’s simple, foolproof primer capture to the Rockchucker’s capture system). Most importantly, the Summit produces very straight ammo that gave excellent results on the target in actual matches.
We compared ammo loaded with the Summit with ammo loaded on an RCBS Rockchucker press. The Summit gave up nothing to the bigger press. Cartridge base-to-ogive measurements of Summit-loaded ammo were just as tight as with ammo loaded on the Rockchucker. Run-out, measured with a concentricity gauge, was the same or better (about .002 or less on bullet nose). Most importantly, the Summit loads accurate ammo. In fact, at one match, scores shot with Summit-loaded .284 Win ammo were actually better than scores shot (in the same gun) with ammo loaded on a Rockchucker:
Despite its small footprint, the Summit is very stable — it doesn’t tip, wobble, or rock. The two front mounting bolts hold it firmly in place — the Summit doesn’t need a rear anchor. This, combined with the fact that the Summit has no overhang, makes this press ideal for a mobile application. For field use (at the range), our tester Mark LaFevers mounted the Summit press on a small platform secured to his trailer hitch (on top of a steel post). This set-up worked great, as you can see in the video below:
Watch Reloading (Sizing/Decapping, Expanding, Bullet Seating) with Summit Press
Photo shows Redding Micrometer Seating Die and .284 Win Cartridge
Mark tells us: “I think the Summit press worked out sweet mounted on the hitch pedestal. The receiver hitch pedestal I made will switch tools between a heavy barrel vise I made and the Summit press. Instead of securing the pedestal with a standard 5/8″ hitch pin, I drilled and tapped for 1/2″-13 bolt to draw the insert up tight against the receiver, eliminating wobble. For charging rounds, I bought 150 plastic test tubes with caps and racks so I can avoid weighing powder charges in the field, unless I want to make changes on the fly.”
The RCBS Summit Press features a rugged cast-iron frame with all-steel linkages. The press is very strong with minimal flex and slop. This allows you to “bump” your case shoulders and seat bullets with great precision and repeatability. The handle can be switched from right to left side (good for southpaws), and the open-front design provides good access, facilitating quick die changes*. The 4.5-inch opening allows you to work with tall cases. Beneath the shell-holder is a spent primer catcher (not shown in photos). The Summit press has a beefy 2-inch diameter ram, with compound linkages for plenty of leverage. A Zerk fitting is included for easy lubrication. The press will accept larger bushings for oversize 1-inch dies.
Summit Press Retails for $238.99
The RCBS Summit Press (RCBS item #09290) lists for $269.95. However, Midsouth currently has the Summit Press on SALE for $238.99. Yes it is IN STOCK and available. An optional short handle from RCBS costs $17.99 at MidwayUSA. ($19.95 MSRP).
This useful video explains the special features of the Summit press — ambidextrous handle, primer catcher, Zerk lube fitting — and shows the press operation.
*To permit his dies to be swapped from Rockchucker to Summit (and back again), with no locking ring adjustments, Mark LaFevers fabricated a new shell-holder base which positions the shell-holder .088″ higher relative to the Summit’s die port. This keeps Summit-mounted dies in the same position relative to the shell-holder as dies mounted in a Rockchucker. So, Mark can swap dies from his Rockchucker to his Summit and maintain exact COAL (when seating) and correct shoulder bump (when sizing). While Mark’s custom shell-holder base lets him swap dies quickly from one press to another, this is NOT a necessary modification. Most folks will simply re-set the locking rings.
Tech Report by B. Walker, owner of The Urban Rifleman LLC
I have been moly coating since I started shooting rifles nearly 26 years ago. I have always moly-coated my bullets. I figured if it was good enough for Walt Berger, it was good enough for me (Walt still moly coats his bullets to this day, if recent match pictures are any indication). I had always used the typical dry method (without the wax) and I had the same jar of moly (molybdenum disulfide) for many years.
I had tried all kinds of methods over the years. But then AccurateShooter Forum member “Bowfisher” sent me a message about moly-coating bullets using water. After his suggestion, I did several batches using the moly-in-the-water method. I was stunned with the great results. This Wet Moly method is the cleanest, easiest, and best coating method I have ever tried. I strongly believe Wet Moly should be the recommended method.
Traditional Dry Moly Coating Process is Dusty and Messy
Before I started the Wet Moly process, I always coated my bullets in small containers in my big Dillon tumbler. I would put the bullets in old EMPTY 1-lb powder containers and add the moly. I would place the powder containers in my big Dillon tumbler and tumble for at least three hours. I would then throw rice in with the bullets to soak up any excess moly dust and shine the bullets. Then I would shake out the rice using a lid with holes drilled in it. My coated stuff came out beautiful if I do say so myself even dry. However, there was always dust and moly mess (there was always some on my fingers when I would handle the bullets after). I only liked to doing coating in big batches to get it over with because it was a chore (by all means don’t get moly on the bottom of your shoes and track the carpet)!
Wet Moly Method — Tumbling in Bottles with Moly and Water
The new wet method entails adding water to the bullets during the tumble in the bottle, and it is way easier and cleaner. The final product is totally dust free and will not come off on your fingers as there is no dust or residue. I think they shoot better too, and the moly works as it is supposed to. I won’t get into the debates over the merits of moly. Some folks believe it works for them. This article is intended for those guys — it is not intended to convert handloaders who are happy with shooting uncoated bullets.
Editor: None other than John Whidden, Multi-Time National Long Range Champion, moly-coats his bullets. Whidden also uses a Wet Moly application method. He agrees that applying moly in a water solution delivers the best results, and doesn’t leave dusty residues.
Here is the basic outline of the Wet Moly application method. In addition to this outline, I created an instructional video that shows my entire process. [Editor: Definitely WATCH the video. It is important to see the post-tumbling rinsing and buffing processses.]
1. Use old 1-lb powder containers. Work over a sink. Add the bullets in reasonable batches to the containers (lets say 2-3 inches of bullets). I try to use use only enough water to cover the bullets and I use a little more moly than I used to with a dry application. I suggest using half a teaspoon of moly per two inches depth of bullets.
2. Tumble for four hours (at least). I tape the container lids shut before placing them in the tumbler. Then, simply place the powder container in your vibratory tumbler.
3. After the elapsed time, take the bottle to the sink and, dump contents into a plastic strainer. I use an old spaghetti strainer that I save just for moly. IMPORTANT: BE SURE you have a strainer that won’t let the bullets fall out! Stream water (from faucet) gently over the bullets to thoroughly clean excess residues off the bullets. Shake strainer to get all the water out. See video time 6:00-10:00.
4. Sift out the bullets onto a paper towel inside an old baking pan and shake to buff. Repeat until the bullets are completely dry and buffed to a high shine. The bullets are clean, dust-free and the moly is gorgeous! Leave for several days before storing or put them in your oven at about 130 degrees for 30 minutes to remove the last bit of any moisture. (WARNING: DO NOT use excessive oven heat or cook too long — set a timer!).
If you follow these instructions, the result should be the best moly coating you have ever seen!
Before and AFTER Wet Moly. Note how uniform the moly coating is on the bullets. The Wet Moly process also leaves a perfect glossy finish after rinsing and drying. And the bullets are totally dust-free! These are Sierra #1380 .224 69gr HPBT MatchKings.
Be sure to visit our online store at TheUrbanriflemanstore.com. We have a full compliment of front and rear bag riders for various rifles that we designed and produce in-house. We also stock Revolution laminated benchrest stocks, and we sell stainless steel Remington prefit barrels (which are getting rave reviews from customers). Also available are Wilson dies, Timney and Triggertech triggers, Berger and Sierra bullets, Magpul and Accuracy International chassis, and lots more.
A while back, we featured a portable reloading bench built on a Black & Decker Workmate. That proved a VERY popular do-it-yourself project so we’re showing it again, in case you missed it the first time.
Texan Robert Lewis made himself a great portable reloading bench from plywood mounted to a Black & Decker Workmate. The bench, roughly 22″ x 19″ on top, folds up to fit easily in your car’s trunk or behind the seats in a pick-up truck cab. Four recessed bolts hold the wood top section to the collapsible B&D Workmate. The sides and back of the unit are attached to the base with small nails. There is a small shelf (also nailed in place) which can be used to clamp a powder measure or hold a scale. Shown in the photo is a Harrell’s Benchrest measure and Harrell’s single-stage “C” press.
The whole unit can be built for about $65.00 with pine, or $80.00 with oak (as shown). Robert explained: “The Workmate was $40. If someone bought a 2’x4′ sheet of 3/4″ oak plywood, I think it is around $30. Using pine plywood would be about half that. Fasteners were $3. Spar Urethane would be $5.”
Robert told us: “I used a couple ideas I found on the web. The Larry Willis website gave me the idea to use the Black and Decker Workmate as a base. I found the Workmate on sale for $40 and the top is made from oak plywood I had in my shop. I sealed the wood with three coats of Spar Urethane. The whole thing folds into a nice package for transportation to and from the range.”
NOTE: Since we first ran this story, the price of a Black & Decker Workmate WM225 has increased. However you can still pick a WM225 Workmate for under $60.00. Amazon is currently selling WM225 Workmates for $59.58. The next best price we found was $69.61 at Home Depot, still a good price (Lowe’s is charging $94.98).
At the request of our readers, we provide select “Deals of the Week”. Every Sunday afternoon or Monday morning we offer our Best Bargain selections. Here are some of the best deals on firearms, hardware, reloading components, optics, and shooting accessories. Be aware that sale prices are subject to change, and once clearance inventory is sold, it’s gone for good. You snooze you lose.
⏺ Very good 9mm defensive pistol complete with holster and mag loader
Finding a 9mm handgun that’s well-made and cost-effective can be tough these days. If you’re in the market, check out the CANIK TP9SF 9MM kit. Owners have praised this pistol, saying it is accurate, reliable, and offers good balance/ergonomics. This $449.99 kit includes the pistol in hard case, PLUS carry holster, cleaning kit, and magazine loader. You’d spend $200 more for a Glock by itself with no holster.
⏺ Recent powder outages show need to have a reliable home generator
If recent events have taught us anything, it’s that you need to be prepared for power outages. For an affordable, basic system, consider the FIRMAN 4550/3650 Watt Recoil Start Gas Generator. This provides 4550 startup watts and 3650 running watts. That should be more than enough to run the necessities until power is restored. This unit also features a patriotic Stars and Stripes color scheme.
3. MidwayUSA — Pelican Vault V800 Case, $134.65 Black
⏺ Very good deal on excellent, large wheeled hard case
This is one of the best large, hardshell rifle cases on the market. The Pelican Vault V800 offers 53″ x 16″ internal capacity — big enough for long match rifles. The V800 compares well to other large, wheeled hard cases costing up to $320.00 but right now, the black V800 is just $134.65 at MidwayUSA, a truly great price NOTE: You must add to MidwayUSA Shopping Cart to see this super-low clearance price. For the tan version V800, the best deal we found was $164.75 on Amazon, still a bargain. This case will hold two large match rifles securely. It features five layers of customizable foam, along with six push-button latches.
4. MidwayUSA — Pro Series Gen 2 Comp Shooting Mat, $69.99
⏺ Large, comfortable, padded shooting mat — save 30%
Shooting well requires good body position and reasonable comfort. You can’t shoot well prone if you don’t have a good mat. One of our favorite mats is the MidwayUSA Pro Series Gen 2 Competition Shooting Mat. This mat boasts welcome extra padding for your knees and elbows and it is oversized to make sure you’re protected from rocks, gravel and ground debris. This mat rolls up nicely for convenient carry.
5. Natchez — Spring Optics Sale Simmons Tasco up to 52% off
⏺ Some excellent deals on hunting optics and binoculars
If you’re in the market for a new scope for recent rifle build or if you need a spotting scope to help at the range, check out the Spring Optics Sale at Natchez. You’ll find a wide selection of Tasco and Simmons scopes, sights, binoculars and spotters all at amazingly low prices up to 52% off.
6. Midsouth — LEE Deluxe APP Press, $84.99
⏺ Unique new Lee App vertical feed press good for repetitive processes
Ever found yourself wanting a dedicated press for repetitive processes such as decapping (spent primer removal) or primer pocket swaging, but you don’t want to buy a costly, conventional cast-iron press. Then consider the innovative Deluxe APP (Automatic Processing Press) Reloading Press. With the ability to mount your dies either on the top or bottom, this press offers unique versatility. The LEE Deluxe APP also offers a vertical feed function for cases or bullets.
⏺ Strong priming tool saves hand fatigue and mounts to bench
There are some great hand-held priming tools on the market but some people have aching hands and need a bench-mounted priming tool. If you want to upgrade to a bench unit, check out the RCBS Auto Priming Tool which features both large and small primer tubes.
As you can see in the video, this unit employs a unique single lever design that allows for good feel and plus positive seating. The vertical tubes feed one primer at a time via a tilting tube-holder.
8. Amazon — Kestrel 1000 Windmeter, $74.00
⏺ Basic Kestrel unit under $74.00 — reliable and accurate
Reading wind is critical for successful shooting and the Kestrel 1000 windmeter is probably the best way to do it for under $100. At only $74.00, this Kestrel 1000 features a 3-button control system and large LCD display. The unit measures current, average, and peak wind speed values quickly and accurately in mph, km/h, feet/min, m/s, or knots.
9. Amazon — Giottos Large Rocket Blaster Air Duster, $16.99
⏺ Clean scope lenses without risking damage, kit has air blower + scope brush
We recently witnessed the shattering of the front lens of an expensive scope when that warm lens was sprayed with cold, compressed air from an aerosol cleaning can. Instant lens fracture. A great alternative to compressed air is the Giottos Large Rocket Blaster Air Duster. Coming from the camera industry, this manually-operated air duster creates a strong blast of ambient-temp air with a single squeeze. This air unit is safe for all optics. The best part is there’s nothing to run out — just squeeze and go. There is also an $18.99 kit with a RED version of the Air Duster. That may be easier to spot in your range bag or tool box.
The U.S. Army Marksmanship Unit (USAMU) regularly releases a reloading “how-to” article on the USAMU Facebook page. Here’s a helpful USAMU guide on removing military primer pocket crimps. If you ever use surplus military brass, you really should this article. It contains vital information “learned the hard way”. The writer has tried many different options for removing/swaging out crimps. He weighs the pros and cons of various methods and provides some advice that will save you time and headaches. This article was the second in a 3-part series. Visit the USAMU Facebook page regularly for other informative articles on reloading methods.
A common question, and important issue with US GI surplus 5.56 brass is “what to do with the primer crimp?” Our Handloading Shop does not prime/re-prime GI 5.56 brass, as we receive it in virgin state (primed) and don’t reload it. However, our staff has extensive private experience handloading GI brass in our own competitive shooting careers, and have several tips to offer.
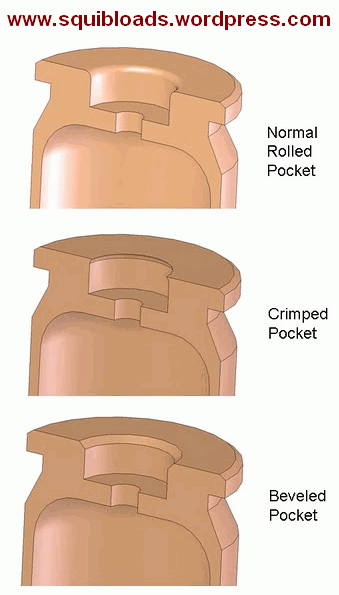
Once the brass is full-length sized and decapped, the staked-in ring of displaced metal from the primer crimp remains, and hinders re-priming. Some swaging tools exist to swage out this ring, allowing free access to the primer pocket. Some are stand-alone products, and some are reloading-press mounted. Early in this writer’s High Power career, he used the common press-mounted kit several times, with less than stellar results.
Setting Up Swaging Tools
Surplus brass tends to come from mixed lots, and primer crimp varies from very mild to strong. Also, primer pocket dimensions vary. So, setting up this “one size fits most” tool involves trying to find a happy medium for a selection of different types of brass in your particular lot. Some are over-swaged, some under-swaged, and some are “Just Right.” Overall, it was a time-consuming and sub-optimal process, in this writer’s experience.
Cutting Out the Crimp Ring with a Chamfer Tool
[After trying swaging tools] this writer evolved to using the ubiquitous Wilson/RCBS/Other brands chamfer and deburring tool to cut out only the displaced crimp ring at the top of the primer pocket. One caution: DON’T OVER-DO IT! Just a little practice will let the handloader develop a “feel” for the right degree of chamfer that permits easy re-priming without removing so much metal that primer edges start to flow under pressure. For this writer, it was three half-turns of the tool in the primer pocket, with medium pressure.
Here, as with all bulk reloading operations, mechanization is our friend. A popular reloading supply house has developed an inexpensive adaptor that houses the chamfer/deburr tool (retained by an allen screw) and allows mounting in a hand drill or drill press. This speeds the operation significantly, as does use of one of the popular Case Preparation Stations that feature multiple powered operations. (Say good-bye to carpal tunnel syndrome and arthritis!)
One advantage of chamfering the primer pockets lightly to remove remnants of primer crimp, vs. swaging, is that primer pockets are not loosened in this process. US GI (usually LC) NATO 5.56 brass has a great reputation for longevity due to the superior hardness of the case head vs. some softer brands of commercial brass. This means the brass will stand up well to multiple full-pressure loads without loosening primer pockets, and the chamfering method helps support this benefit.
Powered Case Prep Centers — What to Look For
A word of advice (often learned the hard way) — think carefully before jumping on the “latest/greatest” case prep center. One with a proven, long-time track record of durability and excellent customer support has a lot going for it, vs. the flashy “new kid on the block.” Analyze the functions each case prep center can support simultaneously — i.e., can it chamfer, deburr and clean primer pockets all at the same time, without having to re-configure?
Do the tool-heads that come with it look truly functional and durable? If not, can they be easily replaced with proven or more-needed versions, such as a VLD chamfer tool, or a solid/textured primer pocket cleaner rather than a less-durable wire-brush type?
Tips for Priming with Progressive Presses
When re-priming, a couple of factors are worth noting. When re-priming using either single-stage presses, hand tools, or bench-mounted tools (such as the RCBS bench-mounted priming tool), precise alignment of the primer pocket entrance with the primer is easily achieved, and priming goes very smoothly. When using certain progressive presses, due to the tolerances involved in shell-heads, etc., one may occasionally encounter a primer that isn’t quite perfectly aligned with the primer pocket.
If resistance is felt when attempting to re-prime, DO NOT attempt to force the primer in — doing so can be dangerous! Rather, just exert SLIGHT upward pressure to keep the primer in contact with the case-head, and with the support hand, move the case back/forth a trifle. The primer will drop into alignment with the primer pocket, and then prime as usual. After priming, check each seated primer by feel. Ensure it is below flush with the case head (cleaning primer pockets helps here), and that there are no snags, burrs or deformed primers.
More Info on Primer Pocket Swaging
For more information about removing military crimps in primer pockets, we recommend you read Get the Crimp Out on the Squibloads Gun Thoughts Blog. This is a detailed, well-illustrated article that shows how to use various primer pocket reamers/cutters. It also has a very extensive discussion of swaging using CH4D, RCBS, and Dillon tools. The Squibloads author had much better luck with swaging tools than did the USAMU’s writer — so if you are considering swaging, definitely read the Squibloads article.
The illustration of primer pocket types is from the Squibloads Blog Article, Get the Crimp Out.
Erik Cortina is one of the nation’s top F-Class shooters. A member of Team Lapua-Brux-Borden, Erik has been a top performer at National and World F-Class Championships. Erik is also a very smart guy and a skilled toolsmith who has upgraded his shooting equipment in interesting ways. Today we feature three “How-To” videos from Erik. These show how to upgrade a SEB Coaxial Rest, how to improve the performance of an RCBS Chargemaster, and how to create your own Modified Case for measuring length to lands. Watch and learn…
1. How to Make a Modified Case for the Hornady OAL Tool
In this video, Forum member Erik Cortina shows how to create a custom modified case for use with the Hornady Lock-N-Load Overall Length Gauge (formerly the Stoney Point Tool). While Hornady sells modified cases for many standard cartridges, if you shoot a wildcat such as the 6mm Dasher or .284 Shehane, you’ll need to create a custom modified case. And even if you shoot a standard cartridge such as the .308 Win, you can get more consistent measurements if you make a custom modified case from a piece of brass fired in your chamber.
MORE INFORMATION: Want to learn more? We published a much longer story in which Erik explains in greater detail how to made the Modified Case. That article illustrates the 5/16″ – 36 RH HSS Tap required and shows how to set up the lathe to drill and tap your case. If you are serious about making your own Modified Cases, you should Read the Full Article.
2. How to Upgrade your SEB Co-Axial Joystick Rest
Joystick (coaxial) rests are used by top shooters in benchrest and F-Open disciplines. With coaxial rests, you can adjust both vertical and horizontal aim instantly in one fluid movement — there are no mariner wheels to spin or knobs to turn. Just gently stir the joystick to move up, down, or sideways. Erik Cortina explains: “If you want to get into F-Class (Open) and want to win, you should get a SEB rest. SEB makes an excellent product, but the one thing we upgrade automatically … is adding the F-Class feet. These have a bigger footprint and a spike on the bottom [so you can] dig the feet into the ground and make your rest a lot more stable.” In this video Erik installs a set of Blake Machine Co. F-Class feet. These feature a set-screw, so they are easy to attach and then remove for travel (no Loctite!). “Simple yet effective” declares Erik.
In the second half of the video (starting at 5:30), Erik installs a Dan Bramley Joystick Holder. This features two clamp-on cradles that hold the joystick crosswise below the top (see photo). This handy accessory ensures your handle always remains with the rest (and doesn’t get left at home when you travel to a big match). This joystick holder has been popular with competitors. Erik says, “The Bramley Joystick holder is $60.00 — money well spent.” To order, email Dan at dbramley [at] yahoo.com.
3. How to Make the RCBS ChargeMaster 1500 Work Better
Erik Cortina has been fiddling around with his RCBS ChargeMaster and he discovered something interesting. Through a series of tests he determined that the ChargeMaster dispensed slightly more precise charges when he trickled the last few 10ths of a grain on to the RCBS pan. Erik wasn’t expecting this result, but he confirmed there may be a slight benefit to this trickling method (as opposed to allowing the ChargeMaster to dispense the full charge). You can see Erik’s test procedure in this video:
We should note that Erik’s preferred method of weighing powder is to first dispense a slightly lower charge with the RCBS, transfer the pan to a laboratory-class Sartorius magnetic force restoration scale, then trickle up with his Omega (Dandy Products) Powder Trickler. However, if you don’t have a $800+ laboratory-grade scale, you might just try trickling on to the ChargeMaster pan.
MORE INFORMATION: We have published a more lengthy Bulletin Article that covers Erik’s Chargemaster Performance Findings in greater detail. That article has more photos plus a clever, bonus “Beep Defeat Tip”. If you own a Chargemaster, we recommend you READ the Full Article.
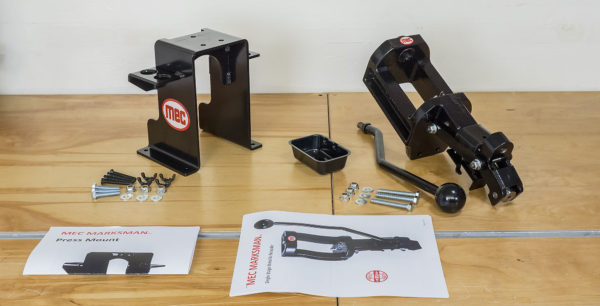
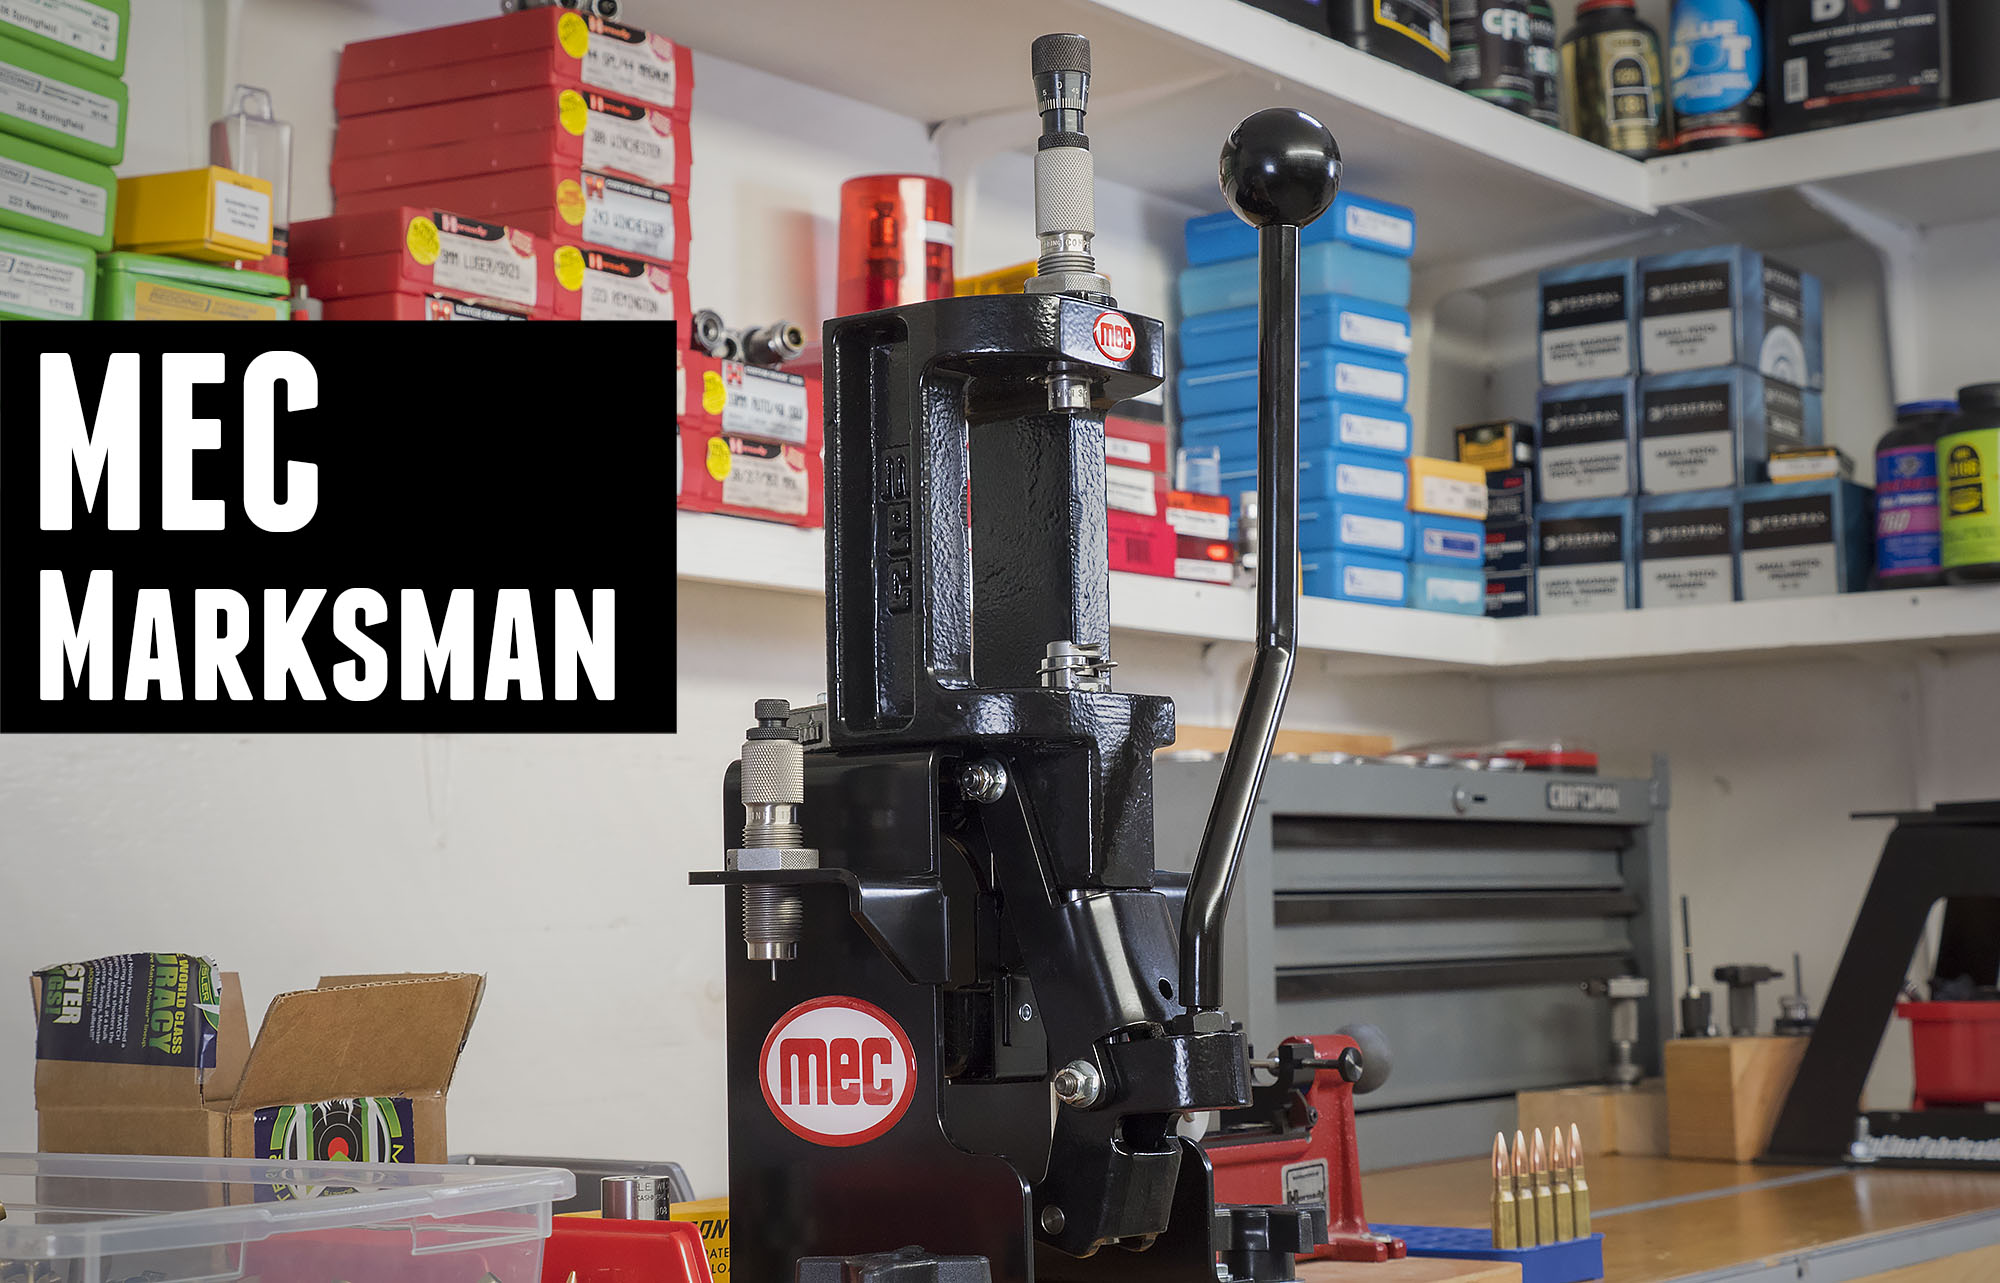
If you need a heavy-duty, single-stage reloading press, definitely look at the MEC Marksman, a beefy black single-stage unit with many impressive features. MEC, noted for its shotshell reloading machines, now offers the cast-iron MEC Marksman press, offering many features we really like. First, the rugged, cast-iron frame is strong enough for the toughest reloading jobs. Second, the Marksman features an OPEN front — that smart design makes it easier to insert and remove cartridge cases. It also makes it much easier to place your bullets during the seating stage.
This open-front design makes good sense — note that Hornady’s LNL single-stage press also has an open-front layout. Importantly, the MEC Marksman has an innovative, self-centering shell-holder. This patented design should help hand-loaders reload more efficiently.
We were impressed when we first saw the MEC Marksman press. The Marksman combines a sturdy cast-iron frame with a smart, user-friendly open-front design. With a $255.00 MSRP it is more expensive than an RCBS Rock Chucker ($214.16 MSRP), but the MEC Marksman offers some distinct advantages — such as the open front plus the patented floating shell-holder system.
MEC Marksman Press Review by Ultimate Reloader
Our friend Gavin Gear got his hands on a MEC Marksman press and put it through its paces. He came away impressed with the product, saying it delivers excellent performance, and has many impressive features. Gavin tells us: “Cast iron tools and machines are a lifetime investment. The made-in-USA MEC Marksman features ductile cast-iron construction, an open-front frame design for easy cartridge access, a new floating shell-holder design with a unique retention system, and ambidextrous handle setup.”
Gavin liked the Marksman’s system for holding spent primers. A tray sits behind the ram to catch spent primers exiting from a hole near the bottom of the ram. This is more foolproof than the plastic primer cups on some other single-stage presses. Expect less spent primer “spillage”.
The Marksman is sold as a stand-alone unit. However MEC also offers a very nice steel mount/riser for the Marksman. Gavin tested the Marksman with this riser, and he says it was sturdy and well-built. Gavin liked the riser. He said that elevating the Markman press up above the benchtop made it easier to handle cases and to operate the handle. You also get extra left- and right-side die-holders.
Manufacturer’s Product description: The MEC Marksman® is made from ductile cast iron for superior quality and durability. Our patented shell holder self-centers each cartridge. The MEC Marksman® is compatible with all 7/8-14 thread dies to change calibers quickly. Reloading .22 Hornet to .416 Rigby can all be done with one convenient machine.


 Effects Of Cartridge Over All Length (COAL) And Cartridge Base To Ogive (CBTO) – Part 1

 Redding T-7 Still Within Spec


 With its innovative “moving die/static cartridge” design, the RCBS Summit Press definitely demonstrates “out of the box” thinking. Unlike other presses, the case does not move. Rather, the reloading die comes down to the case. We are happy to report that this unique “upside-down” reloading press works great.


 Be sure to visit our online store at

 A while back, we featured a portable reloading bench built on a Black & Decker Workmate. That proved a VERY popular do-it-yourself project so we’re showing it again, in case you missed it the first time.


 Tips for Priming with Progressive Presses


 If you need a heavy-duty, single-stage reloading press, definitely look at the MEC Marksman, a beefy black single-stage unit with many impressive features. MEC, noted for its shotshell reloading machines, now offers the cast-iron