Whidden Gunworks makes great sizing and seating dies. The Whidden full-length sizing die with neck bushing is very popular because it allows you to “tune” the neck tension by using different bushings, with larger or smaller inside diameters. In this video, John Whidden explains how to choose a the right bushing size for use with your neck-sizing and full-length sizing bushing dies.
For most applications, John suggest starting with the caliper-measured outside diameter of a loaded cartridge (with your choice of bullet), and then SUBTRACT about three thousandths. For example, if your loaded round mics at .333, then you would want to start with a 0.330 neck bushing. John notes, however, that you may want to experiment with bushings, going down a thousandth and up a thousandth. With thin In addition, as your brass ages and the necks harden, you may want to change your bushing size.
Quick Tip: Try Flipping Your Bushings
You may also want to experiment with “flipping” your neck bushings to alternate the side that first contacts the neck of the case. (One side of the bushing is usually marked with the size, while the other side is unmarked.) So try “number side up” as well as “number side down”.
Some folks believe that one side of the bushing may allow a smoother entry, and that this can enhance concentricity. Other people think they can get very slightly more or less neck tension depending on how the bushing is oriented. This is a subtle effect, but it costs nothing to experiment.
If one bushing orientation proves better you can mark the “up” side with nail polish so that you can always orient the bushing optimally. NOTE: We have confirmed that some bushings are actually made with a slight taper. In addition, bushings may get distorted slightly when the brand name and size is stamped. Therefore there IS a reason to try both orientations.
Power Trimming Technology Saves Time
Trimming and chamfering brass are tasks hand-loaders grow to hate. Those chores are time-consuming and tiresome. Thankfully there are faster, better alternatives to manual trimming/chamfering. In this article, Forum member Erik Cortina shows how to use the Giraud tool which trims and chamfers in one operation. Erik has his own YouTube Channel dedicated to precision reloading and accurizing. Here we feature Erik’s video about the “mother of all brass trimmers”, the Giraud powered case trimmer. Erik says: “If you do volume reloading… this is the only trimmer to get. It not only trims to length but it also chamfers your case mouth inside and out.” In his video, Erik offers some very clever and useful tips that will help you get the most from your Giraud.
This is a manufacturer’s photo showing an older model.
The Giraud trimmer is very precise. When set up correctly, it can trim brass with amazing consistency. In the video, Erik trims five pieces of brass in 15 seconds (6:32 mark). He then measures all five with precision calipers (7:00-8:08). All lengths are exact within .0005 (half a thousandth). Erik notes that the Giraud trimmer indexes off the case shoulder. As long as you have fire-formed brass with consistent base-to-shoulder dimensions, you should get very consistent trim lengths.
The secret to the system is a 3-way cutting head. This cutter can be swapped in and out in a couple minutes with wrenches provided with the kit. Erik has three different heads; one each for 6.5mm, 7mm, and .30 caliber. The video shows how to adjust the cutting heads to match caliber diameter (and to get the desired amount of inside/outside chamfer).
To trim and chamfer cases, you simply insert them nose-first into the cartridge-specific case-holder. Erik offers a smart tip — He uses a die locking ring to position the cartridge holder (3:15). This can be locked in place. Erik says die locking rings work much better than the hex-nuts provided by Giraud (with the hex-nut, one must re-set cut length each time you change case-holders.)
The Giraud can be used in either horizontal or vertical modes. Erik prefers to have the trimmer aligned vertically, allowing him to push cases down on the trimmer head. But the trimming unit has twin sets of rubber feet, allowing horizontal or vertical orientation.
Improved Case-Holder Made with Chamber Reamer:
For his .284 Shehane, Erik had to create his own case-holder (Giraud does not make one for that wildcat cartridge). Erik used his chamber reamer. To his surprise, Erik found that the brass was easier to trim in the custom case holder (compared to the Giraud-made spring-loaded holders). With a perfect fit, trimming and case extraction went more smoothly and the process was easier on his hands. (See 9:00-10:00). Based on Erik’s experience, you may want to create your own custom case-holder.
Trim Bullet Meplats Also
With a special bullet-holder fitting and meplat cutter head, the Giraud power trimmer can be used to trim bullet meplats. Trimming meplats can help make the Ballistic Coefficents of a batch of bullets more consistent. Uniforming meplats is also often done as a first step in the process of “tipping” bullets to improve BC.
Do you own an RCBS electronic powder dispenser? If you do, take the time to watch this ChargeMaster Tuning video from 8541 Tactical. This nine-minute video demonstrates how to re-program your ChargeMaster to “tune” the dispensing process. The video shows the exact programming procedures to follow, step-by-step. Some folks want a faster powder flow — others tune their machines for a more reliable drop (with fewer over-runs). One cheap and popular modification is to insert a 1″-long section of a McDonald’s plastic straw in the ChargeMaster’s silver dispensing tube. This works surprisingly well to smooth kernel drop and prevent “clumping” that can cause an over-charge. The McDonald’s straw MOD is demonstrated in this video, starting at the 6:22 mark.
Large-Diameter Dispensing Tube Mod
Many folks have had success with the McDonald’s straw modification demonstrated in the above video. However, some folks would like to get even better flow performance (with virtually no clumping). Forum Member Frank B. has come up with a new option using a brass hose fitting with a large outside diameter. The hose fitting (with tape wrapped around the barbed nose section) is placed inside the RCBS dispensing tube (have some kind of wrap — you don’t want metal-on-metal). Here’s how the unit looks installed:
Frank tells us: “I have found a cure for the over-throw problem. It is a simple 1/4″ barbed hose nipple. I wrapped a couple layers of tape around the barbed end for a snug fit. With this in place, I have thrown 100+ charges of Varget without a single overthrow. The ID of the barbed end needs to be approximately 3/16″ to feed a steady flow. This works because of the larger ID at the drop.”
Frank adds: “You can see in the photo that the powder is not stacking up. You can watch it drop one grain at a time. Hope this will take the aggravation out of your case charging.” For best performance with this brass fitting MOD, we recommend de-burring and smoothing out the front edge of the brass fitting over which the kernels drop.
Brass fitting mod suggested by Boyd Allen. We welcome reader submissions.
When is a single-stage reloading press worth close to a thousand bucks? When it’s made in Germany with CNC technology and crafted to aero-space precision standards. UltimateReloader.com’s Gavin Gear recently got his hands on a Turban 120mm Heavy Präzipress. This unit retails for about 715 Euros (714,27 €), which is $858.88 U.S. Dollars at current exchange rates*. Gavin put the Präzipress through its paces, and came away VERY impressed. READ FULL REVIEW HERE.
Impressive Test Results
Sizing once-fired 6.5mm Creedmoor cases with the Präzipress, Gavin achieved great results for shoulder “bump” consistency. The sizing results were nothing short of spectacular. After zeroing the first of ten cases, the remaining nine were essentially identical, showing as “0.000”, meaning less than half a thousandth of variation.
The Präzipress also delivered ultra-low run-out when seating bullets using a Forster die. On all ten test cases, the run-out was +/- 0.001″ (one-thousandth) or less.
Is this kind of press worth the money? Gavin says “yes” if you demand the highest level of precision in sizing and seating: “When you use this press, it’s immediately clear that there are no details neglected, and I can’t imagine one of these presses ever wearing out. Based on the precision tests I did with ammunition loading, it’s clear that this level of precision DOES make a difference for ammunition dimensions and consistency.”
According to Gavin, the “Heavy” 120mm version of the Präzipress is massive and boasts many notable design features:
— Three guide rods with linear roller guides (I have not seen these on any other press)
— Ambidextrous operation (handle can be mounted on left or right side)
— Positive snap shellholder retainer (secure, but easy to insert/remove shellholder)
— 120mm opening accepts cartridges up to .408 CheyTac Size length
— Enclosed spent primer catch system which contains debris
— Optimized leverage (VERY powerful mechanical advantage for sizing)
— Oversized handle (bar diameter) that minimizes flex
There are now three (3) triple-column Präzipress sizes. Along with the 120 model press featured above, there are even larger 140 and 150 models:
* Stated price does NOT include shipping to USA and other fees. The Turban-shop.de website states: “In the case of delivering to a non-EU country, there can be charged extra tolls, taxes, and fees. Packaging costs will be charged separately.”
With millions of American gun-owners deciding to start hand-loading because of ammo shortages, all types of reloading resources have been in short supply, including printed load manuals. Thankfully, reloading handbooks are becoming more widely available again. Midsouth Shooters now has most of the current manuals in stock. In addition you can find many of the best load manuals at Amazon.com. Some are offered in digital as well as print format.
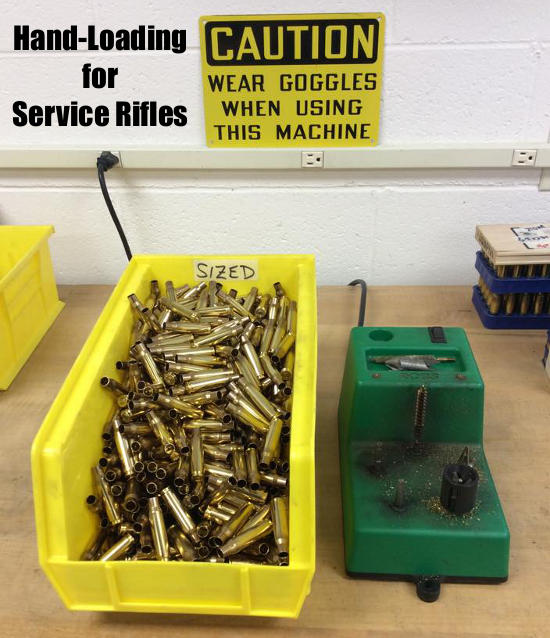
The U.S. Army Marksmanship Unit (USAMU) has published a great series of reloading “how-to” articles on its Facebook Page. This post covers key factors to consider when loading ammunition for Match Rifles and Service Rifles, with a particular focus on self-loading “gas guns”. Visit the USAMU Facebook Page each Wednesday for other, helpful “Handloading Hump-Day” tips.
We offer some “cardinal rules” to help new gas-gun handloaders with safety and efficiency. These address both Match Rifle and Service Rifle versions of the AR15, M1 Garand, M1A, and M110. However, they can also improve safe reloading for many other auto-loaders such as M1 Carbines, FALs, SIGs, etc. The author distilled these principles many years ago to help focus on the essential aspects of these rifles.
RULE ONE: Service Rifles Are Not Benchrest Rifles
Gas-guns require a relatively loose fit between ammunition and chamber (vs. bolt actions) for safe, smooth operation. Many techniques, such as neck sizing and keeping cartridge headspace quite tight, are popular in the extreme bolt gun accuracy realm. However, they are of little value with Service Rifles, and some could even be hazardous. Before adopting a specialized technique, seriously consider whether it is appropriate and beneficial in a gas-gun.
RULE TWO: Never Compromise Safety to Obtain Accuracy
Example: If choosing a brand of great, but ultra-sensitive match primers offers possibly better accuracy at the risk of slam-fires in your design of rifle, don’t do it! You are issued exactly two eyes and ten fingers (best-case scenario). Risking them trying to squeeze 0.25 MOA better accuracy out of an M1A, etc. simply isn’t worth it.
RULE THREE: Tailor the Precision to Your Individual Skill and Your Rifle’s Potential
This has been addressed here before, but bears repeating for newcomers. If you are struggling to break out of the Marksman Class, or using a CMP M1 “As-Issued,” then laboriously turning the necks of your 600-yard brass is a waste of time. Your scores will improve much faster by practicing or dry-firing. On the other hand, if the reigning champions anxiously check your scores each time you fire an event, a little neck-turning might not be so far-fetched.
Verifying Load Improvements — Accuracy hand-loading involves a wide variety of techniques, ranging from basic to rather precise. Carefully select those which offer a good return on investment for your time and labor. In doubt? Do a classic pilot study. Prepare ammo for at least three or four ten-shot groups with your new technique, vs. the same with your standard ammo. Then, pick a calm day and test the ammo as carefully as possible at its full distance (e.g. 200, 300, or 600 yards) to verify a significant improvement. A little testing can save much labor!
RULE FOUR: Be Your Own Efficiency Expert
Serious Service Rifle shooters generally think of ammunition in terms of thousands of rounds, not “boxes”, or even “hundreds”. Analyze, and WRITE DOWN each step in your reloading process. Count the number of times each case is handled. Then, see if any operations can be dropped or changed without reducing safety or accuracy. Eliminating just two operations saves 2000 steps per 1000 rounds loaded. Conversely, carefully consider any measurable benefits before adding a step to your routine.
RULE FIVE: In Searching for Greater Accuracy with Efficiency, Look for System Changes
For example, instead of marking your 300-yard rounds individually to differentiate them from your 200-yard ammo, would a simple change in primers work? If accuracy is maintained, using brass-colored primers for 200 and silver for 300 provides an indelible indicator and eliminates a step! Similarly, rather than spending hours selecting GI surplus brass for weight and neck uniformity, consider splurging on some known, high-quality imported match brass for your 600-yard loads. Results should be excellent, time is saved, and given limited shooting at 600 yards, brass life should be long.
RULE SIX: Check All Your Primers Before Packaging Your Loaded Ammo
This seems simple and even intuitive. However, many slam-fires (which were much more common when M1s and M1As were the standard) are due, at least in part, to “high” primers. Primers should be seated below flush with the case head. The USAMU has addressed this at length in a previous column, but each round should be checked for properly-seated primers before they are packaged for use.
Three near-equal-weight 7mm bullets with different shapes and bearing surface.
This article, from the USAMU Facebook Page, concerns reloading safety. In the relentless quest for more speed and flatter ballistics, some hand-loaders load way too hot, running charges that exceed safe pressure levels. Hint: If you need a mallet to open your bolt, chances are your load is too hot. Stay within safe margins — your equipment will last longer, and you won’t risk an injury caused by over-pressure. In this article, the USAMU explains that you need to account for bullet shape, diameter, and bearing surface when working up a load. Don’t assume that a load which is safe for one bullet will be safe for another even if both bullets are exactly the same weight.
Today, we continue our handloading safety theme, focusing on not inadvertently exceeding the boundaries of known, safe data. Bullet manufacturers’ loading manuals often display three, four, or more similar-weight bullets grouped together with one set of load recipes. The manufacturer has tested these bullets and developed safe data for that group. However, seeing data in this format can tempt loaders — especially new ones — to think that ALL bullets of a given weight and caliber can interchangeably use the same load data. Actually, not so much.
The researchers ensure their data is safe with the bullet yielding the highest pressure. Thus, all others in that group should produce equal or less pressure, and they are safe using this data.
However, bullet designs include many variables such as different bearing surface lengths, hardness, and even slight variations in diameter. In fact, diameters can occasionally range up to 0.001″ by design. Thus, choosing untested bullets of the same weight and caliber, and using them with data not developed for them can yield excess pressures.
This is only one of the countless reasons not to begin at or very near the highest pressure loads during load development. Always begin at the starting load and look for pressure signs as one increases powder charges.
Bullet Bearing Surface and Pressure
Bullet bearing surface length (BSL) is often overlooked when considering maximum safe powder charges and pressures. In Photo 1, note the differences in the bullets’ appearance. All three are 7 mm, and their maximum weight difference is just five grains. Yet, the traditional round nose, flat base design on the left appears to have much more BSL than the sleeker match bullets. All things being equal, based on appearance, the RN/FB bullet seems likely to reach maximum pressure with significantly less powder than the other two designs.
TECH TIP: Bullets of the same weight (and caliber) can generate very different pressure levels due to variances in Bearing Surface Length (BSL).
Bullet 1 (L-R), the RN/FB, has a very slight taper and only reaches its full diameter (0.284 inch) very near the cannelure. This taper is often seen on similar bullets; it helps reduce pressures with good accuracy. The calculated BSL of Bullet 1 was ~0.324″. The BSL of Bullet 2, in the center, was ~0.430″, and Bullet 3’s was ~ 0.463″. Obviously, bullets can be visually deceiving as to BSL!
Some might be tempted to use a bullet ogive comparator (or two) to measure bullets’ true BSL for comparison’s sake. Unfortunately, comparators don’t typically measure maximum bullet diameter and this approach can be deluding.
Note: Due to time constraints, the writer used an approximate, direct measurement approach to assess the bullets’ different BSLs. While fairly repeatable, the results were far from ballistics engineer-grade. Still, they are adequate for this example.
Photo 2: The Perils of Measuring Bearing Surface Length with Comparators
In Photo 2, two 7mm comparators have been installed on a dial caliper in an attempt to measure BSL. Using this approach, the BSLs differed sharply from the original [measurements]. The comparator-measured Bullet 1 BSL was 0.694” vs. 0.324” (original), Bullet 2 was 0.601” (comparator) vs. 0.430” (original), and Bullet 3 (shown in Photo 2) was 0.602” (comparator) vs. 0.463” (original). [Editor’s comment — Note the very large difference for Bullet 1, masking the fact that the true full diameter on this bullet starts very far back. You can use comparators on calipers, but be aware that this method may give you deceptive reading — we’ve seen variances just by reversing the comparators on the calipers, because the comparators, typically, are not perfectly round, nor are they machined to precision tolerances.]
Thanks to the U.S. Army Marksmanship Unit for allowing the reprint of this article.
Useful reloading gear does not have to be costly. Here are ten handy (and very inexpensive) items that belong on your loading bench or in your range kit.
• Magnifying Glass – We use a flat, 2″x2″ pocket 4x-8x magnifier. This folds up on itself. Very handy, we use it to inspect bullets and brass. Use this to check your flash holes for burrs, and check the meplats of your bullets before loading.
• Clear 35mm Film Cannister – Use this to transfer the thrown powder charge to the little measuring cup that sits on your scale. That way you don’t get any kernel splash. Also if the charge weight is obviously off, it’s easy to dump back in the measure. A film canister works pretty well as a trickler too.
• Compressed Air in a Can -- Get these at office supply stores. Use the can (with tube attached) to blow crud out of cases after cleaning the neck with a brush, and blast loose debris out of primer pockets.
• Pin Vise – A simple pin vise with a #53 bit is perfect for deburring Lapua PPC and BR flash holes without reaming the flash-holes any larger. The Lapua PPC/BR flash-hole diameter is 1.5 mm, or 0.059″. Amazon.com sells a handy $8.99 pin vise kit with 10 bits, including the ideal 1.5mm bit. Other vendors offer a #53 pin vise bit that measures .0595″ or .060″ (depending or source). You can find pin vises and bits at hobby stores — here’s an example below with ten bits including 1.5mm. Pin vise sets can be found from $7 to $15.
• Bounce Dryer Sheets – The common dryer sheets eliminate “static cling” on your plastic reloading parts such as powder measure cylinders, powder funnels, and reloading press plastic bins. Thanks to Doc76251 for this tip.
• Ballistol Aerosol – Try using this versatile lubricant/solvent for full-length sizing. Spray some on a patch and you can wipe the carbon off your case necks. Then, continue to apply a very small amount of Ballistol on the case bodies — just thin sheen is all you need. Ballistol is super slippery, and easy to remove. For general full-length sizing (on small cases) it works great and doesn’t leave a gooey, waxy, or chalky residue. For heavier case-forming jobs, we recommend Imperial Die Wax.
• Shotgun Mop – Stick this in the chamber when using Wipe-Out foaming bore cleaner. This will seal off the chamber so the foam doesn’t flow into your action. For long chambers screw on one section of cleaning rod to aid extraction.
• Colored Sharpie Marking Pens – Mark your bullets ahead of the bearing surface, and the color transfers to the target. This way you can shoot multiple loads at the same point of aim and discern which load shoots the tightest. (Recommended for 300 yards and beyond). With colored bullet tips you can test multiple loads “round robin” to equalize wind effects. When testing seating depths for example, you can mark the longer-seated set of bullets red and the shorter-seated set green and shoot them during the same sequence. Just look at the colored marks on the target to see which grouped better.
• Thin Latex Gloves – You should keep a box of inexpensive, disposable latex gloves (the kind doctors use) in your loading room. These will prevent contamination of primers or powder kernels that you handle directly. Also, use the gloves when handling fine blued tools or firearms to prevent transfering body oils and salts that promote rust.
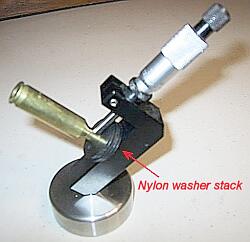
• Plastic Washers for Neck Mic – If you use a Sinclair Neck-wall Micrometer Gauge with integral stand, you can use thin plastic washers to adjust the height of the case on the mandrel. This makes it much easier to measure the same point on the case neck every time. Thanks to MikeCR for this tip (and photo).
On the Applied Ballistics Facebook page a few seasons ago, Ballistician Bryan Litz posed a “Tuesday Trivia” question about ballistics. This being Tuesday we thought we’d bring back this interesting brain-teaser — a true/false question about bullet stabilization. On shooting forums you often find heated arguments about “over-stabilization”. Bryan wants readers to consider the issue of over-stabilization and answer a challenge question…
Is This Statement TRUE or FALSE?
“The problem with ‘over-stabilizing’ a bullet (by shooting it from an excessively fast twist rate) is that the bullet will fly ‘nose high’ on a long range shot. The nose-high orientation induces extra drag and reduces the effective BC of the bullet.”
True or False, and WHY?
Click the “Post Comment” link below to post your reply (and explain your reasoning).
Bullet Movement in Flight — More Complicated Than You May Think
Bullets do not follow a laser beam-like, perfectly straight line to the target, nor does the nose of the bullet always point exactly at the point of aim. Multiple forces are in effect that may cause the bullet to yaw (rotate side to side around its axis), tilt nose-up (pitch), or precess (like a spinning top) in flight. These effects (in exaggerated form) are shown below:
Yaw refers to movement of the nose of the bullet away from the line of flight. Precession is a change in the orientation of the rotational axis of a rotating body. It can be defined as a change in direction of the rotation axis in which the second Euler angle (nutation) is constant. In physics, there are two types of precession: torque-free and torque-induced. Nutation refers to small circular movement at the bullet tip.
Sinclair International has a good article on Case Lubrication which shows the various products and application methods available. Part of Sinclair’s Step-By-Step Reloading series, the article shows how to apply Spray Lube, Die Wax, or conventional lube from a Pad. The story also explains how to use dry lube to slick up the inside of your case necks.
Spray Lubes
High-volume reloaders often turn to spray-on lubricants such as the RCBS Case Slick (#749-001-341WB) or the Hornady One Shot (#749-016-818WB) to quickly lubricate large numbers of cases at once. An indispensable piece of gear that helps make spray lubing easy is a polymer lube rack that holds cases upright and arranged to maximize their exposure to the spray.
Editor’s Note: Ballistol Aerosol is other good spray product for regular full-length sizing (not heavy case-forming). It goes on clear (no chalky residue), it is ultra-slippery, and it will remove the carbon from your case necks as you apply Ballistol with a patch. This is my primary spray lube — but many folks dislike the distinctive Ballistol smell. Try before you buy.
Sizing Die Wax
Over the years, many benchrest shooters have come to trust Imperial Sizing Die Wax (#749-001-052) for their case lube needs. It offers high lubricity and easily wipes off with a paper towel. In fact, its lubricity makes it a popular choice for case forming, for those wildcat folks who need to form their own unique or obsolete cartridges. Unlike lube pads or spray lubes, sizing wax is applied more naturally. You just put a little on your fingers and transfer it to the cases by handling them. As simple and easy as Imperial Sizing Die Wax is to use, it’s probably best for low-volume applications.
Dry Lubricant
Redding’s Imperial Application Media (#749-001-166) is a dry neck lube used to lube the inside of the neck, whether you’re full-length sizing or neck-sizing only. It consists of ceramic spheres coated with a fine graphite-based powder. You simply dip the neck into the container for a second to pick up the right amount of lube. This lube lets the expander ball move smoothly throughout the case neck instead of “grabbing” or “chattering”. That minimizes case neck stretching.
Editor’s Note: Dry Lube is also very useful if you ultrasonically clean your cases. After the ultrasound process, the inside of the case neck can be so “squeaky clean” that bullets don’t seat smoothly. A quick application of dry lube on the insisde of the necks will help bullets slide into the neck easier. As a result, the neck “grip” on the bullets should be more consistent from round-to-round. Consistent neck tension is key to accuracy and uniform velocities.
Tired of spending $15-$25 for a can of spray lube that doesn’t last very long? For about the same price as a single 10 oz. can you can make your own effective spray lube that should last for multiple seasons and lube thousands of cases quickly and easily.
In the YouTube video above Gavin Gear of UltimateReloader.com shows how to make your own case lube using simple, inexpensive ingredients. First recommended by the 6.5 Guys, this Liquid Lanolin + Isopropyl Alcohol mix works well and is very cost-effective. Here’s what you need:


 Quick Tip: Try Flipping Your Bushings


 Impressive Test Results


 • Magnifying Glass – We use a flat, 2″x2″ pocket 4x-8x magnifier. This folds up on itself. Very handy, we use it to inspect bullets and brass. Use this to check your flash holes for burrs, and check the meplats of your bullets before loading.
 • Ballistol Aerosol – Try using this versatile lubricant/solvent for full-length sizing. Spray some on a patch and you can wipe the carbon off your case necks. Then, continue to apply a very small amount of Ballistol on the case bodies — just thin sheen is all you need. Ballistol is super slippery, and easy to remove. For general full-length sizing (on small cases) it works great and doesn’t leave a gooey, waxy, or chalky residue. For heavier case-forming jobs, we recommend Imperial Die Wax.
 On the


 Sizing Die Wax


